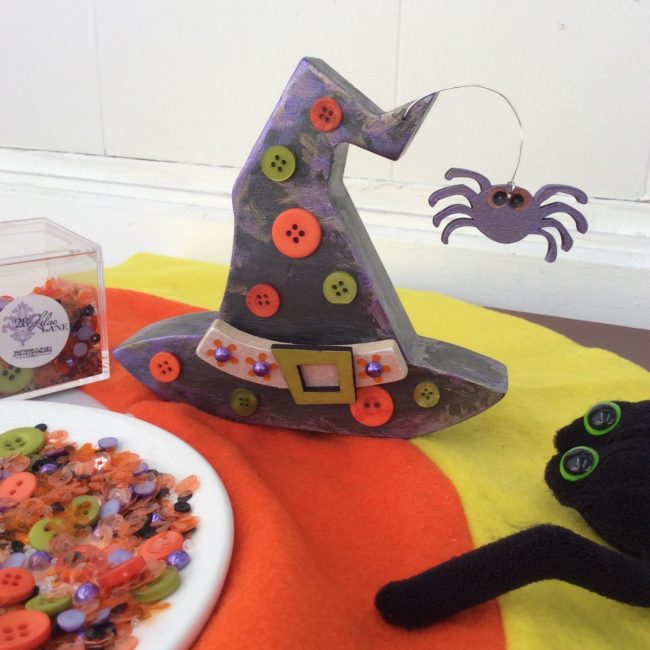
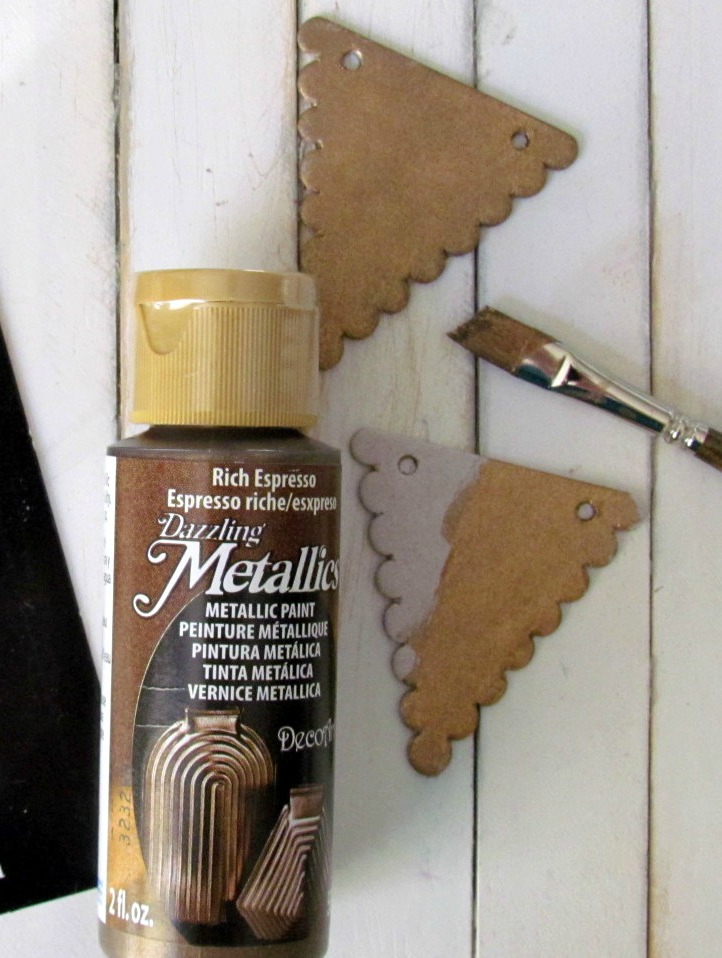
For this witch hat Halloween decoration I started with a wooden witches hat from Foundations Decor. The hat comes with a band, buckle and a cute little spider with a piece of wire you can curl any way you like.

For this witch hat Halloween decoration I started with a wooden witches hat from Foundations Decor. The hat comes with a band, buckle and a cute little spider with a piece of wire you can curl any way you like.

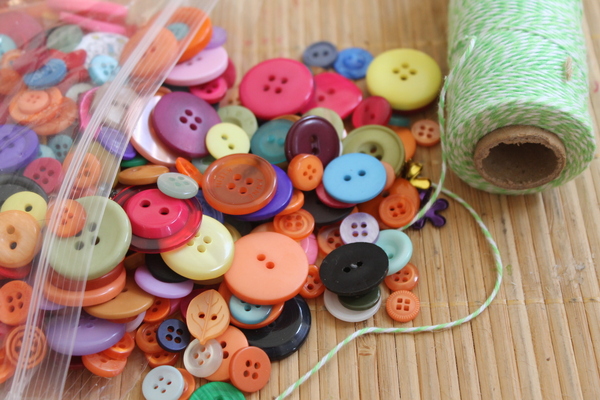
Nothing beats a cute holiday project that everyone can make together. With Independence day fast approaching, here is a simple project the whole family can enjoy.
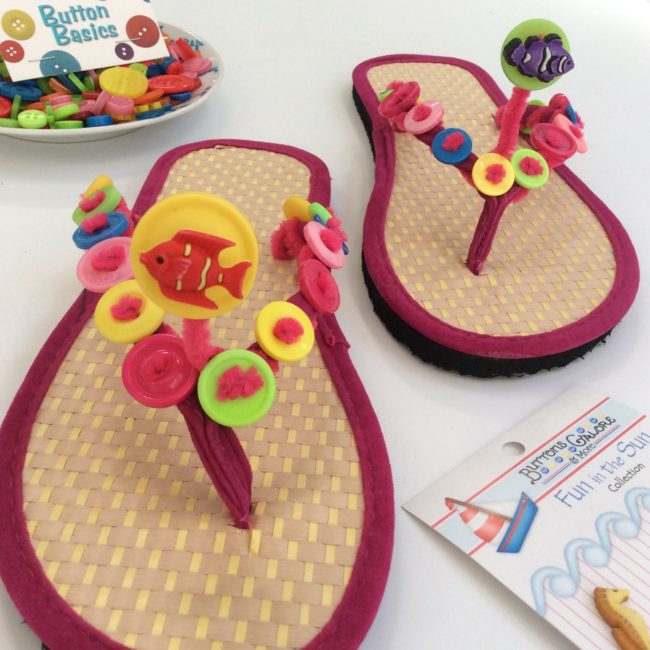
Every summer I like to get a fresh new pair of flip-flops…or two, and decorate them to give them a personal touch. What better way to adorn than with buttons!
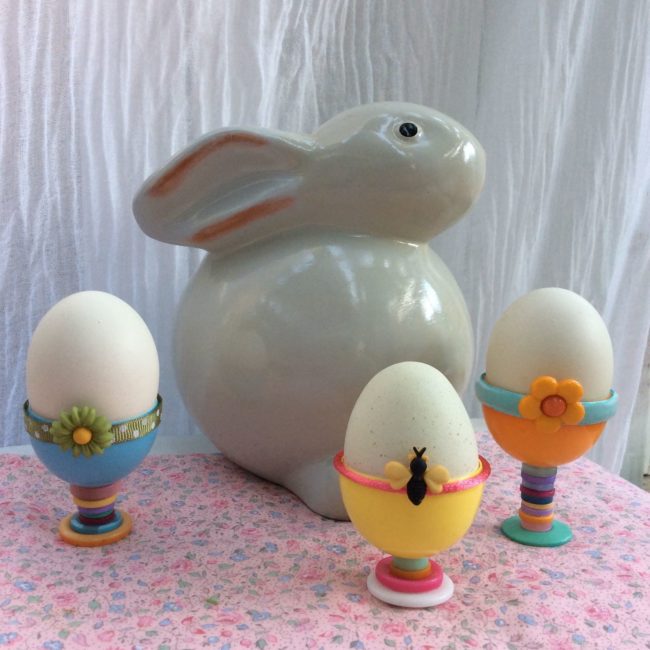
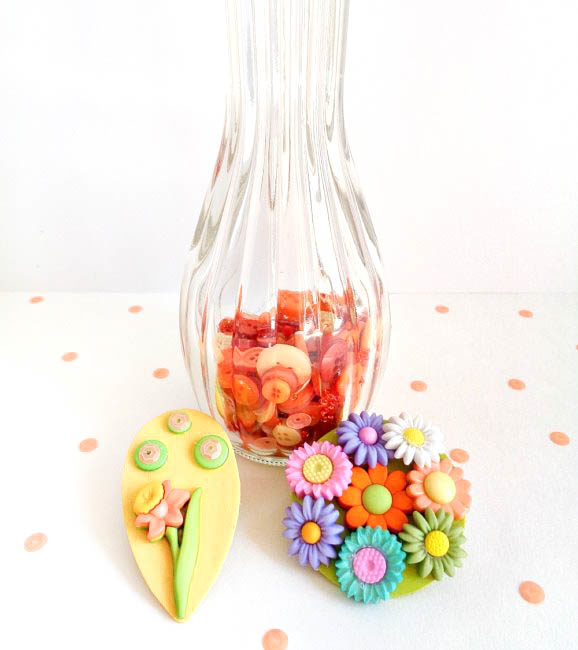
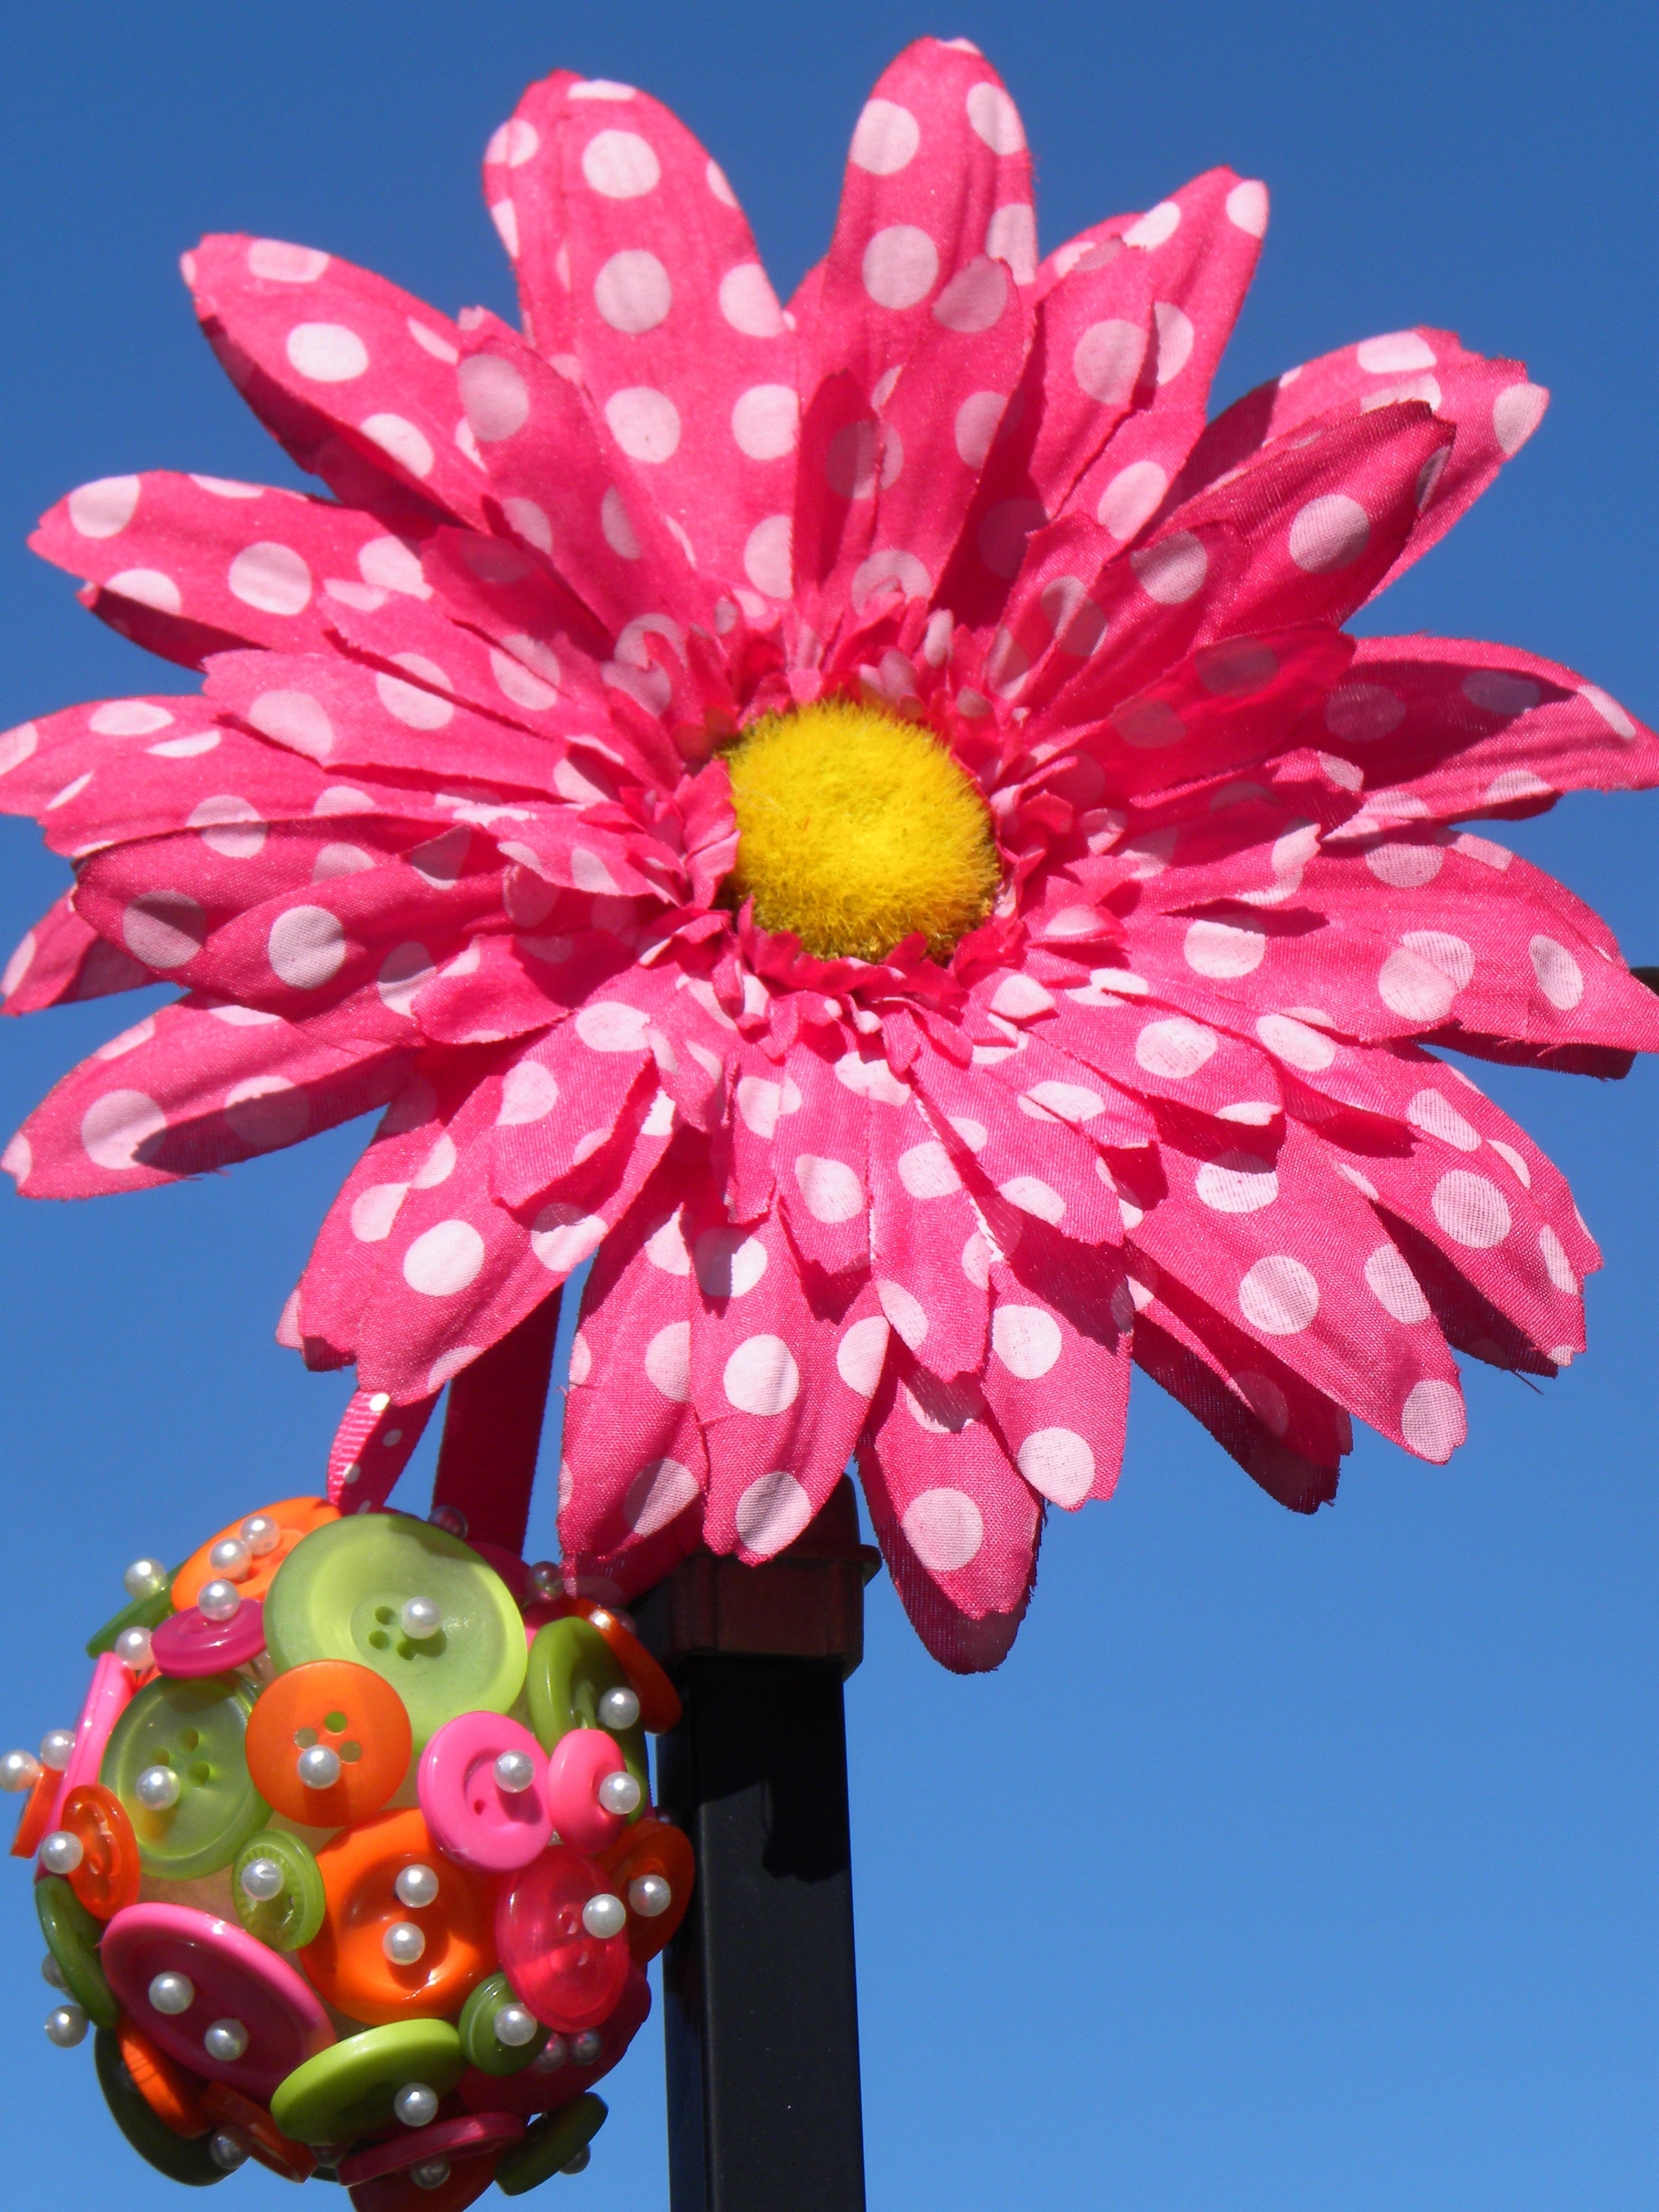
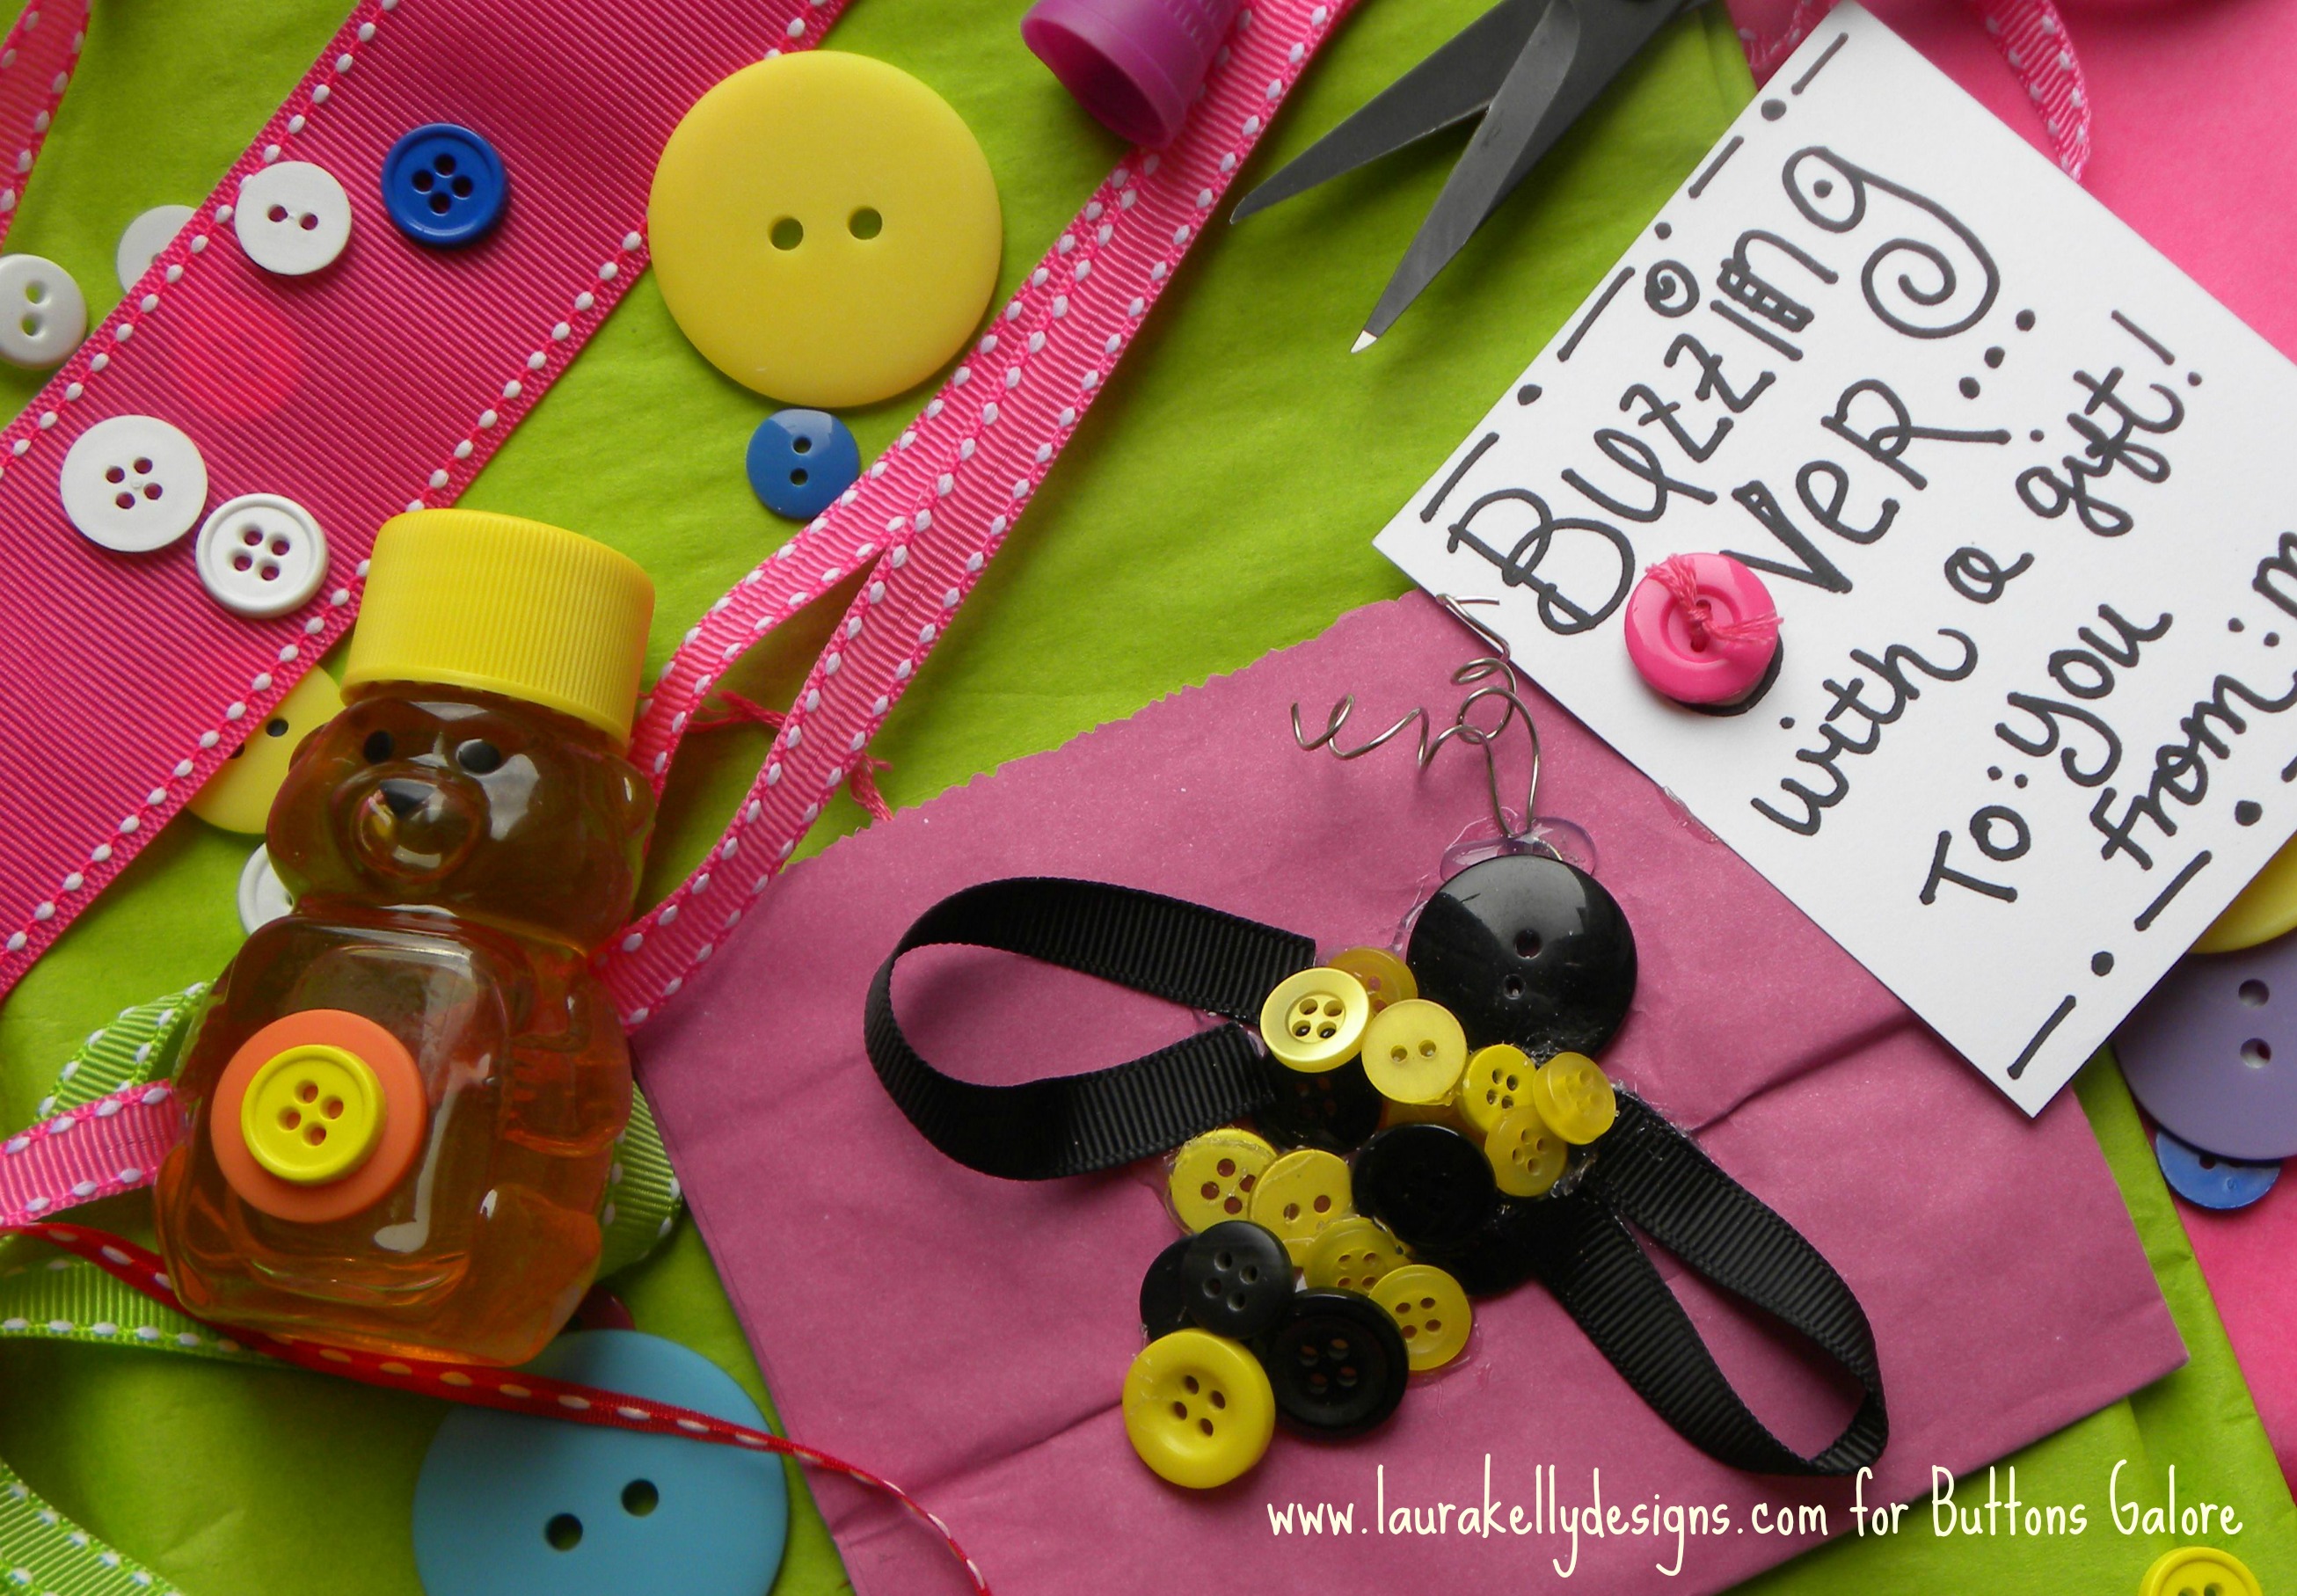
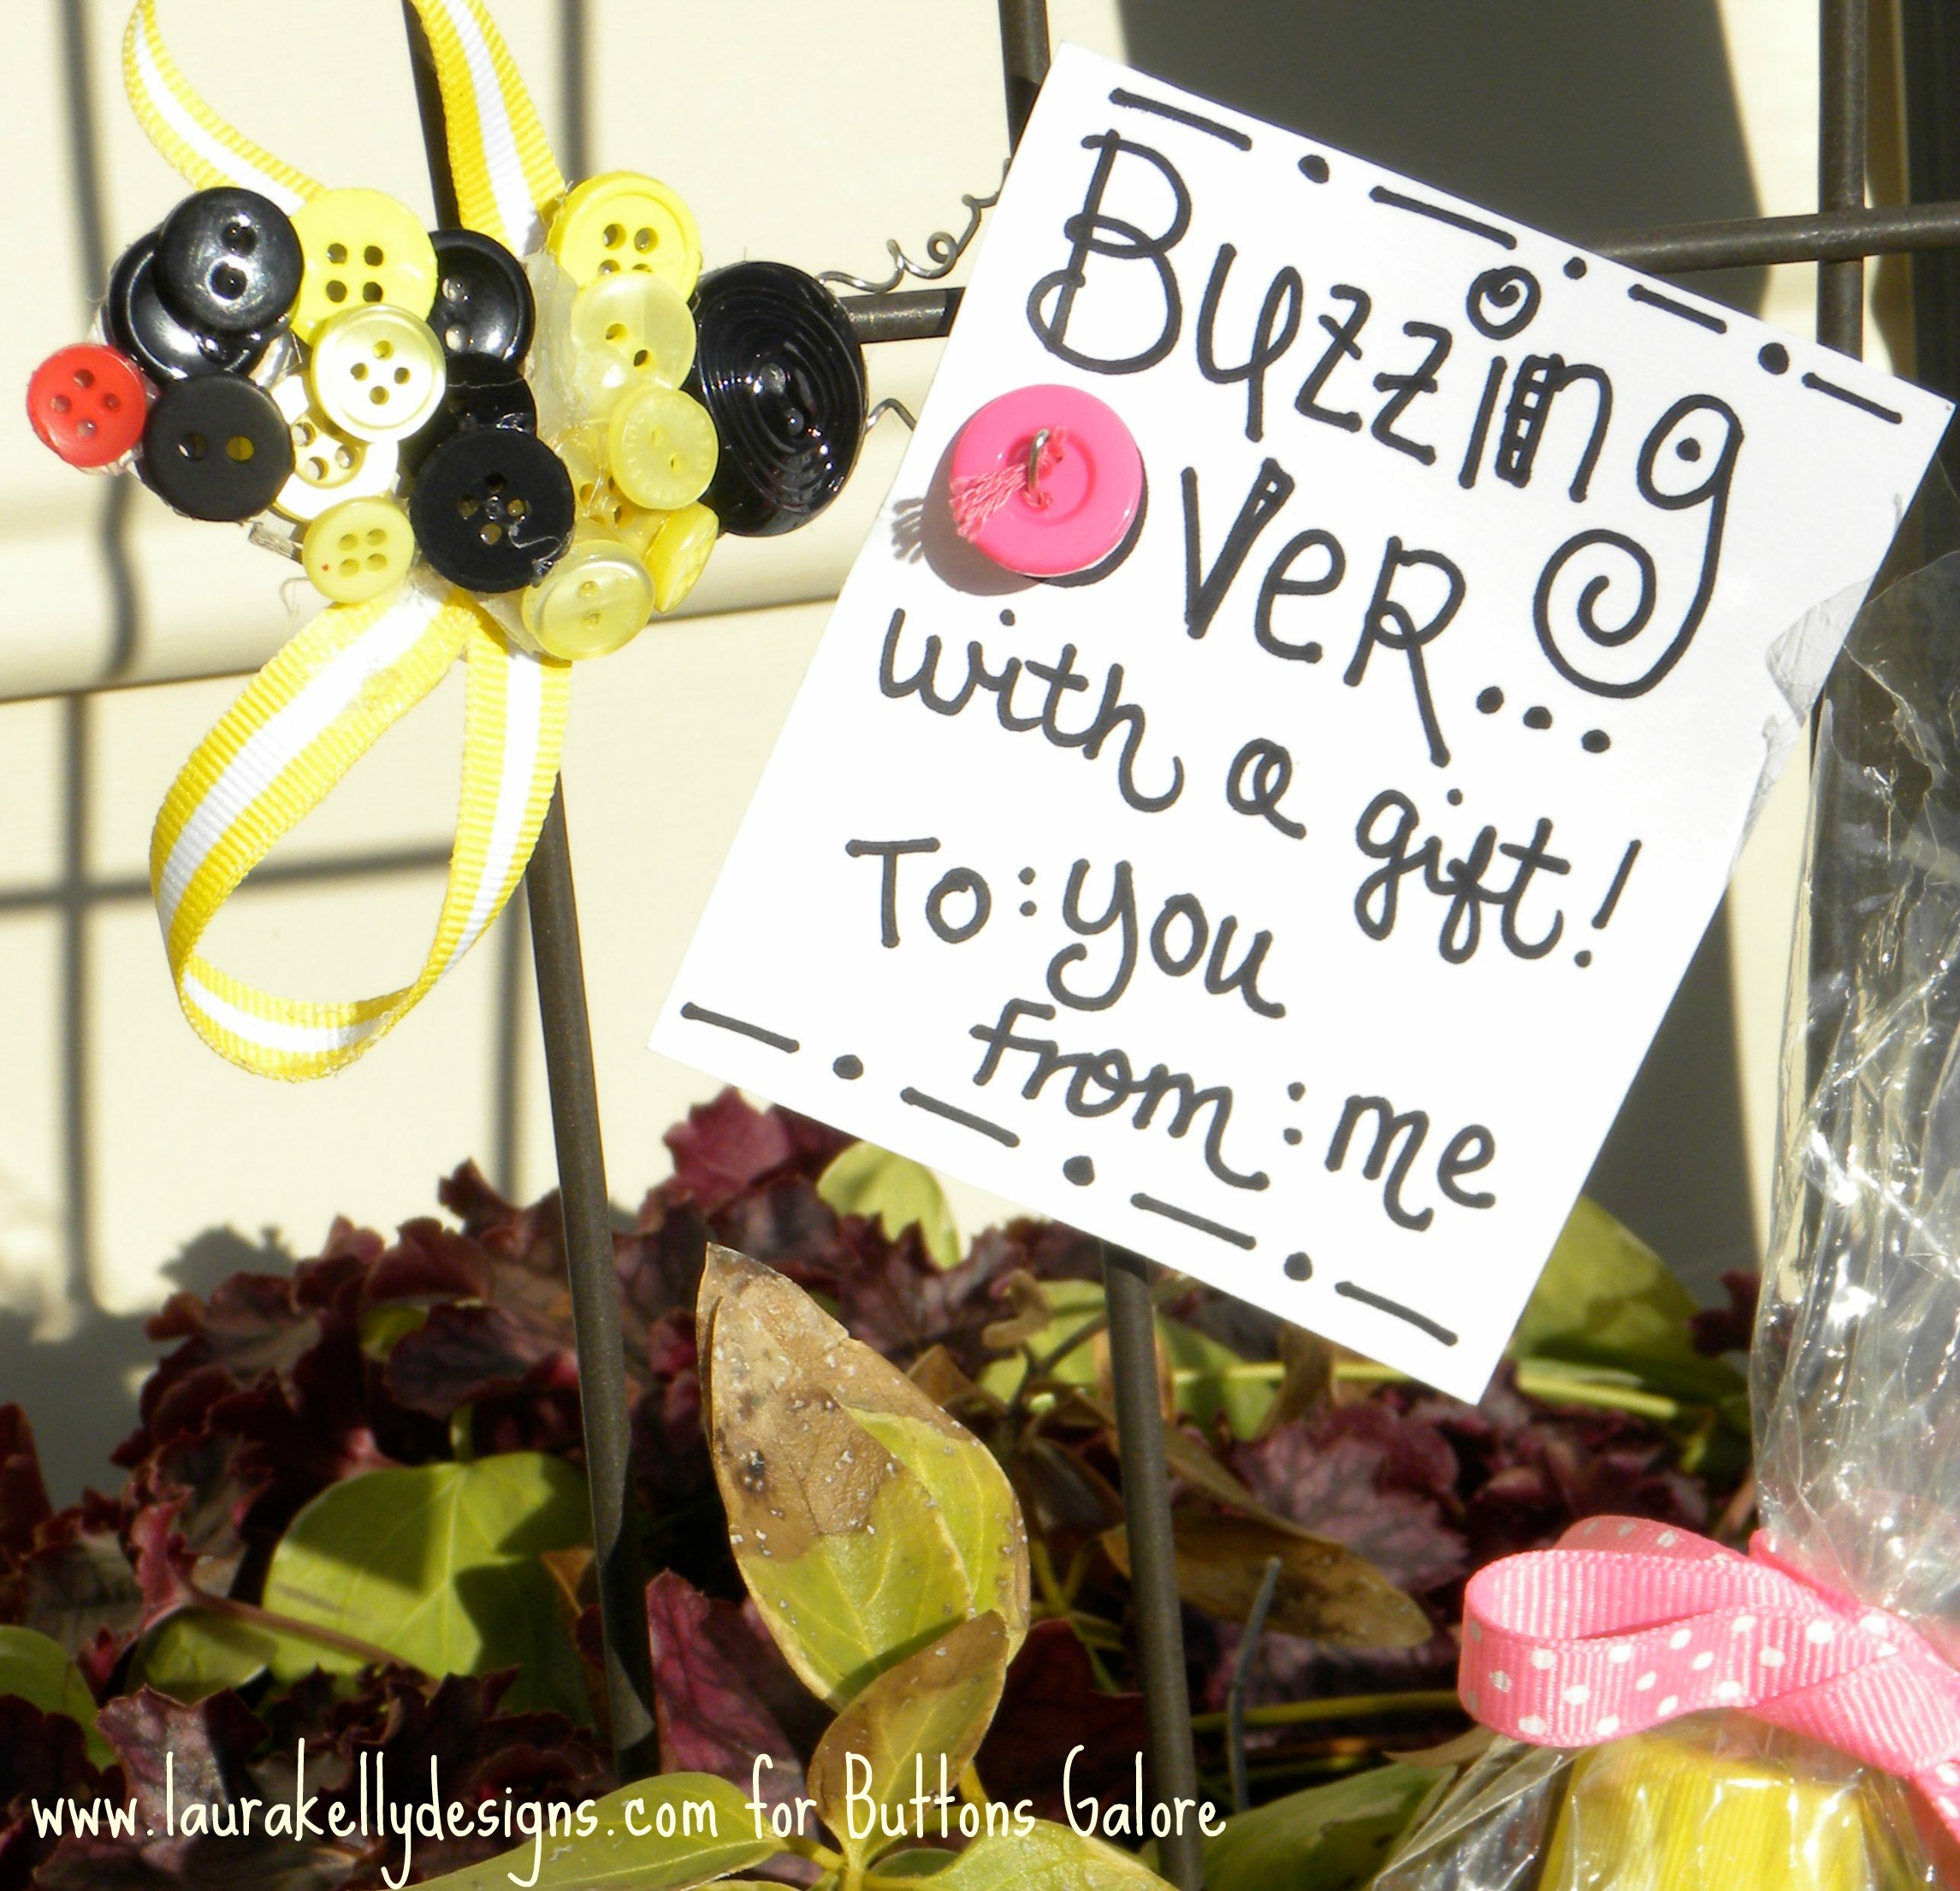
Here is a fun and easy way to display your Easter eggs? Colorful pedestal egg holders made with buttons are a pretty and unique way to showcase Easter eggs! For these egg cups I used a variety of sew through buttons from our several of our button collections to make the pedestal and flowers and a bee button from the Spring Fling 3D Button Collection for the finishing touch.
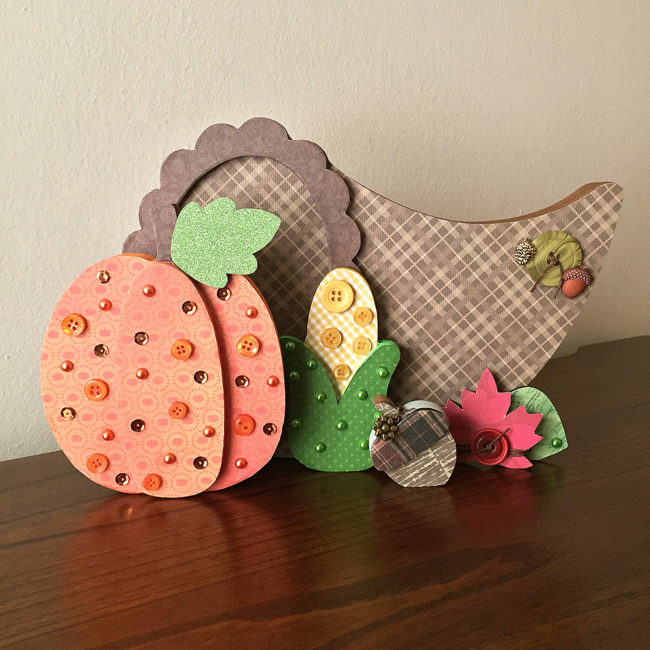
Thanksgiving will be here soon and the house will be full of relatives and friends. Why not create something to show off before dinner with this DIY thanksgiving cornucopia home decor set? Continue Reading →
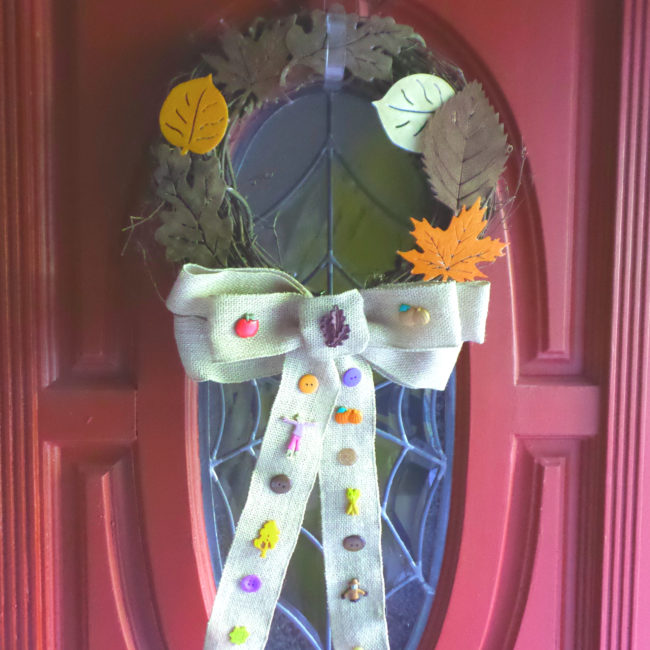
Hi everyone! It’s Lorrie here with a fall wreath featuring autumn-themed buttons from Buttons Galore & More! This fall wreath will look great on your front door to greet visitors, or on the wall inside your home to add some seasonal flair.
To make this easy fall wreath, I started with a grapevine wreath and a plain burlap bow that I picked up at my local craft store. I decorated the wreath itself with some plastic leaves that I painted in beautiful autumn colors. But the real fun starts with the bow! Continue Reading →
With Thanksgiving right around the corner, I’ve been thinking about how to dress up my holiday table a little bit more this year. I’ve never actually used napkin rings before, and I thought it might be a fun addition to my Thanksgiving table. These easy Thanksgiving napkin rings only take about 10 minutes to make. Thanksgiving table decor couldn’t get any easier! I love the fun fall vibe they add to the table. And the buttons from our super adorable Fall Friends button collection were so perfect for the project! Continue Reading →
Hello Everyone! This is Katie from the Buttons Galore & More Design Team and today I will be showing you how you can decorate a new product available from Buttons Galore and More!
If you haven’t noticed, Buttons Galore & More has a new area on their website which is dedicated to home décor. This home décor is a new line of wooden products which are super easy to embellish and decorate. The nice thing about the new line is that you have tons of options for different holidays, themes, or seasons. Continue Reading →
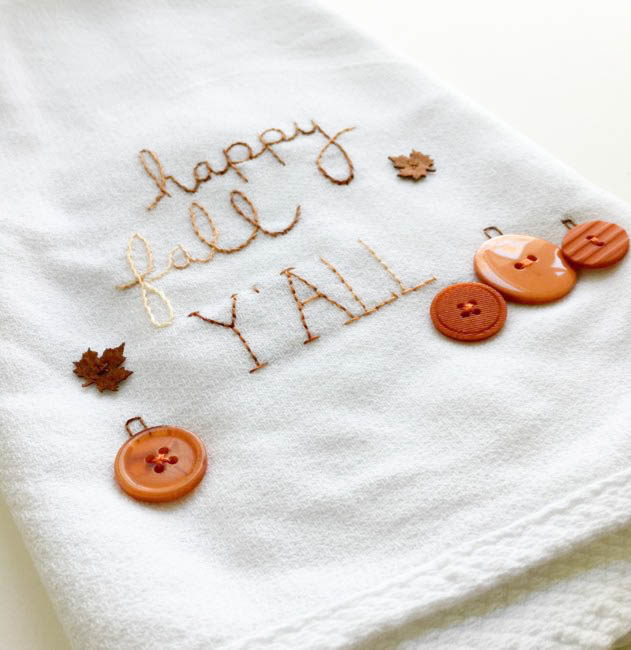 We’ve had so many crisp mornings lately, I have gotten so eager for fall! So bring on the pumpkins, acorns, orange and brown! Today’s project is a super quick embroidery project to add to your fall decor. Even the most beginner of embroiderers can easily stitch up this DIY fall tea towel. Continue Reading →
Hello button lovers! This is Katie from the Buttons Galore & More Design Team, and today I have a fun DIY flower button brooches project if you are someone who is just not ready to make that transition into the fall season!
Now, as a fall season girl at heart, I know making flower button brooches sounds a bit weird in September. However, there are those folks who just love spring and summer. If this is you, then these flower button brooches should make the fall season a bit more bearable and make those warm cardigans a bit cuter! Continue Reading →
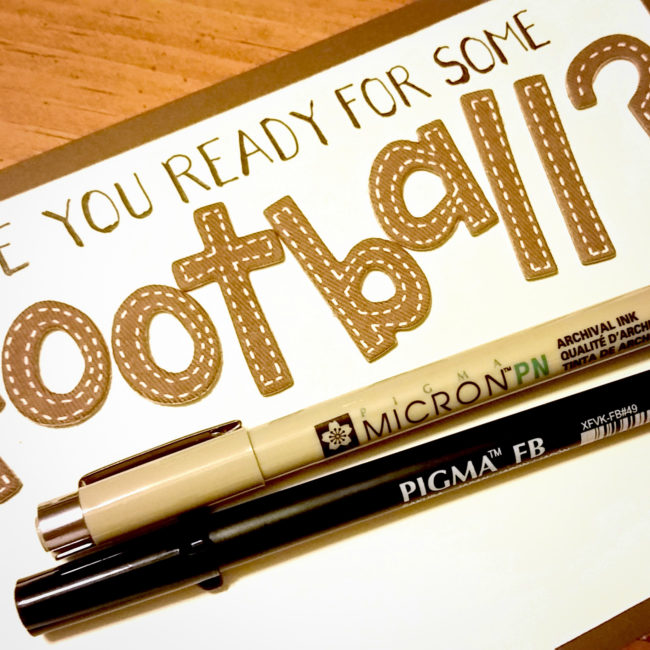
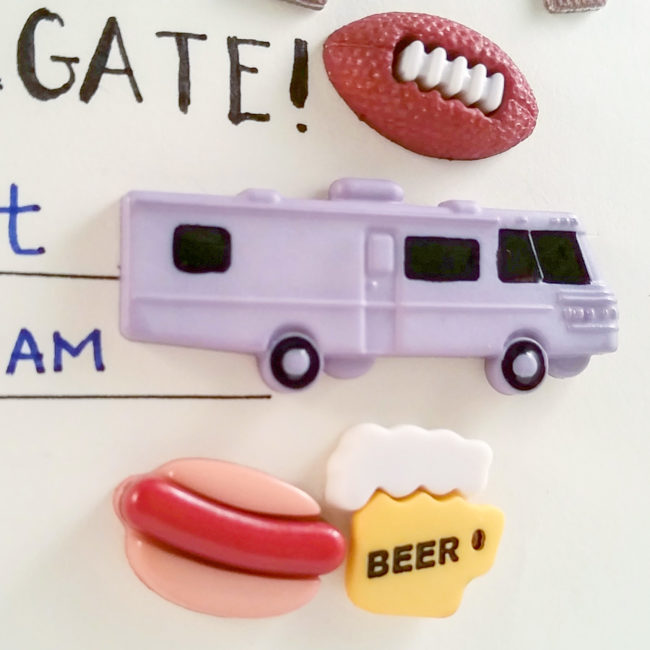
Fall is quickly approaching, and we all know that fall means FOOTBALL! Today, I will show you how to make the cutest DIY tailgate party invitation using football themed buttons from Buttons Galore. So get ready to fire up the barbecue and cheer on your favorite team!

Using a paper trimmer, I cut the brown cardstock to 5″ x 7″ and the tan cardstock to 4.5″ by 6.5″. I then inked the edges of the tan cardstock with brown chalk ink to add dimension. I used a tape runner to attach the tan cardstock to the brown cardstock to make the base of the invitation. Next, I hand lettered the words on the invitation. I used a fineline pen to do the lettering, then used a brush pen to darken all my downstrokes. This is an easy way to make your hand lettering look great, even if you aren’t that good at it! The word “football” made from alphabet stickers was then added.
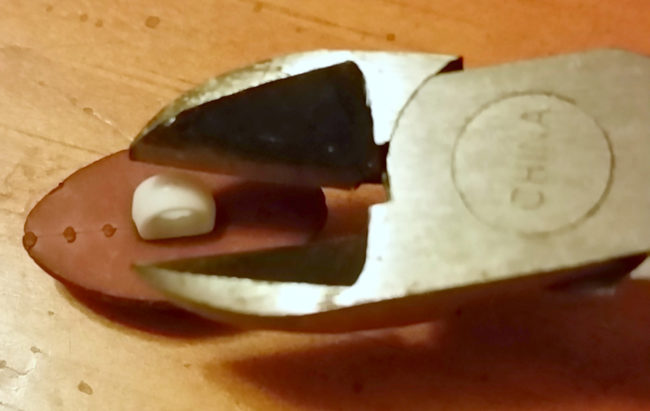
I then chose the buttons I was going to use. Most of these buttons had shanks on the back. In order to use them on a flat surface like this one, I had to remove the shanks. This is easy to do using a button shank remover or a pair of side cutters. I clipped off the shanks, then attached the buttons to the invitation using red line tape. This tape is strong enough to hold these buttons securely!
I placed the buttons all around the card in the white spaces. The buttons give this invitation a fun feel and cool dimension that you just can’t get with any other embellishments… plus they are absolutely adorable!
Your guests won’t be able to resist this super fun invitation! Go team!
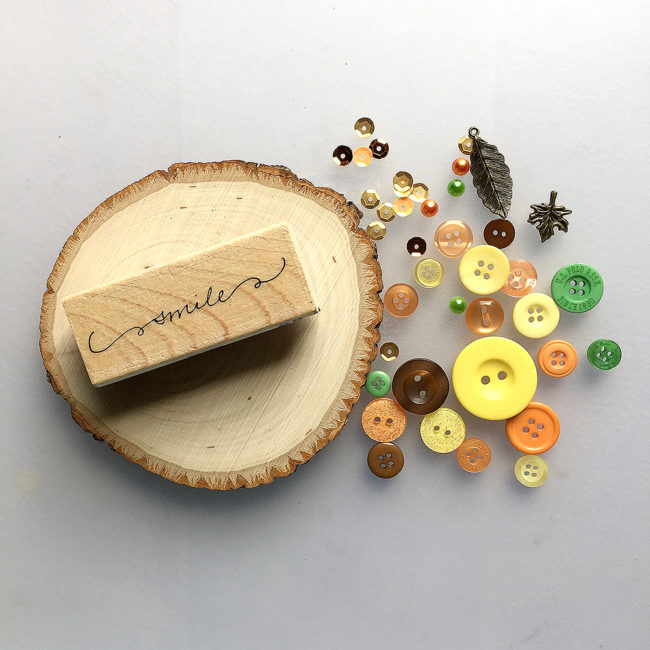
If you’re like me, you just can’t wait for the temperatures to drop. Now is the perfect time to get started on some fun and simple projects for fall. Today, I’m going to show you how to use the Autumn Afternoon embellishment kit by 28 Lilac Lane to create an awesome fall wood coaster wall decor piece for your home.
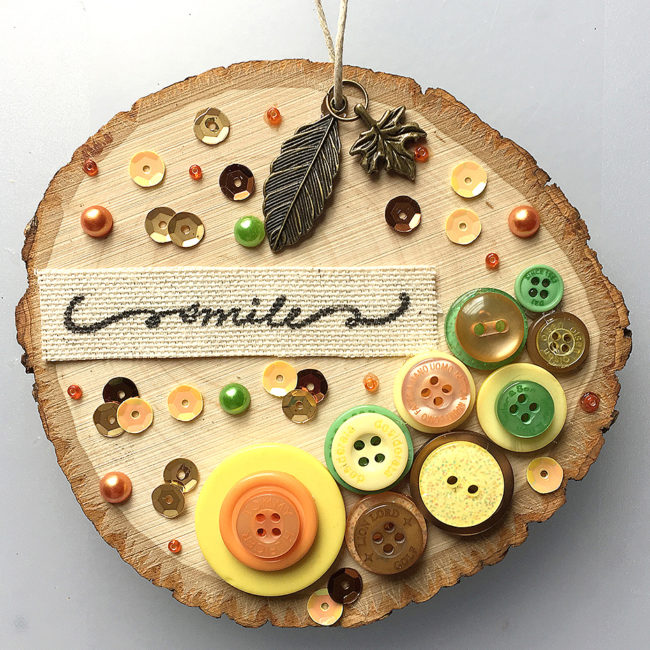
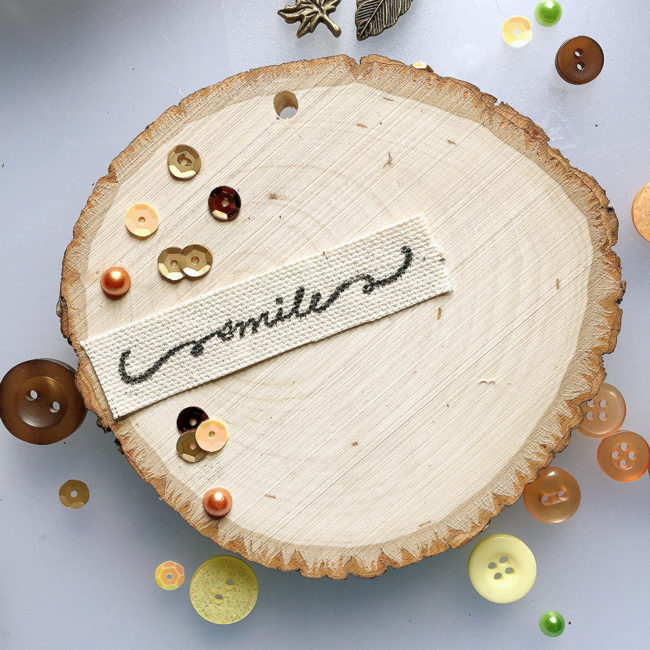
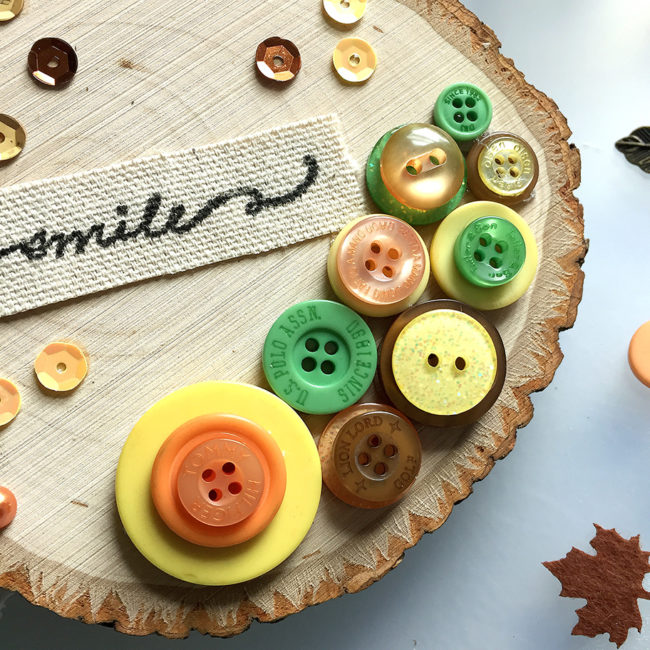
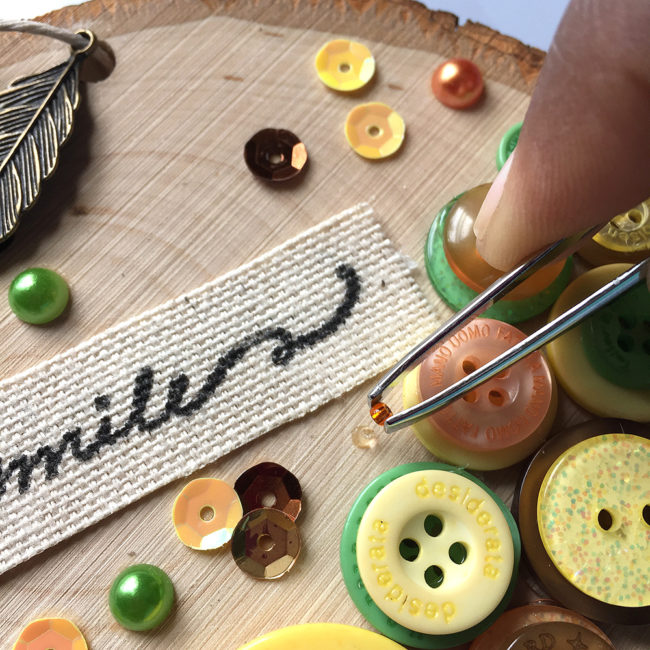
The first thing you need for this project is a wood surface. I’m using a 4 1/2″ round wood coaster that is about 1/2″ thick. Next, you will need to find a stamp with a word or phrase that expresses the perfect sentiment. I have selected a “smile” stamp. Smiles are always in season! You can of course go with something specifically related to fall. Most importantly, ensure that anything you choose will fit nicely onto your coaster.
I have drilled a hole in the top in order to attach a string, but you may be able to find one that is pre-drilled for crafting. On a scrap piece of duck cloth I have stamped the word “smile” in black ink and then glued the fabric to the coaster’s surface. Then I used a clear-drying glue to begin adding pearls and sequins.
Don’t forget to leave room for buttons! Using a glue gun, I arranged the buttons closely together near the bottom edge and stack a few for extra dimension.
The kit includes leaf and feather pendants in bronze that look great hanging and add just the right touch for the season. I looped the cord through the wood coaster and each pendant. I used a 7″ length of hemp cord. After I attached the pendants, I just tied a knot in the cord to finish it off.
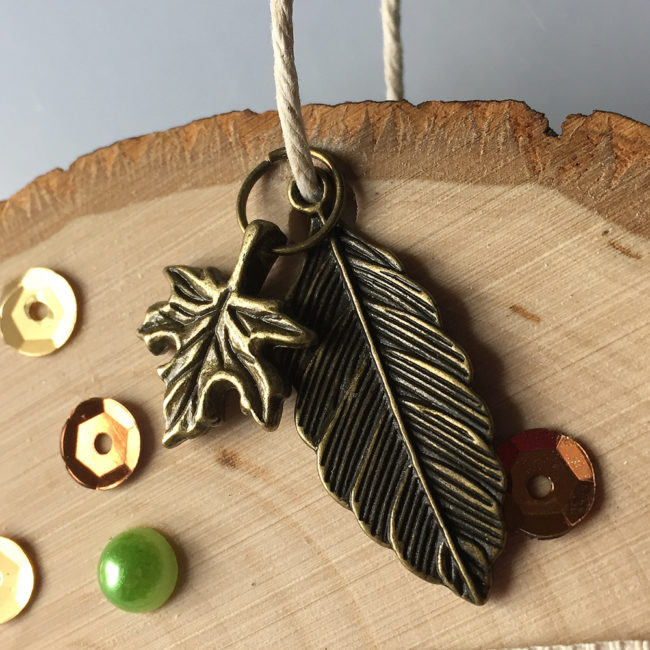
For the last step, I applied a few seed beads using the tiniest dab of glue. Using tweezers will assist in applying the beads exactly where you want them. As we all know, glue can at times get messy!
And its just that easy! Your newly embellished fall wood coaster wall decor is complete.
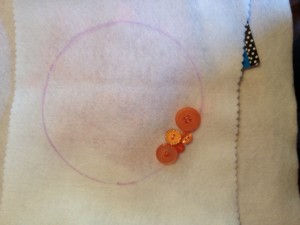
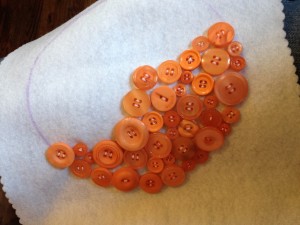
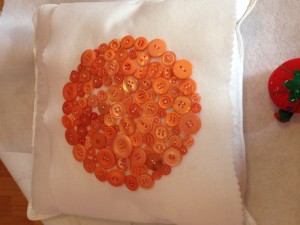
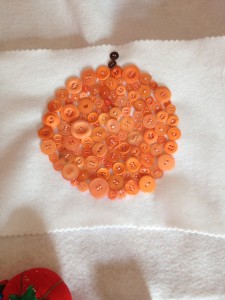
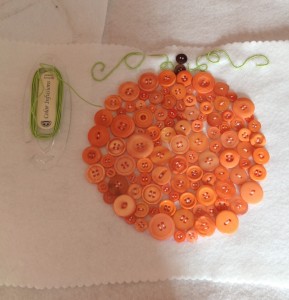
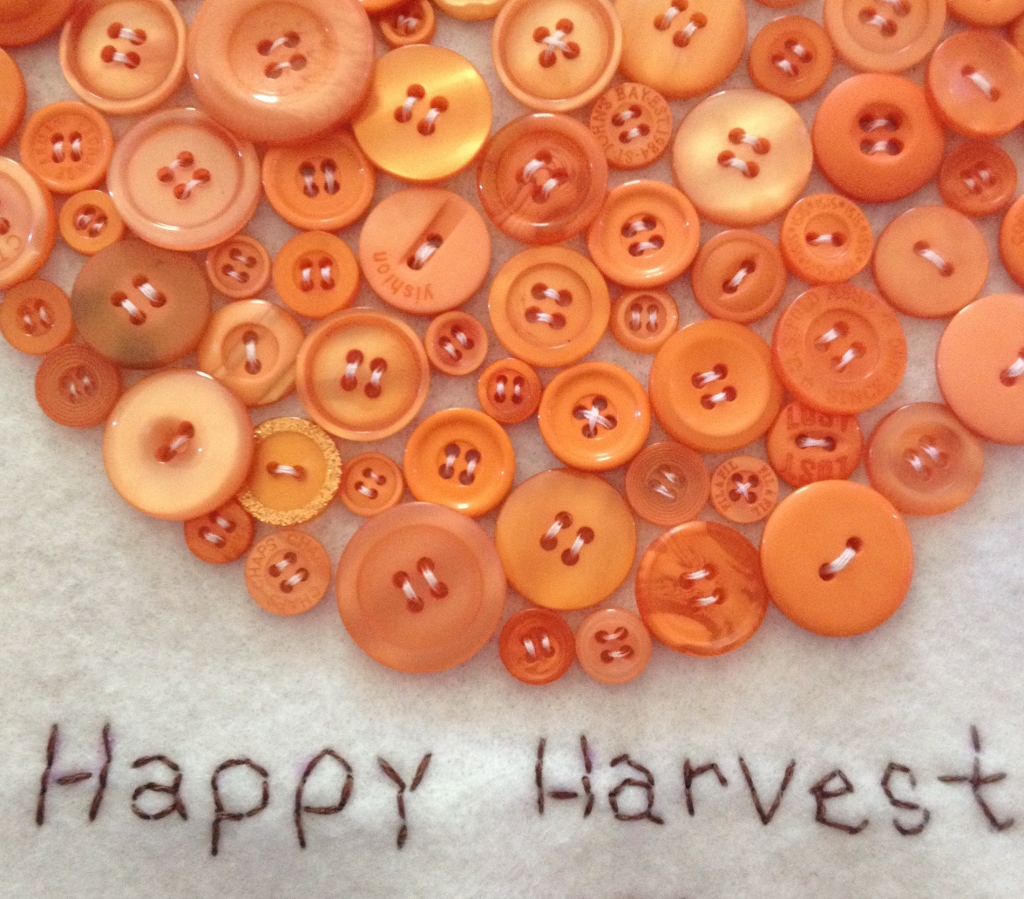
Hello Everyone! This is Katie from the Buttons Galore & More Design Team, and today I have a fun button pumpkin wall hanging project to get you in the mood for fall decorating!

This project is perfect to make if you are looking for an easy and inexpensive way to spice up your home décor for fall, halloween, and thanksgiving. I got the idea for this project when I saw a felt wall hanging designed for the 4th of July. However, instead of a pumpkin, the original wall hanging had a heart shaped flag made from felt and a few buttons. Personally, I thought the idea was cute but could be recreated in a simpler way. In today’s project, the whole DIY is only 3 steps and does not involve any sewing tools!
To decorate my button pumpkin wall hanging, I used two button sets for a majority of the project. Those two button sets were the 28 Lilac Lane ”Pumpkin Spice” Embellishment Bottle and the Buttons Galore Autumn Value Pack. Both of these button sets provided a wide variety of harvest/fall style buttons and worked really well together. My personal favorite out of both of these sets was definitely the 28 Lilac Lane ‘”Pumpkin Spice” Embellishment Bottle because you received a ton of beautiful orange colored buttons.
So, to find out how to make your own pumpkin button wall hanging, keep reading below!
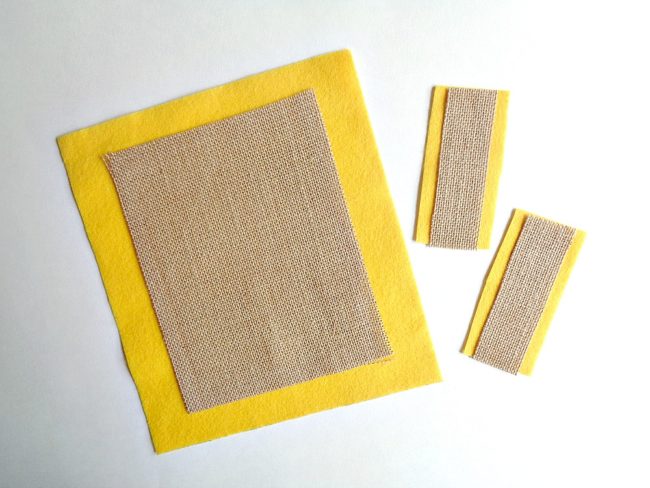
Step 1: Cut one piece of felt that measures 9 inches by 10 inches and two smaller pieces of felt that measure 2 inches by 3 ½ inches. Then cut out one piece of burlap that measures 6 ½ inches by 8 inches and two smaller pieces that measure 1 inch by 3 ½ inches.
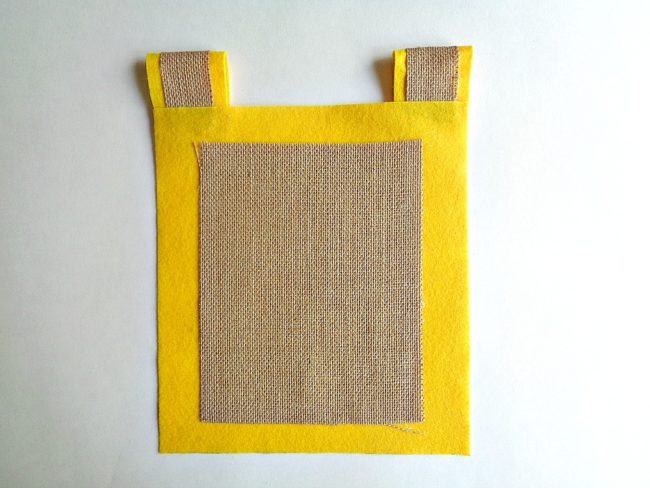
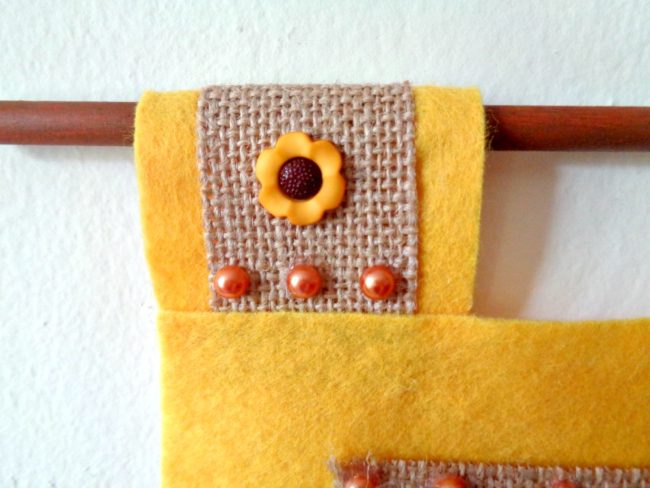
Step 2: Layer the larger piece of burlap centered onto the larger piece of your felt and glue it into place with your hot glue gun. Then layer the smaller pieces of burlap centered onto your smaller pieces of felt and glue them into place. Finally, create loops for your wall hanging by folding over the smaller pieces of felt/burlap and glue them in the corners of your larger felt piece.
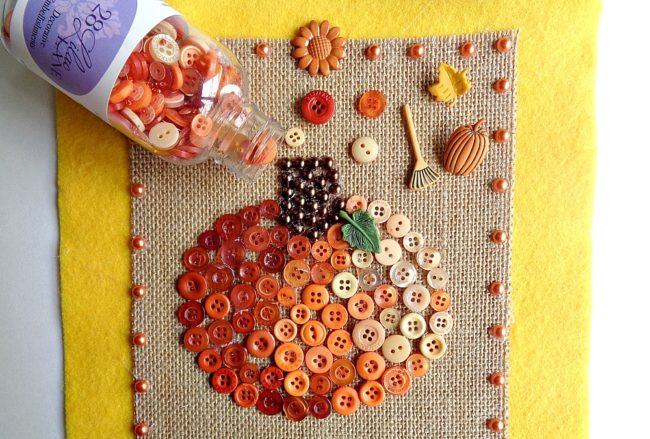
Step 3: Now take your pen and draw the outline of a pumpkin onto your burlap. Then begin gluing on your buttons around the outside of your pumpkin to create an outline and then fill in the middle with more buttons. For my pumpkin, I decided to go from dark to light buttons and then use shimmering half pearl flat backs for the stem. Finally, use the rest of your normal buttons and decorative buttons to decorate the rest of your wall hanging.
For my button pumpkin wall hanging I used the following:
Once you are happy with how your button pumpkin wall hanging looks, you are ready to hang it on the wall by sliding a dowel rod or wooden stick through the two loops!

I loved how this pumpkin button wall hanging turned out and I think it would look so cute as part of a gallery wall!
While creating this project, I did free hand the design of the pumpkin. However, if you are not comfortable drawing your own pumpkin (in step 3), you can always google ”pumpkin template” and print out a template to trace around. With that being said, if pumpkins are not your thing, you could always change the main image to be something else. For example, I think a leaf created from the 28 Lilac Lane “Toasted Graham” Embellishment Bottle would look really pretty.
If you made this pumpkin button wall hanging, what 28 Lilac Lane items would you use?
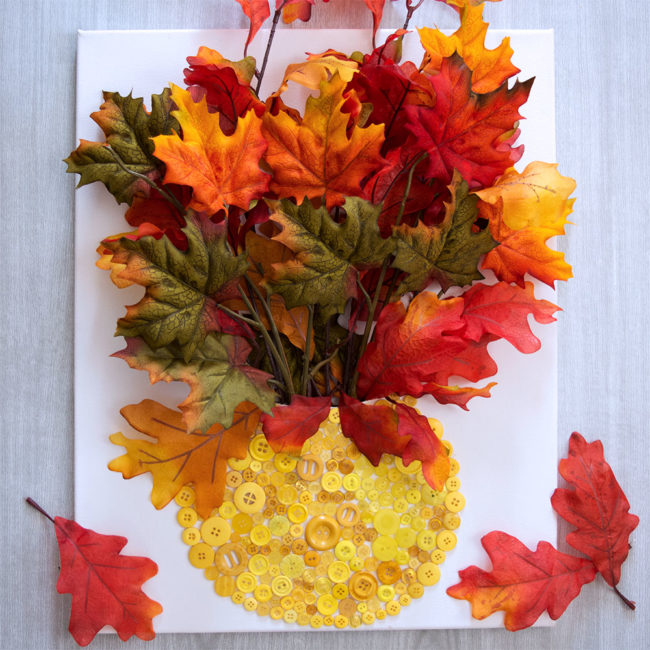
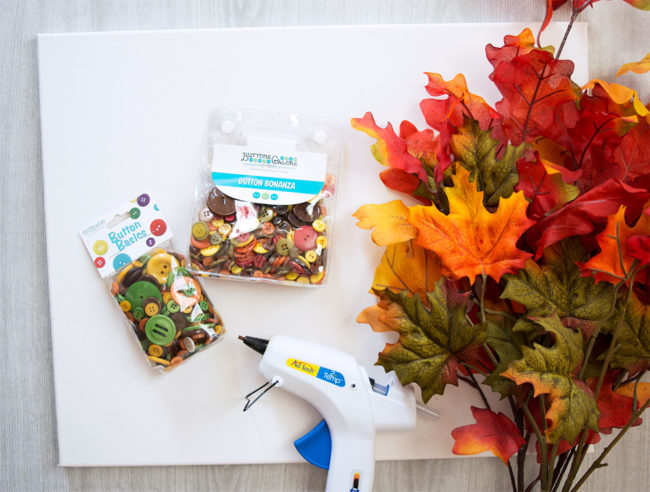
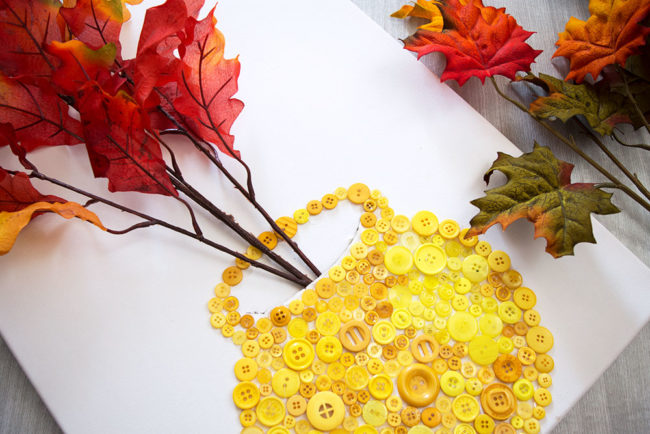
Autumn is one of my very favorite seasons. I love the cooler (but not cold) temperatures and the gorgeous bright colors that appear in nature. This Button Vase Fall Canvas wall art is the perfect project when you’re short on table space but want to add those beautiful fall colors to your home.
Use a pencil to draw (or trace) a simple vase shape to the bottom half of your blank 16×20 canvas.
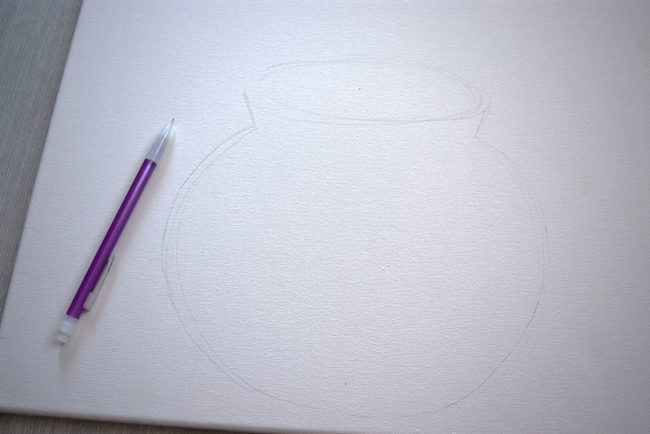
It doesn’t need to be perfect, just a rough outline so that you know where to place the buttons for the button vase. The buttons will cover up any pencil marks. I drew a round vase, but you can make it any shape you want. Whichever shape you use, make sure to keep it on one end of the canvas.
Glue buttons to the outlined vase you drew on the canvas. I used a hot glue gun to attach the buttons.
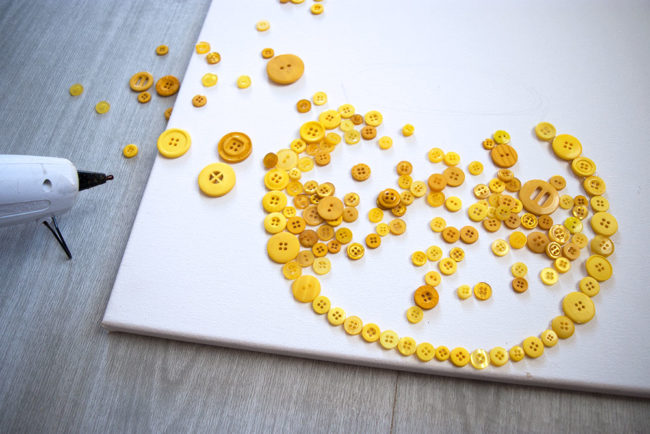
Because I was using Silk Autumn Leaves in my vase with beautiful red and orange colors, I made my vase Yellow to complement them. I used every yellow button in the Harvest and Fall Festival button sets to fill my round yellow vase. I liked that the shades of yellow in these two sets were in line with the yellow you’d actually see on fall leaves.
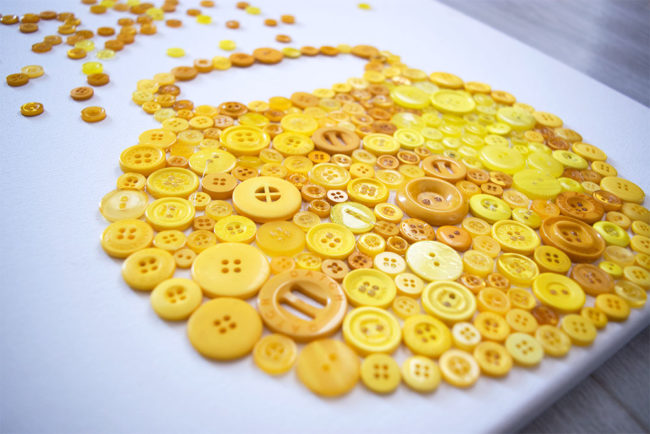
Don’t glue buttons inside the mouth part of the vase at the top but fill the rest of the vase.
Use a sharp craft knife to cut a line in the canvas just above the buttons in the mouth of the vase.
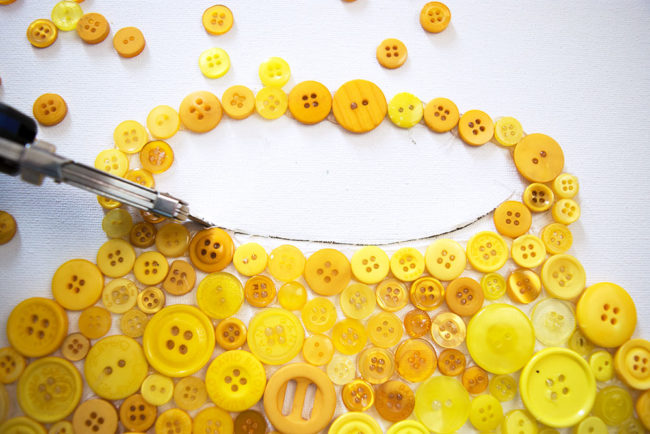
Insert your Autumn Silk Florals or Leaves through the hole in the canvas. Arrange them however you like. I find that the canvas vase looks best when it’s full. I used four Silk Leaf stems to fill my vase.
Turn your canvas over, and use hot glue to secure the stems in place for added stability. I used an entire small glue stick to fix my stems in place.
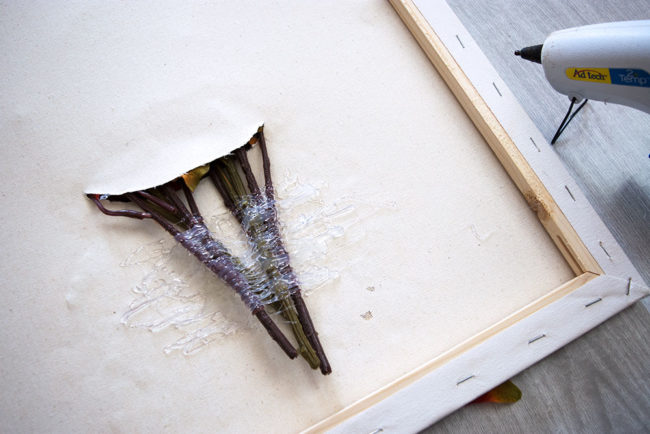
Use single leaves to fill in any blank spaces or gaps at the base of the stems. Secure them in place with hot glue.
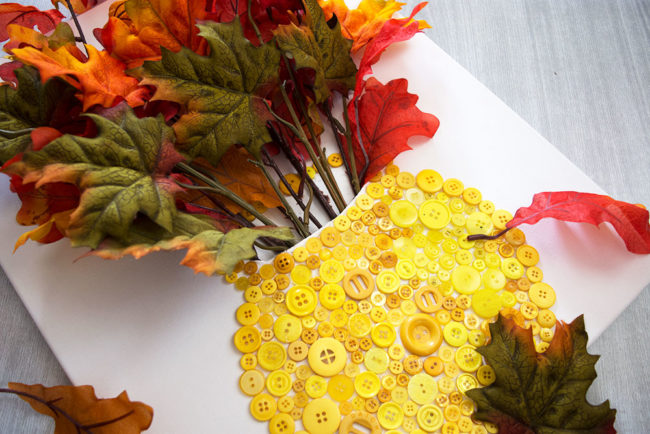
If you have some unruly leaves on the stems that aren’t laying quite right, a dot of hot glue can help secure them to the canvas in a more pleasing way.
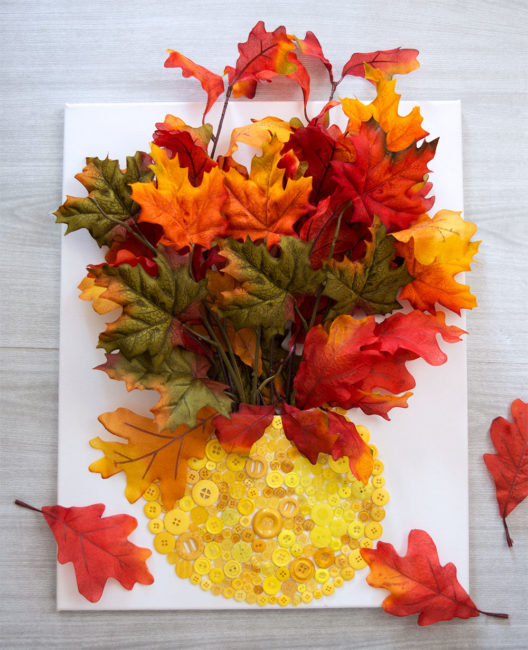
Hang your canvas on the wall, or prop it up on a table for a beautiful bright pop of autumn colors! I think that I will take a slightly smaller canvas and use the red buttons in the Fall Festival and Harvest button packs to make a smaller red vase with some pretty silk sunflowers! The pair will look great together with my fall decor. The possibilities are endless if you just change the color of the buttons for your vase to complement the flowers or leaves you have! Happy Fall Crafting!
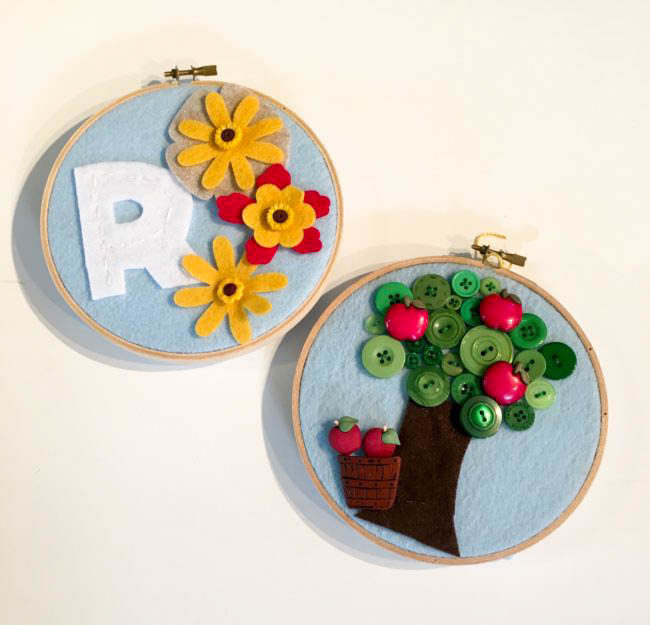
I’ve had the joy of teaching sewing in our community for the past few years to children of all ages. When people discover that I teach sewing to children, the first question they always ask is “what is a good beginner project?” This little hoop project is always my number one go-to project for anyone who has never used a needle and thread and wants to learn to sew. Even better, including buttons in the project ensures that they will also walk away with a great life skill for those days when a button pops off their shirt at the most inopportune time – and you know we’ve all been there!
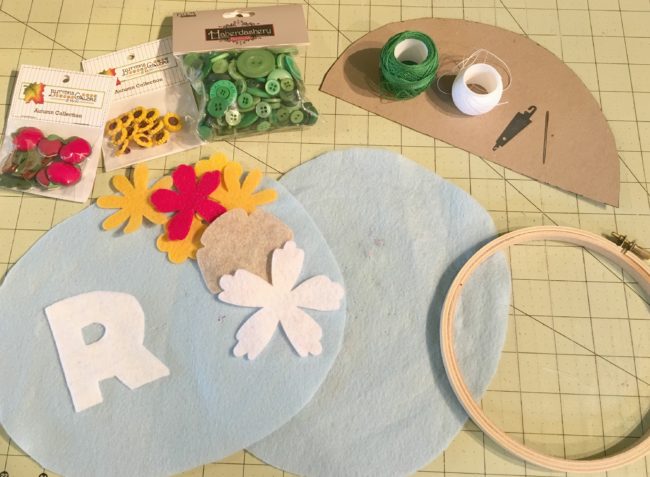
First up, let’s talk supplies. You will need the following to complete the two hoops:
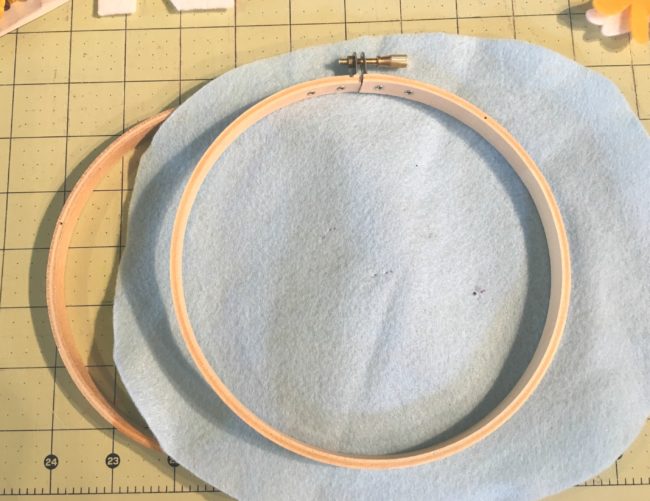
Now that you’ve gathered up all your materials, let’s get started and learn to sew! First, you need to find something to make a roughly 8-inch circle. Find a bowl or something round to trace around and cut your blue felt into two circles.
Next up, let’s set them in your embroidery hoops. This is often the most daunting thing for new stitchers, but all you need to do is make an embroidery hoop “sandwich”! Unscrew the bolt just a little and separate the hoops into two parts. Take the part without the bolt and lay it on your workspace. Then lay your blue felt circle on top of the bolt-less hoop and sandwich them all together by setting the hoop with the bolt outside the bottom hoop and the felt. Tighten up the screw and pull on the edges of the felt just a little to make everything tight.
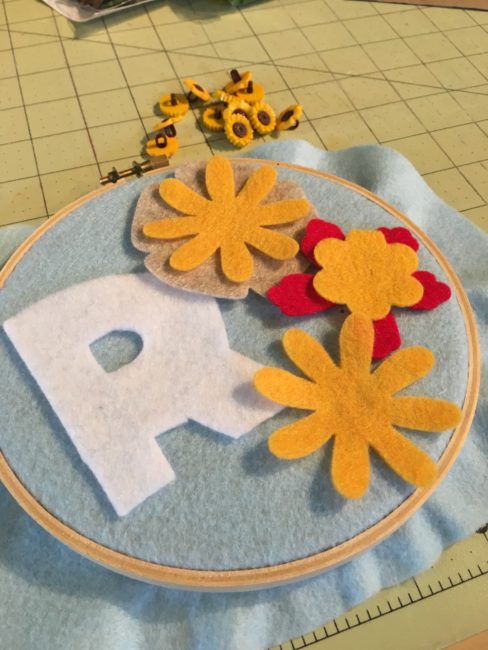
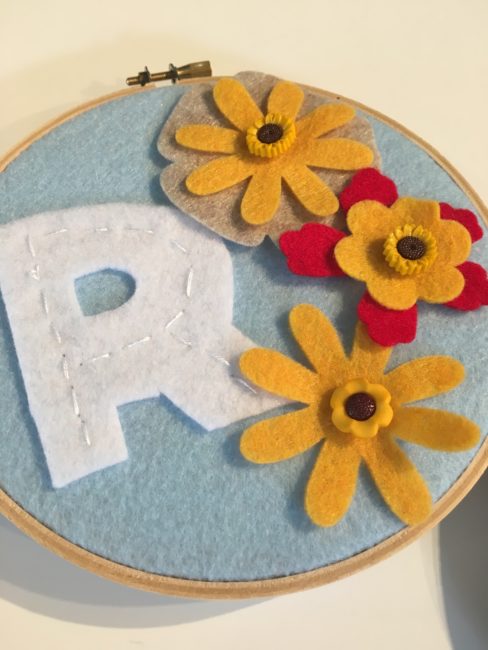
Now, print out the pattern page with your initial on it and cut out the correct initial for you. Use the paper pattern to cut out your initial with whatever color felt you would like. Then gather up your Sunflower buttons, the felt flowers, and your initial. Lay them all out on top of the hoop in whatever design you like best.
Now it’s time to stitch down your initial. Take your white thread and needle. Thread your needle and make sure to put a knot on the end! We are going to stitch down our initial with a running stitch.
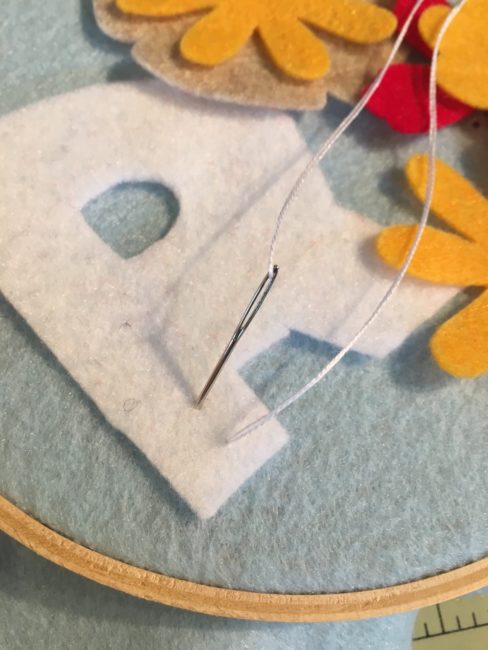
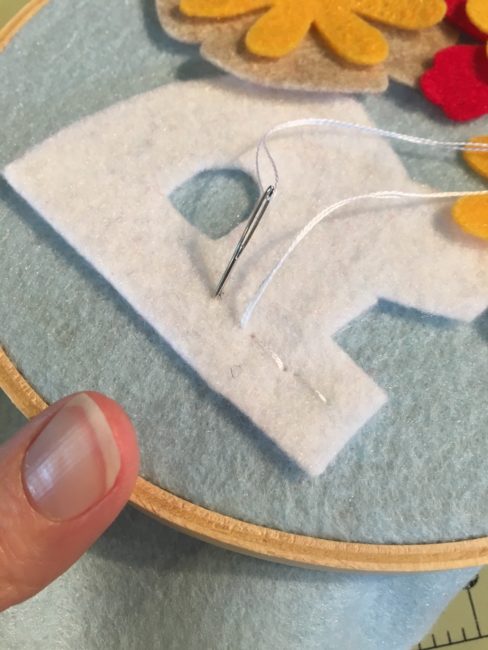
First up, bring your needle up from the bottom and pull gently until your knot stops the thread. Don’t pull too hard or you will pull your knot all the way through! Then bring your needle back down about a pinky finger width from where you started and pull the thread all the way through. Then bring your needle back up and then down as you stitch along the middle of your initial letter. Always remember to “follow your thread” and stitch with a rhythm of up and down.
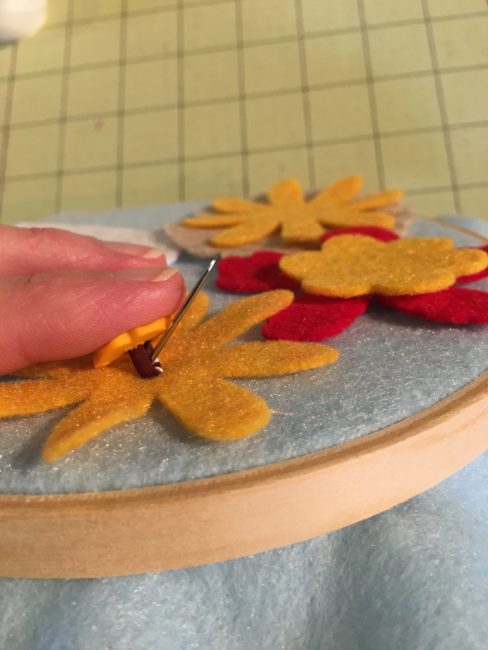
Lastly, grab your Sunflower buttons and lay them on top of your felt flowers. These are shank style buttons and can be a little more tricky for little hands to sew. Start out by bringing your needle up from the bottom and pull it all the way through till the knot stops you. Then take your button shank and thread it onto the needle and thread. Let it fall all the way down and then put your needle back through the top of the felt, pulling the button tight to the felt as you pull the thread from underneath. Continue to sew the button on a few more times and then move down to the next flower.
To finish off my hoops, I like to take a hot glue gun and glue the rim of extra felt around to the inside of the back. But sometimes I like to leave it open like a little ruffle fringe! Your choice!
Put a pretty ribbon through the top and you are done!
To make the tree, gather up a scrap of brown felt and cut out a little tree trunk. You have the option of sewing down your tree trunk with a running stitch or you can use some craft glue to glue it down.
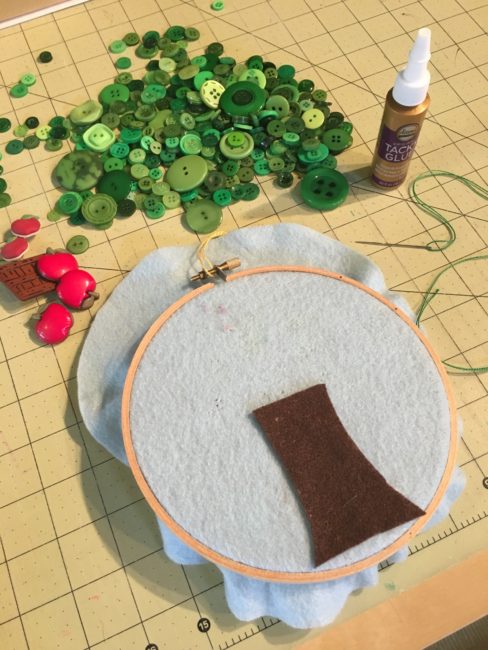
After gluing down the trunk, grab your green thread, a needle and the Apple Pickin buttons from the pack and stitch those down in random spots above your tree trunk. These are the same shank style as the sunflowers. Next, pour out your bag of Green Haberdashery buttons and choosing those that fit best, stitch down green buttons around your apples to fill in the tree.
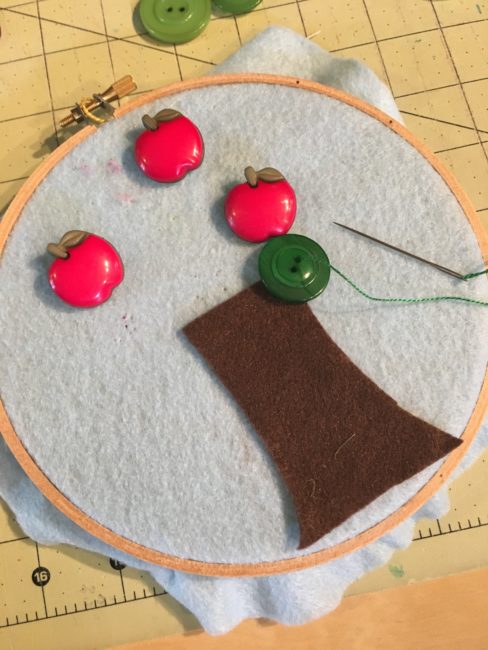
After you sew all the button “leaves” down, take your apple basket and apples and stitch those down near the bottom of the tree. Add a little ribbon for hanging, finish the back by gluing the felt edge to the back or leave it like a ruffle.
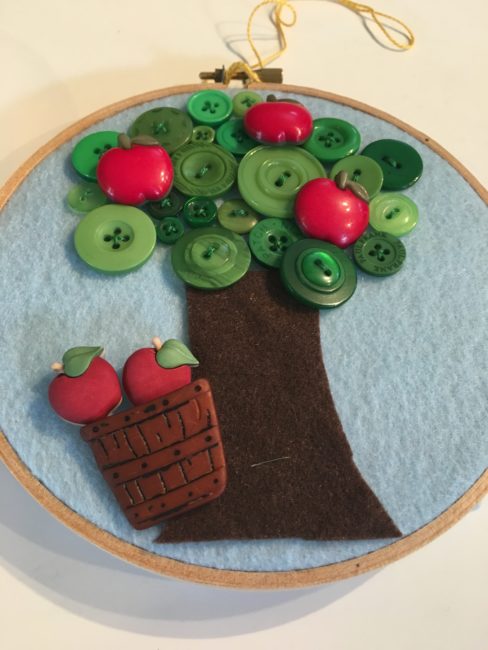
And there you go, two little Fall inspired hoops – these are perfect projects for beginning stitchers!

This project combines two of my favorite things: coloring and sequins! Using a pre-printed canvas, markers, and new sequins from 28 Lilac Lane, I made a fun project that is an easy way to decorate an ocean-themed room. This project is so easy that even the kids can do it!
To make this project, you will need:
How to:
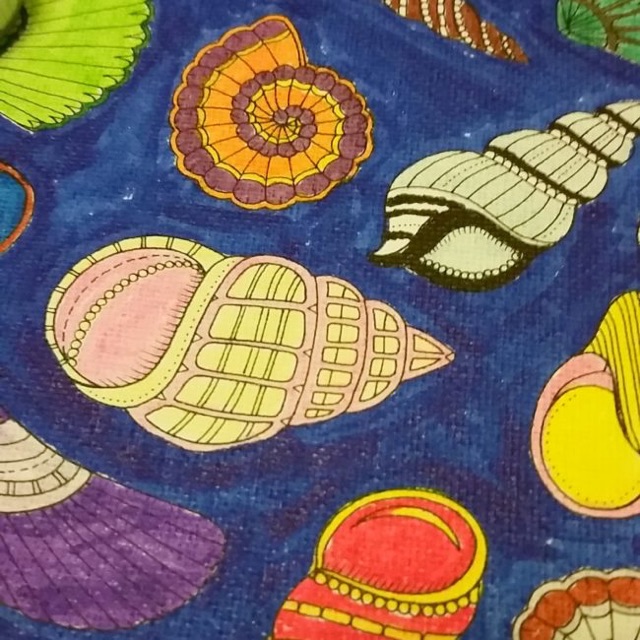
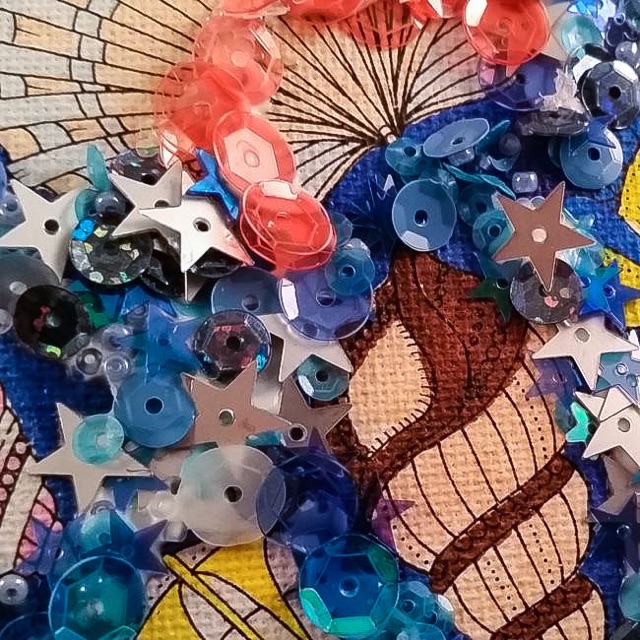
This canvas was so fun to make. I absolutely love to color so I really enjoyed getting out of coloring books and onto a canvas, and the addition of a little sequin bling just makes it even better!
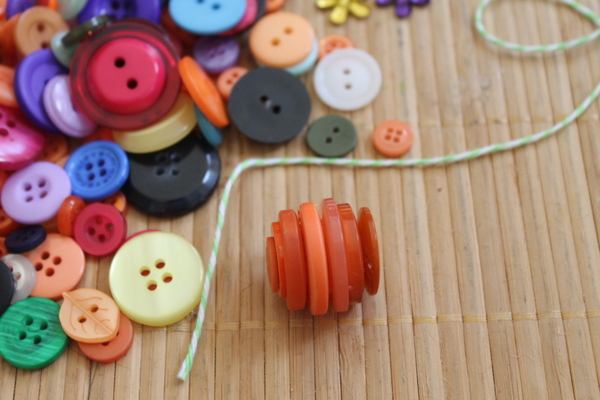
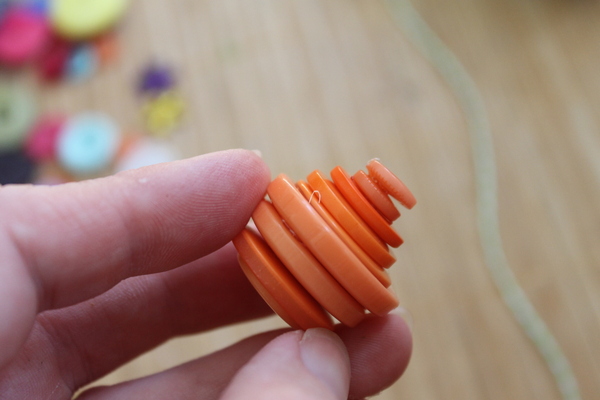
Hi! It’s Lorrie here, visiting the Buttons Galore blog today! Buttons are a fun and easy way to embellish your summer fashion, but have you thought of adding them to your accessories? Who cares if you can’t make it to the beach this summer? Bring the beach to you every single day with these super cute crafty sunglasses (that look and feel like they are covered in sand) featuring summer-themed buttons from Buttons Galore!
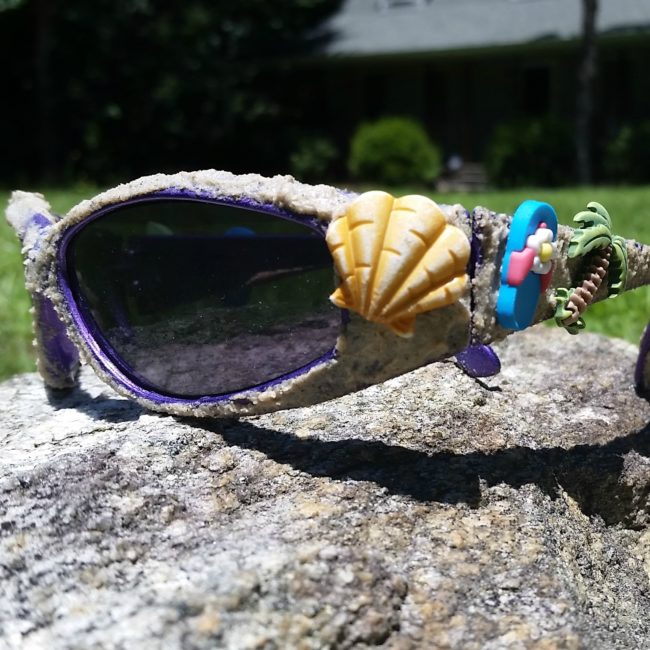
Materials Needed:
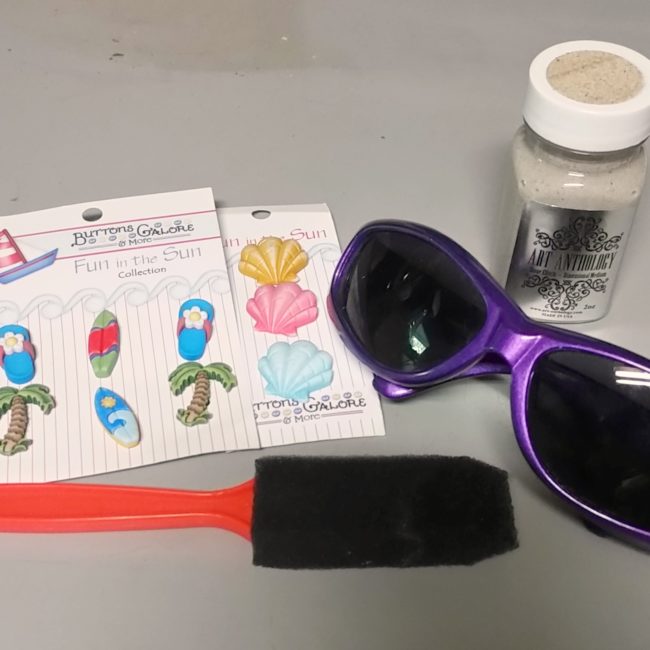
How to:
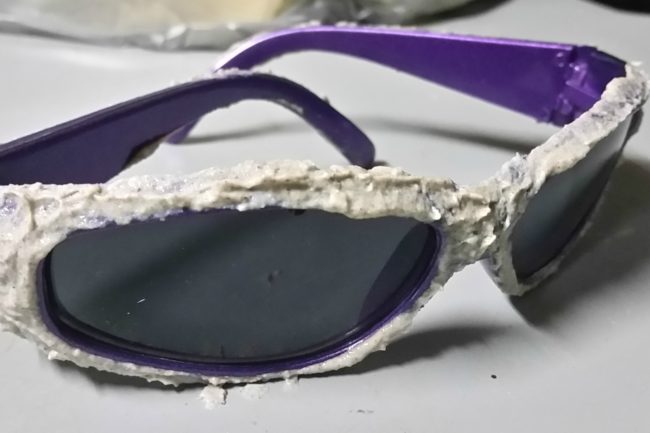
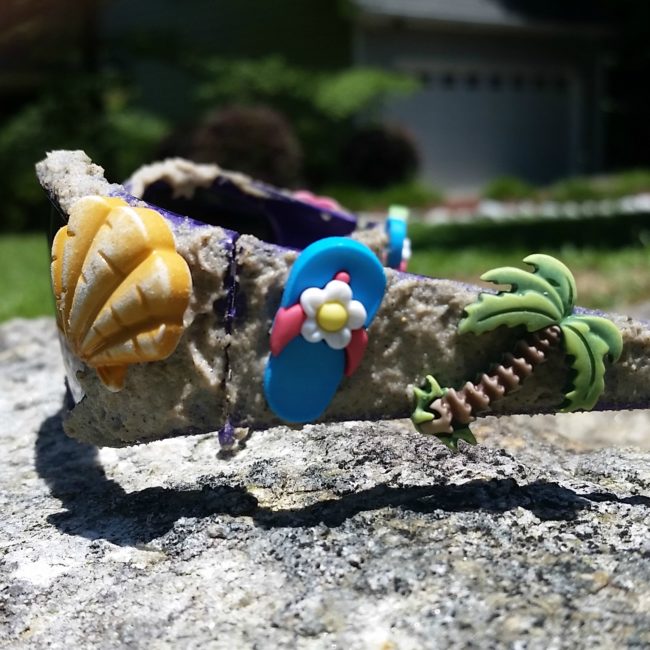
Now you are ready to hit the beach with your summer fun crafty sunglasses – whether the “beach” is your local pool or an expanse of tropical sand!
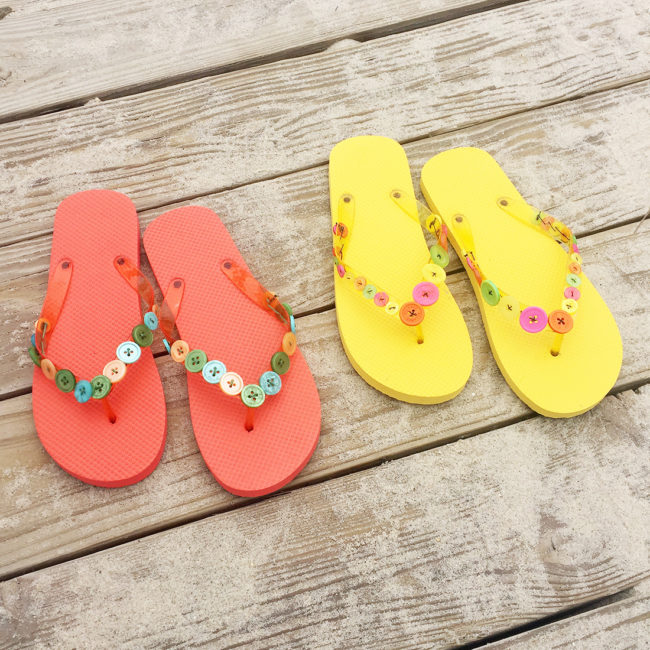
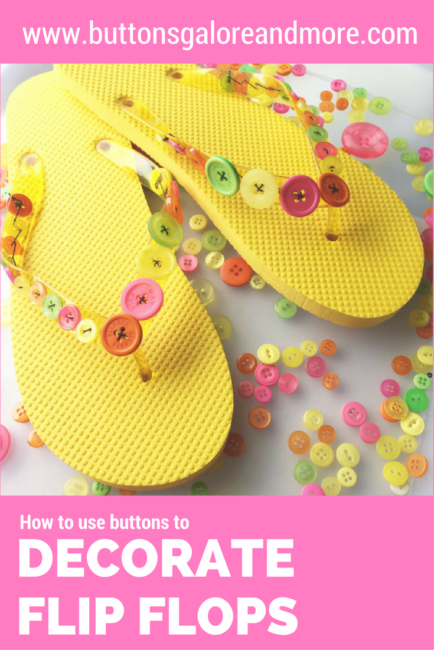
Summer is almost officially here! I’ve got a super easy project to decorate flip flops with buttons to keep you looking fashionable on the hot days ahead.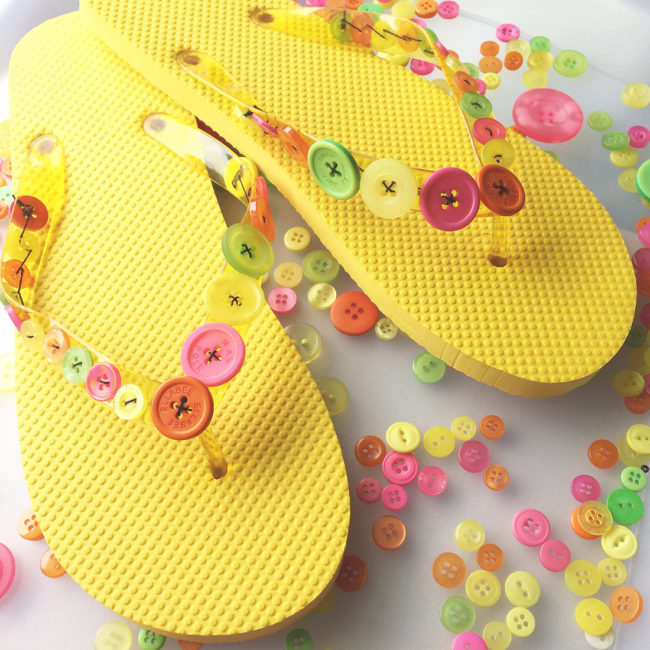
Supplies Needed:
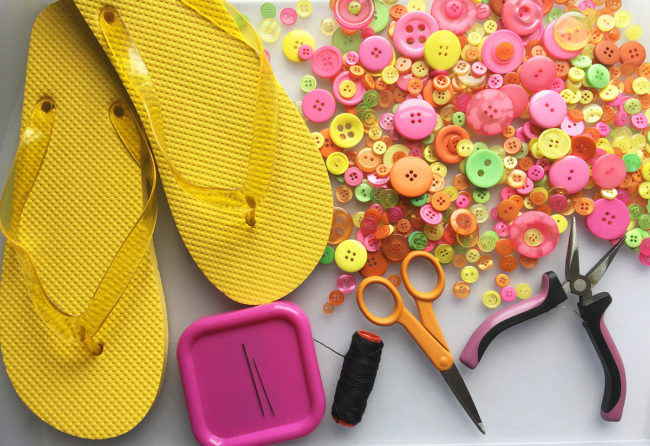
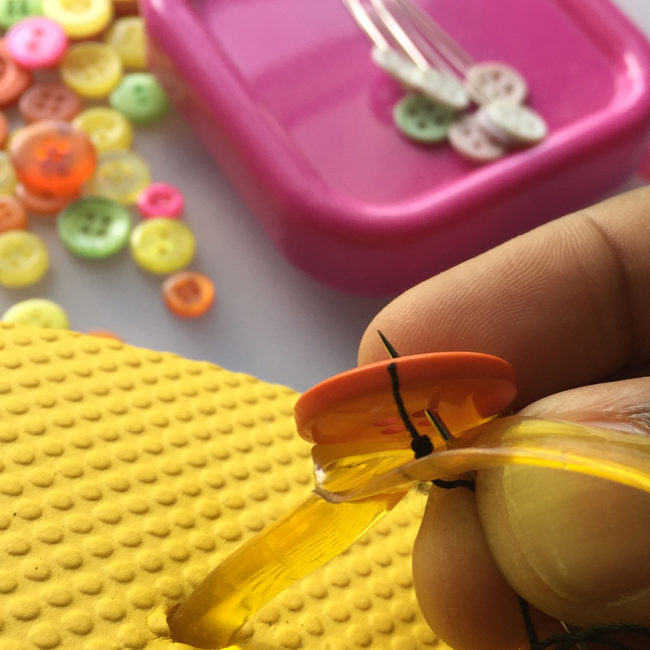
It’s surprisingly easy to decorate flip flops with buttons! Before you get started, make sure you have a thick strong thread. To begin, select buttons from the pack you want to use and line them up on the flip flop strap using pins. This step is optional, but it will provide you with a preview of way the shoe will look and give you the opportunity to work out the placement of the buttons prior to sewing them into place.
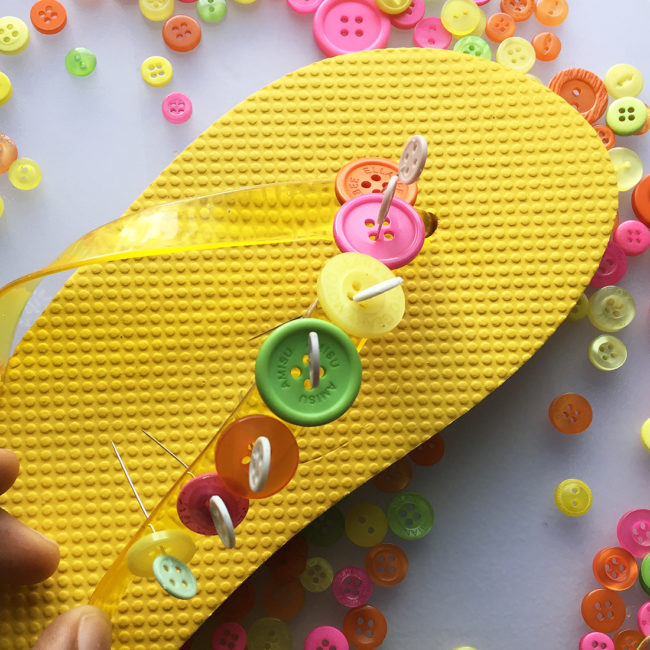
Thread the needle and start attaching the buttons starting at the center of the strap. The first stitch goes into the strap from the top. If you are using a very thick thread or clear plastic thread this will ensure the knot is not rubbing against your foot. After all, you want your shoes to be comfortable!
Be sure to tie all of your knots tightly. Don’t worry about the knot showing, as it will be hidden once you start adding your buttons. Depending on the thickness of your flip flops’ strap and the bulkiness of the thread, you may find it easier to push and pull the needle using pliers. I didn’t have any issues doing it by hand, but I would suggest you have a pair handy just in case you run into any issues.
Continue adding buttons until you get to within an inch or two of the end of the strap. After you have secured the last button, push the thread through so you can again tie the knot on the top of the strap.
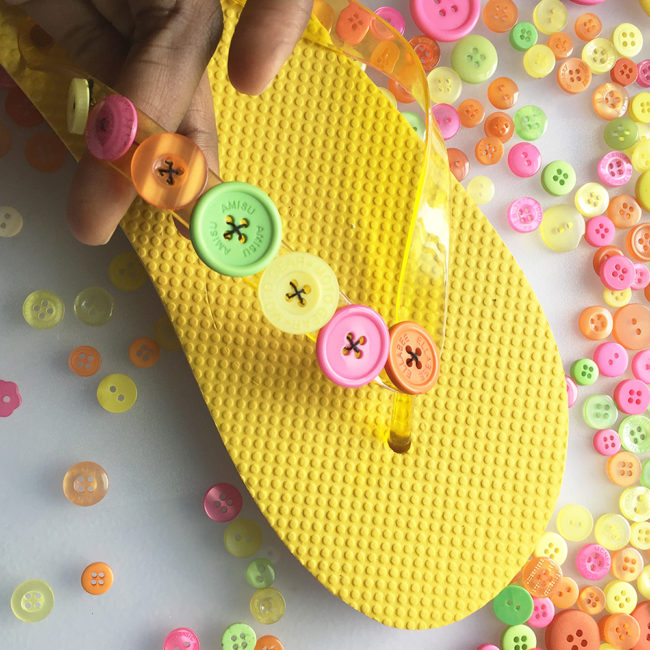
Beginning at the center again, add the next set of buttons to the other half of the strap.
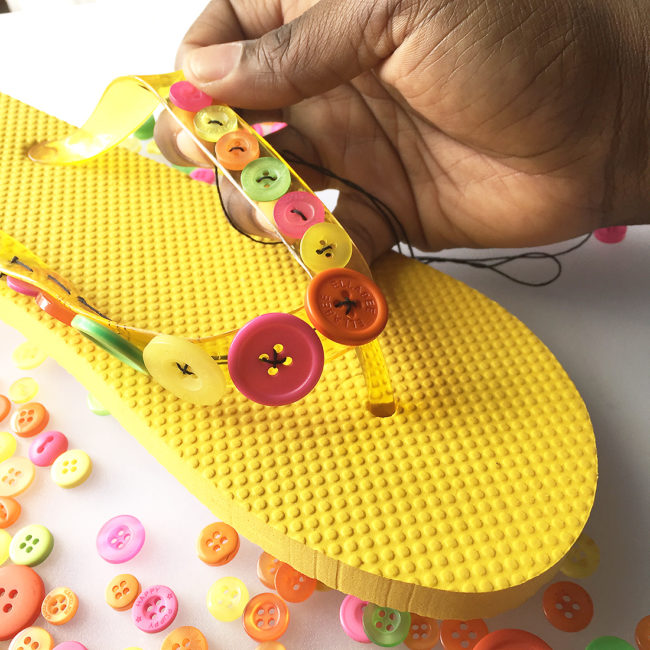
Now you just repeat the process for the other shoe and your flip flops are ready to wear! This time of year it’s easy to find inexpensive flip flops just about everywhere in every color you could need. It’s such an easy affordable project to decorate flip flops with buttons and you can make several a pairs in festive colors to coordinate with every outfit for your summer events. I had so much fun with this project I’ve already got two pairs ready for a stroll on the boardwalk!
Don’t waste any time…the beach is waiting! Grab a Button Bonanza bag and a pair of flip flops to start creating your summer wardrobe today!
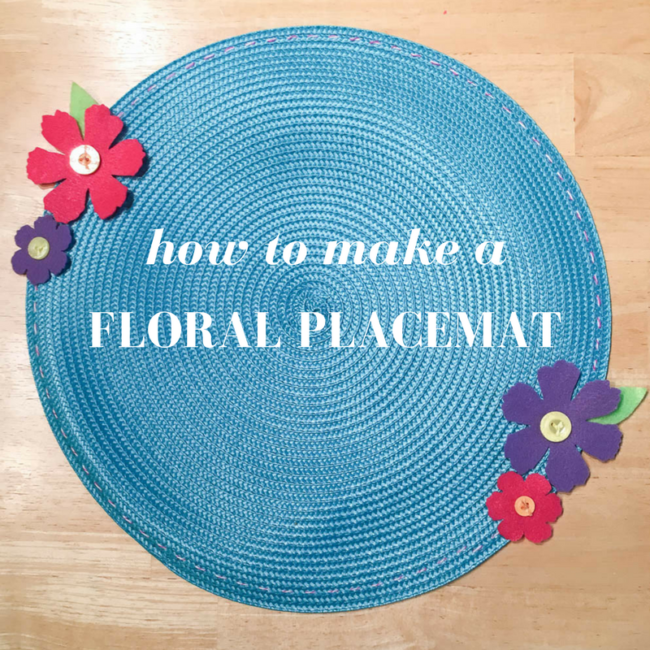
Spring means lots of special occasions! This flower placemat design is great for Easter, Mother’s Day, or for making a birthday girl feel extra special – and it’s super quick and easy to make!
This flower placemat uses supplies from the popular 28 Lilac Lane “Tropical Twist” kit. You can tell that it’s definitely one of my favorites since many of the supplies are used from it! Although the name of this kit, and its themed charms, are definitely summer themed, this project is a great reminder to look at your kits not just as themes but as color palettes as well.
Supplies Needed:
To start making this flower placemat, get out a large needle. Thread it with the baker’s twine from the Tropical Twist kit, and stitch around the outside edge of the placemat. (I recommend doing this is several short lengths to avoid abusing your twine and for efficiency.) To make more than one placemat, use embroidery floss for this step as the kit only contains enough twine for one.
Next, use a flower die to cut flowers out of felt (or hand cut your own). Use scissors to hand cut the leaves.
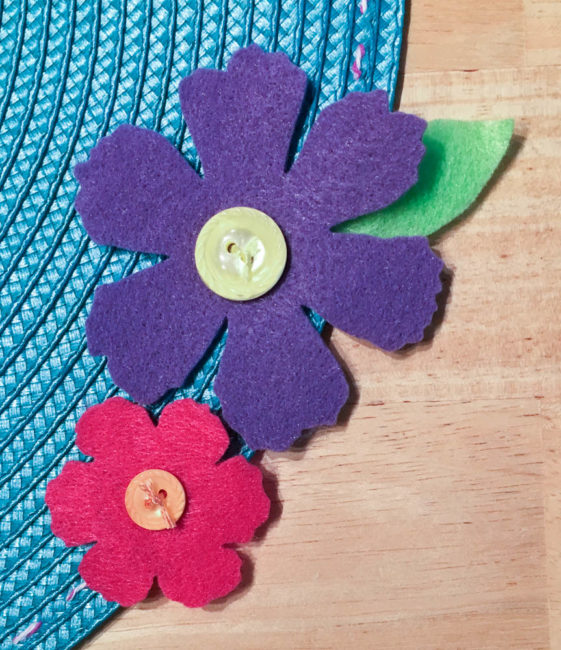
Position your flowers, and select buttons from the Tropical Twist kit to create their centers. Stitch through both the buttons and the flowers with a needle and embroidery floss to attach the flowers to the placemat. Use a needle and thread that matches the felt to stitch the leaves in place under the edges of the flowers as well.

Whether the occasion is Easter, Mother’s Day, or something else…this flower placemat will definitely brighten your spring table!
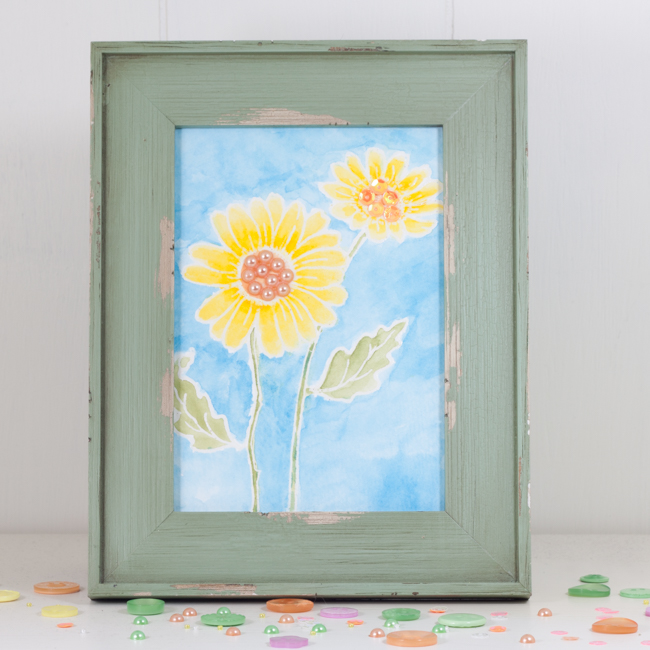
Spring has sprung. Watercolor spring flowers embellished with beautiful touches of 28 Lilac Lane are a perfect home decor project.
Supplies:
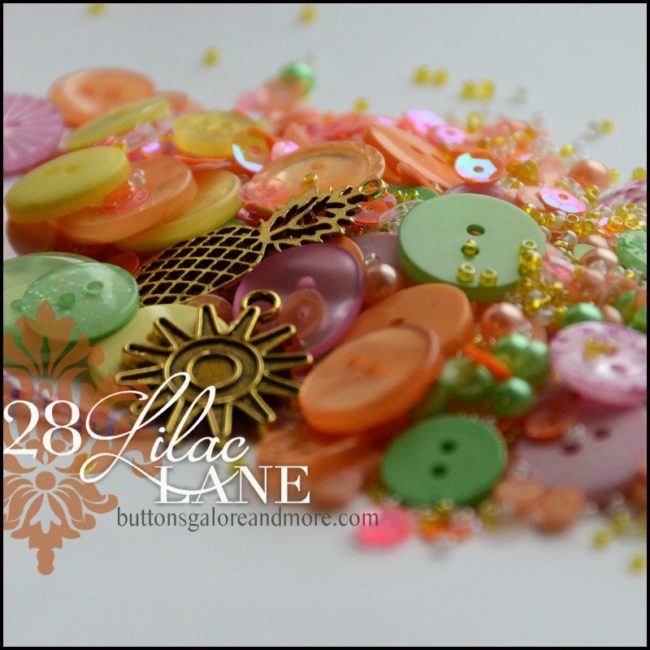
This watercolor spring flowers project uses tangerine colored flat back pearls and sequins from the 28 Lilac Lane “Tropical Twist” embellishment kit. Tropical Twist is a summery blend of yellow, orange and green citrus shades, with some delightful flamingo pink accents! With all of the seed beads, pearls, sequins, buttons, trim and charms, Tropical Twist is sure to have the perfect touch to make your project hot, hot, hot!
This project looks complex but is super easy to make thanks to a shortcut: stamps. To create this design, simply use flower stamp sets to stamp your desired design in clear embossing ink on watercolor paper. Then heat emboss the design with clear embossing powder.
Once the design is embossed, you have a virtually foolproof way of making your own watercolor painting! Simply use a fine detail water brush to color in the design with your watercolors, following the embossed lines as a guide. Any color that gets on the embossed lines can be simply wiped away to keep them clean!
After filling in the design of your watercolor spring flowers, switch to a large water brush to fill in the background with some watery color.
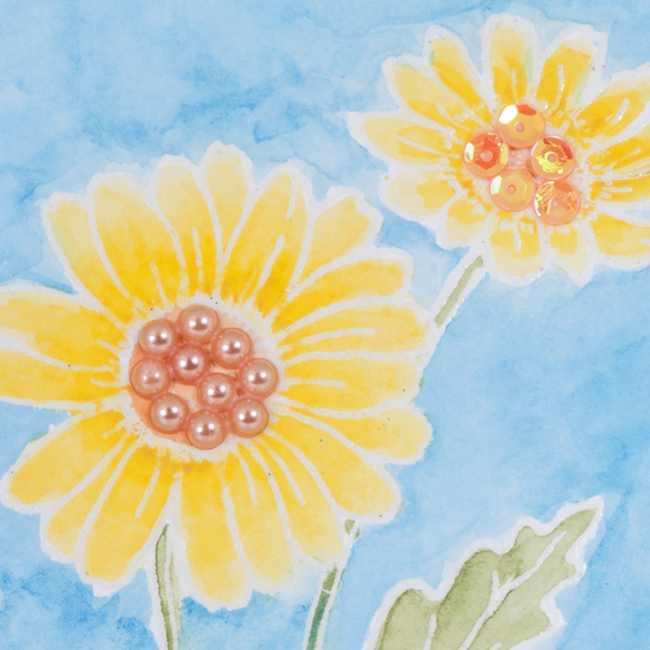
For the finishing touch on your watercolor spring flowers, add some 28 Lilac Lane embellishments to the center of them with a clear drying glue like PPA Matte adhesive. Using flat back pearls or sequins as “tiles” to fill a small area of a design is a great way to get some extra pop on a project. Our kits and embellishment bottles come with plenty of sequins and pearls, so there’s no worry about running out mid-project, either!
This winter has dragged on too long. Get out those watercolors, stamps and embellishments and craft it away with some watercolor spring flowers! (And don’t forget the Tropical Twist, too!)

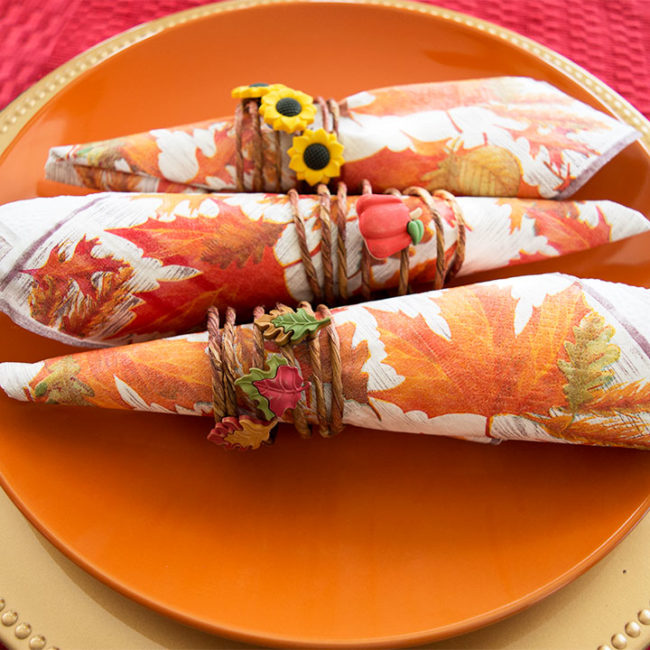
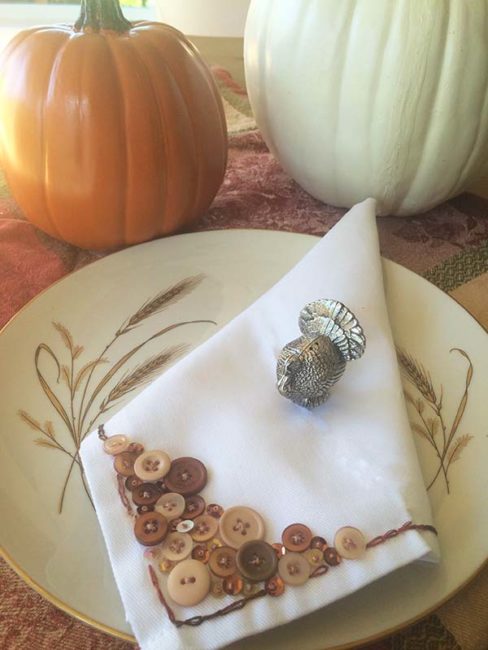
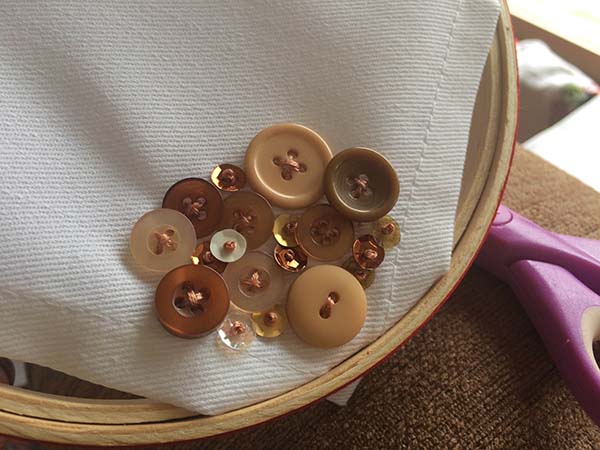
Editor’s Note: Today we welcome back former design team member Laura Bray as a guest designer to share a project for embellished Thanksgiving napkins that are an easy way to make your holiday table beautiful!
Hi Button Lovers! It’s Laura Bray. Some of you may remember me when I was on the design team for Buttons Galore & More. I still use my BGM buttons on my craft projects and I’m so excited about the 28 Lilac line of buttons – the kits and bottles make it so easy to make a pretty, coordinated craft.
It’s almost Thanksgiving, so I wanted to show you how you can turn a plain, cloth napkin into beautiful, boutique-style table décor for the holidays.
Supplies:
Pick a corner to embellish, then begin stitching on buttons of varying sizes and sequins onto the napkin randomly. Not a sewer? You can also use fabric glue!
To clean your napkins, hand wash and try to avoid submersing the embellished corner in water.
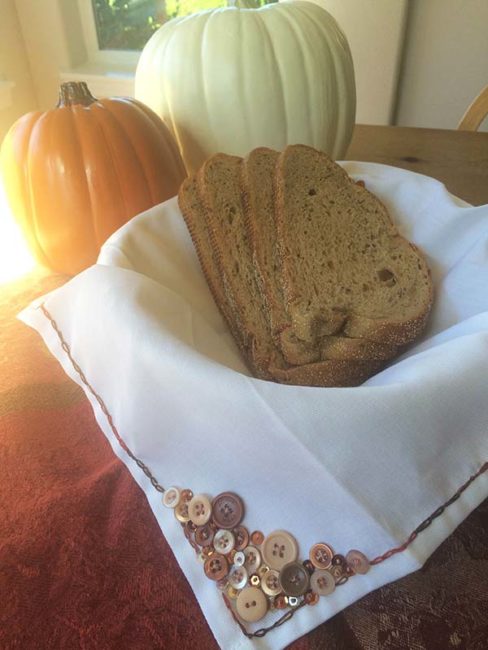
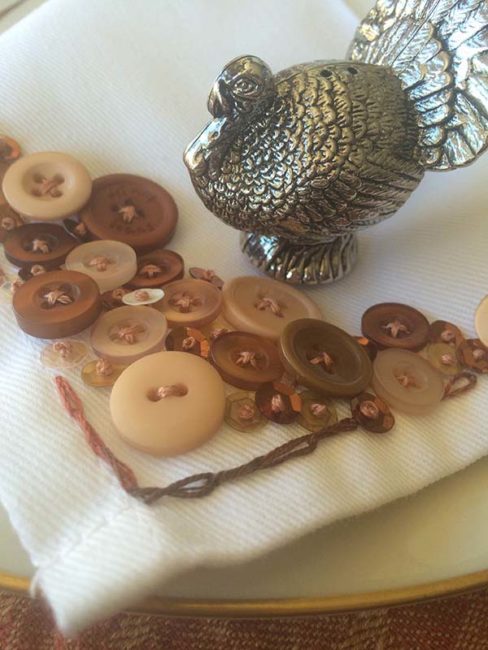
These look so stunning they will probably become family heirlooms!
I’m dreaming of shorter days and weather cool enough to wear sweaters! This summer has been so hot and rough – I’m ready to be done with it! Oh, and it probably has something to do with fall being my favorite season as well.
Today I’ve got a card to share that features my fall inspired Autumn Afternoon embellishment kit from my 28 Lilac Lane line. Here is a look at the finished card:
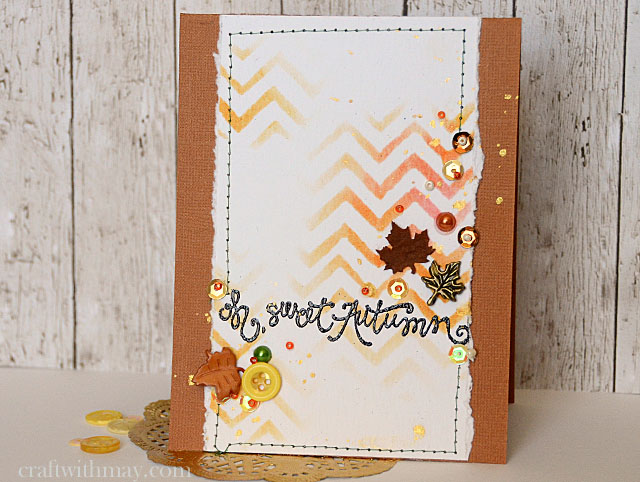
The process to make this card is simple!
It is really that easy!
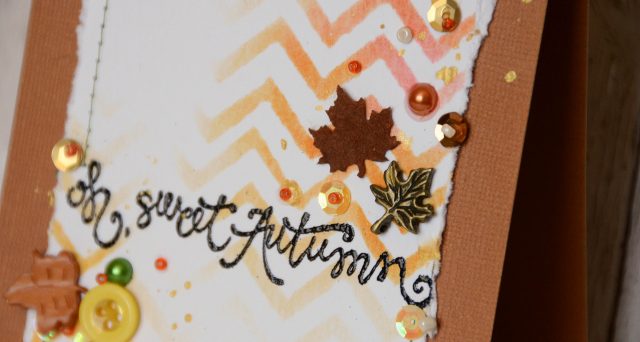
Now I’m back to dreaming of autumn, cocoa, and ending these triple digit days!
Autumn Afternoon isn’t the only fall-themed 28 Lilac Lane kit…don’t miss out on the 28 Lilac Lane Limited Edition Fall Mix that is only available in the Buttons Galore online store! Looking for some inspiration of what to do with my fall limited edition mix? Check out these bloggers! Ashli Oliver, Libby Hickson, Maura Hibbitts, and Rebecca Vick all have outstanding posts up. Enjoy!
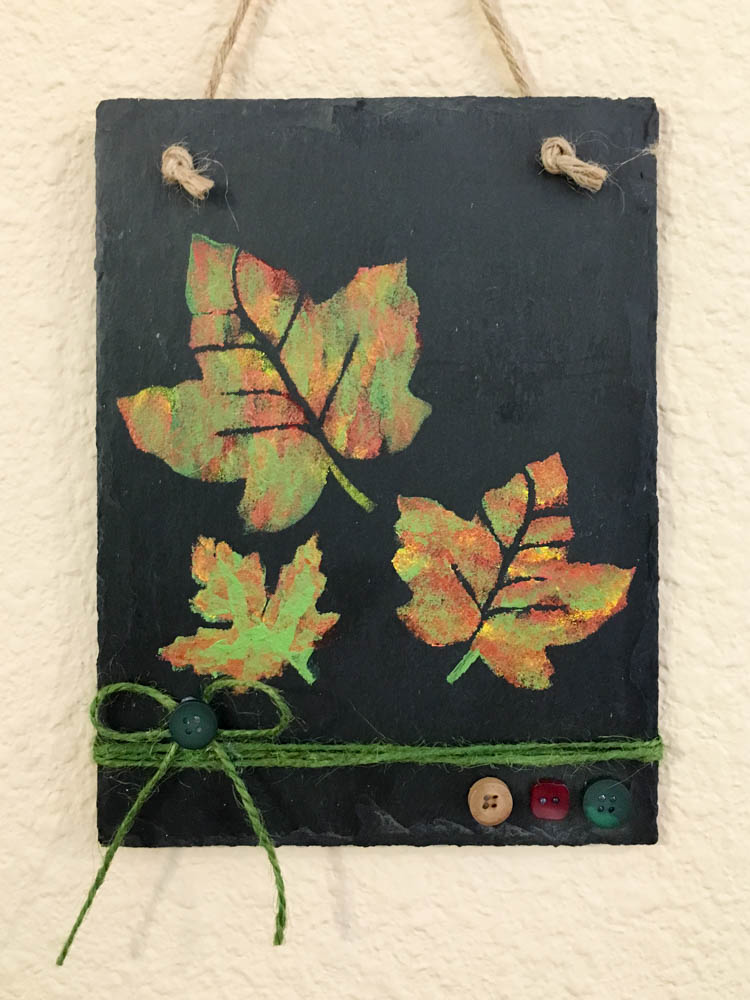
School is starting in many parts of the country, and that means that cooler temperatures – and changing leaves – can’t be far behind! Today’s project is a piece of slate wall decor with painted leaves that will bring fall colors inside so you can enjoy them where it is warm!
Supplies:
(For my paint selections, I used Delta Ceramcoat “Ranchero”, Delta Ceramcoat Select “Light Foliage Green”, Folkart “Cardinal Red” and “Daffodil Yellow”, and Martha Stewart Crafts Metallic Acrylic in “Rust”. But the exact shades aren’t as important as getting a light green, a red, an orange, a yellow, and a metallic.)
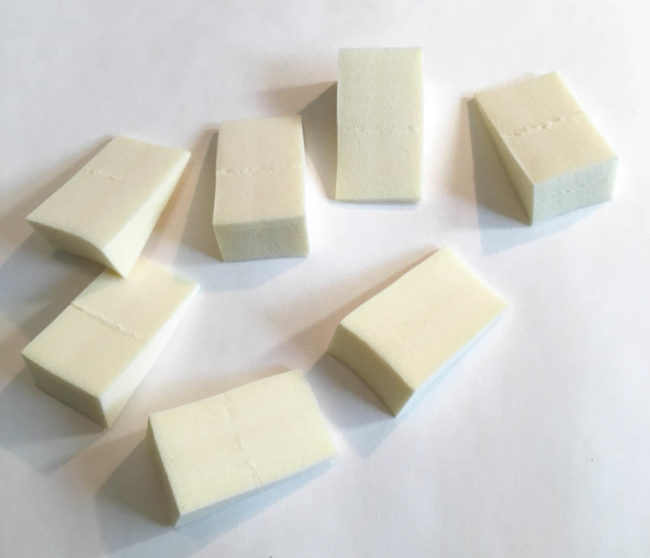
The paint effect looks complex, but the technique is actually really simple. The secret to it is using disposable make-up sponges to apply the paint with a “dabbing” motion, instead of a brush. It’s so simple that even young children can do it!
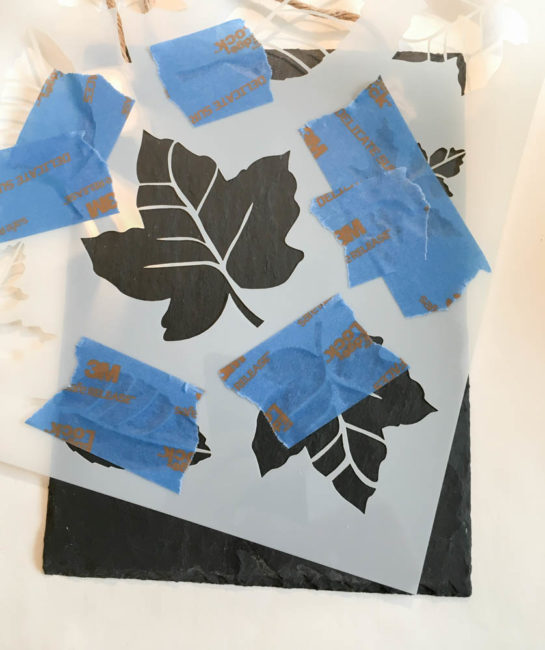
Taping down the stencil, and using tape to cover all of the nearby open areas that I don’t want to paint, helped to ensure that I got a perfect impression from my stencil.
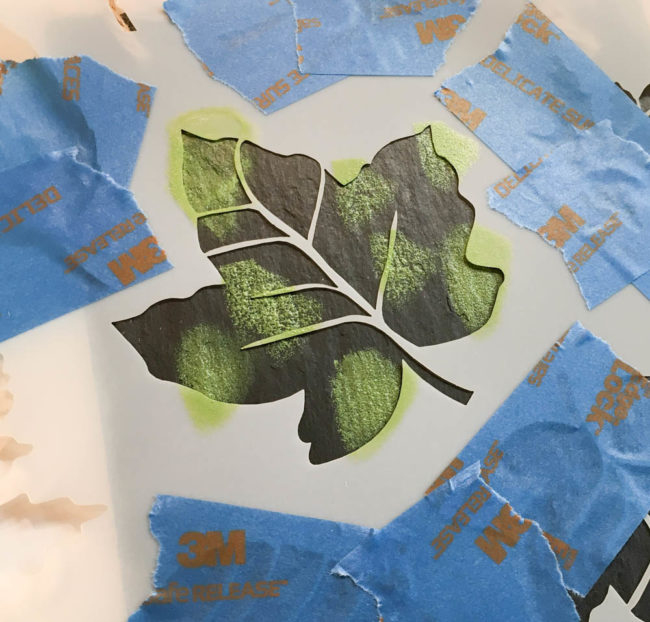
I started with the light green color of paint, using one of the cosmetic sponges. I dabbed one of the end edges of the sponge into the paint, and then dabbed most of the paint off on the palette that I was using. I then used the damp sponge to dab blotches of color onto the stencil. I repeated this process with each color (except the metallic), filling in the whole stencil area.
Then I used the metallic color and dabbed it heavily over the top of the stencil, but not filling in quite completely. I wanted small areas to peek out from underneath. Then I repeated a layer of the light green paint, but not quite as heavily as the metallic.
Sometimes when applying new paint over paint that is still wet your colors might mix and blend a bit. As long as the sponges aren’t too wet, the colors shouldn’t shift too much.
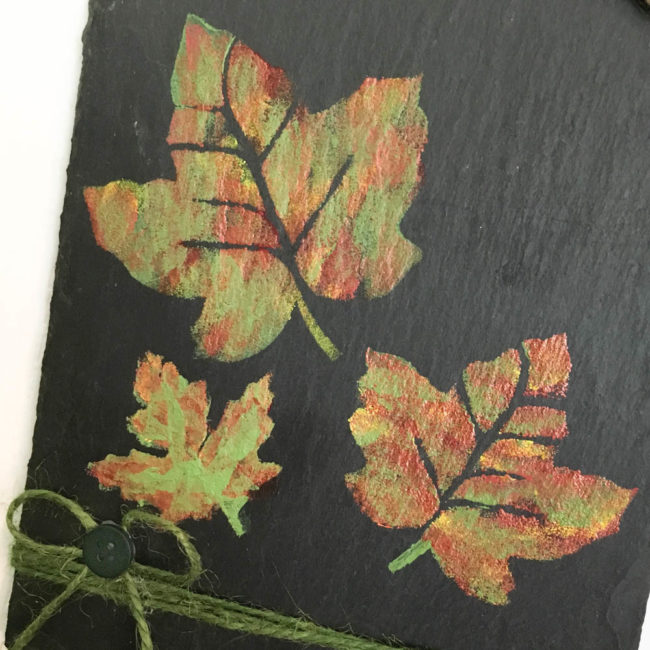
The finished effect will look something like this – a mix of metallic and green with hints of other colors like red and yellow peeking through. Just like with leaves in nature, no two painted leaves will come out the same!
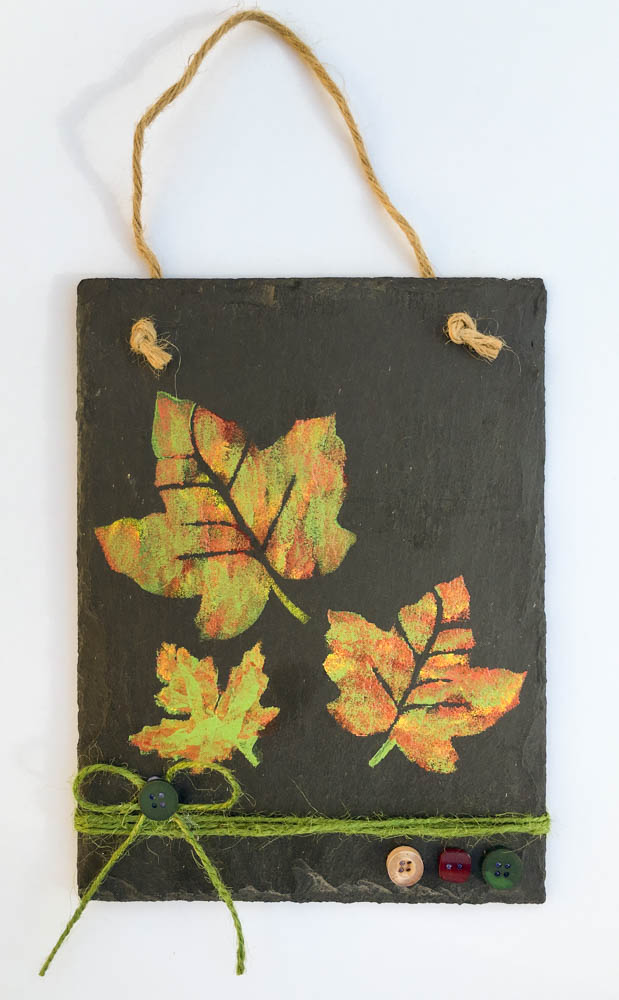
The painted leaves are pretty on their own, but the slate doesn’t really look finished without some dimension on it. I wrapped jute string around the bottom of the slate and secured it on the back with hot glue. The string provides “ground” that the leaves are falling to. Then I made a bow by twisting some string and attached it with some hot glue. I attached a button to hide the hot glue making the bow. Buttons are great concealers for glue and seams! Then, finally, in the bottom corner, I attached three more buttons. I like the repetition of the three leaves as three buttons for balance, and it provides a visual anchor for the other end of the string.

The buttons I used are from our “Argyle” Button Tote. With deep reds and greens, trendy navy, and neutral cream and black, the Argyle mix is a great selection to have in your creative toolbox for the holidays in the last part of the year! What will you use Argyle for?
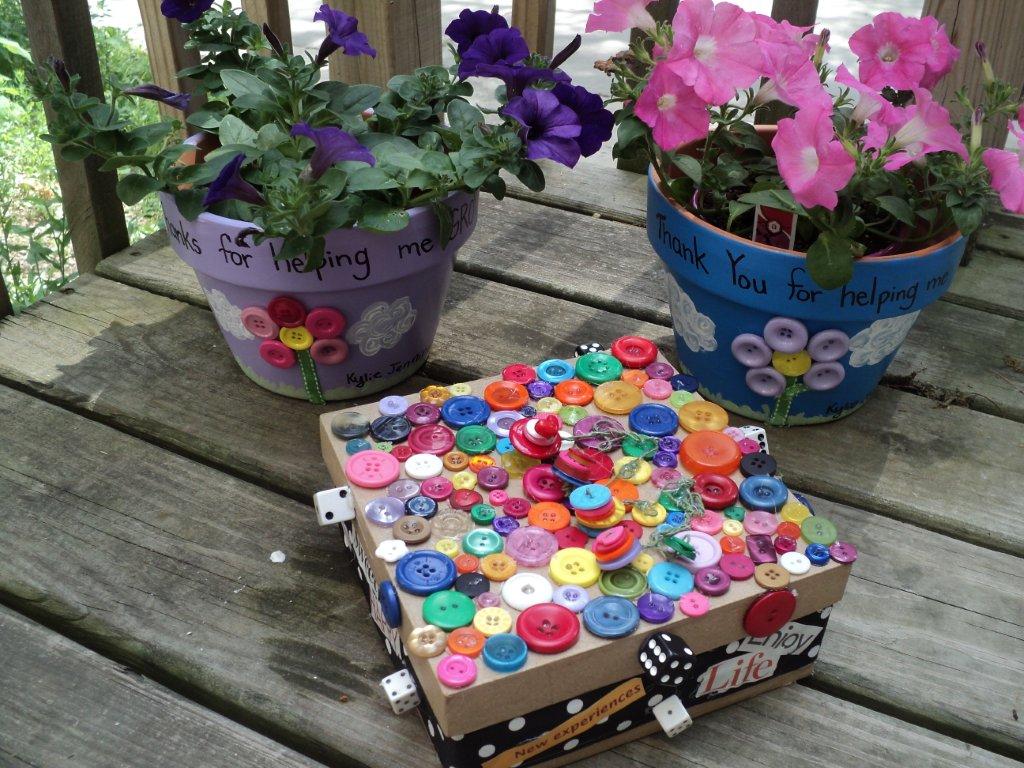
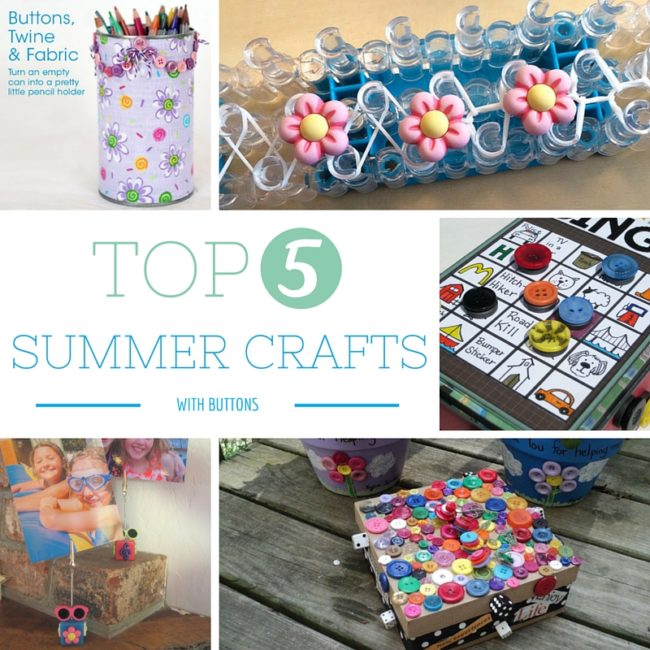
July means hitting the beach, blooming gardens – and stir crazy kids bored with all their summer vacation free time! Here’s our top five ideas for kids crafts projects to turn bored kids into busy kids!
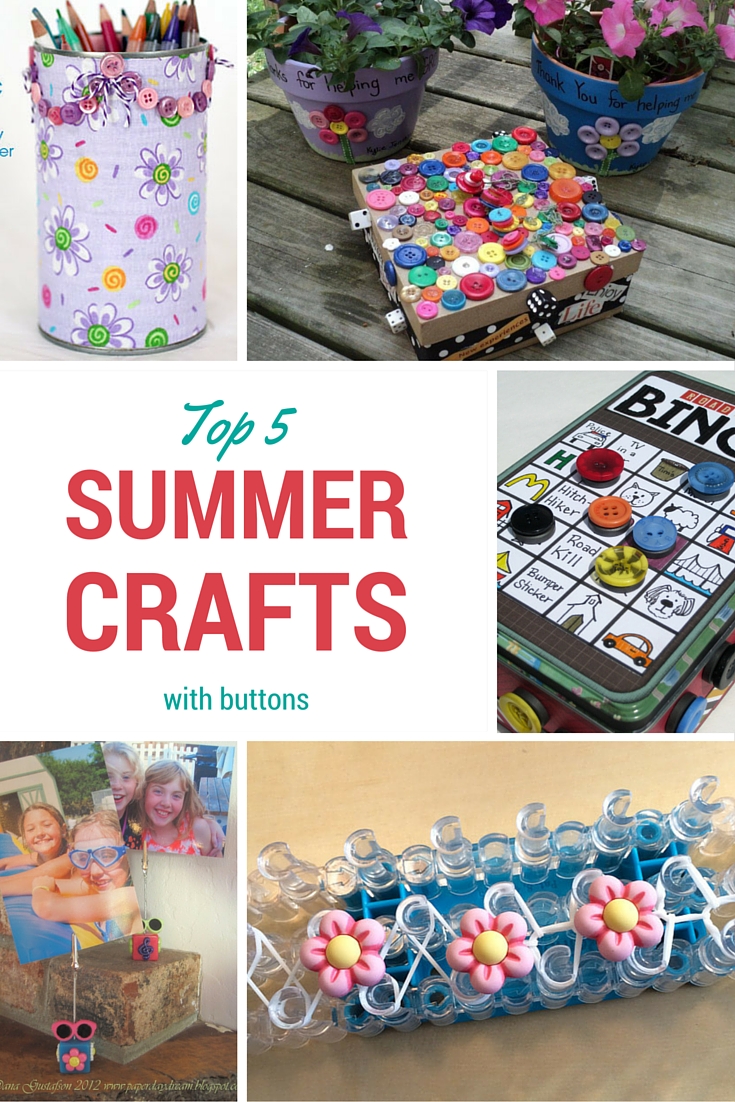
This project is great for even the youngest of kids! This button covered treasure box is an easy to make project using blank paper board boxes available in local craft stores. For the young ones, simple shapes like rectangles and square boxes are available. Older kids may want to try their hand at more challenging shapes like stars, or circles. To keep the kids busy for longer, let them add a coat of acrylic paint as a base before adding on their buttons.
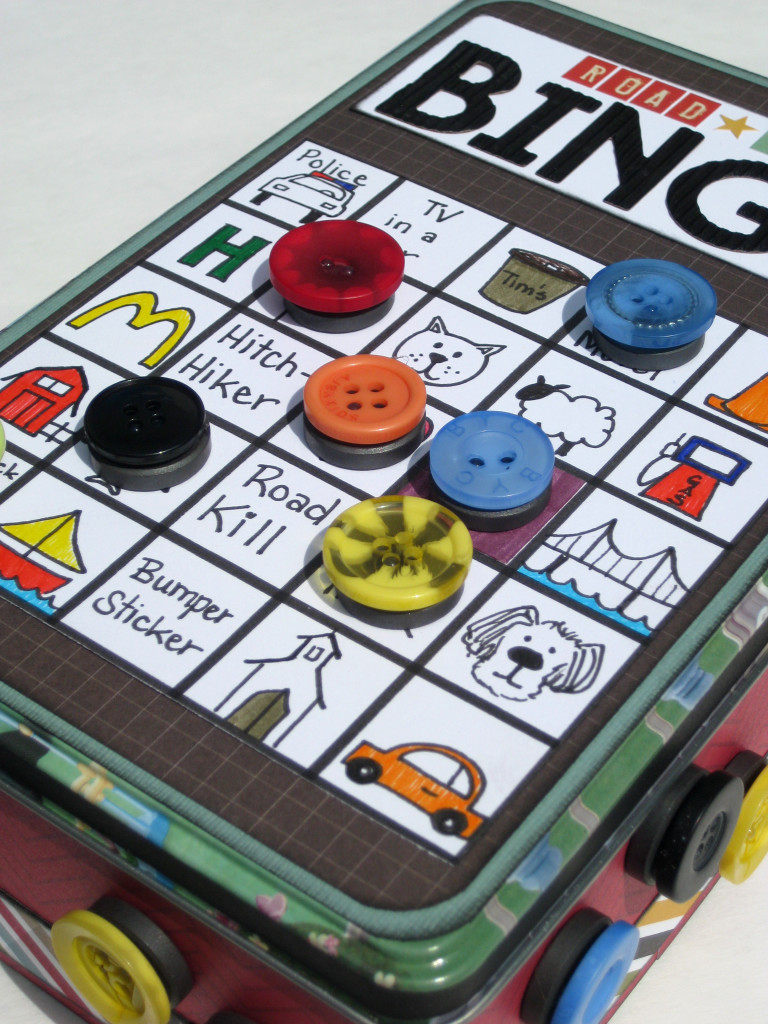
If you are worried about hearing hours of “are we there yet?” from the back seat, Road Trip Bingo may be the answer for you! Let the kids make their tin themselves before the trip, or surprise them in the car. To keep the kids from fighting over whose markers are whose, use a different color for each set (or use 3D buttons to create fun themed sets). Don’t forget to pack a stash of a few extra markers in case of lost ones!
This project will remind the kids to make the most of the last of their summer vacation by having them get ready for back to school! An upcycled can turned into a pencil holder makes a useful decoration for a homework desk, or a fun kid-made teacher gift. If you don’t have any fabric scraps, use contact paper or gift wrap for this easy project.

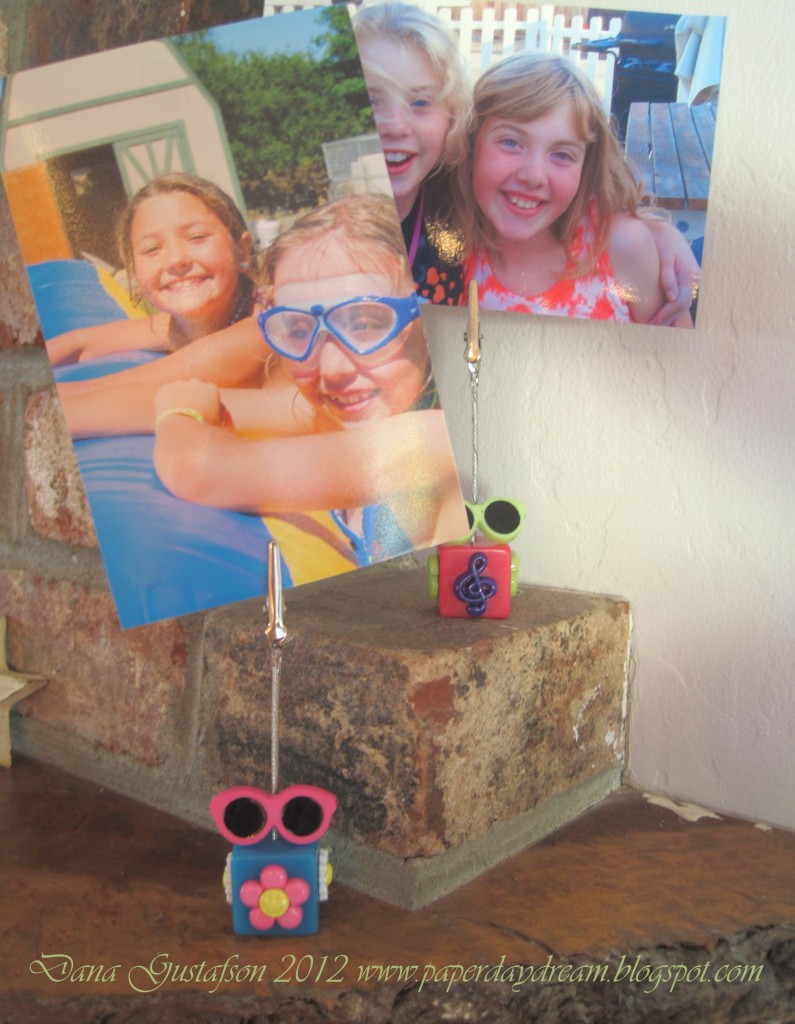
Dollar stores are a great place to find an endless supply of simple items just waiting to be made beautiful. These basic photo clips, paired with a package of 3D buttons, can be easily turned into a fun themed display for favorite photos from any occasion with our wide range of shank buttons.
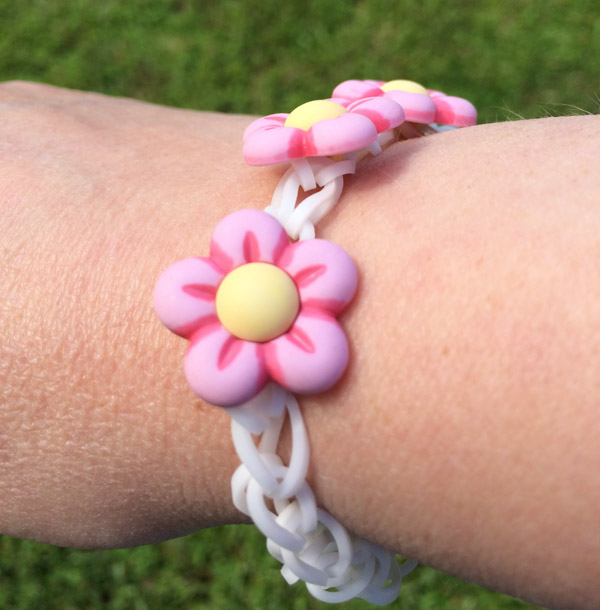
Thanks to the rubber band bracelet craze, many kids have a rubber band loom stashed that they’ve gotten bored with. Bring new life to that old crafty friend of theirs by showing them how to use 3D shank buttons to make charm bracelets! Use themed buttons to make bracelets for special occasions, or use basics like flowers for every day wear! (This project also makes a fun take home activity for a girls birthday party or sleepover!)
These are just a few of our favorite kid crafts for summer! For even more, ideas of great projects to keep kids busy (and learning) with crafts, visit the Kids Crafts section of the blog.
Welcome to the 28 Lilac Lane blog hop on the Buttons Galore blog! Let’s make some spring flowers! Make sure that you stay until the end today for the giveaway!

Spring has us all thinking of flowers! But in some areas they aren’t blooming yet, or we may not be able to have them in the house due to allergies.
The solution is simple…fabric and buttons! 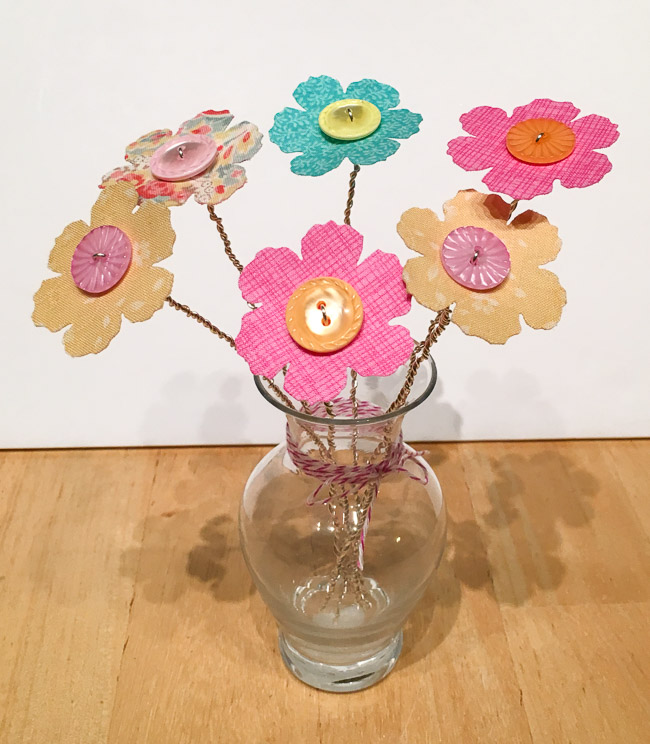
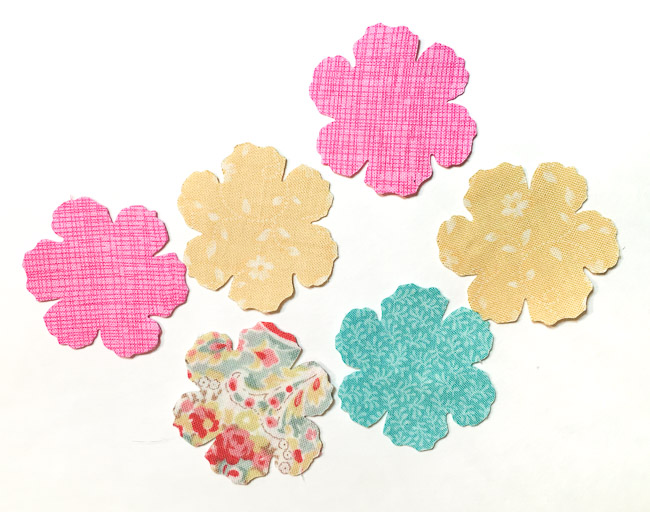
This project starts with fabric and interfacing. Iron heavy-duty iron-on interfacing to the back side of a small fabric scrap. Then, wrong sides together, iron another fabric scrap to the back side of it. This will create a double-sided piece of fabric, with the interfacing in the middle to stiffen the fabric.
Run the fabric through your die cutting machine to make flowers. Repeat with several different fabric scraps. If you don’t have scraps that will work for this project, visit your local quilt or sewing store and check out their fat quarter inventory for suitable fabric. Small prints work best for this project.
Select a large button to coordinate with each of your spring flowers. With a piercer or large needle, poke holes through the flower where the button’s holes are.
Cut a length of the German Style wire about twice the desired stem length and fold it in half. Poke one end through each of the button’s holes and the flower and pull to snug the loop down on top of the button. Begin twisting the wire together under the flower. Continue until you reach the desired stem length and clip off the wire ends.
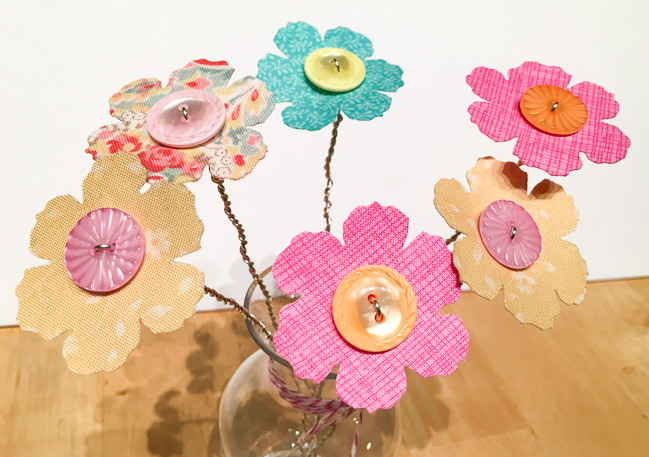
Arrange your spring flowers in a vase, and for the finishing touch wrap baker’s twine around the neck and tie a pretty bow!
Supplies:
Don’t miss the other stops on the blog hop:
To celebrate this blog hop, Buttons Galore is giving away a fabulous 28 Lilac Lane prize! One lucky winner is going to win two 28 Lilac Lane embellishment kits, an embellishment bottle, and a sequin tin – and the best part is that it is winner’s choice!
To enter, comment below and tell us which of the 28 Lilac Lane embellishment kits is YOUR favorite! This giveaway is open until Midnight pacific time on Sunday, April 24th. One entry per person, and only U.S. mailing addresses are eligible to win.
Thanks for visiting the blog hop and good luck! If this is your first visit to the blog, please make sure to subscribe to the blog and follow our Facebook, Instagram, Twitter, and Pinterest!
Old man winter has been really reluctant in some parts of the country (including at the Buttons Galore warehouse) to pack it up and head back to the arctic where he belongs! So today we thought we’d share on the blog a round-up of some of our favorite spring projects to remind everyone that spring is coming after all!
This fun project will brighten up any decor and bring the cheer of spring inside – even if Mother Nature isn’t cooperating outside. And the only tool required is a glue gun!
This gorgeous frame project could be used to house a favorite picture, or a favorite seasonal quote. It’s perfect for nursery decor, or a craft room!
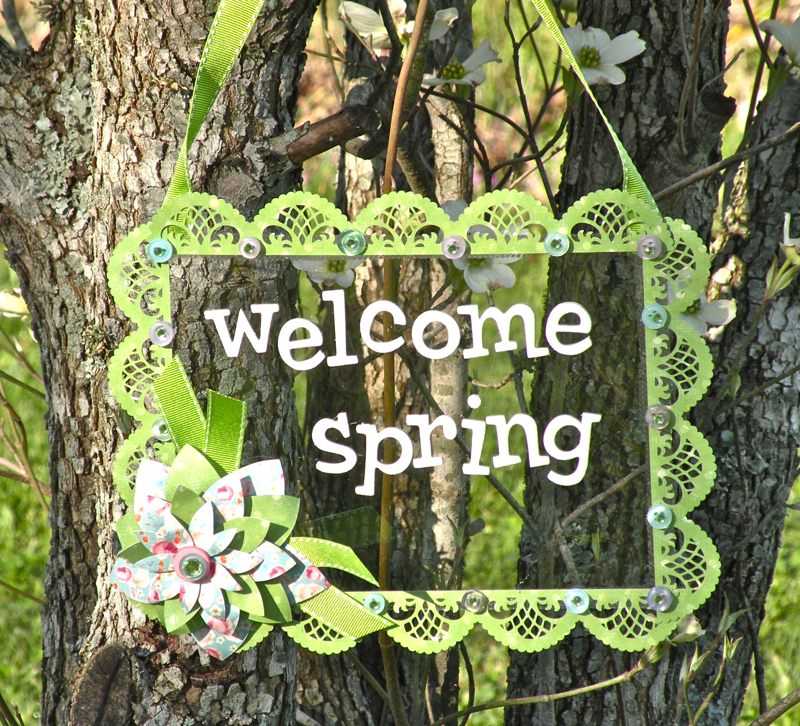
This sign says it all for those who are ready to be done with winter…”welcome spring”. This light and airy look can be made in a variety of spring colors, or the text could be changed out with a child’s name for nursery decor too!
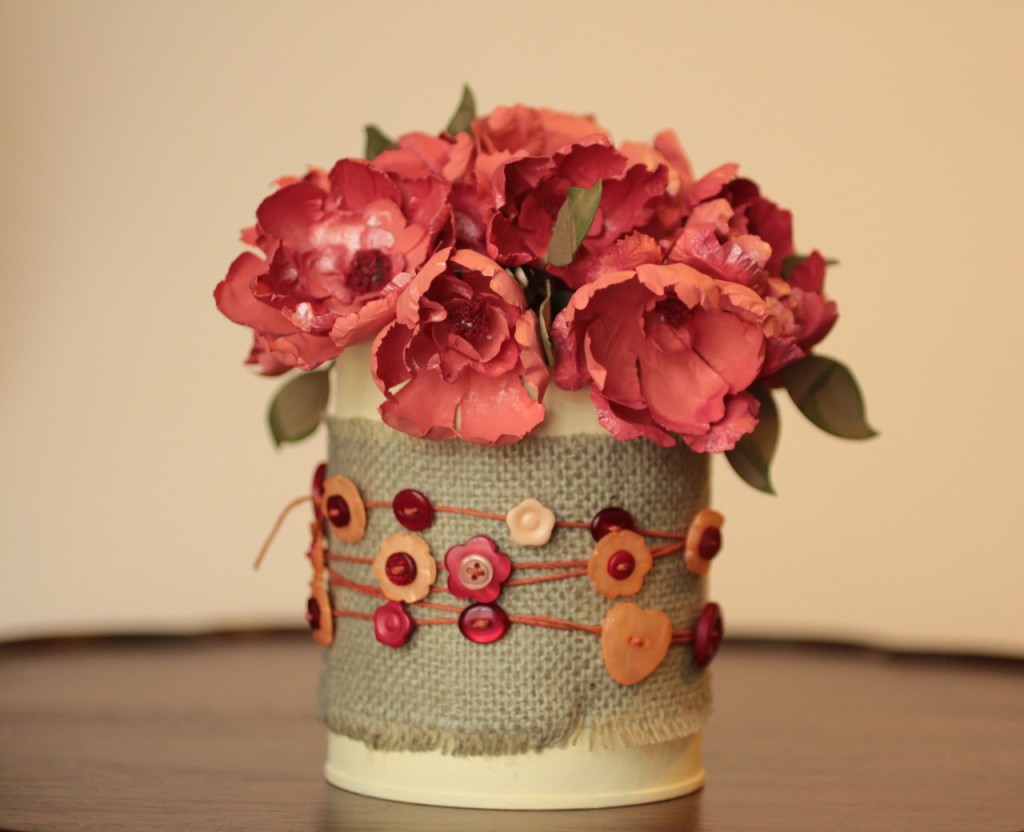
When there is no flowers outside yet, just make your own! This spring project brings the spring cheer and is environmental too, as it upcycles a tin can for the beautiful container the holds the handmade flowers.
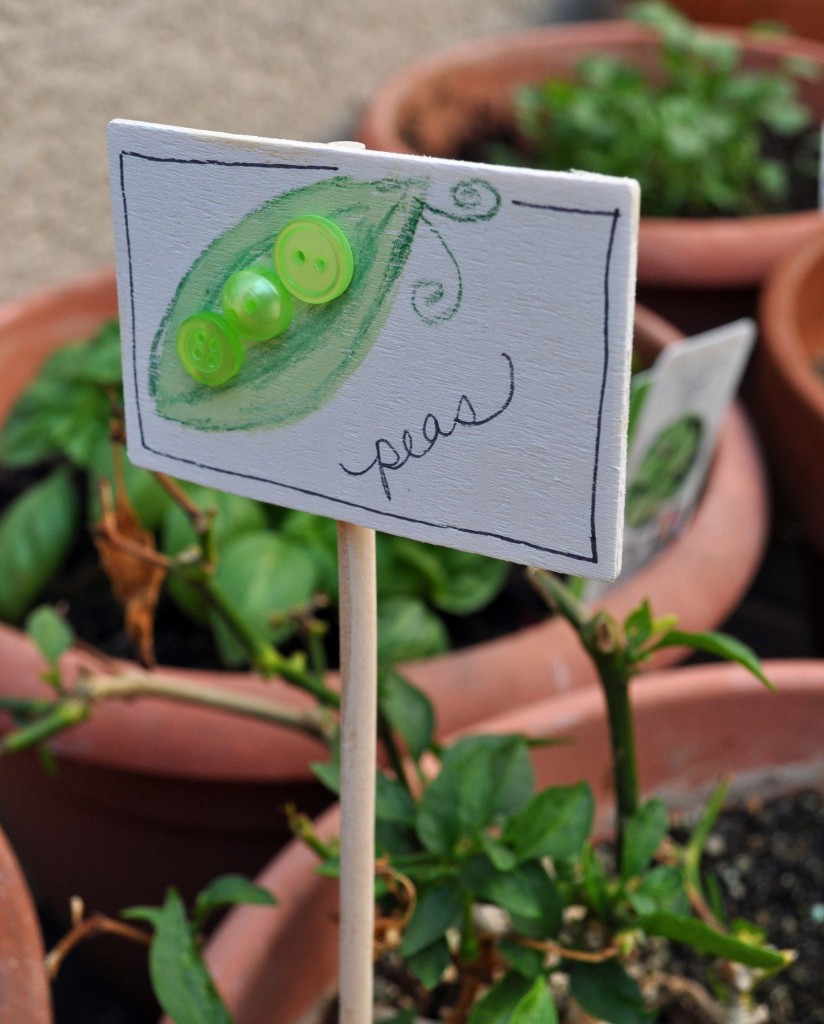
Spring time means gardeners everywhere are dreaming of abundant summer garden harvests, and planting pots of seeds to get a head start on the growing season. These adorable garden markers will help you remember what that little green sprout in that pot is – peas? corn? beans? – before it makes its way out to be planted in the garden.
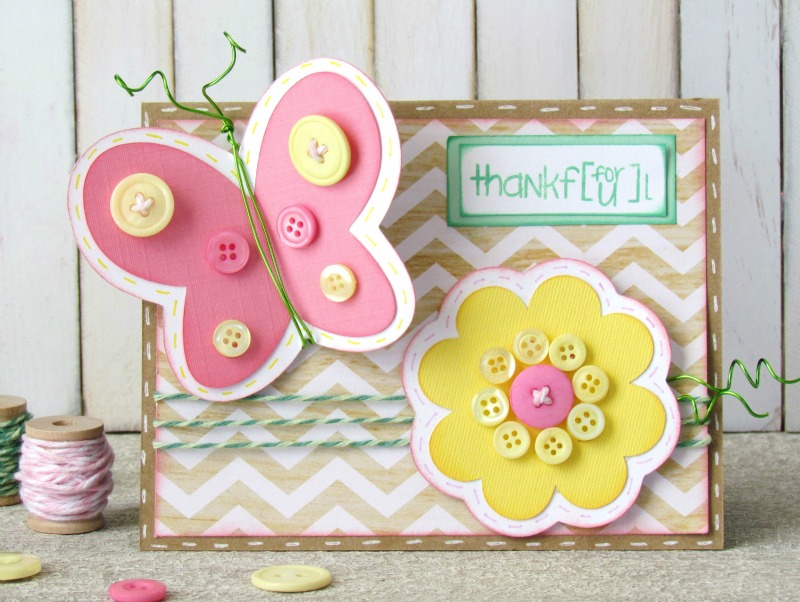
If spring has you feeling in the mind to spread some good cheer, some button embellished flowers and butterflies may be just the way to do it! This quick and easy card will put a smile on someone’s face for sure!
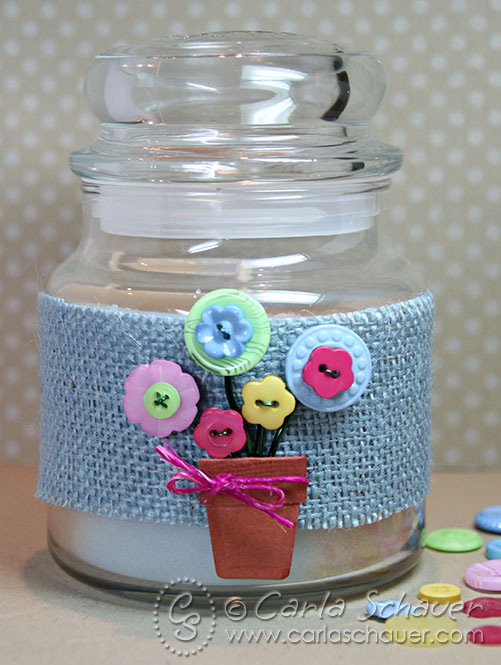
Although it is shown on a candle jar, this spring floral mason jar project could be used for a variety of uses – even storing your buttons in your craft room! With a few color changes (such as natural burlap) it could work with any decor, too. Your creativity is the limit!
And now for the giveaway!
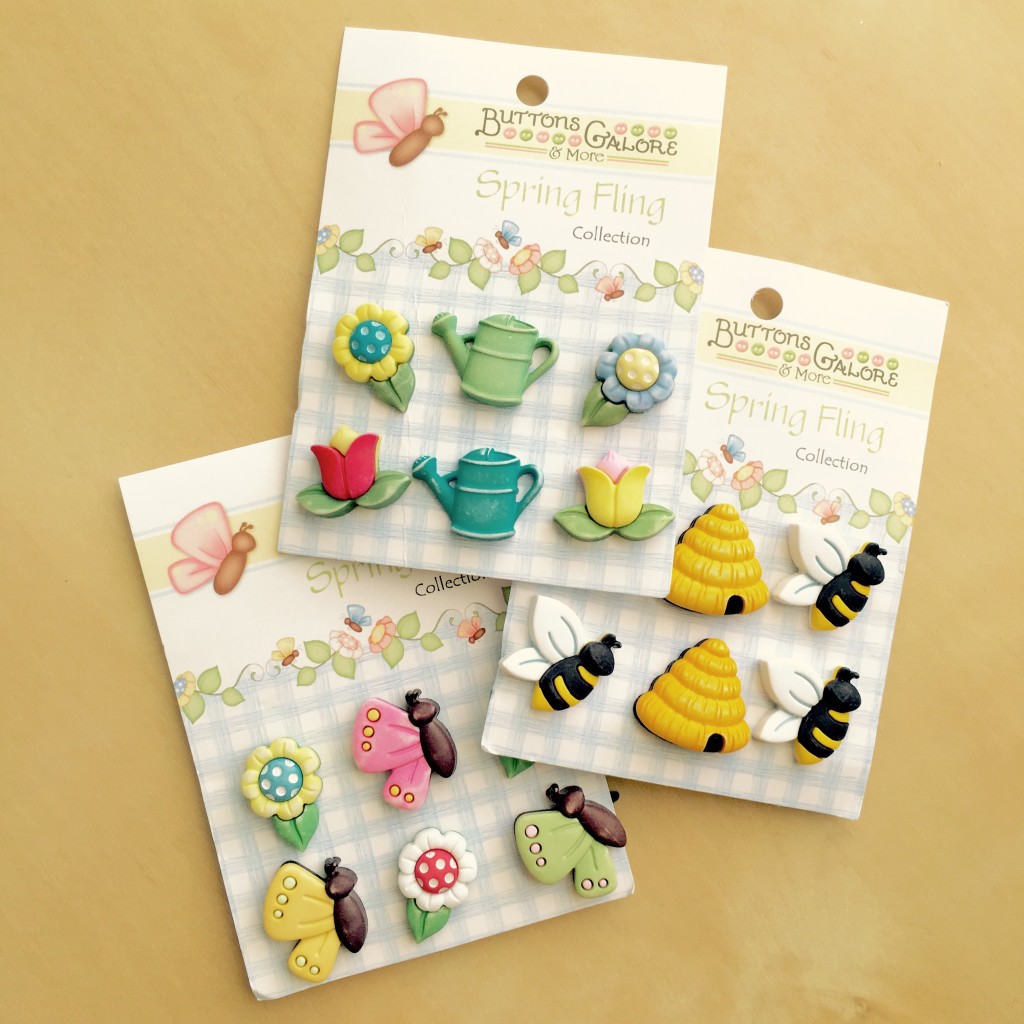
One lucky blog reader is going to win a spring button prize package of a random assortment of our Buttons Galore Spring Fling 3D buttons (a sampling of the collection is shown above) that is worth $20 retail! That will make plenty of great spring projects for the lucky winner!
How To Enter The Giveaway: Leave a comment below telling us which one of the spring projects that we shared here you liked the best! A random winner will be chosen from all comments left before midnight U.S. pacific time on Sunday, April 17th. One entry per person. Giveaway open to U.S. residents only.
Hello there!
Ashli Oliver here with you today to share a super easy mixed media card with big impact!
After swiping on white acrylic paint and drizzling liquid glue on top, I simply stuck lots of little goodies in. The key to making this work is sticking your buttons, sequins, and pearls into your painty goodness while everything is still wet!
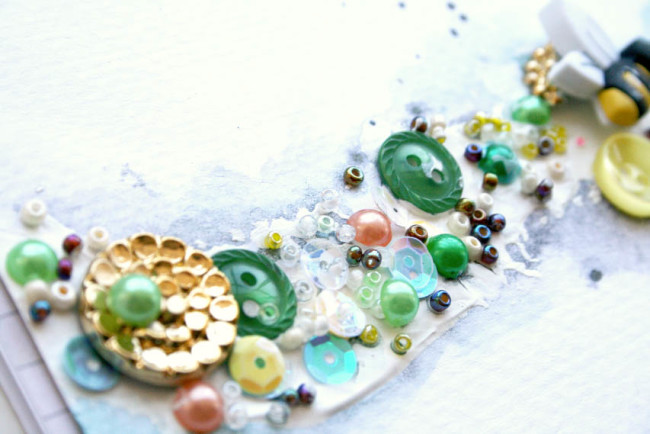
Don’t be afraid to get paint on your embellishments… that is half the fun, after all!
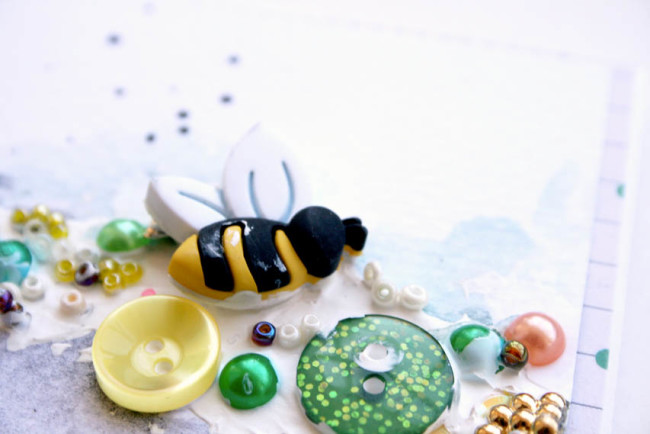
I used a three dimensional Bee Button, goodies from the Antique Tin set, and plenty of the amazing 28 Lilac Lane Collection!
TIP: Did you know that many buttons can be cut in half? That’s right! Using my Tim Holtz scissors, I cut one of the gold Antique Buttons right in half so that I could add it to the edge of my card and tuck the other piece behind my bee!
What a great way to stretch the stash too!
Oh, and of course… I also used those same scissors to cut the backs off of any buttons so I could adhere them to my card.
Once my embellishments were set in, I simply let the paint dry overnight. Then, I added in some watercolor and mist droplets. A piece of patterned paper layered behind the card front finishes this card off!
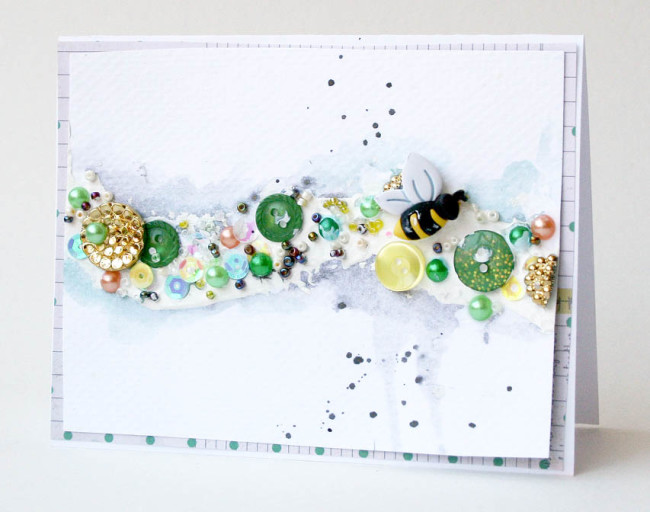
Super fun and a great card for spring! In fact, I think this will serve as a Mother’s Day card around here as my mother loves bees!
Thanks for stopping by today!
Supplies Used:
 Ashli Oliver (aka soapHOUSEmama) lives with her husband and four girls, age 10 and under, in a suburb of Atlanta, Georgia. Ashli is a recovering graphic designer and when she is not busy homeschooling her kiddos, you can find her drinking copious amounts of coffee while playing with paint and pretty paper in her studio. Not only does Ashli love documenting her family’s memories, but she finds great joy in the creative process… which, in her case, usually involves lots of messy, painty fun!
You can find Ashli, and her work, at her Website, YouTube, Instagram, and Classes.
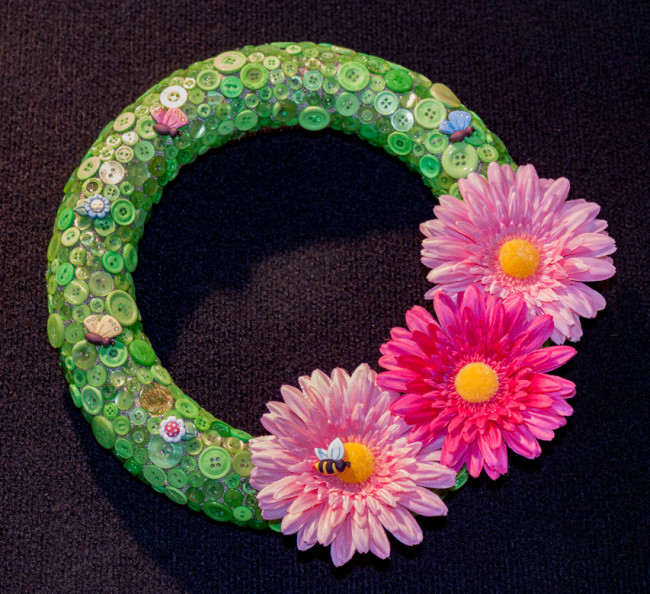
Do the dark days of February have you longing for spring? My spring button wreath project will put a little touch of spring green and flowers inside on your walls – no matter what the weather outside!
To create this project, you’ll need the following supplies:
Begin by wrapping the foam wreath in the burlap ribbon. The ribbon I chose is thin – more like fabric than canvas – which makes for smoother wrapping of the wreath and a better surface to serve as the base for the buttons. Secure the ribbon ends with floral greening pins. It may take several rolls of ribbon to complete the entire wreath.
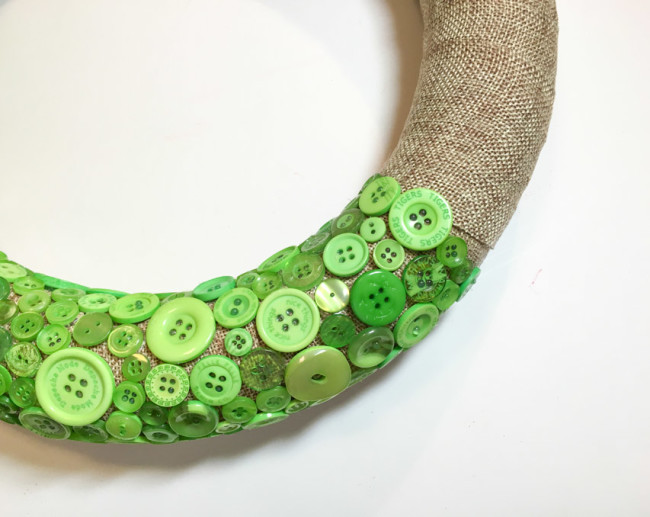
The next step is to use hot glue to start adhering buttons on the wreath. Working in small sections, lay down hot glue and then arrange buttons in it. I highly recommend using a protector (like the hot glue gun finger protectors make by Plaid) when you are pushing the buttons down to avoid burning yourself. Handle hot glue guns with care – even so-called low temperature hot glue will burn!
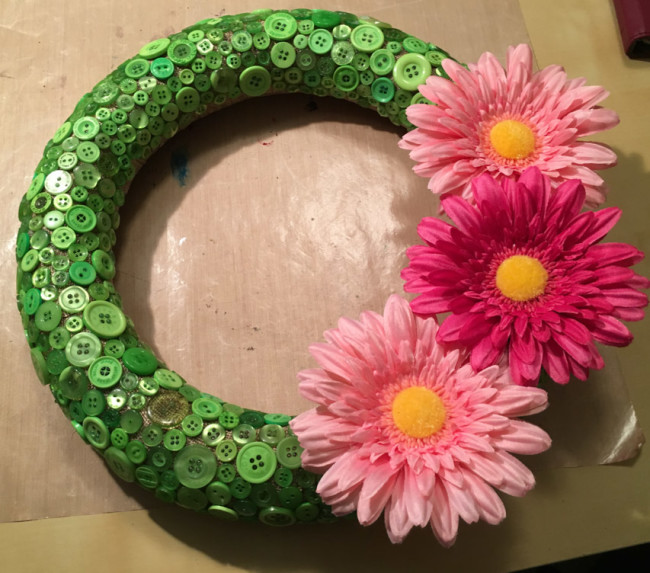
Once the buttons are all in place, trim the stems off of three spring floral blooms. Use hot glue to adhere them onto the wreath.
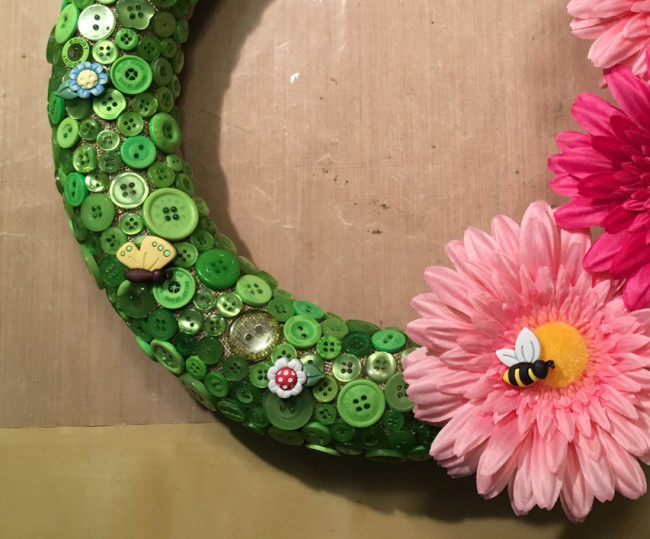
Cut the stems off of the Spring Fling buttons, and using hot glue, adhere them scattered around the wreath. Don’t forget to add a bee on one of the flowers!
Hang your wreath on the wall with a wire, a wreath hanger, or with a ribbon and nail – and then sit back and enjoy the spring!
Utilizing basic supplies and everyday items in my crafting, and finding usefulness in even the simplest things is something I enjoy tremendously. With a few beautiful caramel buttons, some ink, and a little creativity I quickly came up with a fun card design that is perfect for any season.

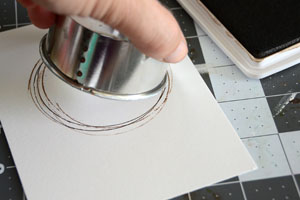
Step 1: Take a circle object such as a cookie cutter or cup and tap with black ink. “stamp” onto your paper several times, creating a wreath shape. Repeat with brown ink.
Tip: Roll the cookie cutter or disposable cup around instead of stamping flat. This will give you more control of your lines.
Step 2: Use scissors to cut out leaf shapes and color with green watercolor or ink. Place these in three spots along your wreath, and add small caramel buttons as well. At this time you should also cut out a ½” high strip of cardstock for your sentiment, and notch the ends to fit.
Tip: instead of handwriting you could use a computer font or alphabet stamps.
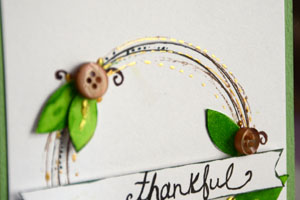
Step 3: Add the finishing touches to your card. Ink the edges of the sentiment banner, add some gold paint or ink to highlight the circle shape and around your buttons, and add any other details you would like.
Tip: Want even more: Use a pen to add flourishes and dots, as I did here with a brown pen.
When it comes to Thanksgiving I don’t do a lot of home decorating, but I do enjoy creating cards for a few special people. This card is a lot of fun to make with fabric scraps, though using patterned paper would work just as well. The harvest Button Bonanza bag is perfect for all your fall crafting needs and just screams Thanksgiving to me.
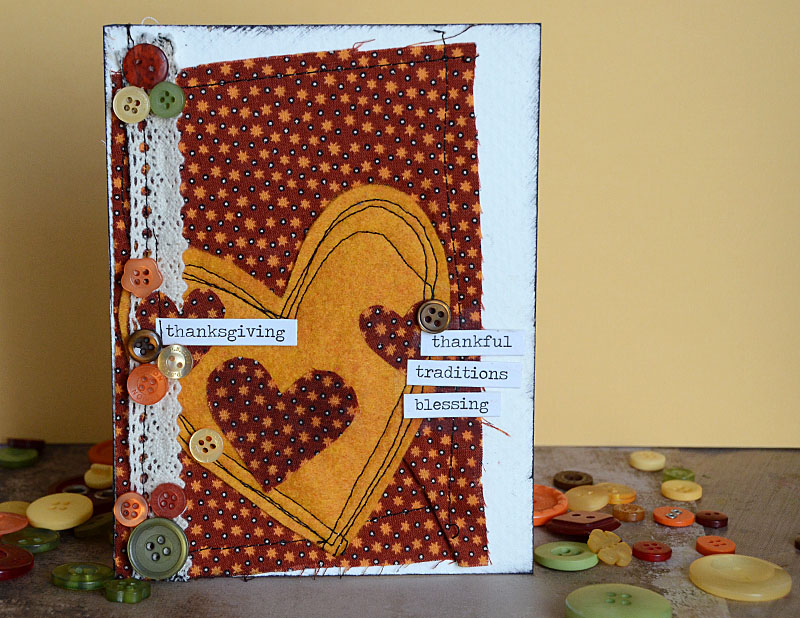
Supplies Needed: Felt, fabric with iron-on backing, word stickers, thread (hand or machine stitch), liquid adhesive, and harvest Button Bonanza bag
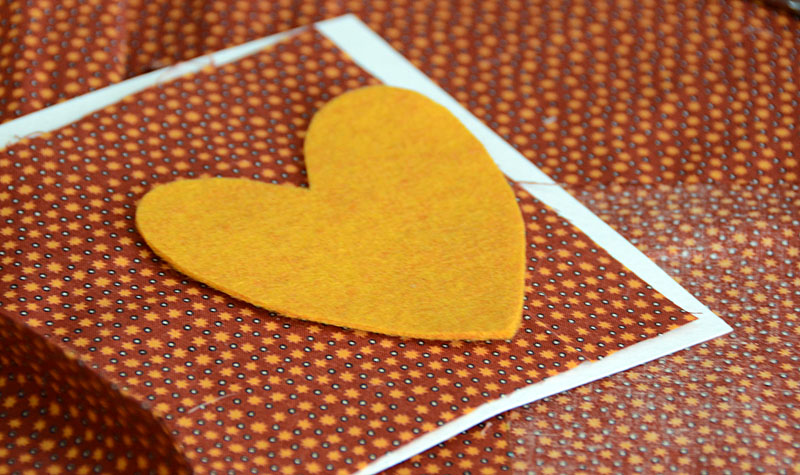

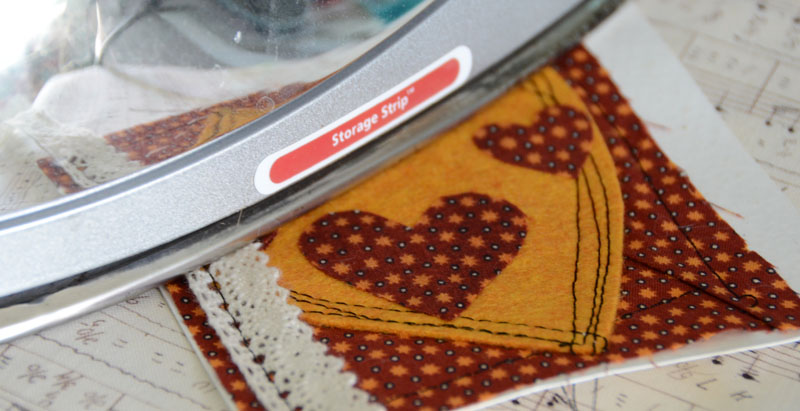
Beyond Thanksgiving, this simple card would be great for any holiday or occasion – and is a lot of fun to make! Don’t forget that you can create this design with either fabric or patterned paper.
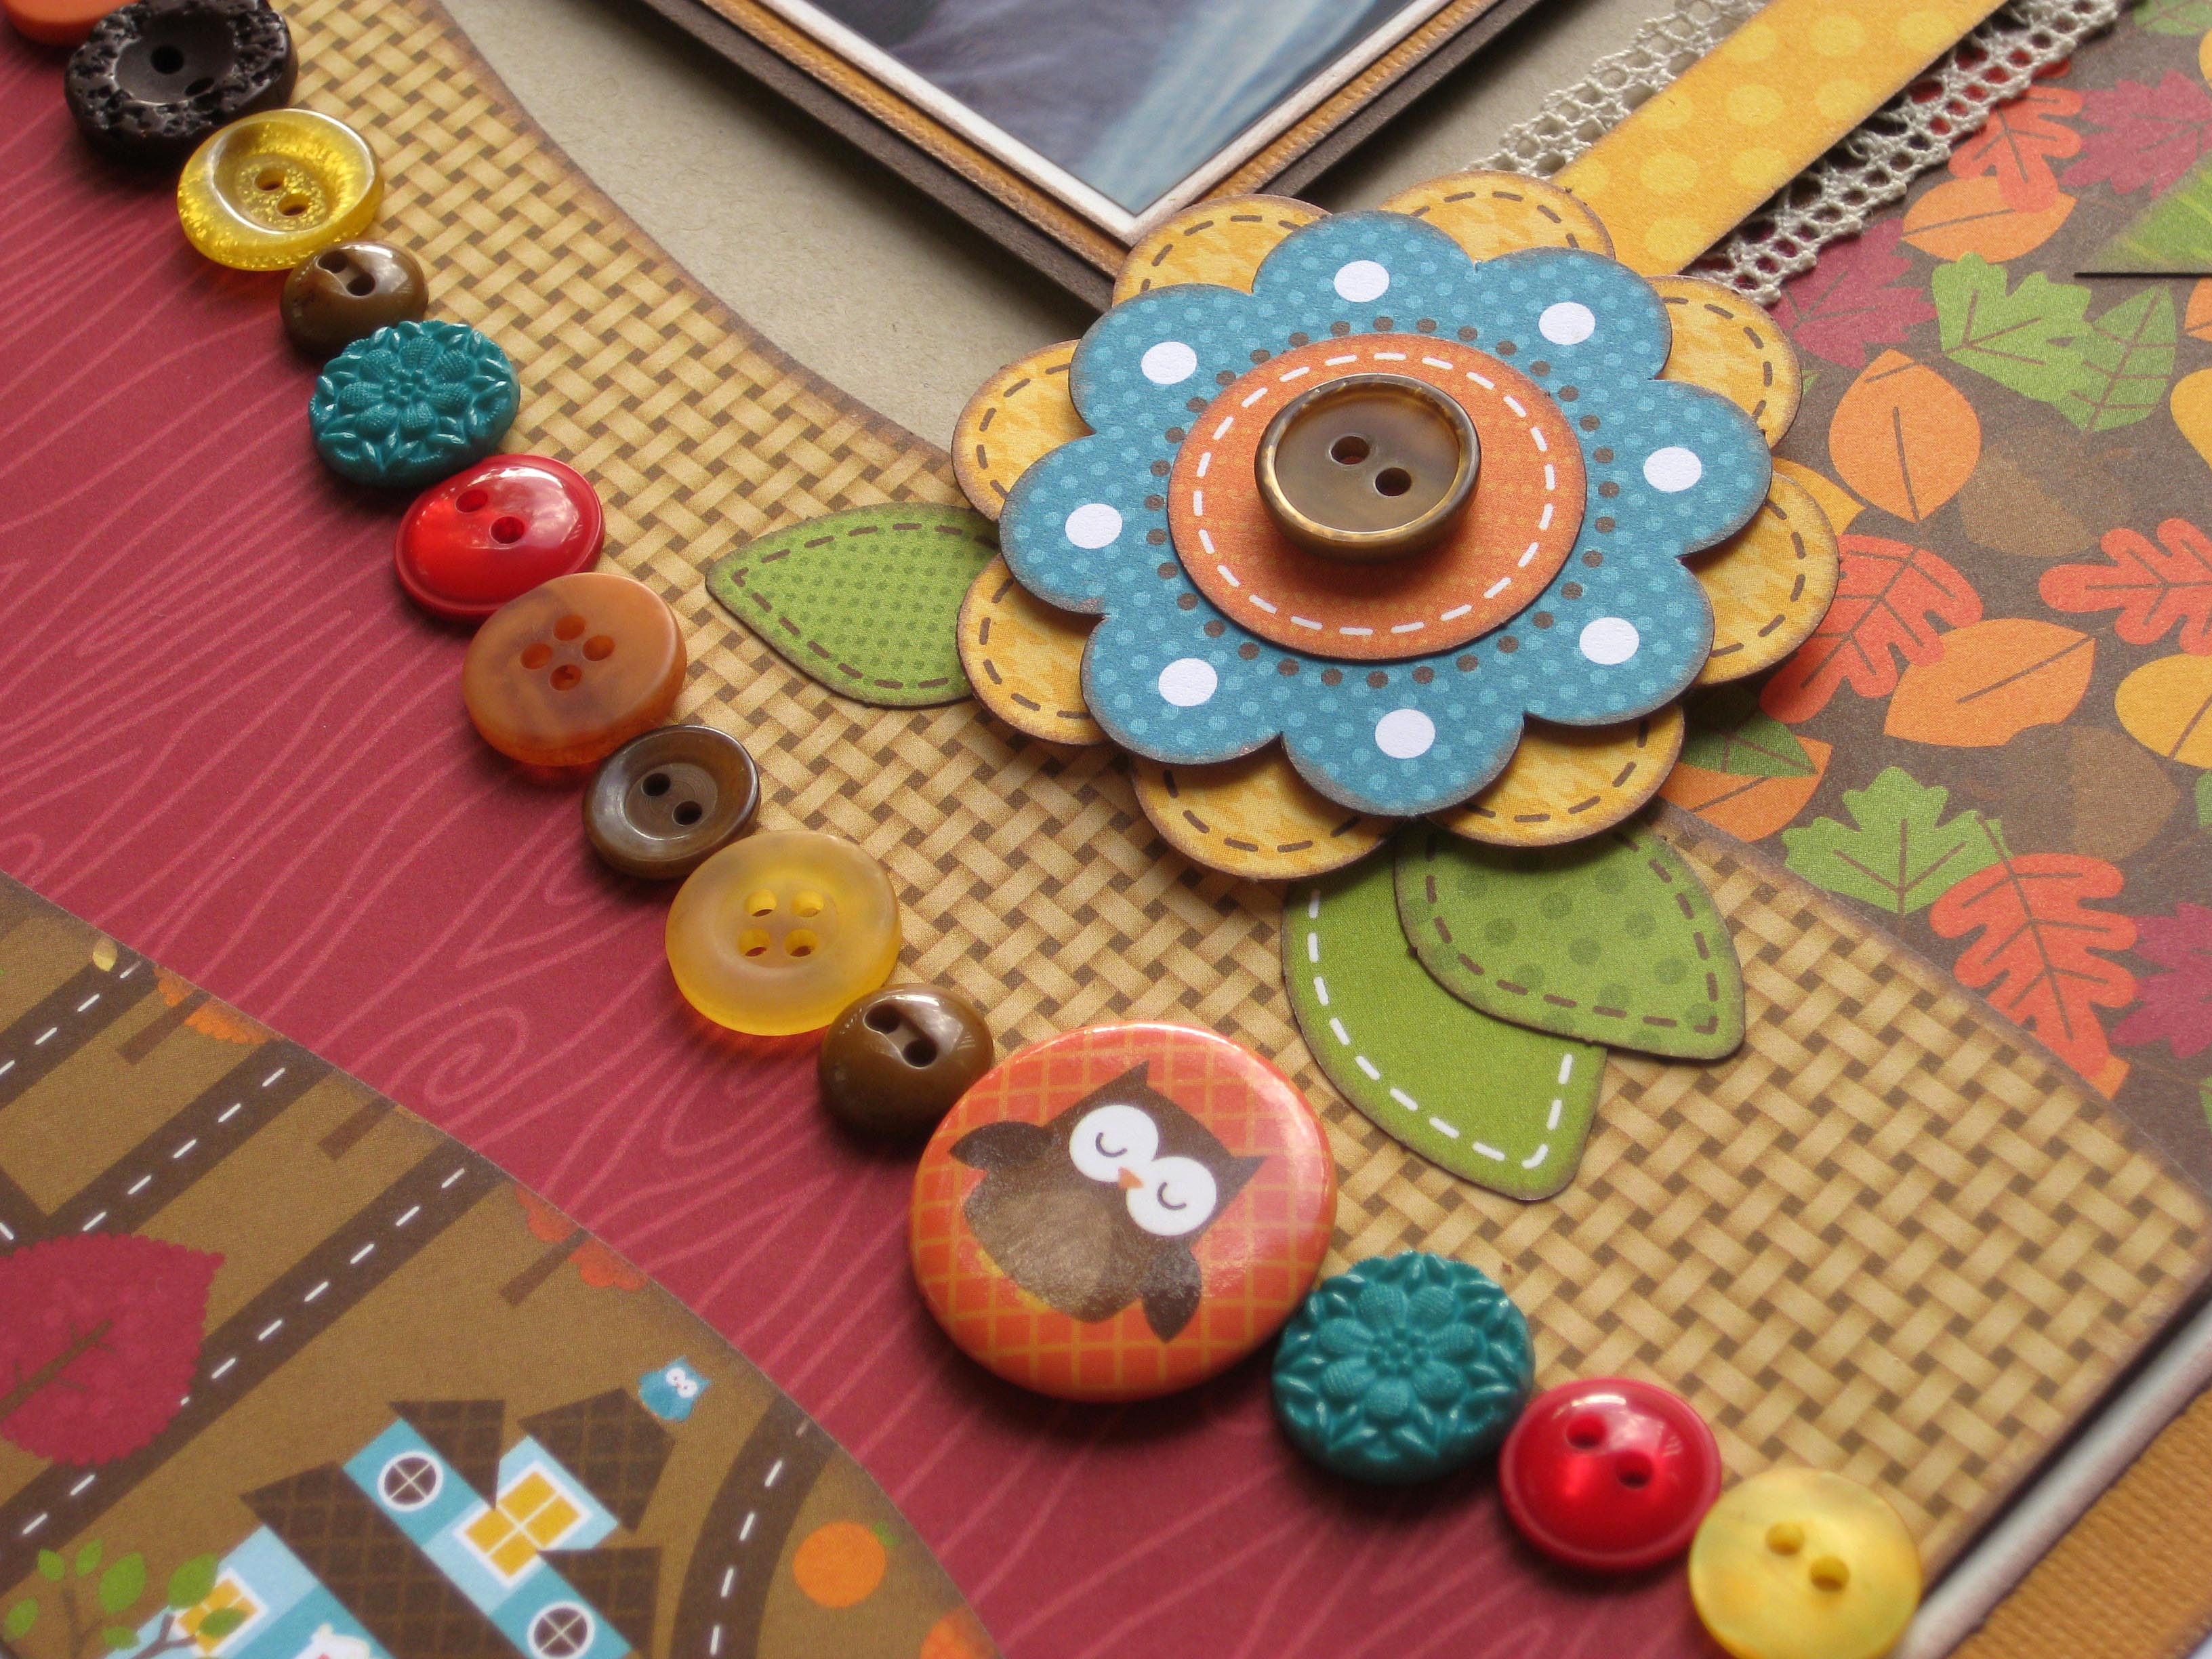
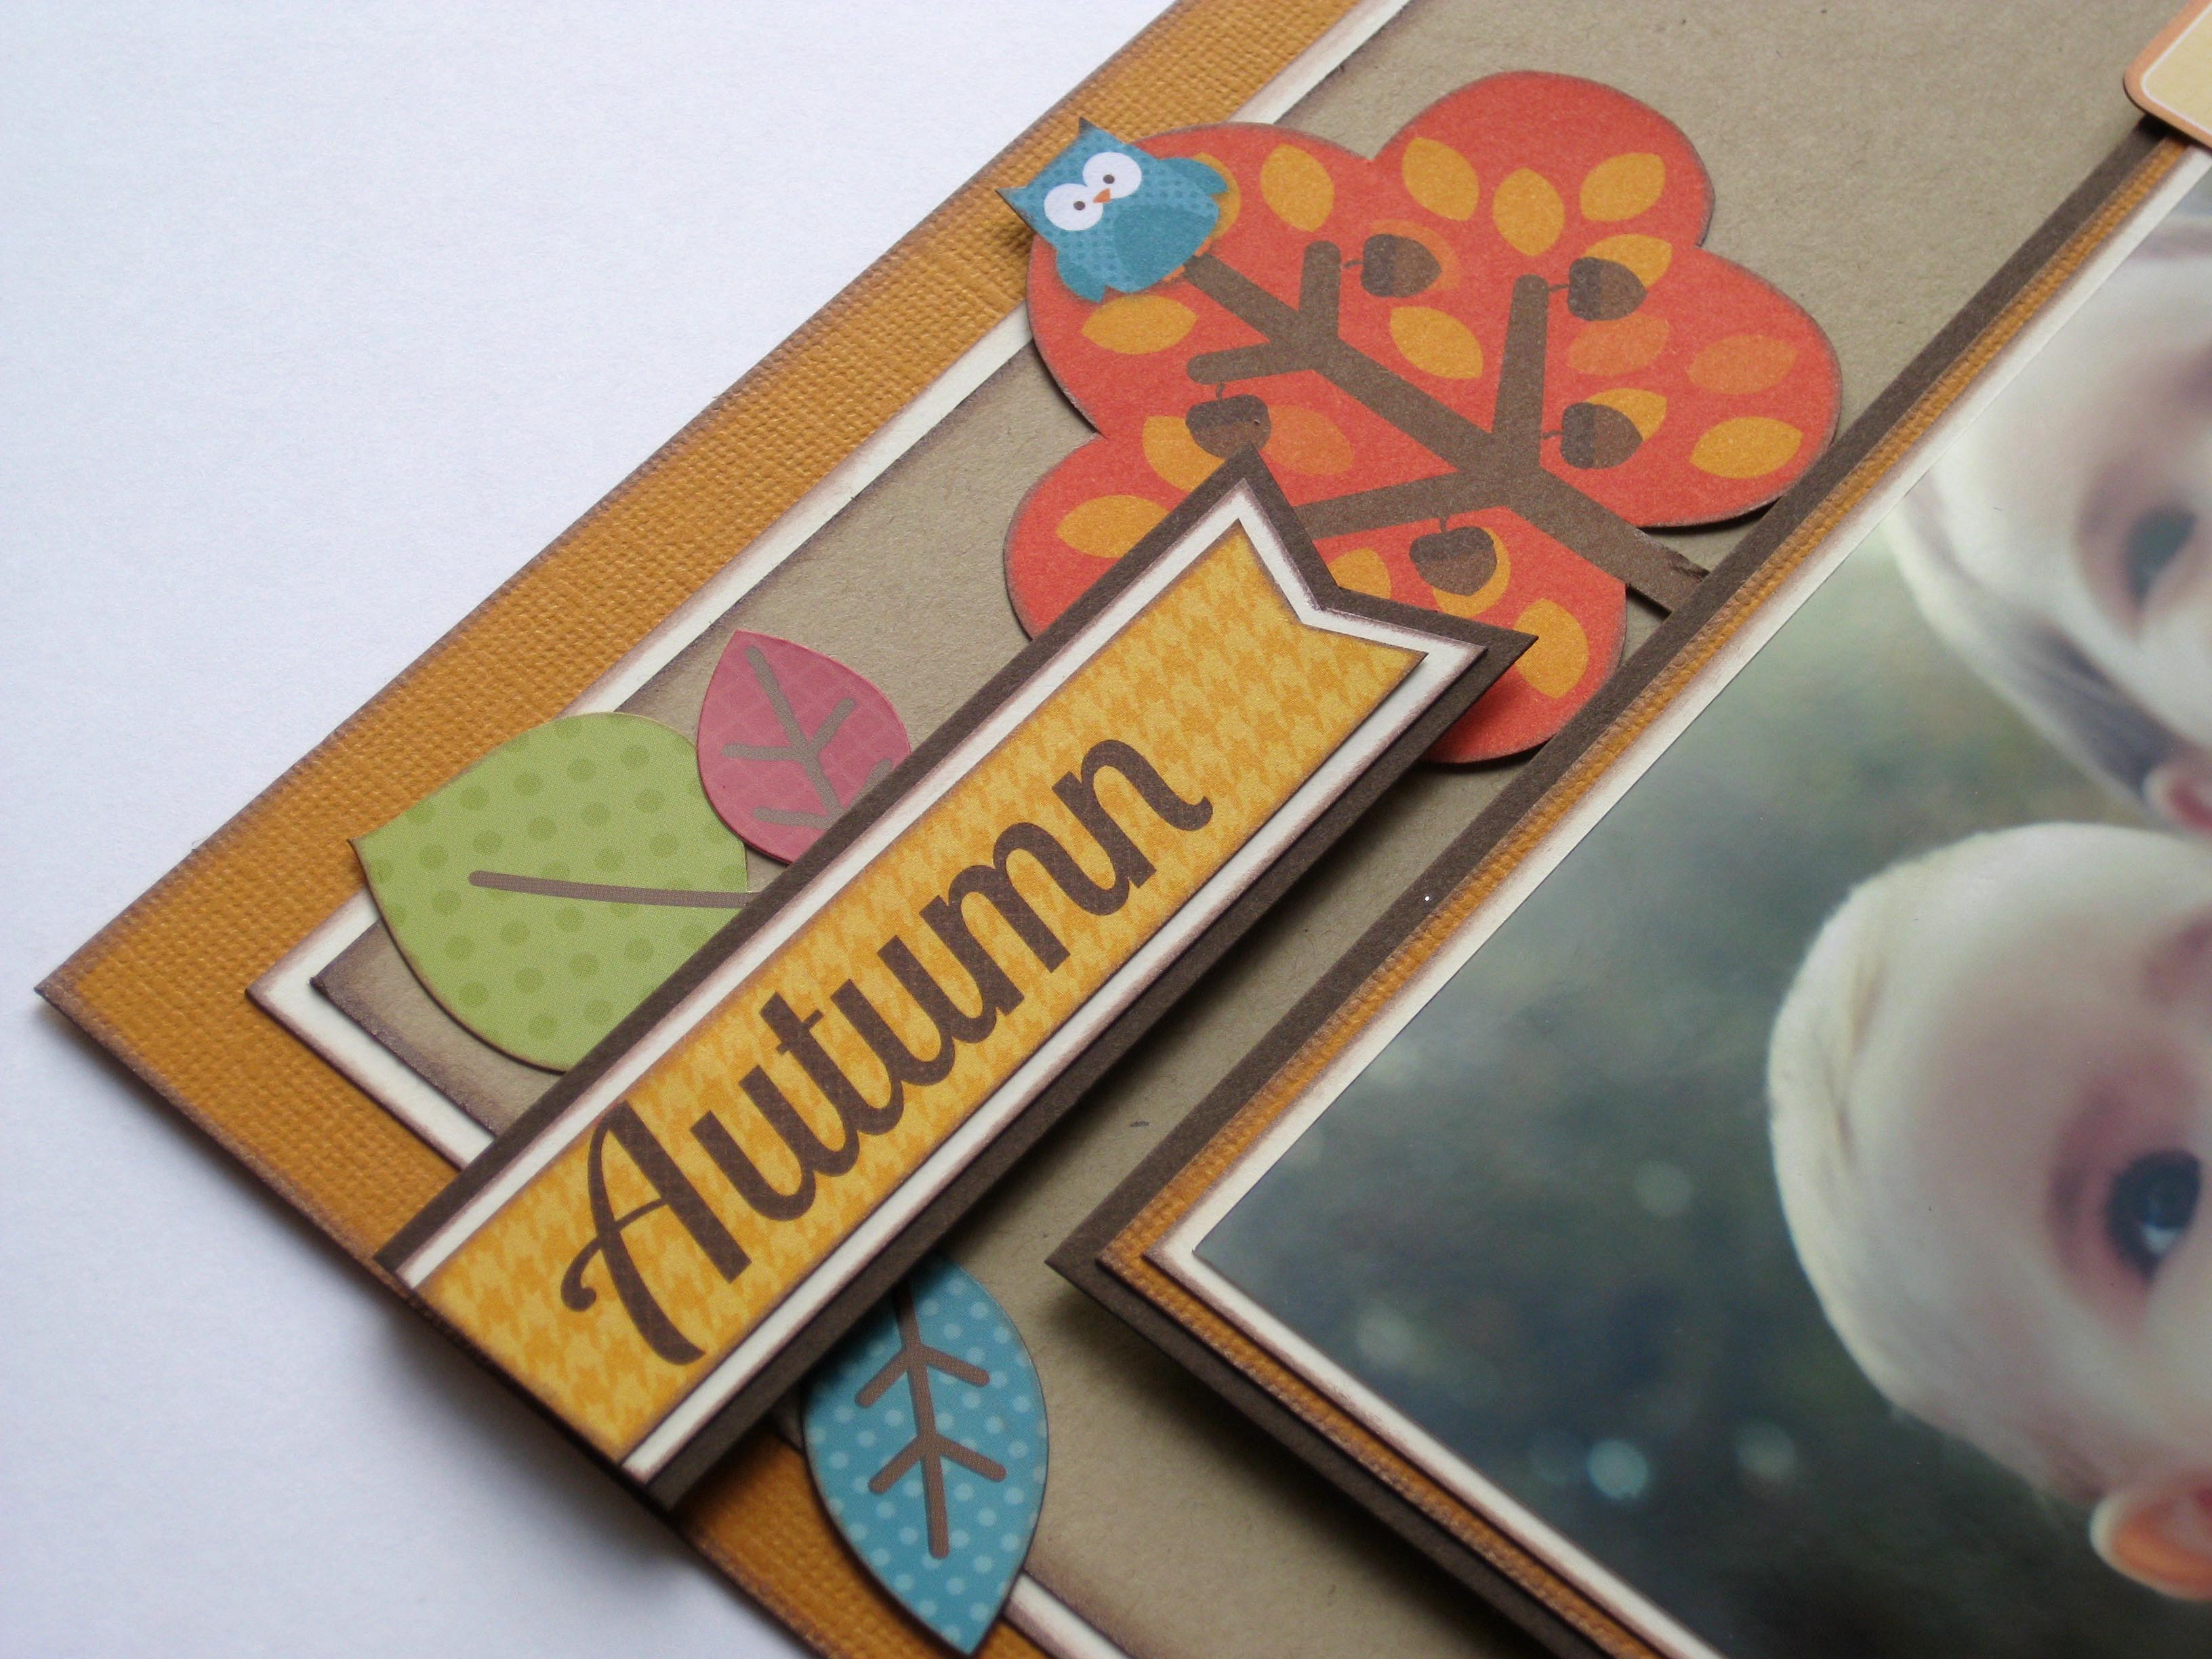
Welcome to our new Holiday Frame series! This is the first in a series where I will be creating interchangeable inserts for a photo frame to provide year round seasonal decoration for any room in your home!
This 8″ x 10″ frame can stay out all year round, and the interchangeable inserts can be easily filed away when the seasons change until it is time to use them again.
Our first design, with the word “Autumn” and pumpkins, can take you through the fall season and both the Halloween and Thanksgiving holidays.
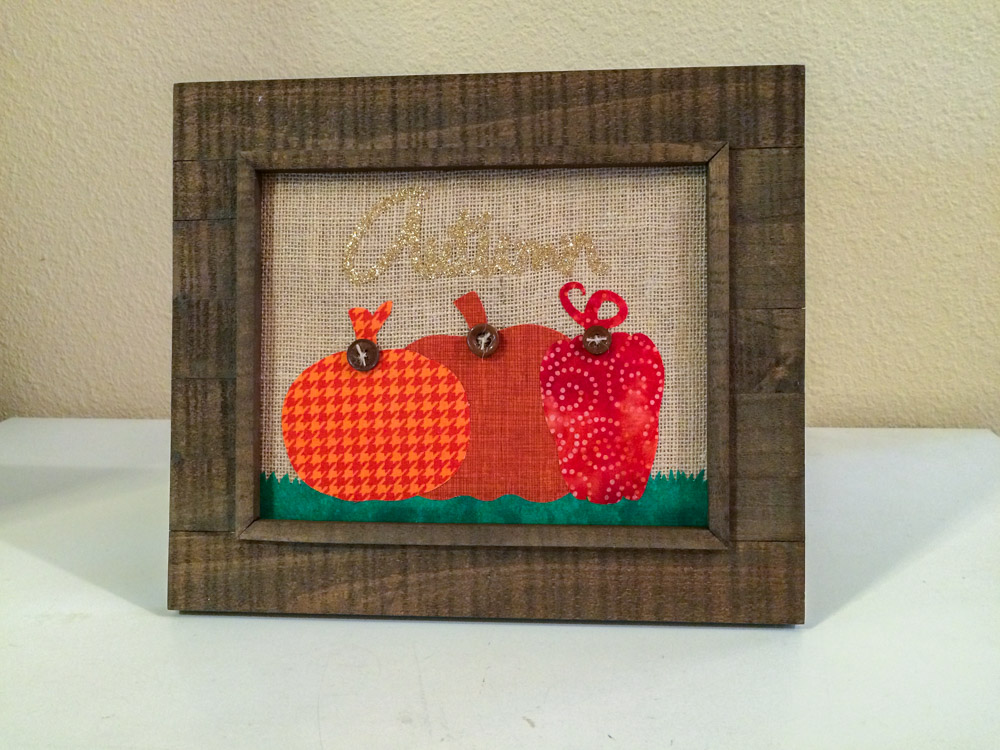
Supplies:
Instructions:
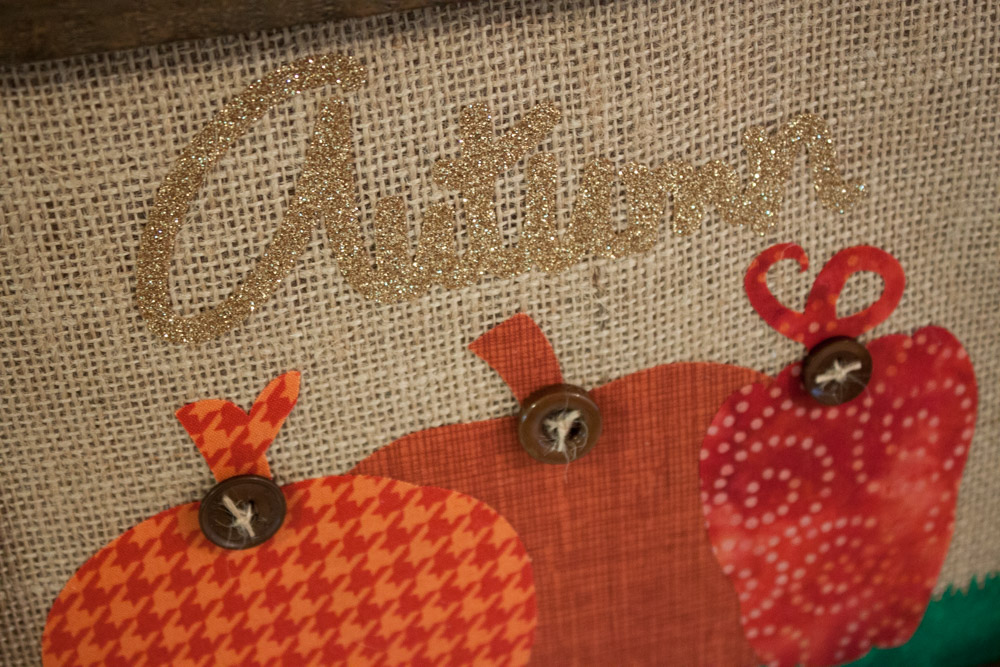 Cut the word “Autumn” from glitter iron-on material.
The buttons provide dimension to the design, as well as providing some brown that ties the design to the frame.
Come back in mid-November for the next installment in the series – for Christmas!
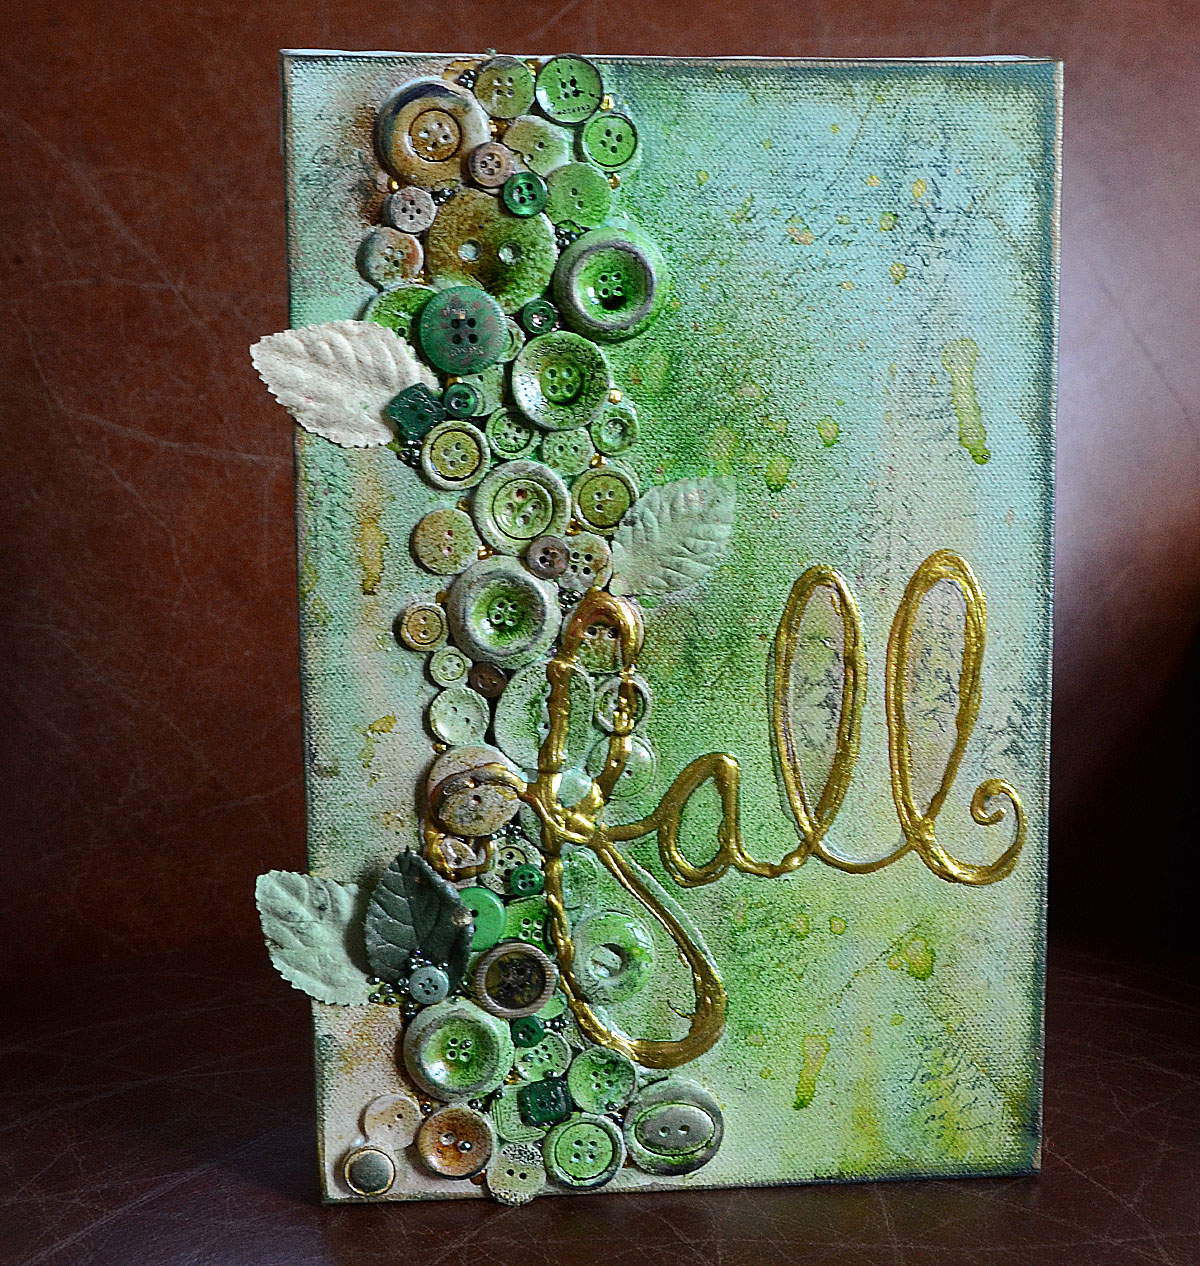
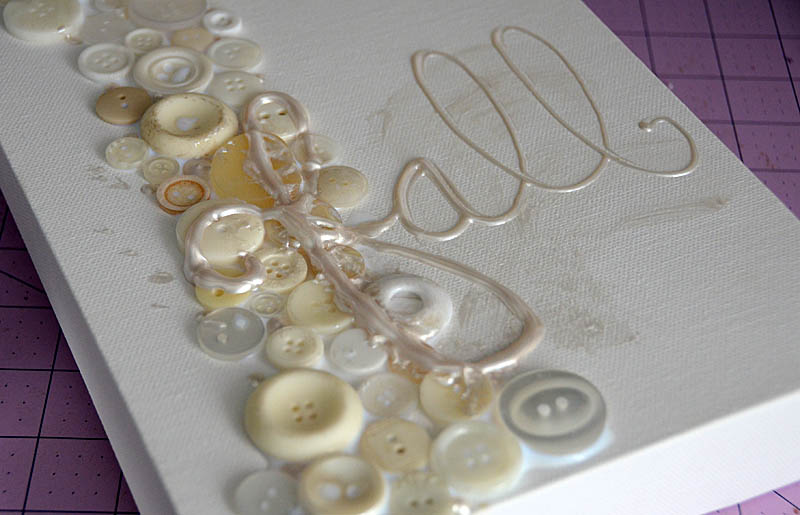
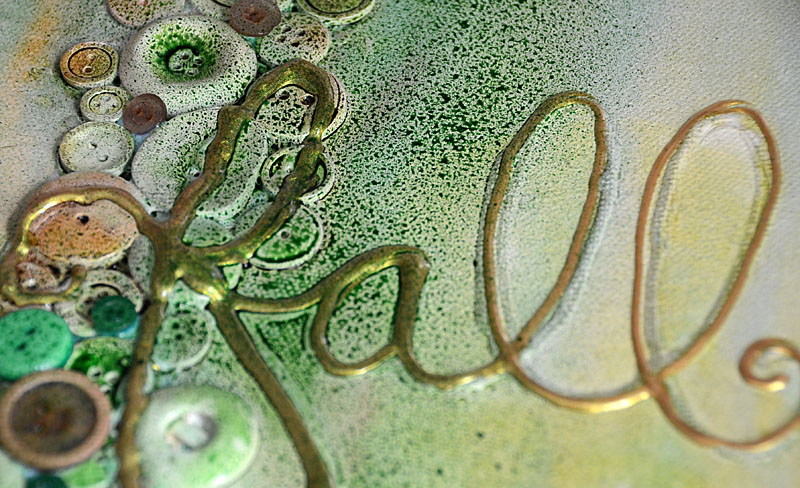
Fall is here, and it’s time to change out the summer decor for something more autumnal. May Flaum is joining us today with the perfect mixed media canvas to change the season on your walls in style. – editor
The beauty of this project is that it can be any color, subject, or size. Even better? It will allow you to use whatever color of buttons you happen to have a lot of! In this example I am working with the Ivory button bonanza bag, however I more often use a mix of buttons (often colors I don’t like or get too many of!). Everything is coated with gesso – so you can truly work with any colors you have!
Supplies:
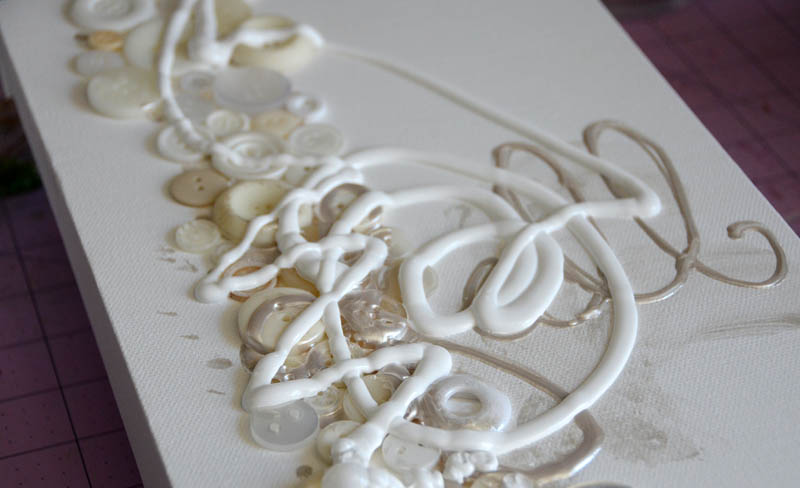
Step 1: Apply a generous amount of liquid adhesive in the area you wish to place your buttons. Add more as needed.
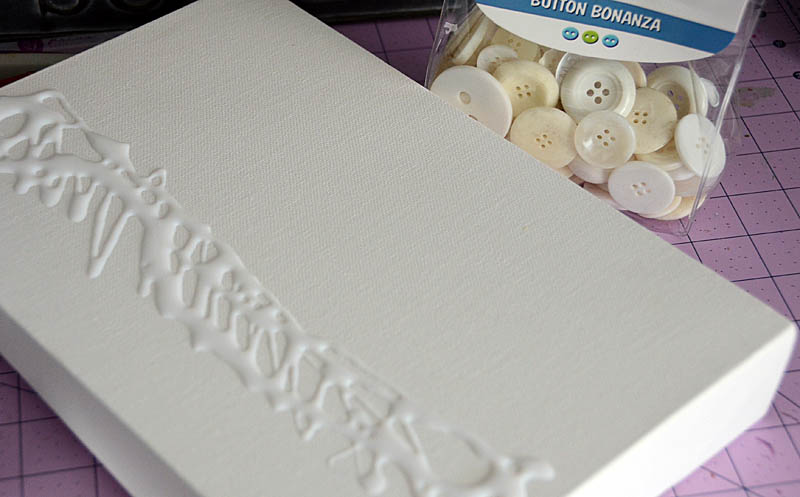
Step 2: Add buttons, beginning with larger ones and working smaller.

Note: From this step forward, you will need to let the project dry completely between every step.
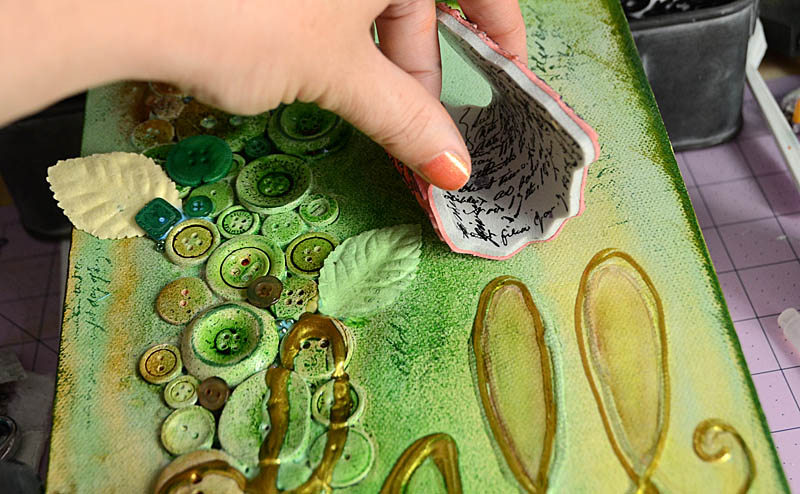
Step 3: Using a dimensional liquid product such as gel medium or a white or pearl dimensional paint pen, write your word.
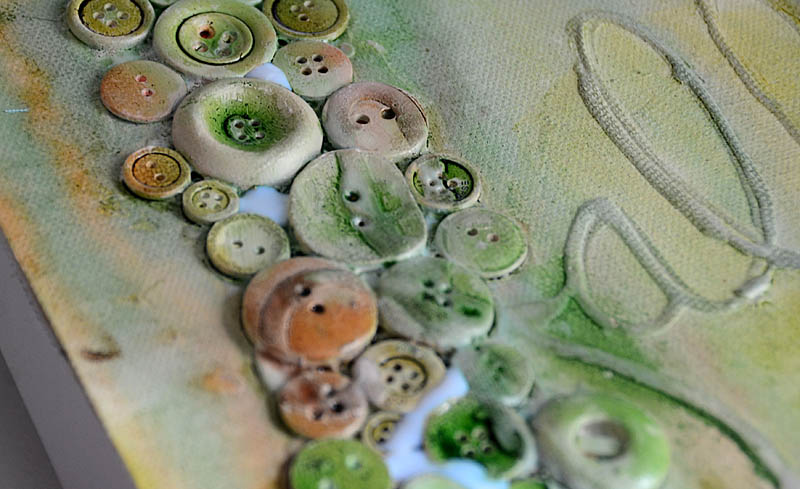
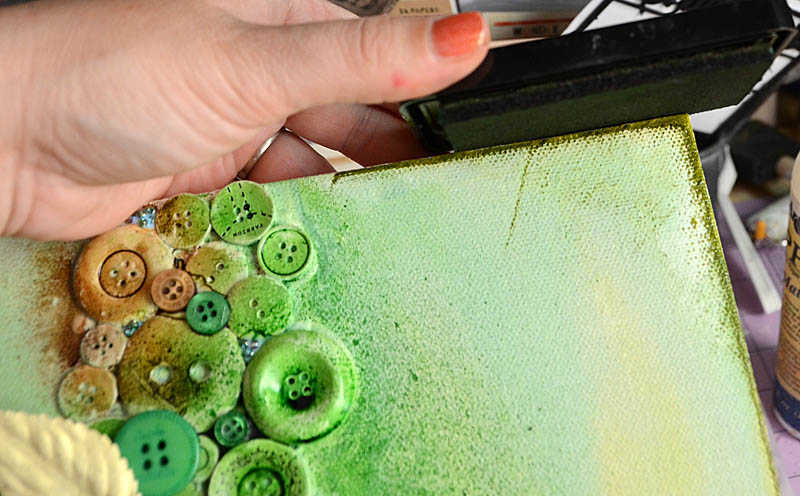
Step 4: Apply a good amount of gesso over the entire surface and work in so that everything is fully covered.
Step 5: Mist colors of your choice across canvas. Allow to dry and repeat this process until satisfied. If you’d like them to “run” then tilt canvas up on one side while wet.
Note: Depending on the brand(s) used and properties of your spray ink/colors results may vary. Don’t be afraid to repeat step 5 many times! If you don’t have sprays/mists, feel free to use any color media you have on hand such as watercolor or acrylic paint as a substitution!

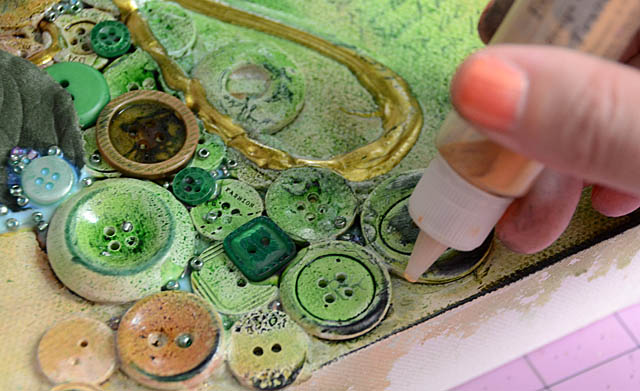
Step 6: Apply liquid adhesive in spots and gaps where you can add more buttons. Then add buttons in colors that compliment your design, as well as leaves or other elements that you’d like to feature.
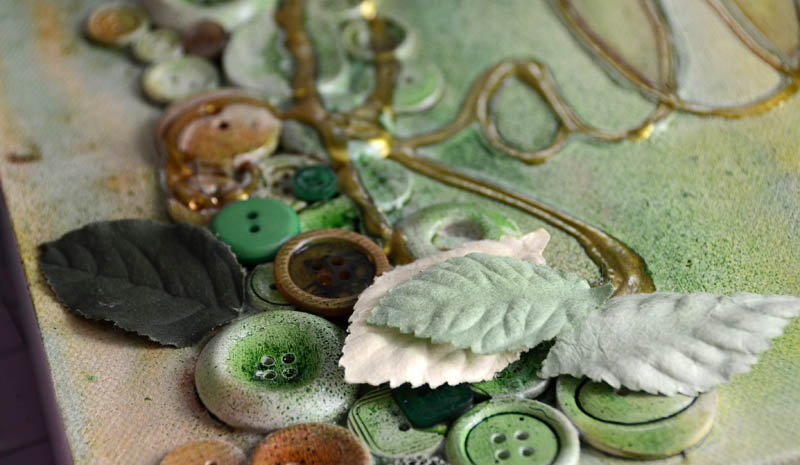 Step 7: Go over your word with gold dimensional paint or a pen to help it stand out, and spray a bit more color in a bold or dark color if desired.
Step 8: Use a permanent ink pad and ink the edges of your canvas. If desired, repeat this with multiple colors. For this canvas I used a dark green and a black.
Step 9: Use a script or other design stamp and permanent ink, and stamp randomly around the canvas. This works best with an unmounted rubber stamp, and adds a lot of depth to the project.

Step 10: Finish project by adding any finishing touches such as dots of gold paint, pearls, beads, rhinestones, and more.
What I love most about this project is that you can customize it so many ways, and for any size or theme you like. It’s a great way to use leftover buttons and other supplies you may have sitting around. I hope you give it a try!
Even thought it’s still hitting temperatures close to 90 degrees at blog central here in Florida, Labor Day passing means fall will rapidly be settling in at Buttons Galore headquarters in New Jersey. And fall means a chance to pull out some colors and designs that many of us haven’t used all summer!
How about the Buttons Basics in Caramel and Outlandish Orange?
Add a nice holdover from summer – some deep pink from the “Summertime” Button Bonanza – and you’ve got a great mix of fall leaf colors!
Fall brings many occasions that call for dashing off a quick note to someone. Let’s make them pretty – and festive!
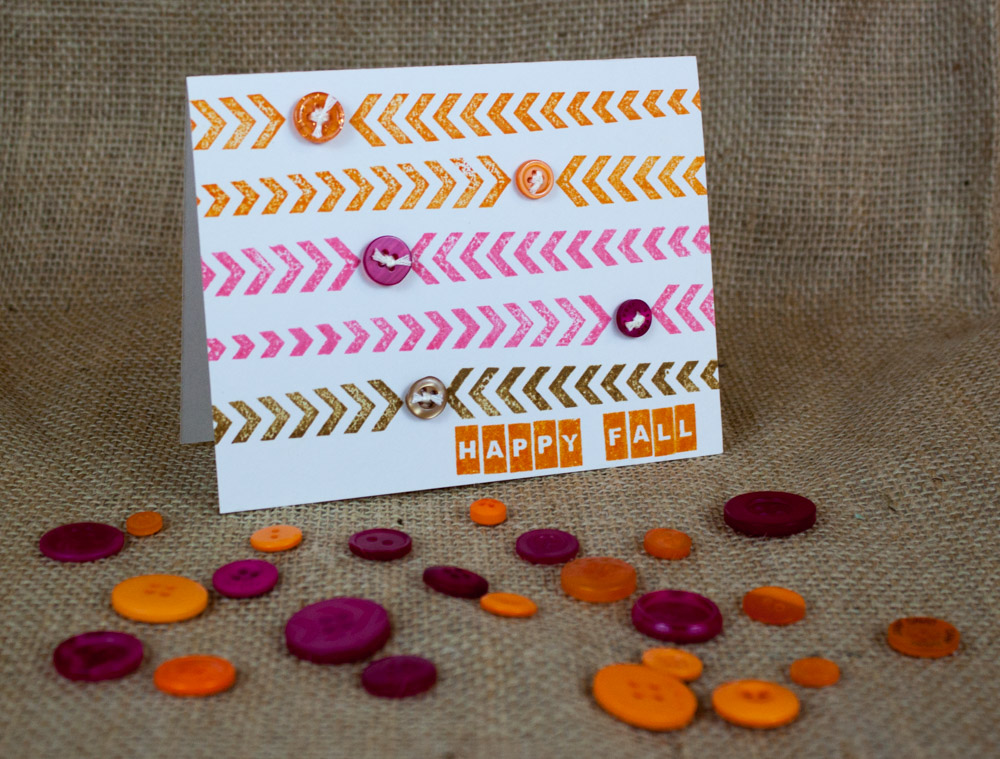
Look for Outlandish Orange, Caramel, and the Summertime mix at AC Moore!
1. Cut paper in half longwise and fold to make a card base.
2. Starting near the fold, use the stamp set to stamp the arrow border once from each side, leaving a gap in the middle to place a button. Work your way down the card, changing colors as you get closer to the bottom.
3. Use the alphabet stamps to create the phrase “Happy Fall,” aligned with the right edge.
4. Thread buttons and tie them using embroidery floss and needle.
5. Attach buttons in border gaps with adhesive dots.
This versatile button card design could work for any season or holiday, simply by changing up the color scheme and the sentiment that is stamped. Try the bright primary colors in our Primary Button Bonanza (also available at AC Moore) for a birthday card, or red, white, and blue for a patriotic theme!
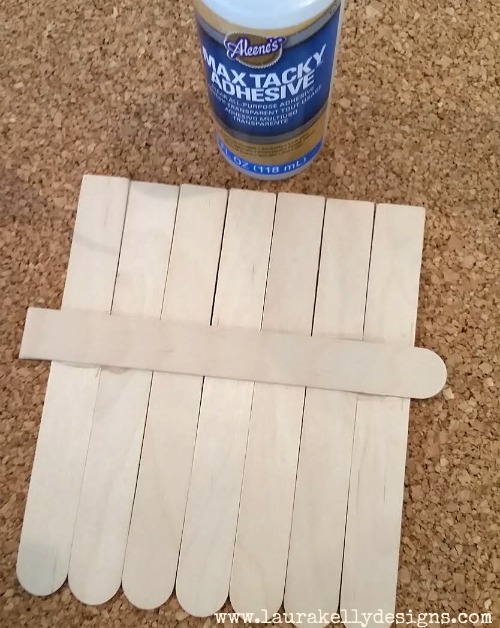
Check out this awesome project for the changing of the seasons! Creating crafty decorations with kids is so super fun and this is a great one for just that! This is especially awesome because it can be done in 15 minutes and left to dry which makes it perfect for a school or party activity.
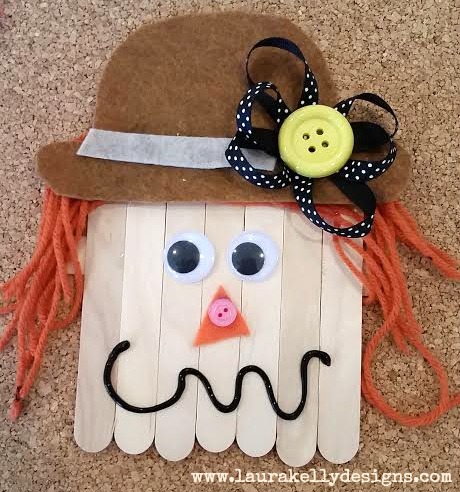
You will need popsicle sticks, glue, yarn, felt, buttons and google eyes (or whatever fun crafty things you have around the house).
Glue your sticks together to create a scarecrow head and let them dry.
Then add your decorations with glue and let dry before you use it as a decoration.
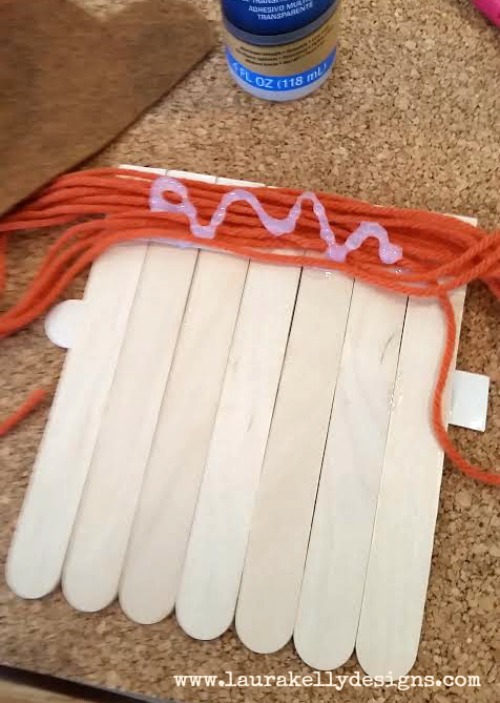
That’s all! HAPPY Fall Y’all!
Laura
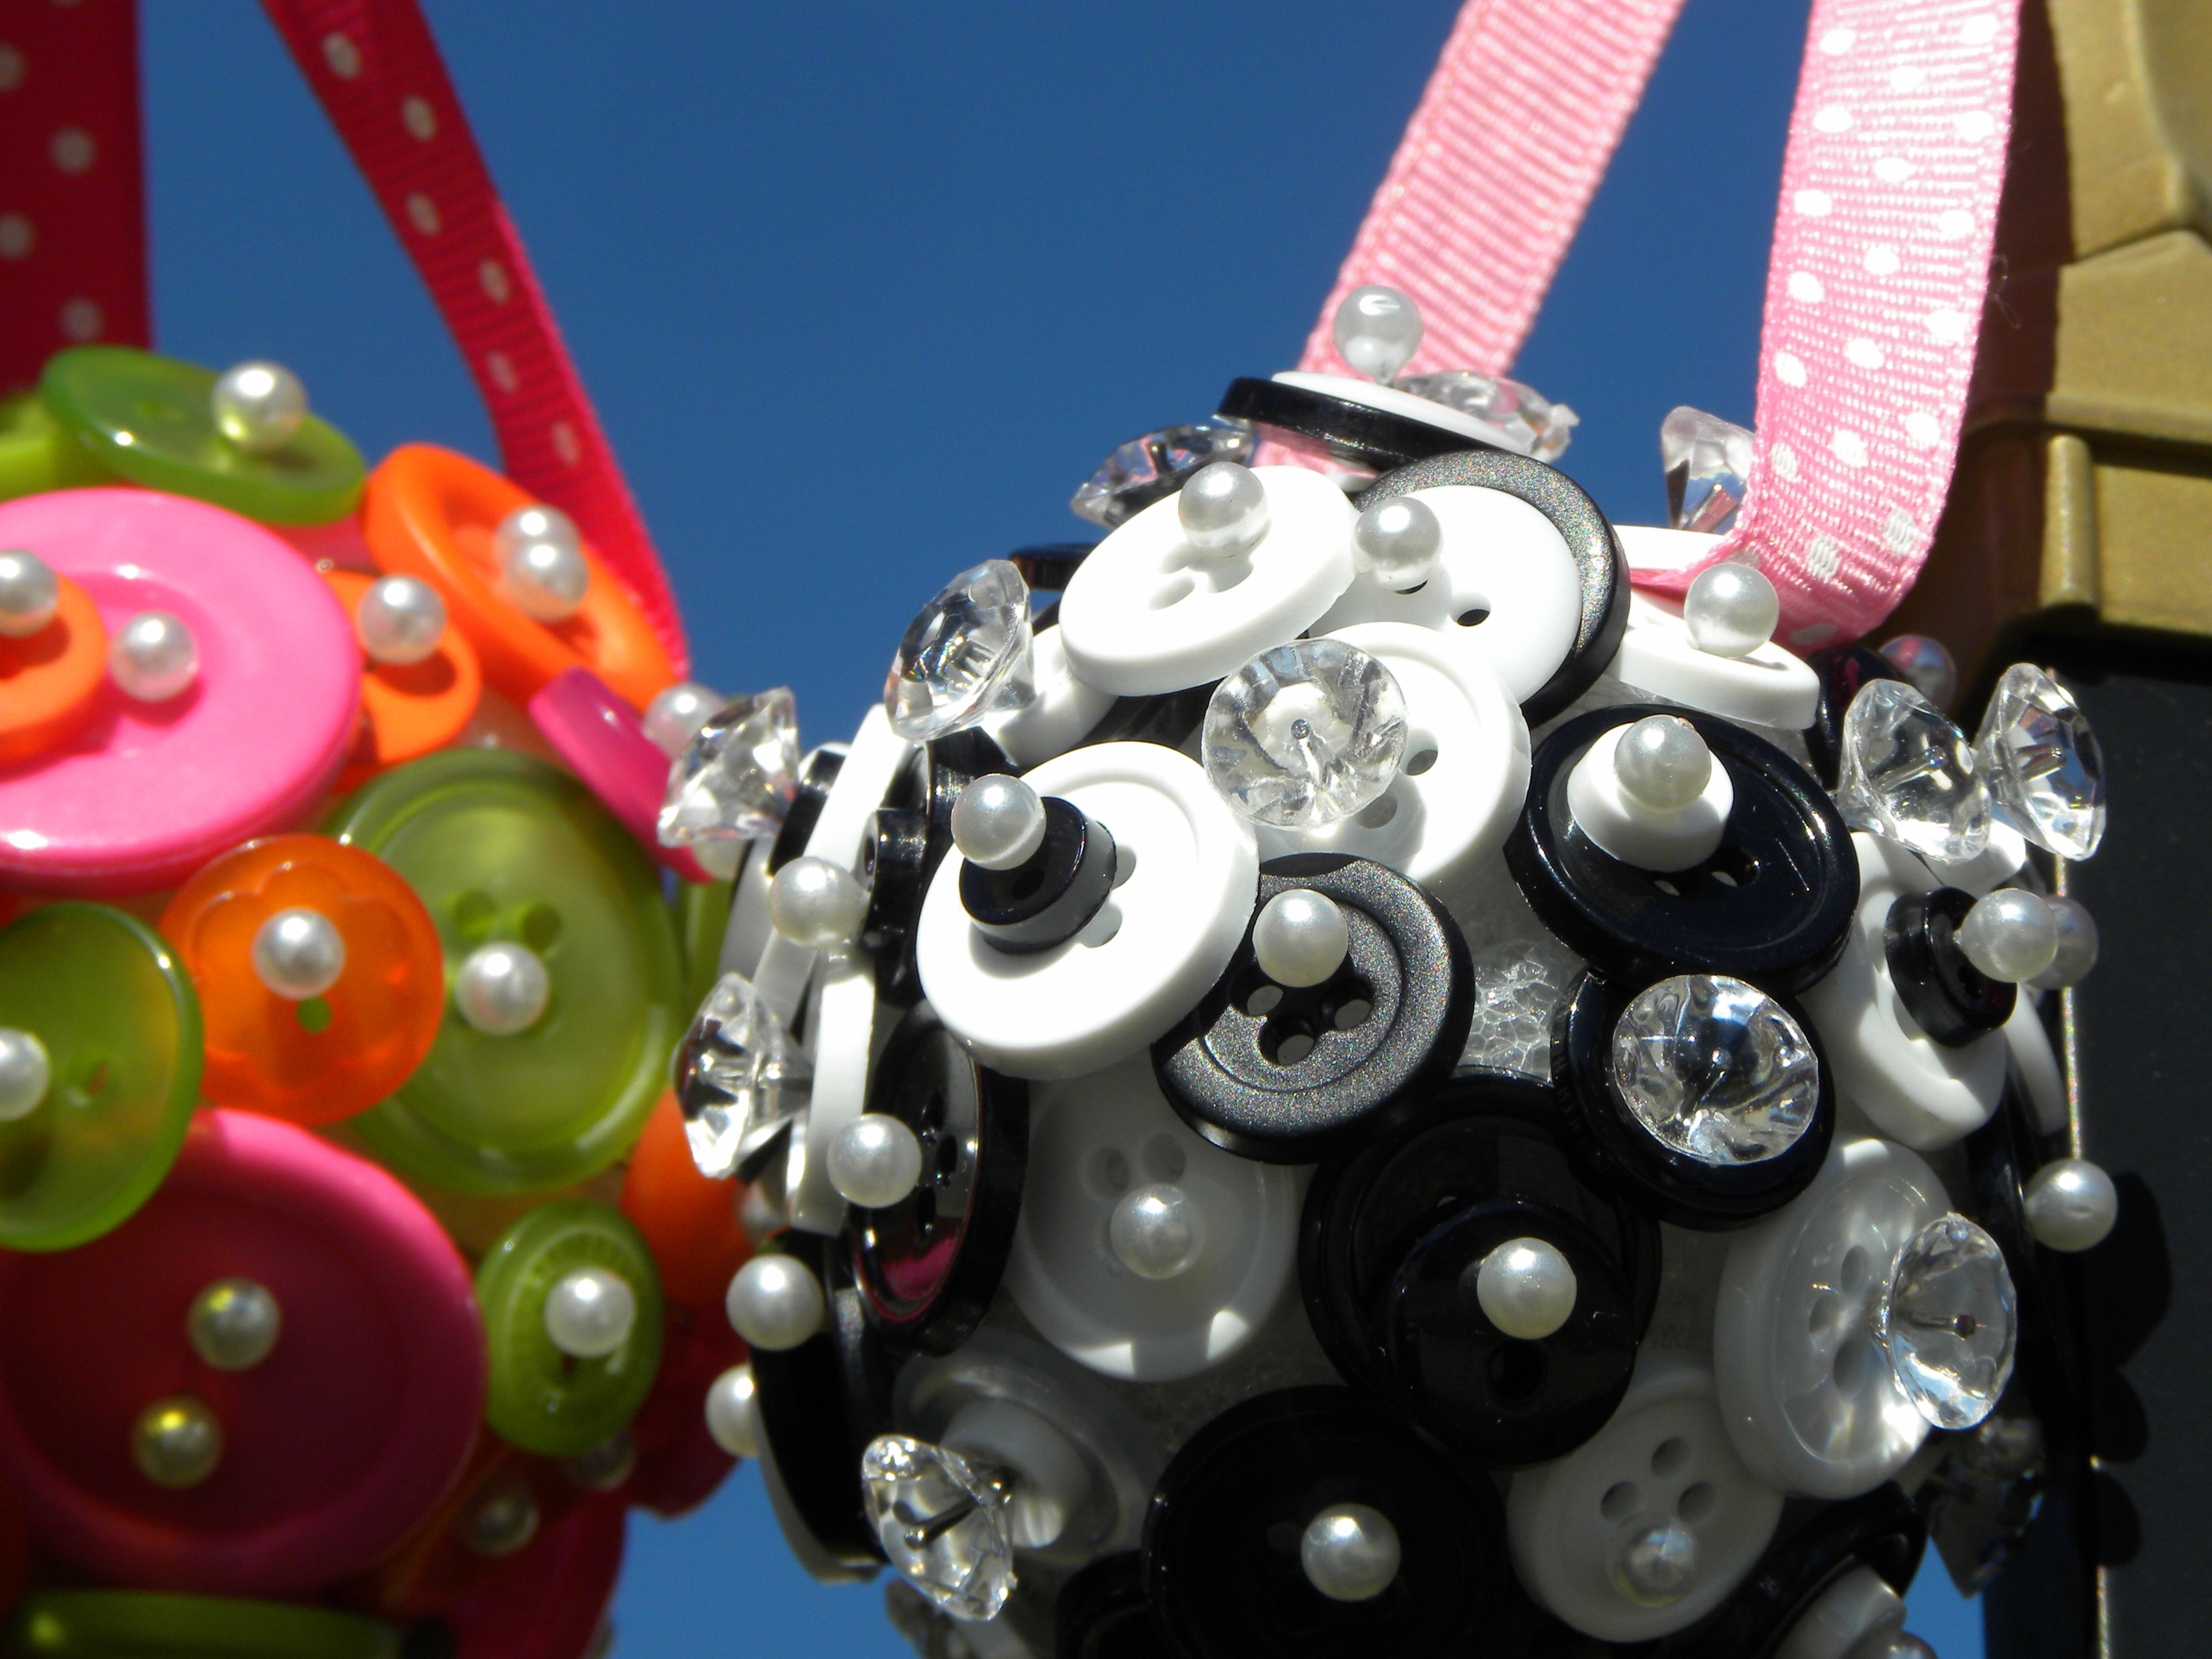
How beautiful are these ornaments for springtime?
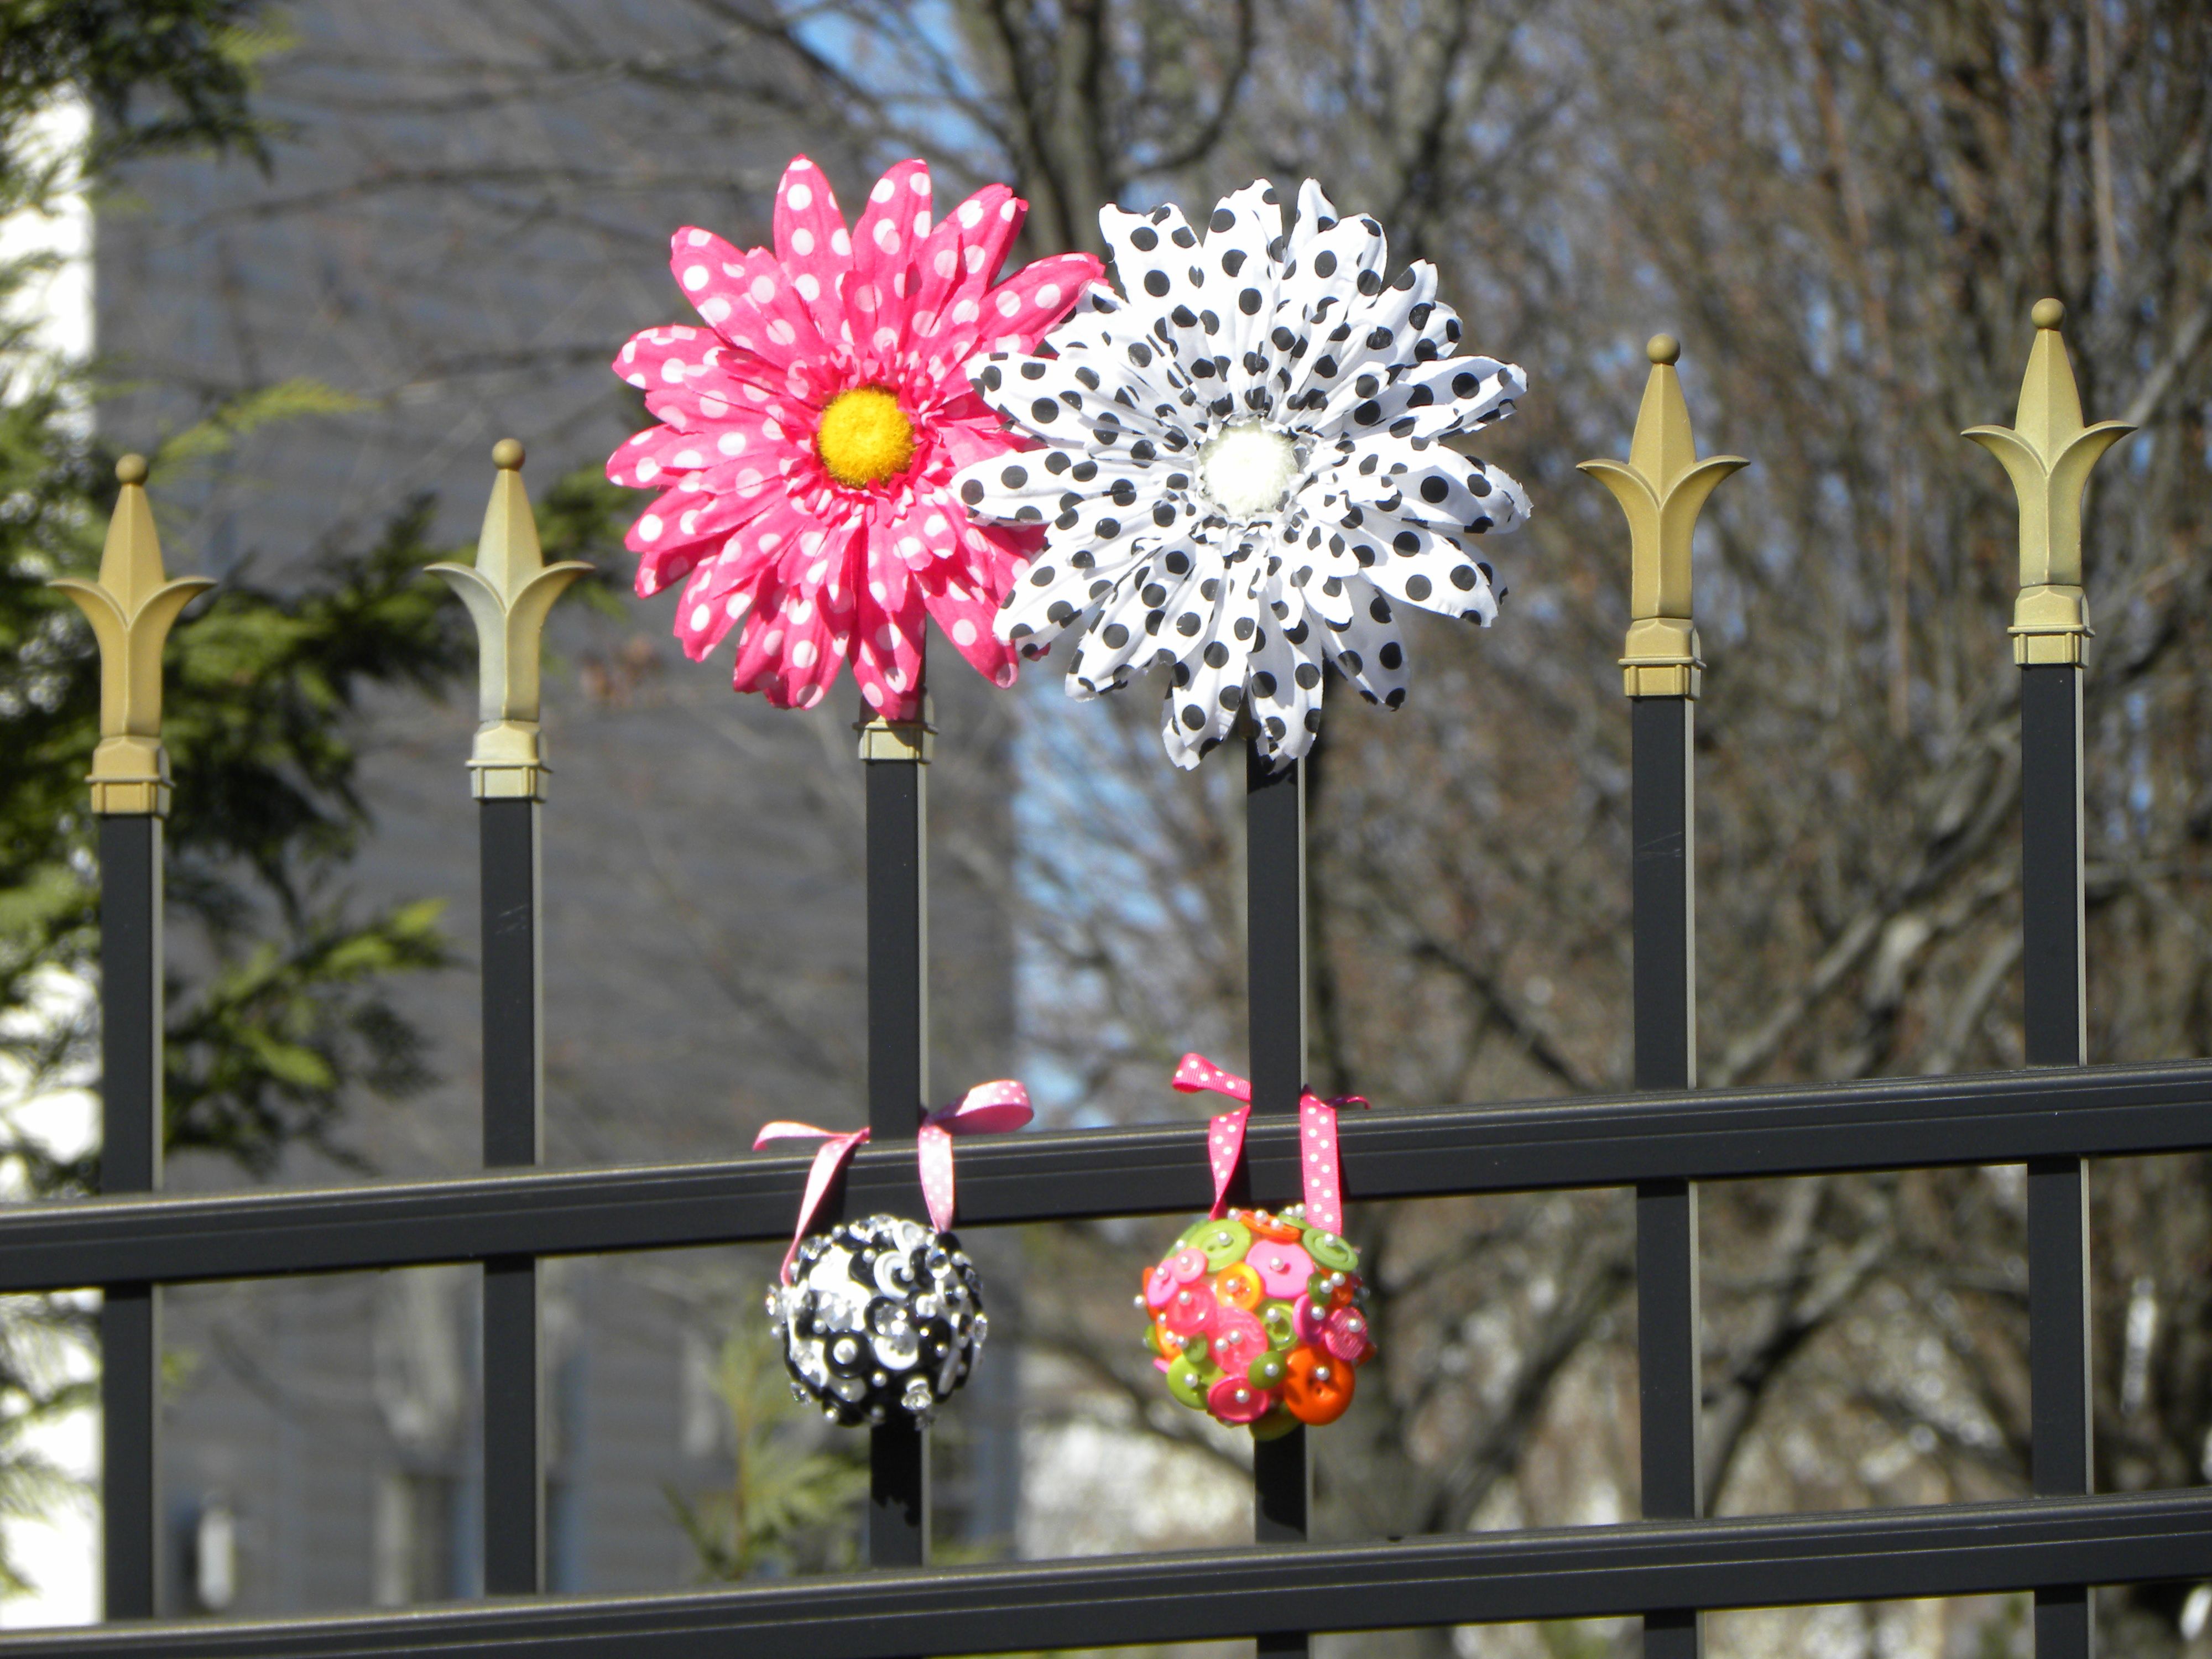
To create them you simply need a foam ball in the size you would like, buttons and ball-end pins. The longer pins can go through multiple buttons which is something to keep in mind when choosing materials. Attach the buttons to the ball by pushing the pins through the button holes into the ball. Cover the ball entirely then attach a ribbon for a hanger either with the pins or your favorite adhesive.
They are fun to put together for decorating.
They look great outdoors for a breath of fresh brightness.
Happy Springtime,
Laura
It it that busy springtime season of gift giving again…Teacher Appreciation, Mothers Day, Graduation!!! Here is a cute bee that you can make out of buttons to decorate any gift and and let someone know that you think they are the bee’s knees!
To make the bee, you will need to use hot glue to hold all of the pieces together. I added ribbon for wings and wire for antennas. Super cute, really easy and lots of fun!
I chose my Sunshine Yellow and Black Beauty buttons from the Laura Kelly mix offered as a Bright Mix of Colors. You can buy them individually bagged by colors too.
Happy Gift Giving,
Laura
A simple Thanksgiving Centerpiece – I made up in about 15 minutes using Buttons Galore Carved Wood Buttons and supplies I already had stashed. It seriously does pay off to hoard craft supplies.
This centerpiece happens to coordinate nicely with my Thanksgiving Dessert Table Decor that was featured on the Buttons Galore Blog recently too.
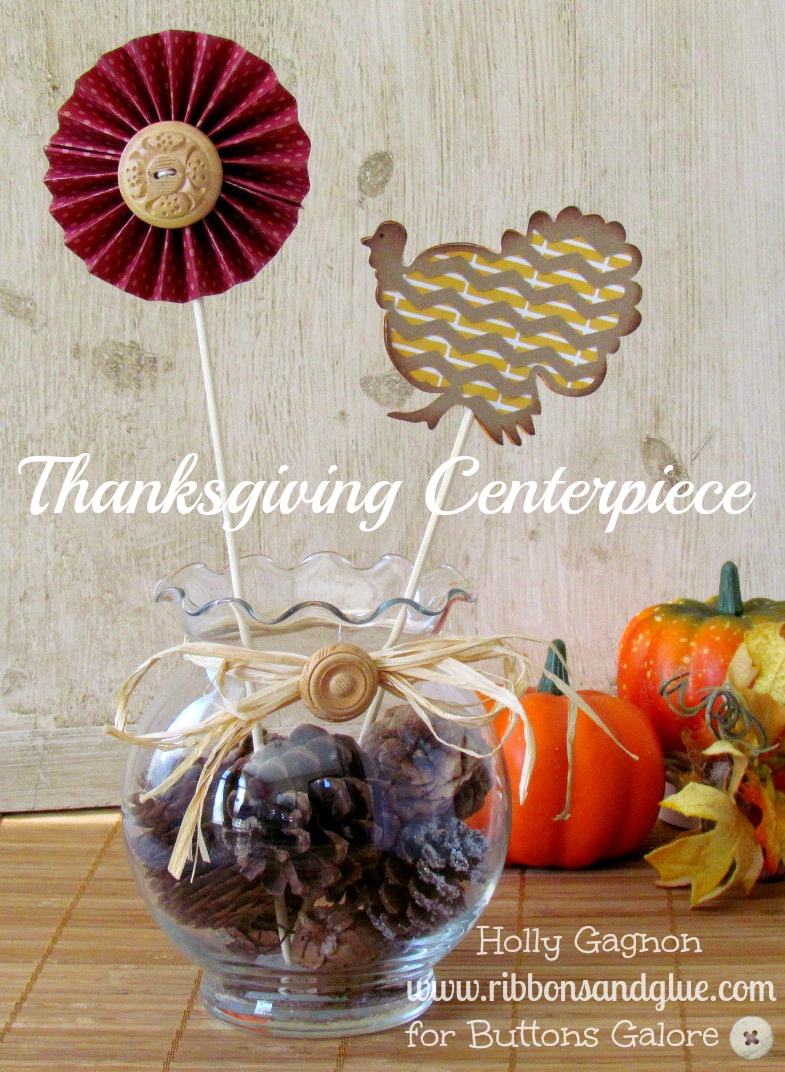
If I need to make up some quick and simple centerpieces, I always turn to making rosettes or finding something fun that can be stuck on a stick.

For this simple Thanksgiving Centerpiece, I added pines cones to a dollar store vase, made a 3″ rosette, added a BGM Carved Wood Button to the center then used my Silhouette to cut out a Turkey cut file.
If you don’t have access to die cutting machine, you could easily add more Fall rosettes in various sizes to your centerpiece along with Fall leaves or any other festive decor you like.
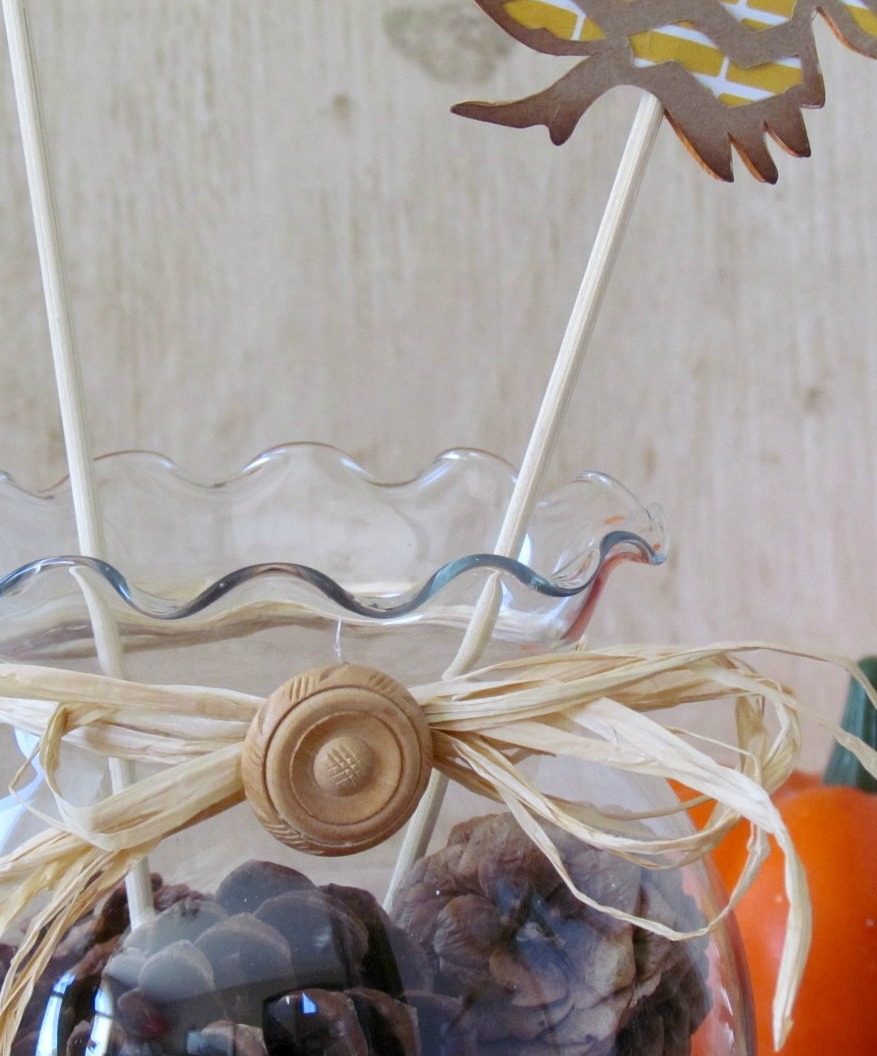
Everything just looks better on a stick right, right? Plus, Buttons Galore Carved Wood Buttons ties the Fall decor together nicely.
For more Fall inspiration head over to my blog Ribbons & Glue.

Like Me on Facebook!
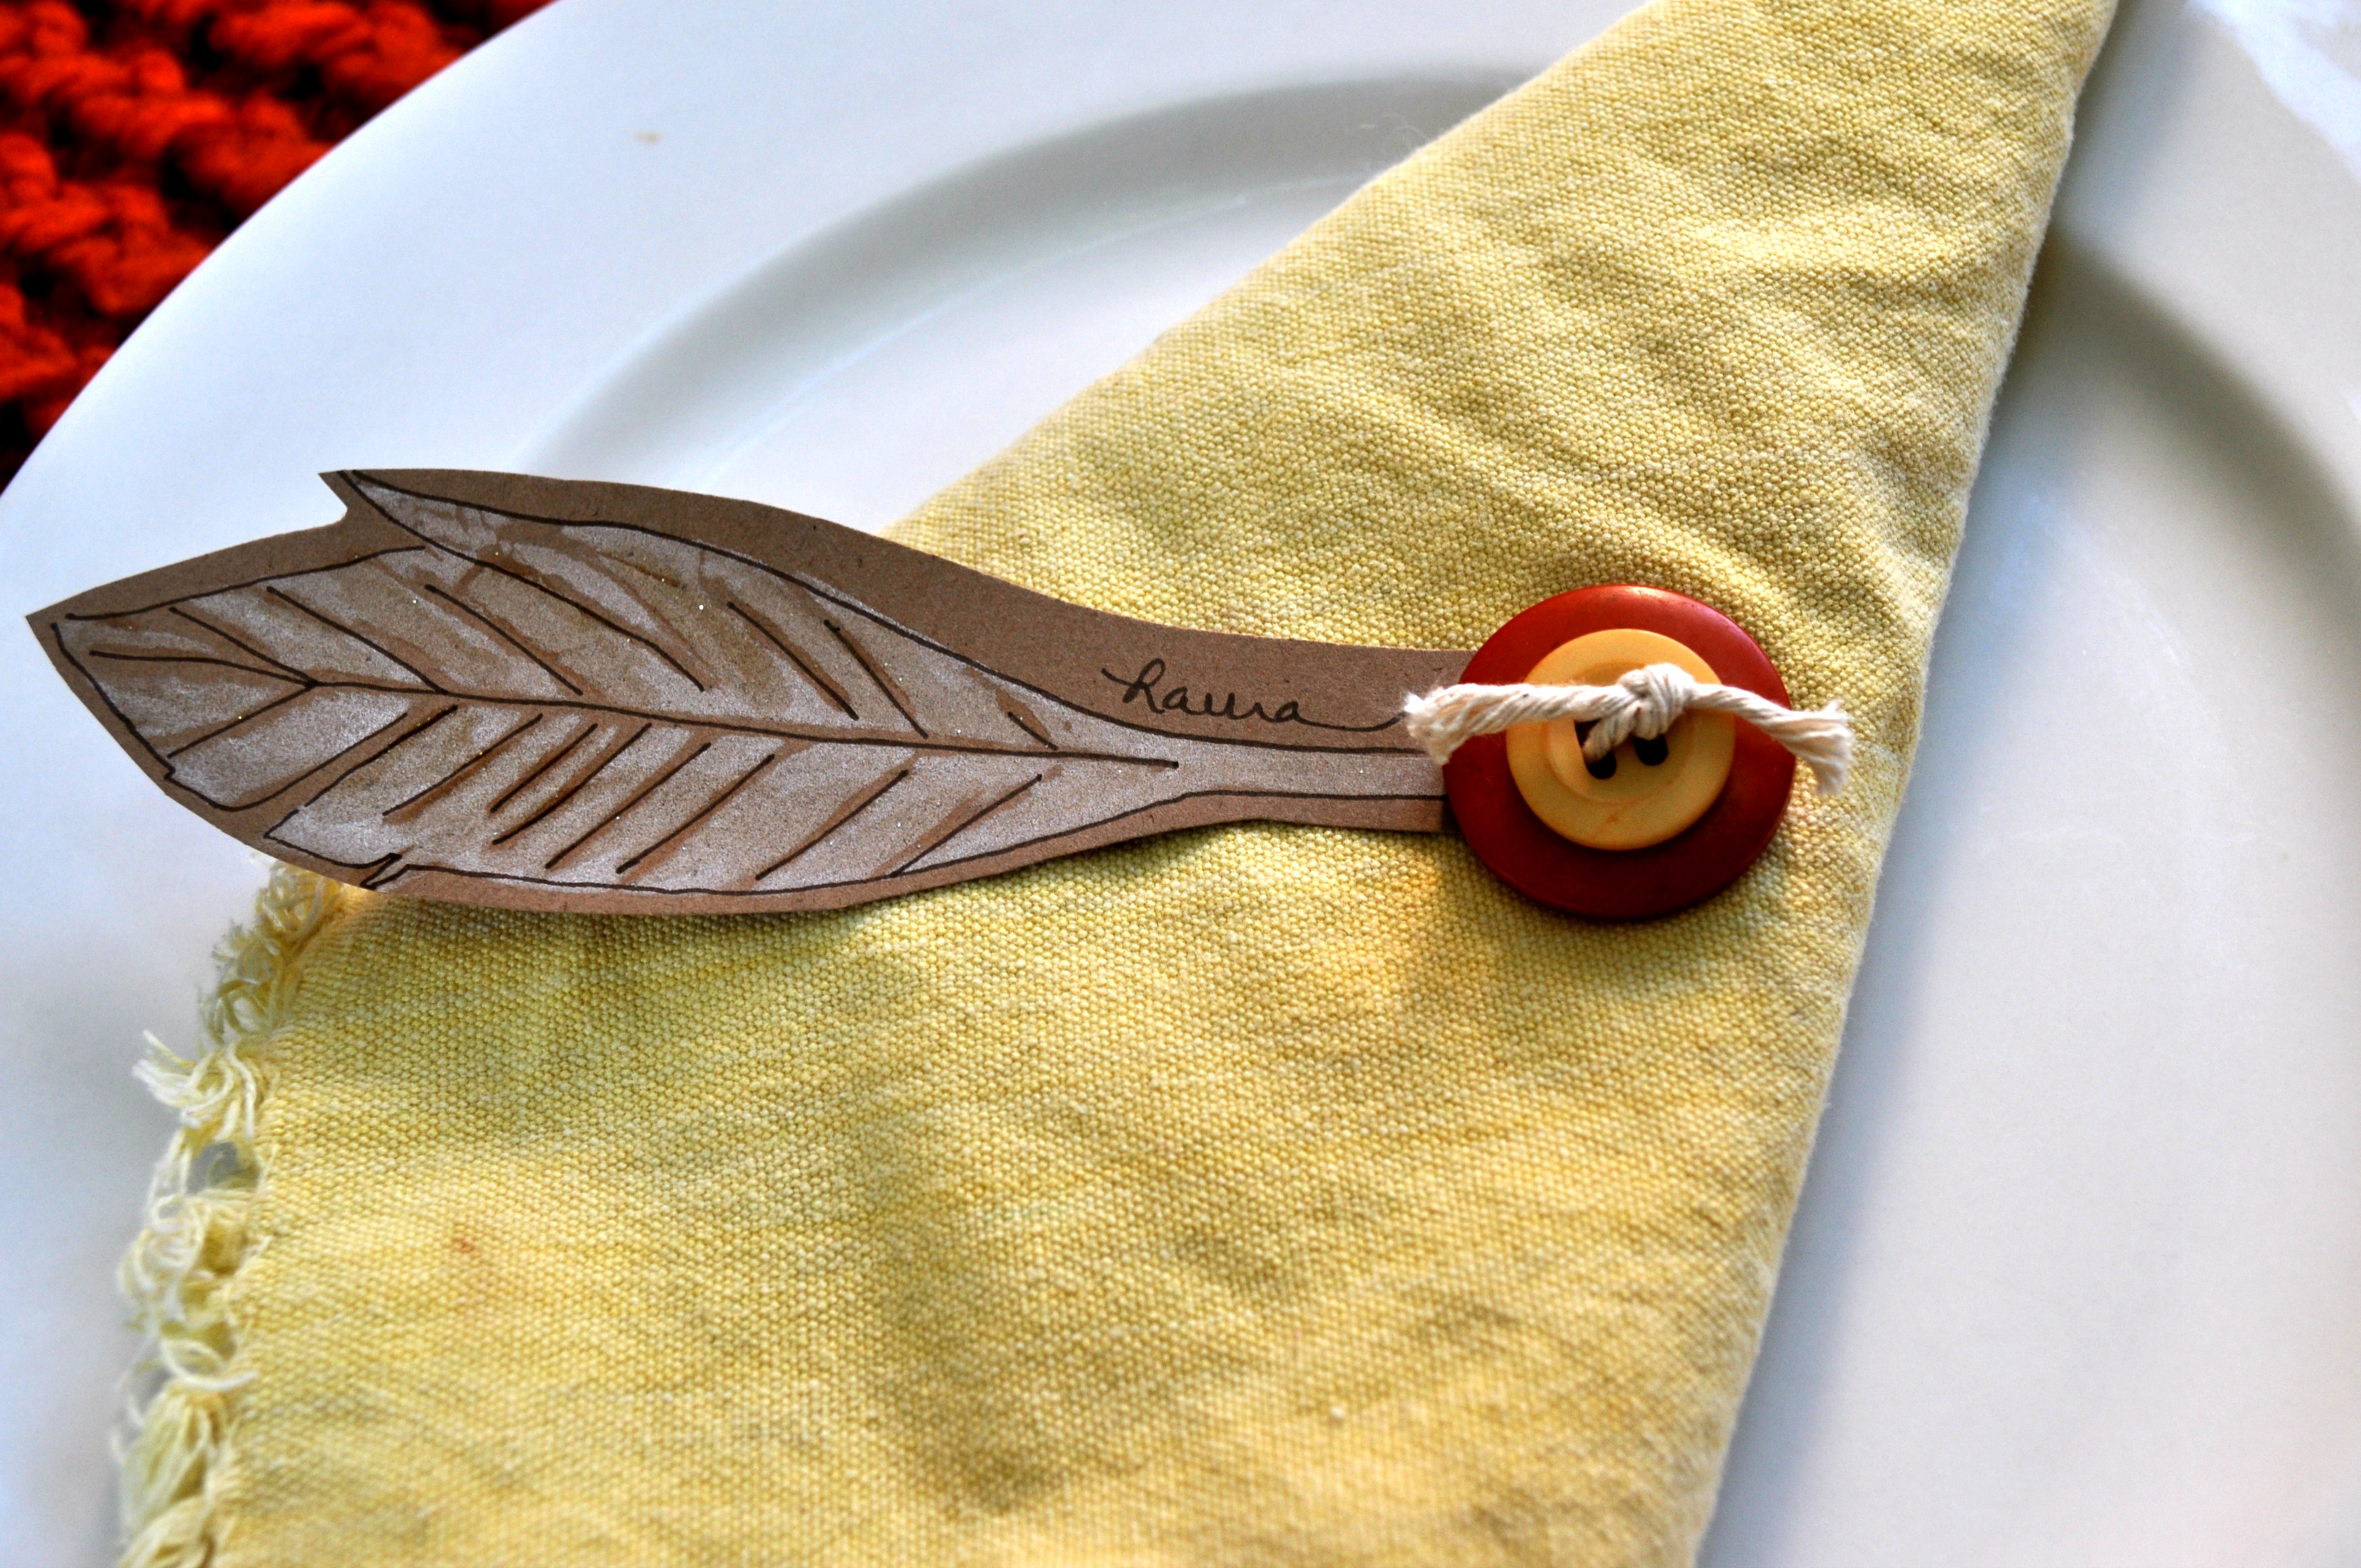
Thanksgiving is my favorite holiday. Not only is the ultimate holiday for foodies, but it’s also a time to gather with loved ones and enjoy each other’s company without the distraction of gift giving. I host 12-14 people at my house every year. I love preparing the meal, but I also love coming up with a great table setting. The easiest way to set a table is to come up with a theme and then build on it. This year, I’m thinking Feathers and Buttons just might be my theme for 2013. Here are two Thanksgiving place card ideas for your table.

This place card idea reminds me of childhood trips to the Natural History Museum. I loved to peer into the glass cases and see the natural collections. These simple place cards bring back those special memories of learning about nature.
Supplies:
Instructions:
Supplies:
Instructions:
Thanks for joining me today. If you would like to get a free printable, Thanksgiving planner, come and visit me on my blog, Laura Bray Designs.
![]()
Holly here from Ribbons & Glue sharing a simple Thanksgiving Dessert Table Decor using Tiny Buttons from Buttons Galore that’ll add some glitz and sophistication to your Holiday table this year.
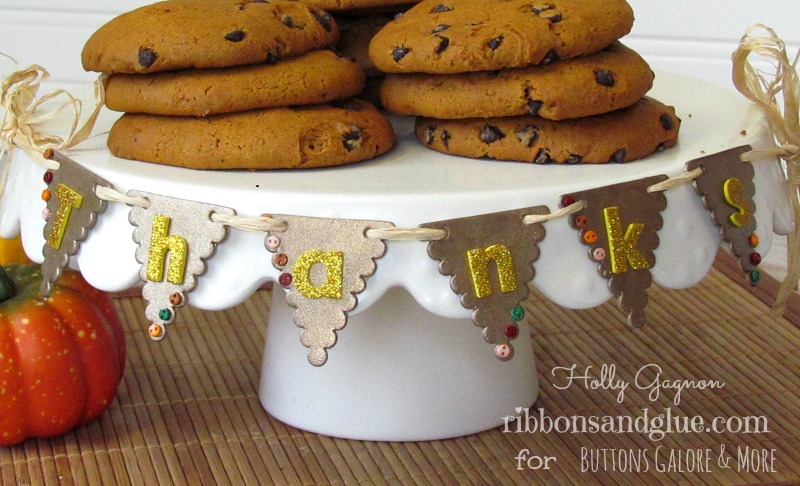
Thanksgiving Dessert Table Decor
When I think of Holiday gatherings, the first thing I think of is food and of course the yummy, rich desserts are the most important part. Show off those yummy desserts you’ve slaved over by creating this simple dessert table decor.


Like Me on Facebook!
For more Fall inspired crafts, visit my blog www.ribbonsandglue.com
This Autumn Button Border Layout shows so vibrantly exactly why I love the season….the stunning colors! I knew from the start of this creation that I wanted the embellishment focal point to be the Autumn Button Border.
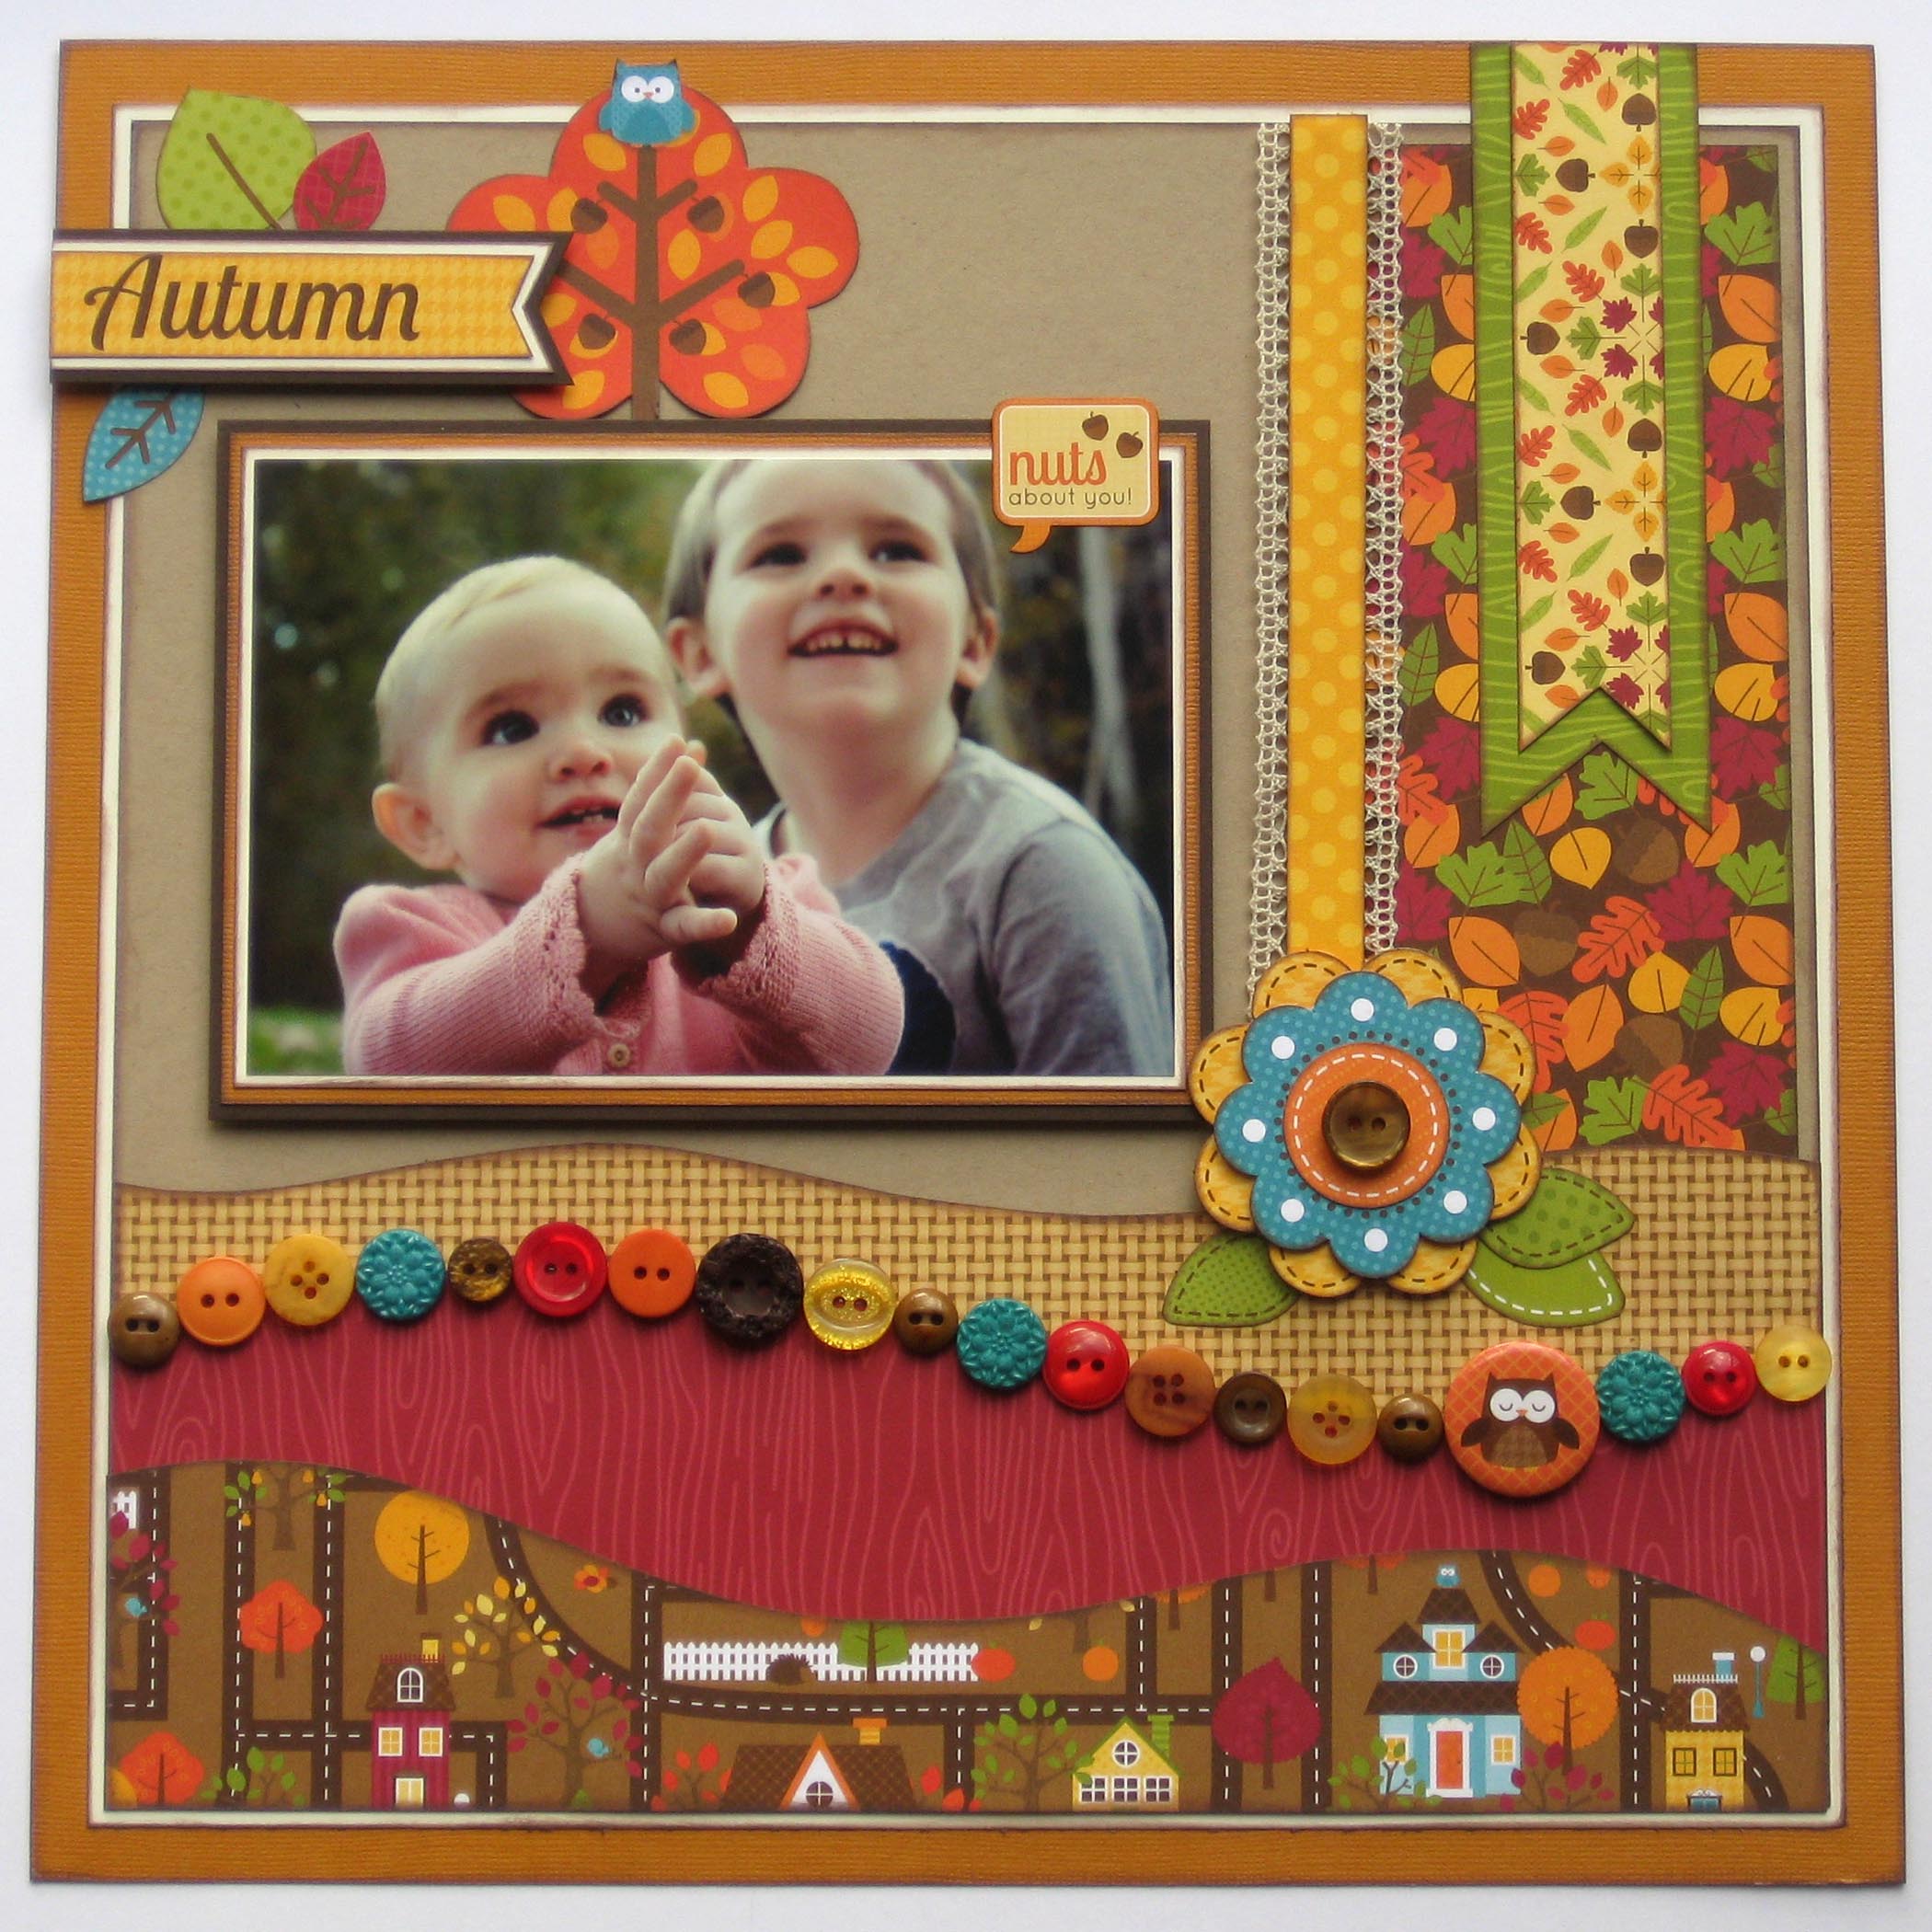
Here is what you will need to create this Autumn Button Border layout.
Project Recipe:
I wanted a true mixture of all of the rich colors of this paper collection, when creating this Autumn Button Border. I think the combination of the buttons and the coordinating embellishments from the paper collection were a perfect match.
Thank you so much for stopping by. If you would like to check out more of my button and paper crafting creations, please check out my blog Scrappy Chick Designs.
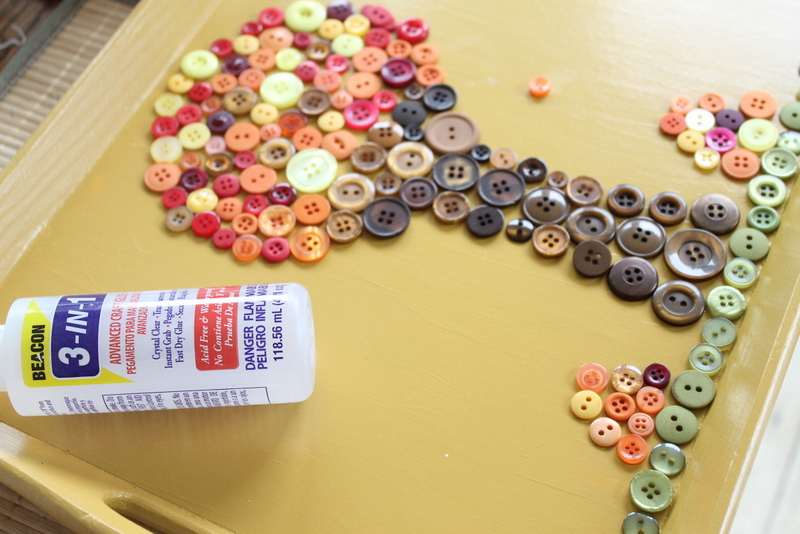
My fall button serving tray is one of my favorite buttons projects I have ever made. Plus it is easy to make which is a win win right? Grab your buttons and a thrift store tray to get started making your own version. Don’t need a serving tray for fall? Maybe use this same idea with a button ornament in the center for Christmas? Or a heart in the center for Valentine’s Day? I can think of all sorts of different tray designs for all seasons of the year.

I started with a tray from the thrift store for 99 cents and a bottle of Americana gloss enamels in Antique Gold.
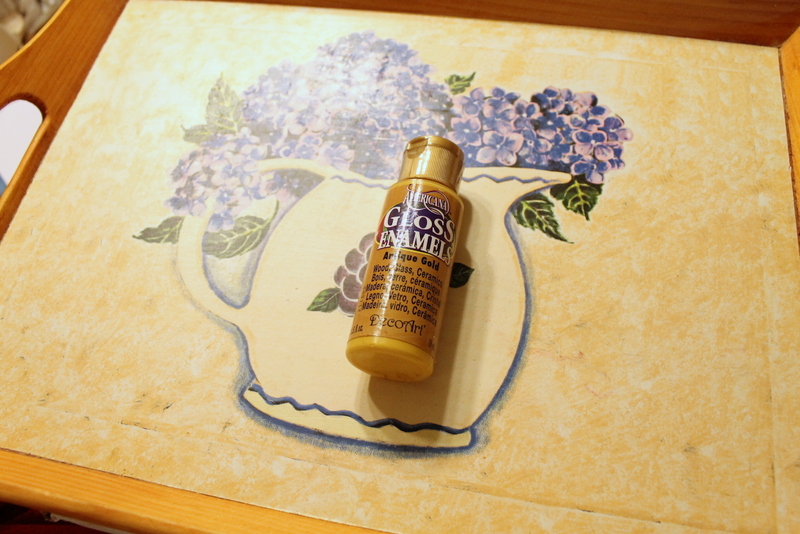
I painted my entire tray with 2 coats of the paint then grabbed some fall themed buttons from Buttons Galore and More.
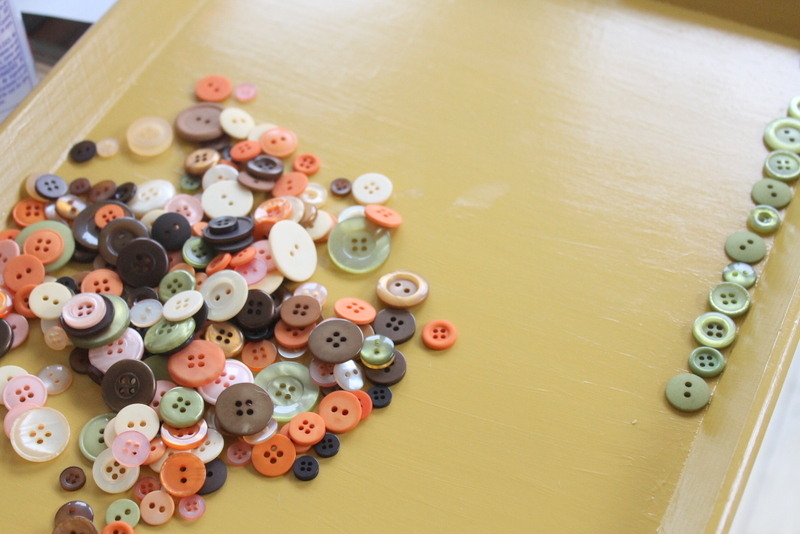
I laid the buttons out on my tray until I was happy with the arrangement. I then used my 3 in 1 Beacon adhesive to glue them directly to the tray.
Once the glue was completely dry, I mixed a two coat epoxy to make my tray nice and smooth. Don’t be afraid of epoxy! Just mix and pour according to the package directions. I spent quite a bit of time using a flame to pop bubbles that come up from the epoxy itself and the buttons. Yes my finished project still has a few bubbles but overall it looks amazing. The buttons seem to create more bubbles than is normal with an epoxy project.
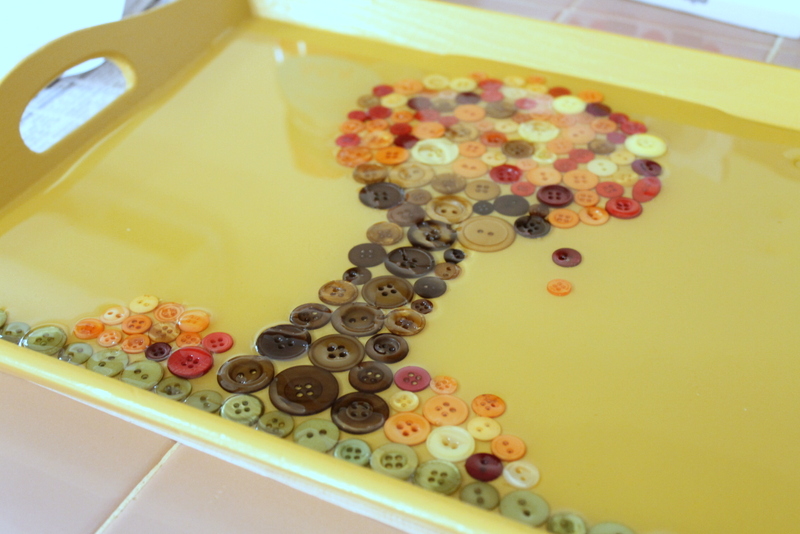
Allow your epoxy to dry for a nice long time before you touch it (don’t be tempted to touch!!). You will be left with a glossy flat serving tray with buttons in it! Now some of my buttons stick up just slightly out of the epoxy (there is a slight hump in the epoxy). This can easily be fixed with a second epoxy pour however the bumps do not really bother me for my needs so I am leaving them. You could also be extra careful when choosing buttons for your design and choose only the flattest buttons to include.
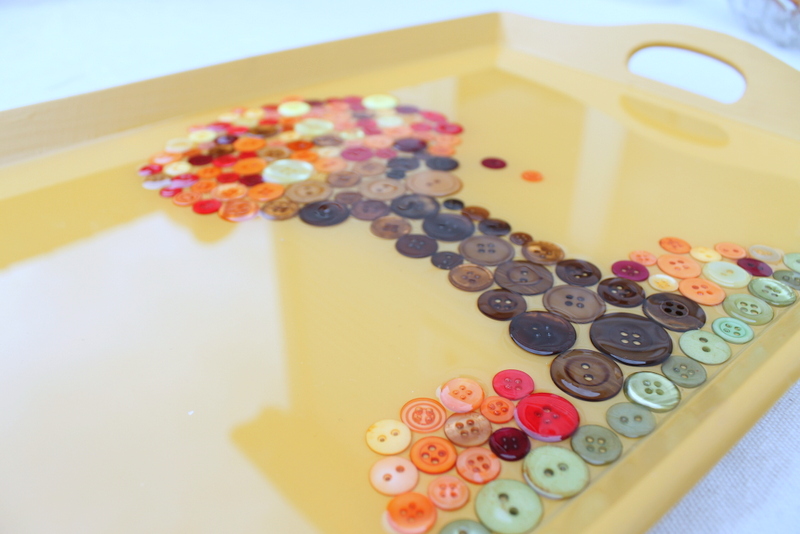
Just so you can see my entire button fall scene here is a picture of the entire tray.
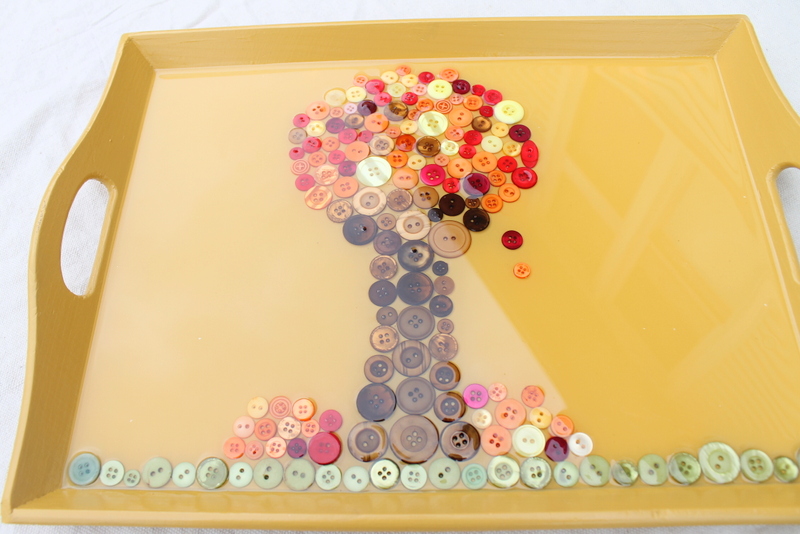
It is so darn cute I could eat it up. Speaking of eat it up, use your fall tray to serve snacks to the kids or for a wonderful addition to your Thanksgiving and fall themed parties. Want more buttons on your Thanksgiving table? Be sure to check out my rustic burlap napkin rings as well.
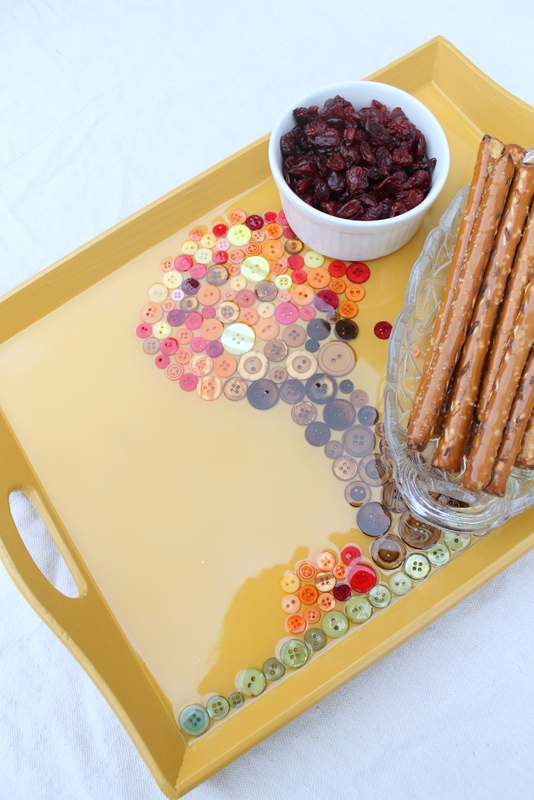
Will you be adding buttons to a tray anytime soon? Don’t let that epoxy pour scare ya! My fall button serving tray will make an appearance at our Thanksgiving meal and many snacks in the meantime.
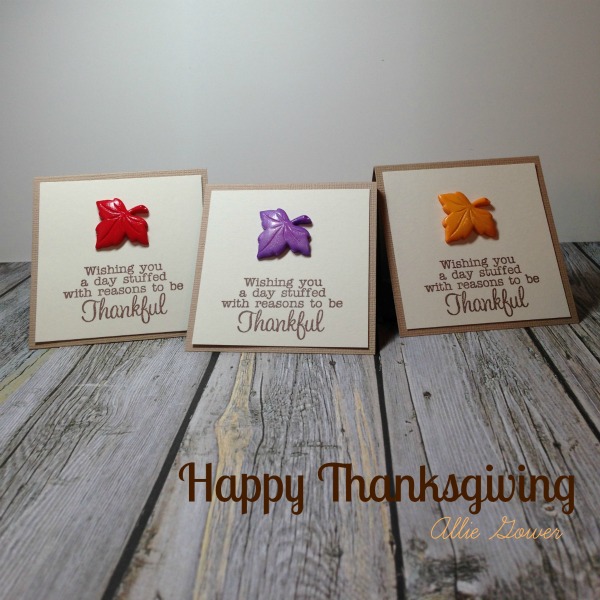
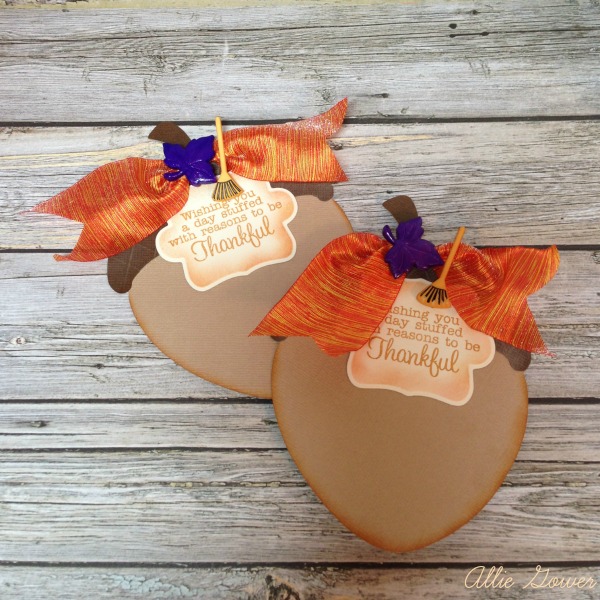
Wishing you a day stuffed with reasons to be Thankful … with this set of Thankful Cards. Create clean and simple Thank you cards with a stamped sentiment, two colors of card stock and the lovely leaf buttons from the Autumn Value pack. Adhere everything together with Mini Glued dots and you have a wonderful set of thankful cards to use this holiday season.

Autumn Value Pack
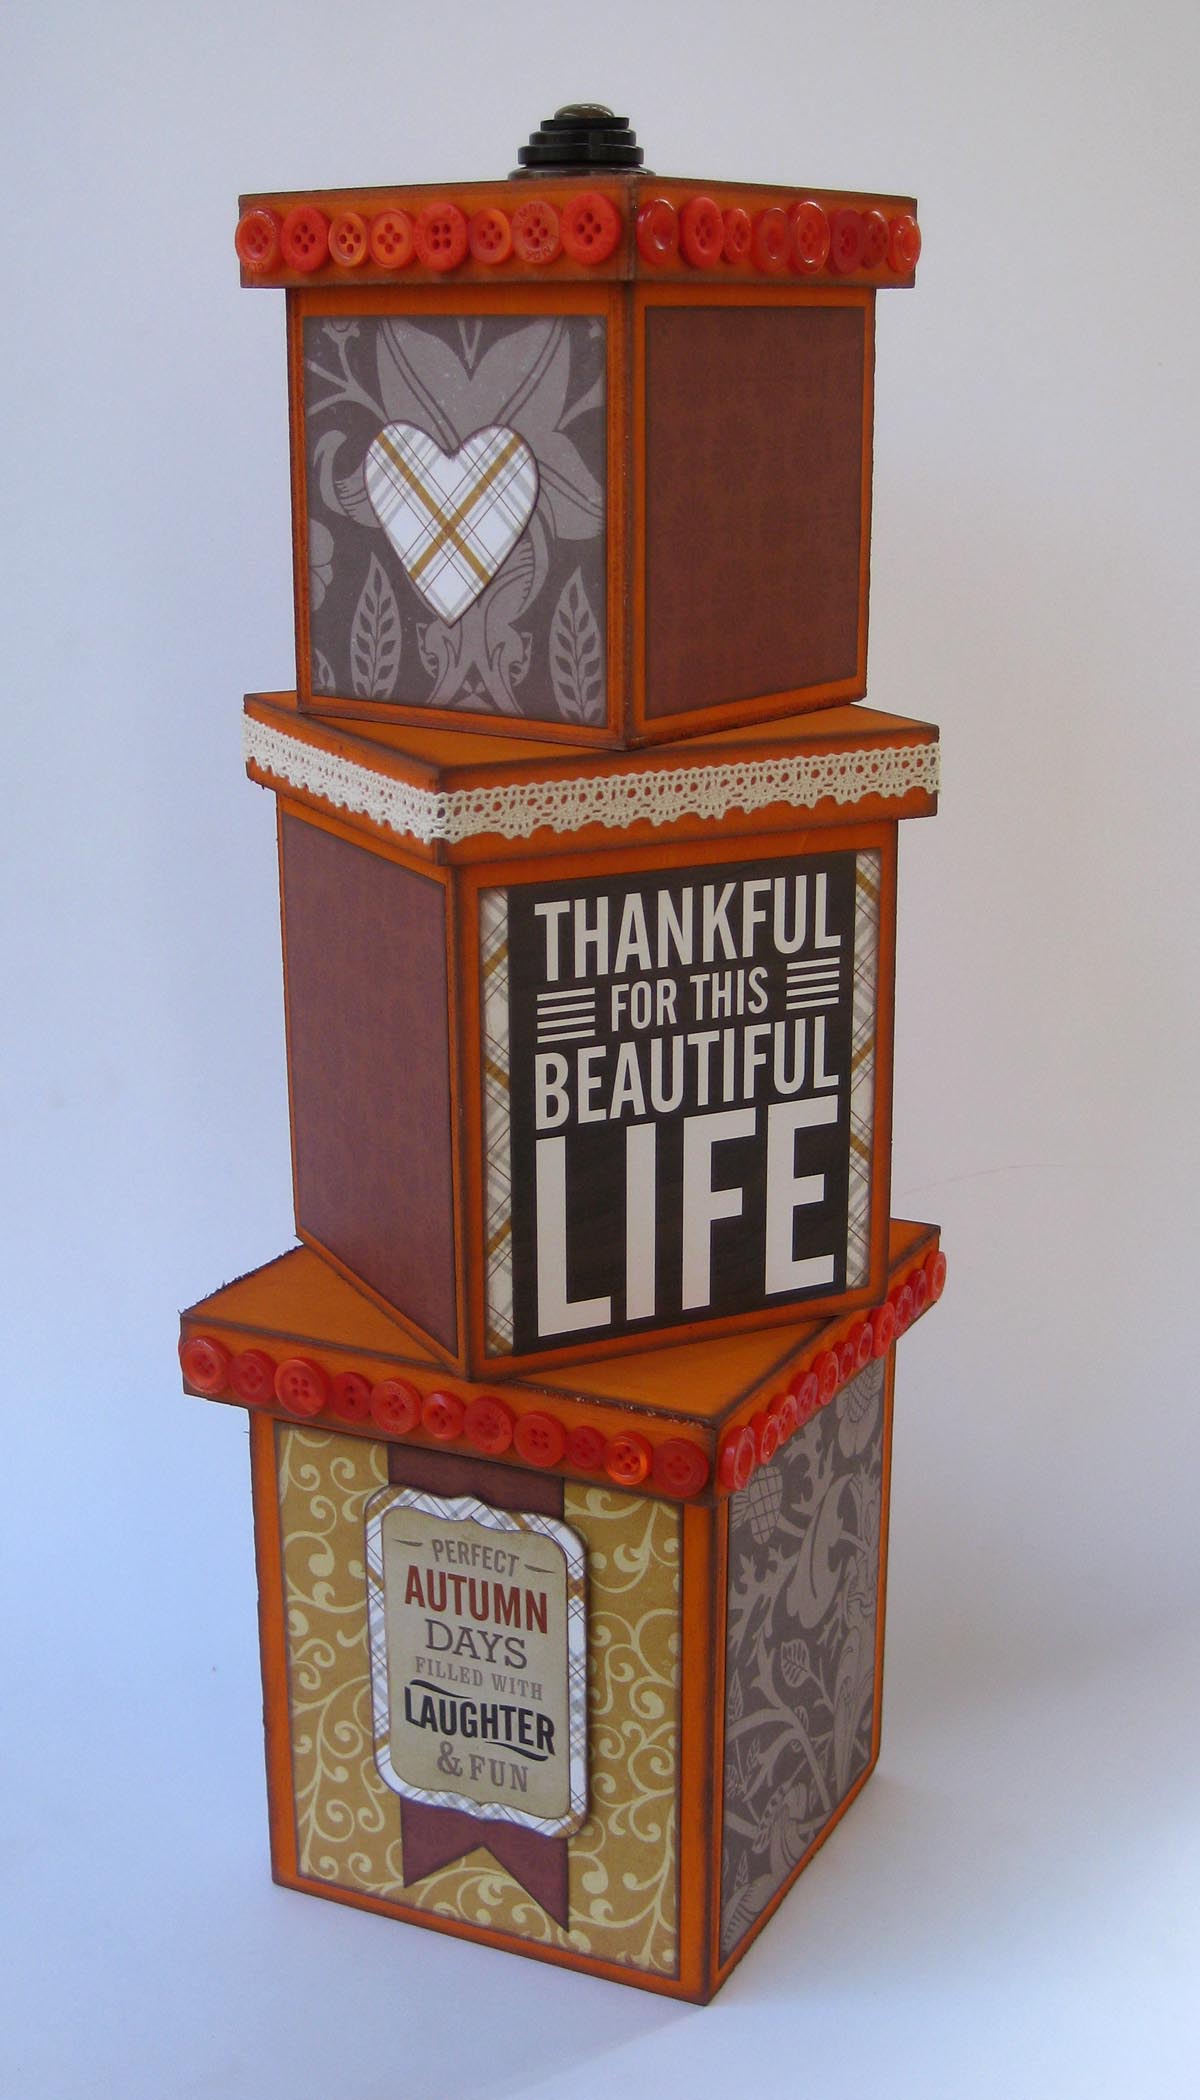
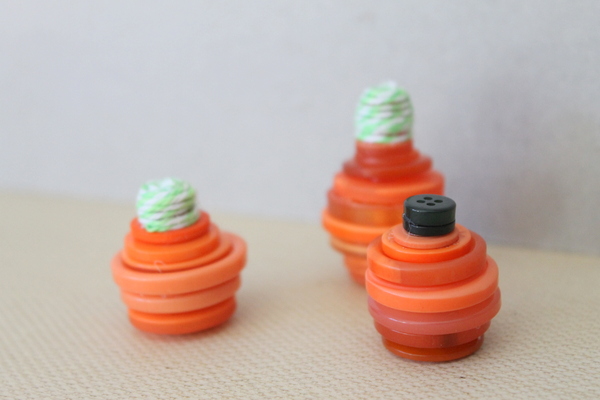
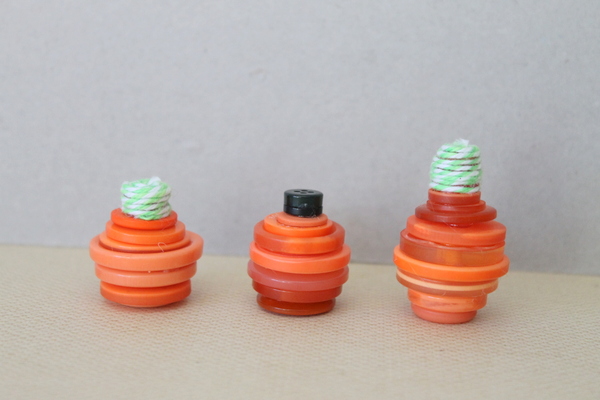
These Button Pumpkin Stacking Boxes could be the perfect addition to your Autumn and Thanksgiving home decor. This post will give you a step by step tutorial on how to create something like these Button Pumpkin Stacking Boxes for your home.
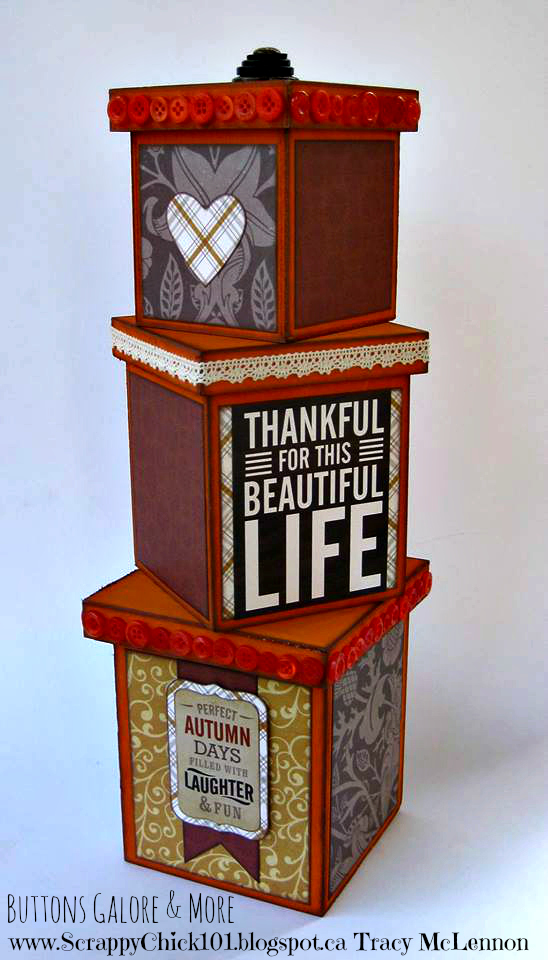
Project Recipe:

I started creating my Button Pumpkin Stacking Boxes by painting all the boxes and their lids with Spiced Pumpkin paint. I used a foam brush and it only took one coat of paint.
Once I had my boxes painted I then inked all the edges to give more of a distressed look.
My next step was to cut patterned paper to fit on 4 sides of each of the boxes. I chose Echo Parks Fall Reflections Collection.
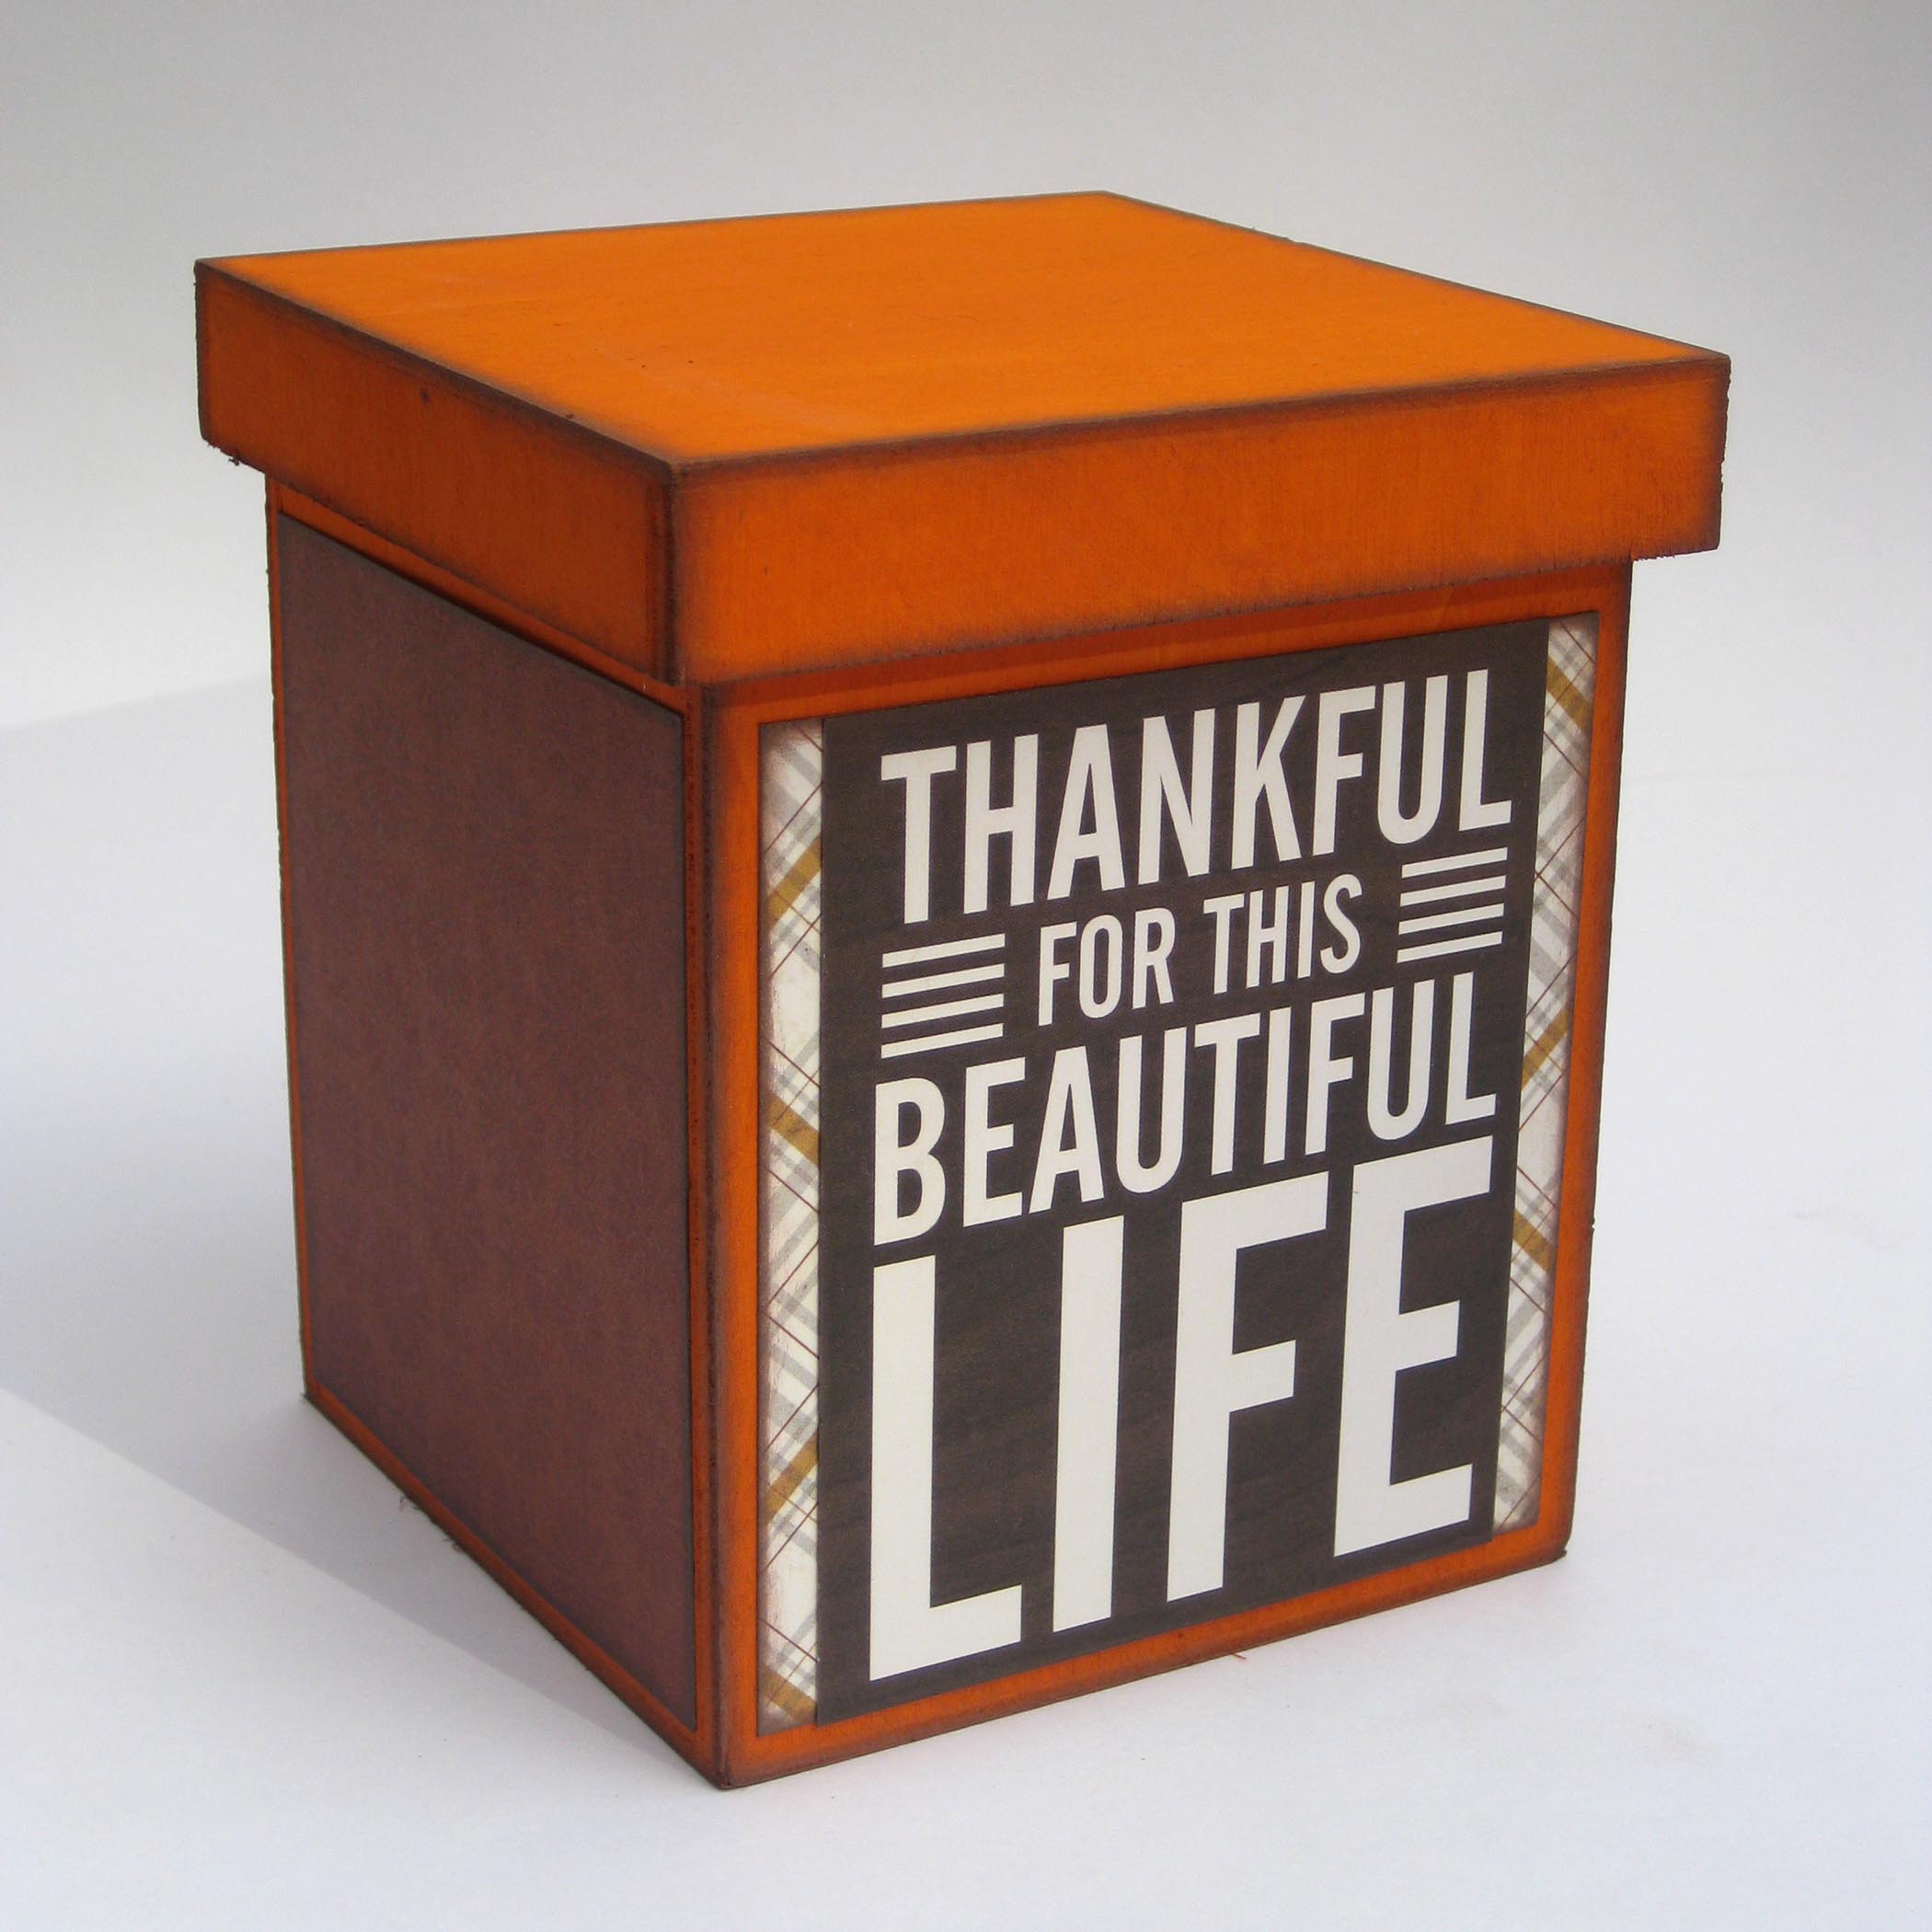
On the top and smallest of the Button Pumpkin Stacking Boxes I created a pumpkin stem by stacking brown buttons. I also added orange buttons around the lid of the smallest and the largest of the Button Pumpkin Stacking Boxes.
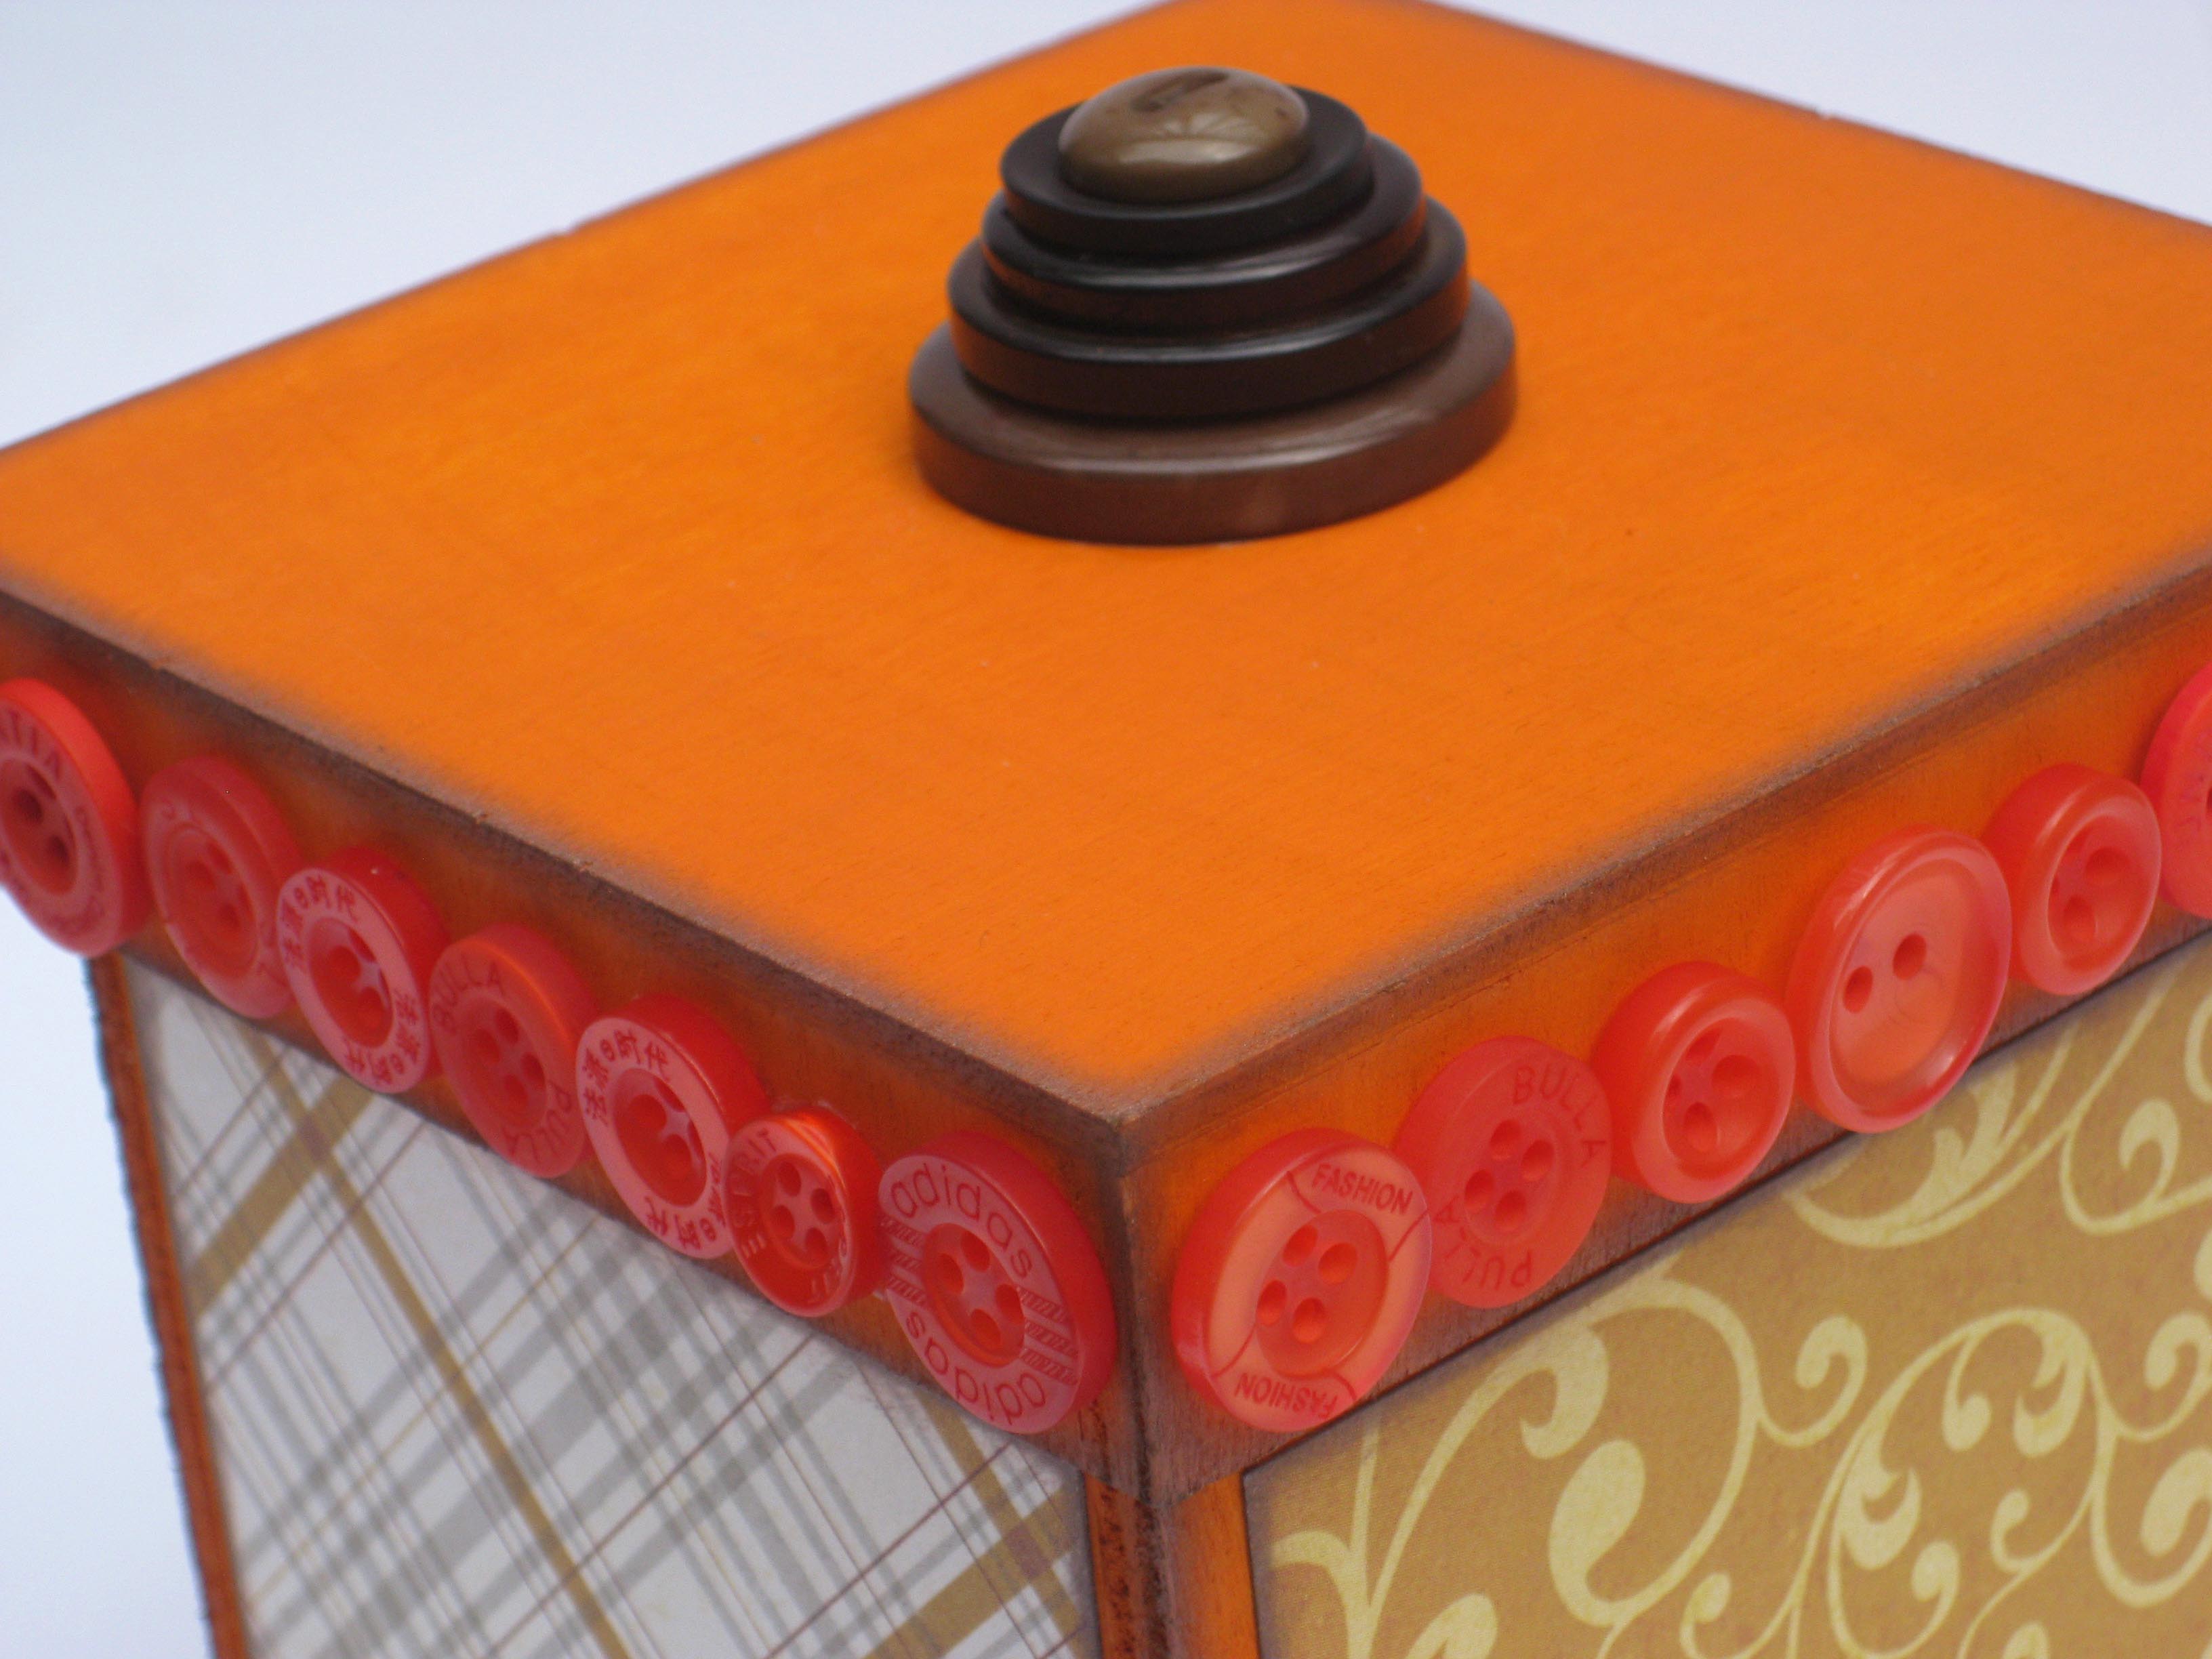
Then all there was left to do, was add a few more simple embellishments.
My Button Pumpkin Stacking Boxes are now ready to warm up my home’s decor for the holidays.
If you would like to check out more of my button and paper crafting creations, check out my blog Scrappy Chick Designs by clicking HERE. Thank you so much for stopping by.
My family hikes or goes for a bike ride every weekend and, inevitably, we always return home with a leaf, feather, or pine cone. The natural bits and bobs were piling up on the table, so I decided to create a nature mobile. I love how we can now display our finds in a piece of artwork and nothing is glued down, so we can change it out whenever we want.
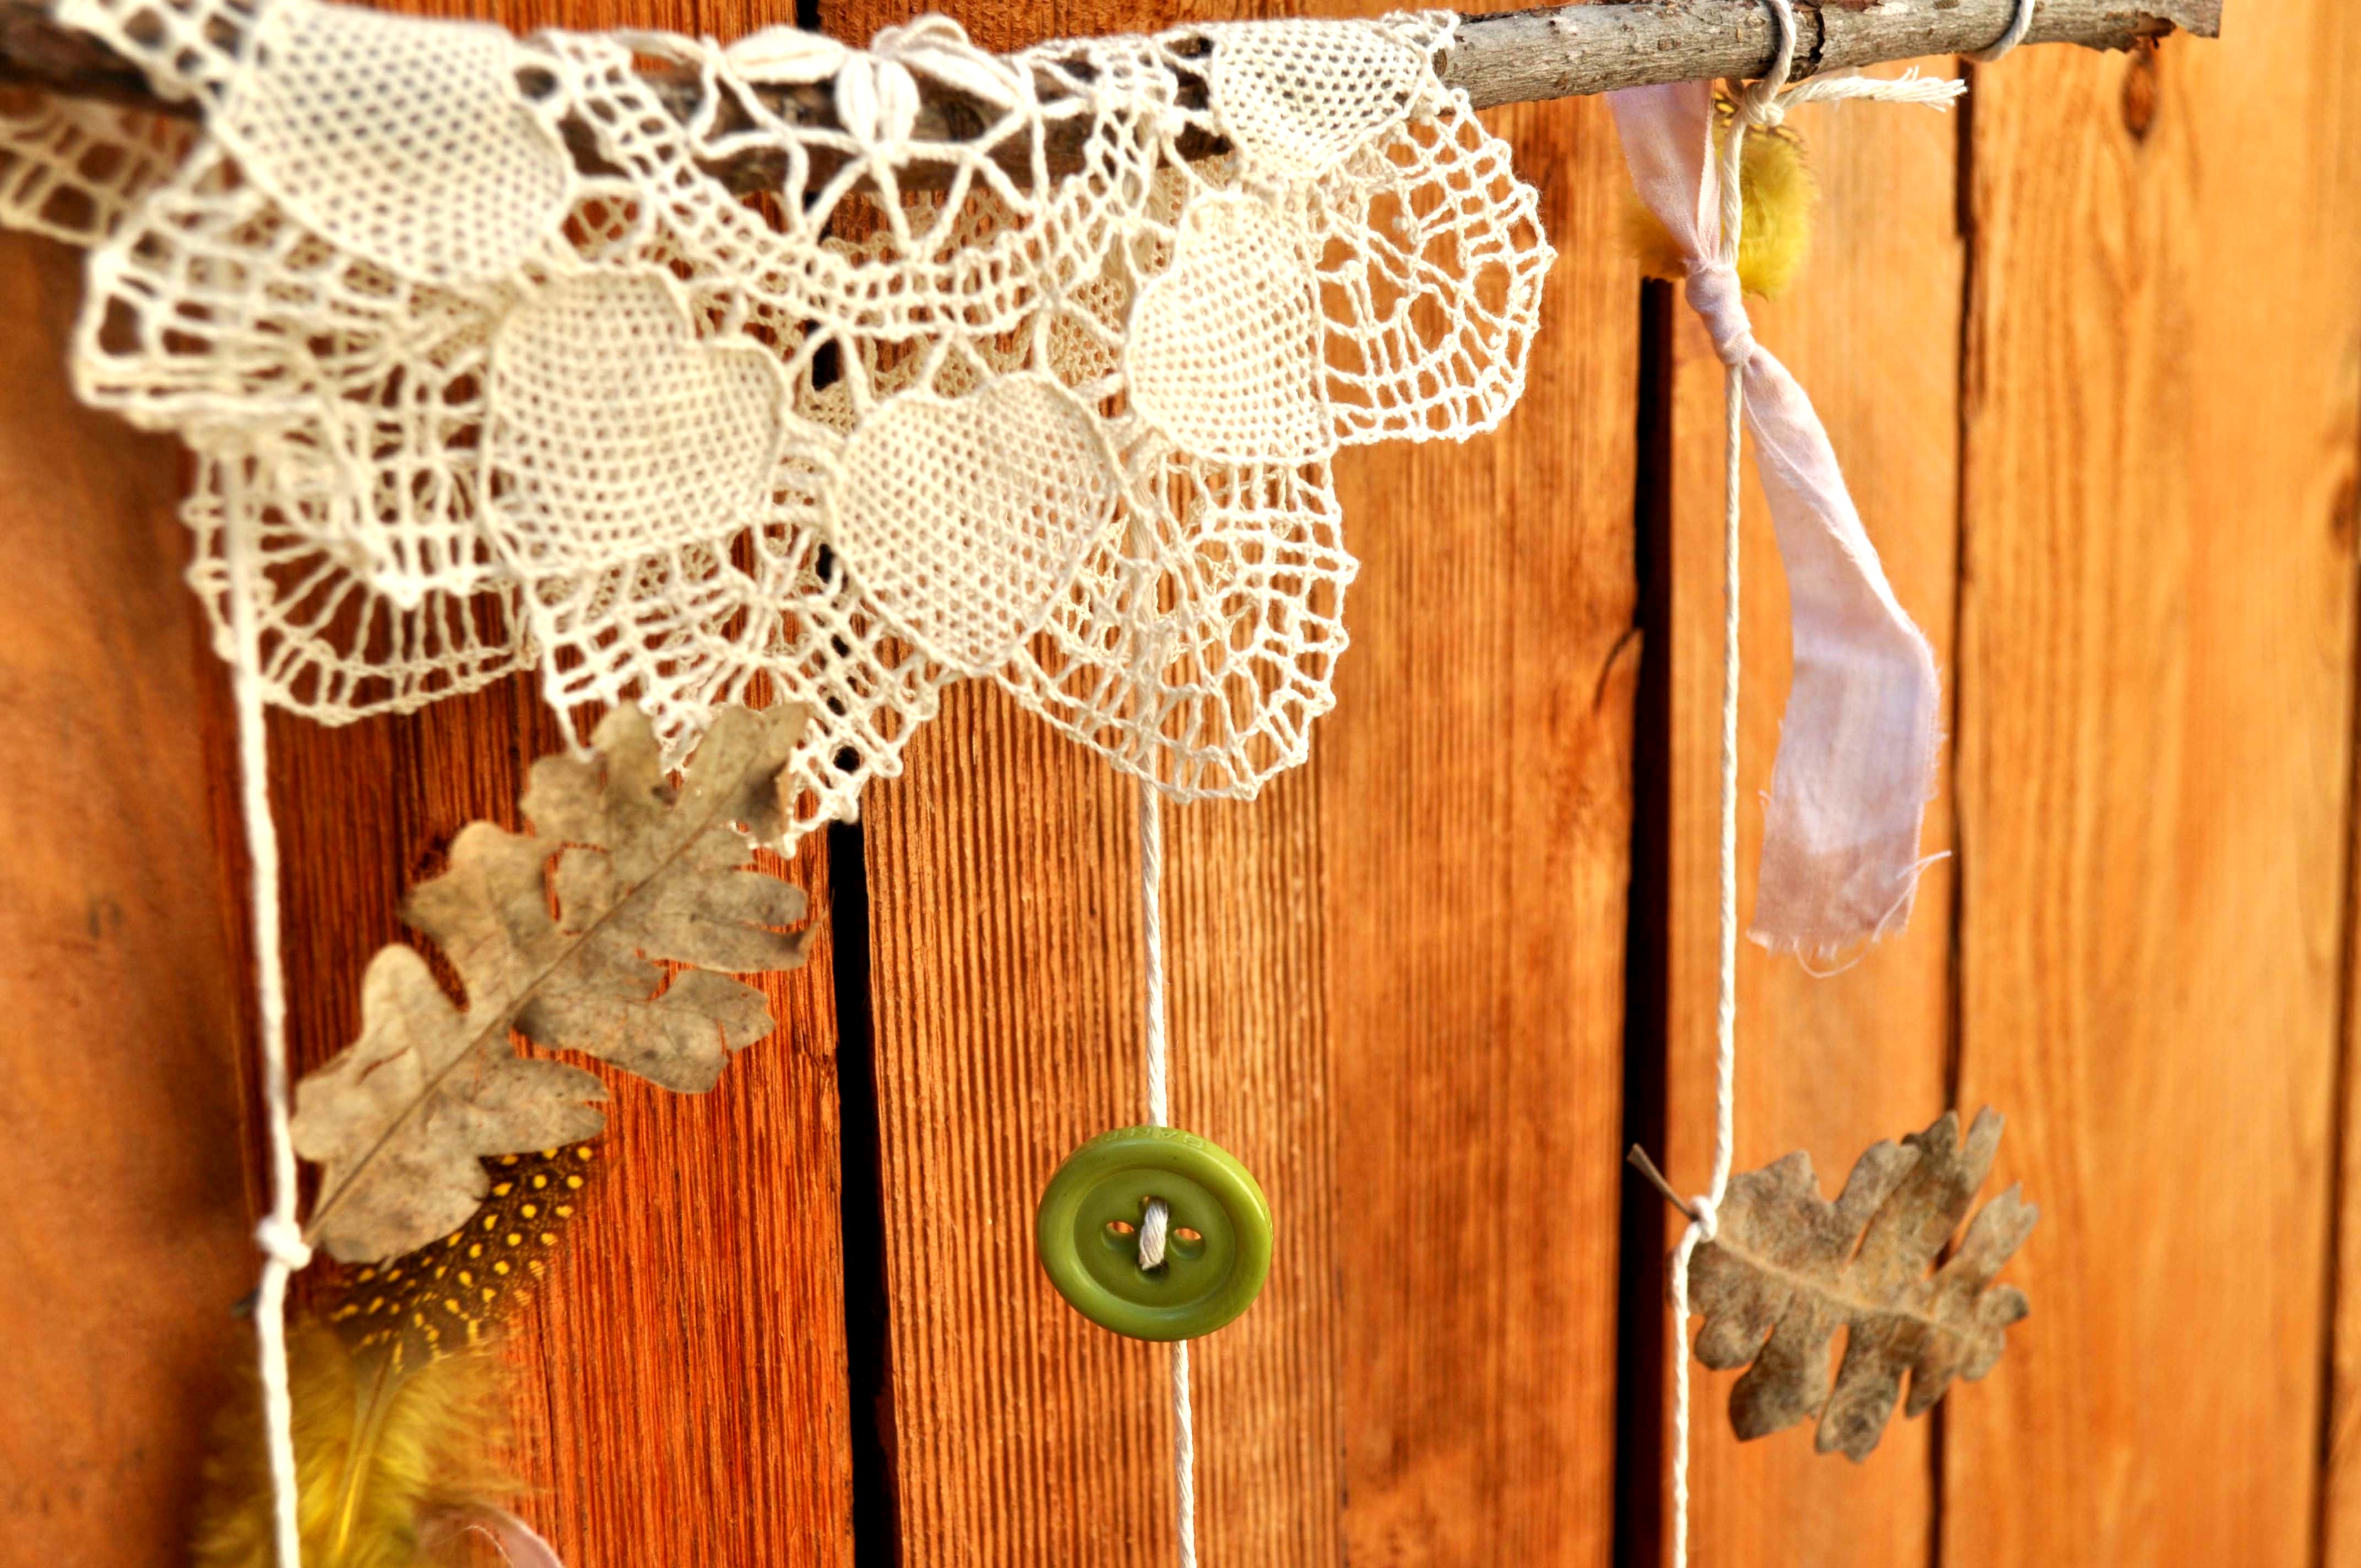
Supplies:

Instructions:
Thanks for stopping by today. Find out how to make another nature display on my blog, Laura Bray Designs.
![]()
Tis the season to say Thanks a Bunch … so glad you’re here today.
Autumn Value Pack
Create simple and elegant cards with card stock and button embellishments. Buttons Galore and more carries novelty buttons in almost any theme imaginable. Many buttons are available in both small variety packs and in large bulk packaging. Adhesives are also carried in the store.
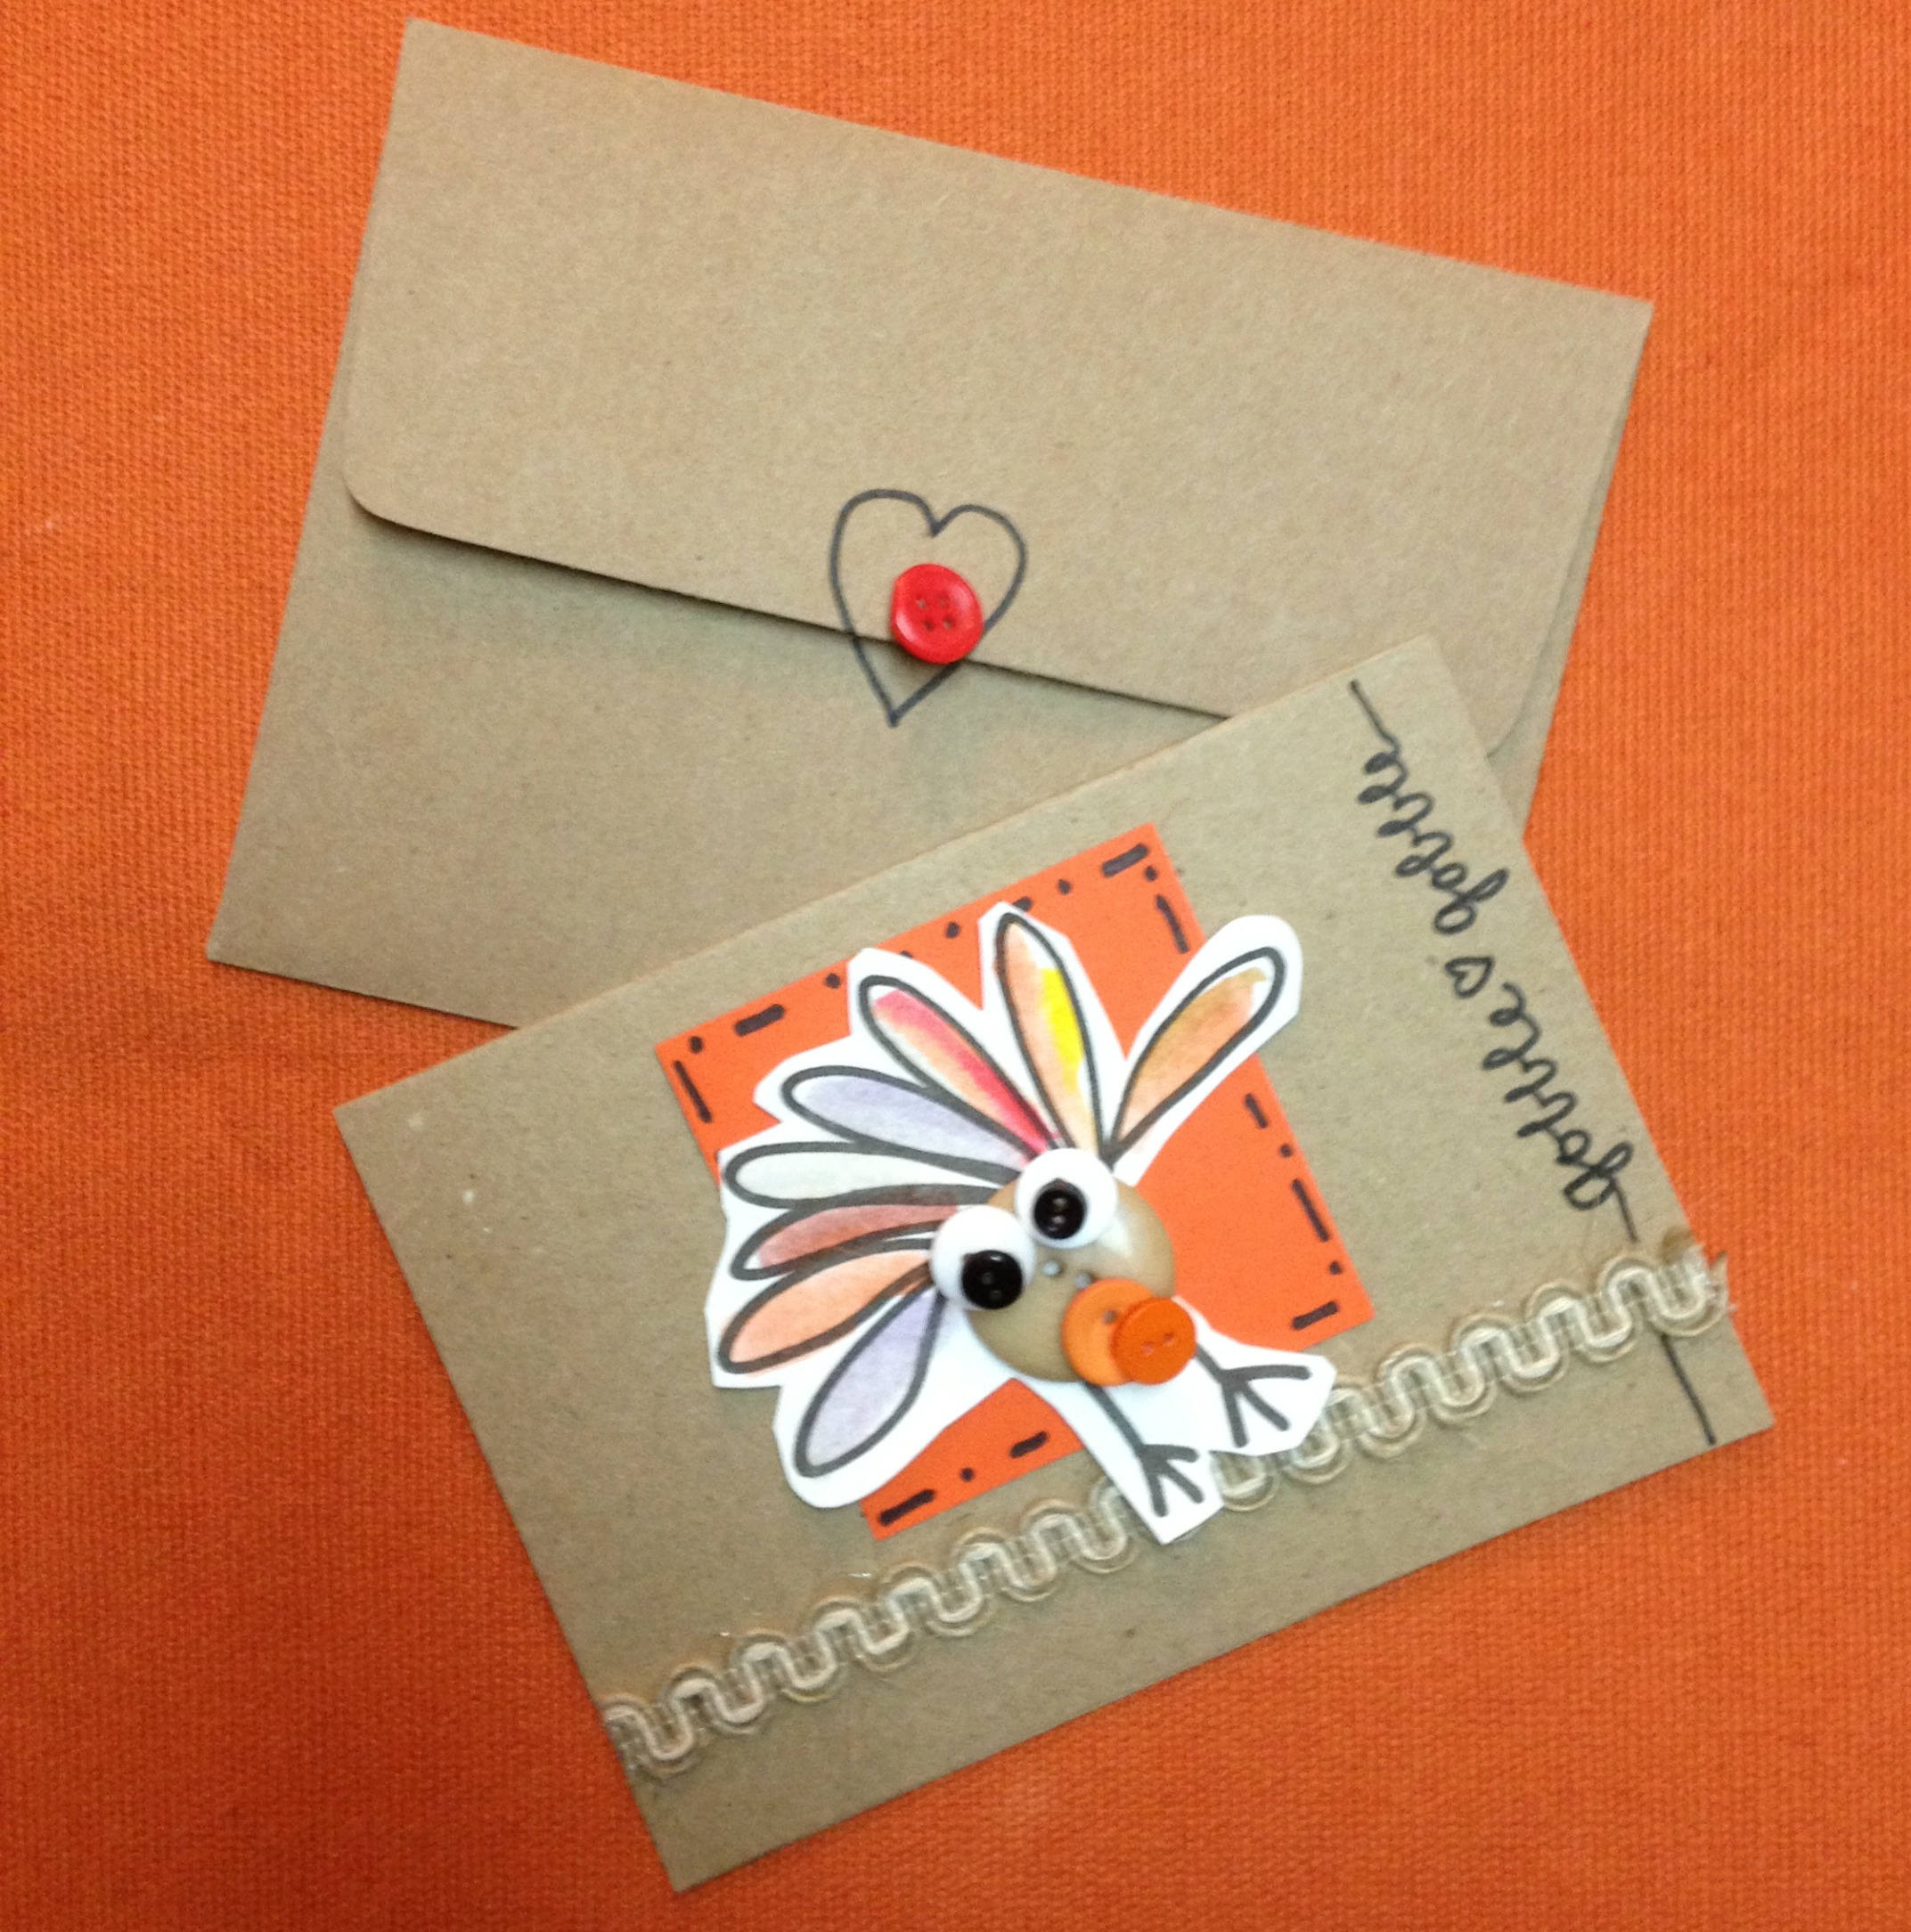
Here are two really simple to make Thanksgiving card ideas using buttons from my collection with Buttons Galore. They are so much fun that you might want to gobble gobble about them after you create your own! I used pre-cut note cards and envelopes from my local craft store. They come in all kinds of colors. I also used trims that I had on hand and glue dots along with a downloadable doodle design sheet.
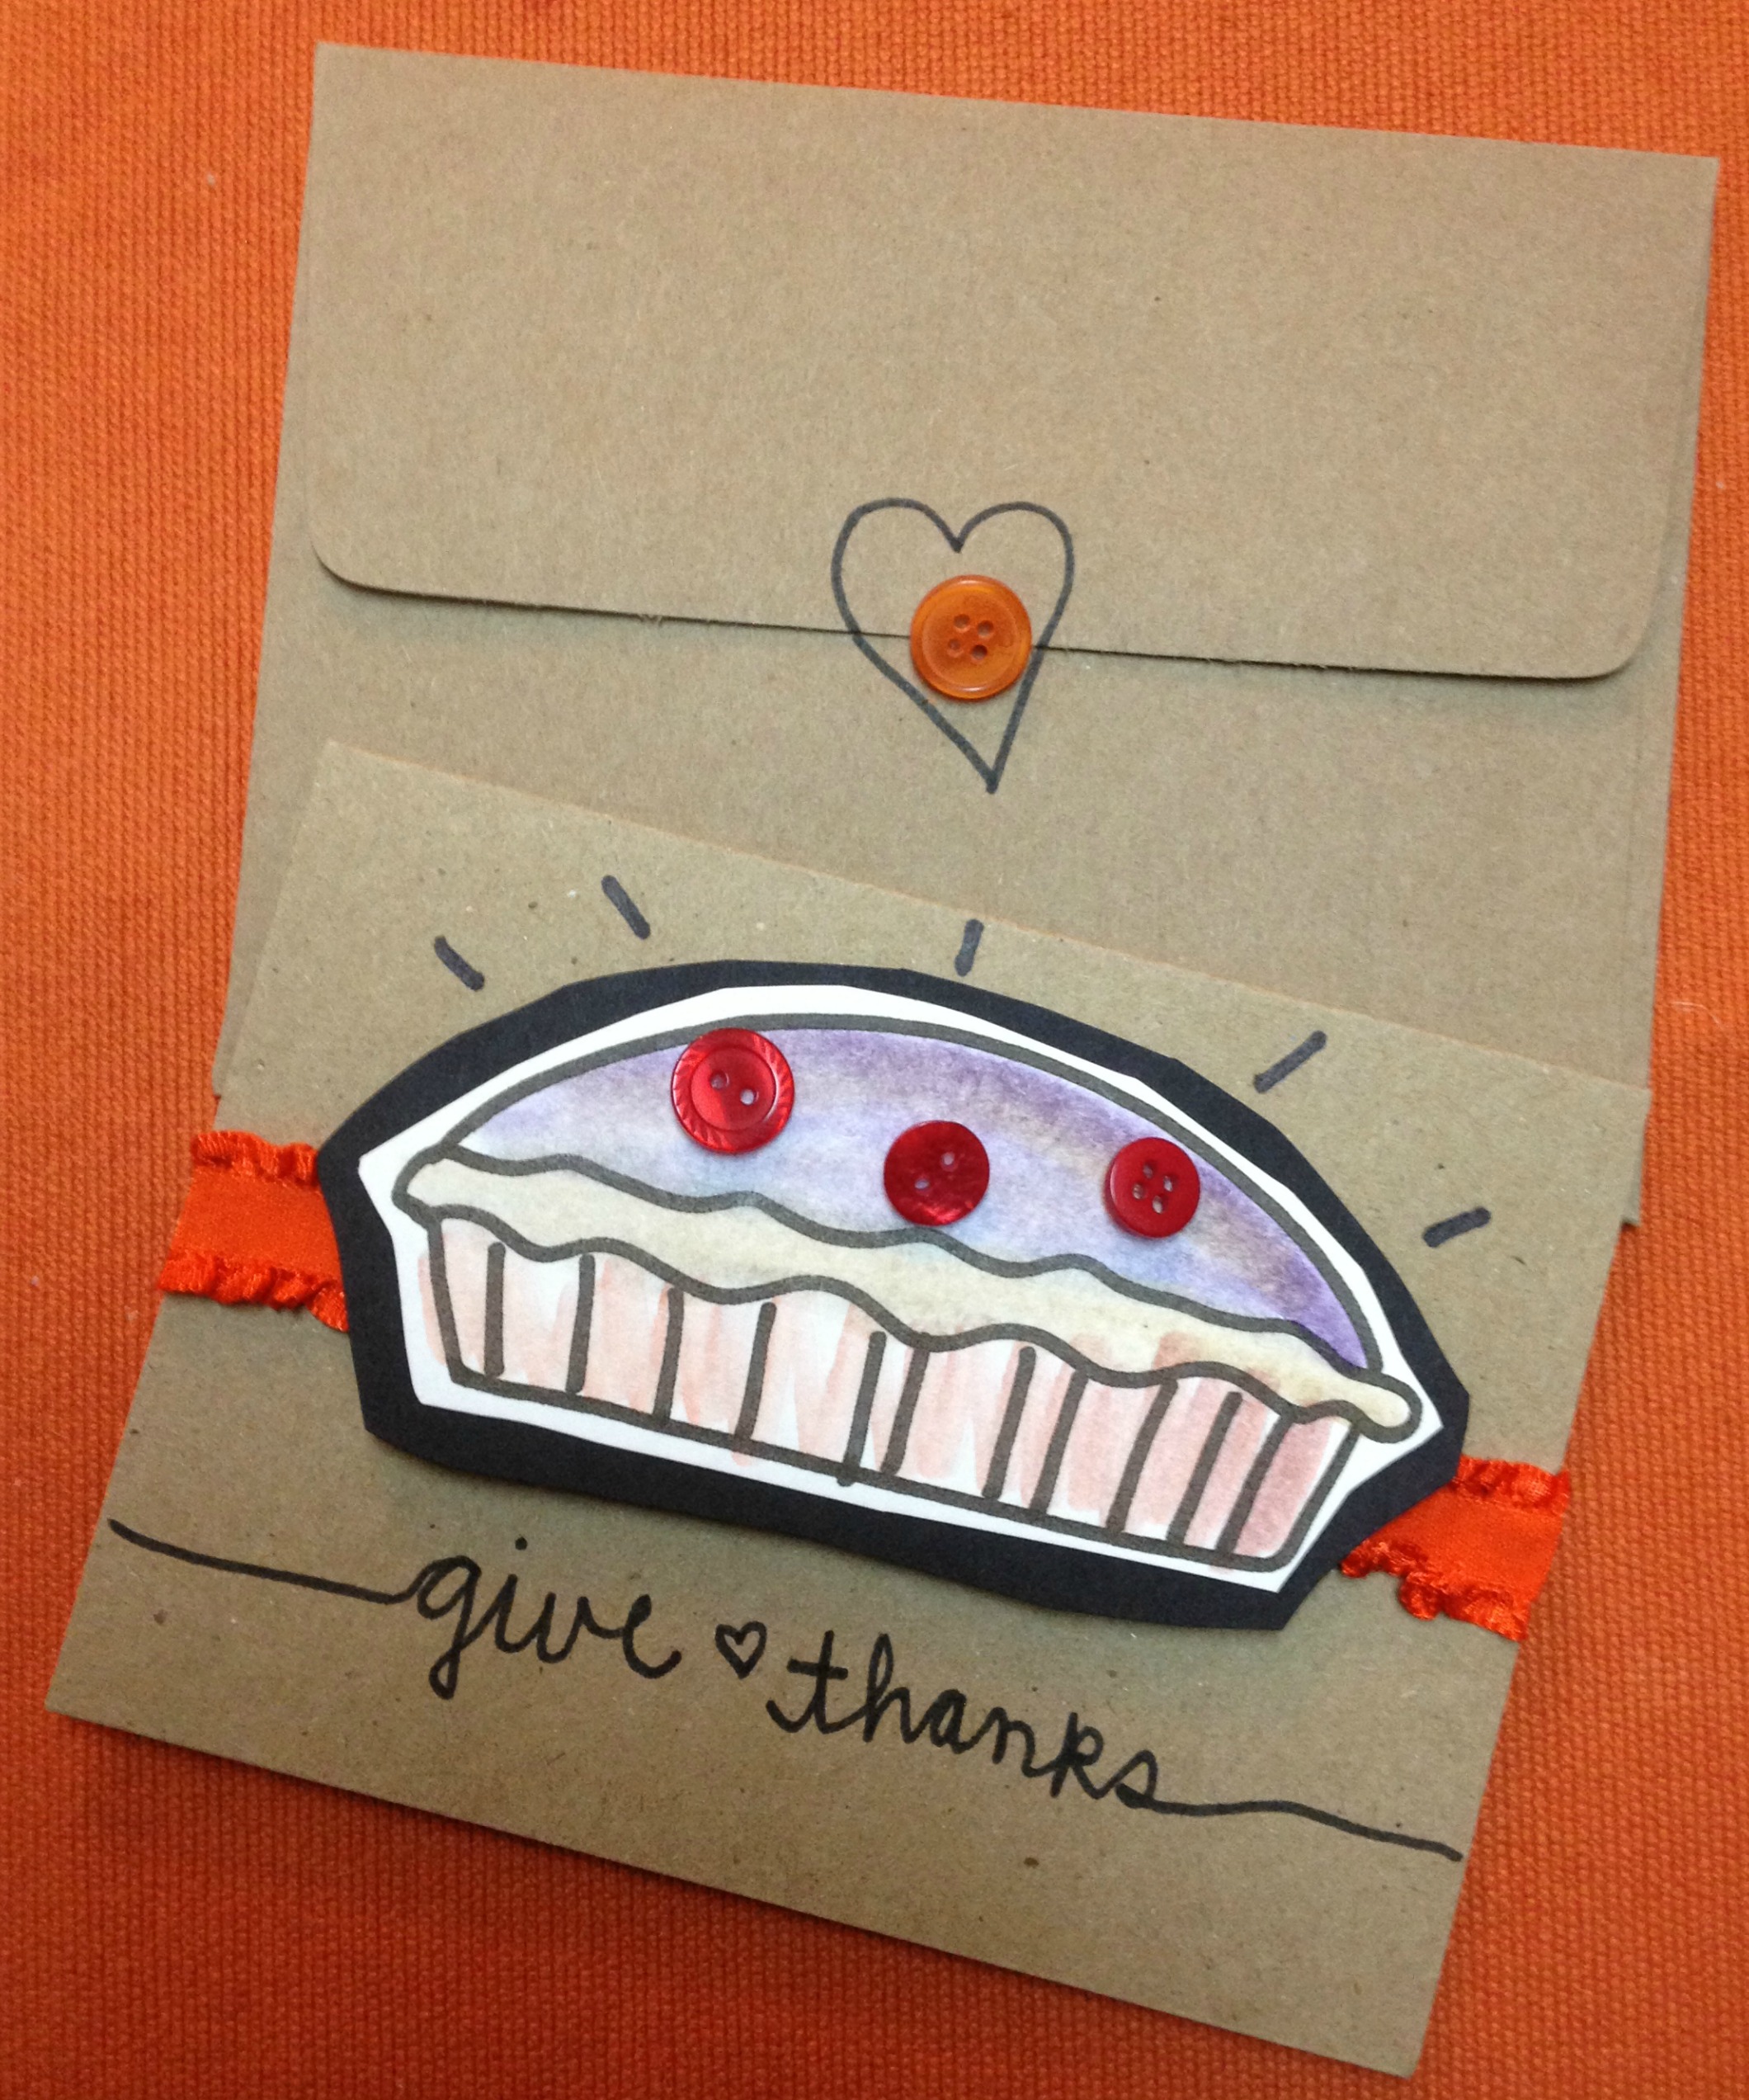
To make them you can draw your own pie and turkey background or you can download the template for free on my website in another Thanksgiving post that shares ideas of ways to use buttons to create some Thanksgiving fun. You can click here to get to my blog post to get the downloadable printable or on the picture below.
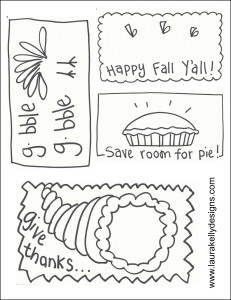
Either way, when you have you backgrounds drawn or printed, color them in and cut them out. The next step is to use Glue Dots to add a border of some sort using whatever trim or ribbon you have on hand. You could also use washi tape. Then Add your cutouts either directly or mounted on colored card stock and add buttons to create the 3-D effect. The colors I used are Outrageous Orange, Radically Red, Black Beauty, and Bold Brown.
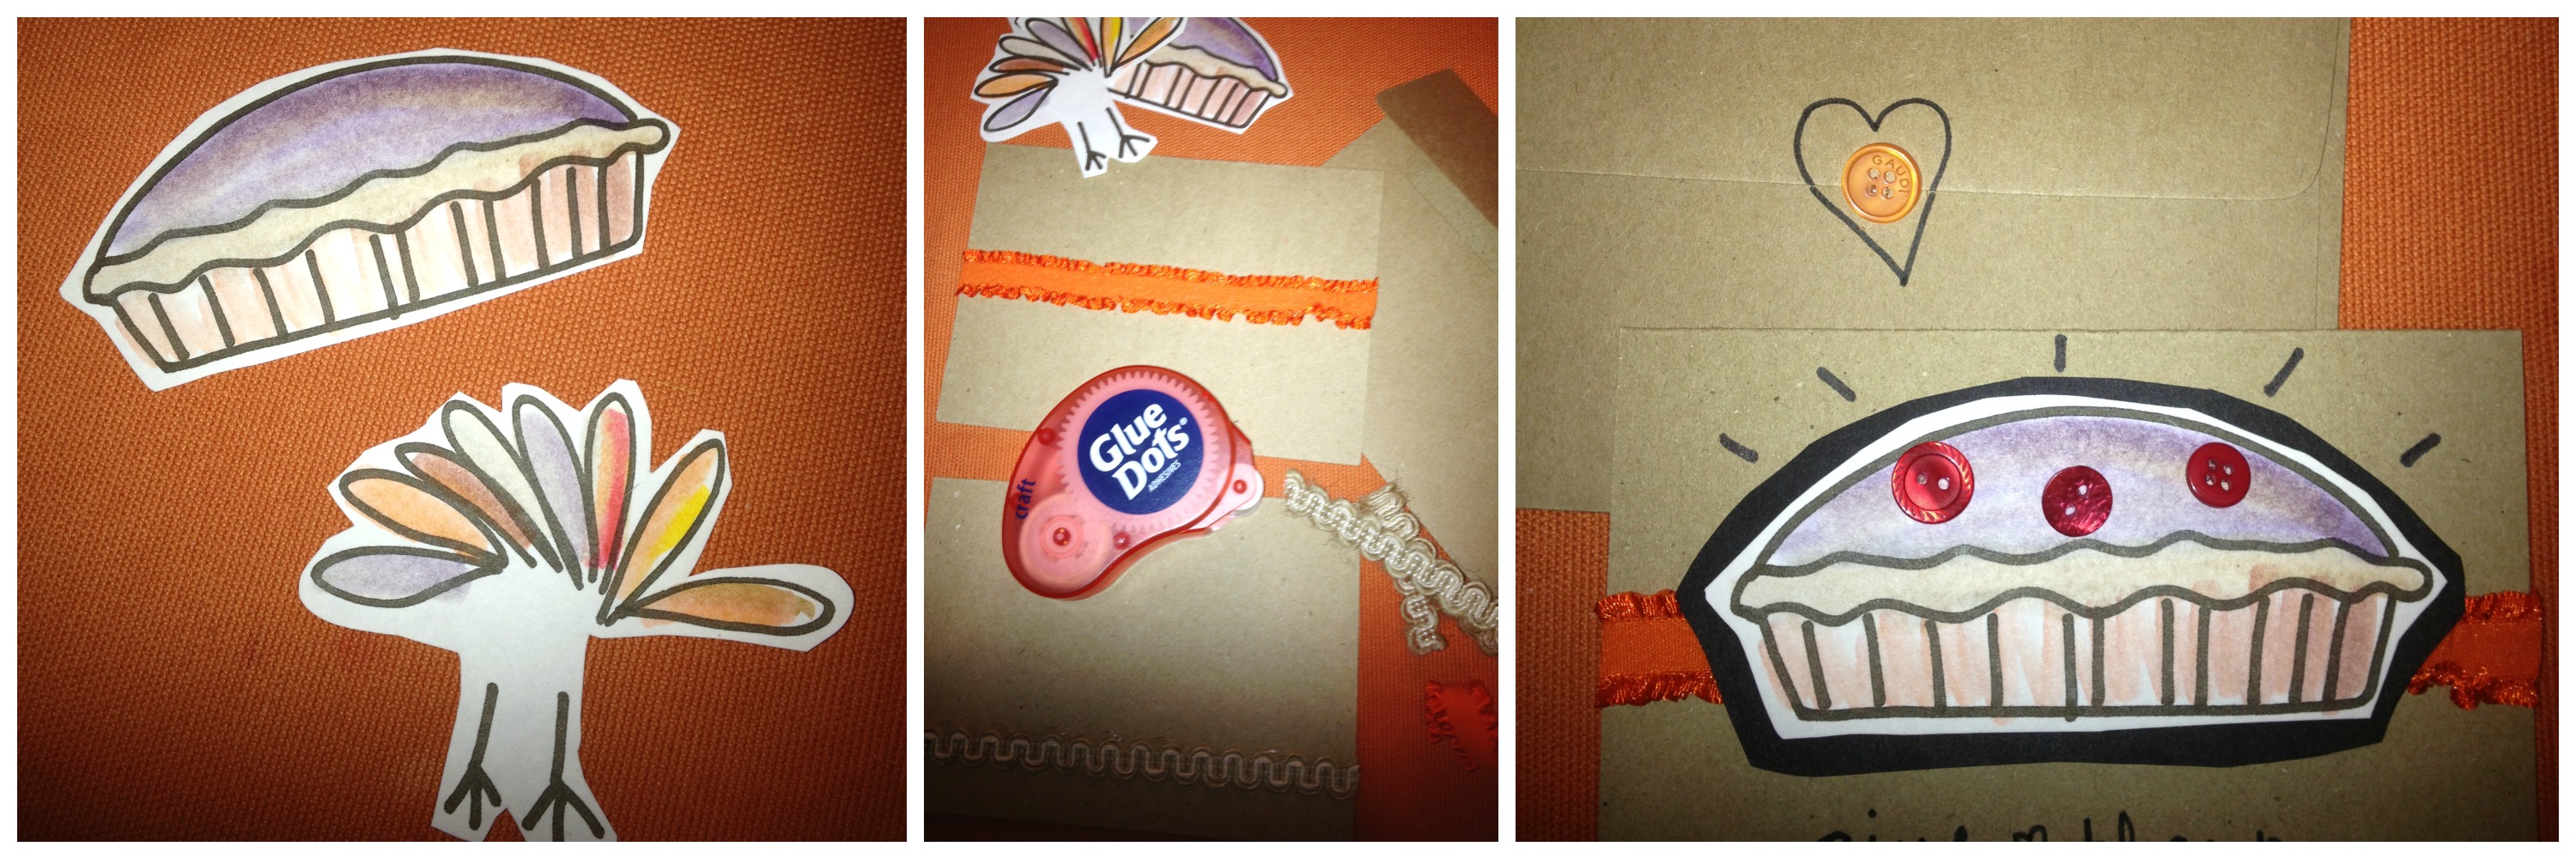
If you want to add words to your cards you can, or you can leave them with your crafty design to speak for itself. If you are hand delivering, add a heart and a button to the back of the envelope. I am in love with the turkey doodle card. Gobble Gobble.
Happy Preparing For Thanksgiving,
Laura
Create a cute Fall Mum Jar for your table. Fill with your favorite treats or use to store things.
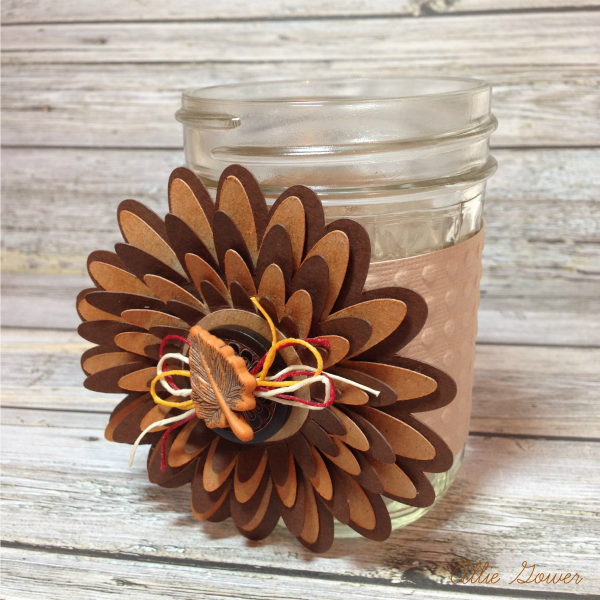
Autumn Value Pack
Wishing you a day stuffed with reasons to be Thankful … with this set of Thankful Cards.
Autumn Value Pack
I am getting ready for a DIY Autumn Craft Night at my studio and I have these super cute little Halloween trinket tokens, lucky pumpkins! I wanted to wrap them up in a festive way for favors and this is what I came up with…mini autumn gift bags. I really like them because the buttons can be part of the favor as they can be reused on projects that my guests make when they get back to their studios and homes.
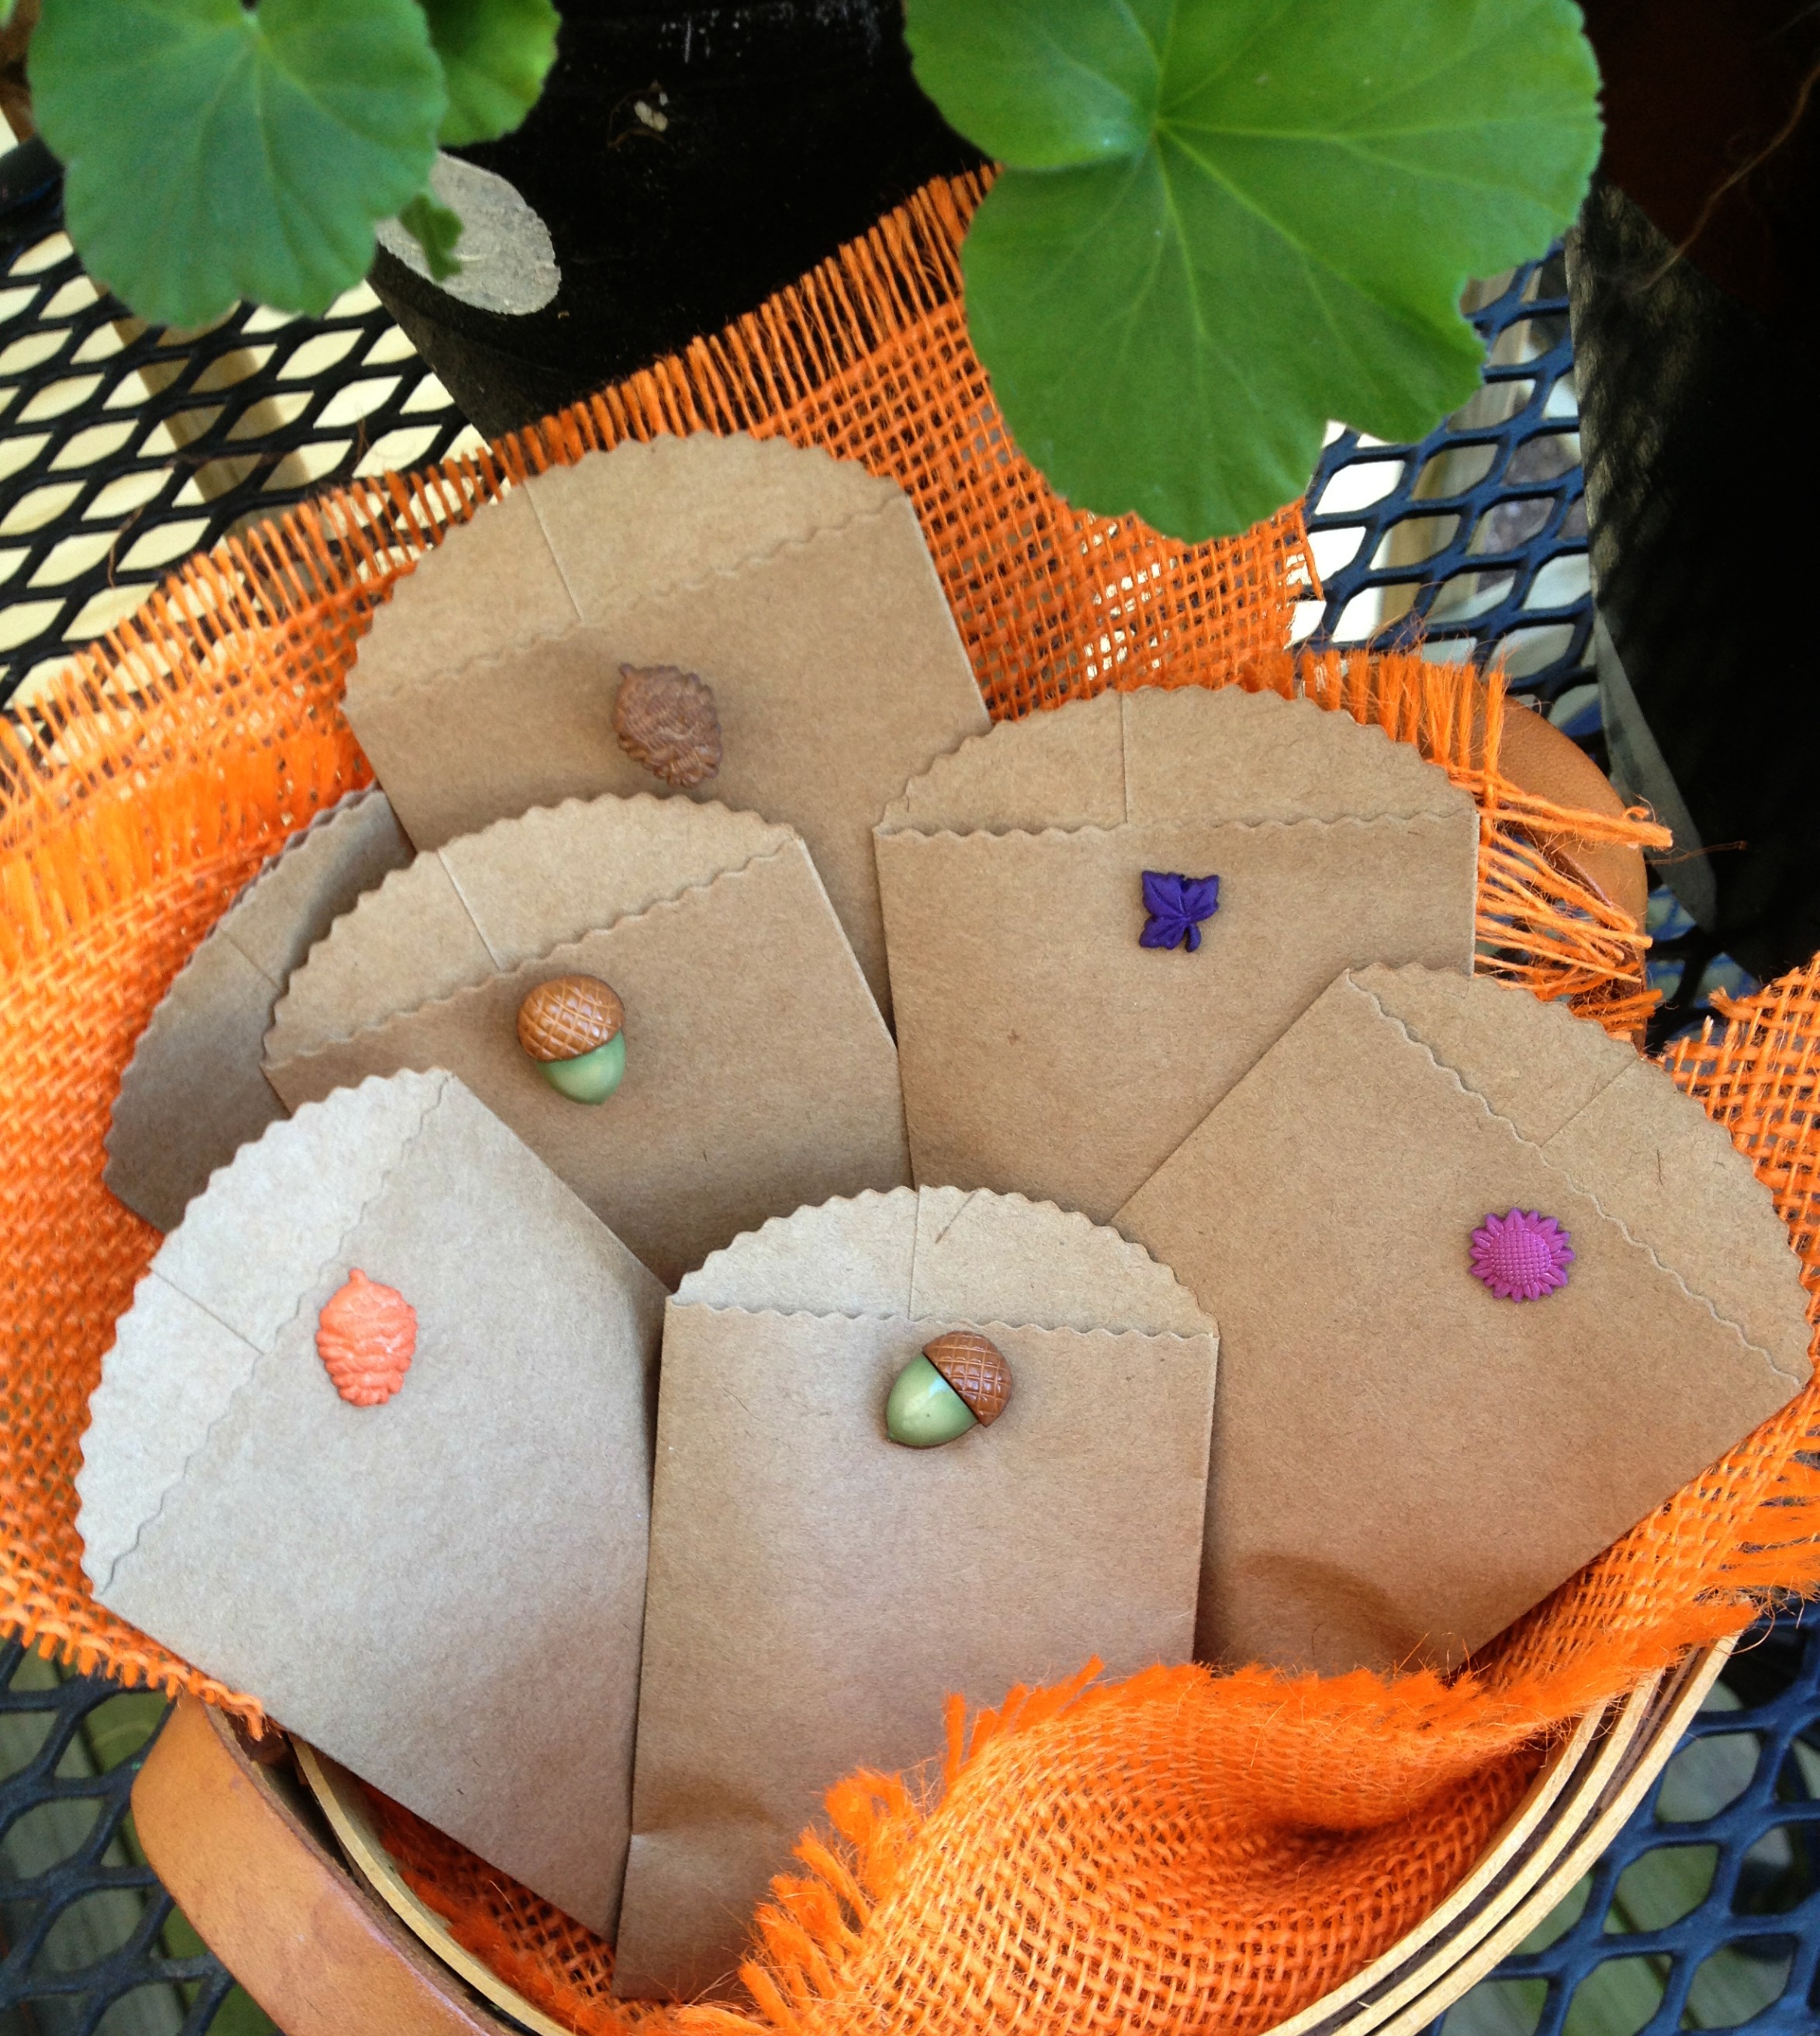
To create them, I used the Autumn Potpourri collection, a hole puncher and little bit of wire. I punched a hole in the mini treat bag (from Canvas Corp) then pushed the button through the hole. On the other side, I slid a short piece of wire through the button and twisted it. This is so easy and created such a fun little collection of favor bags.

This same method could be used to attach the autumn (or any) buttons through fabric and ribbon too. I have some really fun Christmas ones that I am going to try next with some gift wrap ribbon. Yes, I will share when I do it.
Happy Autumn,
Laura
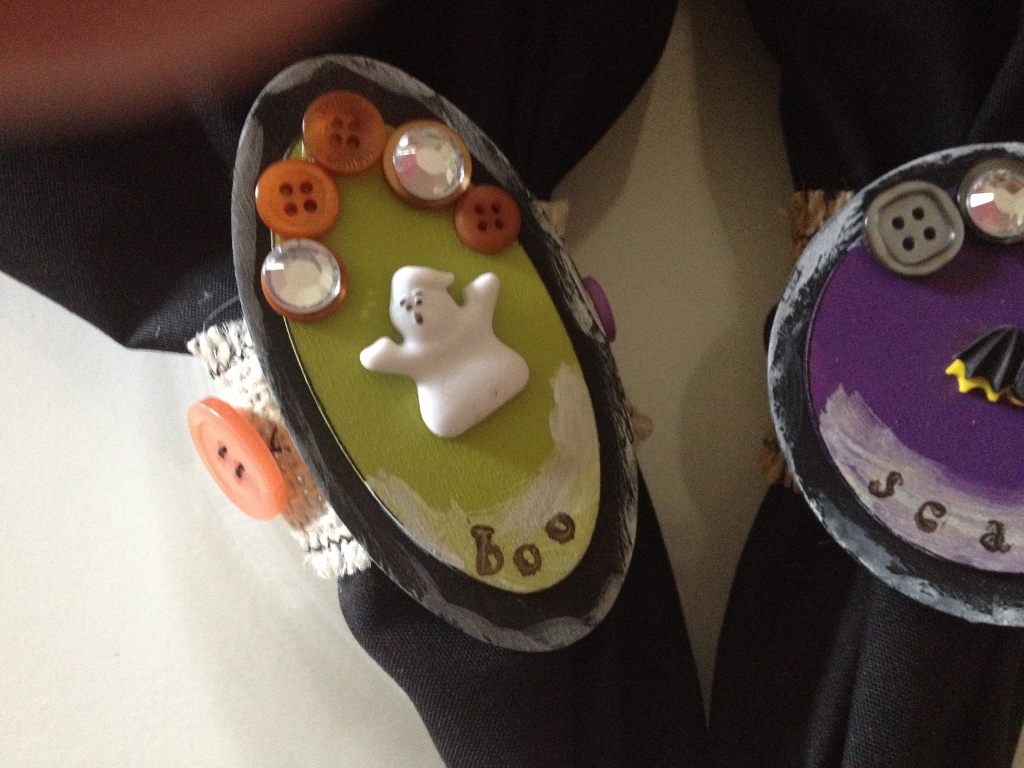
 Looking to create some fun for this Halloween for your spooky table decor? These Halloween Napkin Rings using Novelty and various flat backed buttons from Buttons Galore and More are as much fun to make as they are to enjoy. With details such as paint, burlap and stamped sentiments, you will love the detail of these Halloween Napkin Rings.
Buttons Galore and More Halloween Novelty Buttons
Laura Kelly Hand Dyed Buttons in colors of your choice
Various unfinished wood shapes of your choice
DecoArt Americana Acrylics in Lamp Black, Pumpkin, Olive Green, Grape Juice and Snow White
Scraps of burlap
Tiny alphabet stamps and ink
Beacon Adhesives Premium Tacky Glue
Buttons Galore and More Shank Remover
Paint brushes, sewing machine and thread, scissors
 To create your own Halloween Napkin Rings, use the Button Shank Remover to remove the shank from the novelty buttons so that the novelty button lays flat on the wood. Lay out the design, layering the wood shapes and arranging the buttons on the shapes to decide on your design.
 For my Halloween Napkin Rings, I used Laura Kelly hand dyed buttons in Smoke and Outrageous Orange.
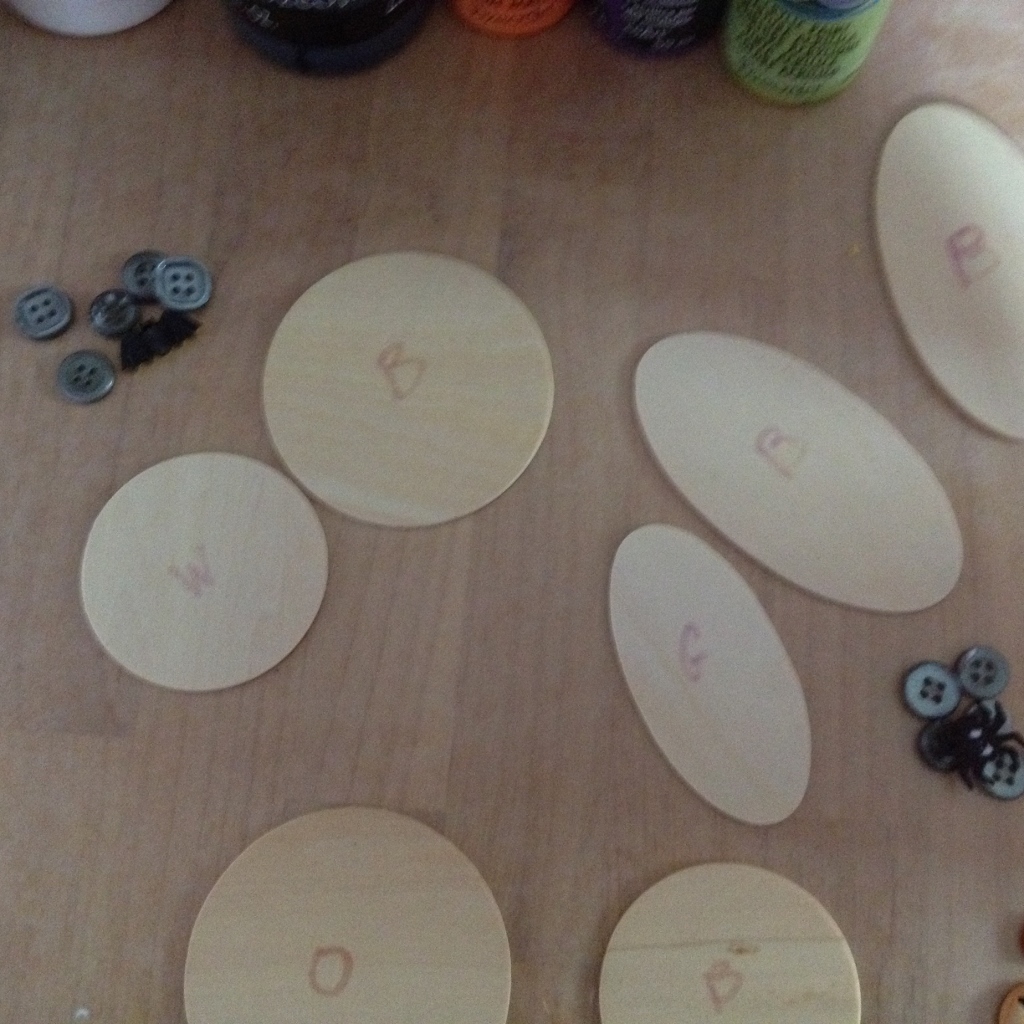 Since you will be working with so many shapes and colors, it is helpful to label your shapes with the first initial so you will know what color to paint it.
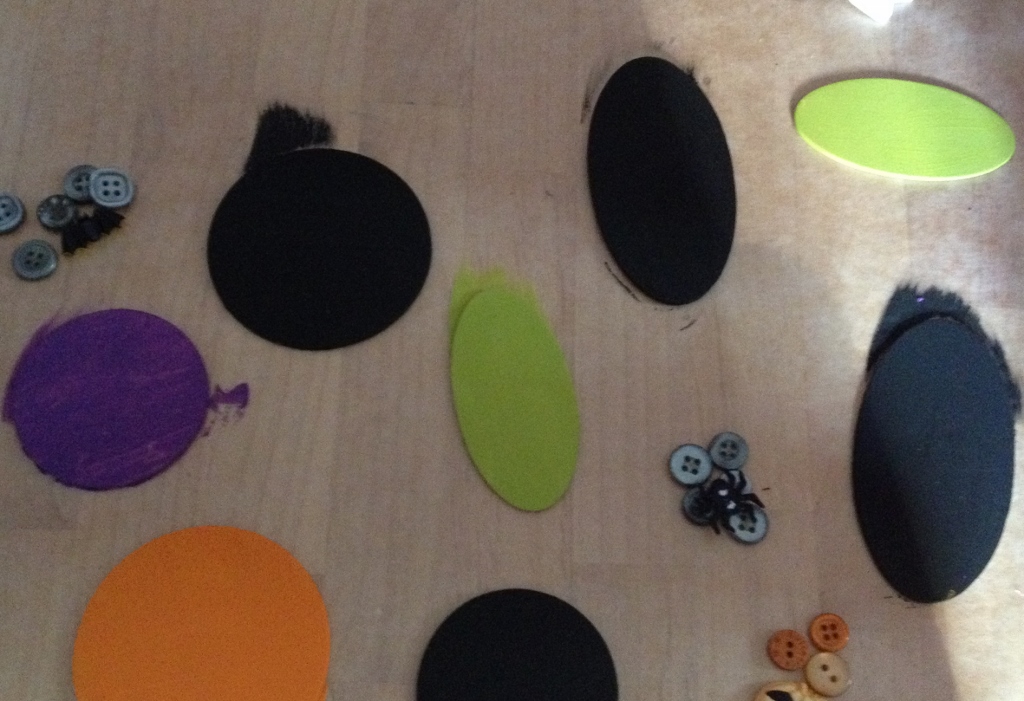 Paint your shapes front and back, using two coats.
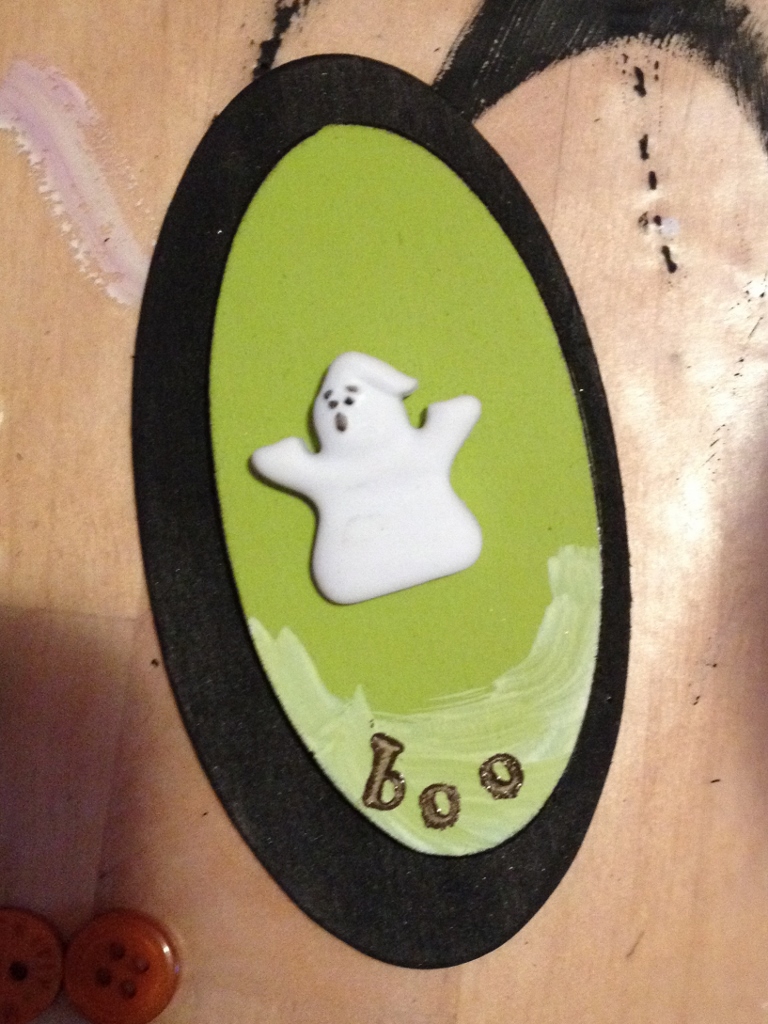 Layer your shapes and glue them together. Dry brush white paint on the bottom of the top shape. Use the alphabet stamps and ink to stamp the shapes. Glue the novelty button to the center of the shape.
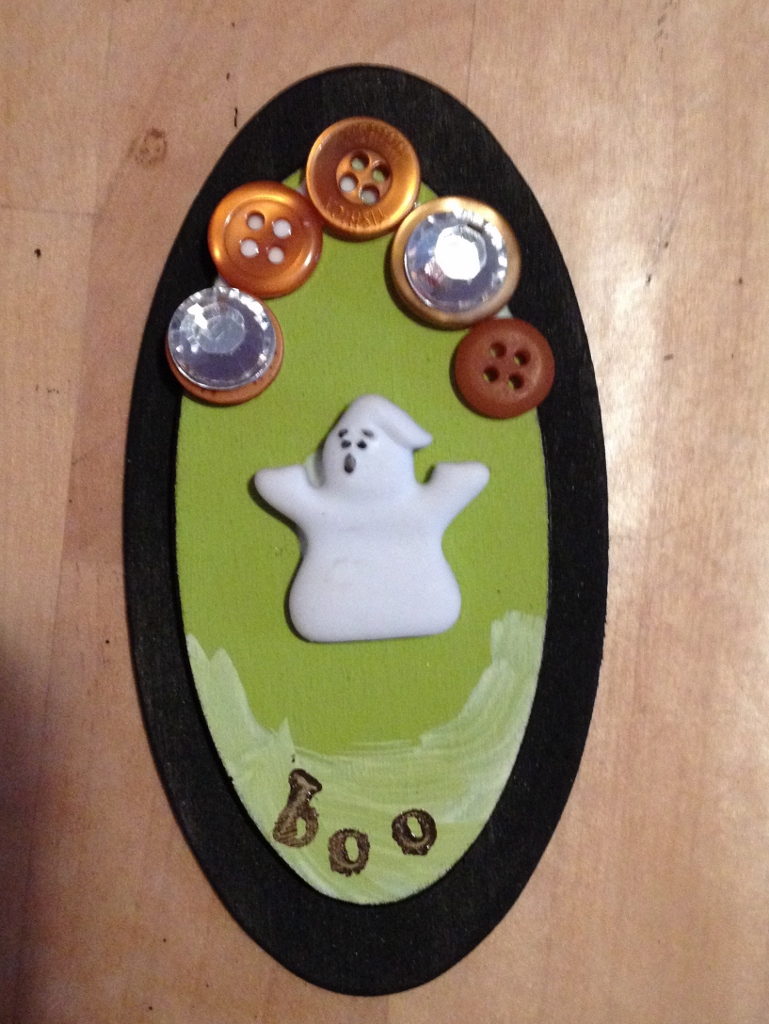 I also added some 9mm acrylic rhinestones to some of the buttons.
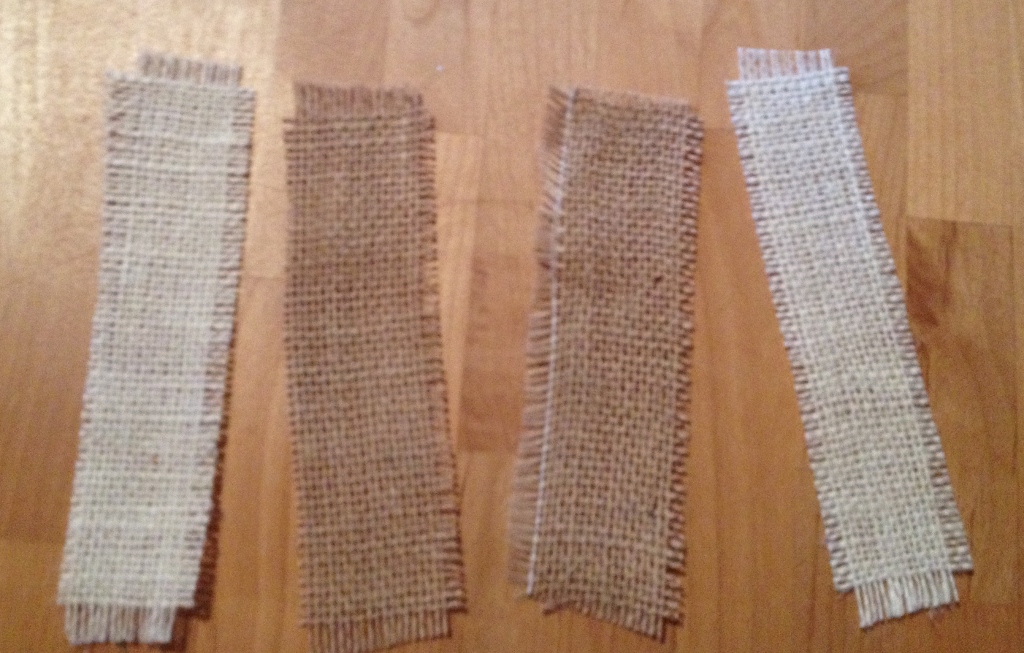 Cut some burlap into strips and use the sewing machine, thread and a zig zag stitch to sew the edges of the strips to prevent fraying.
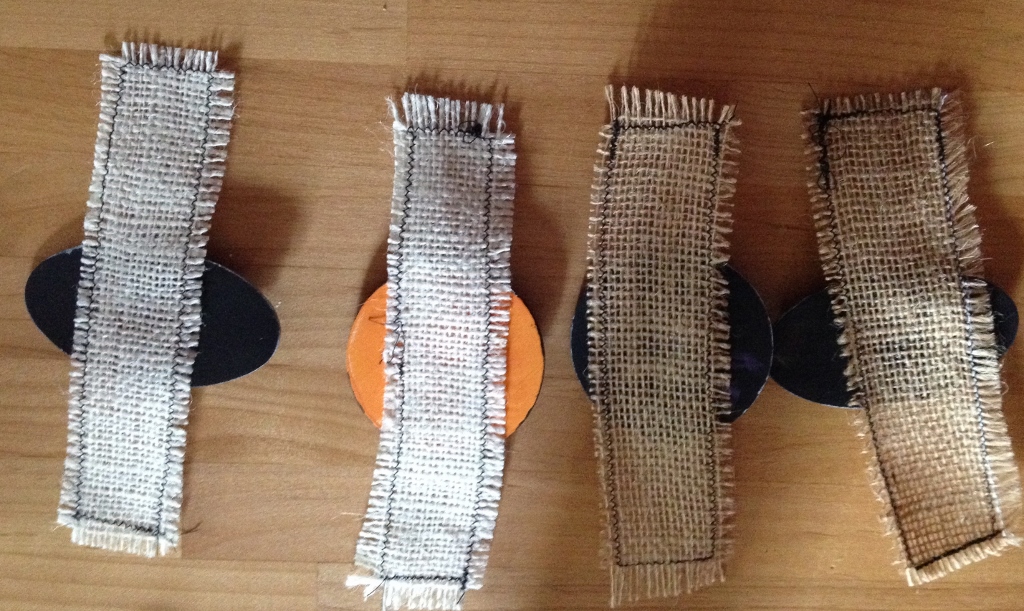
Glue the shapes to the center of each burlap strip and let dry.
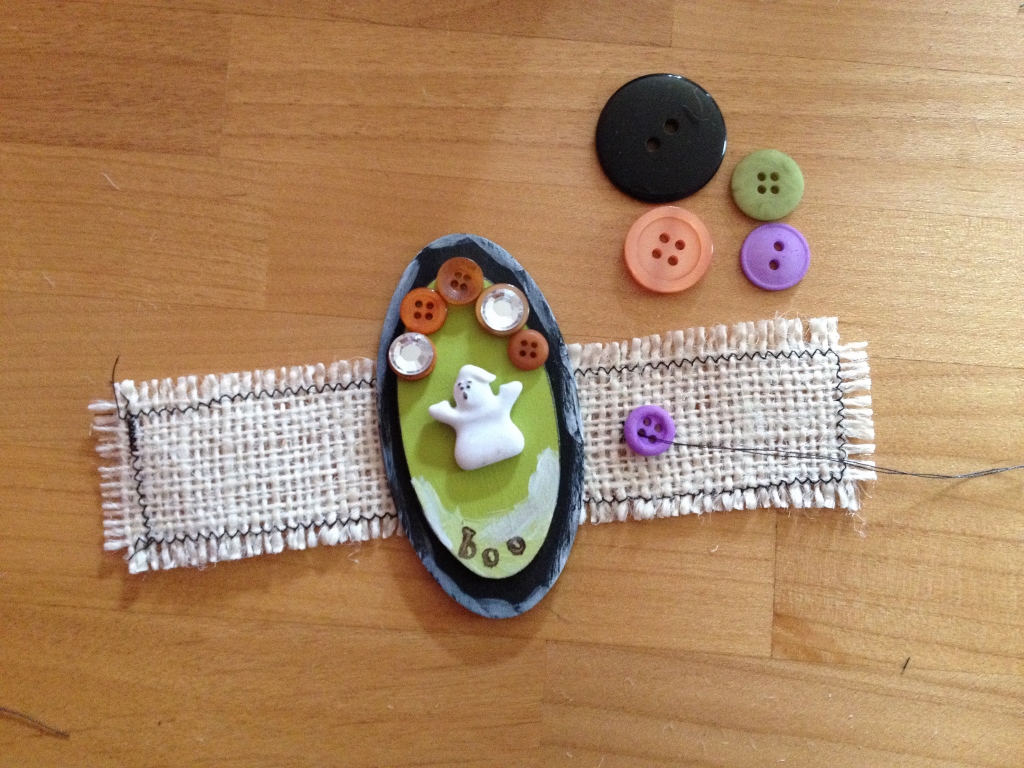 Sew buttons onto the burlap strips. I used orange, purple, green and black from the Laura Kelly Hand Dyed Buttons collection.
Once you sew on the buttons, use the center button to sew closed the burlap strip, creating a napkin ring.
 Create a set of these Halloween Napkin Rings to adorn a scary table setting using buttons!
 Live Life Creatively,
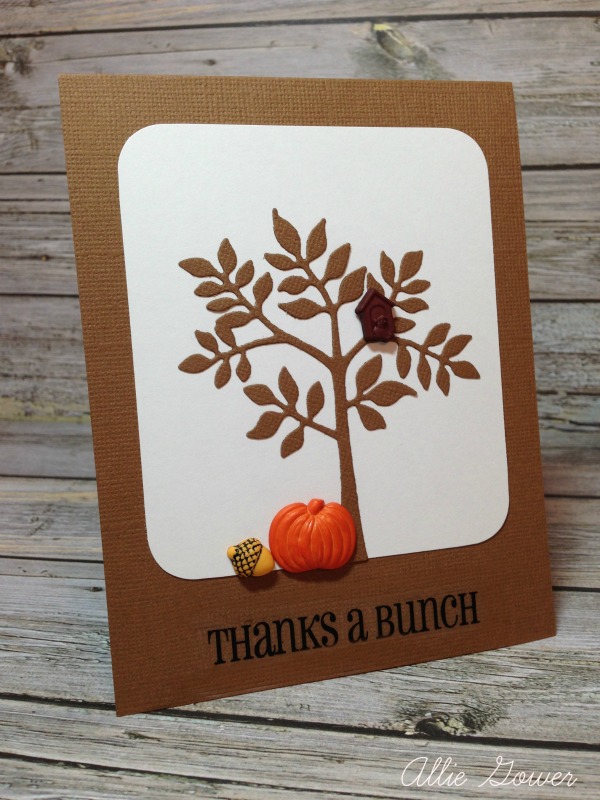
I have had a lot of fun playing with my Silhouette, and I came up with this fun design for a Fall Thank You Card.
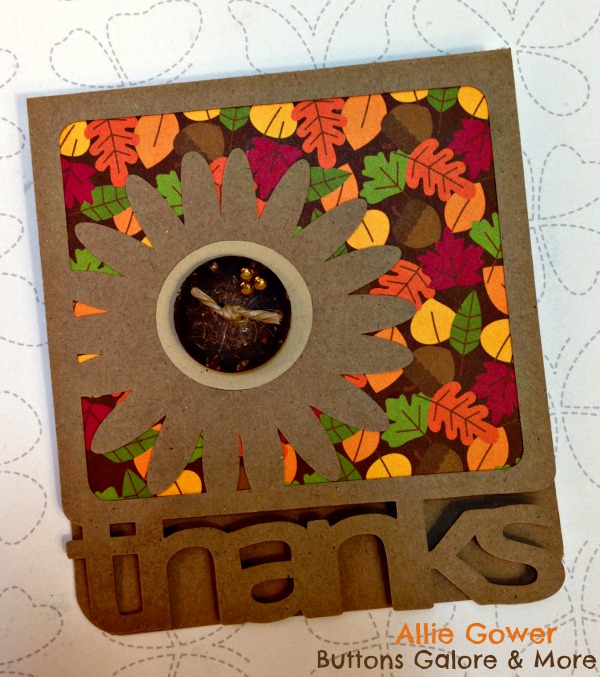
Fall is a wonderful time of the year to remember to say thank you. I’m surprised at the number of people I know that enjoy making cards, but don’t send them to anyone. I challenge you to send a thank you card to someone this week. It feels good to be appreciated. Thank a mail man, a coach, the girl that bags your groceries, someone at church, anyone!
Don’t let me forget to thank you, for stopping by, and for being a part of my journey.

“Hem your blessings with thankfulness, so they don’t unravel.”
Unknown

Rustic Coconut Shell Buttons
One large Rustic Coconut Shell Button
Baby Bling – Want2Scrap
Patterned Paper – Doodlebug Design; Cardstock – DiscountCardstock.com
Twine – My Mind’s Eye
Adhesive – Tacky Glue, Ultra Thin Glue Dot
Other – Silhouette Cameo, Design Studio Software, Font – PtSans
If you would like the file to cut your own card, please contact me through the contact form on my blog at My Card Party. Sorry, but this file is ONLY for the Silhouette.
Thanks again for joining me today,
Allie
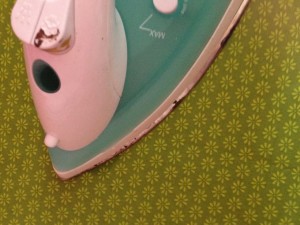
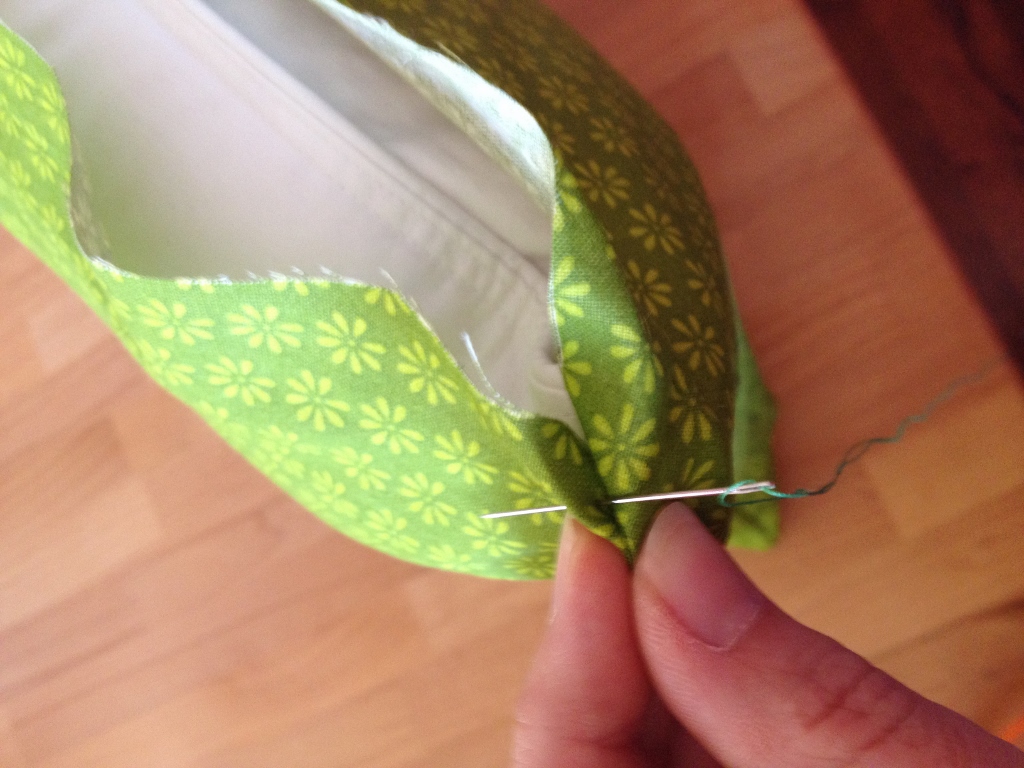
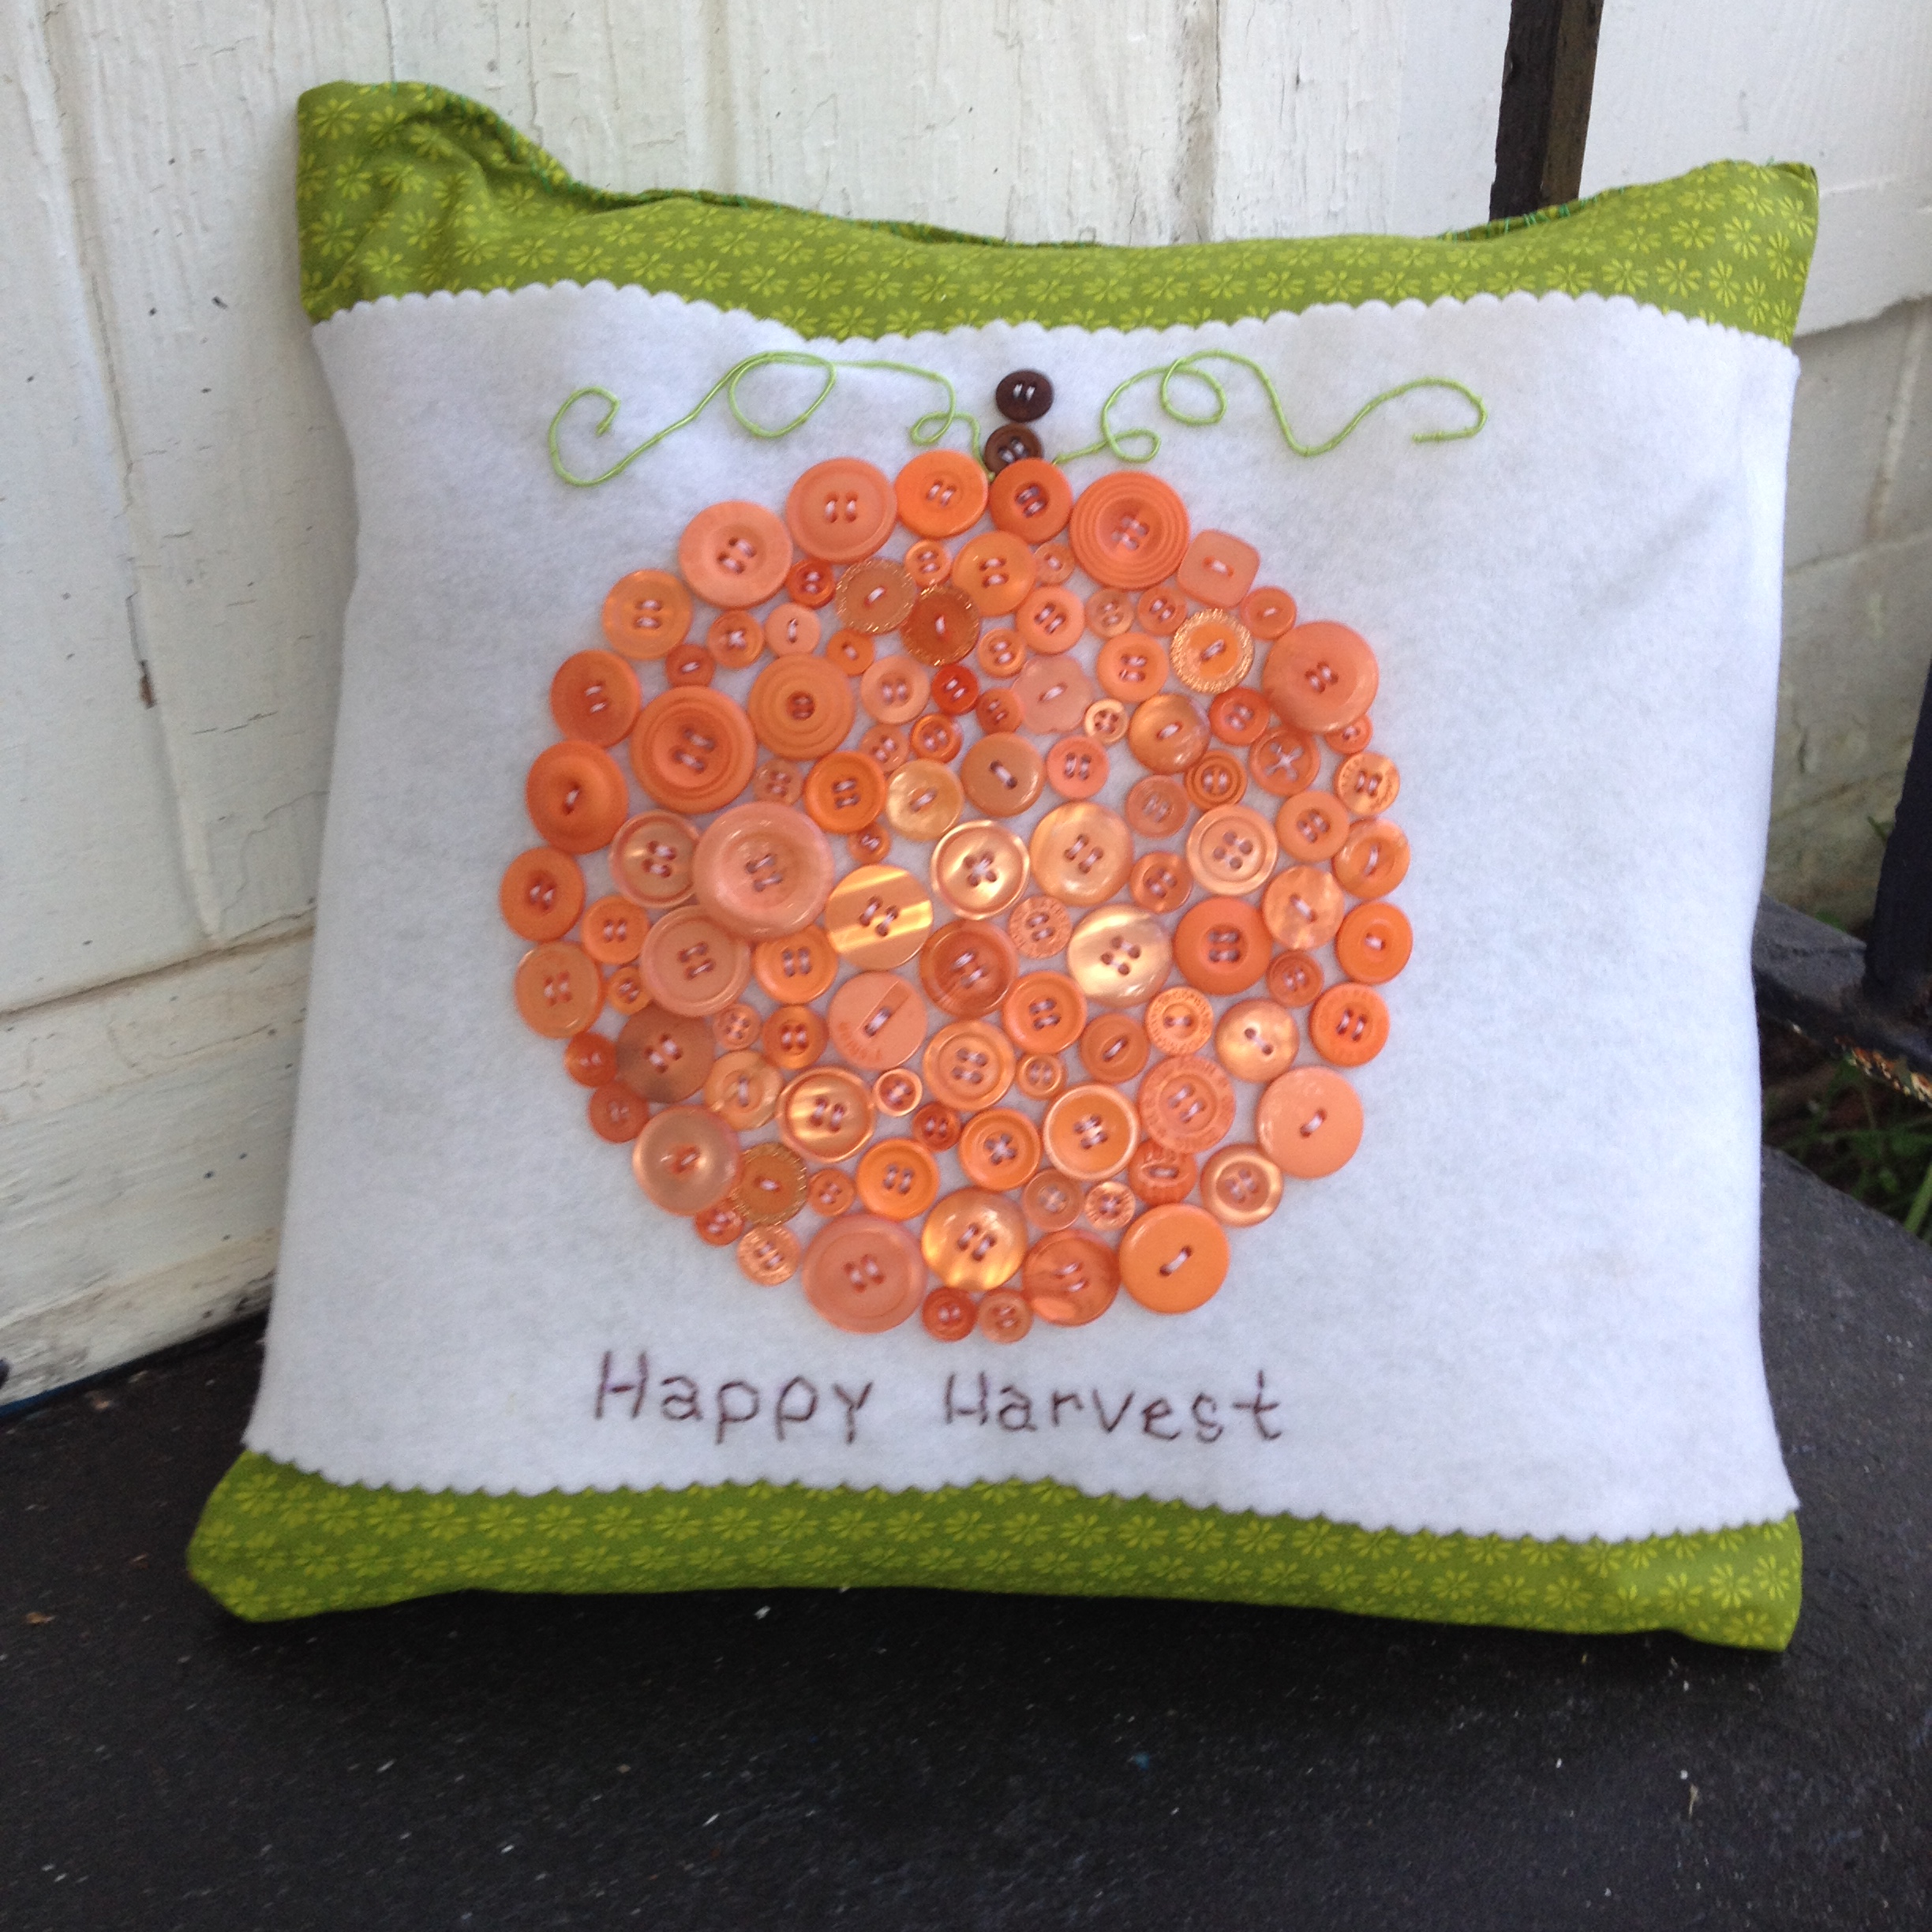 Its October! Time to think about refreshing your indoor decor with all things fall, spicy and harvest. One of the easiest ways to have found to give my decor a facelift is with pillows. Still easier pillow wraps! This easy to make pumpkin pillow wrap will have whet your appetite for making pillow wraps for every season. With an all seasons color like green, you can make pillow wraps for Spring, Summer, Fall and Winter. Here is my Autumnal version. Creating the pillow cover from scratch requires basic sewing experience but you can use a purchased pillow already covered and add your Pumpkin Pillow Wrap to it.
Square Pillow form in a size of your choice
Two green fabric squares that match your pillow form size plus 1/2″ seam allowance on all sides
Enough white felt to wrap around the pillow form snugly
Laura Kelly Hand dyed buttons from Buttons Galore and More in Outrageous Orange and Bold Brown
DMC Color Infusions Memory Thread in Light Green
Self adhesive Velcro Strips in White
Hand sewing needle and thread in white and light green
Brown embroidery thread (6-ply), embroidery needle
Scalloped edged scissors, rotary cutter and self-healing mat, scissors, sewing machine and thread, fabric marking pen
 First, cut out the felt using the rotary cutter and mat. Trim the edges with the scalloped edged scissors. This will give your felt nice clean ornate edges that don’t have to be sewn.
 Use the fabric marker to trace a circle in the size of your choice. Remember that you will be sewing the hand dyed buttons to fill the entire circle so plan accordingly. Thread your needle and start the sewing the buttons on to create the pumpkin by pulling the thread from the back to the front. Just like you would sew on a button.
 Continue to fill in the traced circle, using the traced lines at a guide to make your pumpkin. Use the smaller buttons in the package to fill in the smaller gaps.
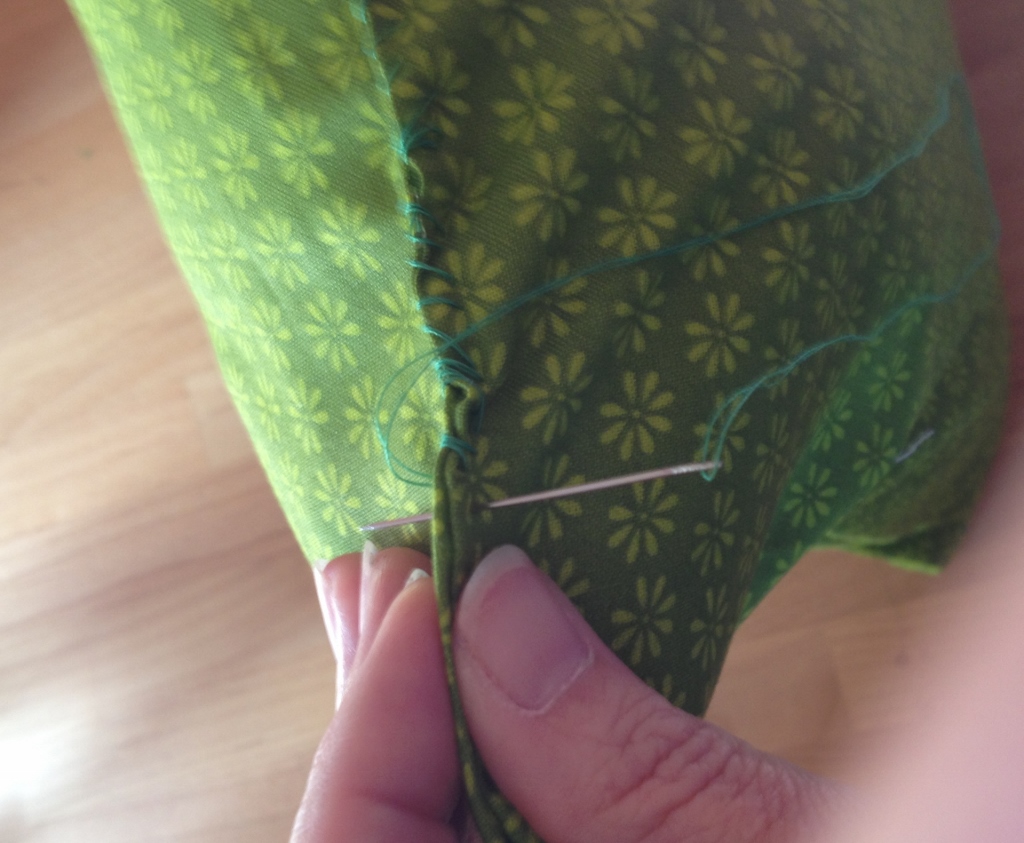
 Finally, a complete circle of hand dyed buttons on your pillow wrap that we will now add details to resemble a pumpkin!
 Use some brown buttons (2 or 3) depending on the size of your pumpkin to create a stem.
 To create vines, I used Color Infusions Memory Thread by DMC in a light green. This can either can glued down or couched down with coordinating thread and a hand sewing needle. I find the couching down method to yield a neater and less messy result.
Thread your embroidery needle with three strands of the 6-ply brown embroidery thread. Use the fabric marker to write a sentiment onto the Pumpkin Pillow Wrap just under the pumpkin and back-stitch the sentiment.
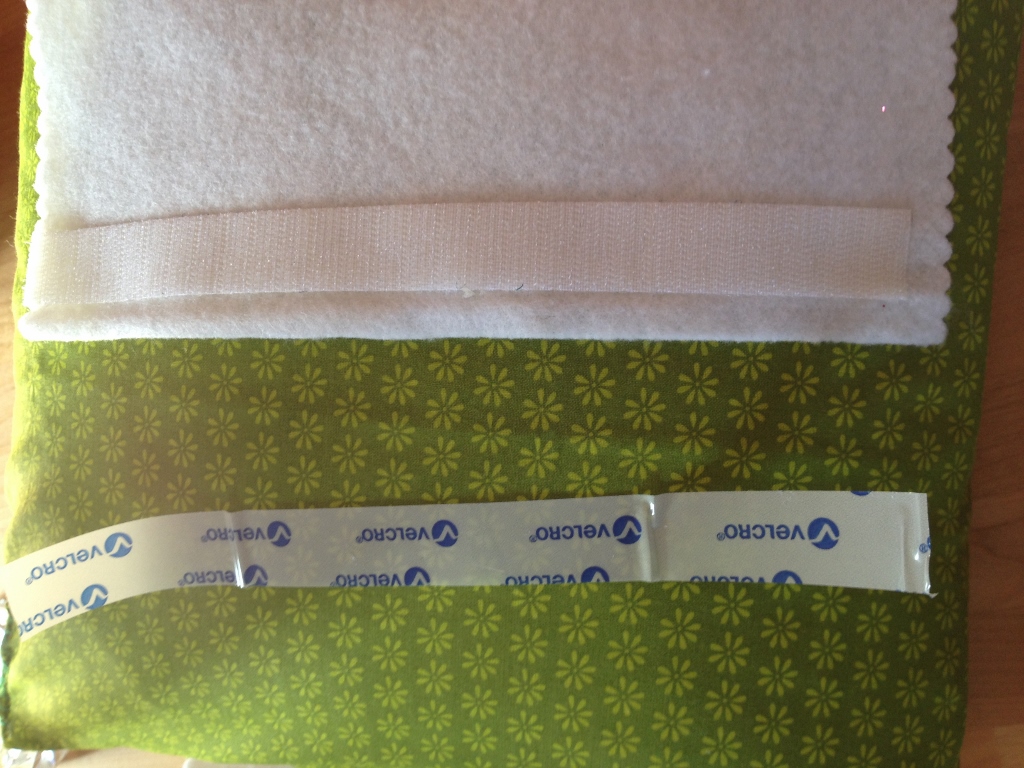
 Iron your squares of fabric for the pillow cover front and back. Place the right sides together and machine stitch the left, top and right sides together using a 1″ seam allowance. Leave the bottom of the pillow open for turning and stuffing with the pillow form. Steam the seams open with the iron set on a steam setting and turn right sides out. Iron again and insert the pillow form into the bottom.
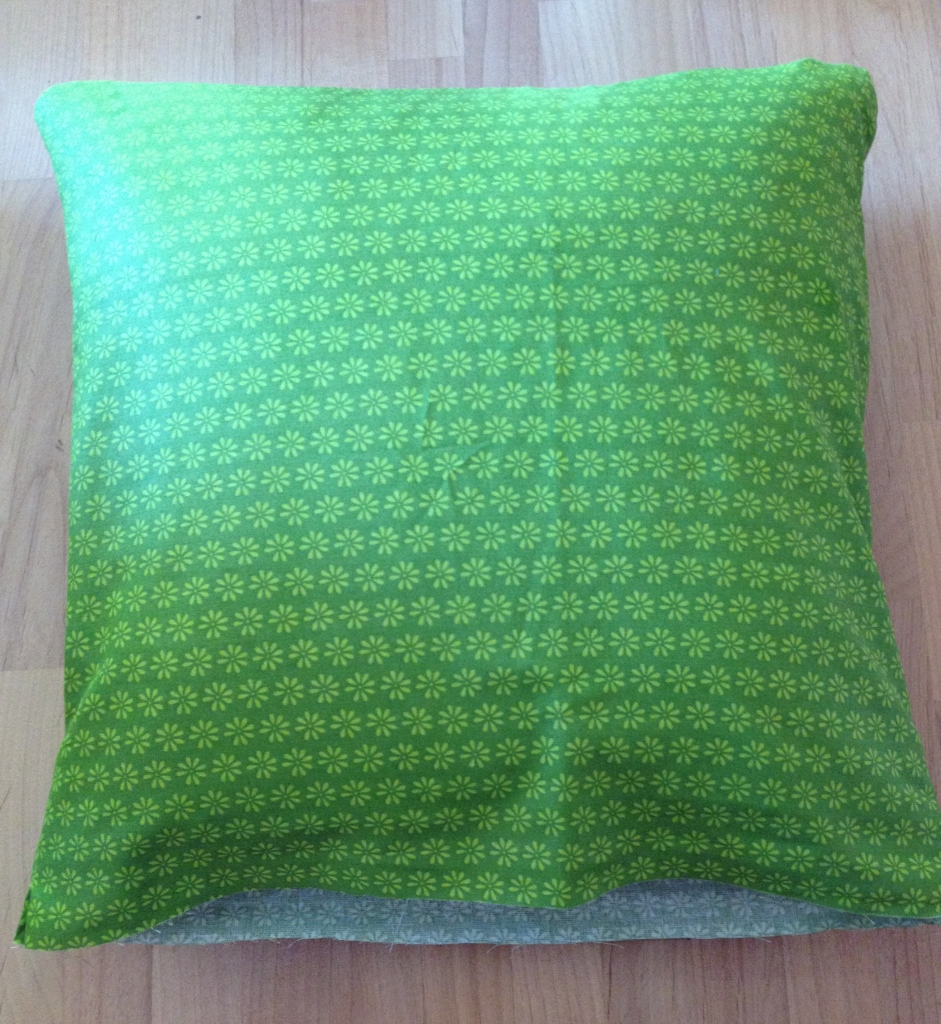 Sew the bottom of the pillow closed using a whip stitch, the hand sewing needle and thread.
 Add a strip of Velcro to the back of your Pumpkin Pillow Wrap as a quick and easy enclosure. I opted for the self adhesive version the sew on version will work as well.
 Now you have a Pumpkin Pillow Wrap that will not only be adorable for the Fall season, but it can be switched out seasonally very easily. Thanks for letting me share. Happy sewing!
Live Life Creatively,
![]()
I’m not into the traditional, spooky look of typical Halloween décor. I like cute and cute means buttons and felt. I created this Halloween wreath with that in mind. I love how the black and white reminds me striped witch’s stockings!

4. Glue buttons into center of flowers. Tip: If you want the flower centers to have little extra pop, slide white-topped pins into the button holes. So cute!
Thanks for crafting a cute Halloween with me today! For my holiday inspiration, visit my blog at Laura Bray Designs
![]() .
.
My button pumpkins are the perfect fall craft. They are quick and easy to make plus make a fun little addition to any of your fall decor. Grab some buttons and lets make some pumpkins.
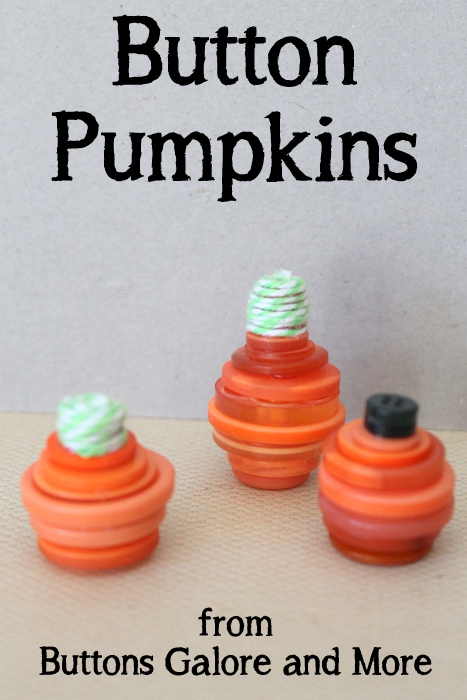
Yes that is it!
Sort your orange buttons and find some that are various sizes. When stacked they should be sphere shaped. Hot glue the buttons together.
If you have some green buttons, find two mini sized ones that are the same size. Hot glue those on top.
No green buttons? Hot glue a couple of orange buttons on top that are mini size.
Then use hot glue and the green twine to wrap those two buttons for a stem.
You can have an entire field full of these mini button pumpkins in no time at all. Use them in your fall decor or to give out as party favors. This is also a great craft to do with older kids (be careful with the hot glue!). Who doesn’t want some little button pumpkins?
Bats are definitely not cute in my opinion but Button Bats are! Especially when there made “spooky cute” using Buttons Galore Haberdashery Buttons.

These bats are simple to make and can be a fun addition to any Halloween decor.


Like Me on Facebook!
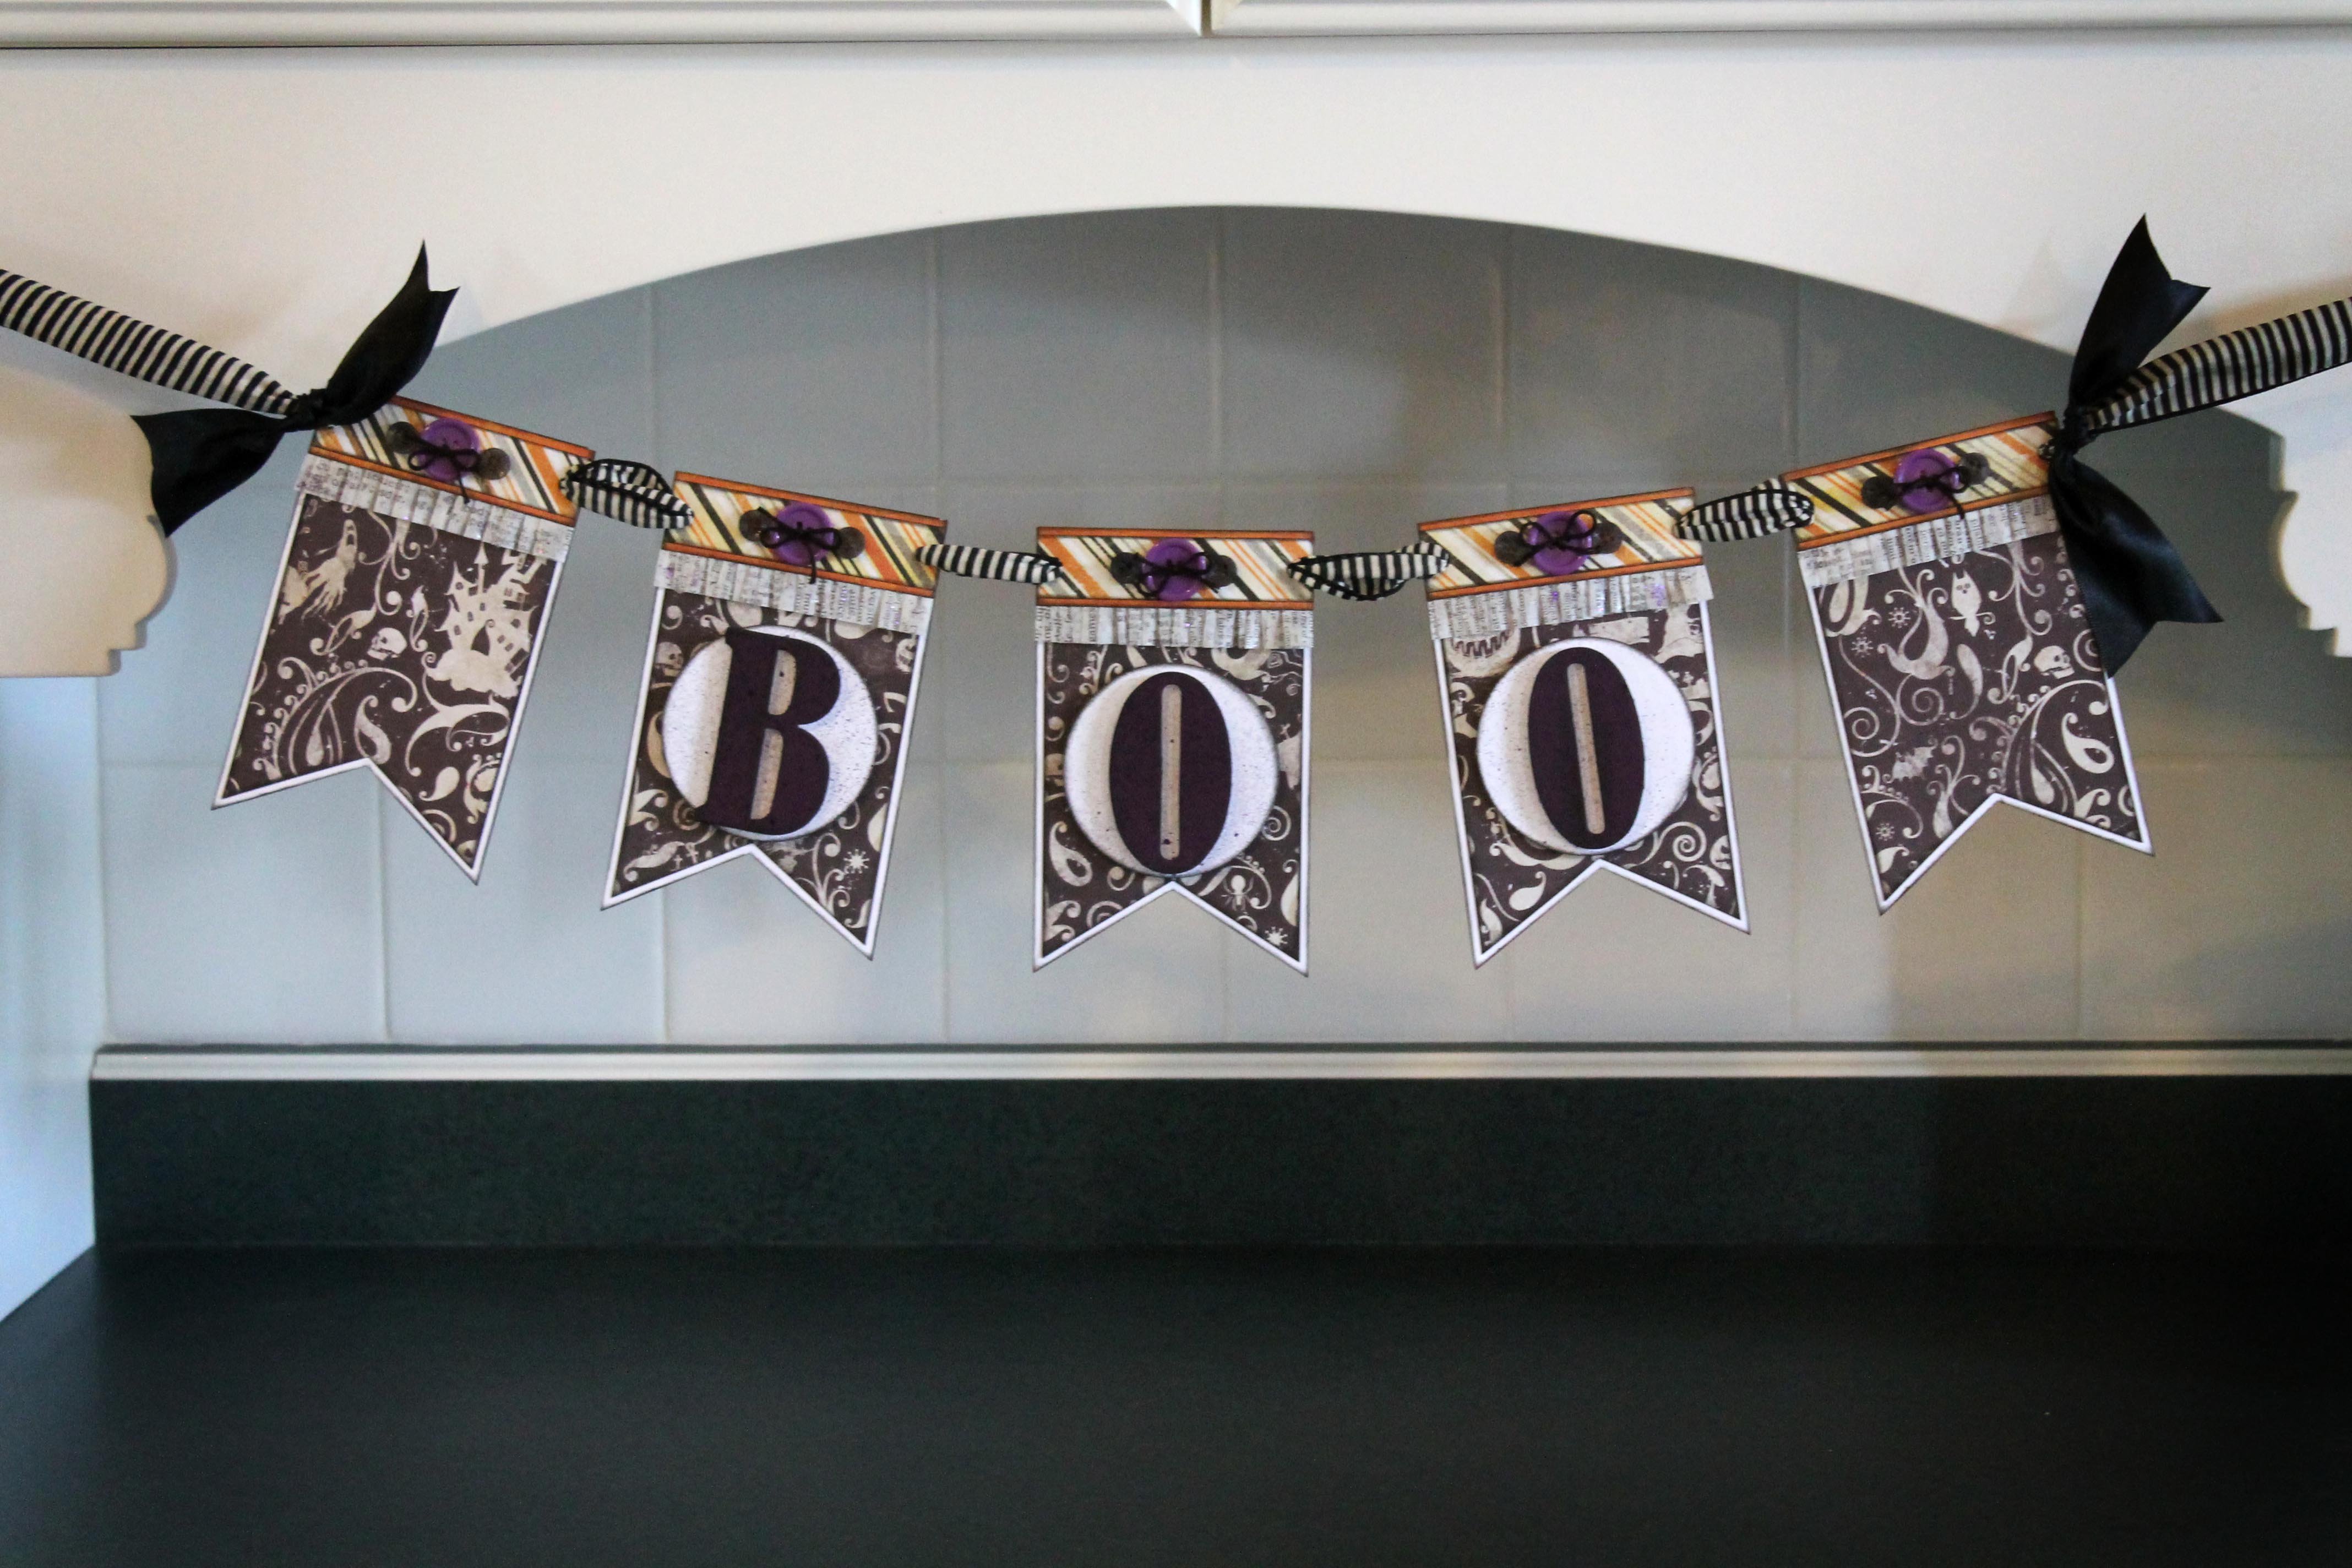
Do you have an upcoming Halloween Party that could use a BOOtiful Halloween Banner?
Or maybe you would just like to add some flair to your home for all those cute little Trick or Treaters. A Halloween Banner is easy to make and can make all the difference in your holiday decor. This BOOtiful Halloween Banner is created using paper crafting supplies that you probably already have.
I generally start with a solid base for my banners. This BOOtiful Halloween Banner has a chipboard base that is covered in white cardstock.
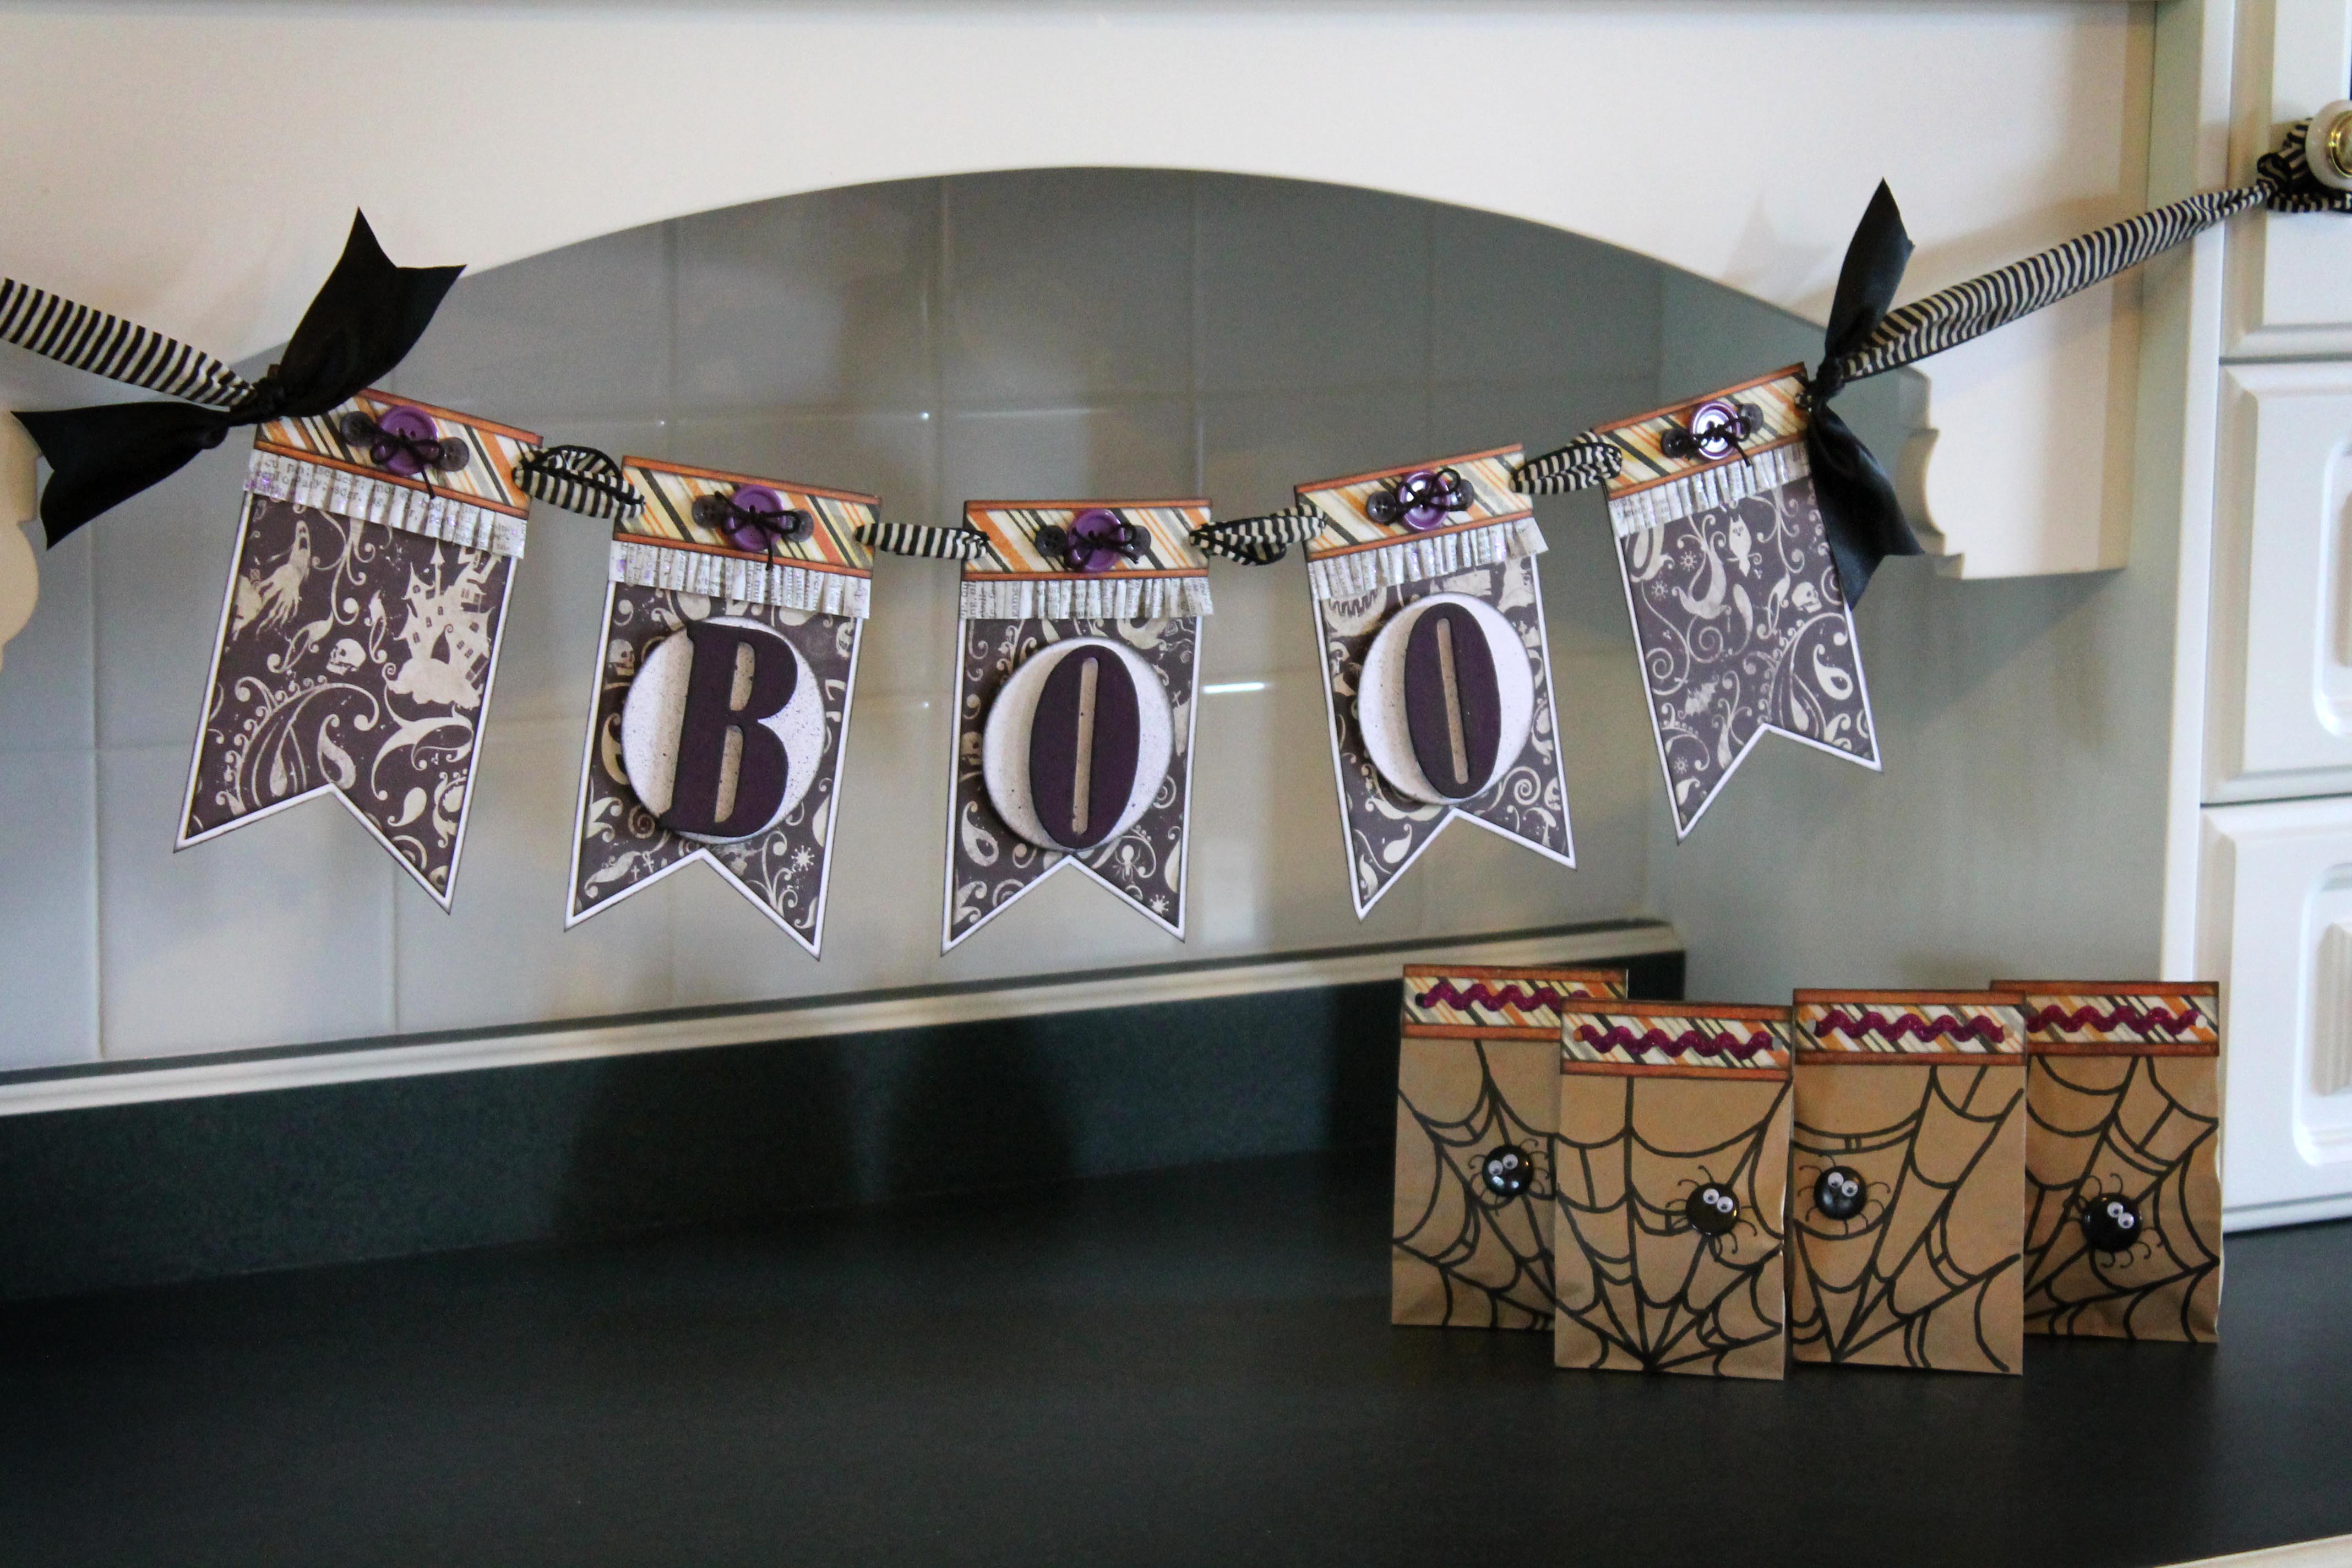
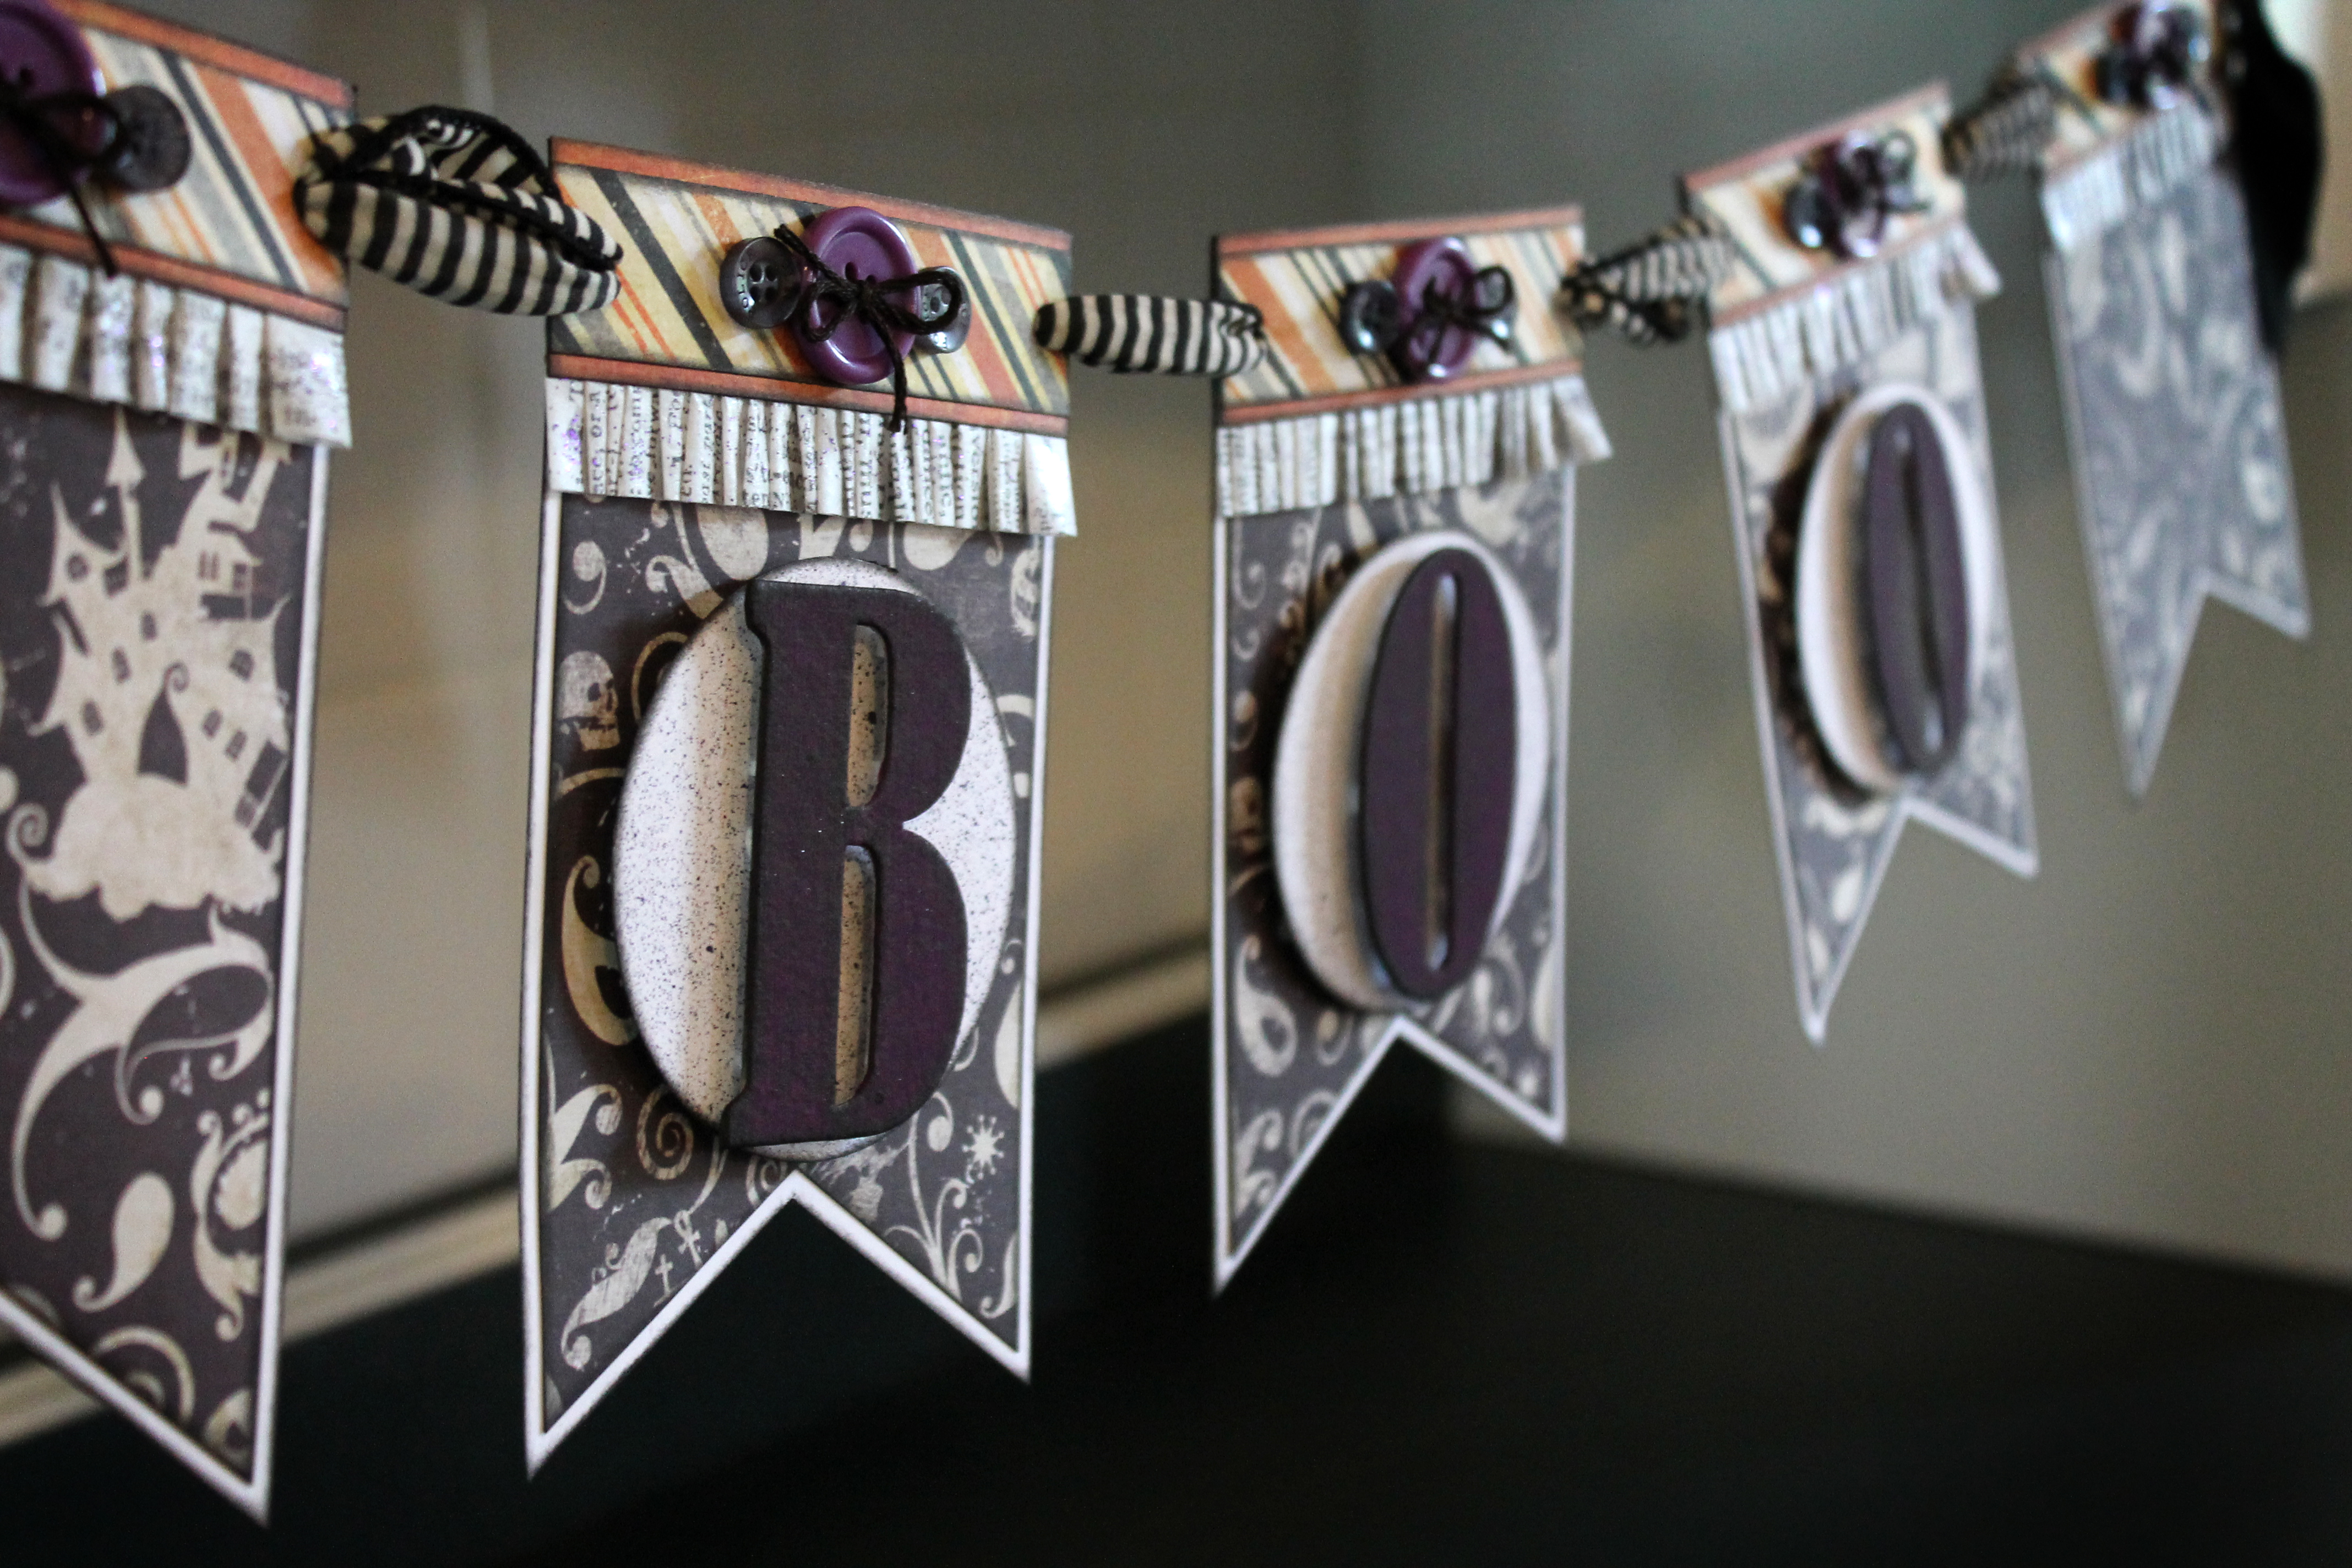
Here is what I used to create this BOOtiful Halloween Banner:
When I create anything that may have some wear and tear. I make sure that I use the proper adhesives. For projects like this BOOtiful Halloween Banner, there is nothing better than Glue Dots to keep everything exactly where you want it.
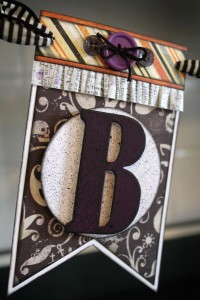
Thank you for stopping by and I hope your Halloween is filled with fun, candy and maybe even a BOOtiful Halloween Banner.
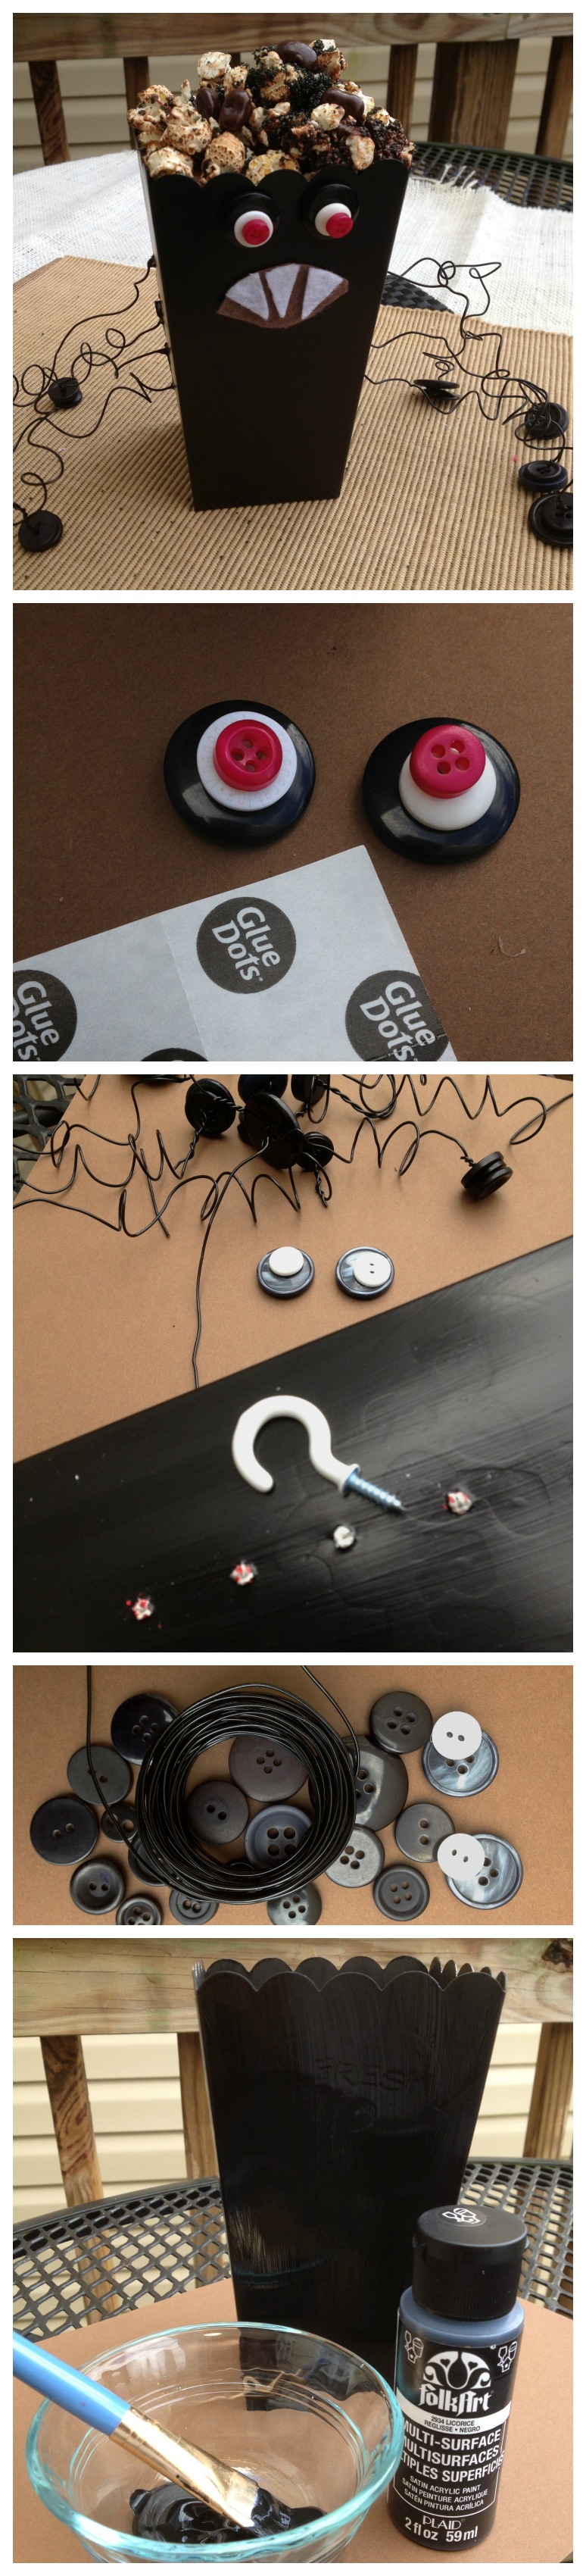
EEEK! It’s a great big SPOOKY Spider. No wait, it’s just a popcorn box in disguise. This Halloween treat box is a creation that I made for the Halloween Movie Popcorn Box Party Hop.
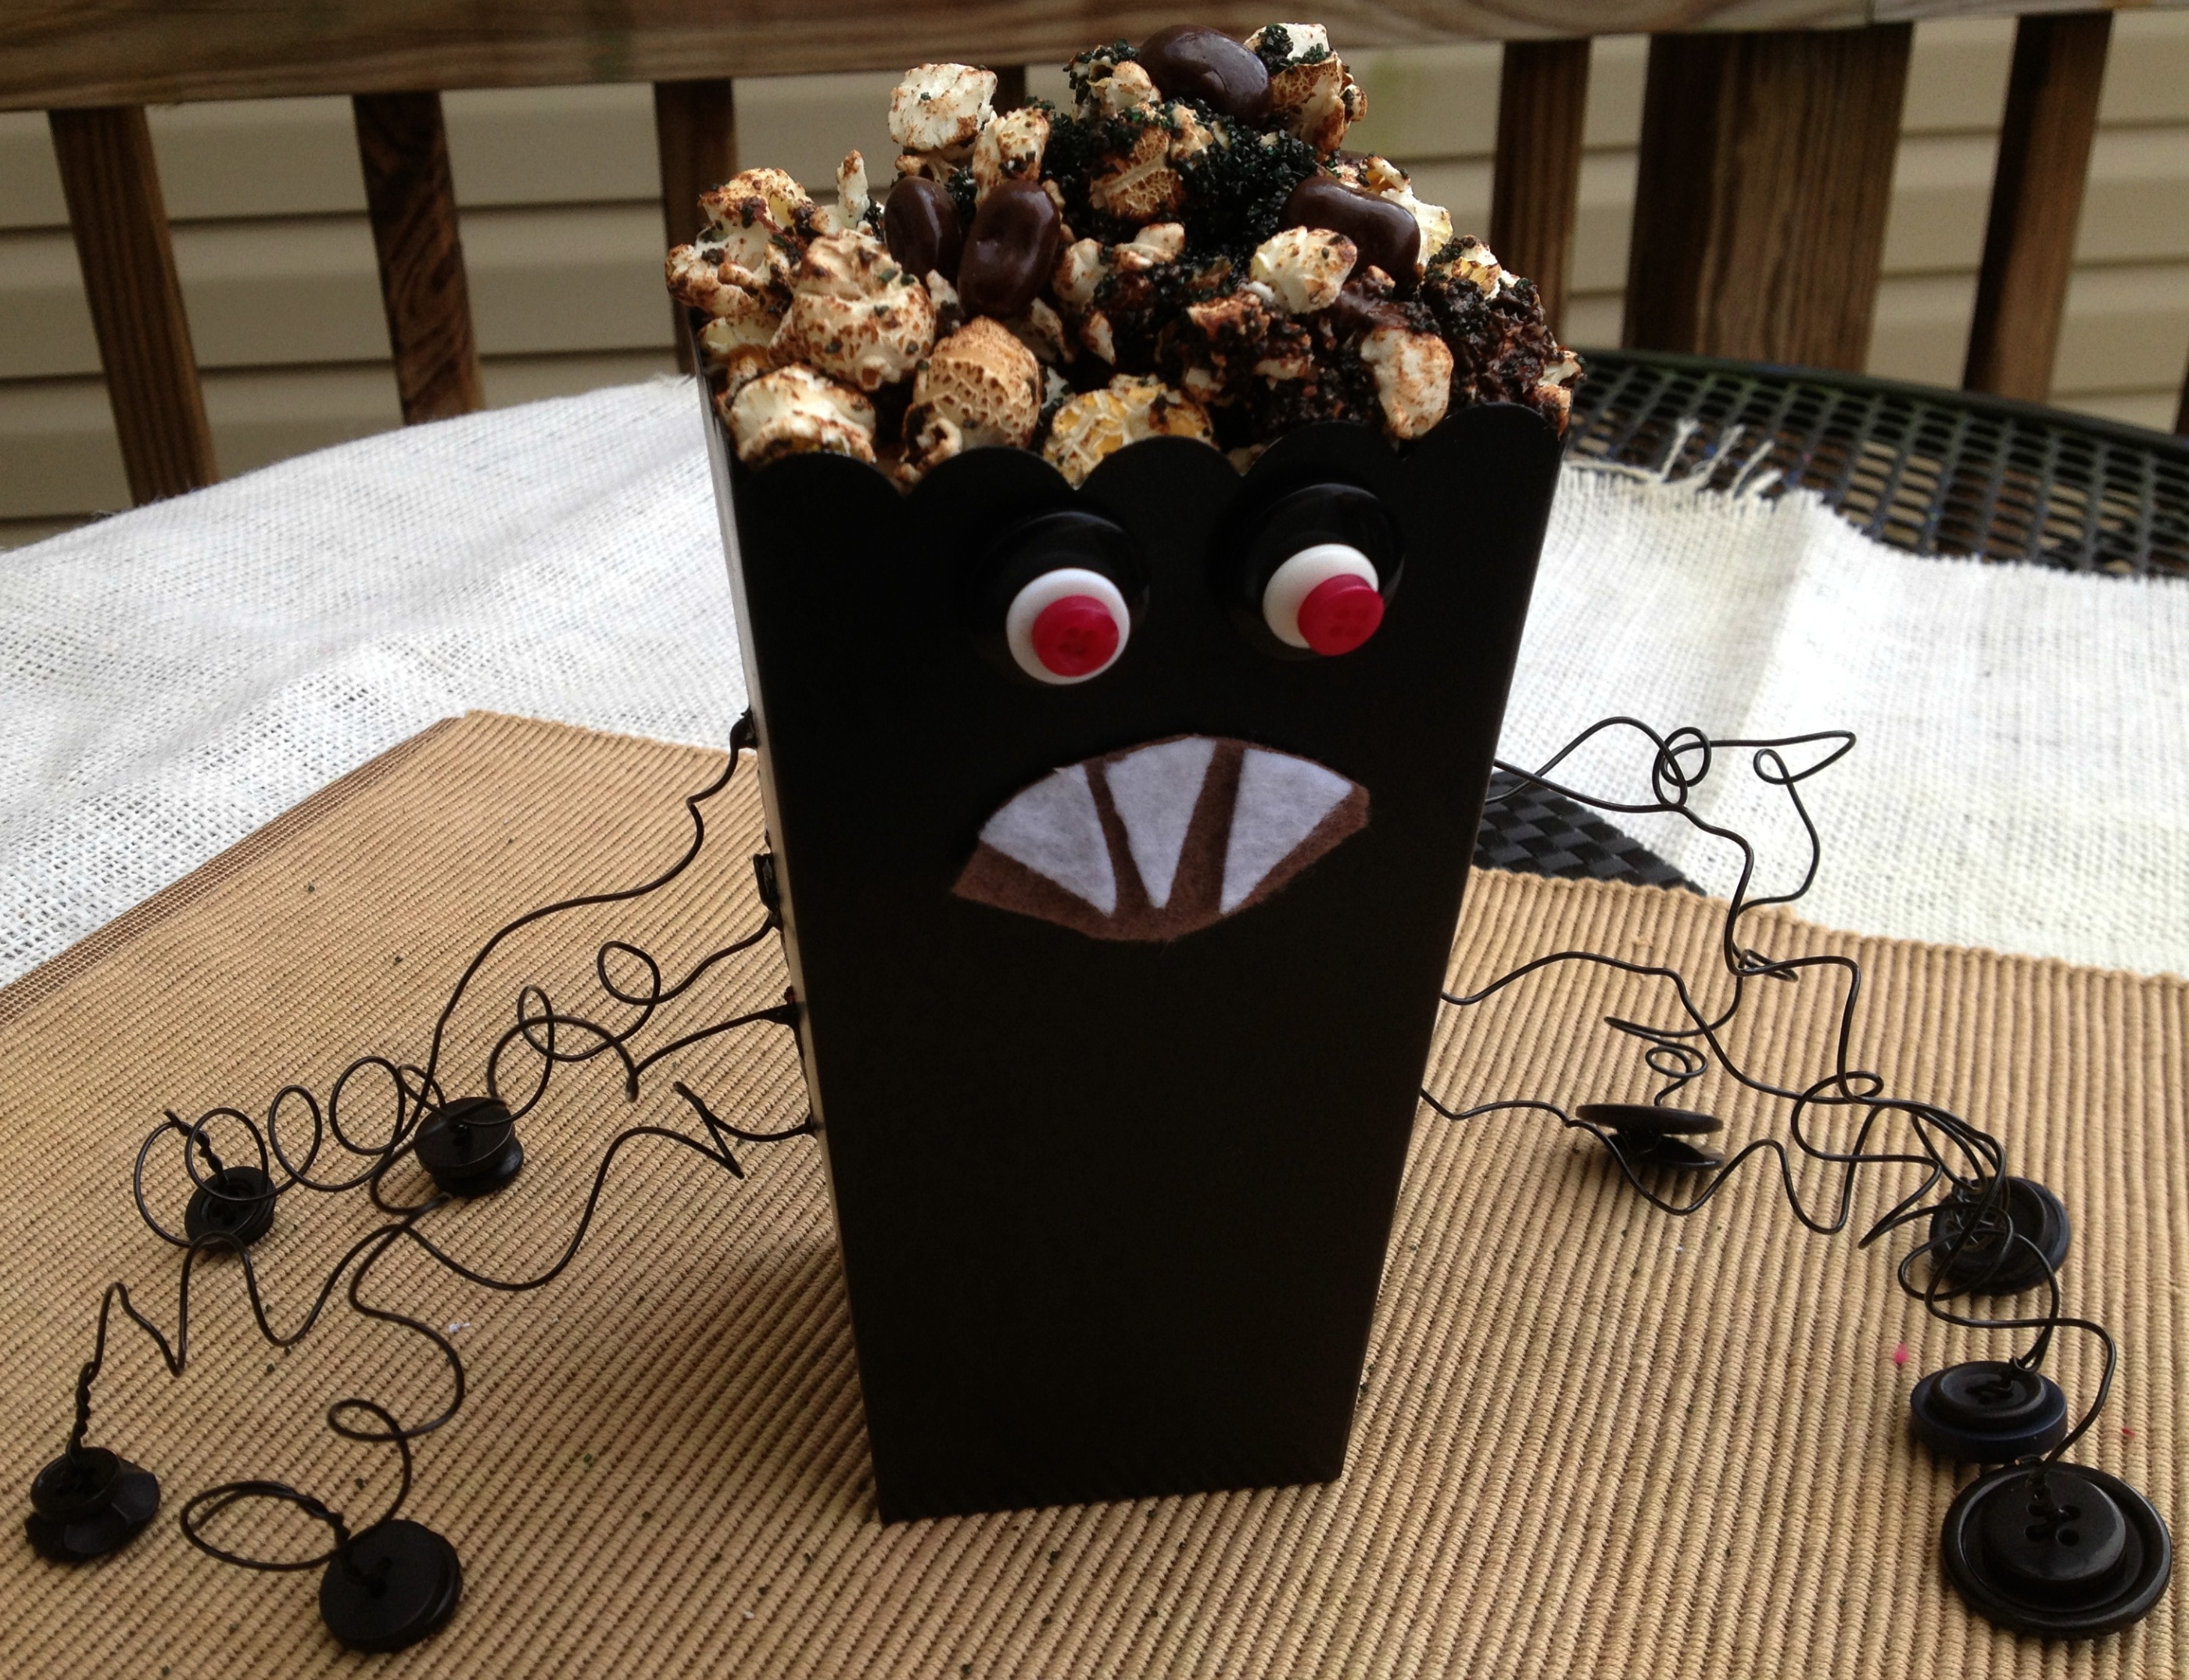
There are more than 30 popcorn boxes in this blog hop party that have been transformed into creations for Halloween. Lots of them use buttons from Buttons Galore as each of the designers was provided with a little package of Halloween colored ones from Laura Kelly’s collection.
Materials used for Spooky Spider:
![]()
I painted this one with Plaid’s Folk Art paint (Multi Surface Licorice) and then embellished with wires for legs and Laura Kelly’s Black Beauty buttons for feet and eyes. To get the wire into the sides, I poked holes with a sharp screw in hook. To fill it up and make it yummy, I added a mixture of popcorn that I shook up in chocolate and black sugar. I also added in some chocolate covered cherry Jelly Bellies to make it a little more fun.
Check out the many other fabulous projects. Lots of them were done by our awesome Buttons Galore design team members and others by creative designers, artists, and bloggers.
Happy Popping Around,
Laura
Paper crafting can be fun and easy with novelty buttons. A few pieces of paper and a sentiment to convey your message, ribbon, a touch of buttons and VIOLA! A quick, cute and simple card you made yourself
Stay tuned for the next card in this series. It is equally as cute and just as simple as this one to make. Check out the website for sales on the buttons.
Want to make a summertime picture frame for your home? Here’s a simple frame embellished with a handmade Sunflower, garden sign and a Haberdashery Carved Wood button.
You could choose any flower to embellish your frame but a Summertime Sunflower really does make a beautiful impact.

I always enjoy seeing the Sunflower fields as we drive across country during our vacation. They really are a beautiful sight. One day, I’ll convince my hubs to actually stop along the interstate to take a photo in the field. He just can’t appreciate a purty photo op. Men.

A Haberdashery Wood Button makes the Perfect Sunflower Center
I used my Silhouette and a Lori Whitlock cut file to cut out the 3D Sunflower then inked the edges of the leaves and flower with Colorbox ink and added a unique Haberdashery carved wood button to the center. It really is the perfect center for a Sunflower!
I’m totally in love with all the Haberdashery Wood Buttons you can find in The Button Shop too. They’re all so unique in design.

On the other side of the frame, I hand cut out a garden sign and grass, stamped a sentiment and hot glued the grassy sign onto a dowel. A perfect Summertime frame to display Summer memories in.

Like Me on Facebook!
Summer, when you hear that word what images does it conjure up in your mind? For me I think of the heat, the BRIGHT colors and RELAXING! I love Summer. I know a ton of people who just hate the heat, but being a gal who’s always got cold fingers and toes, I love that during the summer month’s my body feels WARM all over, all day long! Bright colors, well I love those too! Wearing them, creating with them, you name it, I love it! And relaxing…well let’s just say there’s a well loved, well worn hammock in my backyard that my kids and I all enjoy piling into and having a good snuggle time in. I can relax with the best of them, and in STYLE to boot! LOL
For my project today you can see each of these elements we are talking about have been captured perfectly! From the bright sunshine, the bright colors of the porch chair and the slouchy posture of my sweet Elliott, this scrapbook layout just screams SUMMER. Pairing up bright buttons & bright papers with a nice wide swath of burlap helps to give this layout rest amongst the busyness. Now, while I was creating I got to the point where everything was on the layout EXCEPT the title. And I was STUCK…I mean the page was cute, but needed something…but what….that was when I emailed a photo of the layout and then called our DT Lead Niki Meiners and said “What’s wrong with this page..I am stuck” As if on cue she replied “Oh just add a title to the page – SUMMER” “Where??? Where would I even put a title??” I replied. “Ummm right there under the photo overlapping the patterned paper, burlap and above the cluster of red big buttons…” And you know, she hit the nail on the head!!! It was JUST what this layout needed. Talk about a friend being a help just when you need it!!! So now you tell me…who do you call if you get stuck or just can’t seem to “make it all workout” in your creative process??

I have a hostess gift to share today using Buttons Galore and More buttons and a cute flowerpot die-cut shape. Of course I’ve included burlap to fit with our monthly theme!
I used the following materials:
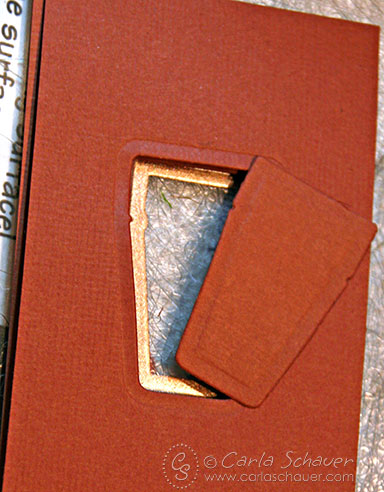
I started by cutting the smallest Flower Pot die from the Terra Cotta cardstock using my die-cut machine. The die embosses the cardstock at the same time as it cuts.
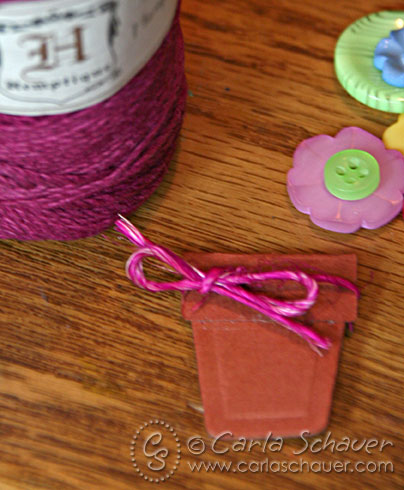
Then I folded over and glued the top part of the die-cut to create the top of the pot, and tied a hemp cording bow. I selected flower-shaped and round buttons with interesting patterns in several colors from the Spring Blossoms Grab Bag for the flowers.
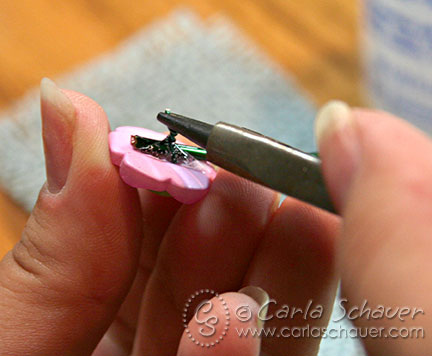
I cut 5 pieces of 16 gauge wire (smaller gauge numbers=thicker wire) to the lengths I wanted for flower stems, then set them aside. I cut 5 pieces of 22 gauge wire and threaded the thin wire through the buttons (connecting stacked buttons), with open ends toward the back of the button. I added a dot of glue to the back of the button, pressed the thick wire stem into the glue, and twisted the thin wire ends together securing the wire stem to the button flower.
Once all my flowers were secured to their stems, I arranged them on a 2″ strip of light blue burlap long enough to wrap around the glass candle jar and glued them in place. Once the flower pot was glued on top of the flower stems, I attached the wrap onto the jar using double sided tape. (Wrap must be removed before using candle, so make sure this adhesive isn’t permanent.)
This type of wrap also works well on vases for a fun summer home decor project. I’ll be using mine for a game night prize!
Burlap and buttons make a great wrap for a bouquet that will last longer than a week. I love fresh flowers, but they do not love my budget. A more budget friendly idea is the tin can that I repurposed.
Sizzix Tattered Florals and Leaf Die Cut
Beacon Adhesive – FabriTac
Jute Cording, Burlap, Styrofoam, Krylon Spray paint, Westcott Scissors and kraft knife.
Buttons – Tangerine Tango, Class
Directions:
Clean and dry tin can. Spray paint can. Let dry and repeat.

Place floral foam inside can.

Cut burlap to fit. Adhere burlap with Quick Grip.

Slide buttons on to jute cording. Wrap cording around container. Adhere buttons into place. Add a second layer of buttons where desired and glue into place.

Add flowers into container.
This recycled tin can vase will work for any type of flowers, fresh or hand made.
It’s spring time and that means planting time! All the gardeners I know are pouring over seed catalogs and dreaming about their summer crops. Today I have a super quick, super fun homemade project that will help you remember which pot you planted lettuce in and which pot has the peas: Button Garden Markers!
The fun thing about this project is that it really inspires creativity. I used orange buttons for carrots, green buttons for peas and lettuce, and red buttons for tomatoes. But the possibilities are endless. Purple buttons for bunches of grapes, yellow for squash. What else can you dream up? The possibilities are only limited by the size of your garden!
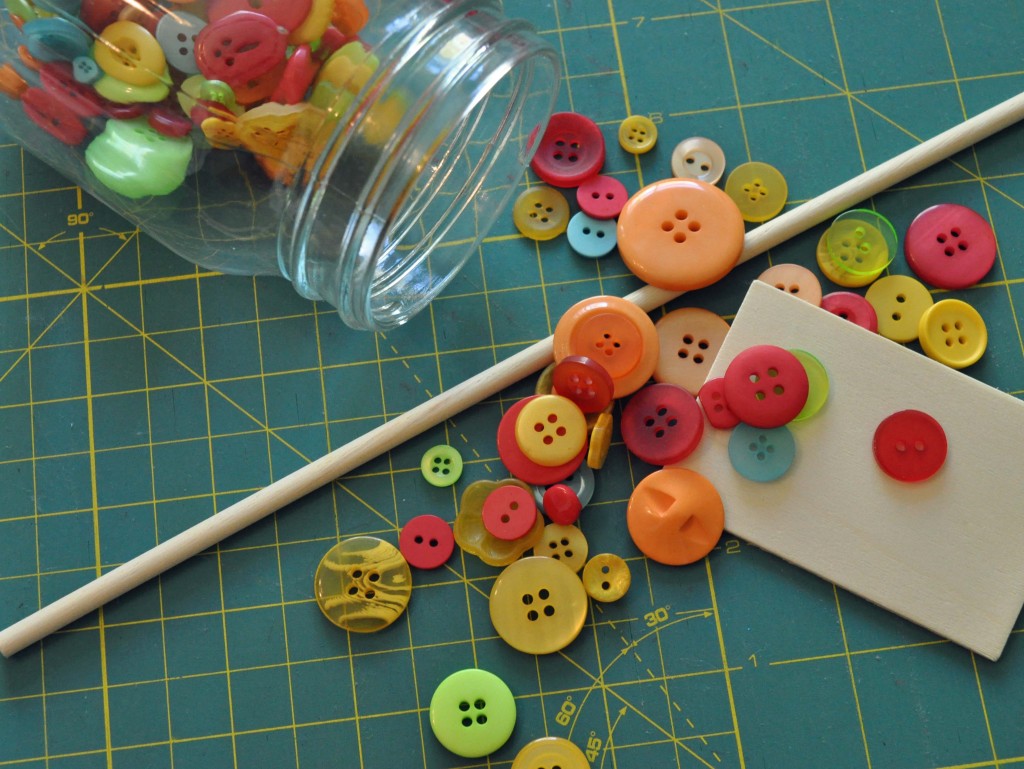 Supplies:
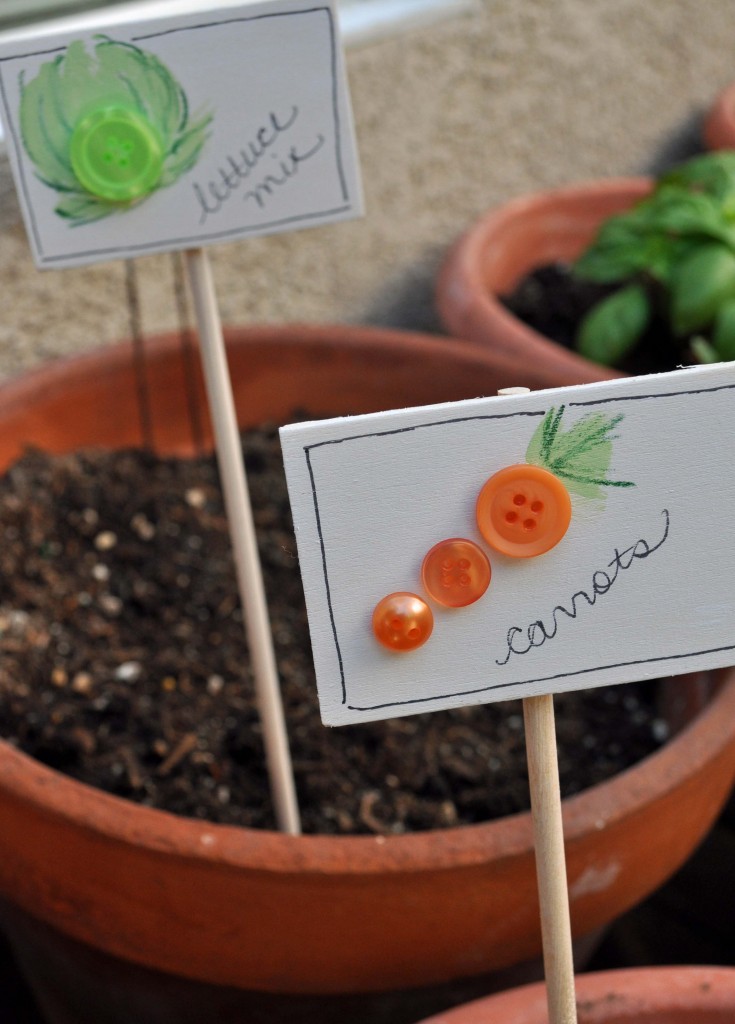
Decide which veggies you need to mark in your garden and gather up the appropriate buttons. For this tutorial, I’ll tell you how I made the Carrot Garden Marker.
See? I told you it was easy. Now – a word to the wise. This is a crafty project and it looks really cute, but remember if you are using these outside, they will need to be protected. I would recommend using paint and glue that you know can stand up to sun, heat and rain, or sealing them with a waterproof sealer.

Spring Garland button art by Laura Bray
Has Spring arrived where you live? If not, why not whip-up a few Spring Fling Button Garlands to drape around the house until the real thing makes its appearance? Or use the garlands for your Spring holiday decor.

Spring Button Garland by Laura Bray
This project is versatile as you can be completely in charge of how you make it based on your skill level and materials available. It’s all about the flowers. The most important thing to remember is that this garland looks best with felt flowers and button embellishments, but you can create the flowers however you want. I used my die cut machine to create the felt flowers and layered a couple of different sizes and colors together. My color inspiration came from Buttons Galore & More’s Citrus Button Jar. I just pulled some buttons out of the bag that inspired me and then matched my felt accordingly. You can also just buy some felt flowers and then bring them up a notch with buttons. Because buttons make everything cuter!
Supplies:
Instructions:
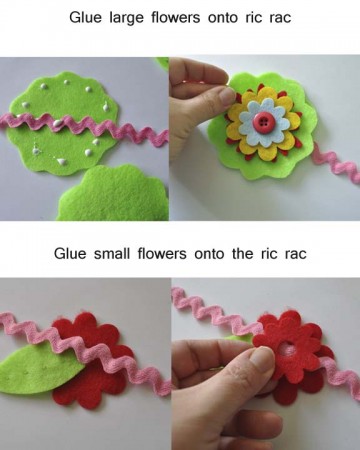
5. Using the same technique, attach a smaller flower to the right of the large flower. Space the flowers approximately 3″ apart. Make sure you glue all the flower fronts to the same side of the ric rac!
6. Continue attaching flowers, to either side of the large, middle flower until you reach the ends of the garland. Remember the pattern is to keep alternating large and small flowers.
Hang your garland and enjoy!
Project Designed by Laura Bray.
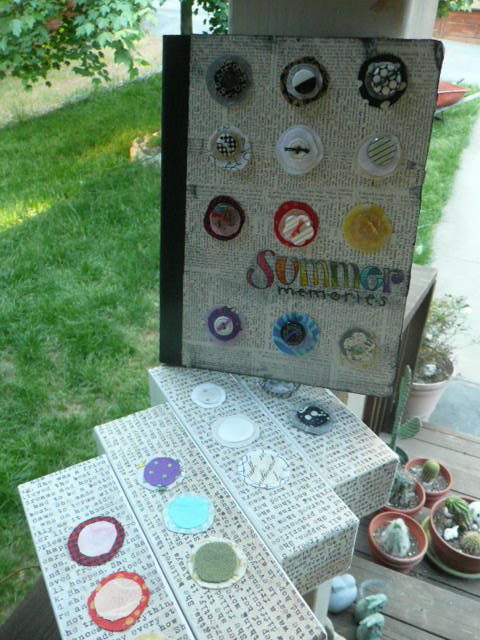
journal and pencil boxes
A few months back, I made some boxes to hold my colored pencils. I loved the design so much that when I was doing my summer journal, I chose to make a matching journal to coordinate with my boxes. Cute, huh!