
Nothing beats a cute holiday project that everyone can make together. With Independence day fast approaching, here is a simple project the whole family can enjoy.

Nothing beats a cute holiday project that everyone can make together. With Independence day fast approaching, here is a simple project the whole family can enjoy.
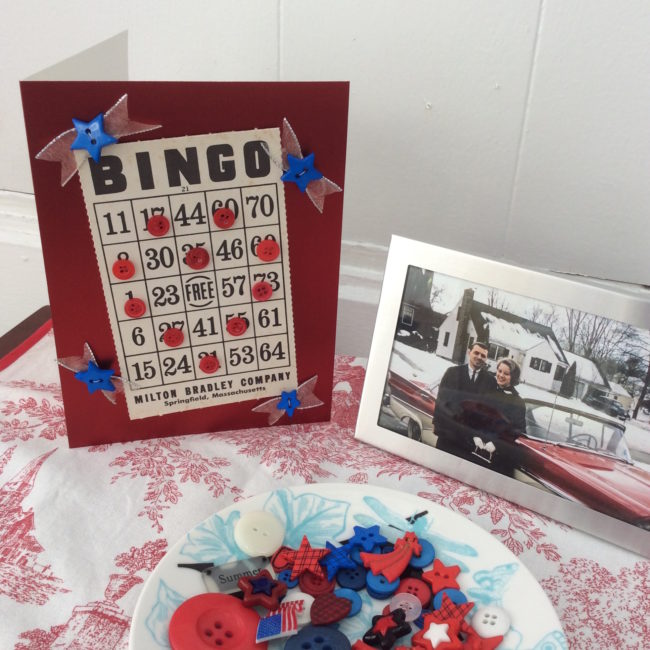
Vintage Bingo cards can be so fun to embellish with buttons. The grid makes a perfect surface to create patterns such as a heart outline. Our family tradition to play Bingo on the holidays and mu Dad is always the number caller. This card is for him.
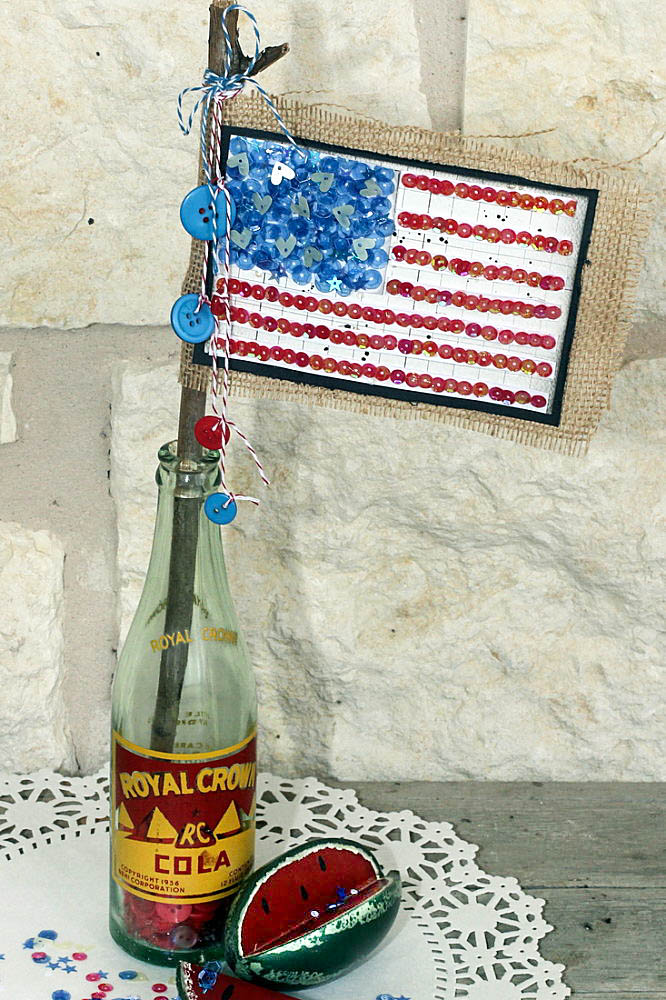
Hi, Connie here with Buttons Galore & More design team! This fun handcrafted sequin flag project is great to create with children, and will look fabulous in your home or on your front door, tucked into a grapevine wreath.
This sequin flag project was created using the brand new Bon Voyage Sequin tin by 28 Lilac Lane. Take a closer look at this beautiful new premium sequin tin!
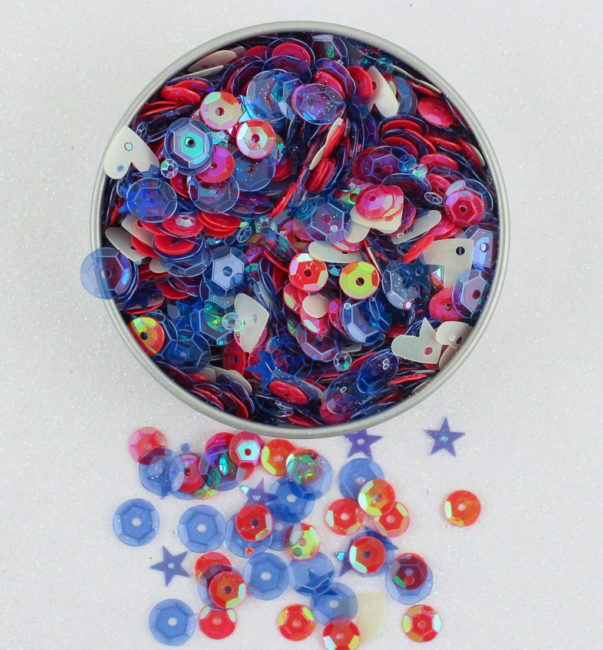
The inspiration for this sequin flag project came from the Bon Voyage sequin tin itself. It is full of red, white and blue sequins along with white hearts and blue stars – so lush! Can’t you see a child waving this flag at a celebration parade and then saving it, by tucking it away in a grapevine wreath for the front door? Or displaying it in a vintage soda bottle? Either way this flag will be a super cute was to display your patriotism!
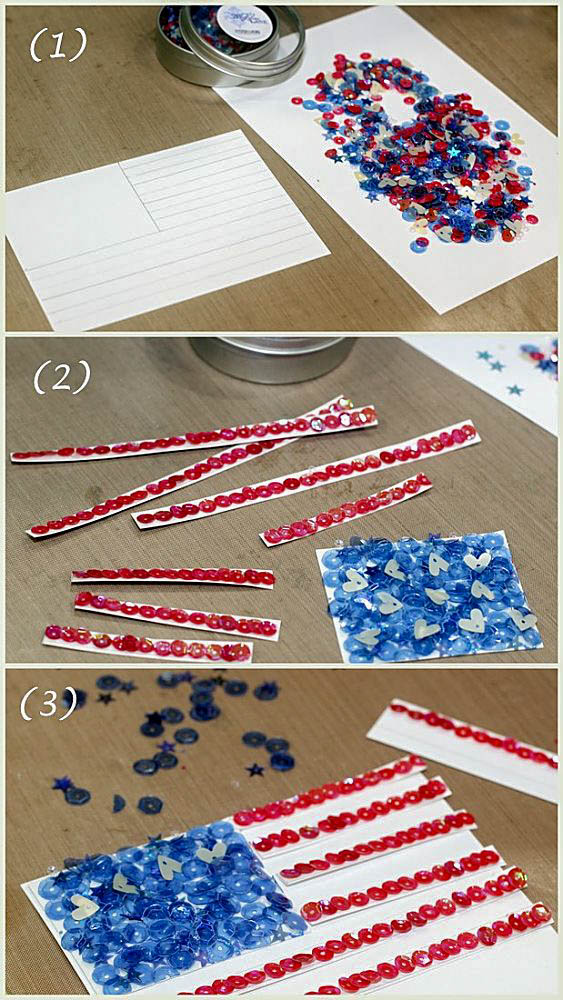
(1) Sketch out a USA flag on white cardstock that is about 4″ X 6″. Separate the large blue sequins, using a toothpick, from the sequin tin.
(2) Glue the large blue sequins on the flag with clear drying glue. Add the white hearts to the blue section and let dry. Do the same with the small red sequins, placing them in strips. Let dry.
(3) Cut the blue section out, and then the red strips. Piece them on a 4″ X 6″ piece of white cardstock or grid paper. When it is dry, mat the flag on black cardstock.
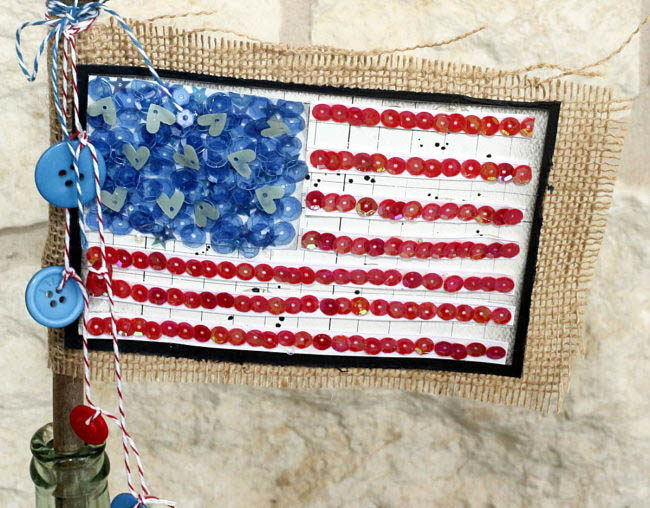
(4) Glue the flag to a piece of burlap ( 5″ X 7″ ) and then glue a stick to the reverse side. (I used a stick from my yard.)
(5) Use twine and buttons, create streamers for the side of the flag. Tie these to the top of the stick.
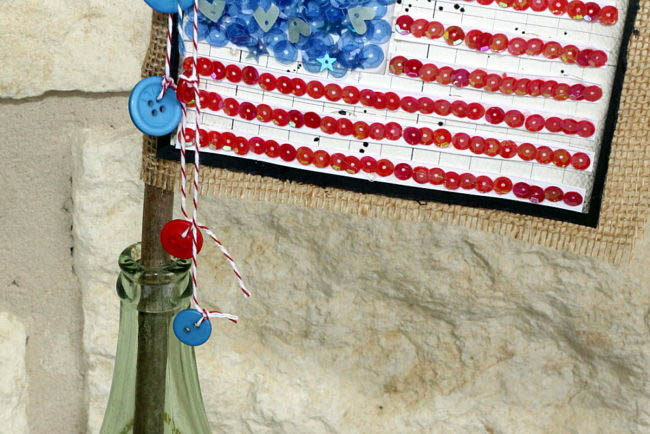
 I chose the vintage soda bottle to display my flag instead of a grapevine wreath. The soda bottle is full of red buttons to hold the stick in place. I really love the finished look!
Thanks for stopping by~
Connie Mercer/DT Member
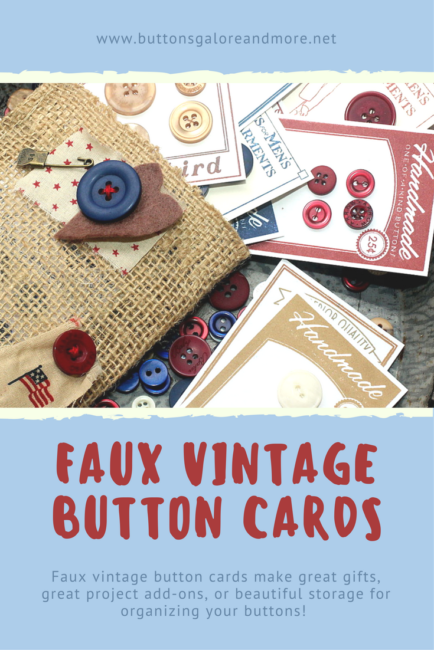
Hi! It’s Connie here with my first post for the Buttons Galore & More design team! Today I am sharing a fun project using Button Galores’ “Patriot” Button Tote to make faux vintage button cards and a tote to store them.
Inspired by the navy, natural, deep red and white buttons in the tote, I created a button bag along with hand stamped faux vintage button cards. The buttons are beautiful and look gorgeous on the button cards! This isn’t a difficult project, just a project that requires time. The end result is a beautiful button bag, full of custom assembled faux vintage button cards, that can be used as a decorative way to store buttons, add them to projects, or for giving the buttons as gifts to fellow crafters.
Supplies needed:
The button cards were created using a button card stamp and beautiful buttons from Buttons Galore. Each card has a sample of the buttons that are included in the Patriot Button Tote. No card is alike, as each is created with different buttons. Each button is hand sewn on the card, for easy access and future use. They are created just like the faux vintage button cards (well almost)! Button cards come in all sizes – these are about 2.5″ X 3″. There is plenty of room to mix large buttons with small or medium buttons on the button cards. These are a great gift idea for a crafter or sewist who is crazy about buttons!
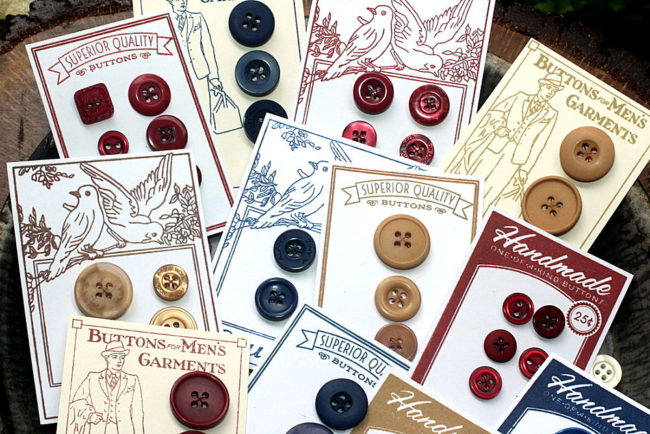
The burlap bag is stitched with some scraps of material and more buttons, after all, it is a button bag. The embellishment layers are hand stitched, to the burlap, on the front of the button bag. The button cards fit nicely in the bag. and will work as a great storage idea or a gift that will be loved.

The finished project, with the faux vintage button cards inside the button bag, is all ready to tuck in a gift bag for a special gift!
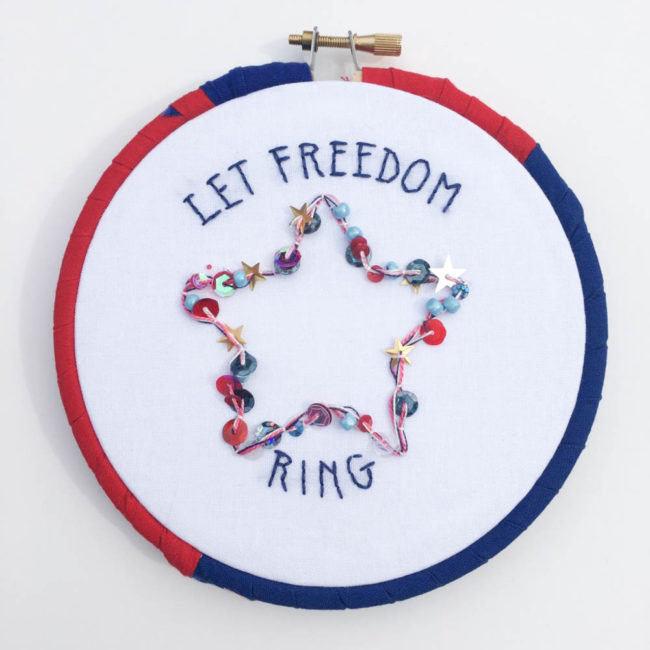
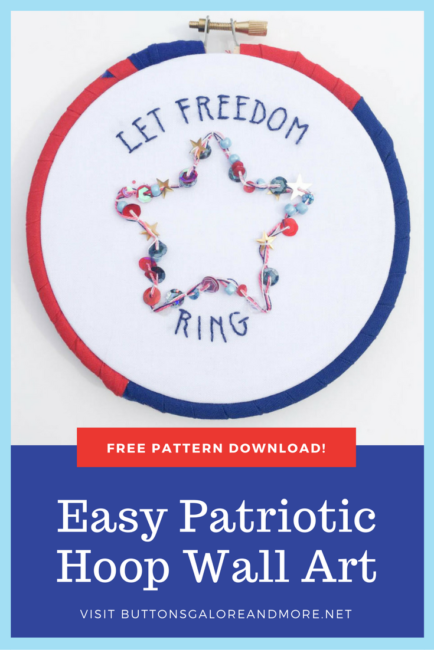
Summer time is kicking up into full gear and July 4th will be here before you know it! Red, white and blue and backyard BBQs are on the horizon! This little patriotic hoop is a great way to get started on those patriotic decorations.
Supplies Needed:
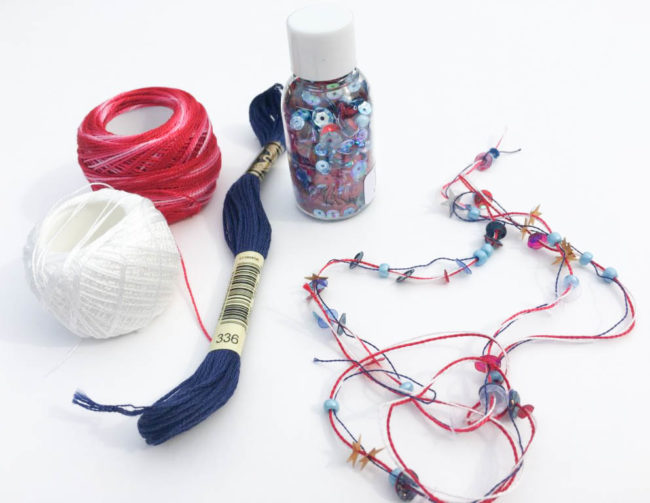
This patriotic hoop features the Stars & Stripes sequin & bead mix that is a mix of larger blue beads, small and large sequins, star sequins and smaller seed beads and glitter. I used the blue beads and sequins to create beaded thread for my hoop.
To get started: take about a yard of each thread; using only 1 strand of the blue divisible floss. Thread all three colored threads onto your needle and pick up different bits of the sequin and beads and push them along down your thread. Continue until you have distributed the beads and sequins sporadically along the thread. They don’t need to be in any sort of order, just make sure that they are spaced out well.
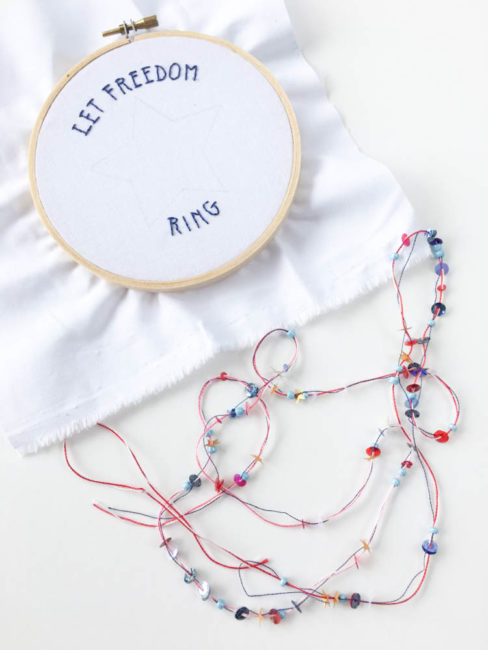
Find a sunny spot and transfer your embroidery pattern onto your fabric. Use three strands of the blue embroidery floss (#336) and backstitch the text. Lay your beaded thread on one of the star lines and with the white cotton perle, use a couching stitch to sew down the beaded thread along the outline of the star. Couch your beaded thread around the star two times.
To finish your hoop you can wrap it in a mix of blue and red fabrics, as I did, or you could even paint the hoop. Set your finished piece inside the hoop, trim your fabric about one inch from the edge of the hoop and hot glue it to the inside.
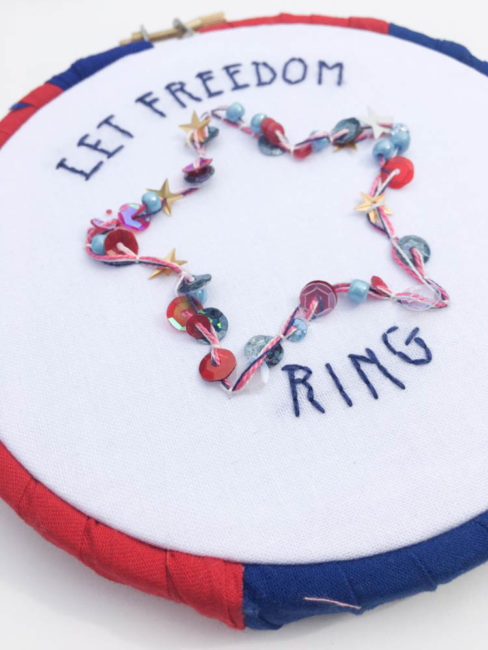
This patriotic hoop wall art is a great project for even a beginner at embroidery. It’s one that looks like it took hours and advanced skills, but is made up of basic embroidery stitches and techniques and can easily be finished in an afternoon!
It’s time to make another addition to our holiday frame project! This time, we’re creating a rustic flag insert for the frame that will be perfect for showing your patriotic pride for the 4th of July or the upcoming Olympics!
(For those new to the series, the holiday frame project is a 8″x10″ frame that I’m creating a series of decorative inserts for to celebrate various holidays and occasions. To see previous installments in the series, click here.)
The hardest part of making this rustic flag project is…the math! To start, you are going to need to measure the opening on your frame, and decide how much border you want around your frame. Then use the painter’s tape to mask off the edges right up to the area that you want to paint.
Divide the remaining vertical area by 7 to determine the width of the stripes on the flag. Use painter’s tape to mark off the bottom stripe and fill in the stripe with paint. Remove the tape right away. While the stripe dries, determine how wide you want your blue area for the stars (I suggest about 40% of the width). Then mask it off with vertical strip of tape to protect it while you paint the top two red stripes. Measure down from the top to create your first stripe, lay down a piece of painter’s tape to protect the “white” stripe, and fill in the red stripe with paint. Remove the tape immediately after painting.
Letting each stripe dry before painting the next one, continue measuring and masking with tape before taping, until all 4 red stripes are painted.
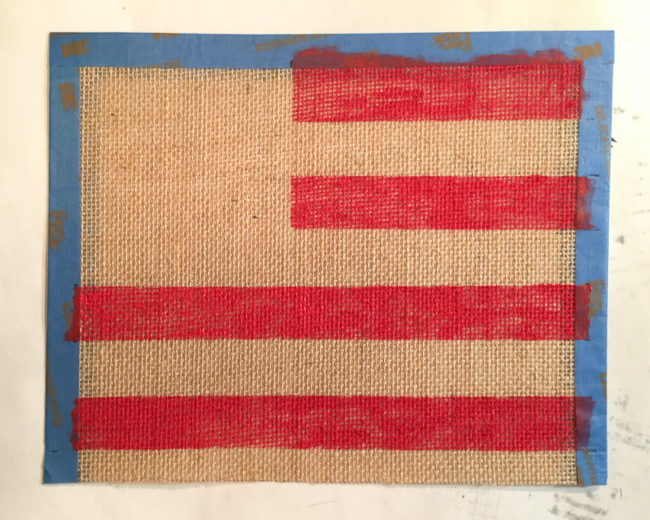
Once all of the red paint is dry, then you can lay down painter’s tape to paint the blue area.
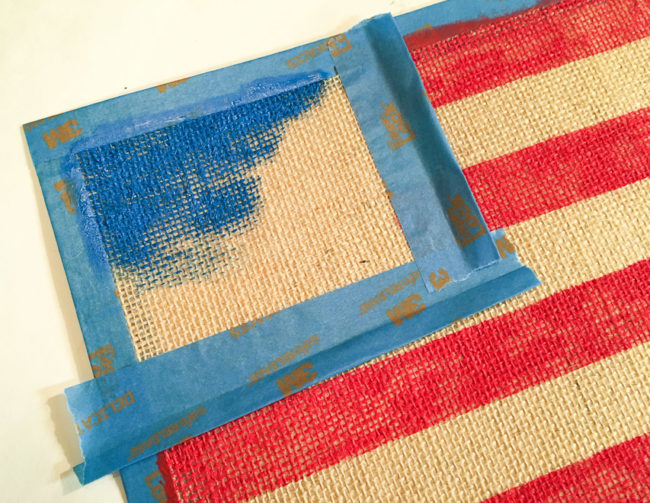
Peel the tape up as soon as you are finished painting, while the paint is still wet. Because of the open weave of the burlap, your paint will appear “patchy”, since in some places it will fill in the weave and in some it won’t. This adds to the rustic feeling of the project!
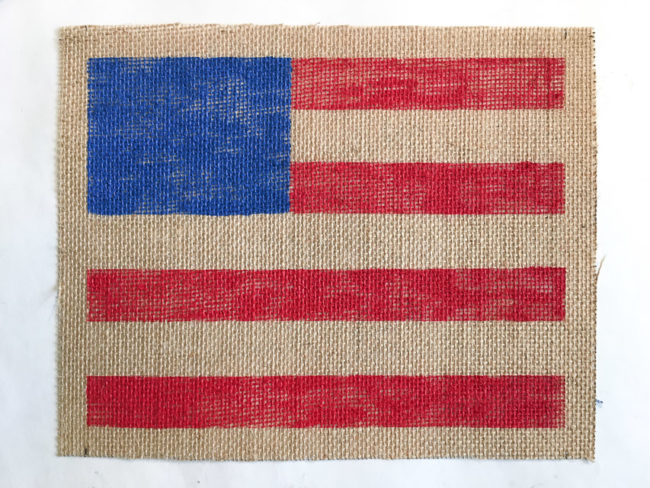
The final step is to select 13 small to medium sized white buttons from the Patriotic Mix of Button Basics. Arrange them in a random way in the blue area, and use a hot glue gun to attach them to the flag.
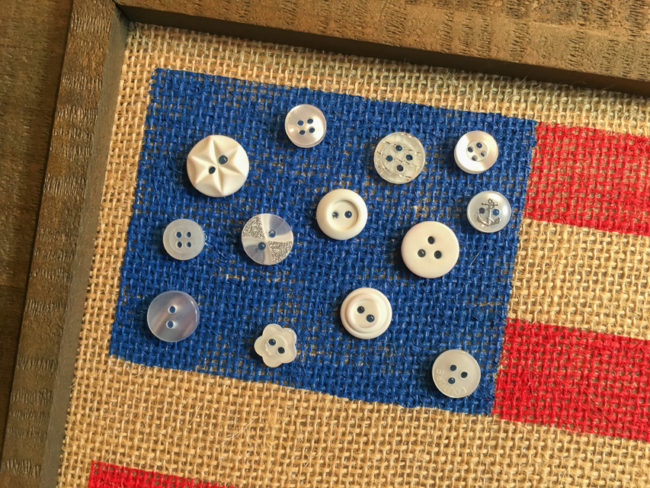
Now you’re all ready to put your flag in your frame and celebrate the 4th of July or cheer on Team USA for the Olympics this summer!

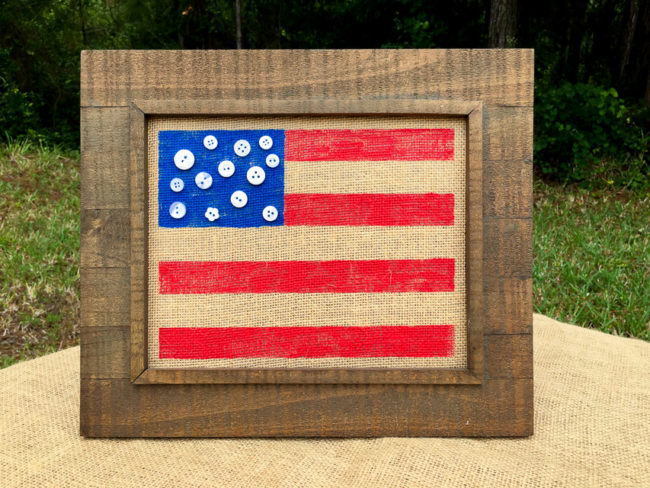
The summer holidays coming has many of us here in the U.S. wanting to display our more patriotic side. This simple pallet flag will help you show your love of country while bringing some country charm to your home as well!
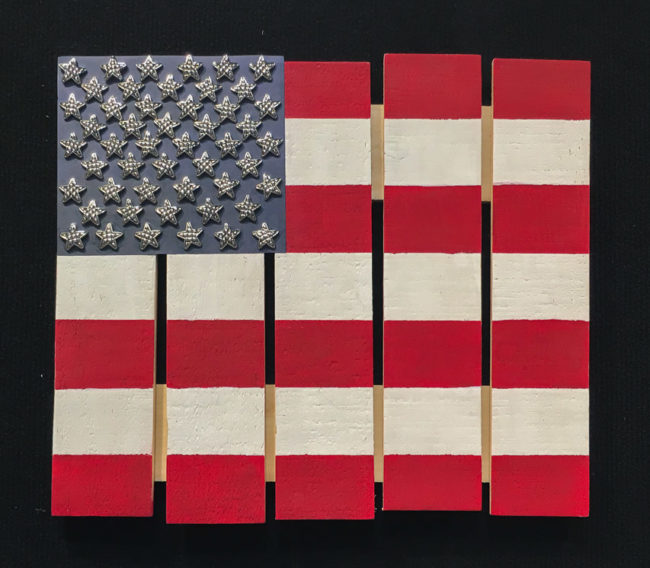
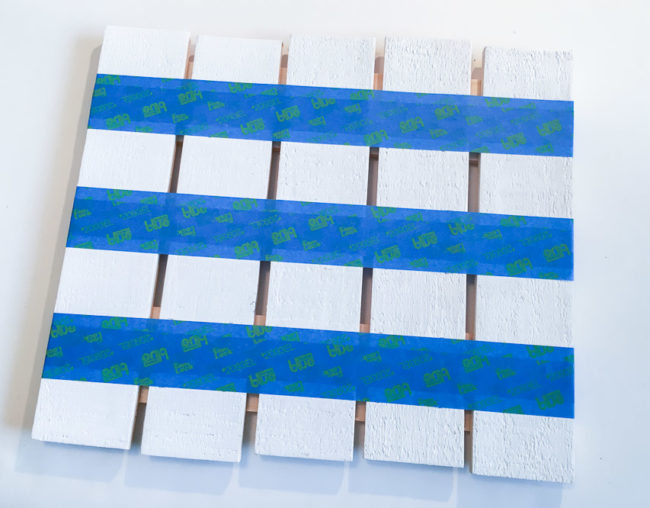
To create this pallet flag, I started by painting the entire pallet white. Then, to create my stripes, I measured the tallest height of the pallet and divided by seven (the number of stripes that I wanted) to get the width of my stripes.
Using painter’s tape to block off the areas that I didn’t want to paint red ensured that I got crisp edges on my stripes. I just measured the width I wanted and laid down a strip of tape at that mark. Then from that edge, I measured again and lay another strip of tape at that mark. That left a small open area between the two strips of tape. To protect my white paint from splatters while painting with the red, I laid down an extra strip of tape on top of the others to fill in that gap. When I was done, I had blue and white stripes like this:
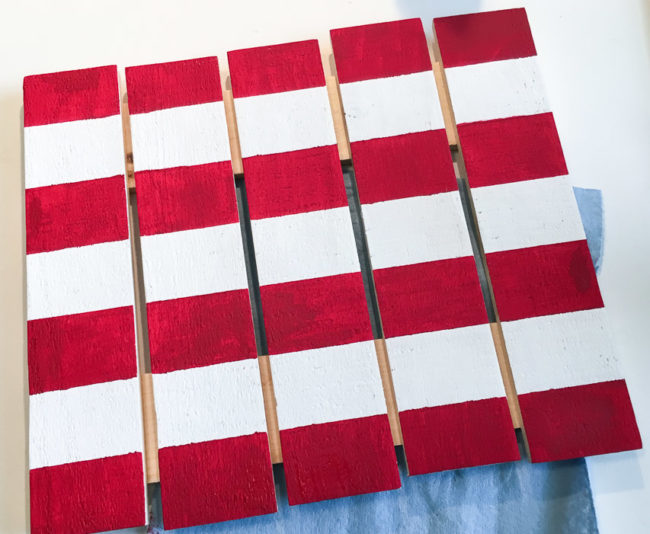
Once the tape was in place, I painted the areas that weren’t covered in blue tape with red paint. The paint below appears patchy because I peeled up the tape while it was still drying – an important step to keep the edges of your paint crisp. Once dry, the paint is much more even.
Instead of painting the blue field for the stars I chose to use a paper background. The paper filled in the holes between the planks on the pallet, allowing for even spacing of the stars. It also allowed me to extend the paper above some of the shorter pallet planks, to the height of the taller planks. This gave me more room to work with for the stars. The paper was adhered down with matte finish white glue.
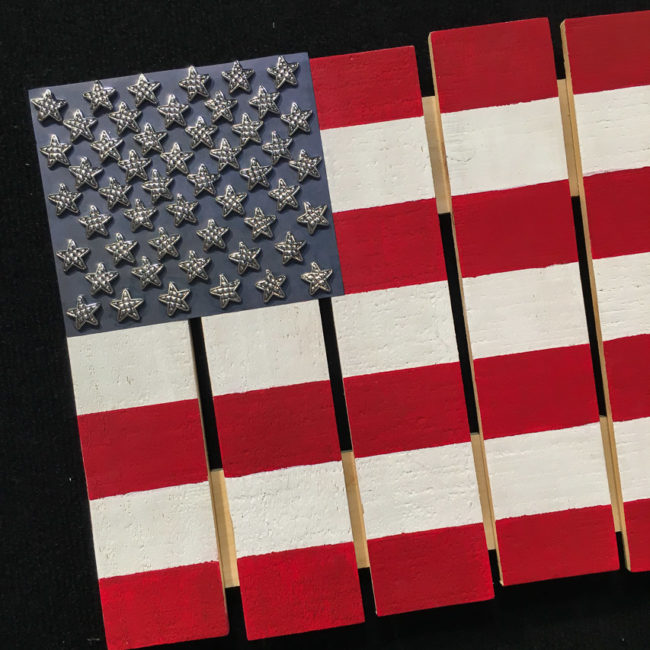
Before attaching the stars, their shanks had to first be removed. Placing the stars required a lot of patience. I worked in sections, letting glue dry on each row before moving to the next so that I wouldn’t push previous stars out of position placing the next row. It’s difficult to get the arrangement exactly perfect, but on a rustic pallet flag like this, that is part of the charm!
While I used silver quilted stars for this project, any of our 3/4″ or less sized stars would work (like our Texas Stars, our Gold Stars, or our Silver Star assortment, or the white stars from our Stars & Stripes assortment). If you don’t have the patience to do all 50 stars, try arranging 13 of them in a circle.
Supplies:
The Fourth of July is right around the corner, and for many of us that will mean taking our food outdoors for a party!
A $1 bucket can be a practical and festive way to hold your party’s utensils, with the addition of some jute ribbon – and of course, buttons!
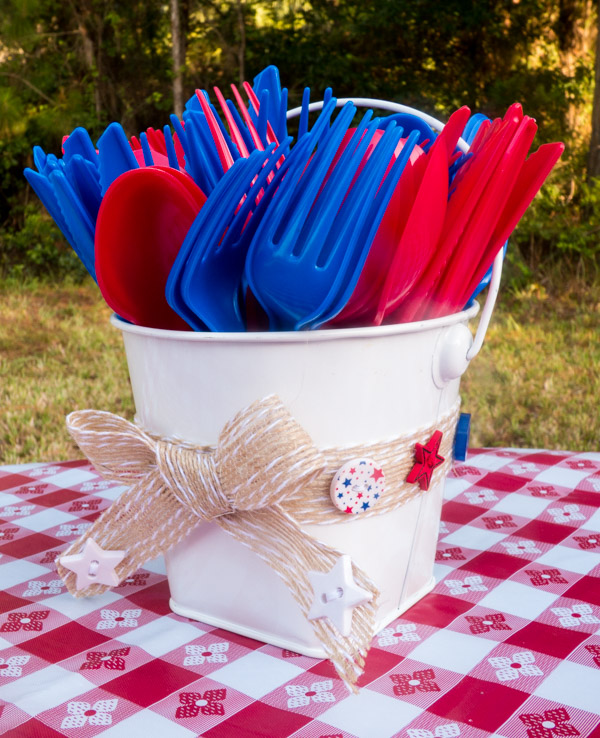
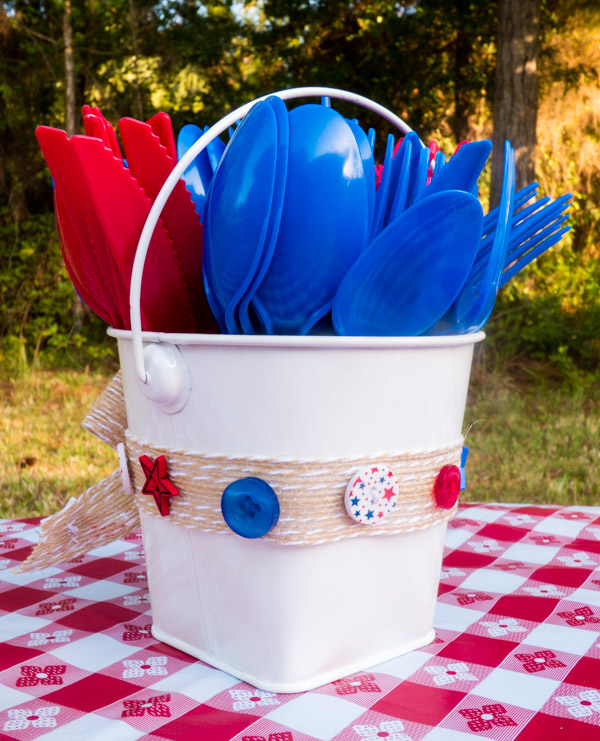
Buttons used in this project came from the Buttons Galore Patriotic Value Pack.
Constructing this project is easy:
1. Cut a length of ribbon that will fit around your bucket. Sew patriotic themed buttons from the Patriotic Value Pack along the middle 3/4 of it. Use adhesive dots to adhere the ribbon around the bucket.
2. Cut another length of ribbon, and tie into a bow. Sew star buttons to the end of the bow’s streamers.
This concept could be adapted for plenty of holidays just by changing button theme pack. Need a utensil holder for that holiday buffet? Try the Christmas Button Grab Bag instead. Or make it a holder for Halloween candy with the Scary button assortment. The options are as limitless as our button selection!
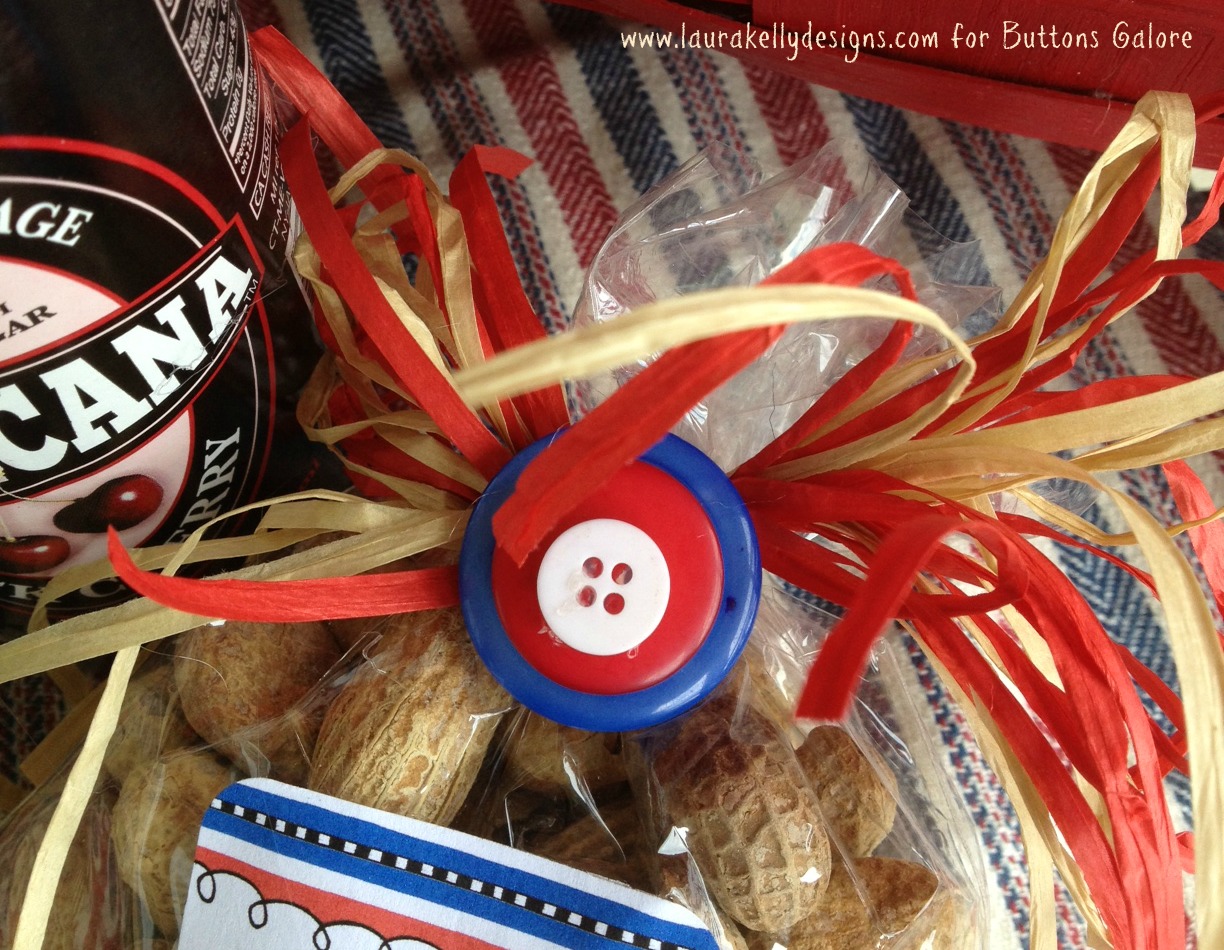
It’s Fifteen MINUTE Friday and the 4th of July. Here is a really quick and cute way to pack up some snacks for the fireworks show. This little packaging idea would be great in a variety of colors for lots of occasions, goody bags and school treats too.
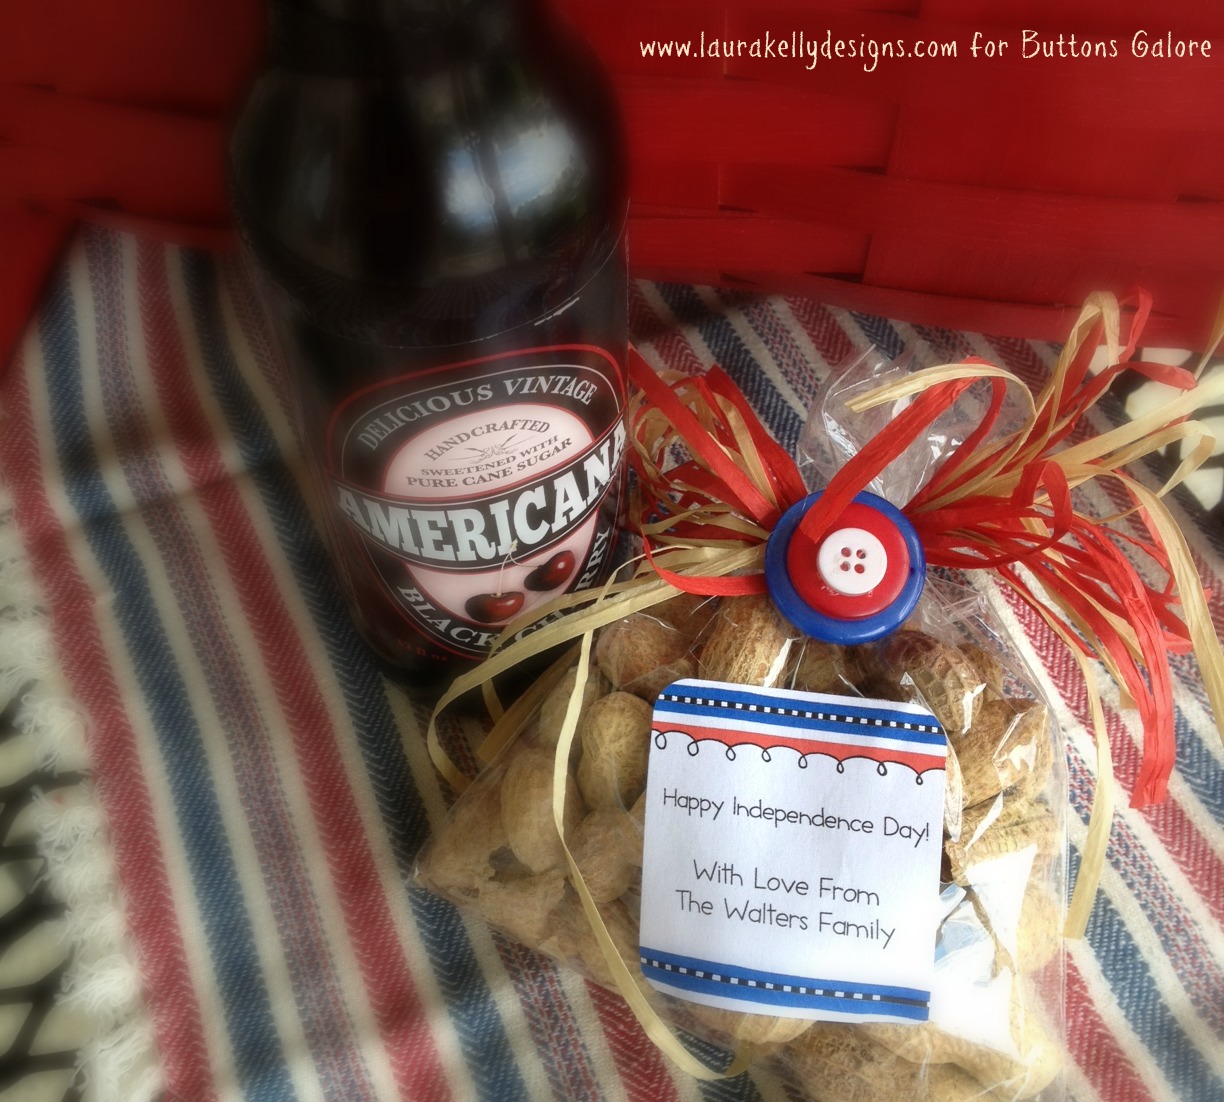
Put you snacks in bags that you can tie closed with ribbon or raffia then add the buttons with Aleene’s Turbo Tacky Glue. The super cute label is from Expressionery.Com and was designed by me so totally matches the colors of the buttons that come in the Laura Kelly Patriotic Mix.
Happy Celebrating!
Laura
Here is a festive, fun and simple to make PATRIOTIC PICNIC PAIL, great for holding snacks, silverware, candles, etc. and totally useable for Memorial Day, 4th of July and Veterans’ Day too!
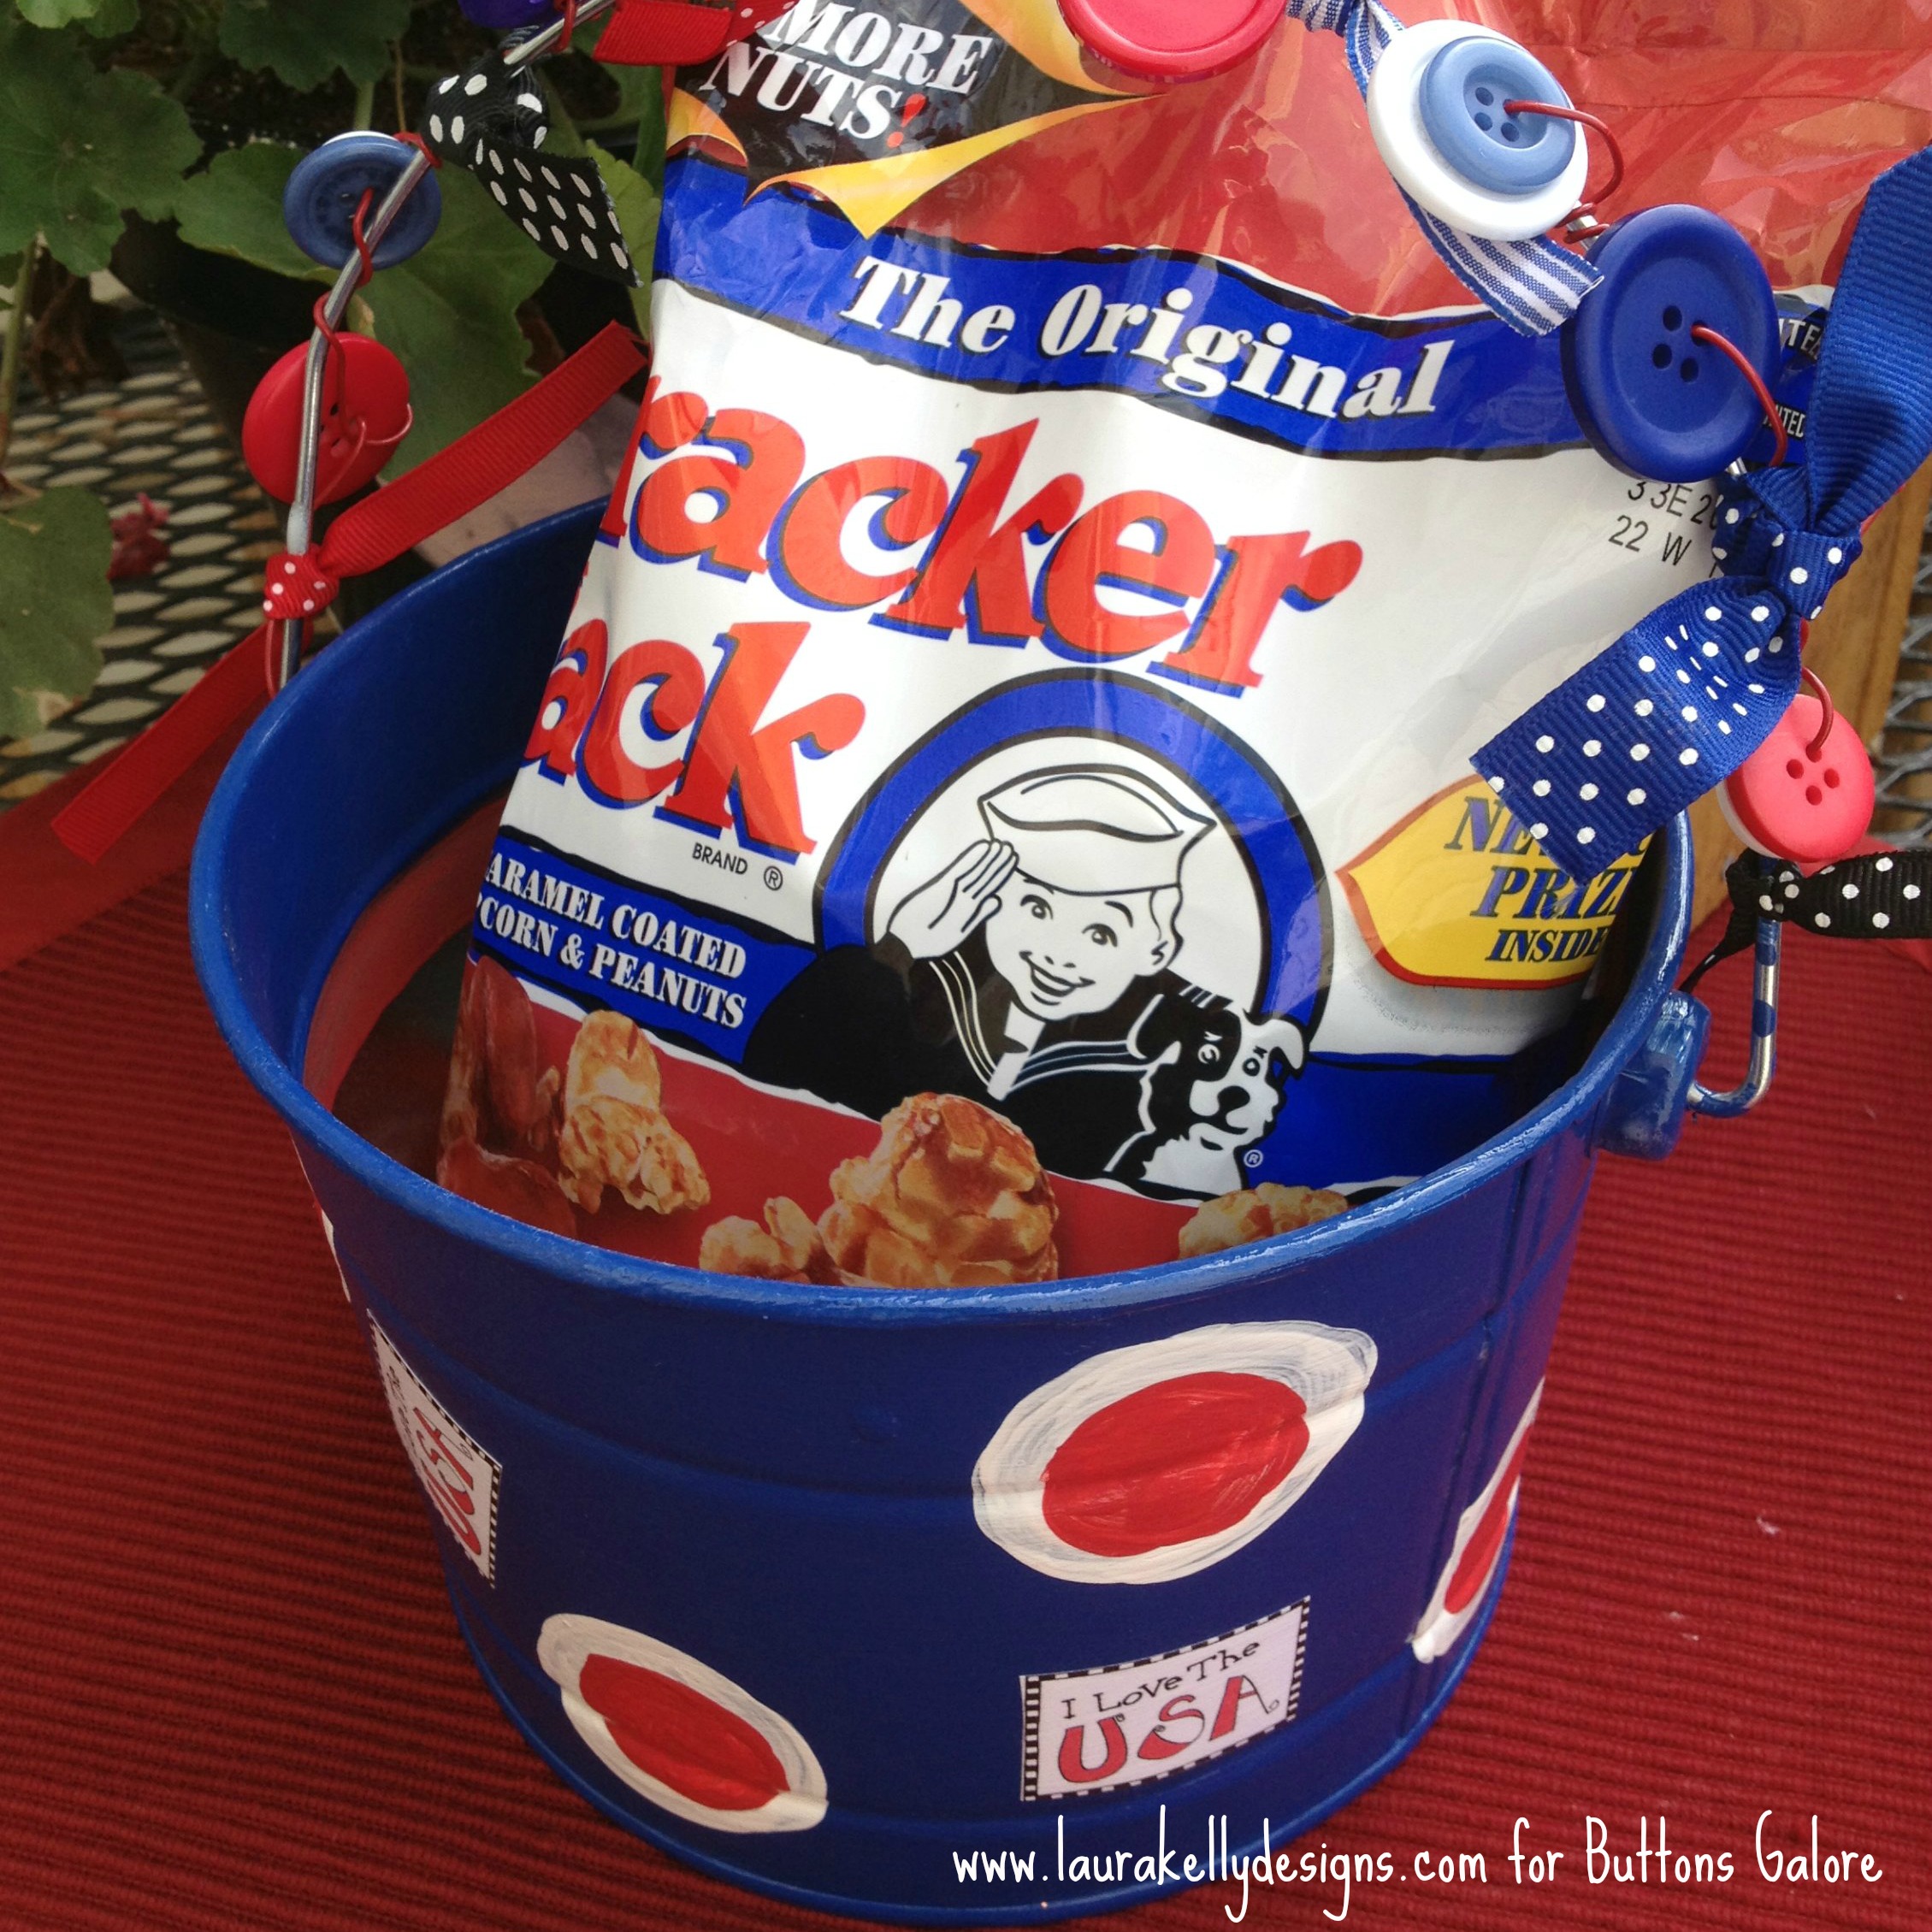
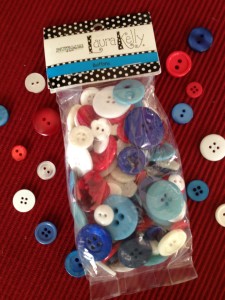
I gathered the products and materials I would need first. You can get my patriotic mix of buttons from Buttons Galore and save yourself from having to buy all of the colors individually.
I painted the tin pail with blue paint, applying three coats to get it bright and covered completely. Then I added polka dots with white, applying two coats. To complete the painting, I added polka dots inside the white ones with red, again applying two coats. I also painted inside of the bucket.

When the paint was totally dry, I used decopauge to add a few “I Love the USA” additions. I printed them out on the computer and cut them first. My favorite choice here is Matte Collage Pauge from I Love to Create.

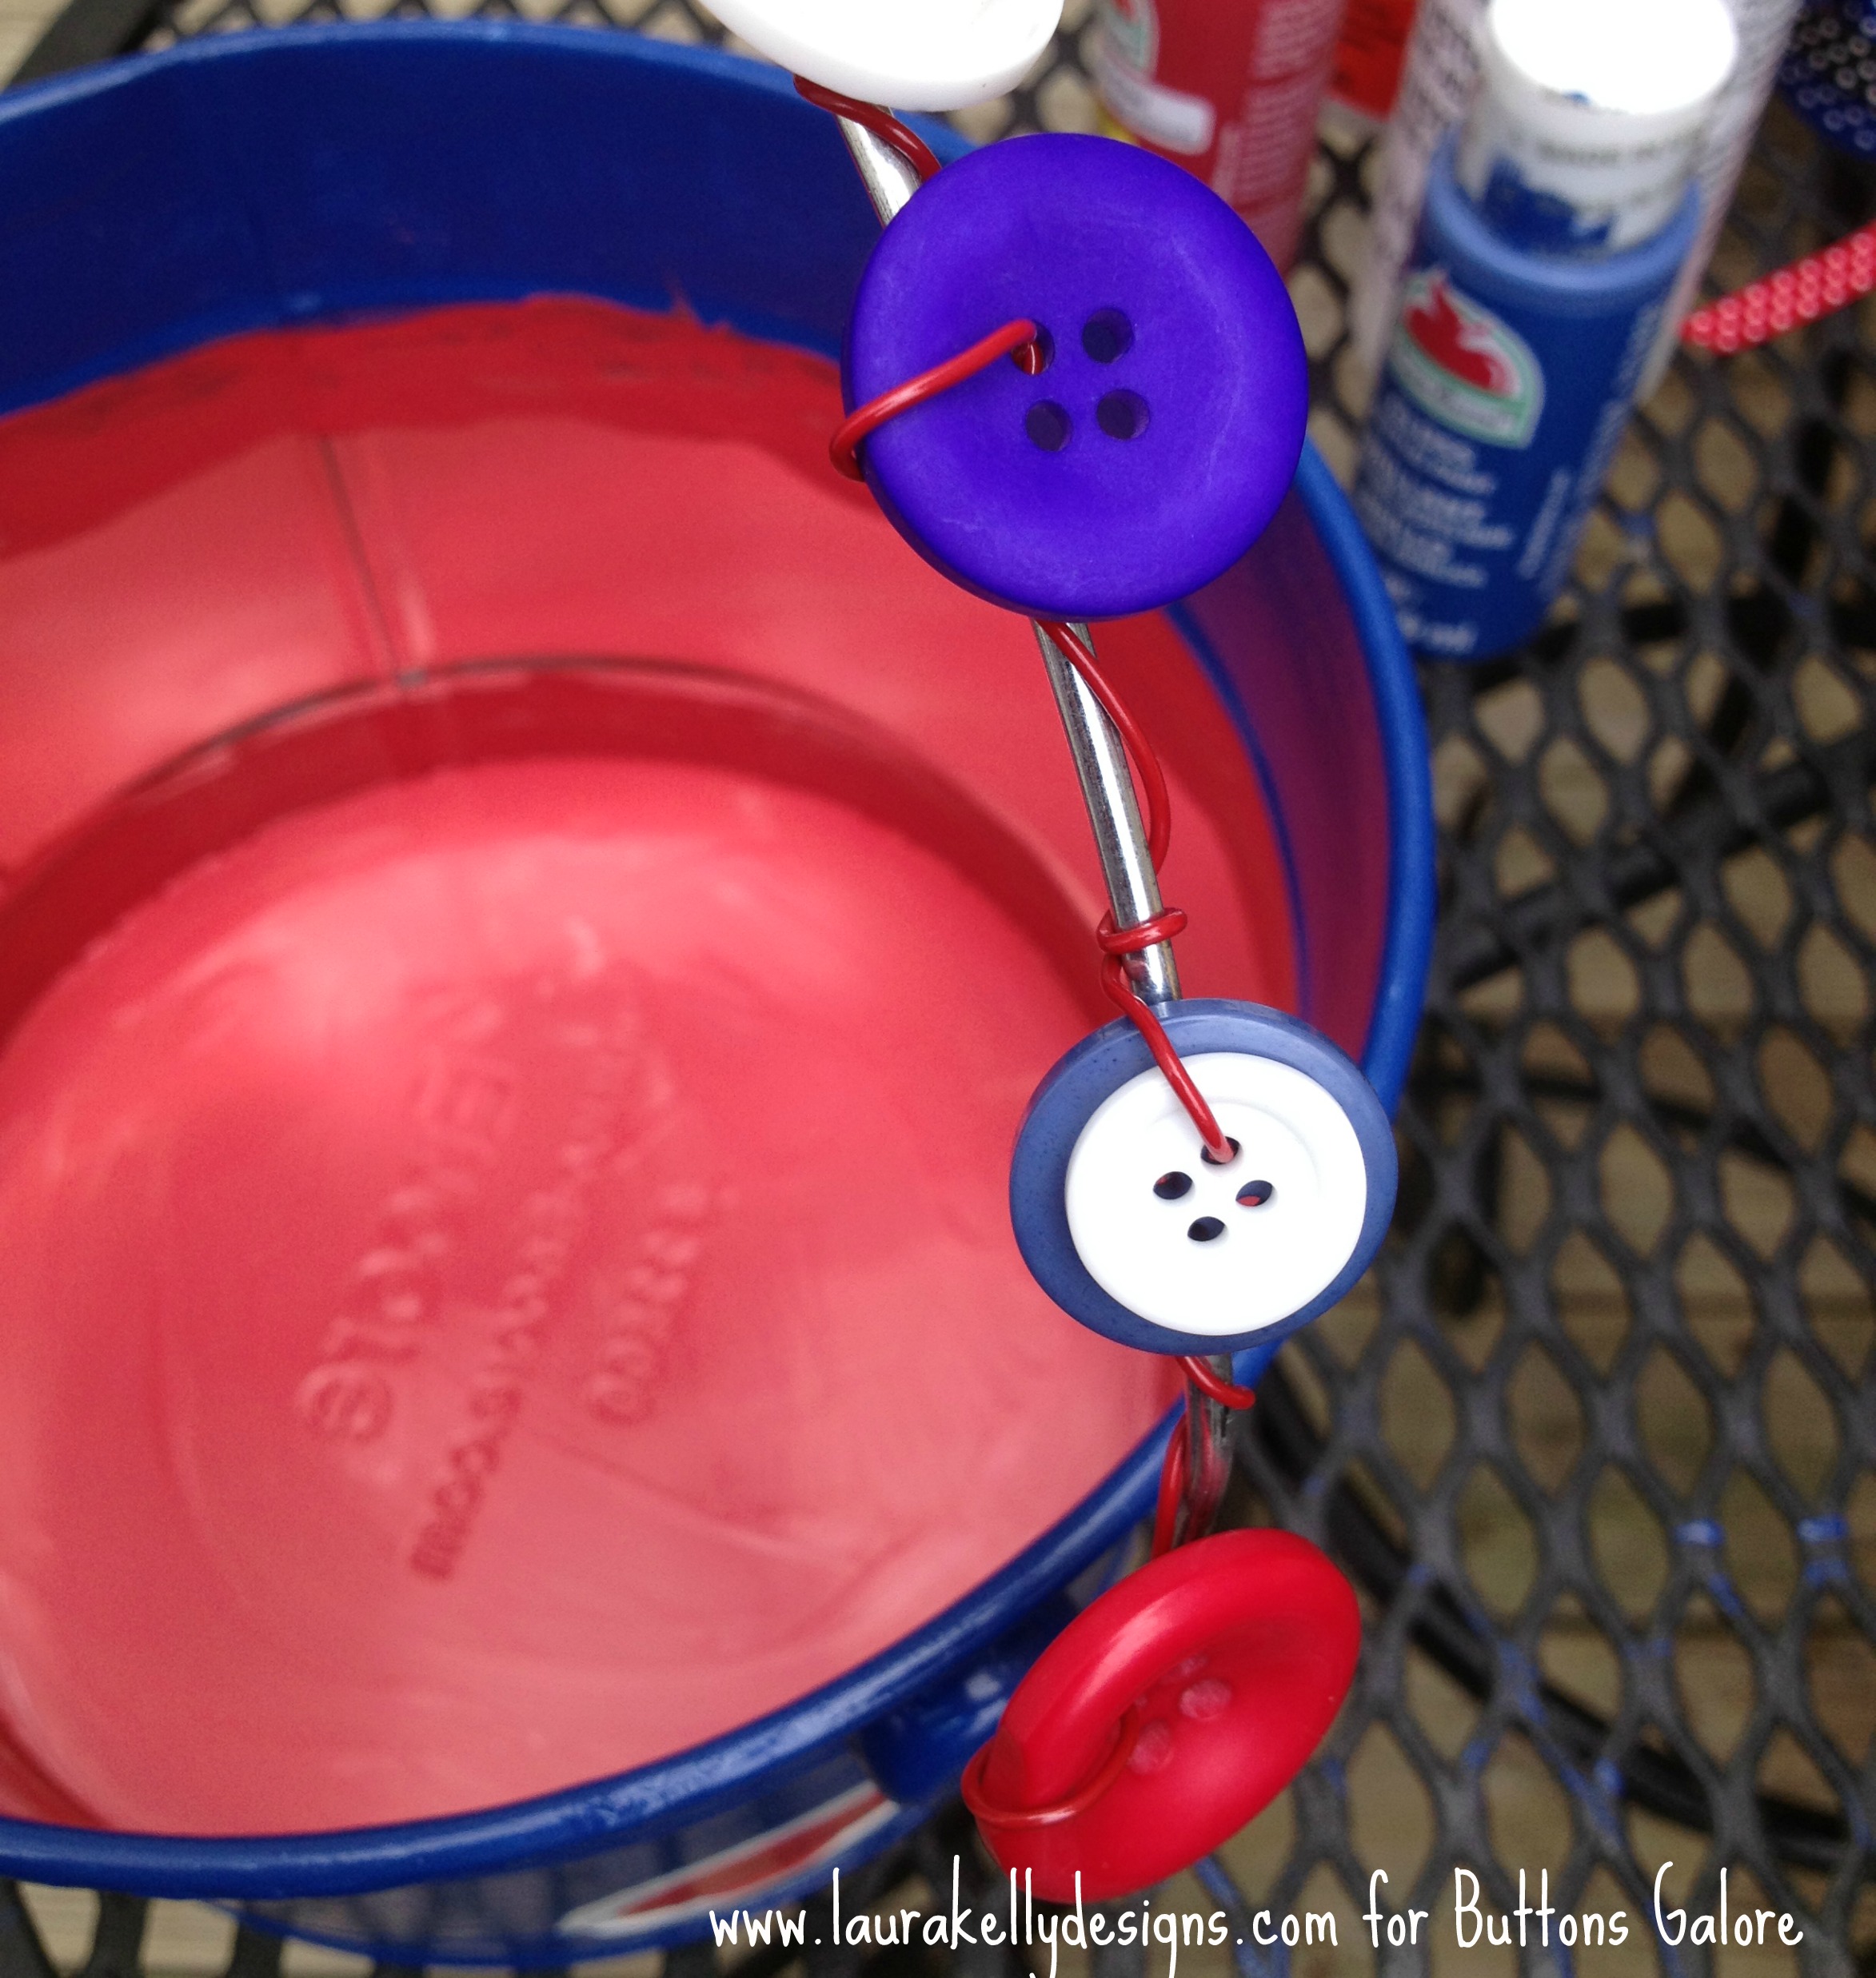
To decorate the handle, I added buttons from my Patriotic Mix from Buttons Galore by threading them onto red wire and twisting in onto the handle as I went from one end to the other. I added a few ribbons tied in knots.
Then I added my favorite red, white and blue packaged snack to complete the project and turn it into a great hostess gift!
Happy Celebrating the USA and Creating with BUTTONS,
Laura
I love decorating empty cans and turning them into something fun and useful again. All those canned beans and soup can really be a DIY project waiting to happen. Add some fabric, ribbon and brightly colored buttons and you have yourself a whole slew of possibilities. For today’s project I decorated a can with patriotic colors and turned it into a pretty little flower vase, perfect for adding to the table for July 4th.
Red White and Blue flower vase
Materials:
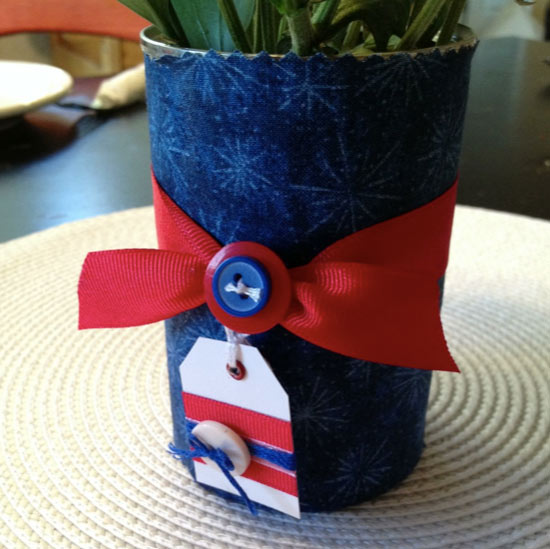
Patriotic flower vase DIY
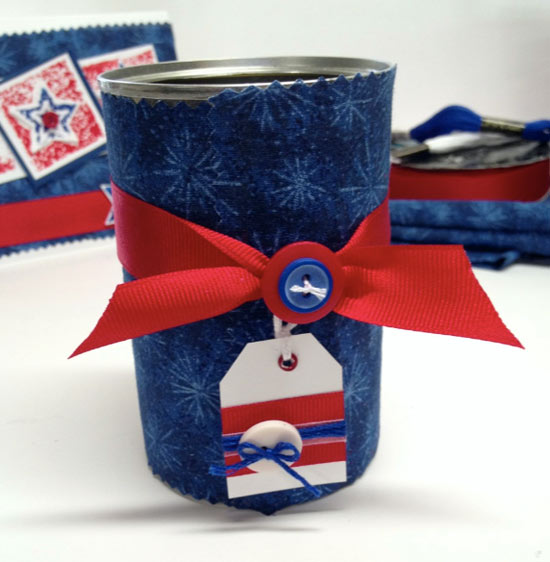
Recycled can to patriotic vase
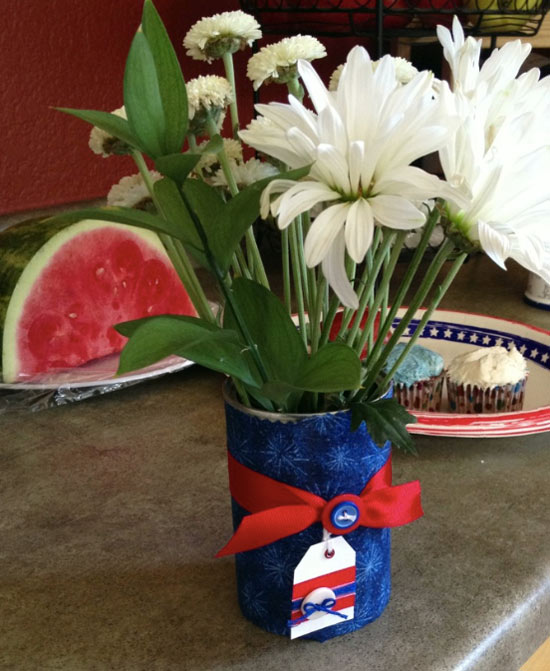
Simple patriotic flower vase
You can make a bunch of these patriotic flower vases to decorate for your July 4th festivities. I use these same kind of decorated cans as utensil holders and pencil/marker holders for parties. You can add a little sparkle by using glitter or rhinstones to the tag and ribbon wrap. You can even add buttons all around the can. Get creative and make your own fun patriotic decorations!
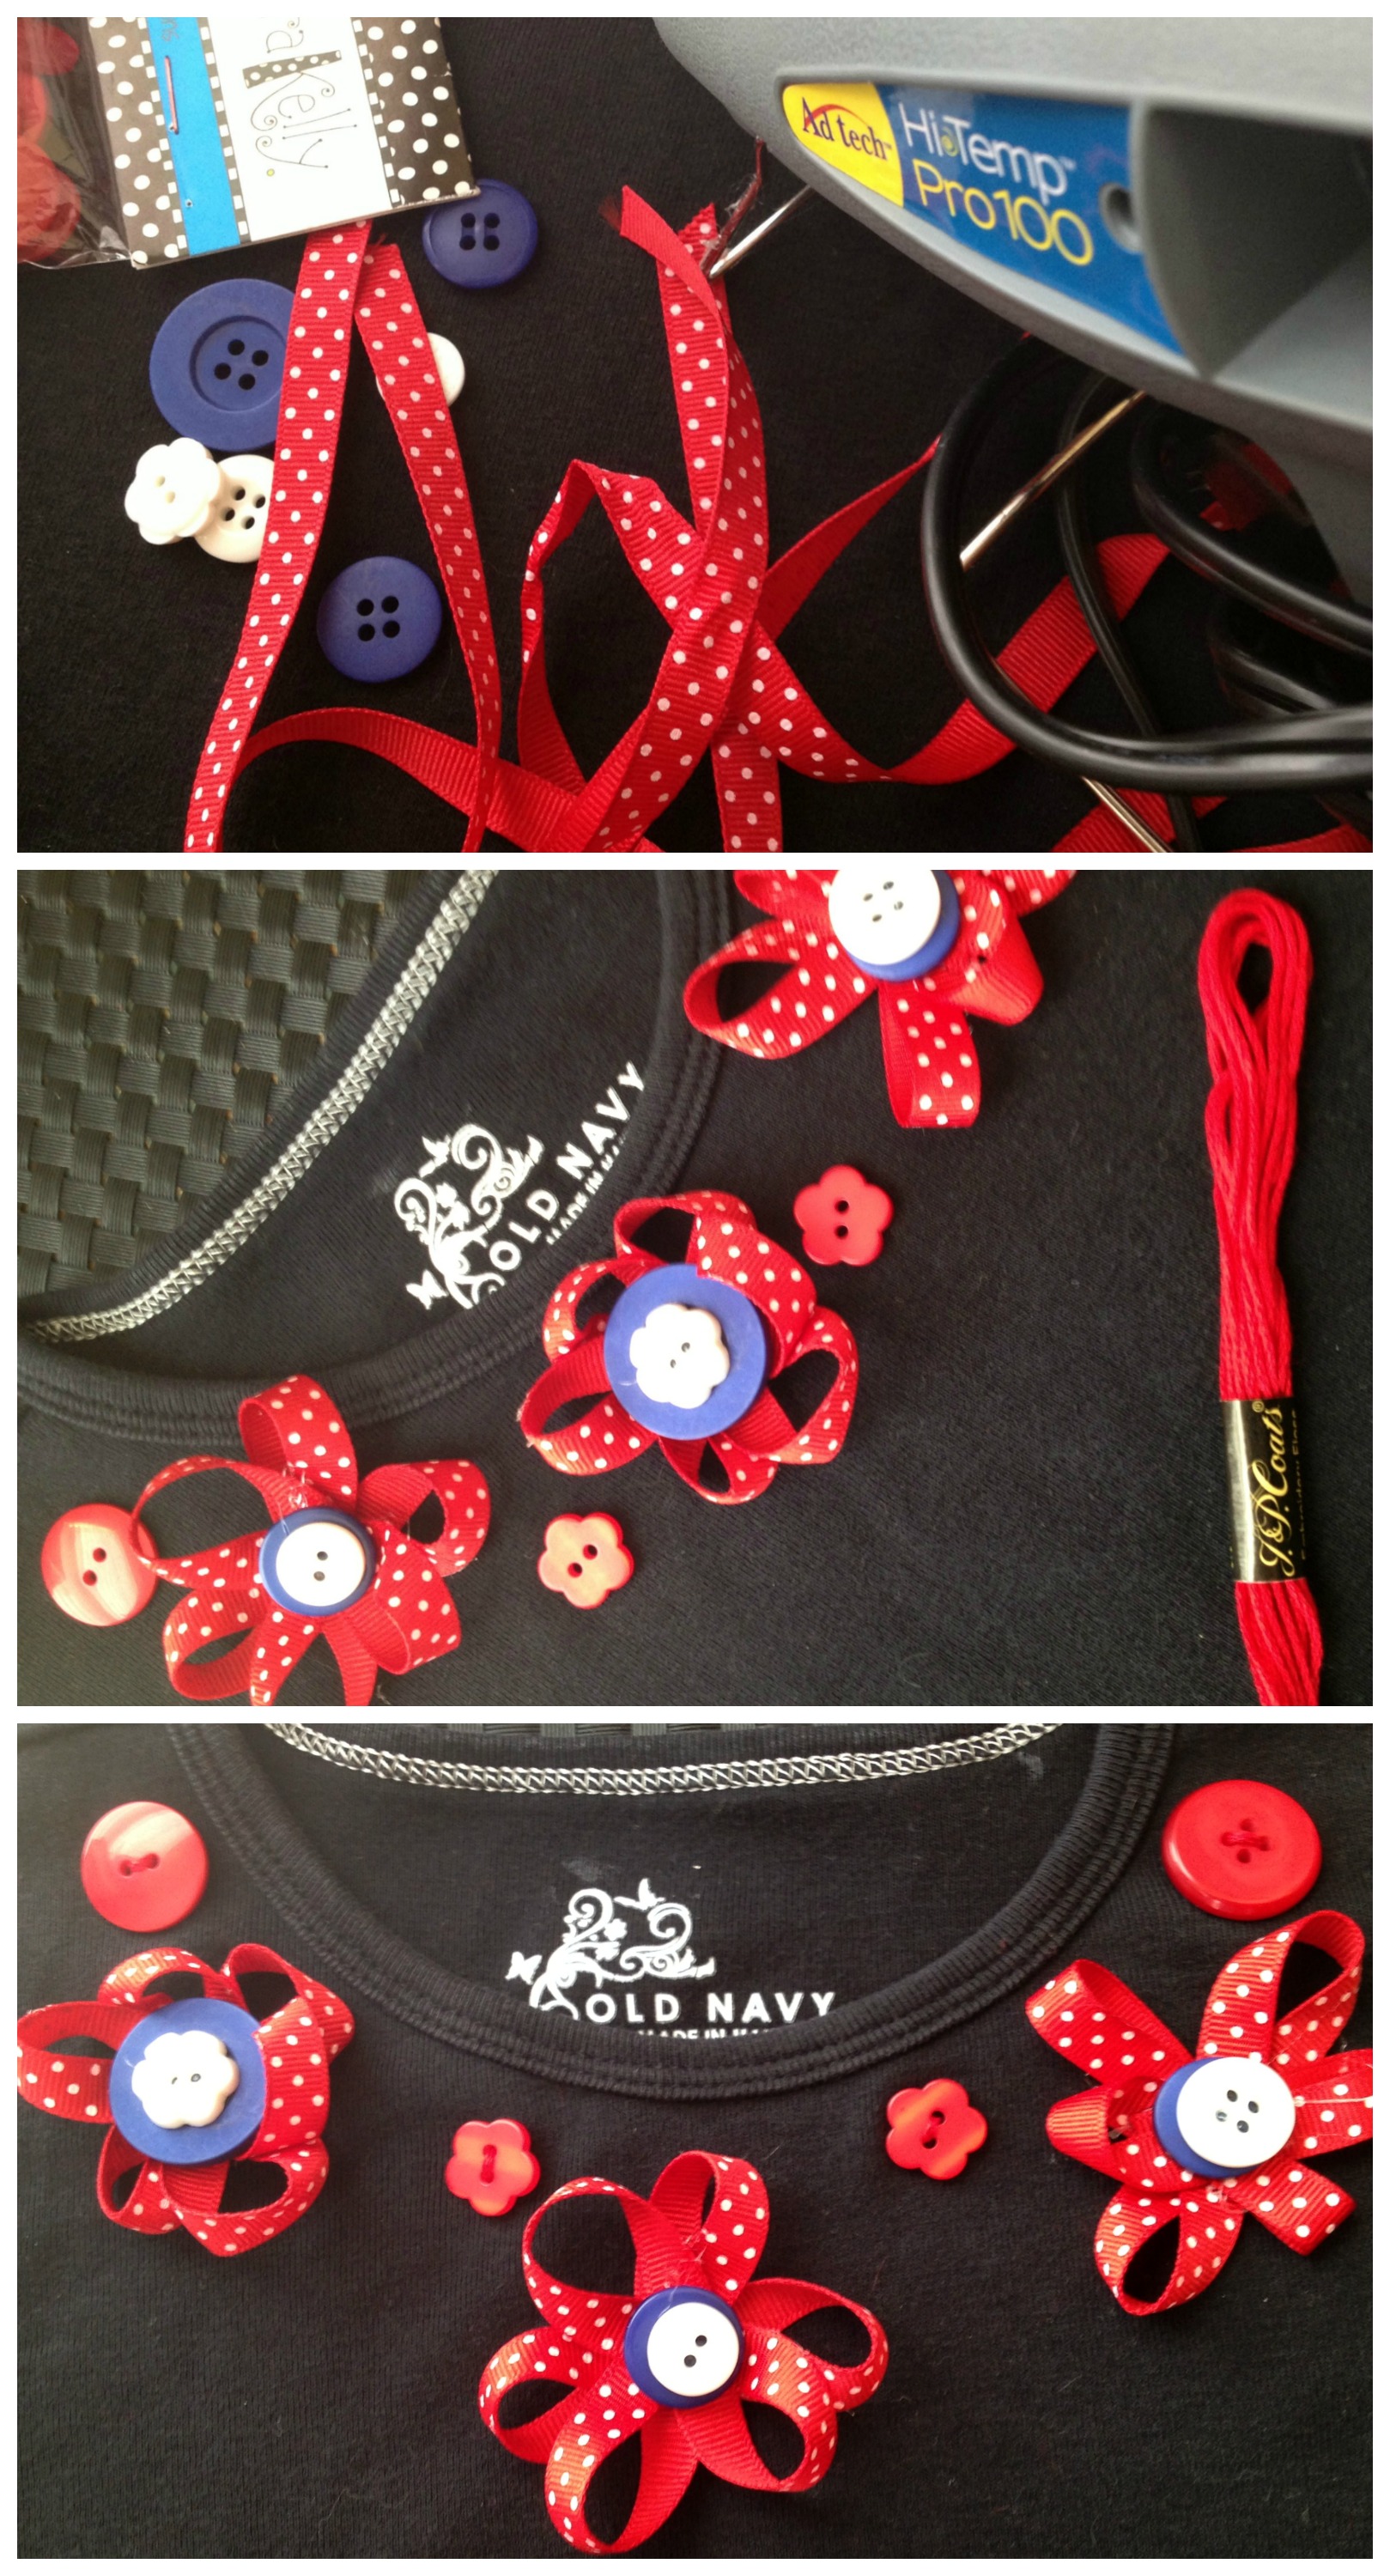
It is that time of year, the red…white…and blue time that is! Here is a quick and easy way to up-cycle an old t-shirt into a festive masterpiece fit for the grandest of parades. It is shown in patriotic style but could be done in any color theme for any occasion.
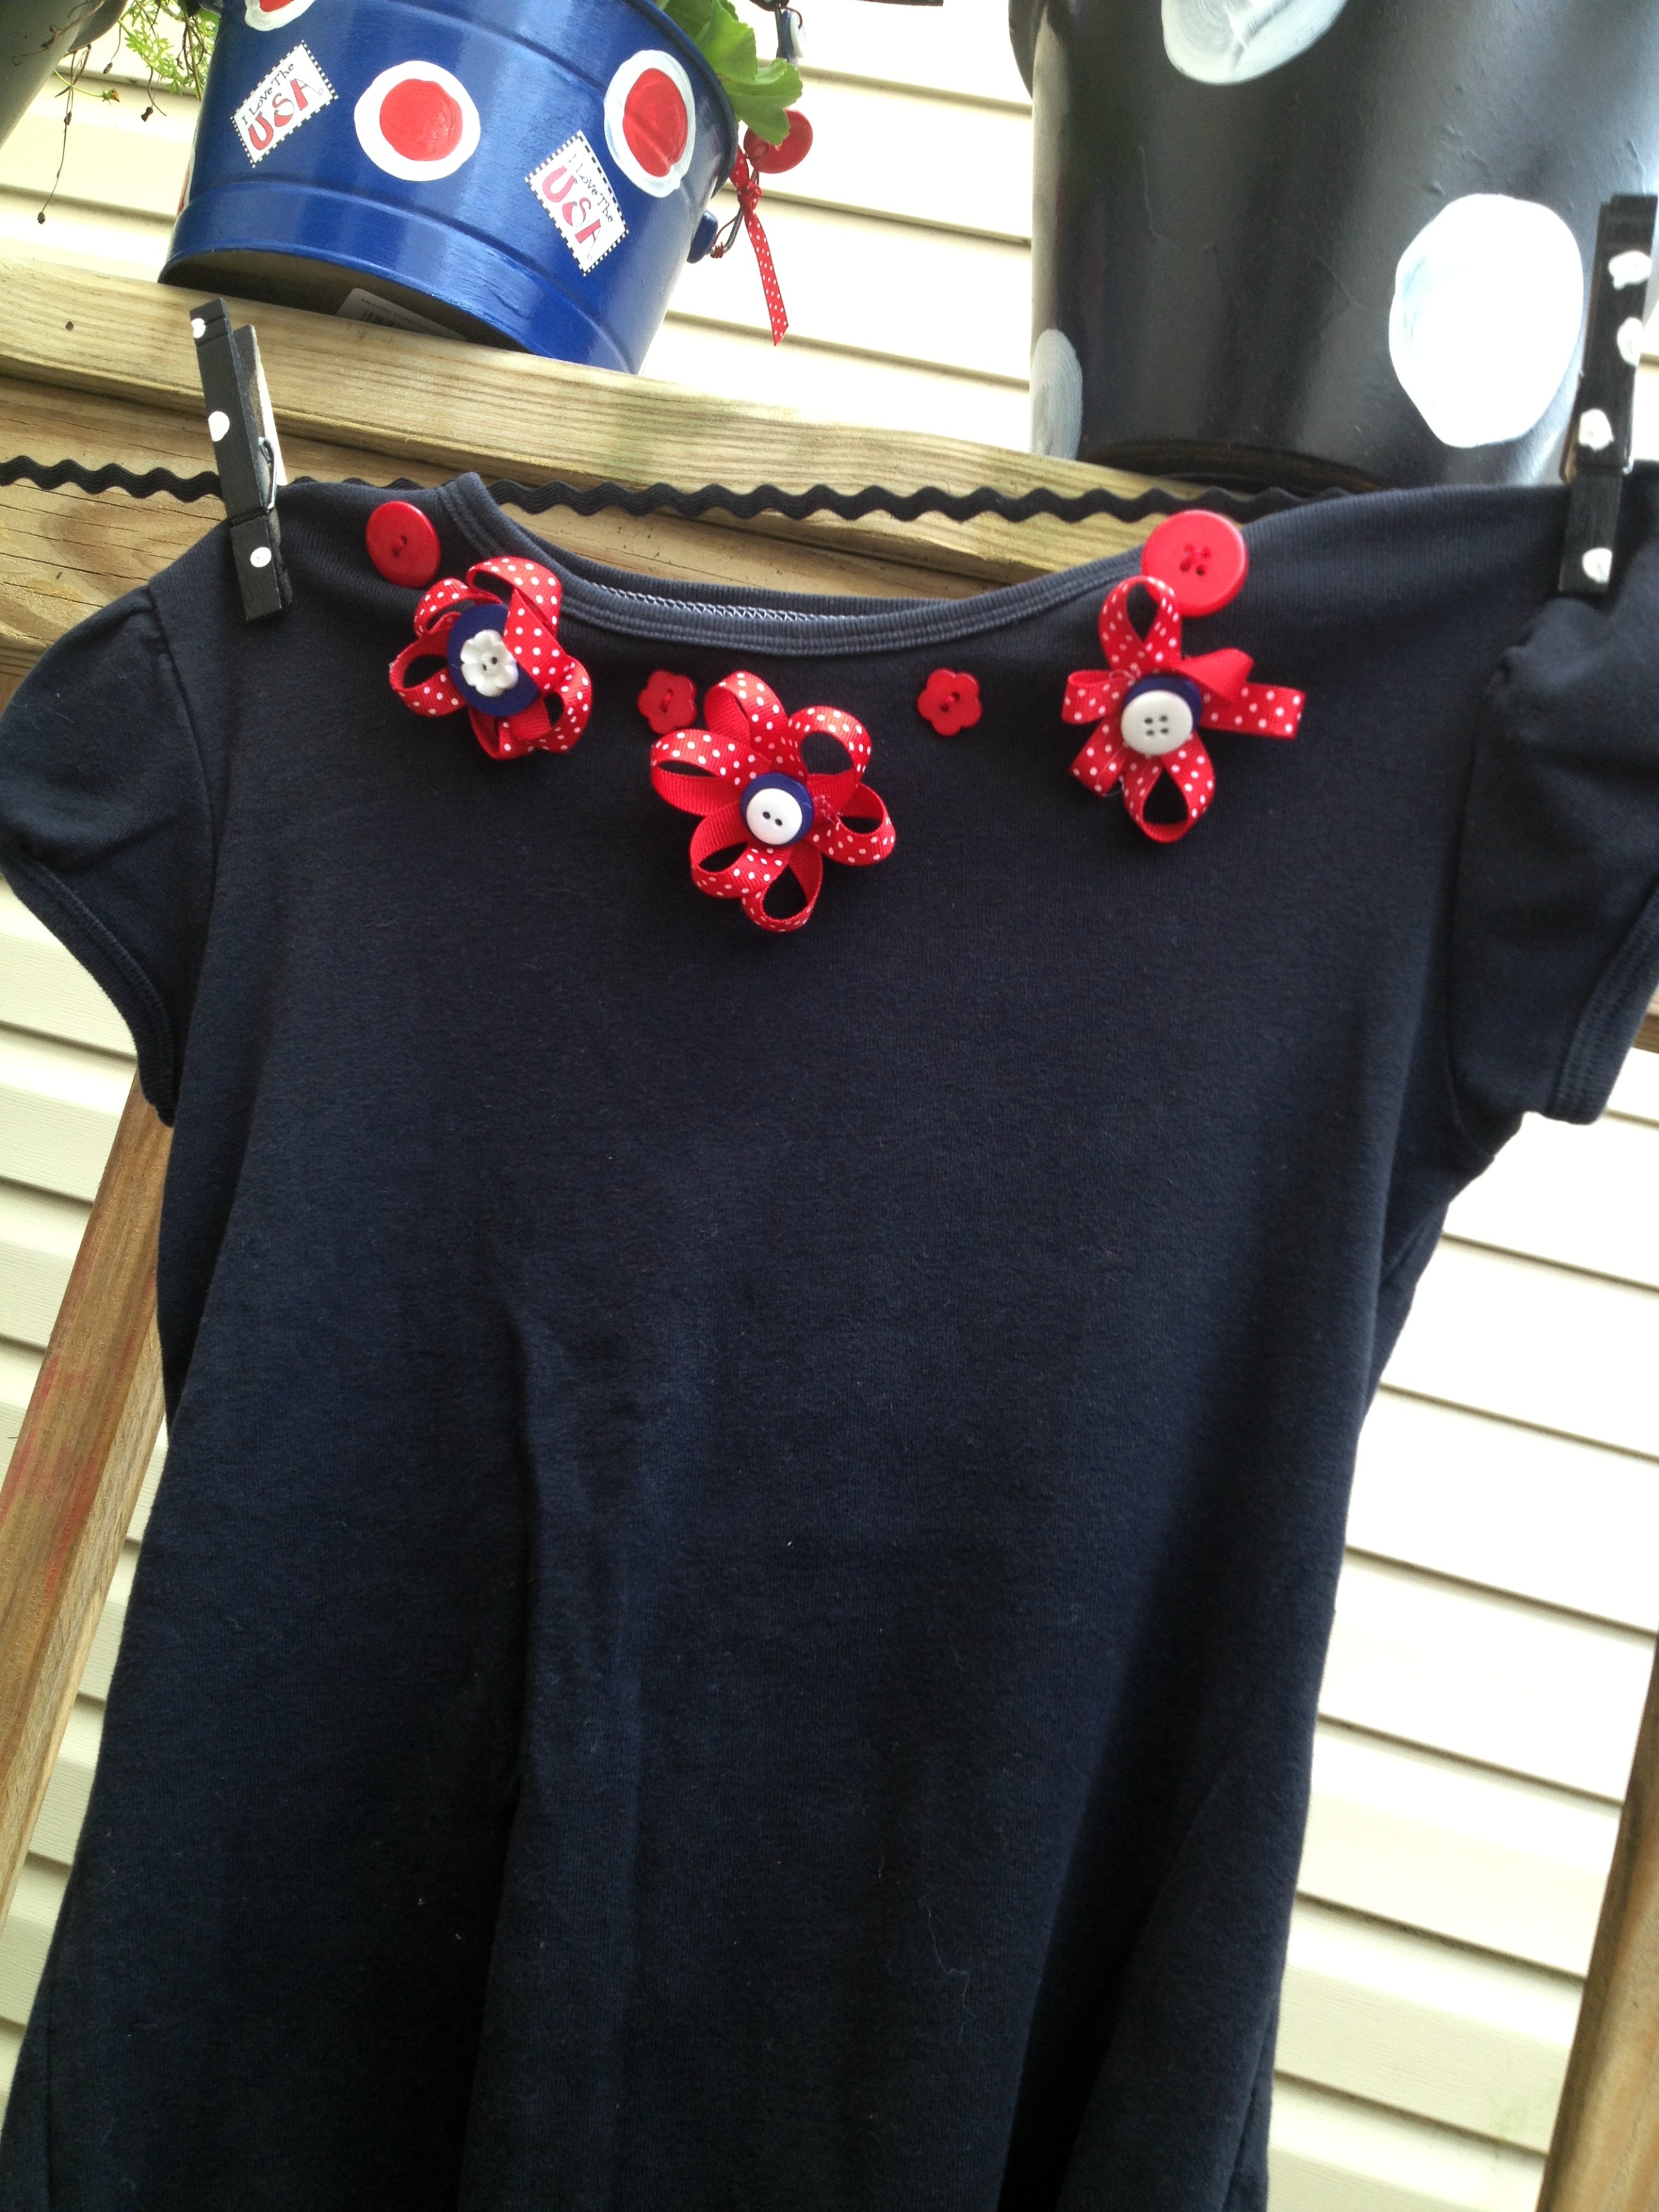
You only need a few things…buttons (Laura Kelly’s patriotic mix is best), embroidery floss (Coats and Clark is my favorite), HOT glue (Ad-tech of course) and ribbon.

Make the ribbon flowers with button centers using your HOT glue. It works best to do the ribbon part first and then add the buttons at the end. Then sew them and additional buttons around the neck of the shirt. If you want to go button crazy, you can sew red, white and blue buttons all of the shirt to look like polka dots.

If you like the shirt and you want an additional patriotic button craft idea to upcycle these denim shorts, visit Laura on her blog for directions.
If you want to win this prize, (buttons in an awesome Viewtainer, Beacon Zip Dry, and a Laura Kelly notepad with a Sharpie, go like Laura on her Facebook page or post a comment on this blog and you will be entered!

Happy Creating using BUTTONS, imagination and LOVE.
Cheers,
Laura
Today’s crafty inspiration is this red, white and blue altered canvas featuring fabric from Laura Kelly Designs and of course buttons! It’s an easy to create project for your home or for a gift.
All of the July 4th celebrations are fast approaching. So that means get out your Red, White and Blue, and get crafting.
I started with and 8×8 canvas that I covered in cardstock and patterned paper. Tip: Make sure you use a strong adhesive that you trust for altered projects to ensure your paper will stay attached to your canvas.
Other Products Used:
Make sure to cover the sides of your altered canvas as well. I like to cover all surfaces that can be seen with patterned paper, ribbon or fabric.

An altered canvas makes a great gift or display for your own home. Thank you so much for stopping by and I hope your 4th of July celebration is full of red, white and blue craftiness. A celebration to remember!
It’s Red, White & Blue season, the perfect colors for this Snap Happy Card. Will you be taking lots of pictures on the 4th?
Every week we share fresh card making ideas using buttons. This week we’re using my absolute favorite Heart Novelty Buttons. I made a card with a gift card inside that’s good for some prints at one of our local stores. What family doesn’t print a ton of pictures?
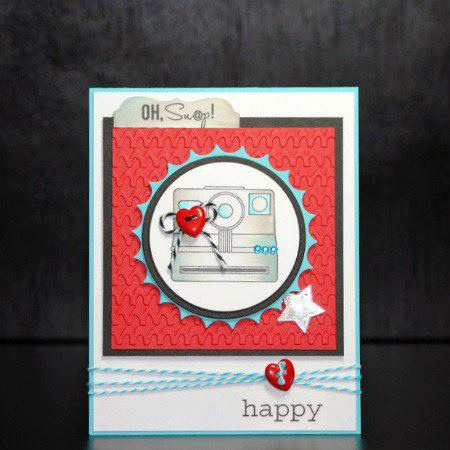
Buttons – two Heart Novelty Buttons – Buttons Galore and More
Stamps – Gina K Designs
Cardstock – DiscountCardstock.com
Embellishments – Turquoise Rhinestones – Want2Scrap; Twine – Doodlebug Design; Stickers – SRM
Tools: Dies (Inverted Scalloped Circles, Star, Circles – Spellbinders Paper Arts; Labels – My Favorite Things) ; Embossing – Sizzix
Adhesive: Hot Glue – Adtech; Dimensional Foam Tape – 3M; Scor-Tape – Scor-Pal
Other: Ink – Tsukineko; Markers – Copic; Flashing Tape – available at most Home Improvement Stores
Thanks for stopping by today. To see more of my art, please visit me at My Card Party. I’ll see you on Thursday with some new Button Jewelry.
Until then, keep creating!
If you visit my house during the month of July this seasonal door wreath will welcome you at my front door. I decided to go big and bright this year using festive patriotic ribbon, painted stars, and red, white & blue buttons from Buttons Galore. I love the nostalgic look of the dimensional stars and the traditional Americana design.

I’m a sucker for wreaths. It’s a rule in my house to have a seasonal wreath on my door at all times. Of course, if I made a new wreath for every season, I’d have a lot of them to store. My husband wouldn’t like this very much either. I have a little secret to share when it comes to my seasonal wreaths. I don’t make a new wreath – I just recycle this grapevine wreath into something new every season.
My secret is to use a heat gun to melt off the hot glued embellishments. It works great every time!

Paint Paper Mache Stars with Plaid Craft Paints
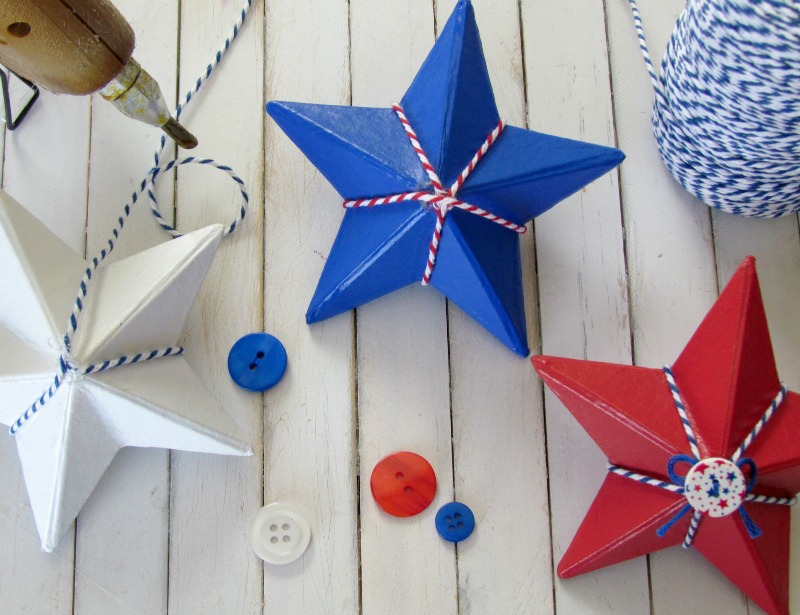
Add a dab of hot glue onto each side of star and wrap twine around
Add festive button from Buttons Galore to center.
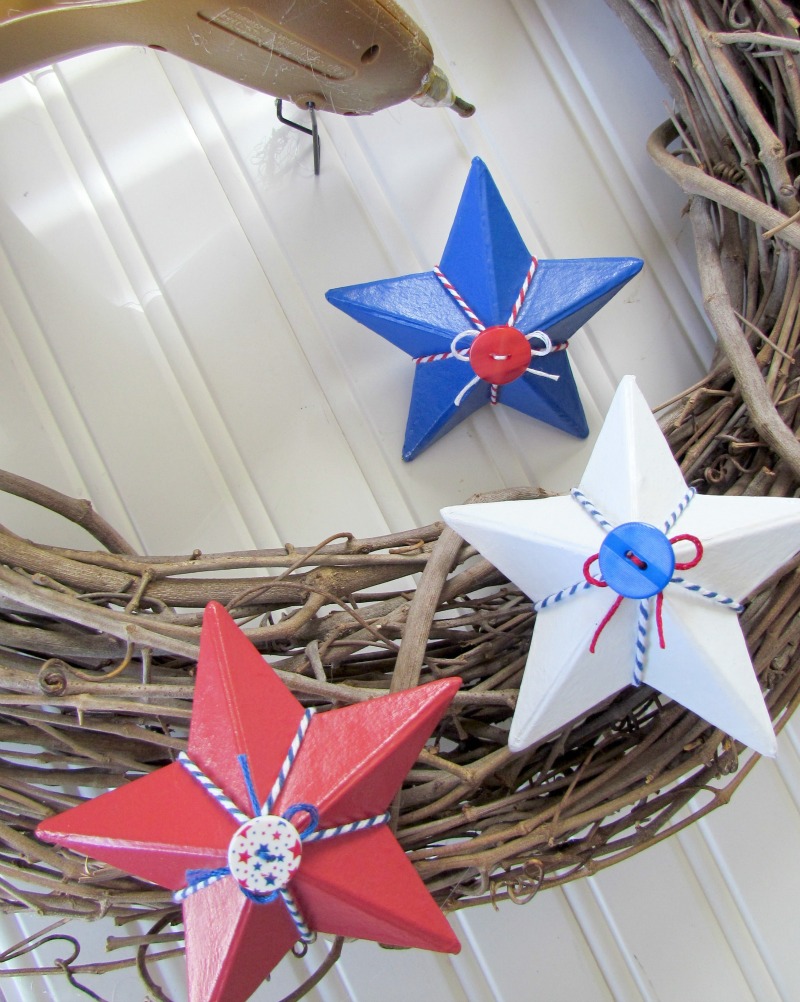
Hot glue painted stars onto a grapevine wreath

Add stacked buttons to the center of your patriotic bow.
I hope my idea of recycling the same wreath for the seasons inspires you to creative you own festive wreaths to welcome visitors at your door. Seasonal door wreaths are a nice festive touch.

Like Me on Facebook!
Are you looking for Americana decorations for the 4th of July for your home? This buttons and stars garland is the perfect solution. A great way to combine the red, white, and blue for a patriotic display that your family and guests will love.

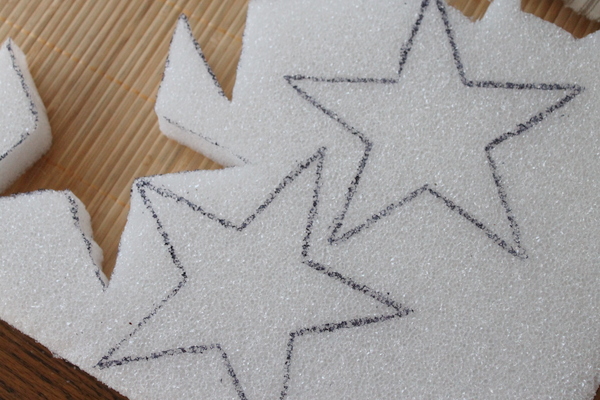
1) Cut stars from your styrofoam sheet as shown above. You could also substitute wood stars if you can find them. I used a Styro Cutter to cut my foam.
2) Cut fabric into squares leaving at least a couple of inches around your star.
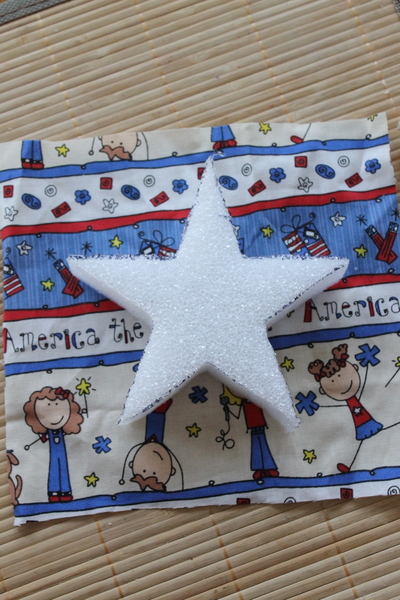
3) Cut into the square to the points on your star.

4) Use Mod Podge to adhere the fabric to the star as shown below. Trim away any excess fabric.

5) Cover the outer edge with ribbon and use Mod Podge once again to adhere it to your star.

6) Twist your red, white, and blue embroidery thread together to form one string. Add your stars and buttons to the string using hot glue. I assembled this garland right on my mantle.
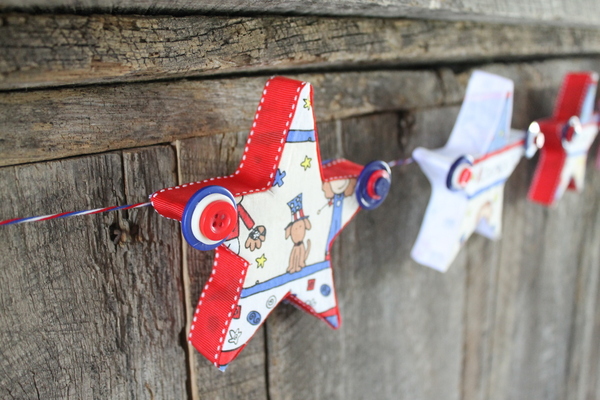
All that is left is to step back and enjoy your creation. A wonderful addition to your 4th of July decor. This buttons and stars garland will be the hit of your Americana decorations this year.

Hi, Allie here and I’m sharing my Patriotic Craft – a Country Chic Flag. We are your LAST stop on the I Love the USA Blog Hop today. Are you hopping with us for this amazing Patriotic Craft Party? You should arrive here via Jen Hadfield’s Tator Tots & Jello Blog.
*******If you’re just getting started – be sure to visit Laura Kelly at Laura Kelly Designs so you don’t miss a SINGLE project! (Also, this is where you enter for the great prizes)******
The designers have worked long and hard to bring you patriotic inspiration. We have gathered top name designers in their respective fields such as: sewing, scrapbooking, card making and many more. We hope you can share in their pride and enthusiasm for all that America stands for and the beautiful country that she is.


designed by Allie Gower for Buttons Galore
Materials needed:
I’ve used lots of Patriotic Buttons along with Laura Kelly’s Beautiful America Fabric. (click the links to purchase) We really appreciate you hopping with us today. Are you inspired to create something patriotic?
If so please share your projects with us on our Facebook page or on Pinterest or even Twitter using hashtags #ilovetheusabloghop #craftpatriotic #laurakellyart
Four more days left of the I LOVE THE USA BLOG HOP… so, keep hopping. Don’t forget to share your crafts too. We really do love seeing what you all create. Comments are always welcome. We all like a little love now and then, right? From all of us at Buttons Galore and More, we wish you a creative, happy and safe Flag Day and 4th of July too! Keep crafting!!!
To enter the I love the USA BLOG HOP, enter the -> a Rafflecopter giveaway
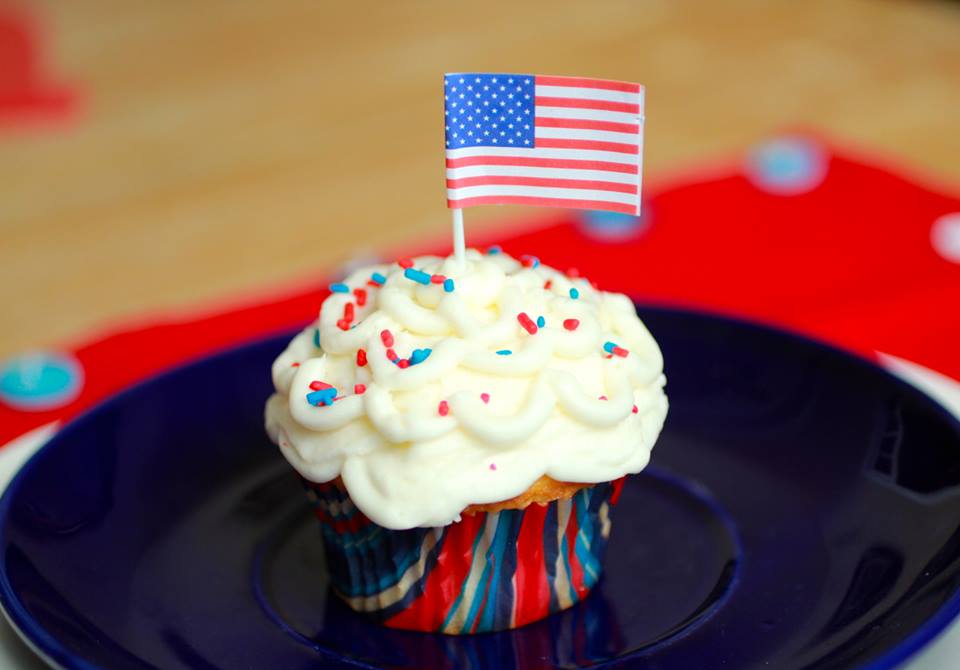
Cupcakes say PARTY! You’re invited to a Patriotic Craft Party!
28 Fabulous Artists – scrapbookers, cardmakers, seamstresses and more joining forces to take your patriotic crafts soaring to new heights. Join our Hostess Artist Laura Kelly Walters and Jen Goode and a parade of sponsors including Laura Kelly “America the Beautiful” General Fabric for Jo-Ann’s Craft Stores, Coats & Clark, Plaid, Fiskars, and Buttons Galore.
Check out this ALL STAR Line Up for the Blog Hop!
Join us! If you want to follow along with hashtags and share your projects with us on our Facebook, Pinterest or even Twitter use hashtags #ilovetheusabloghop #craftpatriotic #laurakellyart
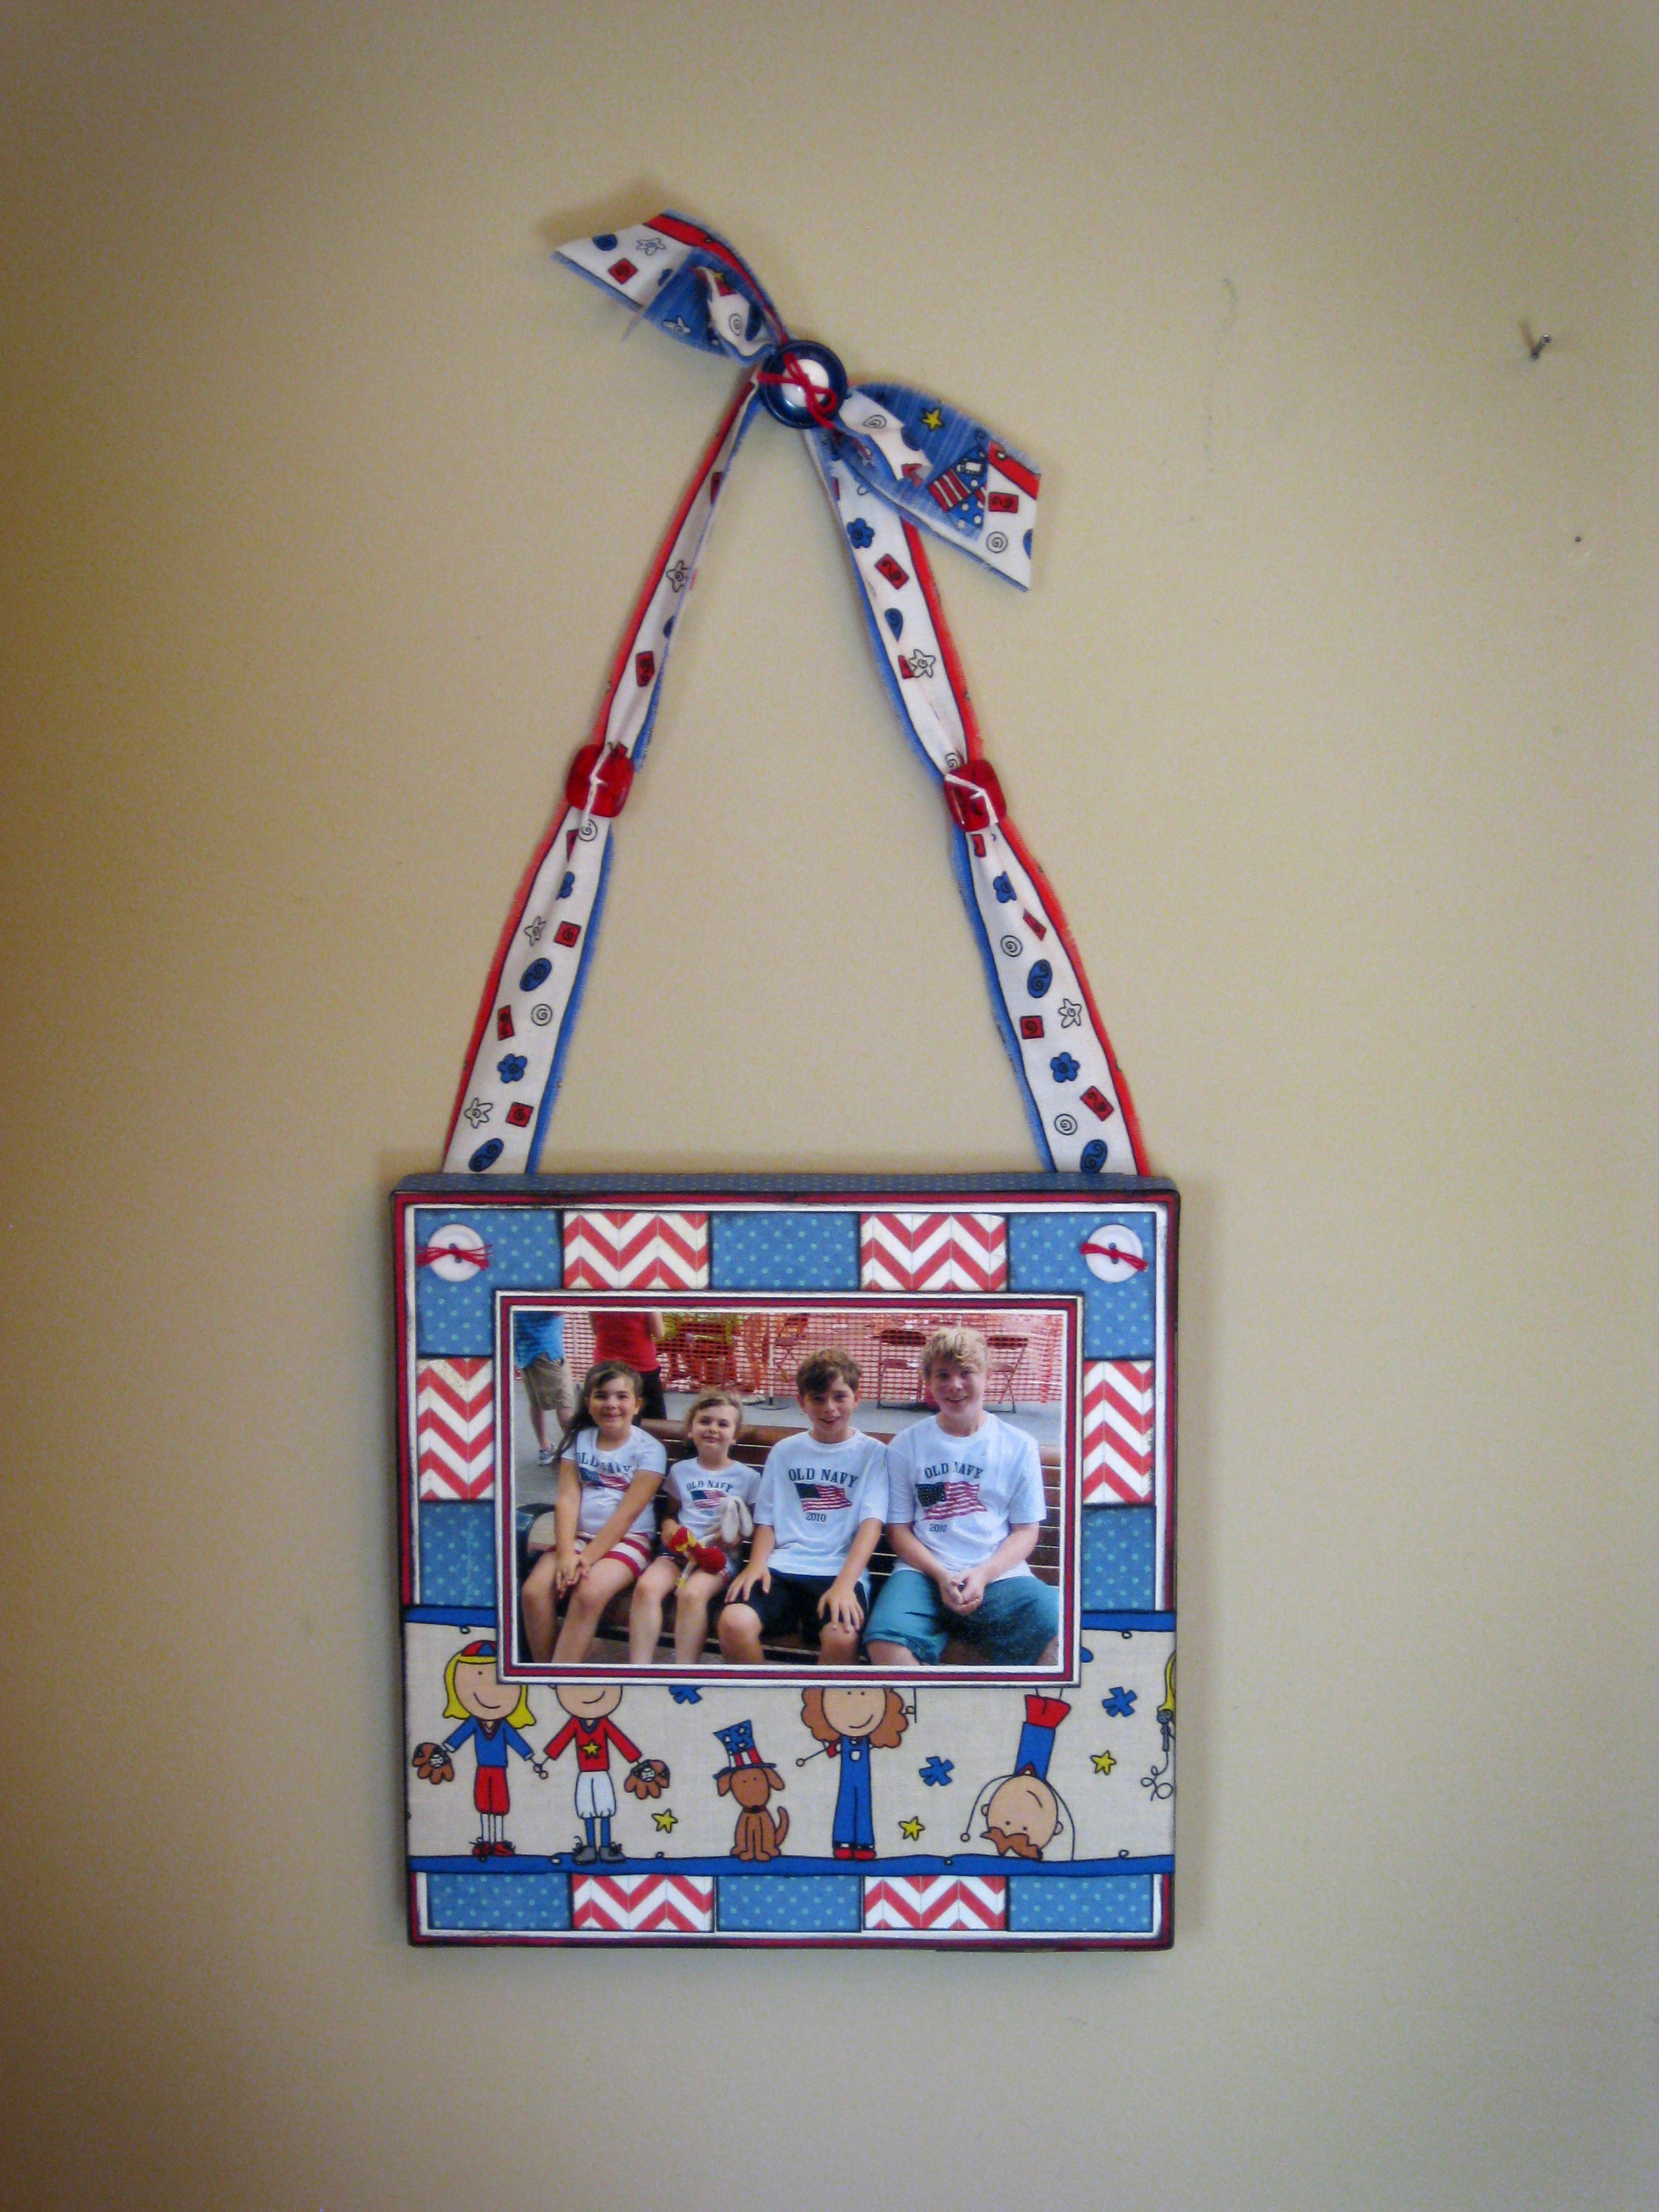
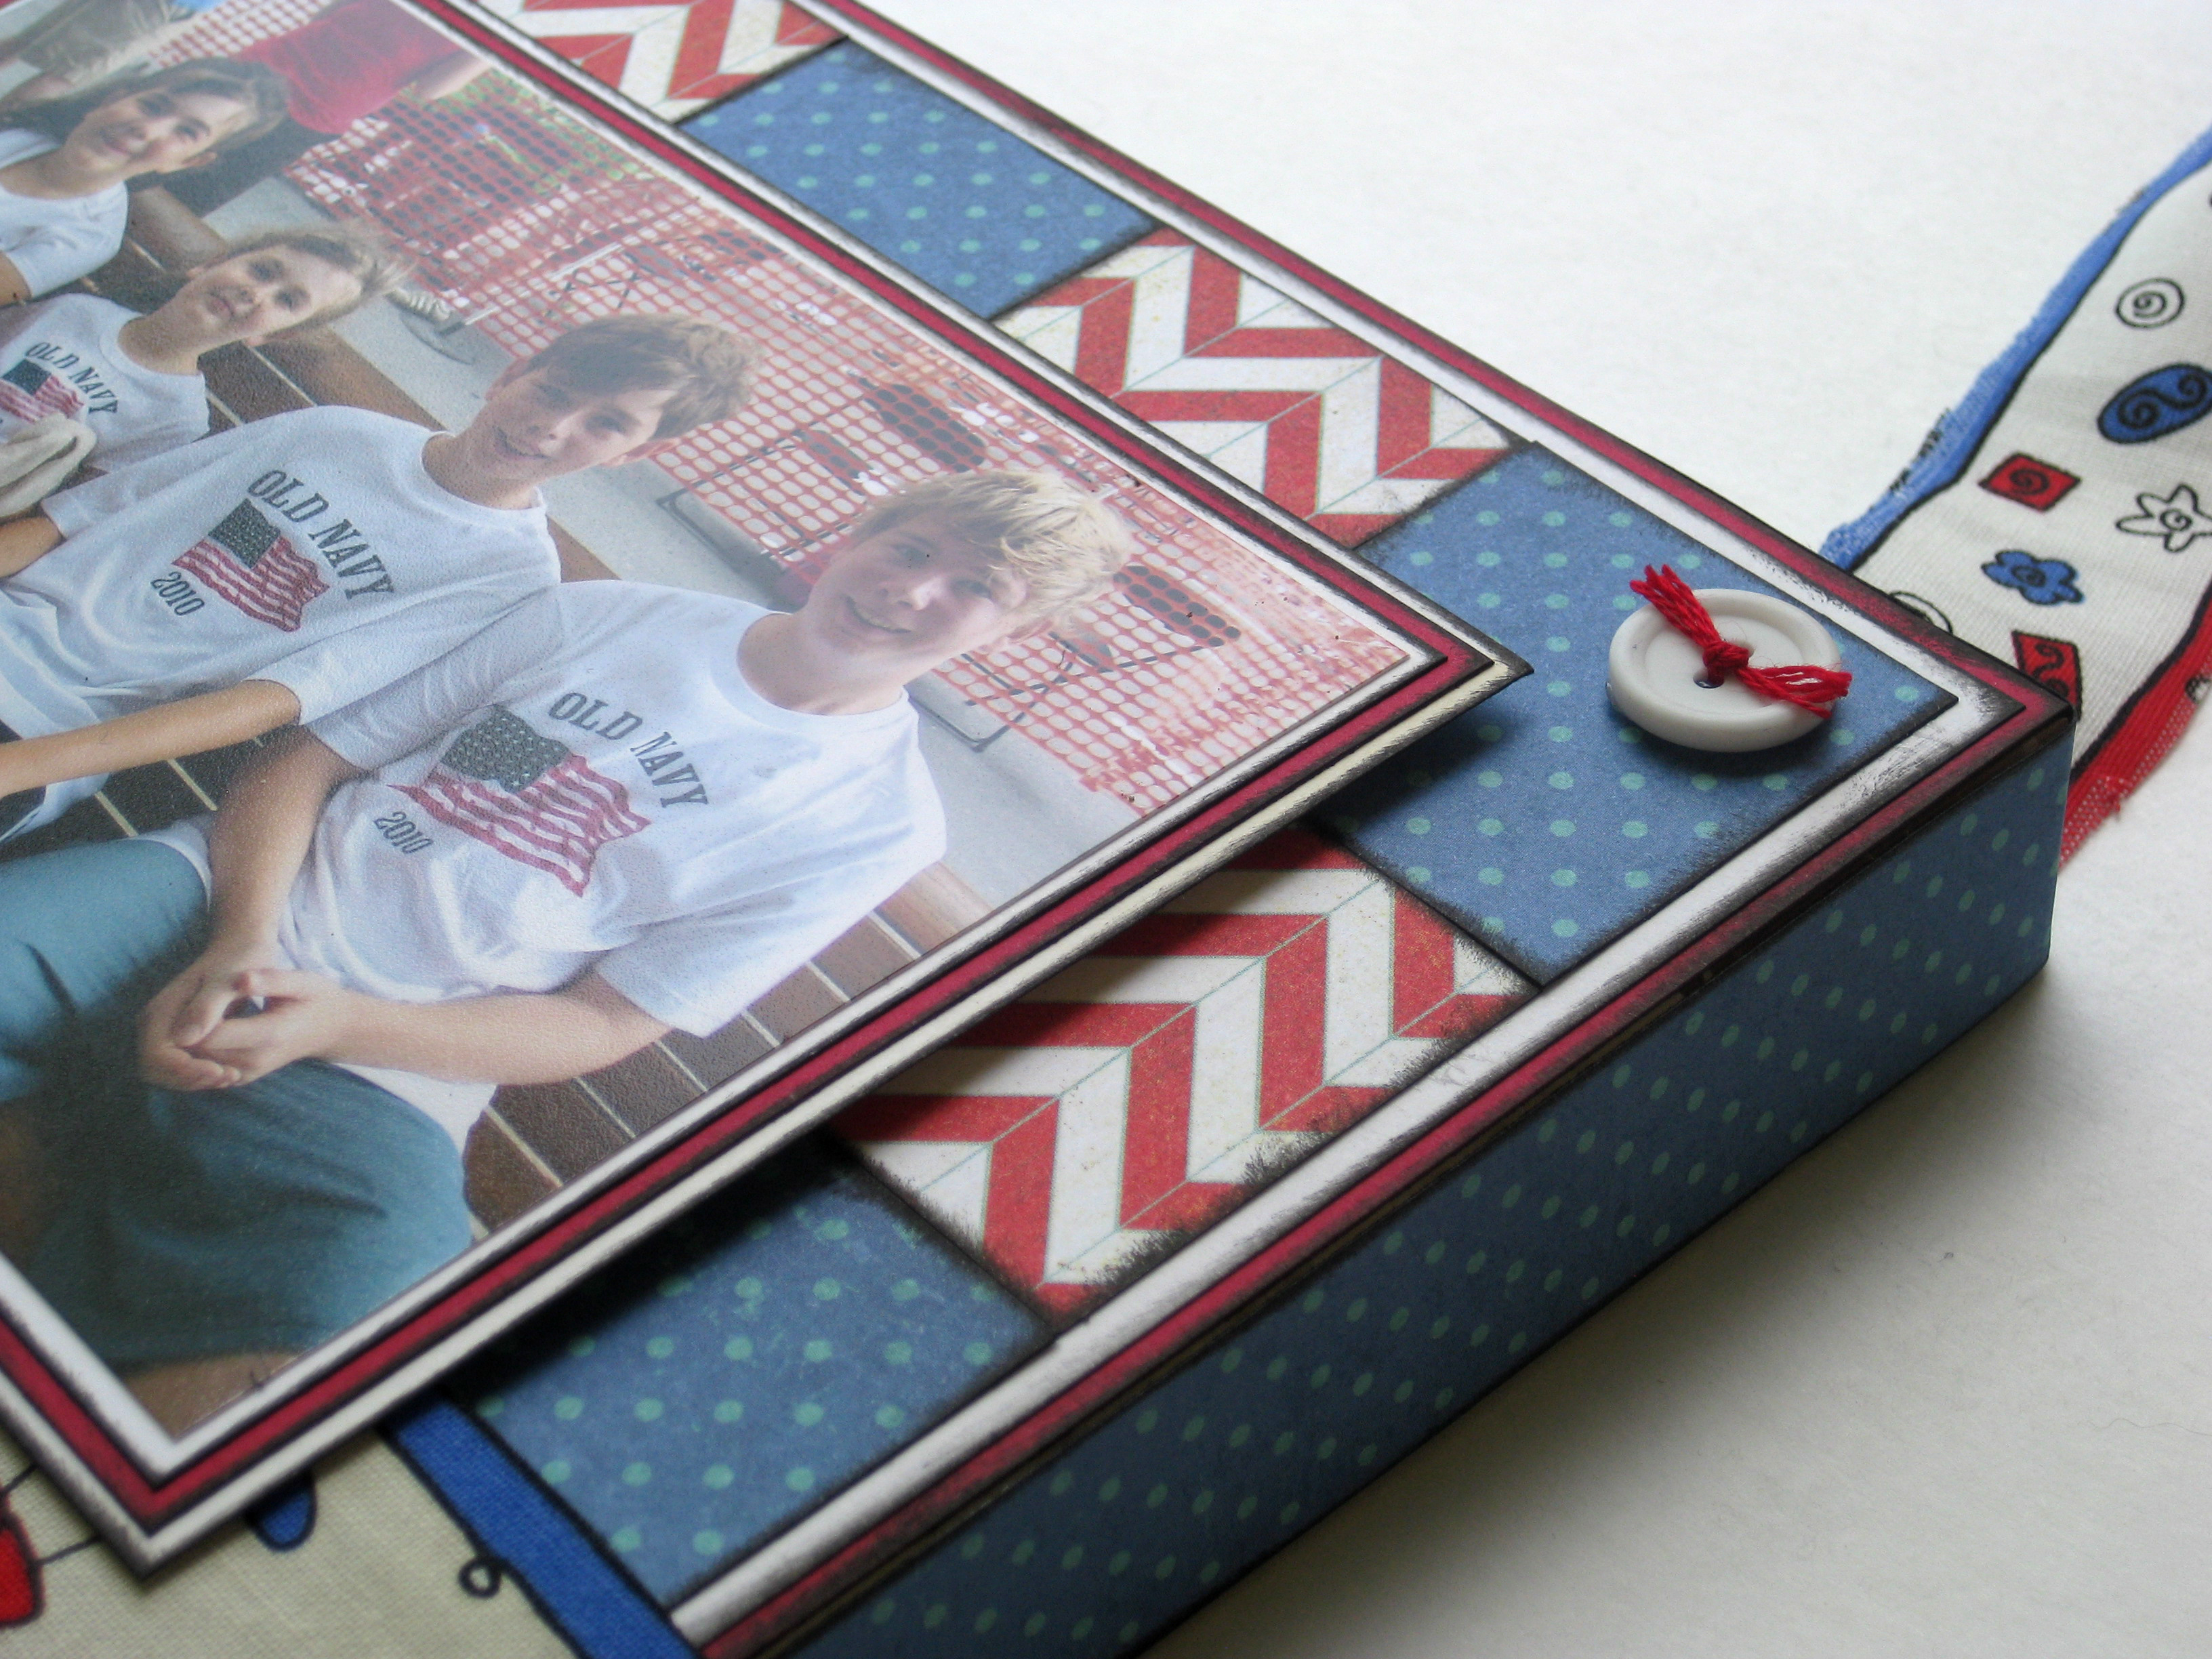
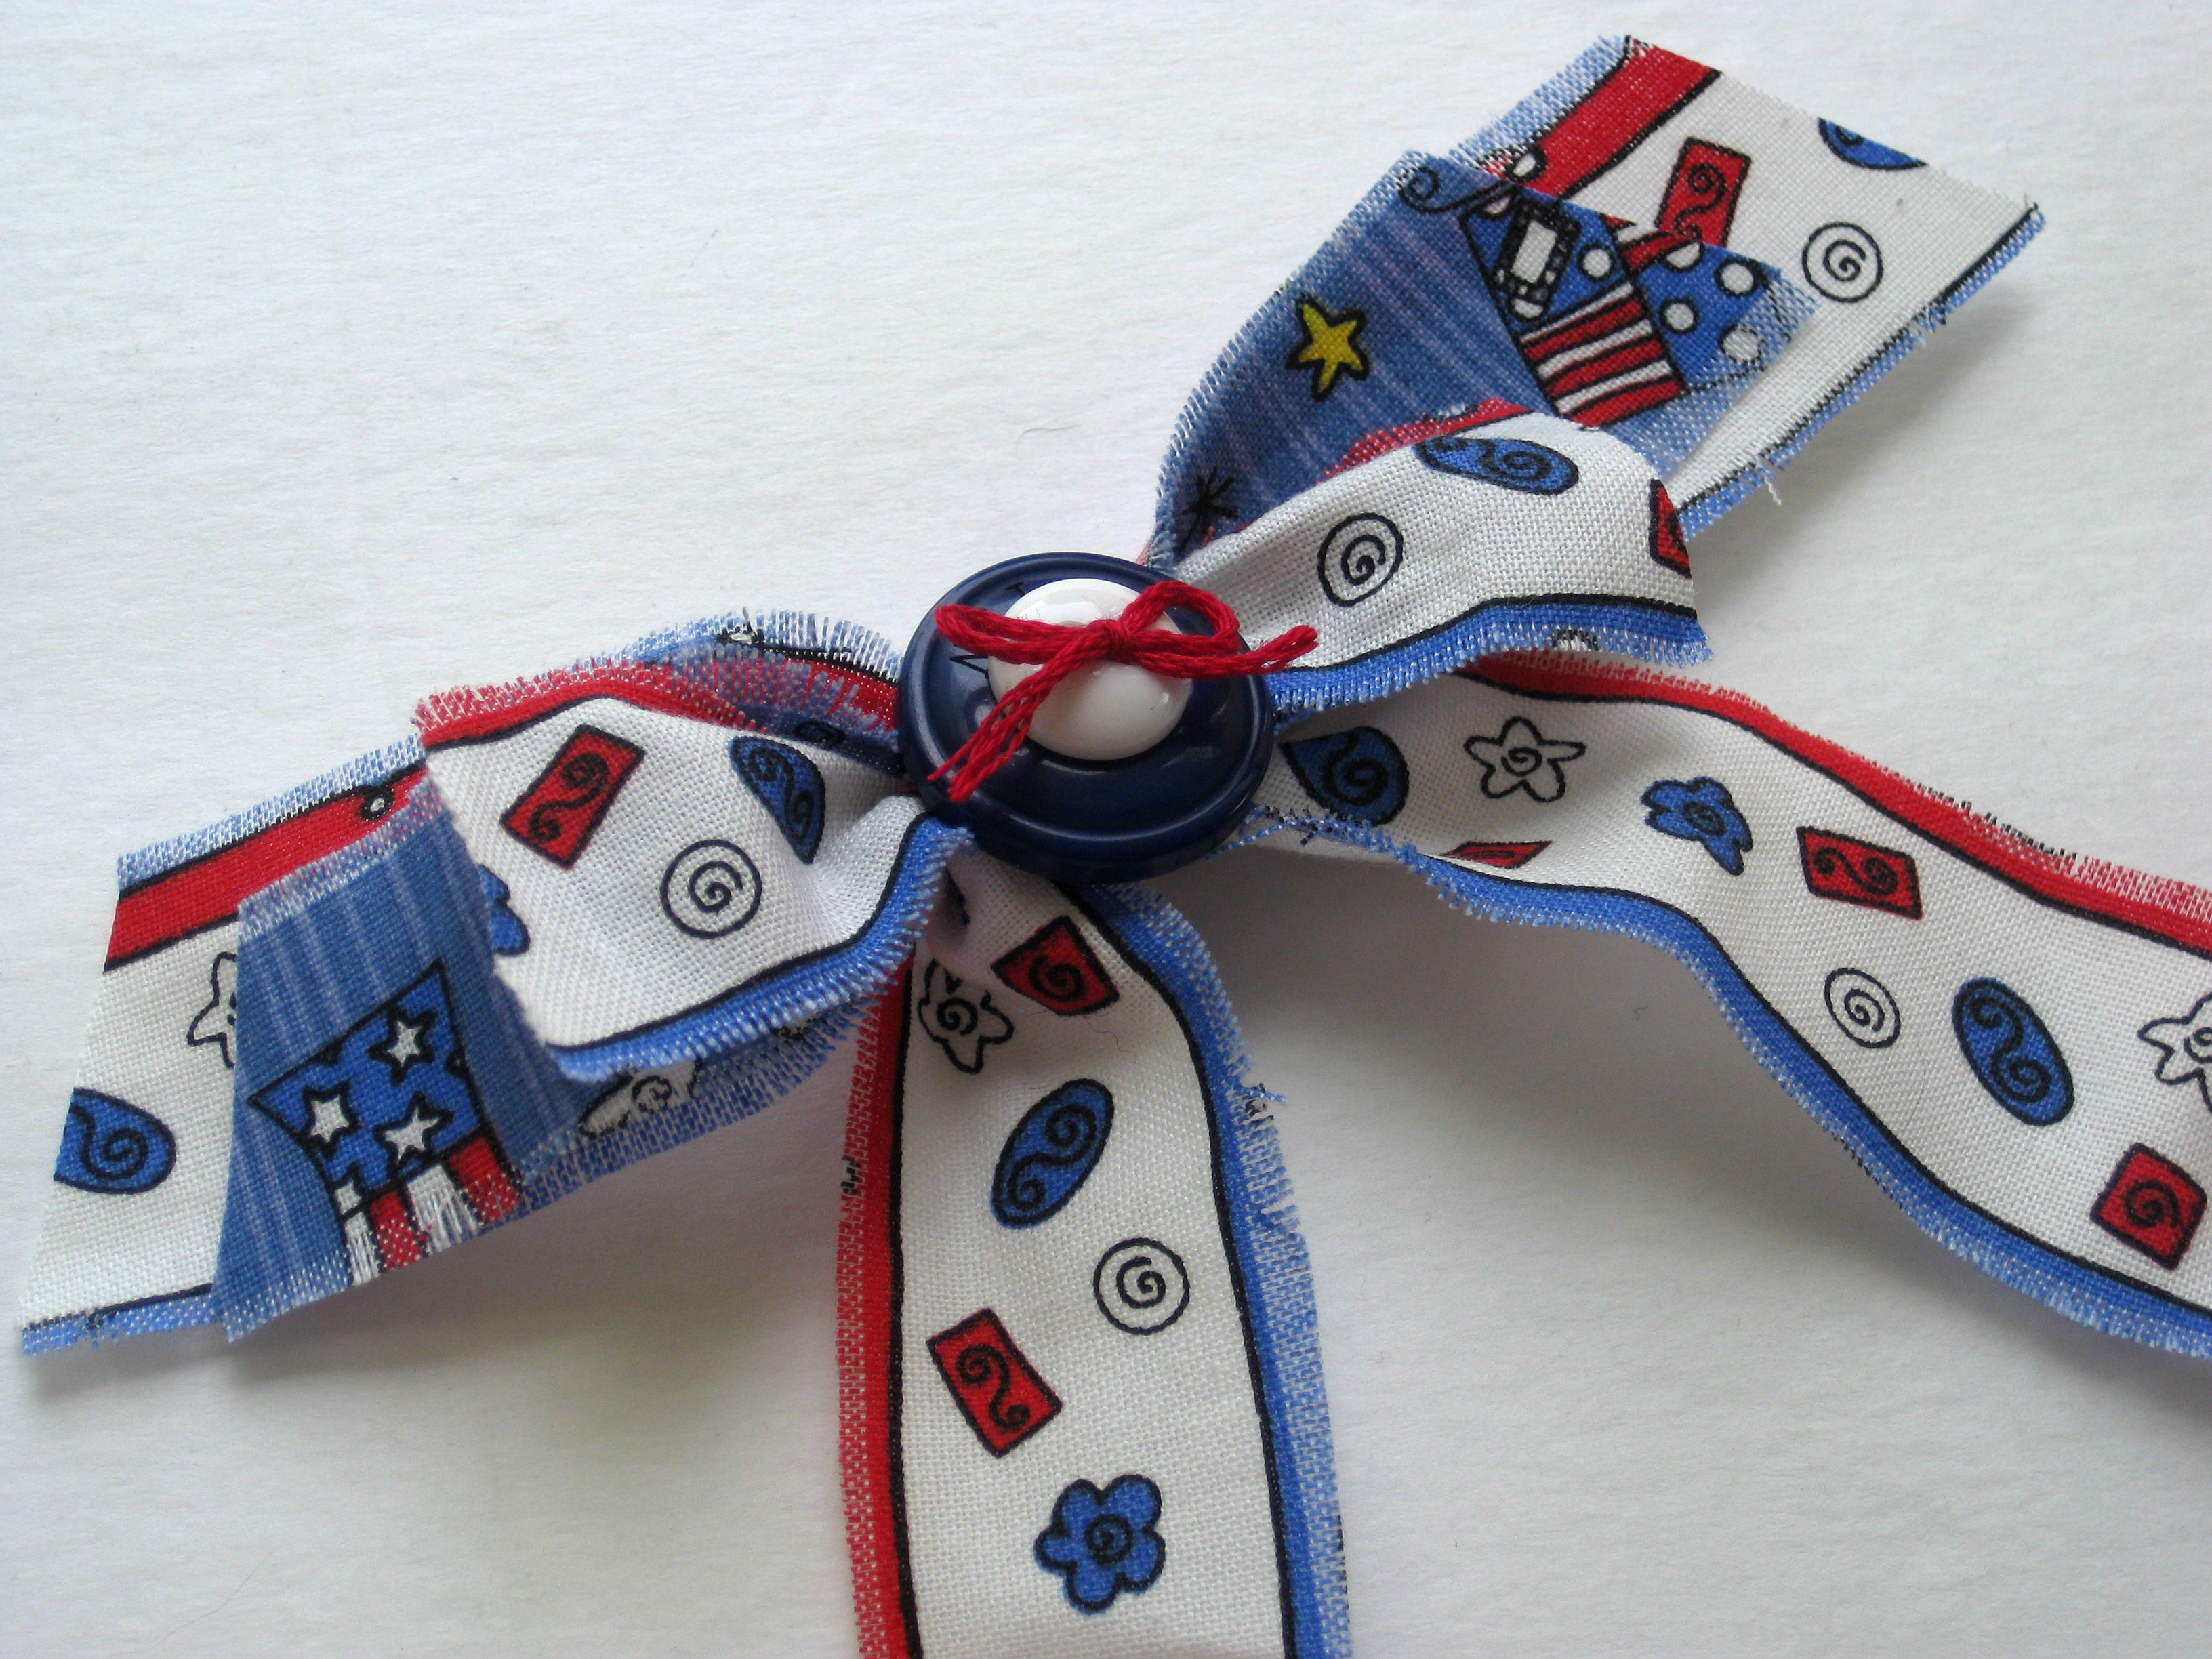
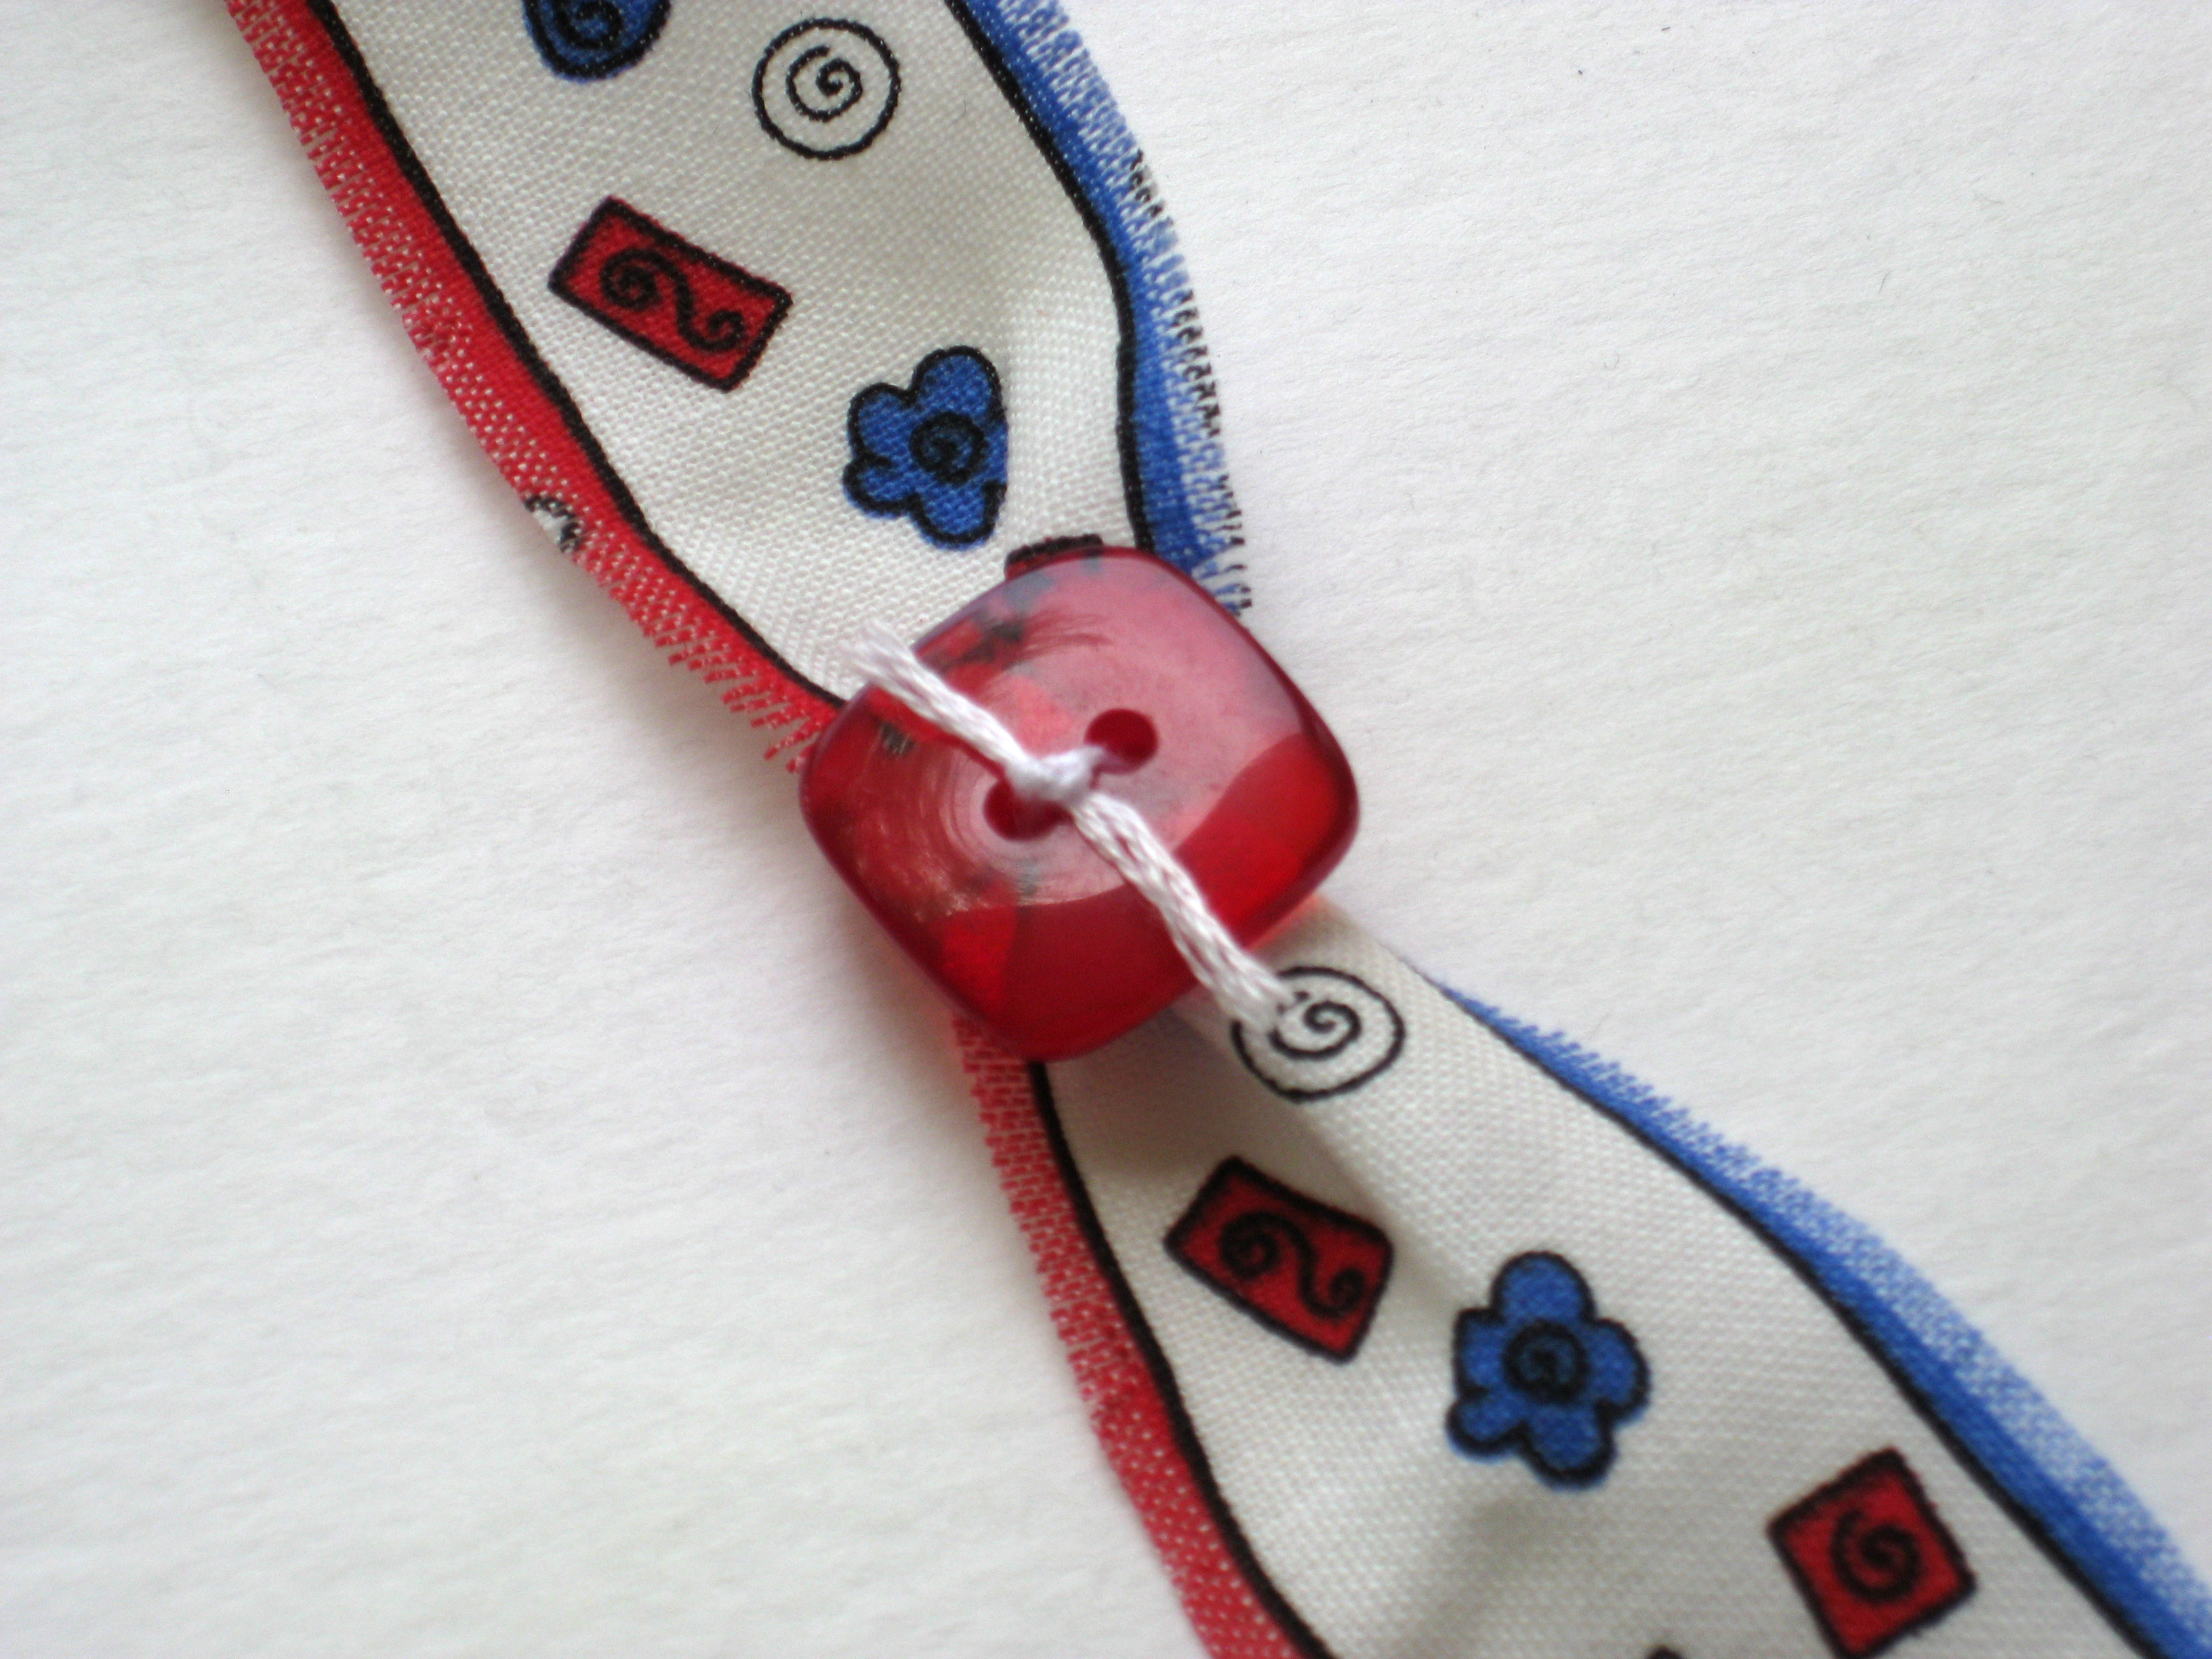
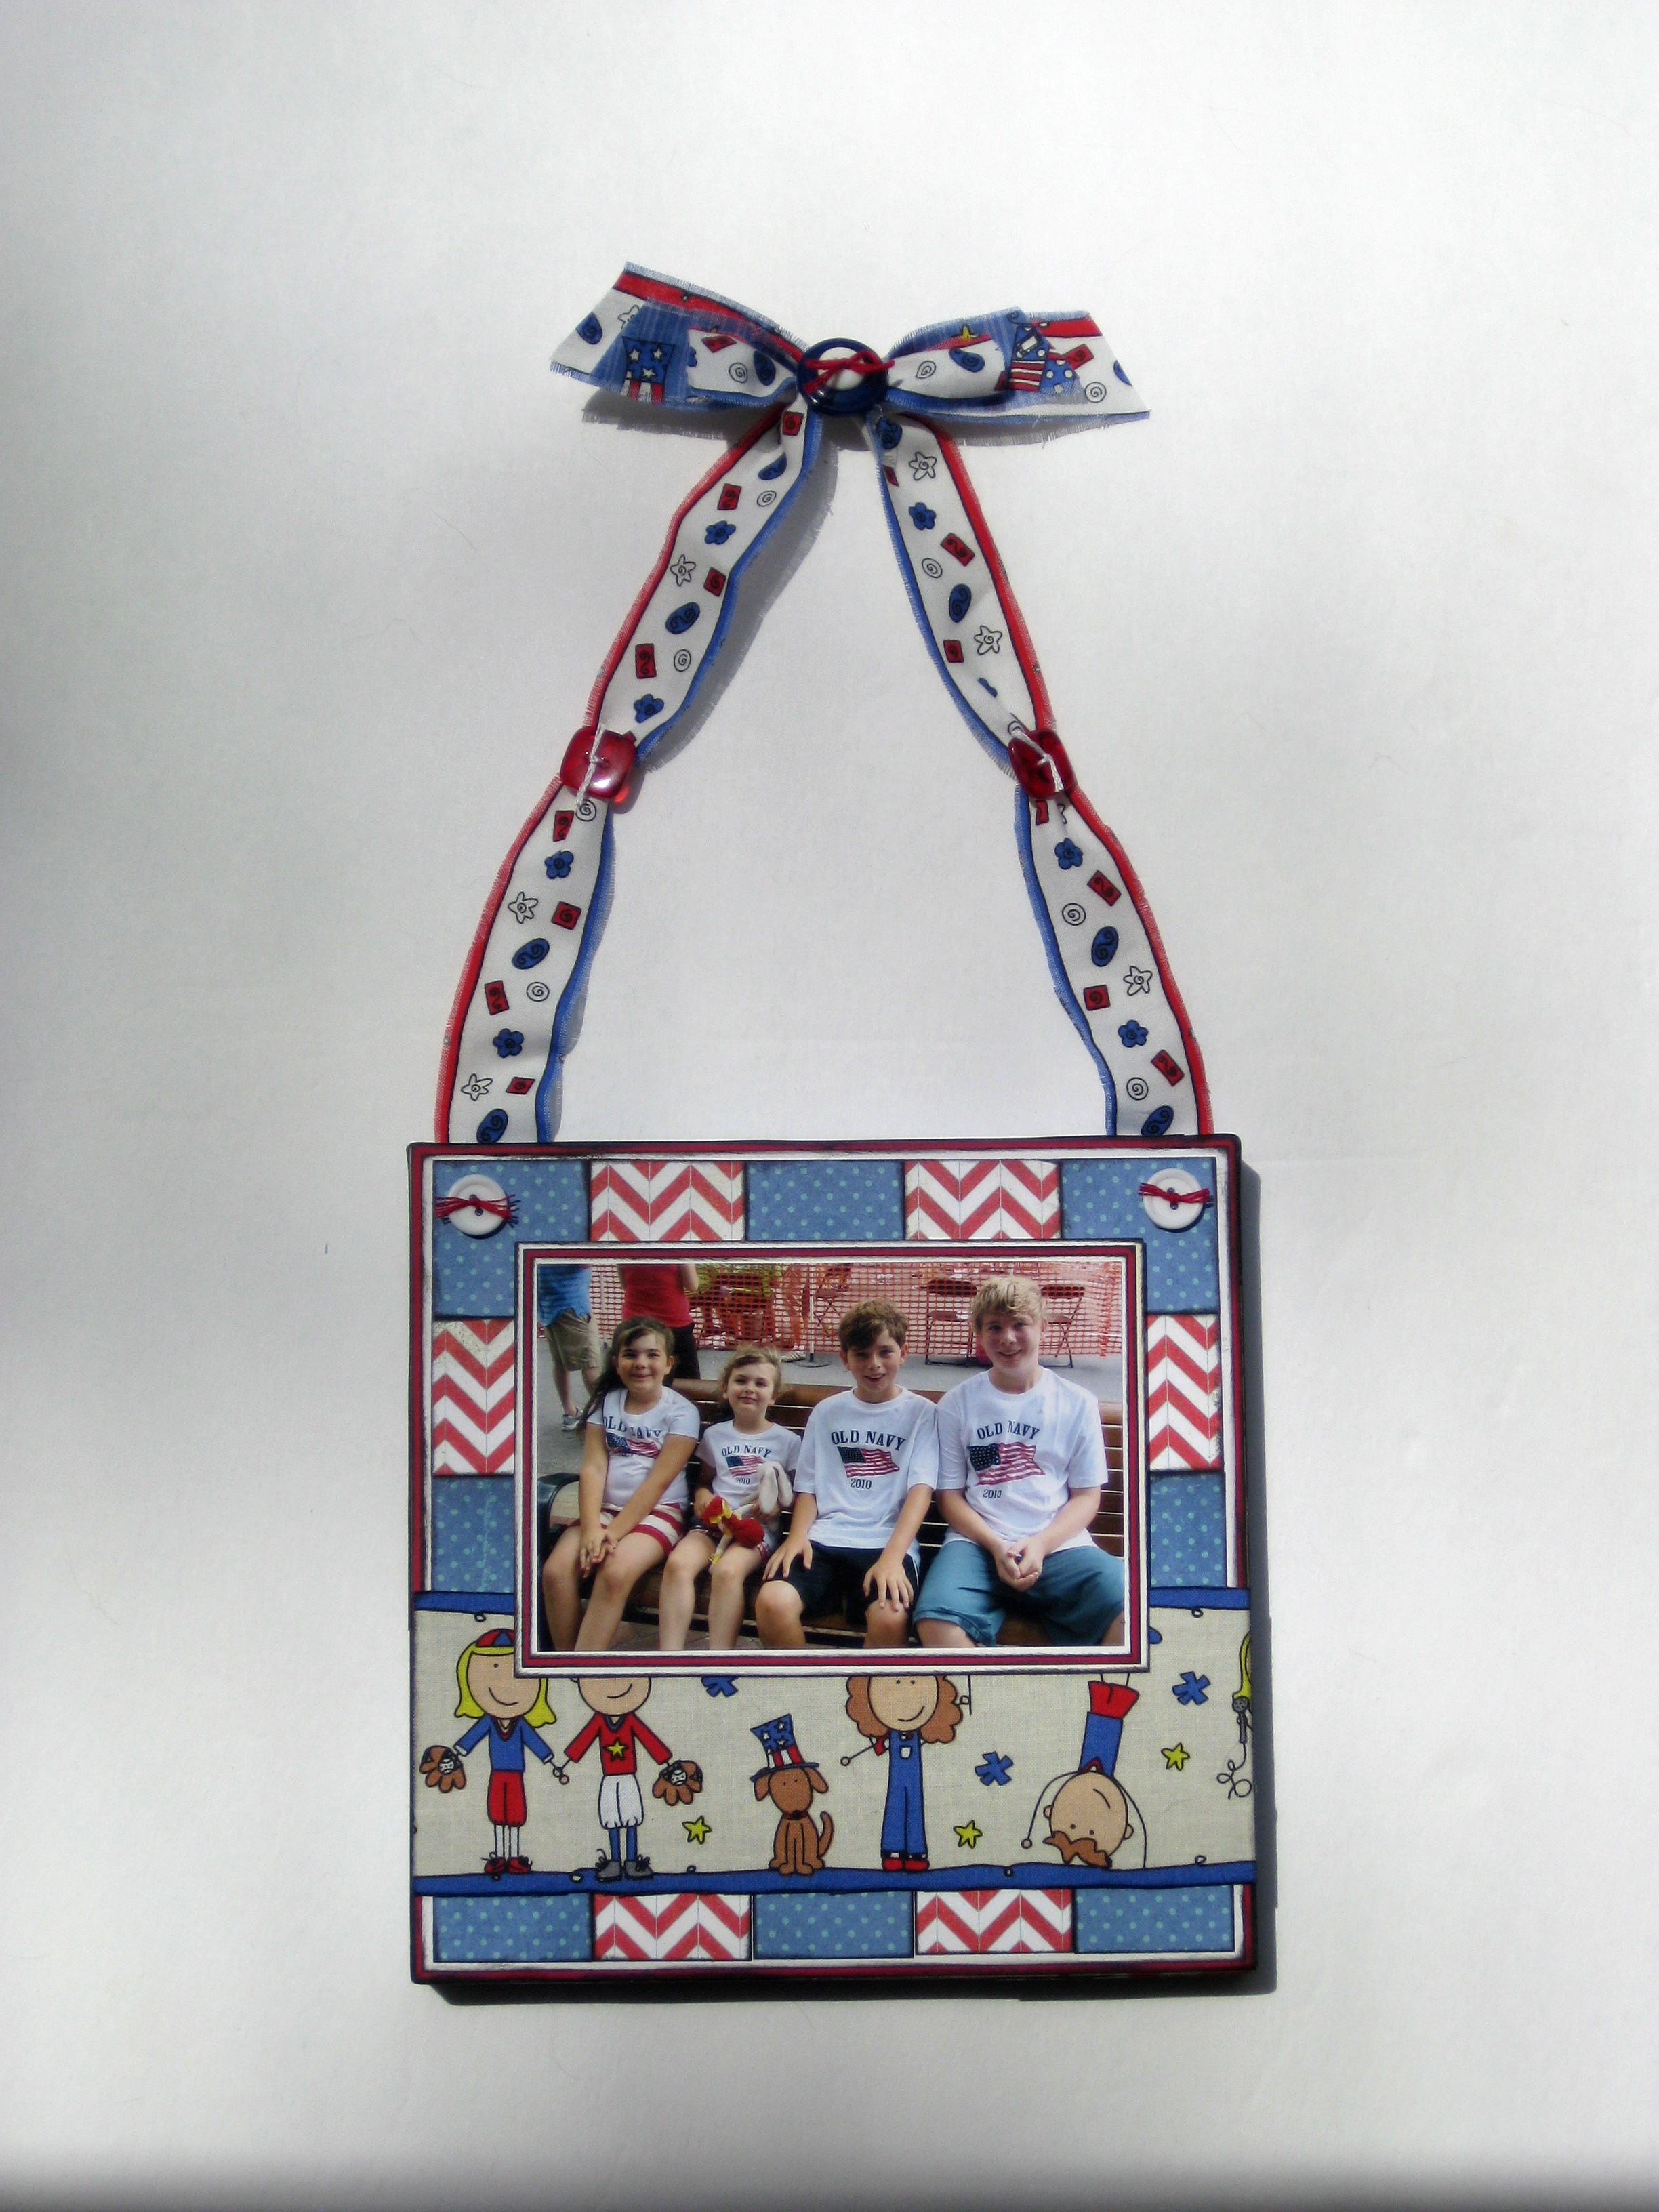
Linda enjoyed the Collage Trim Kit so much that she couldn’t stop with just the wallhanging! So, she created a layout to share using the same paper collection and leftover buttons from the supply list on the Patriotic Wall Art from last week. She was able to chaperone her youngest daughter’s recent class trip to the NH State House, and took a bazillion photos!

Materials Used –

If you would like to know more about Linda you can read her bio below or check out her blog. I know you will find so much more inspiration there!
About Linda:
Hi! I’m Linda Auclair, and I live in New Hampshire with my husband and daughters, Brigid and Aileen. My son Jonathan is away attending grad school at UPenn this year. I’ve been a papercrafter forever, and in the past decade, I have had the good fortune to work for a variety of companies, such as Fiskars, Creative Imaginations, Epiphany Crafts, and my current Design Team post at Echo Park Paper, as well as a number of online retailers. I have had my work published in magazines and eZines, and have been guest blogger/designer for a number of manufacturers. I am an active blogger, and love to share my designs, along with tips and tricks I have discovered, with my readers at http://elendae.wordpress.com/
