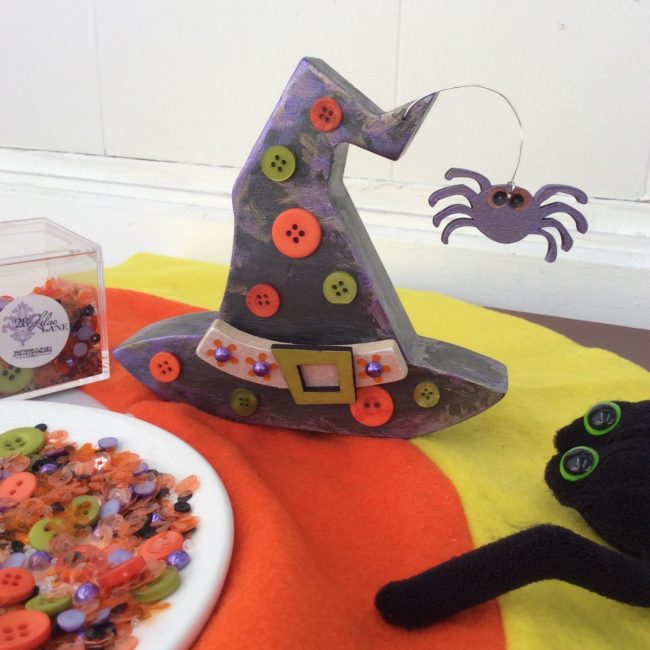
For this witch hat Halloween decoration I started with a wooden witches hat from Foundations Decor. The hat comes with a band, buckle and a cute little spider with a piece of wire you can curl any way you like.

For this witch hat Halloween decoration I started with a wooden witches hat from Foundations Decor. The hat comes with a band, buckle and a cute little spider with a piece of wire you can curl any way you like.
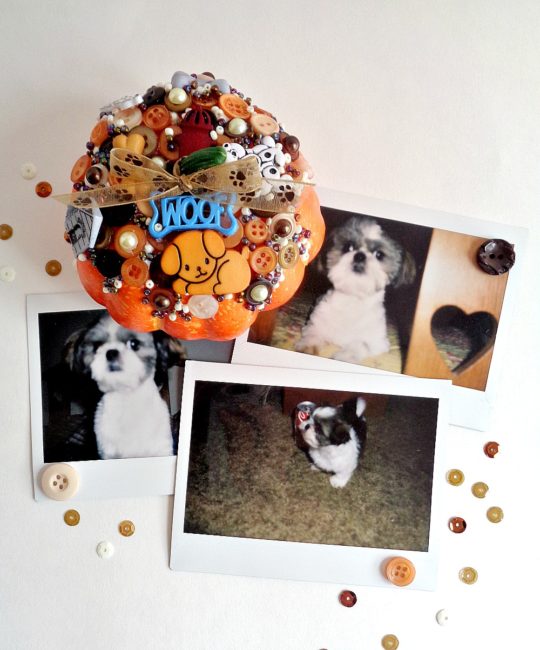
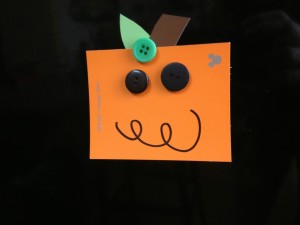
Hello Everyone! This is Katie from the Buttons Galore & More Design Team and today I have a cute pumpkin decorating project that involves your furry four-legged friend! Continue Reading →
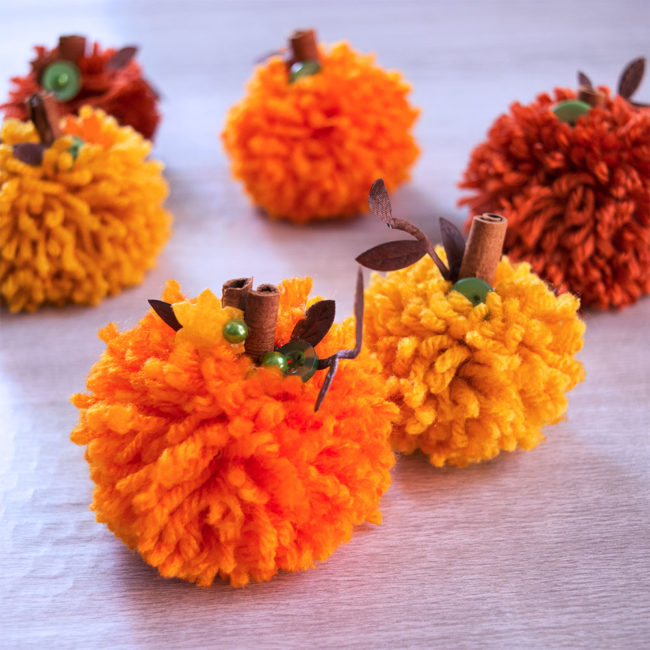
The weather here has started to cool down this week and so I’ve decided it’s time to bring out those pretty autumn colors. Pumpkins are my favorite seasonal decoration in the fall – I love using both fresh pumpkins and artificial pumpkins in my decor. Yarn pom poms are such a fast and easy craft to make. They can add a bit of whimsy to any decor. I wanted to make some DIY pom pom pumpkins to add to my fall decorations, and the beautiful Autumn Afternoon Embellishment Kit from the 28 Lilac Lane collection was the perfect addition to finish off these cute little poms! Continue Reading →
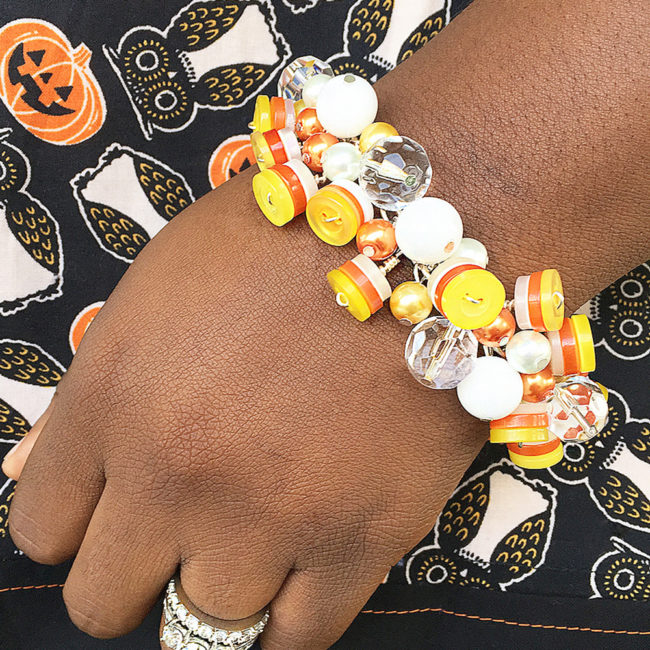
Hi everybody! It’s Anaya from the Buttons Galore & More Design Team. Halloween is fast approaching and I must confess, I’m excited. No, I’m not into the creepy scary stuff – I’m just looking forward to the candy! If you love Halloween candy like I do, I know you’ll enjoy making this super sweet candy corn bracelet.
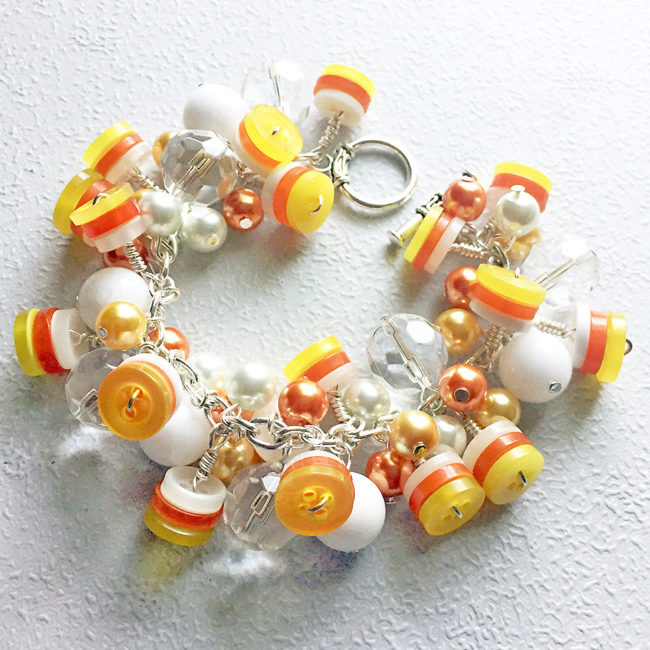
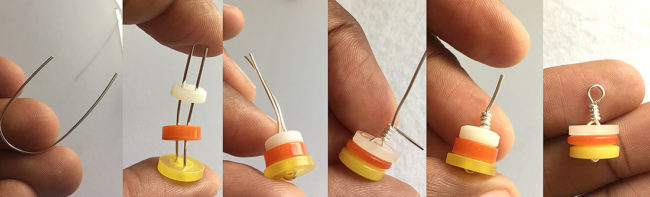
Start your candy corn bracelet by separating the buttons by color and size. You will need to select buttons of a similar size to stack and create little button candy corn charms for your bracelet. Cut a 3-4″ length of wire and gently fold into a ‘U’ shape. Stack buttons with yellow on the bottom, orange in the middle, and white on top. Push the buttons together and twist one end of wire tightly around the other. Trim the excess wire and create a loop using round nose pliers.
Repeat this step a until you have enough to fill your your chain. My bracelet is 7″ and I have attached a button charm to every other link.
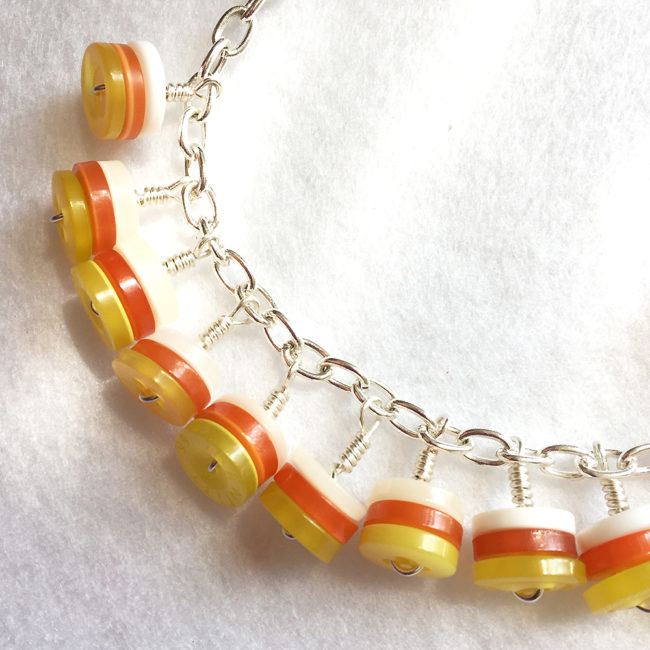
After filling the candy corn bracelet with button charms, gather your selection of beads. I am using 10mm yellow, orange, and white glass pearls along with larger clear and white glass beads. Using headpins, add 2-3 beads to each of the remaining empty links in the chain.
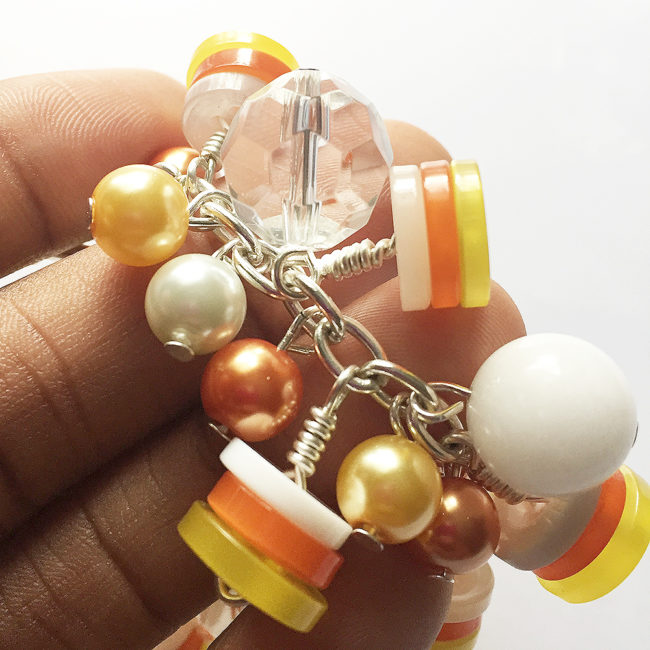
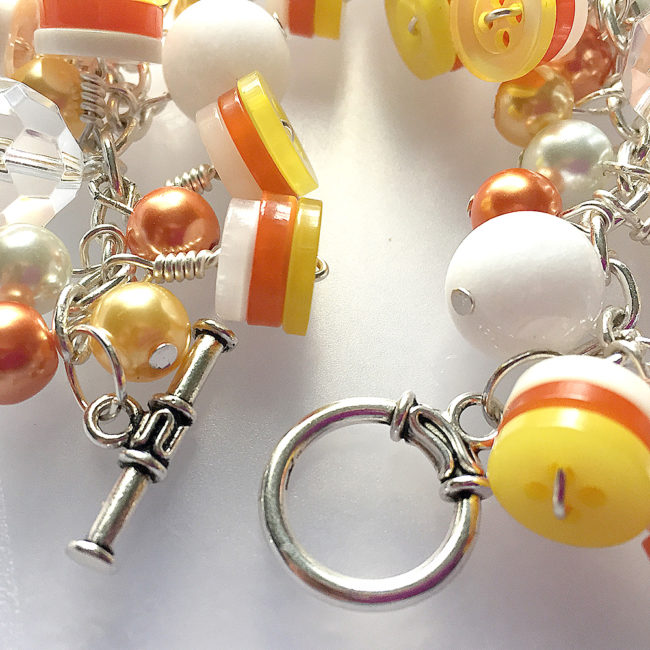
Once the bracelet is as full as you’d like, place a jump ring on each end of the chain. Attach the toggle clasps to the jump rings and your candy corn bracelet is complete!
I hope you’ll give this candy corn bracelet a try! It’s so cute that it’s definitely worth the time and effort to make. You can even modify the steps a bit to create a matching Halloween necklace and earrings. With this kind of arm candy, you’ll be sure to get all the sweet treats you desire this Halloween candy grabbin’ season!
Hello, everyone! This is Katie from the Buttons Galore & More Design Team and today I have a fun Halloween Photo Holder project that you can make to display those Halloween photos or reminders!
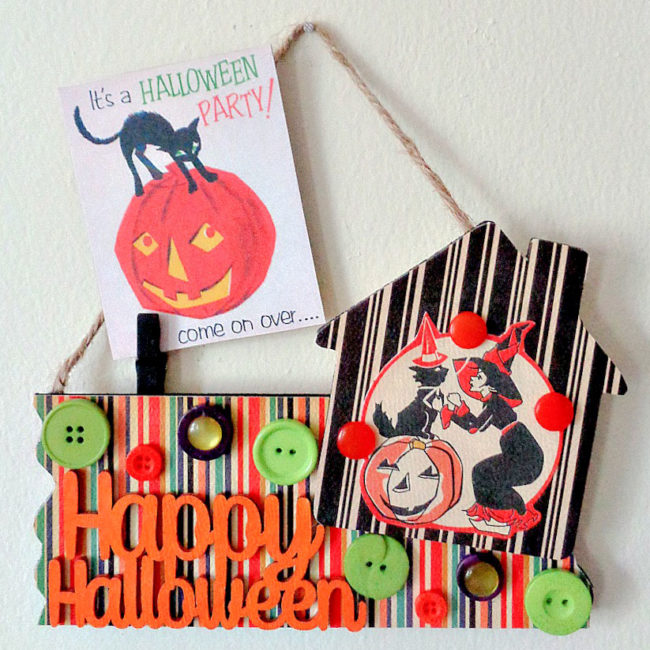
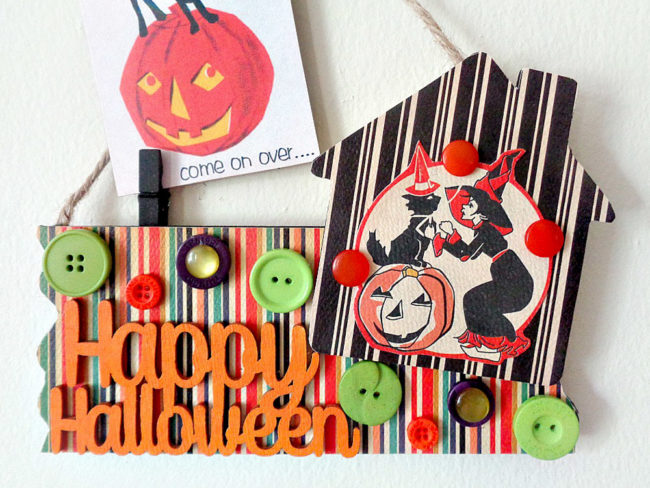
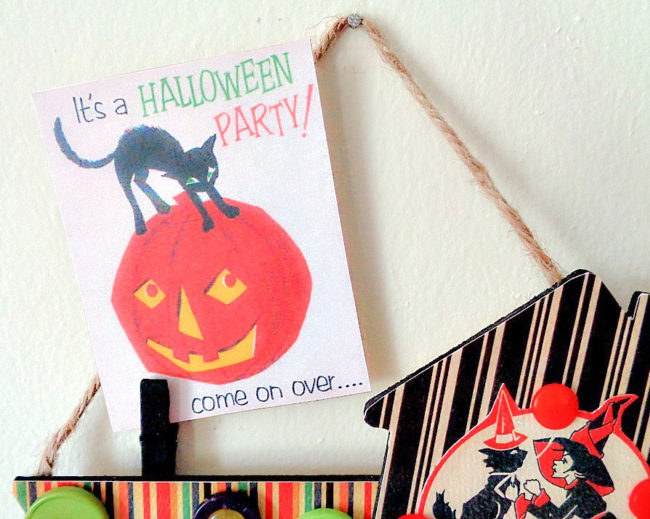
This Halloween Photo Holder is perfect for the Halloween season, due to all the pictures you will be taking during the holiday month. With that being said, even though I’m labeling this project as a photo holder, it could also hold other items as well. For example, it could hold notes, reminders, or that special Halloween party invitation.
To decorate my Happy Halloween Photo Holder, I decided to go with a vintage Halloween look. I achieved this look by using scrapbooking paper that had a vintage Halloween theme and by using the Buttons Galore & More ‘’Scary’’ button tote. This particular button tote was a perfect color palette to use in this project because it included all of the main Halloween colors. Besides the color selection being great, this pack of buttons also provides a wide variety of buttons in different styles and in different shades of those main colors. Overall, whether you like a vintage, modern, or spooky Halloween look, this button pack (I believe) could be used to achieve any number of styles.
So, to find out how to make your own Happy Halloween Photo Holder, keep reading below!
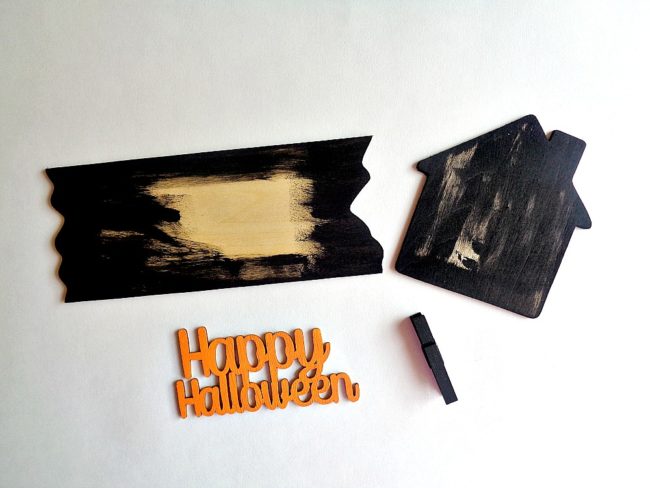
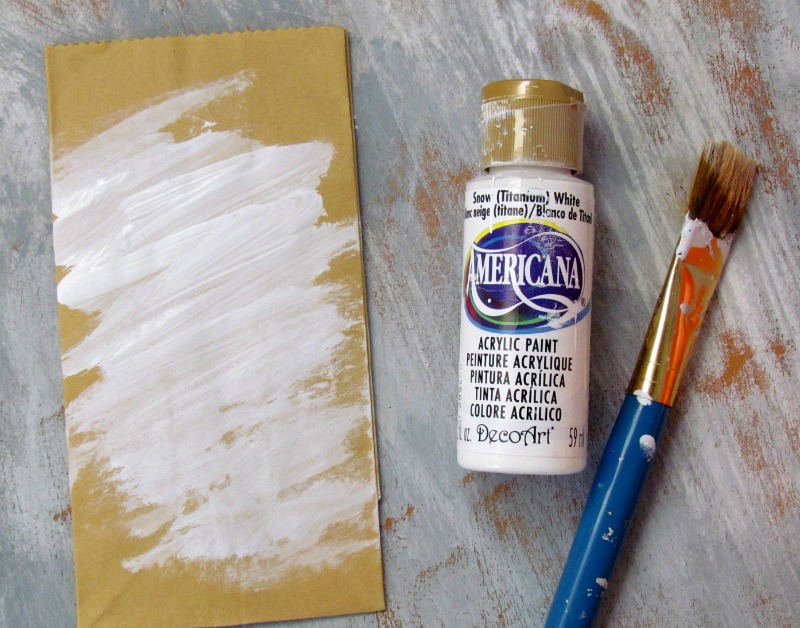
Step 1: Paint your wooden pieces in whatever colors you like and then set them aside to dry.

Step 2: Cut out pieces of scrapbooking paper that will fit on the front of your wooden sign and on the front of your wooden house shape. Then grab your Mod Podge and adhere those pieces of scrapbooking paper to your wooden pieces. Finally, set everything aside to dry.
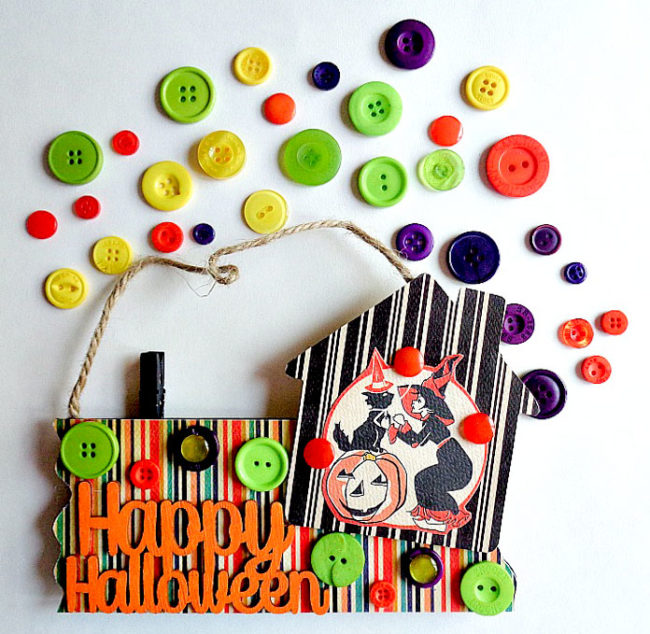
Step 3: Grab your hot glue gun and begin assembling your photo holder! To do this, first glue on your ‘’Happy Halloween’’ phrase and your wooden house shape to the main wooden sign. Then have fun decorating the sign by adding all the buttons that you like! For my photo holder, I chose to use a variety of buttons from Buttons Galore & More ‘’Scary’’ button tote.
Once the front of your photo holder has been decorated, flip it over to the back. Then hot glue your close pin to the back of your sign with the clamp side facing up and sticking out over the edge of your sign. Finally, glue on a piece of twine to create a way to hang your photo holder.
Once you have added your twine you are ready to display your new Happy Halloween Photo Holder!
I love how this Happy Halloween Photo Holder turned out! It would look so cute hanging in an office or even on a simple cork board.
This design could be adapted for any holiday (such as Christmas) by changing up the buttons and paper. What holiday would you like to make it for?
It’s hard to believe it, but fall is creeping upon us and with Fall comes holiday after holiday. Here is a fun and fairly easy fall countdown calendar project to count down the days till Halloween and/or Thanksgiving using some easy to find craft materials and of course…buttons!
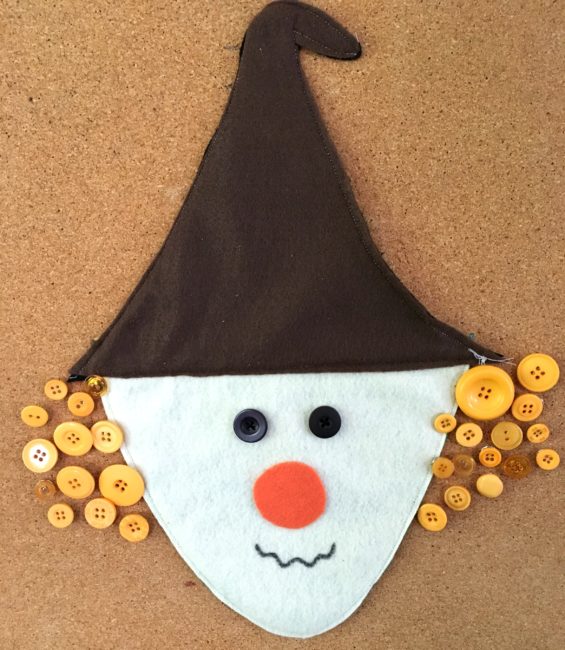
Here’s what you need to make this fun, reversible witch and scarecrow fall countdown calendar.
First, print out your patterns and cut out the felt according to the directions on the patterns. You will have 1 brown hat, 1 black hat, 1 green face and 1 tan face. If you are sewing your project together, go ahead and sew around the curved part of the face. Don’t forget to leave the top open! You will then need to sew your black button eyes onto the green face and onto the tan face.
If you are gluing your project, go ahead and glue the two faces together and then glue the black buttons for eyes onto each face. Let dry well before going on to the next step.
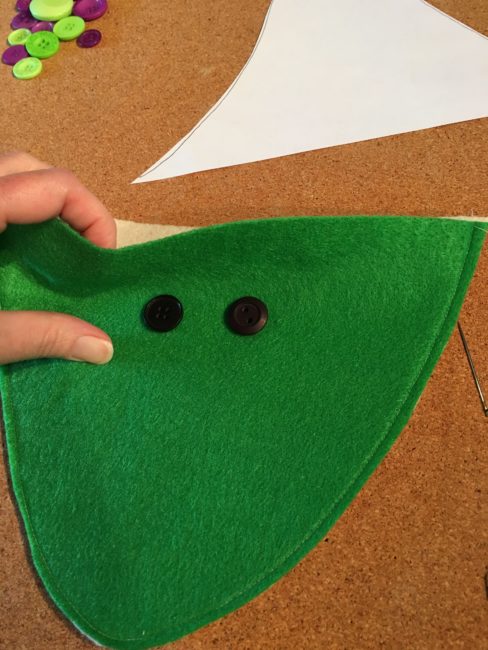
Cut out a wiggly, carrot shaped nose for your witch, along with a circle nose for your scarecrow. Attach them to your faces with craft glue. Use the black permanent marker to draw a mouth for each.
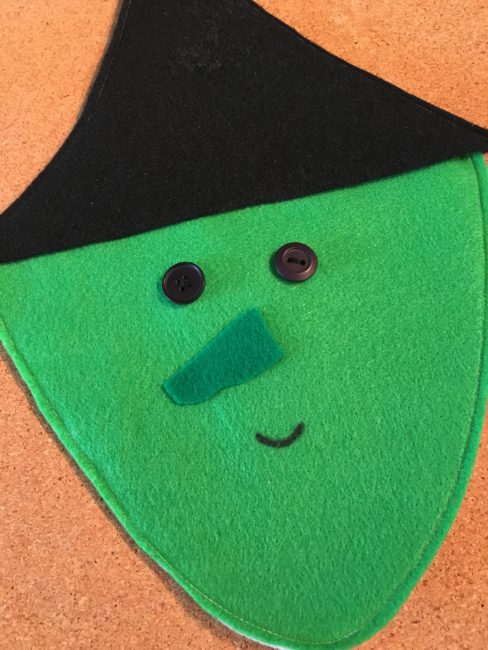
Next, if you are sewing your hats together, sew up and around the two sides, leaving the straight edge of the hat open. Then slide your face inside the two pieces of your hat and sew together; making sure to sandwich all the layers of the felt together when you are sewing.
If you are gluing, glue the hat pieces together and then slide the face inside the hat. You can attempt to glue these parts together, but I would recommend leaving them unattached. They will appear one piece when you attach it to the cork board.
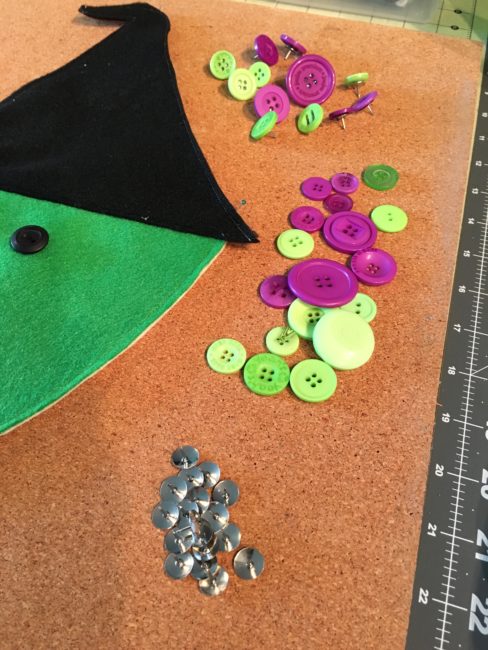
Heat up your hot glue gun and while it’s heating, separate your button pack. The witch hair uses 31 of the purple and green buttons and the scarecrow uses 28 of the orange from the Trick or Treat Button Basics BCB129. Glue the buttons on the thumb tacks and let them cool off.
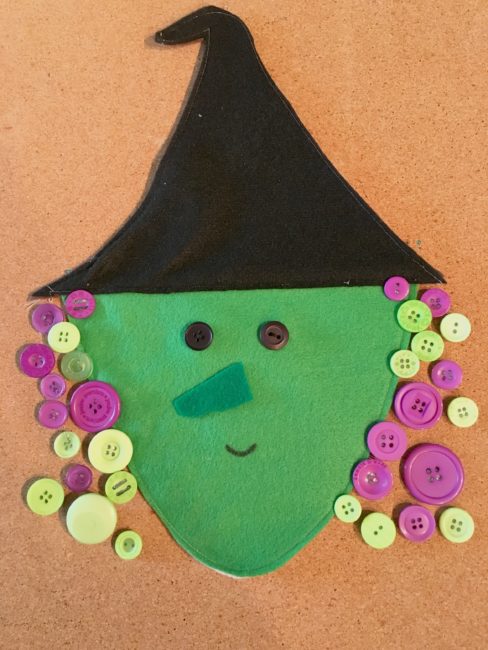
And there you have it! Attach your witch to your cork board with straight pins and either start out with all 31 buttons, taking one off each day until Halloween arrives, or add a button each day as it gets closer! Whichever you prefer!
Once Halloween is past, flip over your witch and start counting down the days till Thanksgiving!
Thanksgiving and Halloween are coming fast…make your fall countdown calendar today!
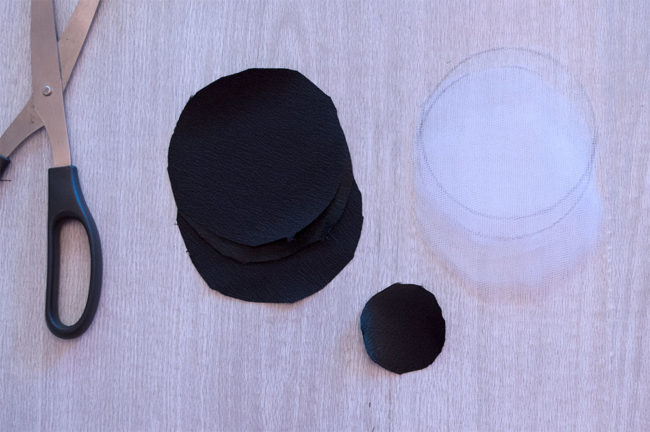
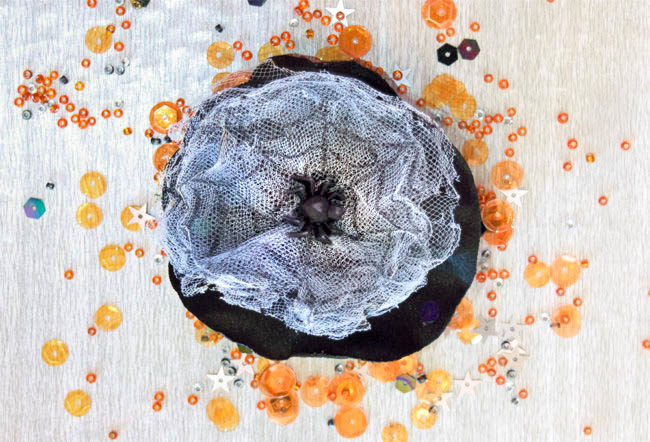
Halloween is coming soon – can you believe it?! You can make this fun Halloween Spider Web Hair Bow in less than 30 minutes. This is one spider web your little girls won’t mind having on their heads because it’s just so cute! It’s easy to customize too, using the same technique with different kinds of fabric, different colors or different accessories.
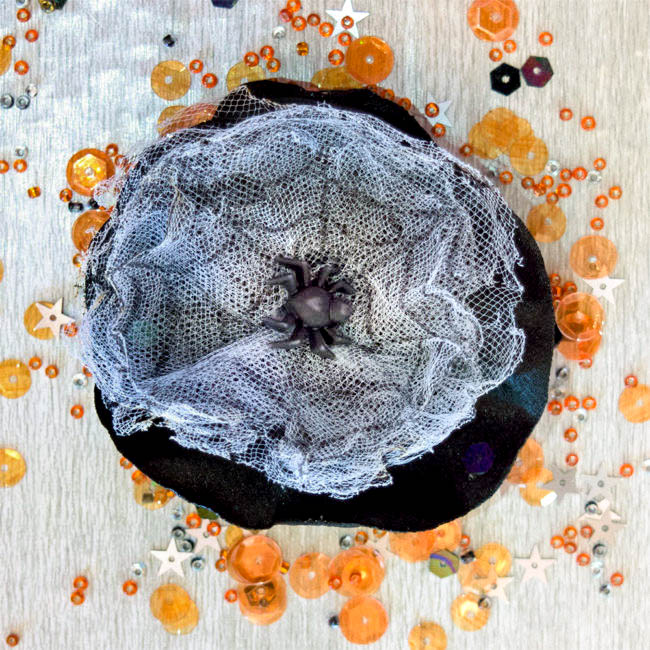
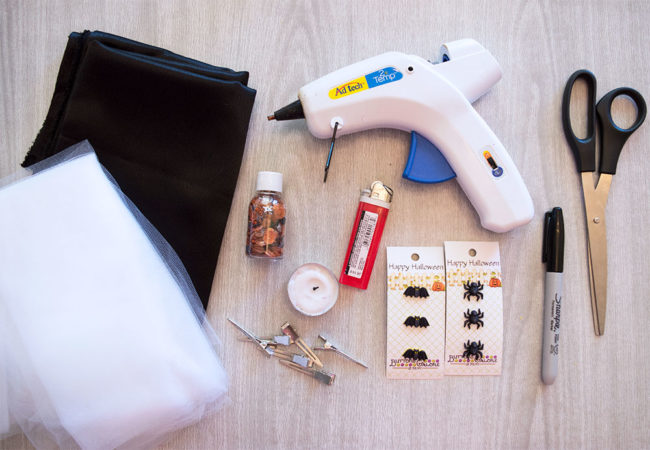
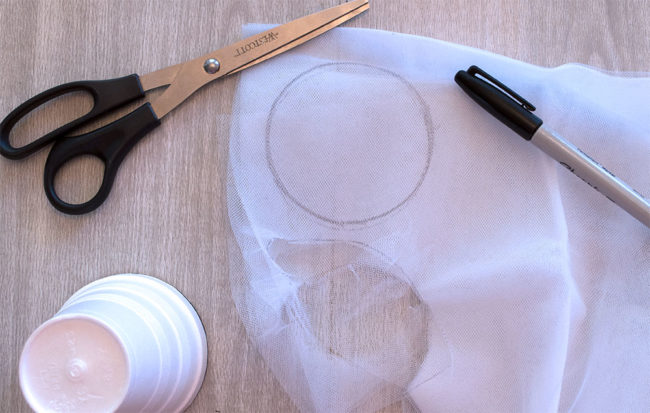
Cut circles in the tulle and black fabric. You will need two 3-4″ black satin circles, and one 1″ black circle. You will also need to cut six 3-4″ circles from the white tulle as well. I used a styrofoam cup to trace my circles. It was the perfect size.
Lots of fabrics will melt great for this project, but I find cotton fabrics don’t melt as well as the synthetic blends. My favorites to work with are satin or chiffon fabrics. This is a great project to use scraps, and you should use whatever you have on hand. It doesn’t take much!
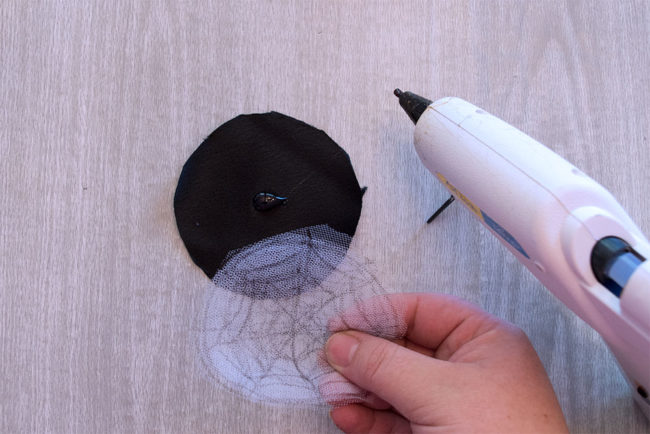
Use a black marker to draw spider webs on the tulle circles. Be sure to put a piece of paper under the tulle so you don’t end up with black spider webs all over your work surface.

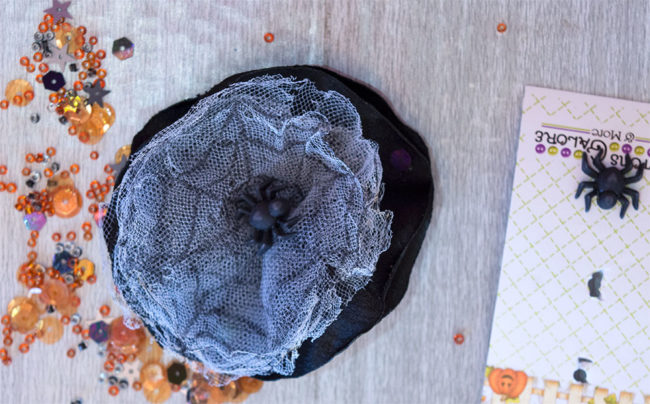
Assemble the fabric circles. I use hot glue to assemble mine, but you could easily sew them together if you prefer. Place a dot of hot glue in the center of each circle and press two circles together.
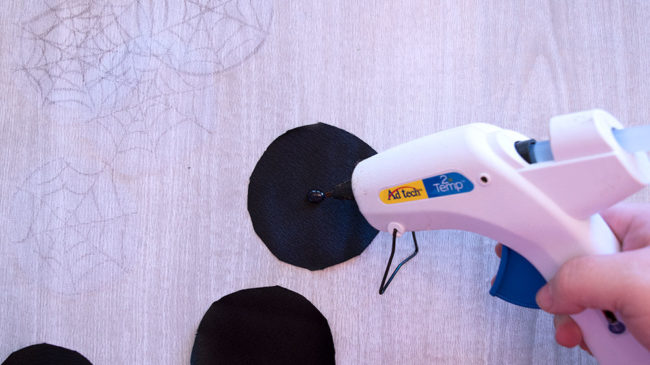
Stack the two black circles on the bottom, and the white tulle circles on top of those with a dot of hot glue between each layer.
*Please use caution when working with an open flame. The melting fabric is hot to the touch. Always keep a bowl of cool water next to your work station when working with a flame in case of burns or fabric that accidentally catches fire.*
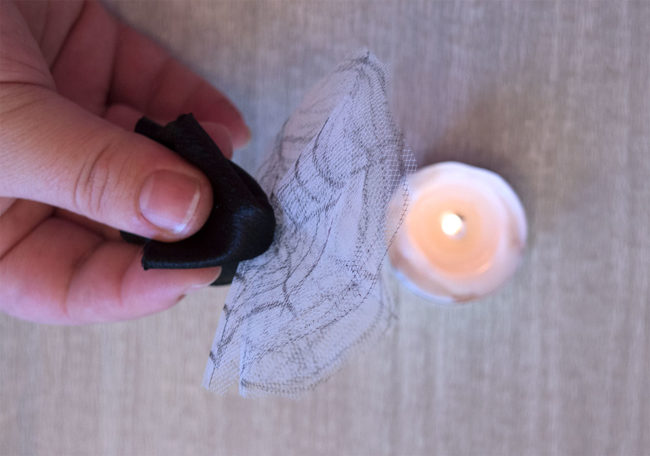
Using a small candle flame (I use a small tea light candle), melt the edges of the tulle and satin fabrics. Carefully hold the fabric down next to the flame. Don’t get it too close. It just needs the heat from near the flame to curl and melt the fabric.
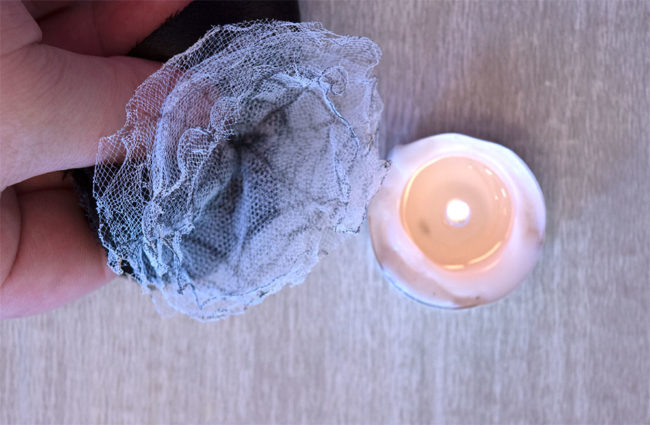
The tulle is very easy to burn. It does not need much heat to curl and melt. A little bit of charing on the edges of the tulle just adds to this cute Halloween spider web hair bow though! Satin fabric needs just a little more heat to curl and melt. Please be careful not to get your fingers too close!
Use glue to attach the adorable 3D Spider Button to the center of the Spider Web Hair Bow. Glue some sequins from the Trick or Treat Bead and Sequin mix to the bow. I used black sequins from the mix and some black seed beads.
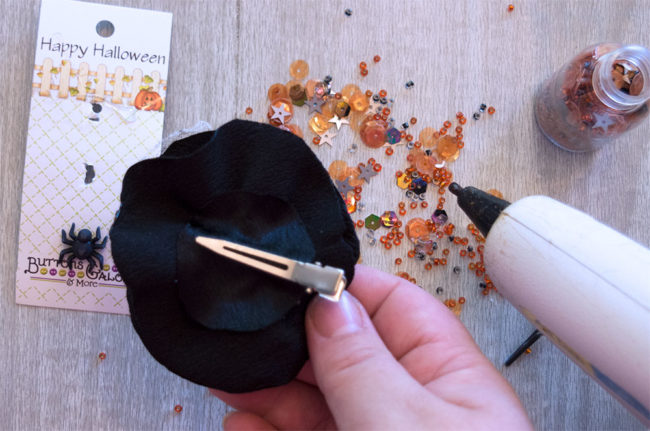
Attach the alligator hair clip to the back of your spider web bow using hot glue and the 1″ circle of black fabric.
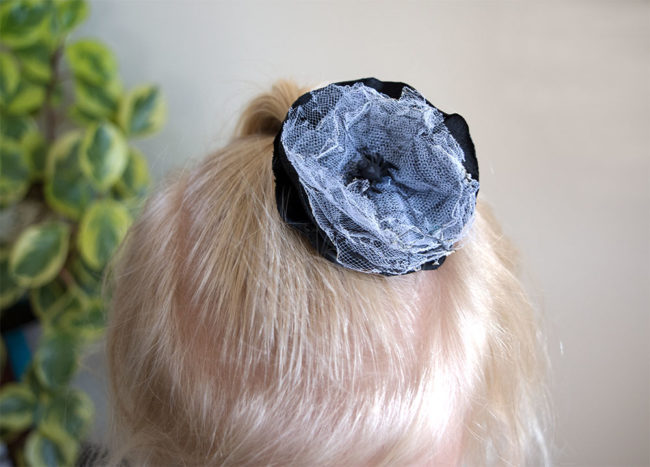
Isn’t it the cutest little spider web you’ve ever seen? I love how the adorable little spider buttons have a cute little heart shape on their backs. Even my spider phobic four-year old didn’t mind wearing this cute little spider in her hair!
You can easily change this technique to suit any style or holiday! Chiffon is my favorite fabric to melt. The curl is fantastic! Change the color of the fabric and the tulle and add other fun embellishments for endless combinations! I want to make one with red chiffon, white tulle, and these adorable 3D Candy Cane buttons for Christmas!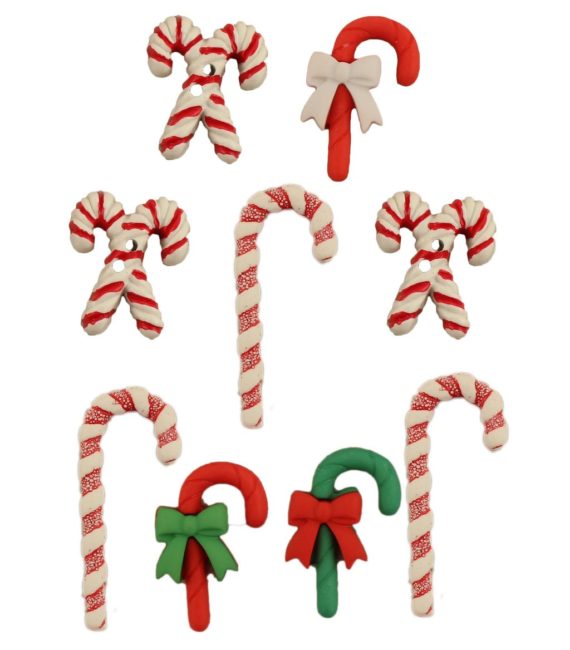
Which 3D buttons would you put in your hair bows?
Hello Everyone! This is Katie from the Buttons Galore & More Design Team, and today I have a fun button pumpkin wall hanging project to get you in the mood for fall decorating!

This project is perfect to make if you are looking for an easy and inexpensive way to spice up your home décor for fall, halloween, and thanksgiving. I got the idea for this project when I saw a felt wall hanging designed for the 4th of July. However, instead of a pumpkin, the original wall hanging had a heart shaped flag made from felt and a few buttons. Personally, I thought the idea was cute but could be recreated in a simpler way. In today’s project, the whole DIY is only 3 steps and does not involve any sewing tools!
To decorate my button pumpkin wall hanging, I used two button sets for a majority of the project. Those two button sets were the 28 Lilac Lane ”Pumpkin Spice” Embellishment Bottle and the Buttons Galore Autumn Value Pack. Both of these button sets provided a wide variety of harvest/fall style buttons and worked really well together. My personal favorite out of both of these sets was definitely the 28 Lilac Lane ‘”Pumpkin Spice” Embellishment Bottle because you received a ton of beautiful orange colored buttons.
So, to find out how to make your own pumpkin button wall hanging, keep reading below!
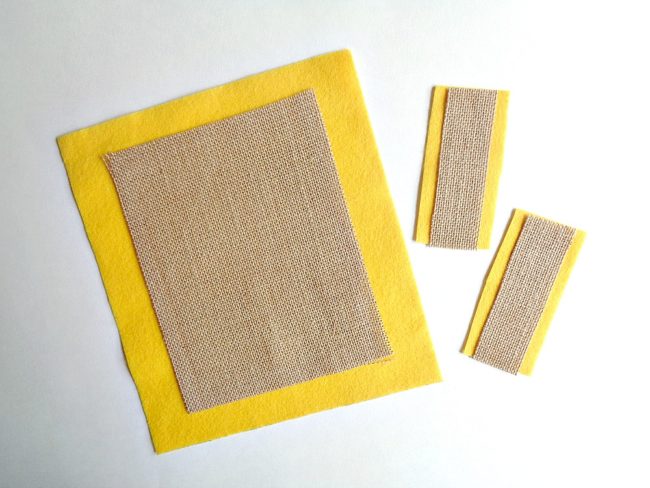
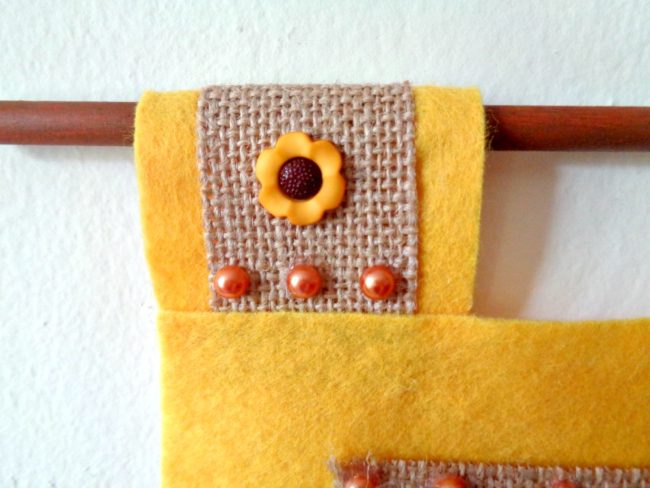
Step 1: Cut one piece of felt that measures 9 inches by 10 inches and two smaller pieces of felt that measure 2 inches by 3 ½ inches. Then cut out one piece of burlap that measures 6 ½ inches by 8 inches and two smaller pieces that measure 1 inch by 3 ½ inches.
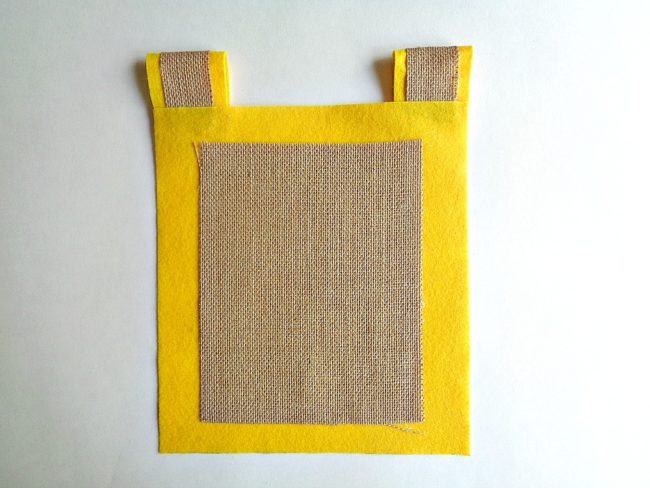
Step 2: Layer the larger piece of burlap centered onto the larger piece of your felt and glue it into place with your hot glue gun. Then layer the smaller pieces of burlap centered onto your smaller pieces of felt and glue them into place. Finally, create loops for your wall hanging by folding over the smaller pieces of felt/burlap and glue them in the corners of your larger felt piece.
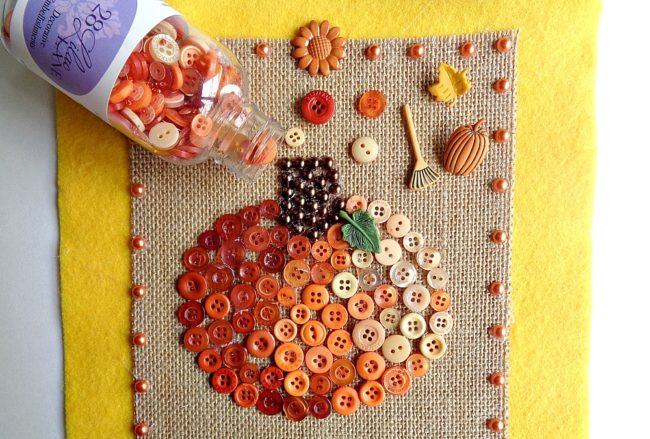
Step 3: Now take your pen and draw the outline of a pumpkin onto your burlap. Then begin gluing on your buttons around the outside of your pumpkin to create an outline and then fill in the middle with more buttons. For my pumpkin, I decided to go from dark to light buttons and then use shimmering half pearl flat backs for the stem. Finally, use the rest of your normal buttons and decorative buttons to decorate the rest of your wall hanging.
For my button pumpkin wall hanging I used the following:
Once you are happy with how your button pumpkin wall hanging looks, you are ready to hang it on the wall by sliding a dowel rod or wooden stick through the two loops!

I loved how this pumpkin button wall hanging turned out and I think it would look so cute as part of a gallery wall!
While creating this project, I did free hand the design of the pumpkin. However, if you are not comfortable drawing your own pumpkin (in step 3), you can always google ”pumpkin template” and print out a template to trace around. With that being said, if pumpkins are not your thing, you could always change the main image to be something else. For example, I think a leaf created from the 28 Lilac Lane “Toasted Graham” Embellishment Bottle would look really pretty.
If you made this pumpkin button wall hanging, what 28 Lilac Lane items would you use?
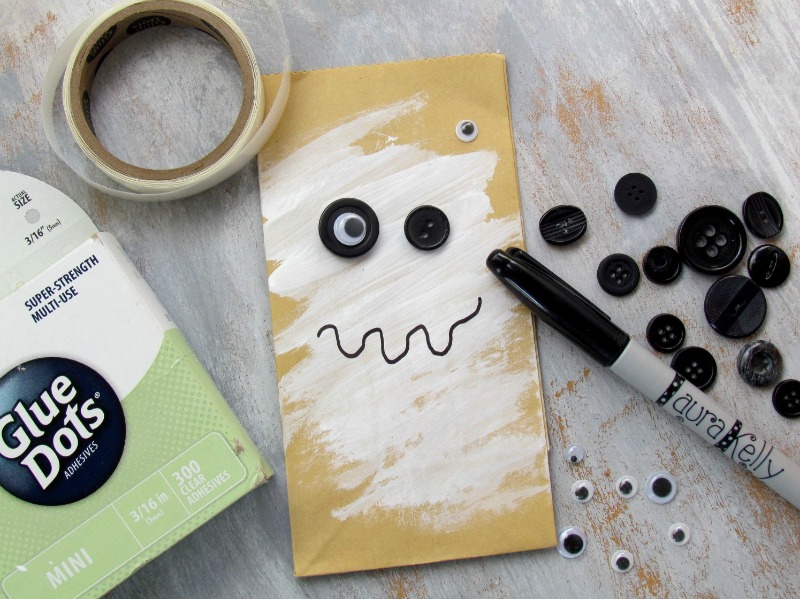
Halloween is coming fast! But there’s still time to make a few more Halloween projects – like this fun scaredy cat halloween tag! It makes a great decoration on a spooky tree or a fun goody bag attachment.
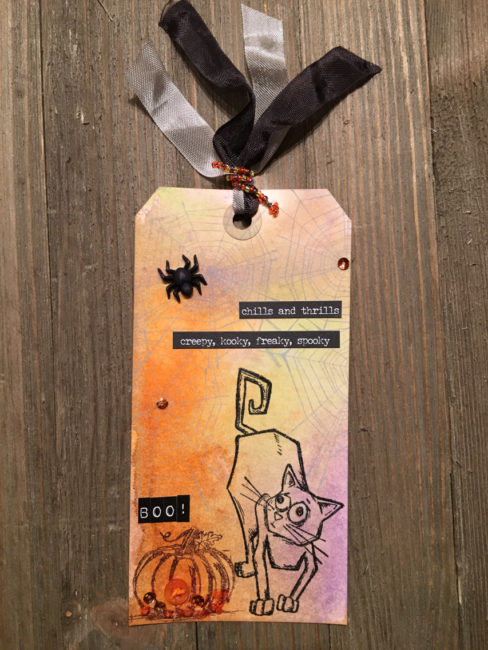
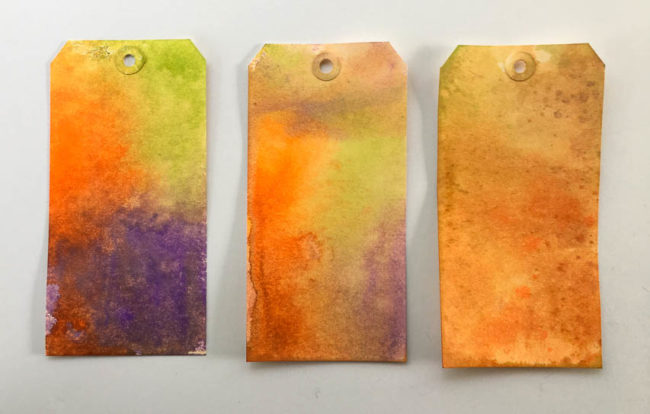
To make my scaredy cat halloween tag, I started with the middle tag below. This is a set of three tags that I made using Distress Spray Stain. I sprayed the three colors of stain on my craft mat in a triangle arrangement, and pressed the first tag into them. That created the tag on the left below. Then I added some water to the mat using my Distress Sprayer, and swiped a tag across my mat again, which got me the tag in the middle that I used for this project. Finally, I took a third tag and swiped it through the color mix that remained on the mat. By that time, the three colors were mixed together enough on the mat that it produced a more brown color, giving me the tag on the right.
Decorating this tag started with a lot of stamping! I stamped the cat in black and heat embossed it with clear embossing powder. Then I stamped the pumpkin in brown, coloring in the part of the blueprint stamp that I wanted to use and stamping it. To make them look wispy, I used silver ink to stamp the spider webs to fill the top of the tag area.
Once the stamping was done, I stuck down the phrase stickers and the letters to spell “Boo!”
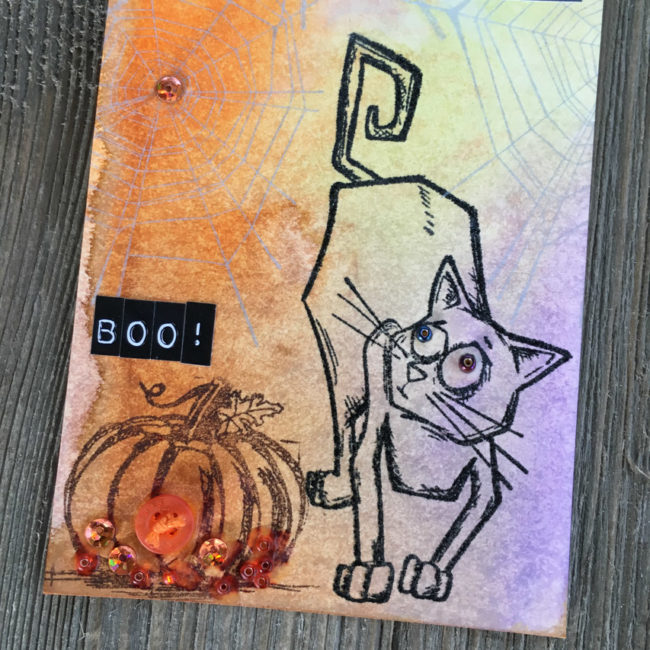
Next I got my PPA Matte Adhesive liquid glue to start adding some beautiful embellishments! Well, first I added a scary one…I cut the shank off of a spider button using button shank removers and glued it onto the spider web on the upper left of the tag. In that spot it looks like the cat is looking at it!
To make the cat’s eyes look really bugged out, I selected two dark colored seed beads from the 28 Lilac Lane “Paws & Pets” embellishment kit and glued them on top of the stamped dots in the cat’s eyes. It makes the cat look even more scared!
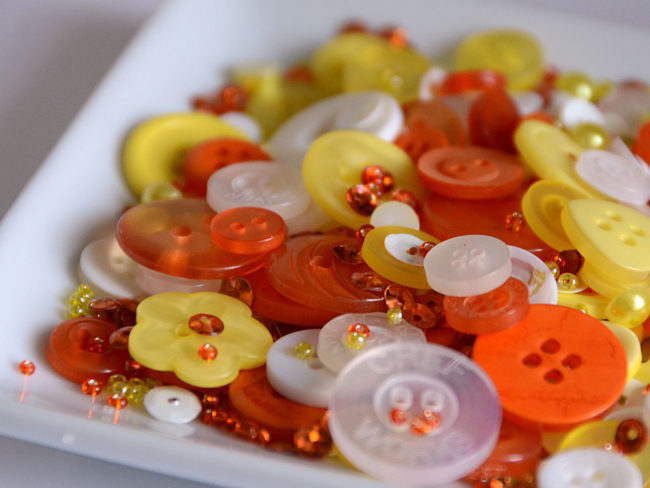
Finally, I dumped the new 28 Lilac Lane “Candy Corn” embellishment bottle (pictured above) into a craft tray, which is a great way to contain all of the small embellishments while you are looking for just what you need. With it all spread out I selected several small sequins to glue on to the spider webs, and glued some small seed beads, sequins, and a button onto the bottom of the pumpkin to give it some orange coloring.
To really look finished, my tag needed some ribbon through the hole. I selected some gray and some black and strung them through the hole. But instead of tying them off, I made a seed bead “twist tie” to fasten it. I cut a piece of wire several inches long. To start, I looped the wire through and around a pair of beads and twisted it together, clipping one of the ends off. then I began threading seed beads onto the wire in a random pattern until the tie was the length I wanted. To finish the wire off, I once again created a loop with two beads in it and twisted the wire together below that loop. I made sure to cut off the ends very close to the twist and turn them under so no sharp points stick out!
The seed bead twist tie was then wrapped around my ribbon to cinch it tight (similar to a ponytail holder). It brightens up the ribbon and brings something shiny to the top of my scaredy cat halloween tag.
And now my scaredy cat halloween tag was ready to hang on my halloween tree with my other tags! (To see the other tags in the collection, check out the Spooky Halloween Tag and the Fall Pumpkin Tag).
Supplies:
Do you make tags? What occasions do you make them for? Tell us in the comments!
The calendar is about to turn October, and most of us are in full-speed Halloween crafting mode! In case you are still in need of some Halloween crafts inspiration, here’s a round-up of our favorite Halloween crafts using our favorite crafting embellishment – buttons, of course!
Our autumn frame is super easy to make with no sewing, and will make a great addition to your home decor or your buffet of candy treats. And it’s a great way to use up those fabric scraps!
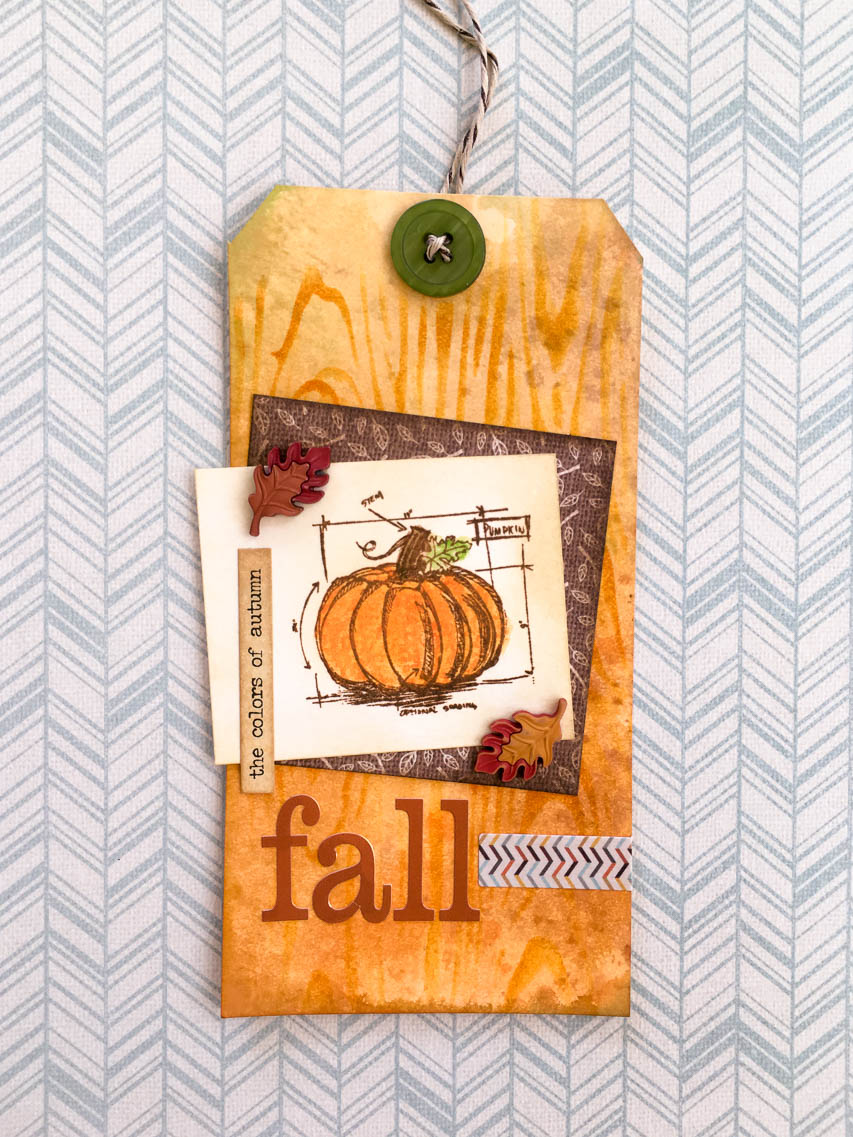
Whether you are planning a hospitality gift for your party hosts, or dropping some fresh baked pumpkin spice brownies at the neighbor’s, this fall pumpkin tag is a warm and friendly way to say “hello” to someone special!
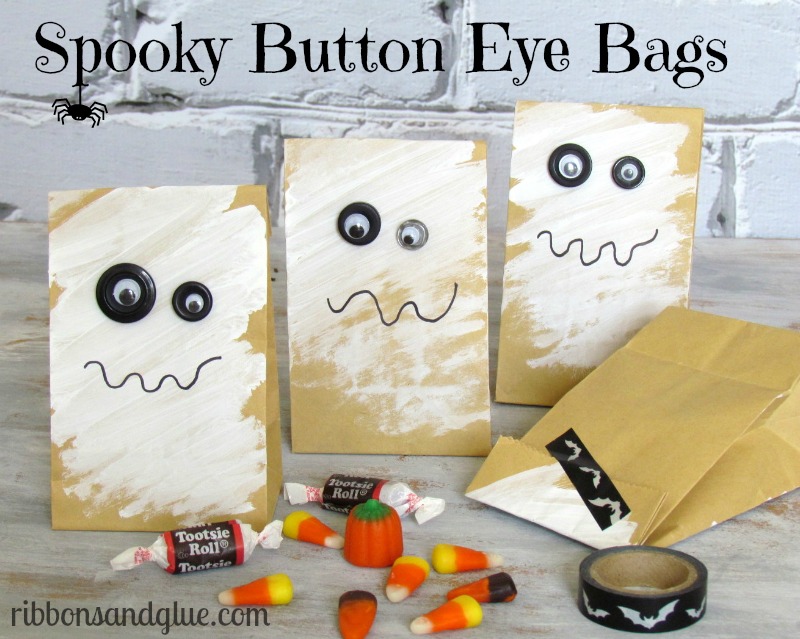
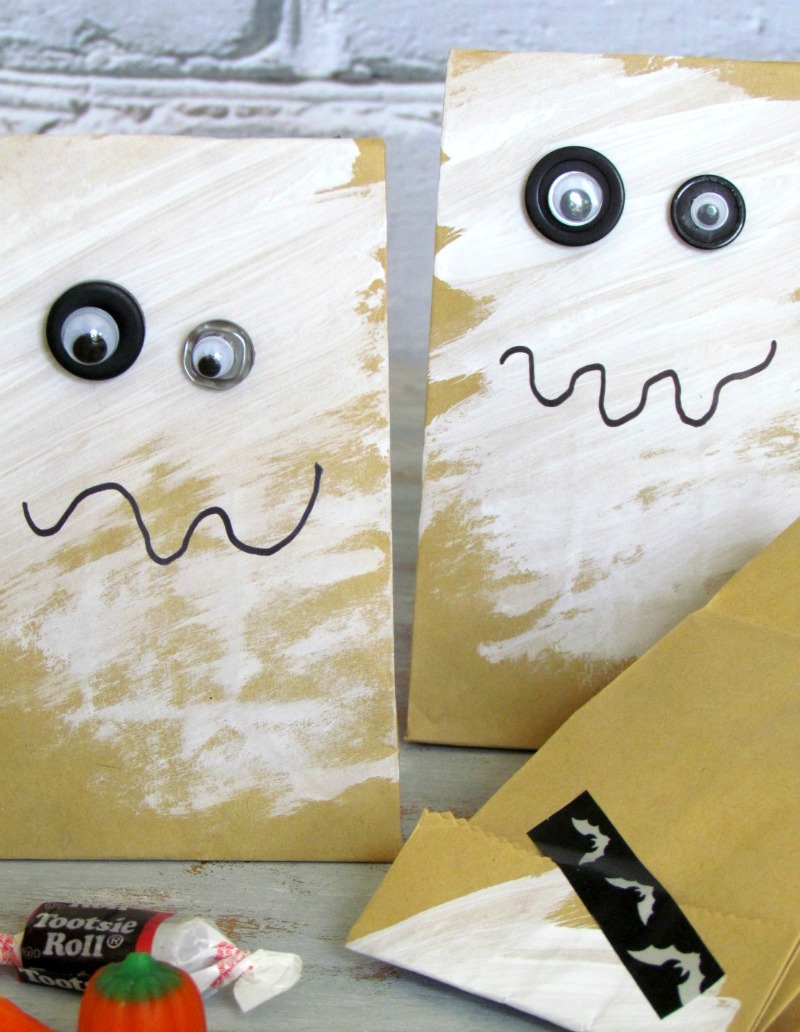
When it comes time to hand out candy, our spooky button eye bags will be the talk of the neighborhood or your kids’ classroom! They are so simple to make that the kids can help!
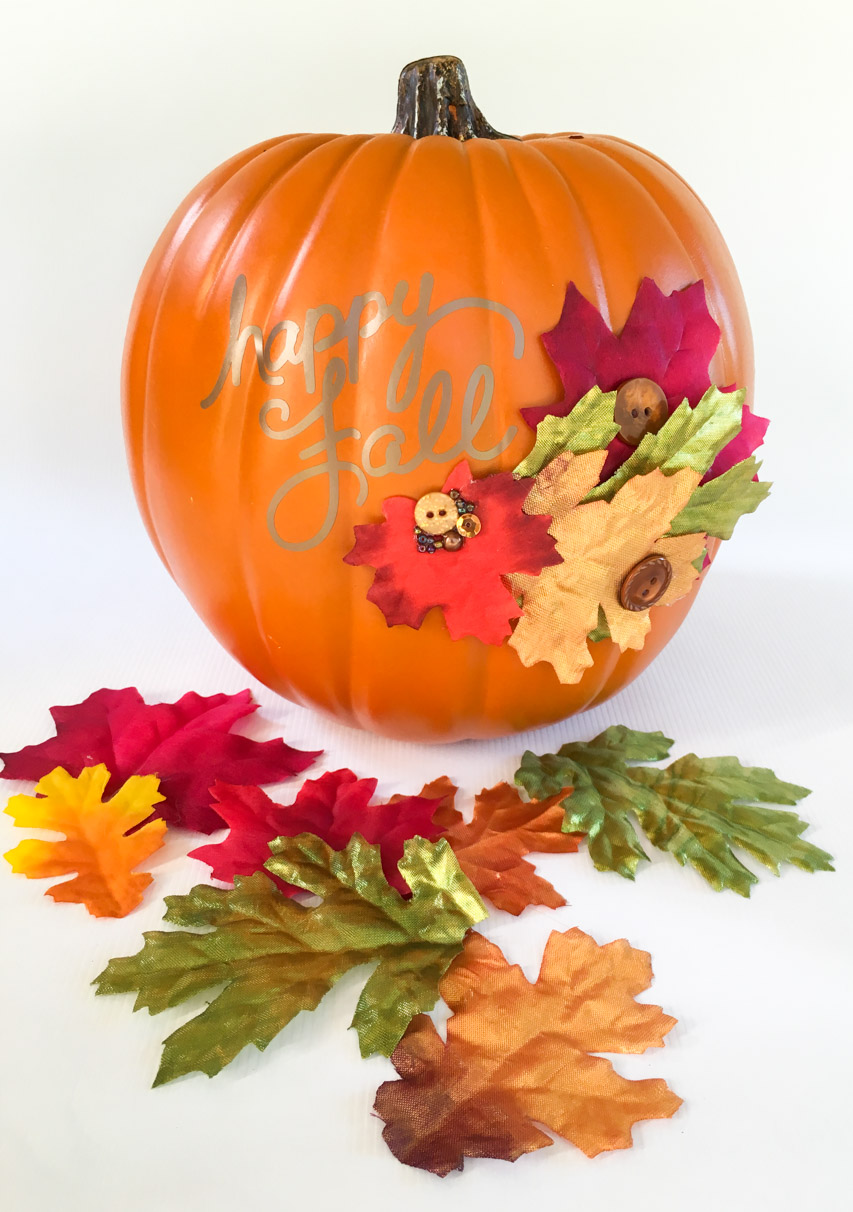
Pumpkins are seasonal decor that can go from early fall all the way through to Thanksgiving. This decorative pumpkin will add a beautiful touch to your home or porch all season!
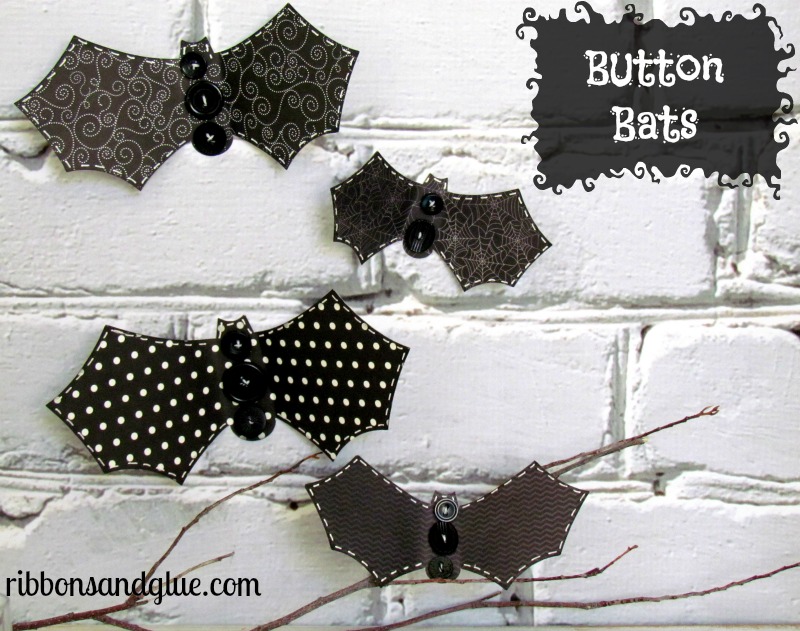
Halloween wouldn’t be complete without some bats! These button bats are more cute than spook, and will look great hanging from the ceiling, staked into a plant, or stuck to a wall.
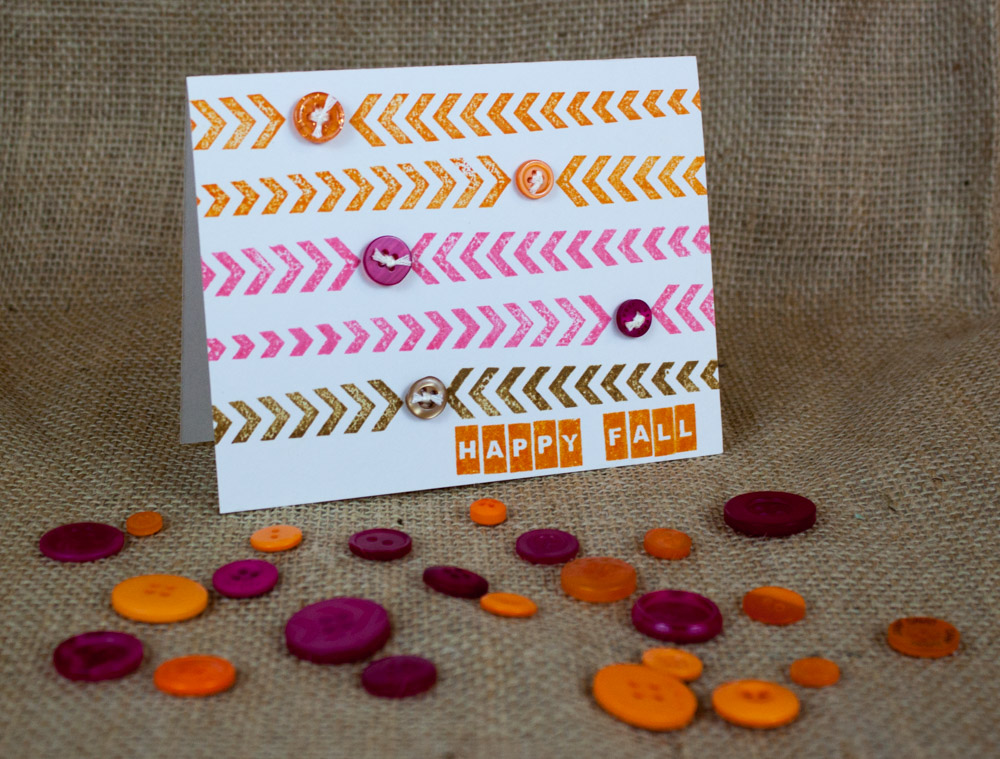
If you aren’t quite ready to give up all the color in your world for the browns of fall, we’ve got the perfect card for you! This fall card brings nice bright pink and orange to a cheery “happy fall” sentiment.
Looking for buttons for your Halloween projects? Don’t miss our brand new Scary Button Bonanza, Trick or Treat Button Basics, and Fall Festival Button Basics!
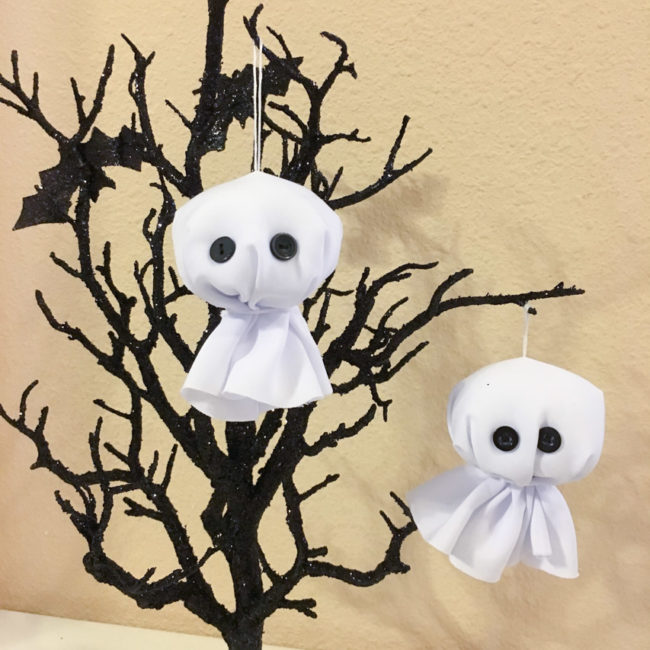
Spooky trees are a fun way to decorate for Halloween. To keep it from getting too spooky and scaring my daughter, I’m decorating mine with some cute ghost ornaments that only take 15 minutes to make!
Supplies Needed:
To begin making these, I first had to raid my kitchen for a 10″ dinner plate to use as a circle template! I laid the plate out on the white fabric and drew around it with the fabric marking pencil. Then I cut the circles out, just inside the lines I had marked.
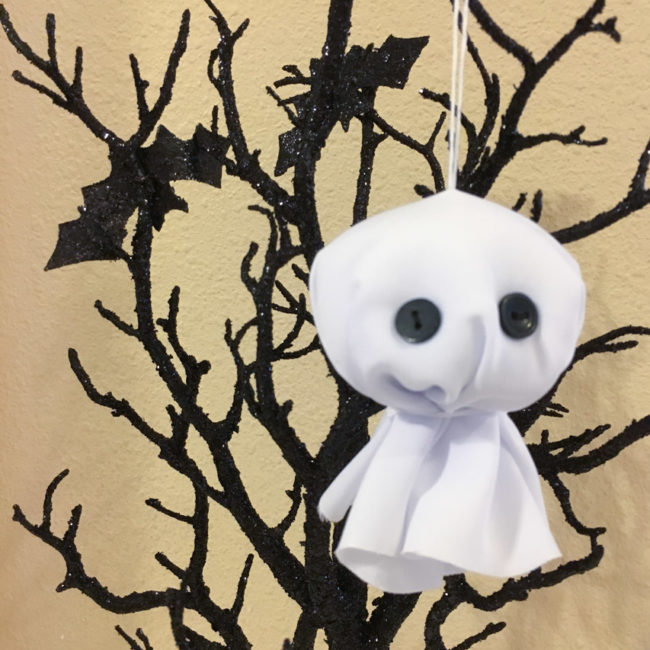
Next, to find the center of the ghost ornament, I folded the circles into quarters. I threaded a needle with white embroidery floss. Then I stitched up through the center of the fabric and back down, leaving a loose loop. I tied the threads together on the reverse side. (The side with the knot became the inside of the ghost.)
To create the pouffy head of the ghost, I balled up some fiberfill to about the size I wanted. Then I gathered the fabric around it, centering the hang loop at the top. I wrapped some embroidery floss around it to tie it off, leaving a small (about a half inch or so) opening so that it isn’t gathered too tight.
The final step was to sew on the buttons for the ghost’s eyes. I threaded my needle with black embroidery floss and used the opening at the center of the fabric gather to pull my needle through when I needed to sew from the underneath side.

Whether you make just one or a whole tree full, these cute ghost ornaments are a 15 minute treat that will make your Halloween extra festive!
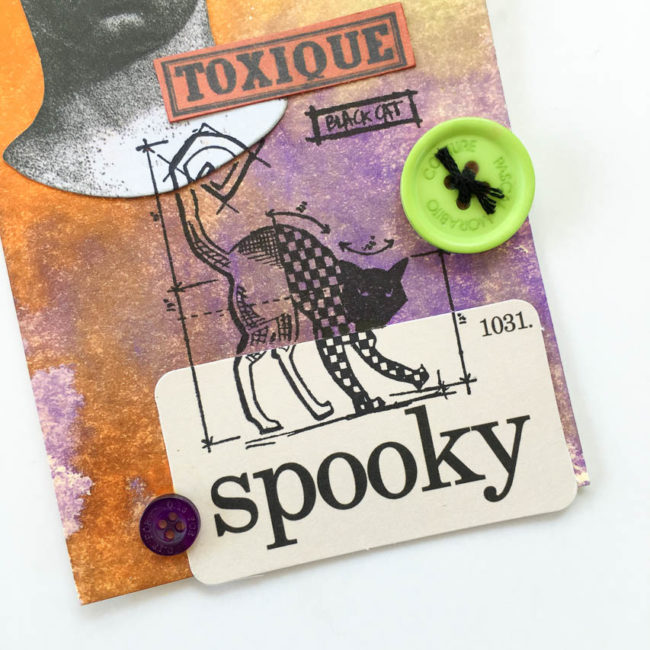
Today we’re taking a walk on the creepy side of Halloween, with a spooky Halloween tag that makes a great attachment for a treat bag or can be a unique holiday greeting by itself!
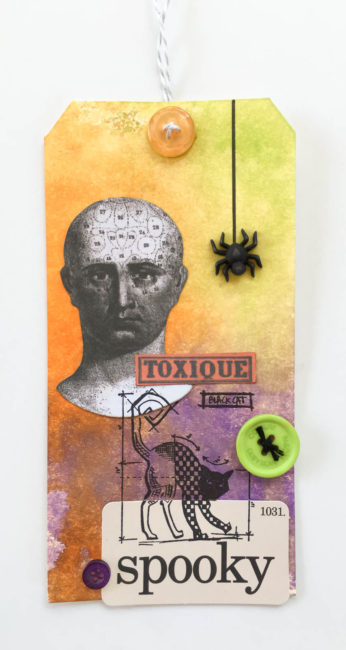
Supplies:
1. Create the background of the Halloween tag by spraying the three colors of Distress Spray Stain in a triangle arrangement on a craft mat and then dragging the tag across the ink. Allow to air dry, or dry with a heat gun.
2. Ink the edges of the paper elements with matching ink to hide the white edges, and glue them in place.
3. Using Archival ink, stamp the creepy cat on top of the background and paper elements.
Tip: If the stamp image is incomplete where the paper layers meet, use the fine point end of the Distress Marker to fill it in!
4. Draw a line for the spider web in the upper right corner using the brush end of the Distress Marker and a ruler.
5. Thread black embroidery floss through the green button and tie off.
6. Use a button shank remover to cut the shank off from the back of a spider button.
7. Glue all of the buttons into place using the PPA Matte Adhesive. (Make sure to center the orange one over the hole in the tag.) Let dry.
8. Thread twine from the back through the button and ending at the back again, to tie off the tag.
9. Enjoy your Halloween tag!
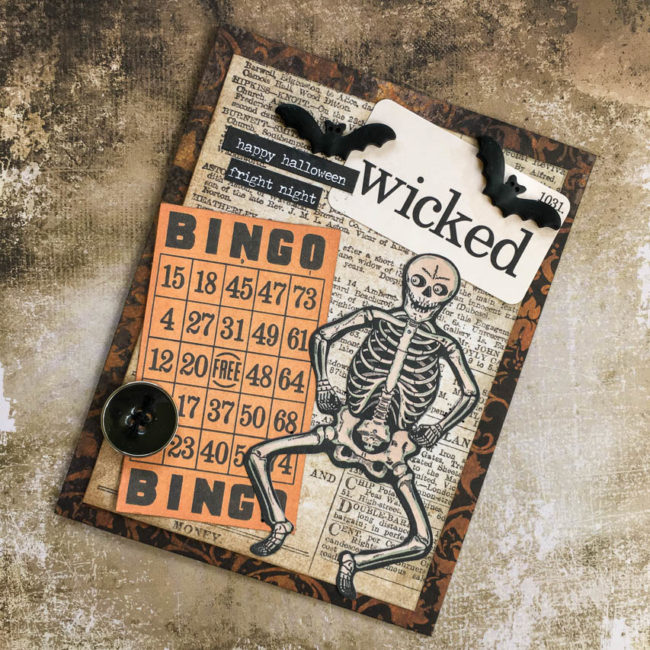
That September chill is in the air, and that means pumpkin spice, apple cider…and Halloween on the horizon! Our 3D buttons make great accessories for your themed cards, and I’m here today to share an idea you can make with bat buttons from our Halloween Value Pack.
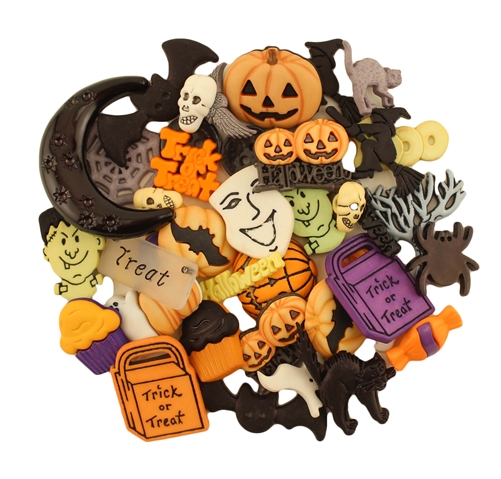
Our Halloween Value Pack includes approximately 50 assorted buttons. The buttons range from 1/2″ to 7/8″ in size and include shank and sew-through buttons. Designs include fun options like pumpkins, monsters, spiders, bats, and everything you need for your Halloween-themed projects!
Supplies:
To create the base of the card front, cut a 4.25″ by 5.5″ piece of the black and orange paper. Adhere to the front of the card base. Cut a 3.75″ by 5″ piece of the text paper, and adhere it centered on top.
Select the bingo card and wicked flashcard from the ephemera pack, and adhere them angled in the corners of the card front. Adhere the skeleton ephemera on top of them.
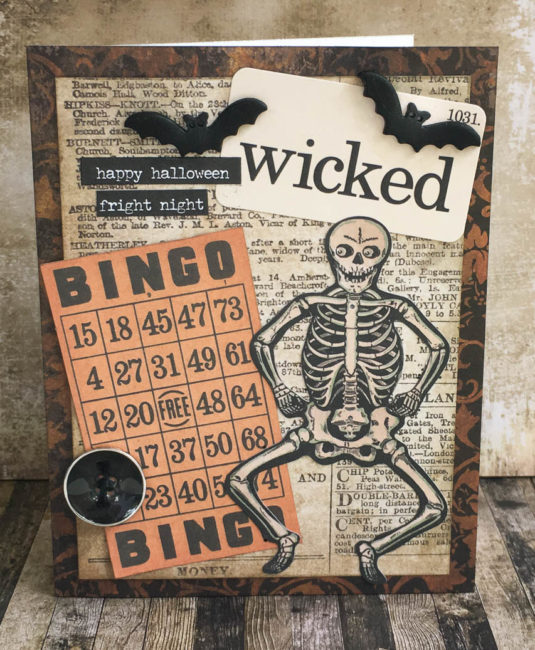
Tie embroidery thread through the large black button from the Halloween Value Pack and glue it on top of the bingo card using PPA Matte Adhesive. Use the PPA Matte Adhesive to also attach the bat buttons from the Halloween Value Pack on top of the “wicked” flashcard.
To finish the card, select some sentiment stickers from the Small Talk sticker set and stick them down in the upper left corner underneath one of the bat buttons.
This quick and easy card is a fun way to say “boo!” to someone for Halloween! Who do you want to send a friendly scare to this year?
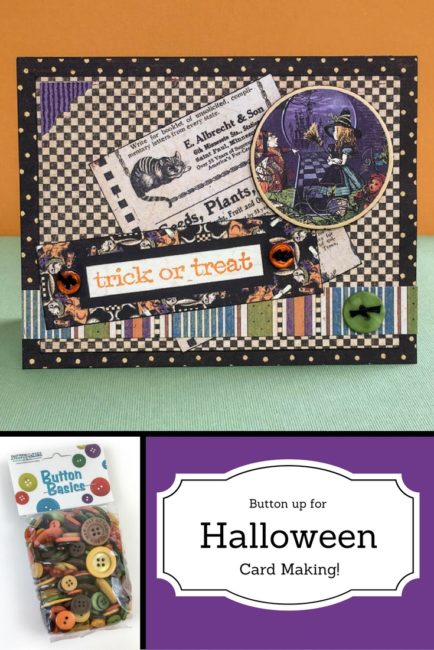
This week, we’re introducing you to six new Button Basics assortments! One of the new assortments is a vintage fall palette called Fall Festival, perfect for making fall, Halloween, and Thanksgiving projects.
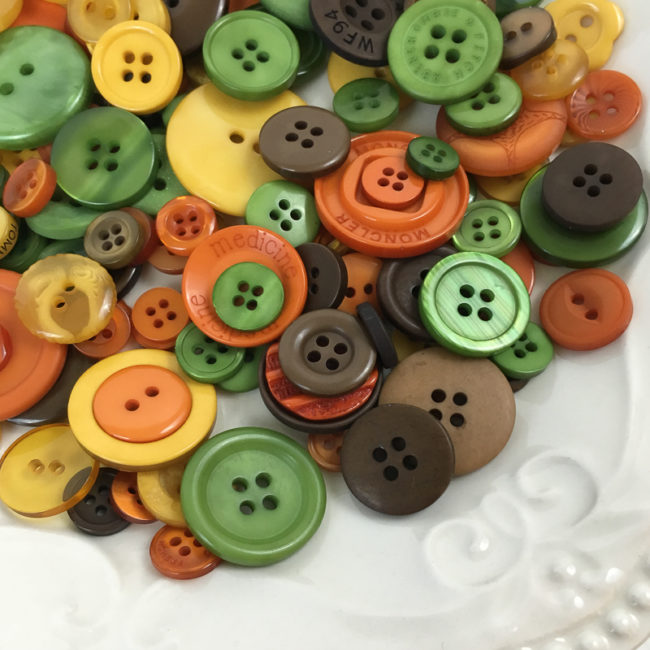
Fall Festival is a mix of brown-tinged tones of green, orange, and yellow, along with coffee shades of brown.
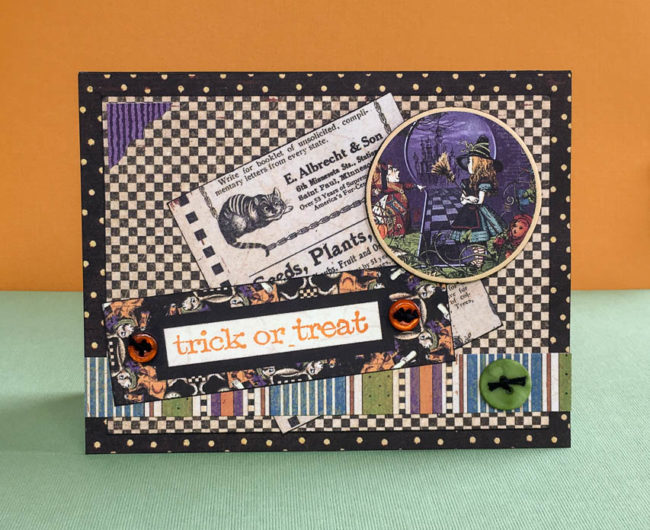
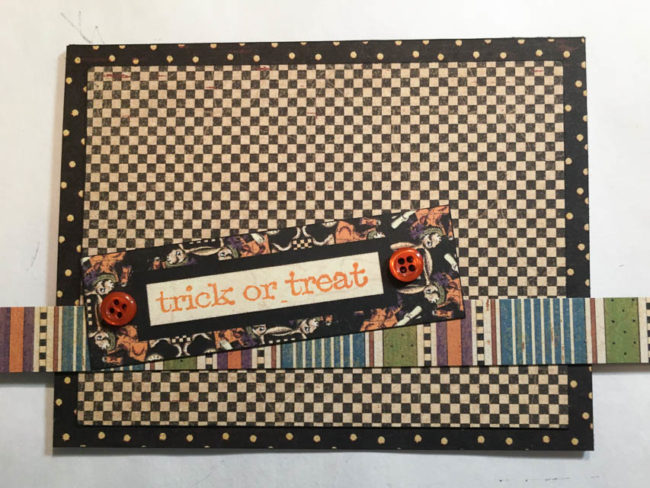
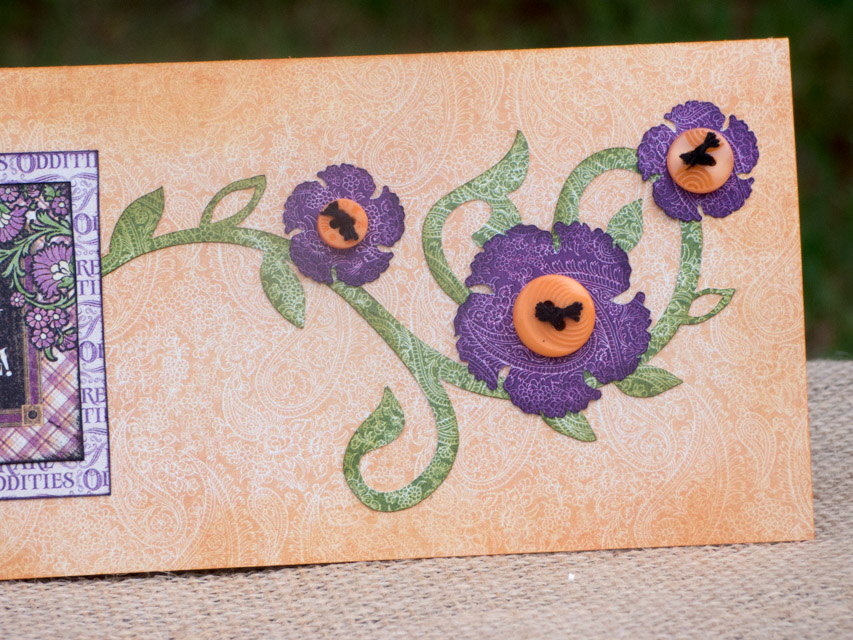
I decided to pair Fall Festival with Graphic 45’s new Halloween in Wonderland collection to make a retro fun Halloween card!
Supplies Used:
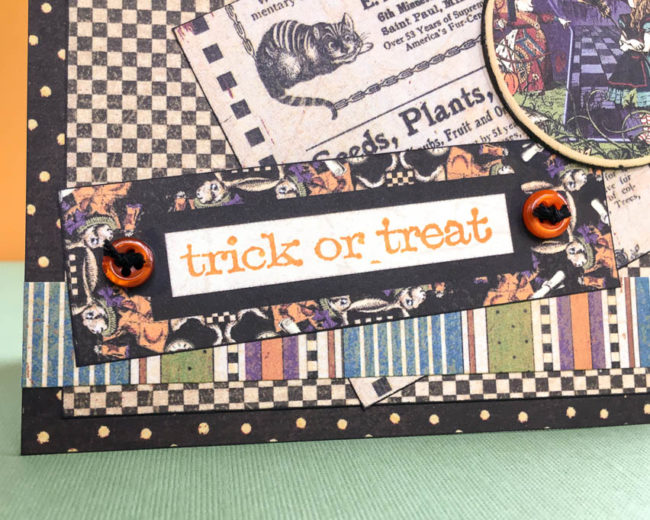
I used tiny orange buttons from Fall Festival, to visually “attach” the faux bookplate that is printed on the label from one of the cut out sheets in the Graphic 45 “Halloween in Wonderland” collection. The buttons highlight it as the sentiment block for my card, and Fall Festival’s color tones coordinate beautifully with the paper collection.
All of my buttons on this card are attached with PPA Matte adhesive, my favorite liquid adhesive for working with buttons and embellishments. It’s just the right consistency – thick enough to hold an embellishment in place, but not so thick that you can’t move it around to get it where you want it. It holds securely, and dries perfectly clear so there’s no need for anxious moments it a little spreads out from underneath your embellishment!
When making a project like a card, I frequently like to start with the most important elements of the design first, and then build around them. That means that I often am starting with elements that will be on top – like this sentiment block – and then working down in my design as I fill in around it. To do this, I lay pieces out without adhering them as I work.
I started by creating my background, and then putting in place the sentiment and the border that I wanted to anchor it. This of course, left me with a lot of open area made up of that super busy tiny checkerboard pattern. It overwhelmed my sentiment so I needed to tone it down.
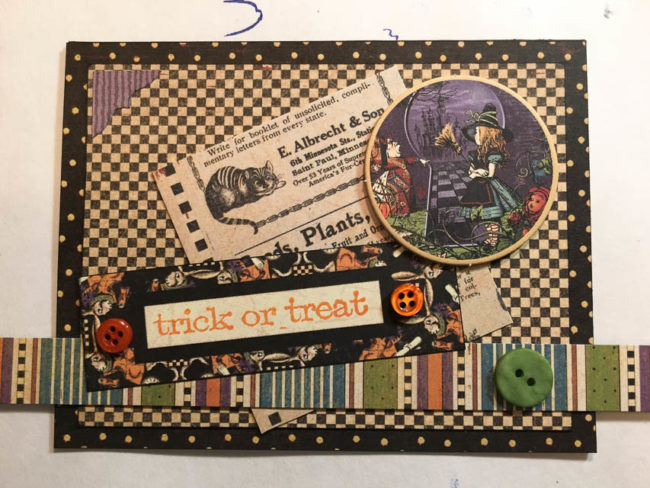
To fix this, I cut a block of a lighter, larger pattern and inserted it behind the sentiment block. Then I used a piece of decorative chipboard from the “Halloween in Wonderland” collection to fill a bit more of the space and add some color. A purple striped corner frame sticker completed the design.
I did all of that without adhering anything except for the purple sticker! So what do you do when you have everything arranged just how you want – but nothing is adhered? I grab my phone and just snap a picture like the one above. Then I can take the design apart to glue everything down, and use the photo as a guide to get everything back how I wanted it! It’s just another way we can turn the camera that is always in our pocket into a creative tool.
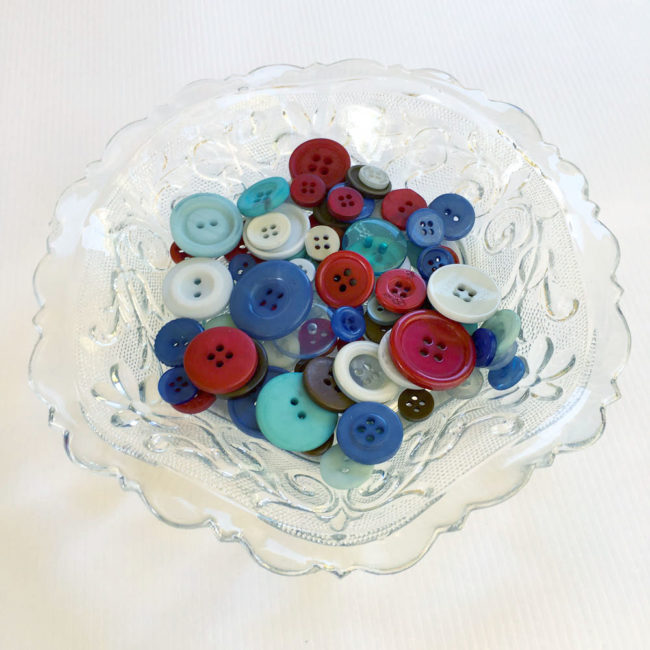
Today we are thrilled to share with you some gorgeous new products for crafting and sewing – six new seasonal and trendy Button Bonanza color mixes!
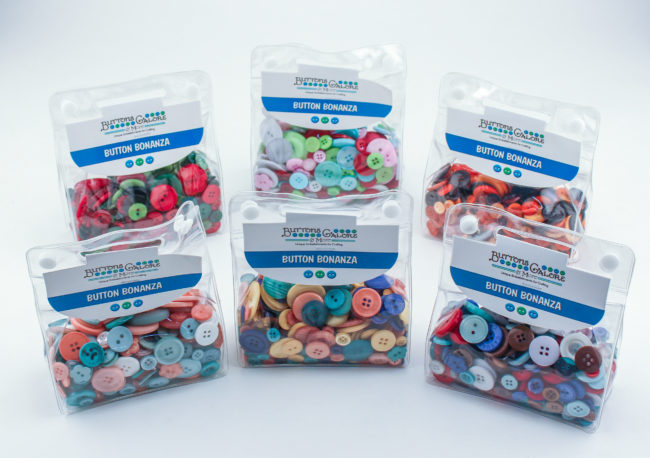
Our six new Button Bonanza totes, available today, include two new trend mixes, a Halloween mix, and three new Christmas and winter holiday mixes! Let’s take a closer look!
First up is Coral Reef, full of beautiful heathered blues and pinks that are reminiscent of this year’s colors of the year. Also, there’s a touch of white for some neutral to pair them with.
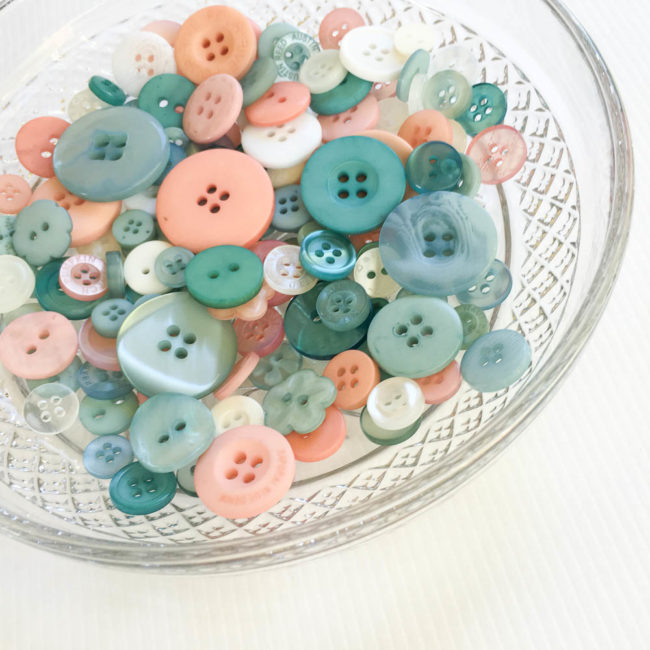
Coral Reef is great for baby projects, of course…but also so much more! These on-trend tones are great for stylish fashion projects, coordinating with many of the latest paper crafting collections, and so much more.
Up next is Glam Girl. This collection combines several very hot color trends into one gorgeous color palette that will make your projects look girly and glamorous! Navy, the neutral of the moment, anchors a palette of yellow, aqua, and rose pink to create Glam Girl. Yellow is THE home decor color at the moment.
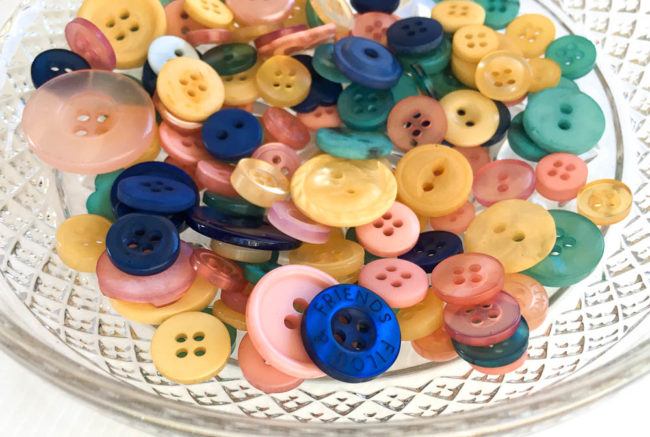
This palette of trend forward colors will work well year-round for all sorts of projects. Glam Girl is especially perfect for quilting, papercrafting, and feminine fall fashion projects!
Now, let’s talk holidays! The weather may still be hot, but cooler days are coming soon and with them the fall holidays. We’ve got the perfect new Button Bonanza for all of your Halloween crafting: Scary! It’s a mix of seasonal orange shades, with some black thrown in for extra scare!
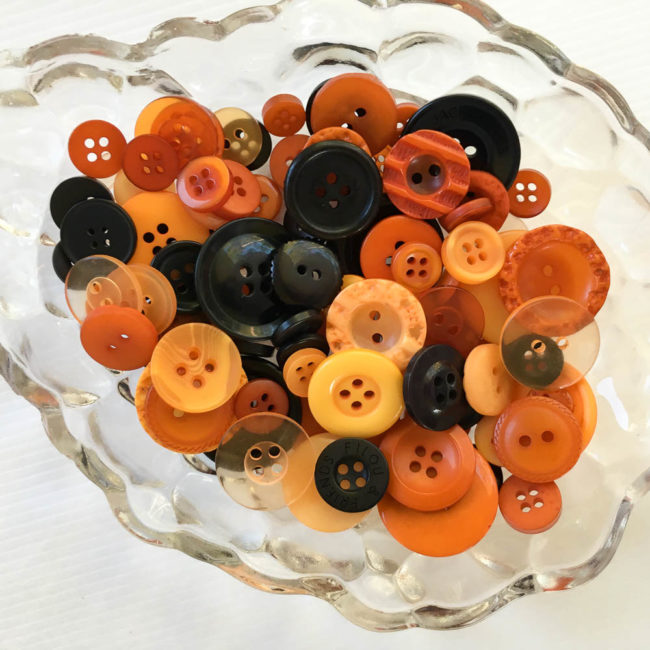
The Scary collection will take you from fall to Halloween to Thanksgiving with a perfect shade of orange for every project. Whether it’s treat bags, table decor, or a scrapbook page of your adorable trick or treater – it’s got to be Scary!
Christmas will also be here before you know it! Our three new Button Bonanzas for Christmas cover a wide range of popular color schemes for winter holidays.
Our Tis the Season Button Bonanza is a classic holiday color scheme – rich reds and deep greens, with a few contrasting lighter green shades to create perfect Christmas greenery!
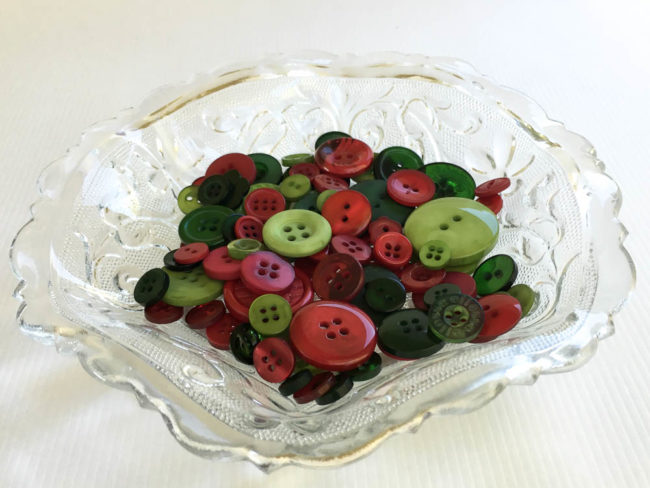
This versatile combination is great for making ornaments & cards, wrapping presents, festive sewing projects…Tis the Season!
Blue, red, and white is also a popular winter color scheme and for fans of that palette, we bring you Winter Wonderland! Two different shades of blue – one light and one dark – paired with deep red and topped off with white and brown neutrals make Winter Wonderland perfect for everything from cute Christmas projects to winter snow scrapbooking!
Winter Wonderland is a really versatile addition to your embellishment collection – when the winter is over, use the red, white and blue buttons for patriotic projects!
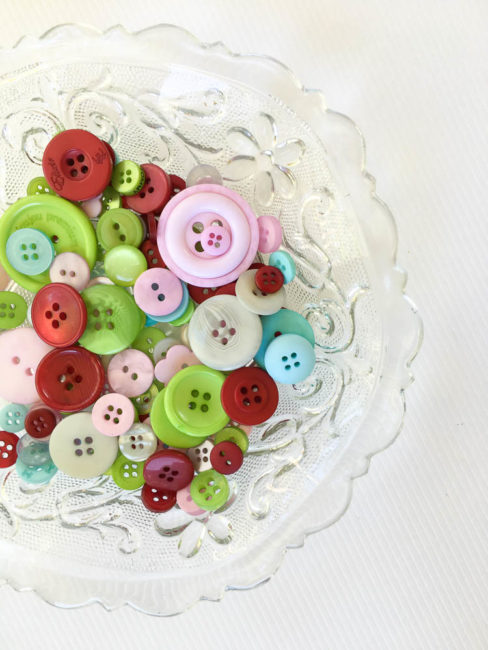
Finally, we have what may be The Merriest collection of all – a mix of pink, pale blue, lime green, and cranberry with white neutral. This fun combination is a great match for kids’ projects and for many of season’s more whimsical papercrafting collections. It’s a lighthearted alternative to the more traditional shades of green and red.
All of these new Button Bonanza products are available today in the Buttons Galore online store (and for wholesale order as well for our retail clients). We can’t wait to see what you all make with them!
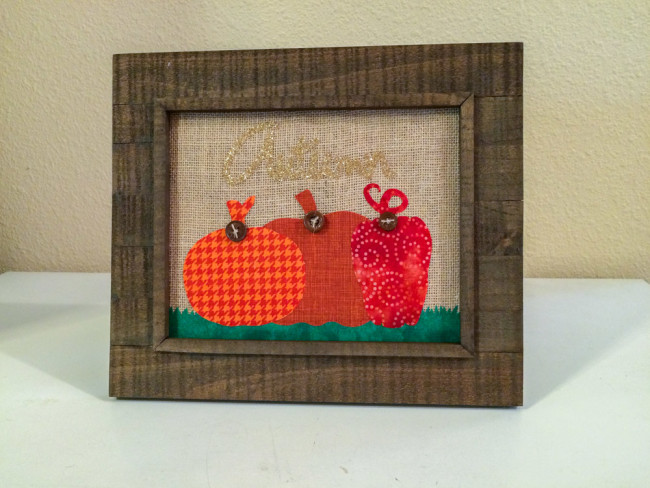
Welcome to our new Holiday Frame series! This is the first in a series where I will be creating interchangeable inserts for a photo frame to provide year round seasonal decoration for any room in your home!
This 8″ x 10″ frame can stay out all year round, and the interchangeable inserts can be easily filed away when the seasons change until it is time to use them again.
Our first design, with the word “Autumn” and pumpkins, can take you through the fall season and both the Halloween and Thanksgiving holidays.

Supplies:
Instructions:
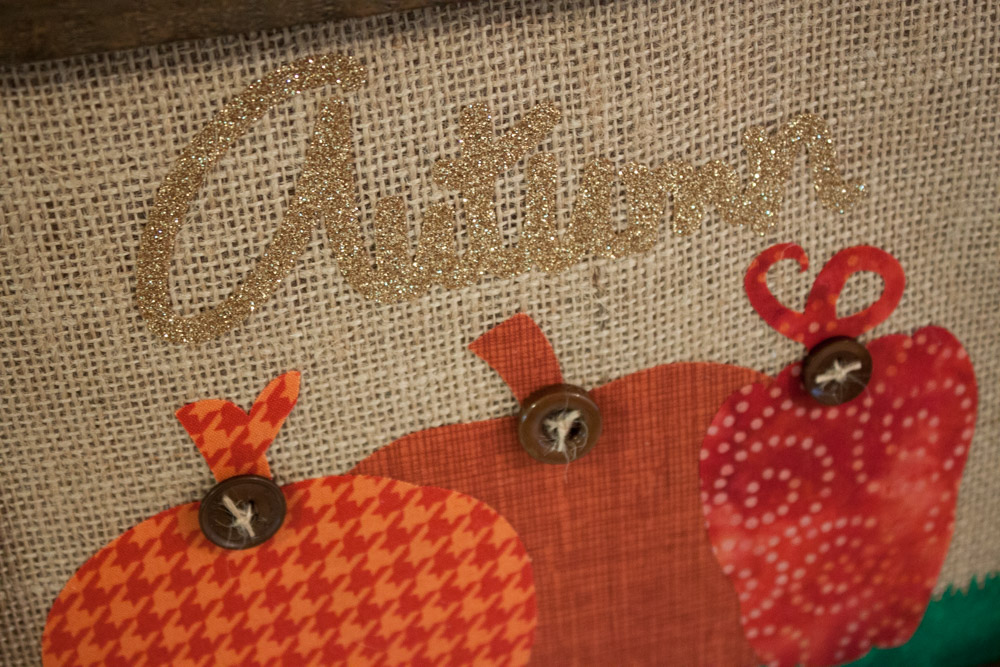 Cut the word “Autumn” from glitter iron-on material.
The buttons provide dimension to the design, as well as providing some brown that ties the design to the frame.
Come back in mid-November for the next installment in the series – for Christmas!
Even though summer is in full swing, Halloween is sneaking up on us (boo!). Today’s project will show you how to use some Halloween products without having to wait for Halloween – and how to kick it up a notch with buttons!
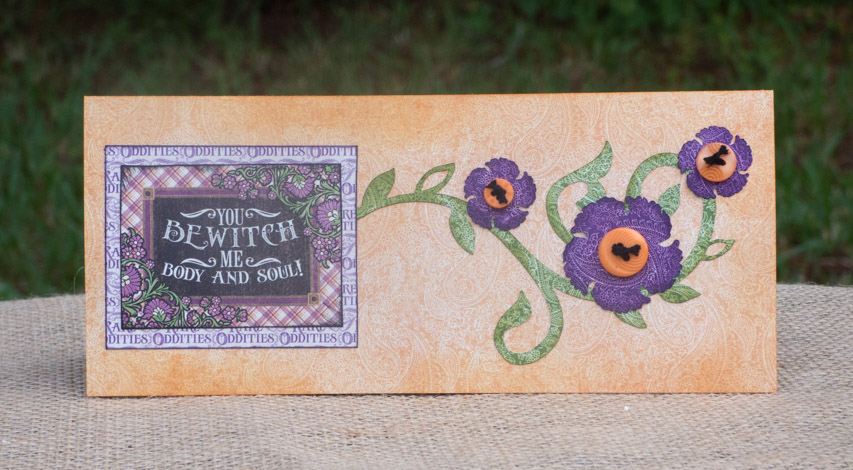
You won’t have to wait until Halloween to give someone this card! With it’s message of love, it can be delivered anytime during the Halloween season.
The buttons are a critical element in this design. They add a pop of color that breaks up the dark purple, but more importantly they add dimension to a design that would otherwise be entirely flat.
Supplies:
1. Cut a 3.5″ by 8″ piece of background paper for the card base. Ink edges. (While this is a non-standard card size, it will fill in a standard business sized envelope.)
2. Use die cut machine to cut out vine and flowers. Ink edges of all pieces.
3. Cut sentiment block from patterned paper. Ink edges and mat on patterned paper.
4. Adhere all pieces to background.
5. Sew thread through buttons and tie off. Adhere buttons on the center of the flowers.
6. Cut an 8″ x 7″ piece of cream cardstock to use as cardbase and fold. Adhere card front to base.
Who would you like to send a bewitching message of Halloween love to this season?
A whole year has gone by! Wow. It seems like yesterday when I was making this spider for the 2013 Halloween Popcorn Box Blog Hop!
Well, it’s here again and I am loving this little box that I created as a pumpkin filled with….BUTTONS!
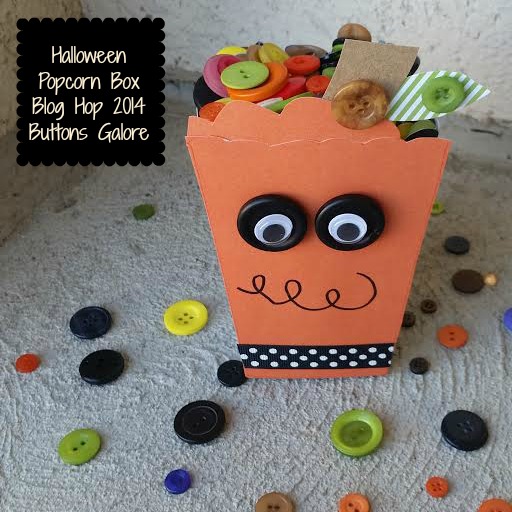
There are LOTS Of great creative inspiring projects this year!
And you can enter to win a fabulous prize too! a Rafflecopter giveaway
Buttons Make Everything Funner,
Laura
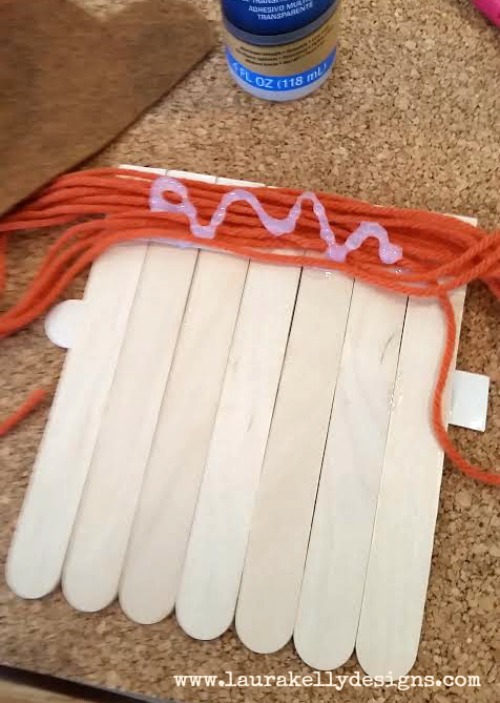
Check out this awesome project for the changing of the seasons! Creating crafty decorations with kids is so super fun and this is a great one for just that! This is especially awesome because it can be done in 15 minutes and left to dry which makes it perfect for a school or party activity.
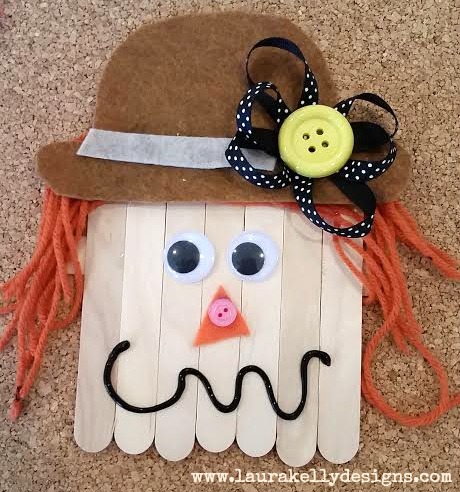
You will need popsicle sticks, glue, yarn, felt, buttons and google eyes (or whatever fun crafty things you have around the house).
Glue your sticks together to create a scarecrow head and let them dry.
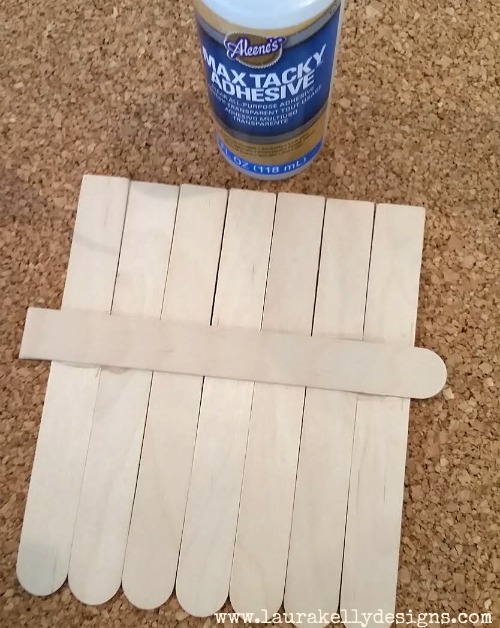
Then add your decorations with glue and let dry before you use it as a decoration.
That’s all! HAPPY Fall Y’all!
Laura
Now this Friendly Frankenstein made from a paint chip is so adorable and so simple. This little guy would be fun for a party decoration, a door decoration or to stick in an envelope and mail to a pal.

You will only need a few things to make this green dude!
1. Buttons (Outrageous Orange and Black Beauty)
2. Paint Chips (Green and Brown)
3. Glue Dots
4. Sharpie Marker
5. Magnet
6. 2 Metal Bobbins
Use Glue Dots to add Outrageous Orange buttons across the top of the paint chip to create a hairline. Then cut two little strips from another color of paint chip to stick out of the sides of his head and add the bobbins. Draw a stitched wound and a creepy smile on the paint chip with Sharpie then add Black Beauty buttons to make it pop. If you want it to be magnetic, flip it over and add buttons to the backside, putting them strategically on the parts that are the heaviest.

He is so fun and so simple. You could also make a ghost from a white paint chip using just Black Beauty buttons and the Sharpie marker.

On my blog today, I am sharing the tutorial to make Frank some Jack-O friends. Hop over and check it out, if you dare!
Happy Creating Fall Magic,
Laura
Lots Trick-or-Treaters will visit our house during Halloween and I like to give special treats to a few of my kids friends that come by. Something special and fun like these Spooky Button Eye Treat Bags.
Kids could easily make these spooky treat bags for there friends too.

Like Me on Facebook!
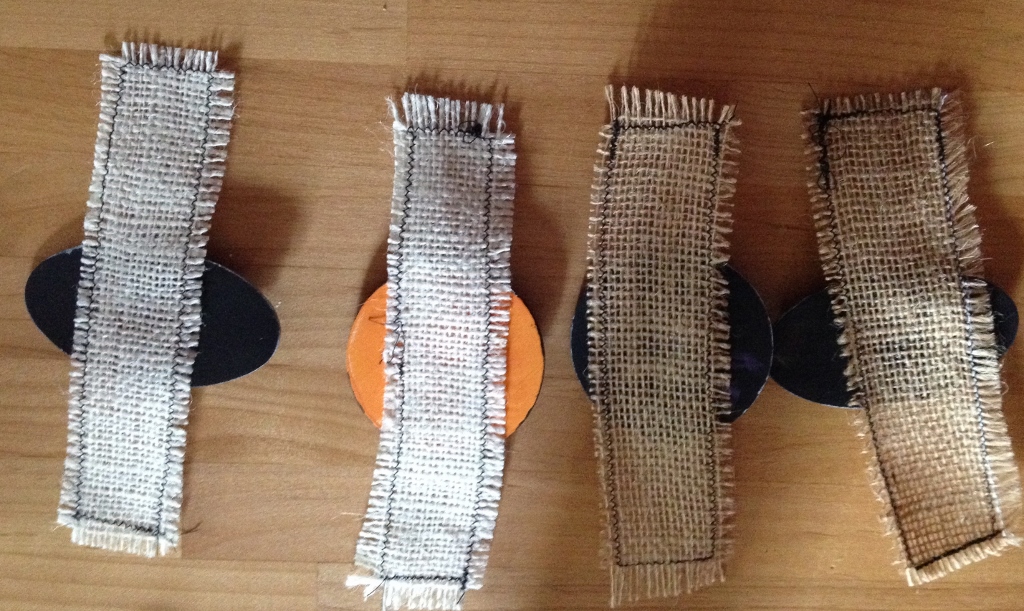
 Looking to create some fun for this Halloween for your spooky table decor? These Halloween Napkin Rings using Novelty and various flat backed buttons from Buttons Galore and More are as much fun to make as they are to enjoy. With details such as paint, burlap and stamped sentiments, you will love the detail of these Halloween Napkin Rings.
Buttons Galore and More Halloween Novelty Buttons
Laura Kelly Hand Dyed Buttons in colors of your choice
Various unfinished wood shapes of your choice
DecoArt Americana Acrylics in Lamp Black, Pumpkin, Olive Green, Grape Juice and Snow White
Scraps of burlap
Tiny alphabet stamps and ink
Beacon Adhesives Premium Tacky Glue
Buttons Galore and More Shank Remover
Paint brushes, sewing machine and thread, scissors
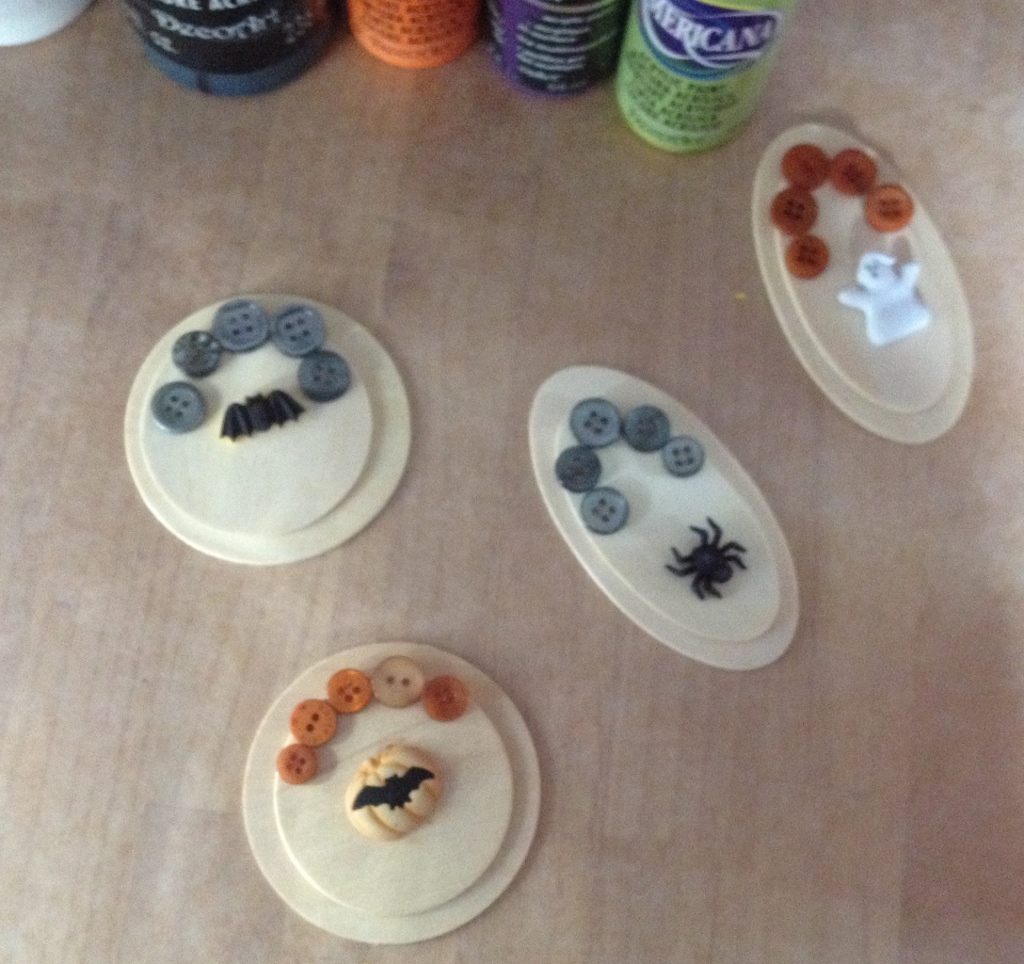 To create your own Halloween Napkin Rings, use the Button Shank Remover to remove the shank from the novelty buttons so that the novelty button lays flat on the wood. Lay out the design, layering the wood shapes and arranging the buttons on the shapes to decide on your design.
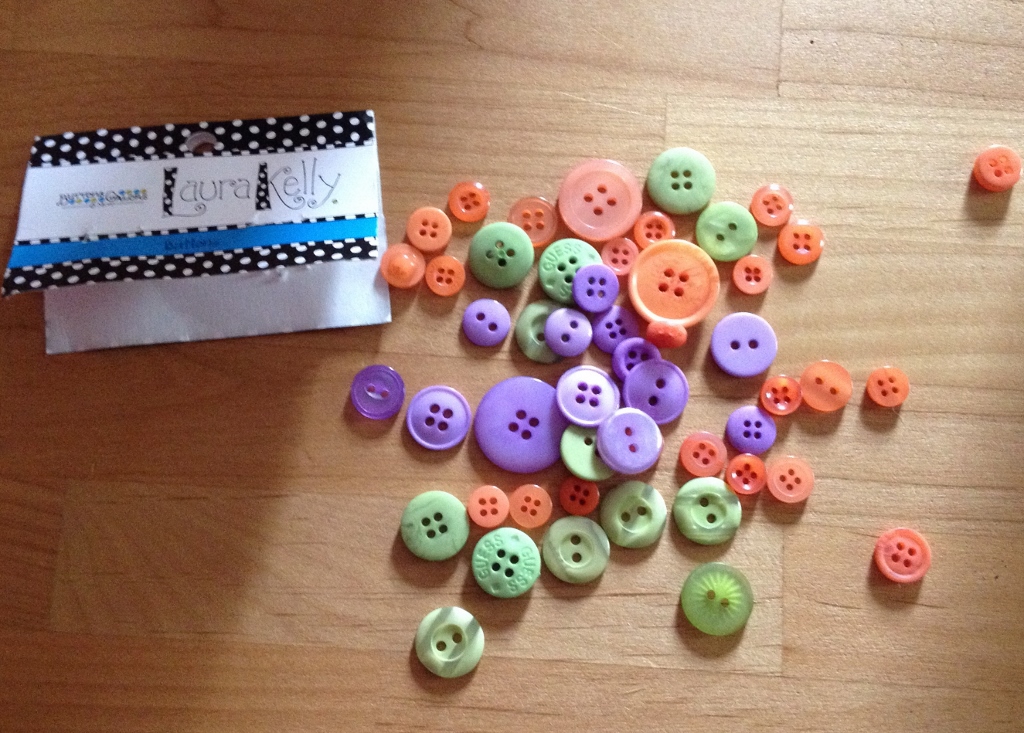
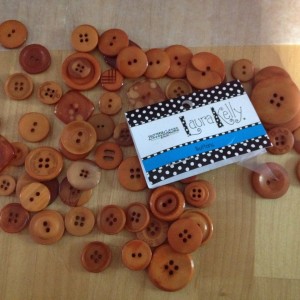 For my Halloween Napkin Rings, I used Laura Kelly hand dyed buttons in Smoke and Outrageous Orange.
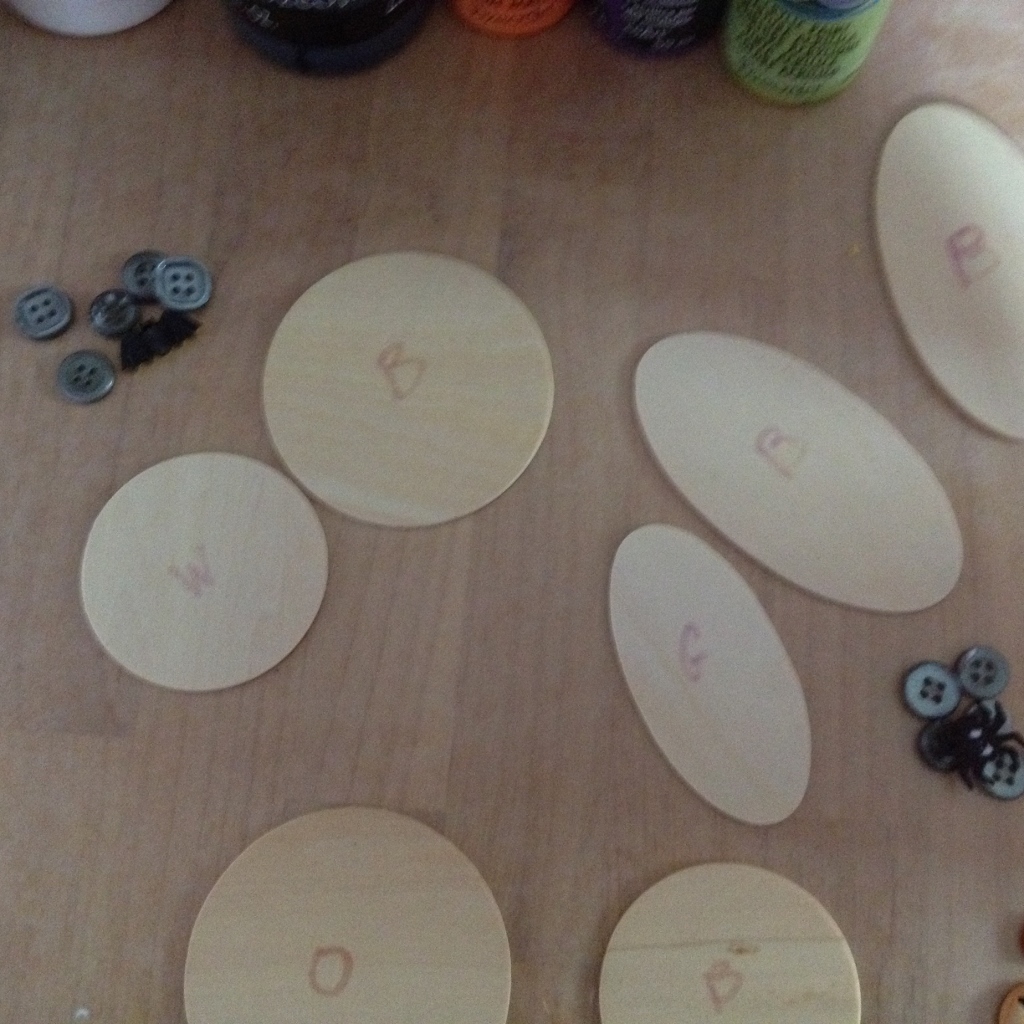 Since you will be working with so many shapes and colors, it is helpful to label your shapes with the first initial so you will know what color to paint it.
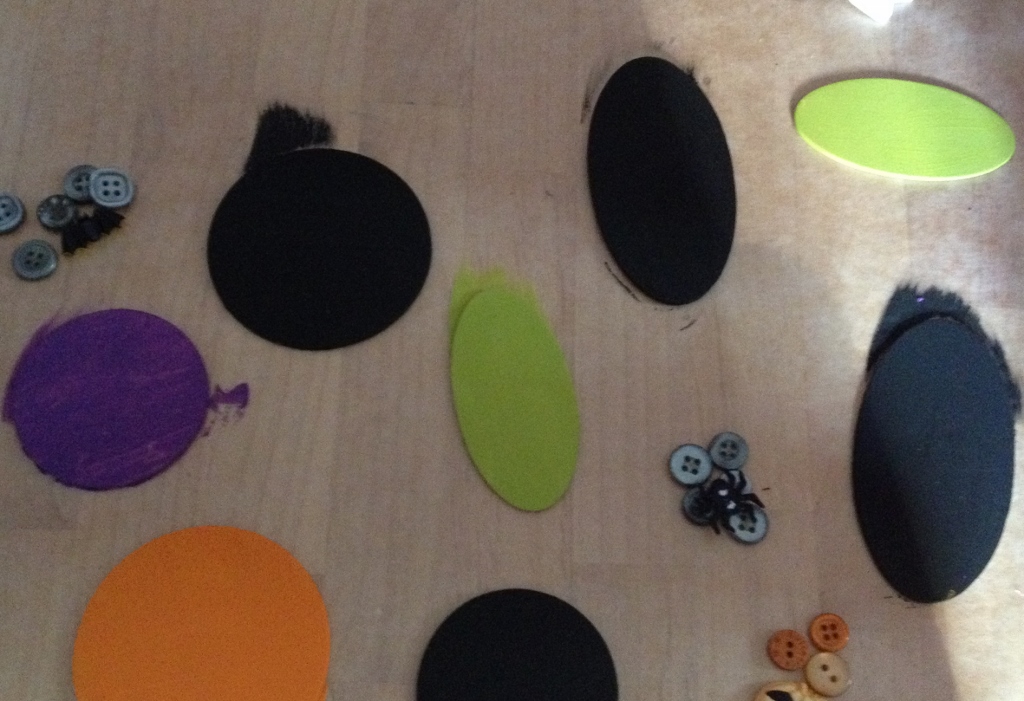 Paint your shapes front and back, using two coats.
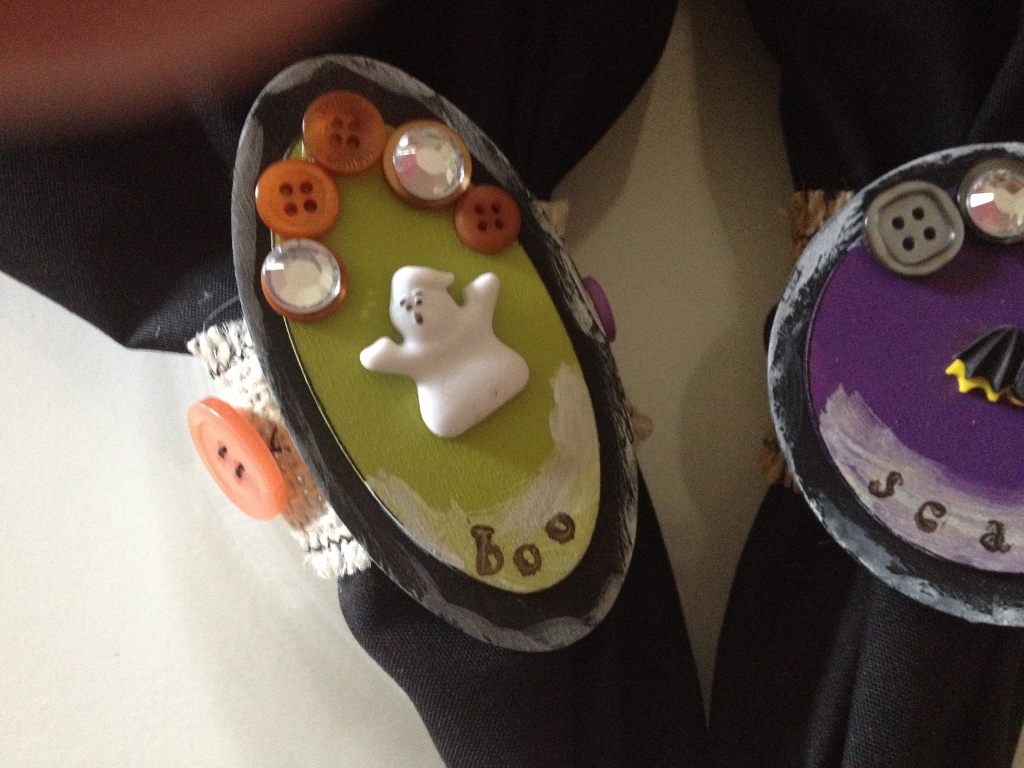
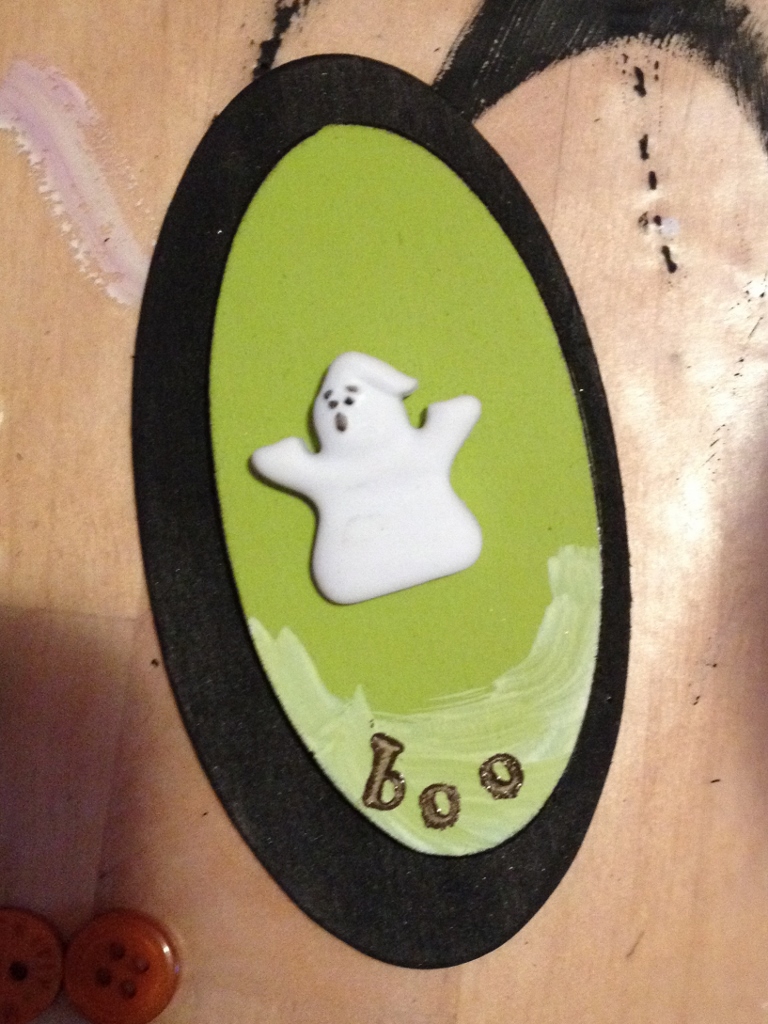 Layer your shapes and glue them together. Dry brush white paint on the bottom of the top shape. Use the alphabet stamps and ink to stamp the shapes. Glue the novelty button to the center of the shape.
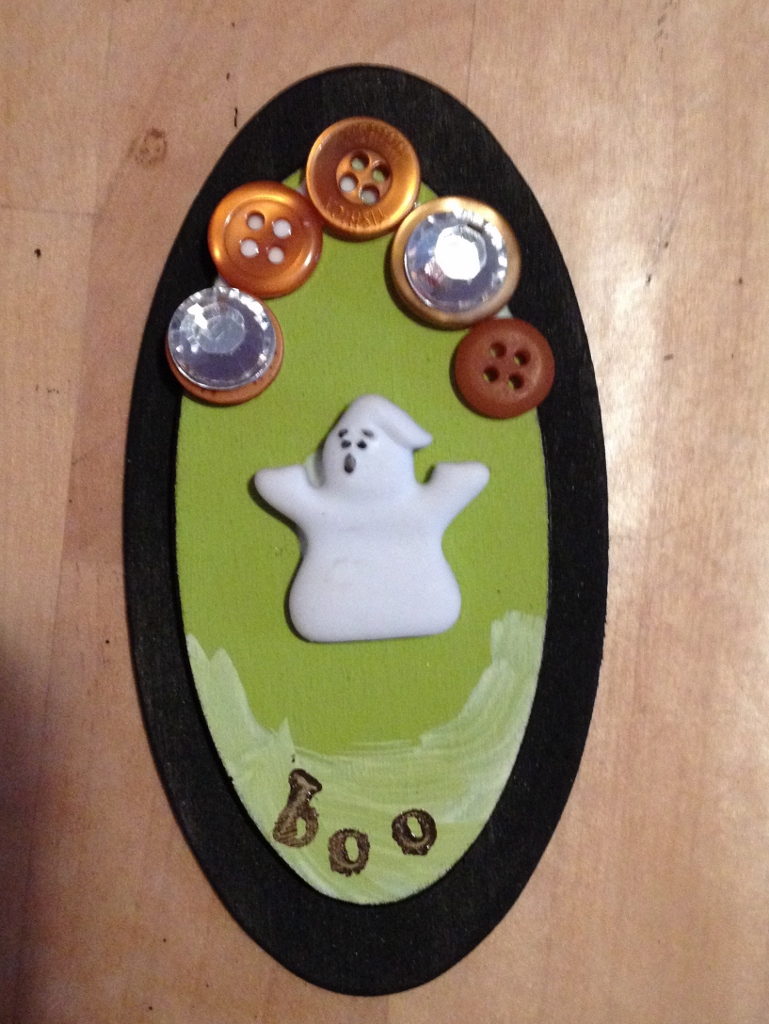 I also added some 9mm acrylic rhinestones to some of the buttons.
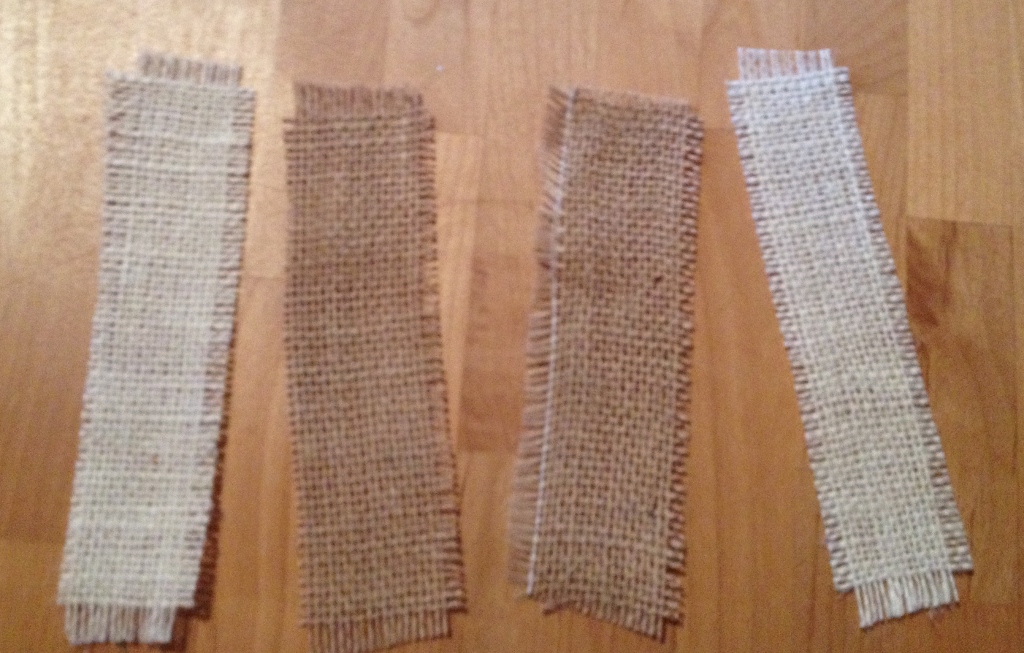 Cut some burlap into strips and use the sewing machine, thread and a zig zag stitch to sew the edges of the strips to prevent fraying.
Glue the shapes to the center of each burlap strip and let dry.
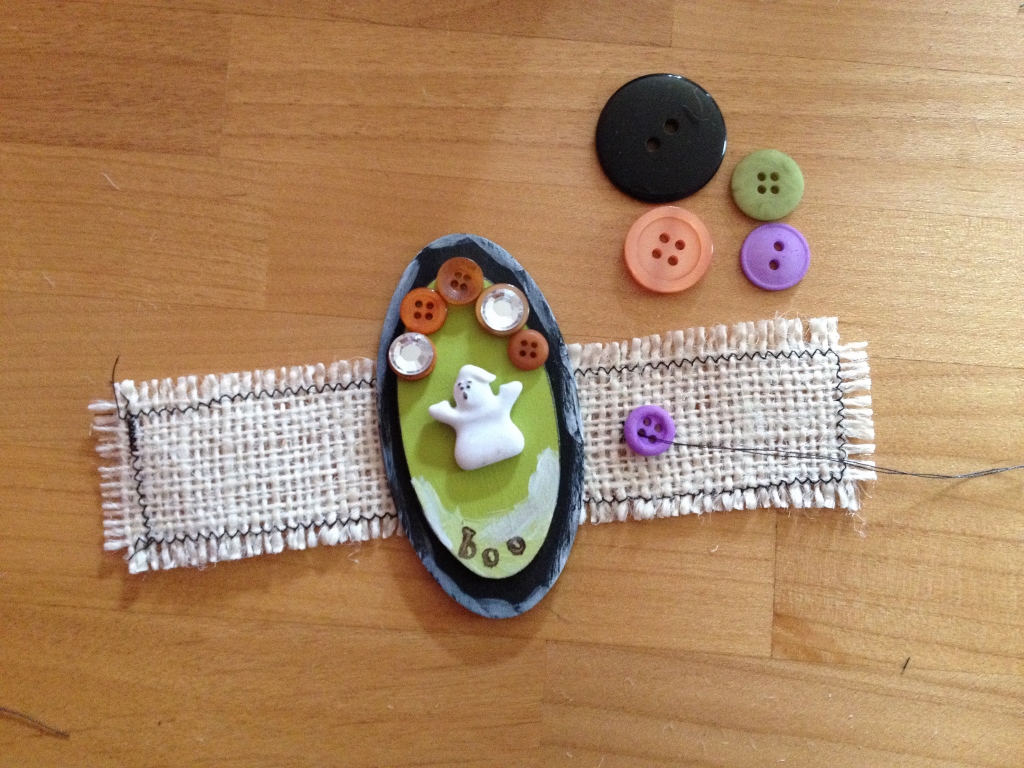 Sew buttons onto the burlap strips. I used orange, purple, green and black from the Laura Kelly Hand Dyed Buttons collection.
Once you sew on the buttons, use the center button to sew closed the burlap strip, creating a napkin ring.
 Create a set of these Halloween Napkin Rings to adorn a scary table setting using buttons!
 Live Life Creatively,
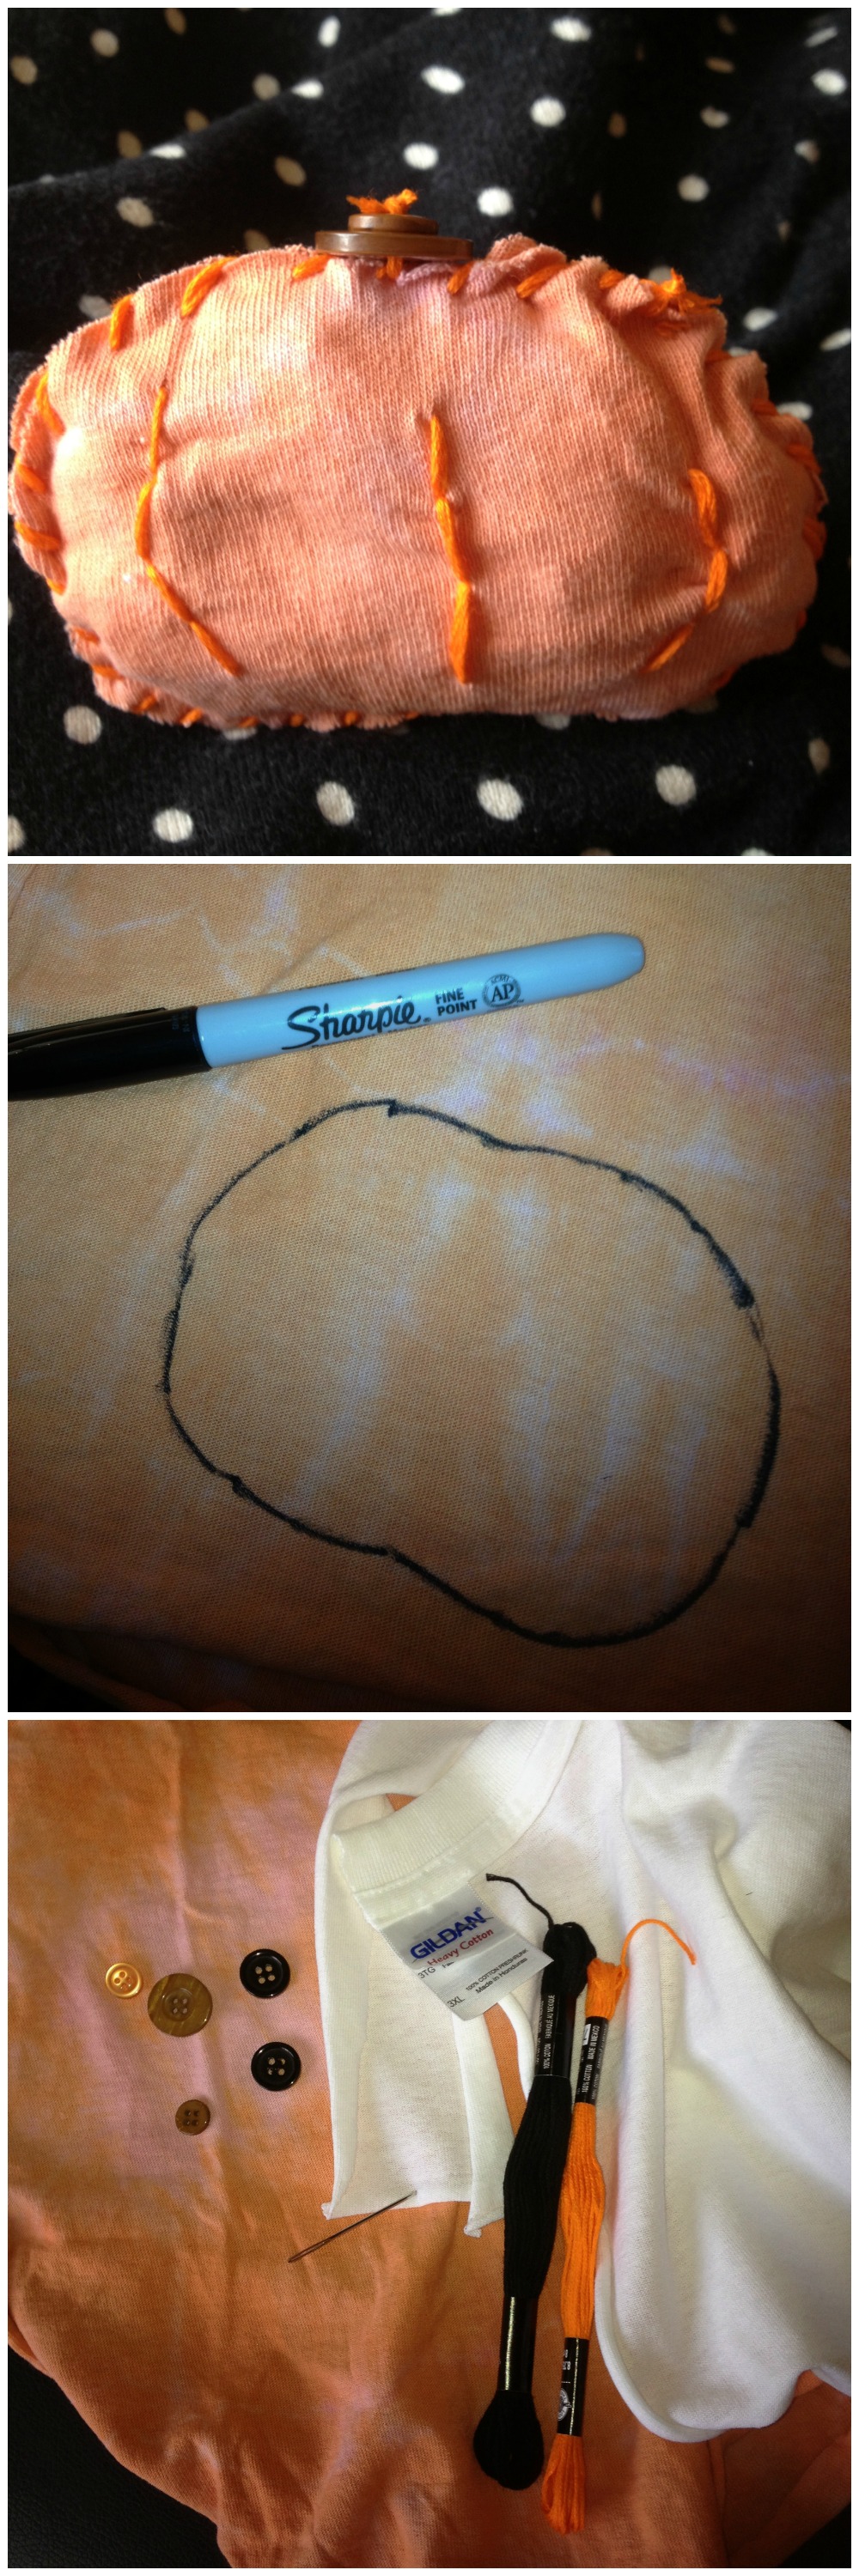
Last week we made autumn scarves out of t-shirts (that we stole from Daddy’s drawer) using Rit Dye and we had a bunch of leftover scraps. Not being able to bear throwing away such beautifully dyed fabric, I decided to stitch up a DIY pumpkin and see how it would turn out for Halloween decor. It took less than 15 minutes and I think it is quite adorable and will make for some fun decorating.
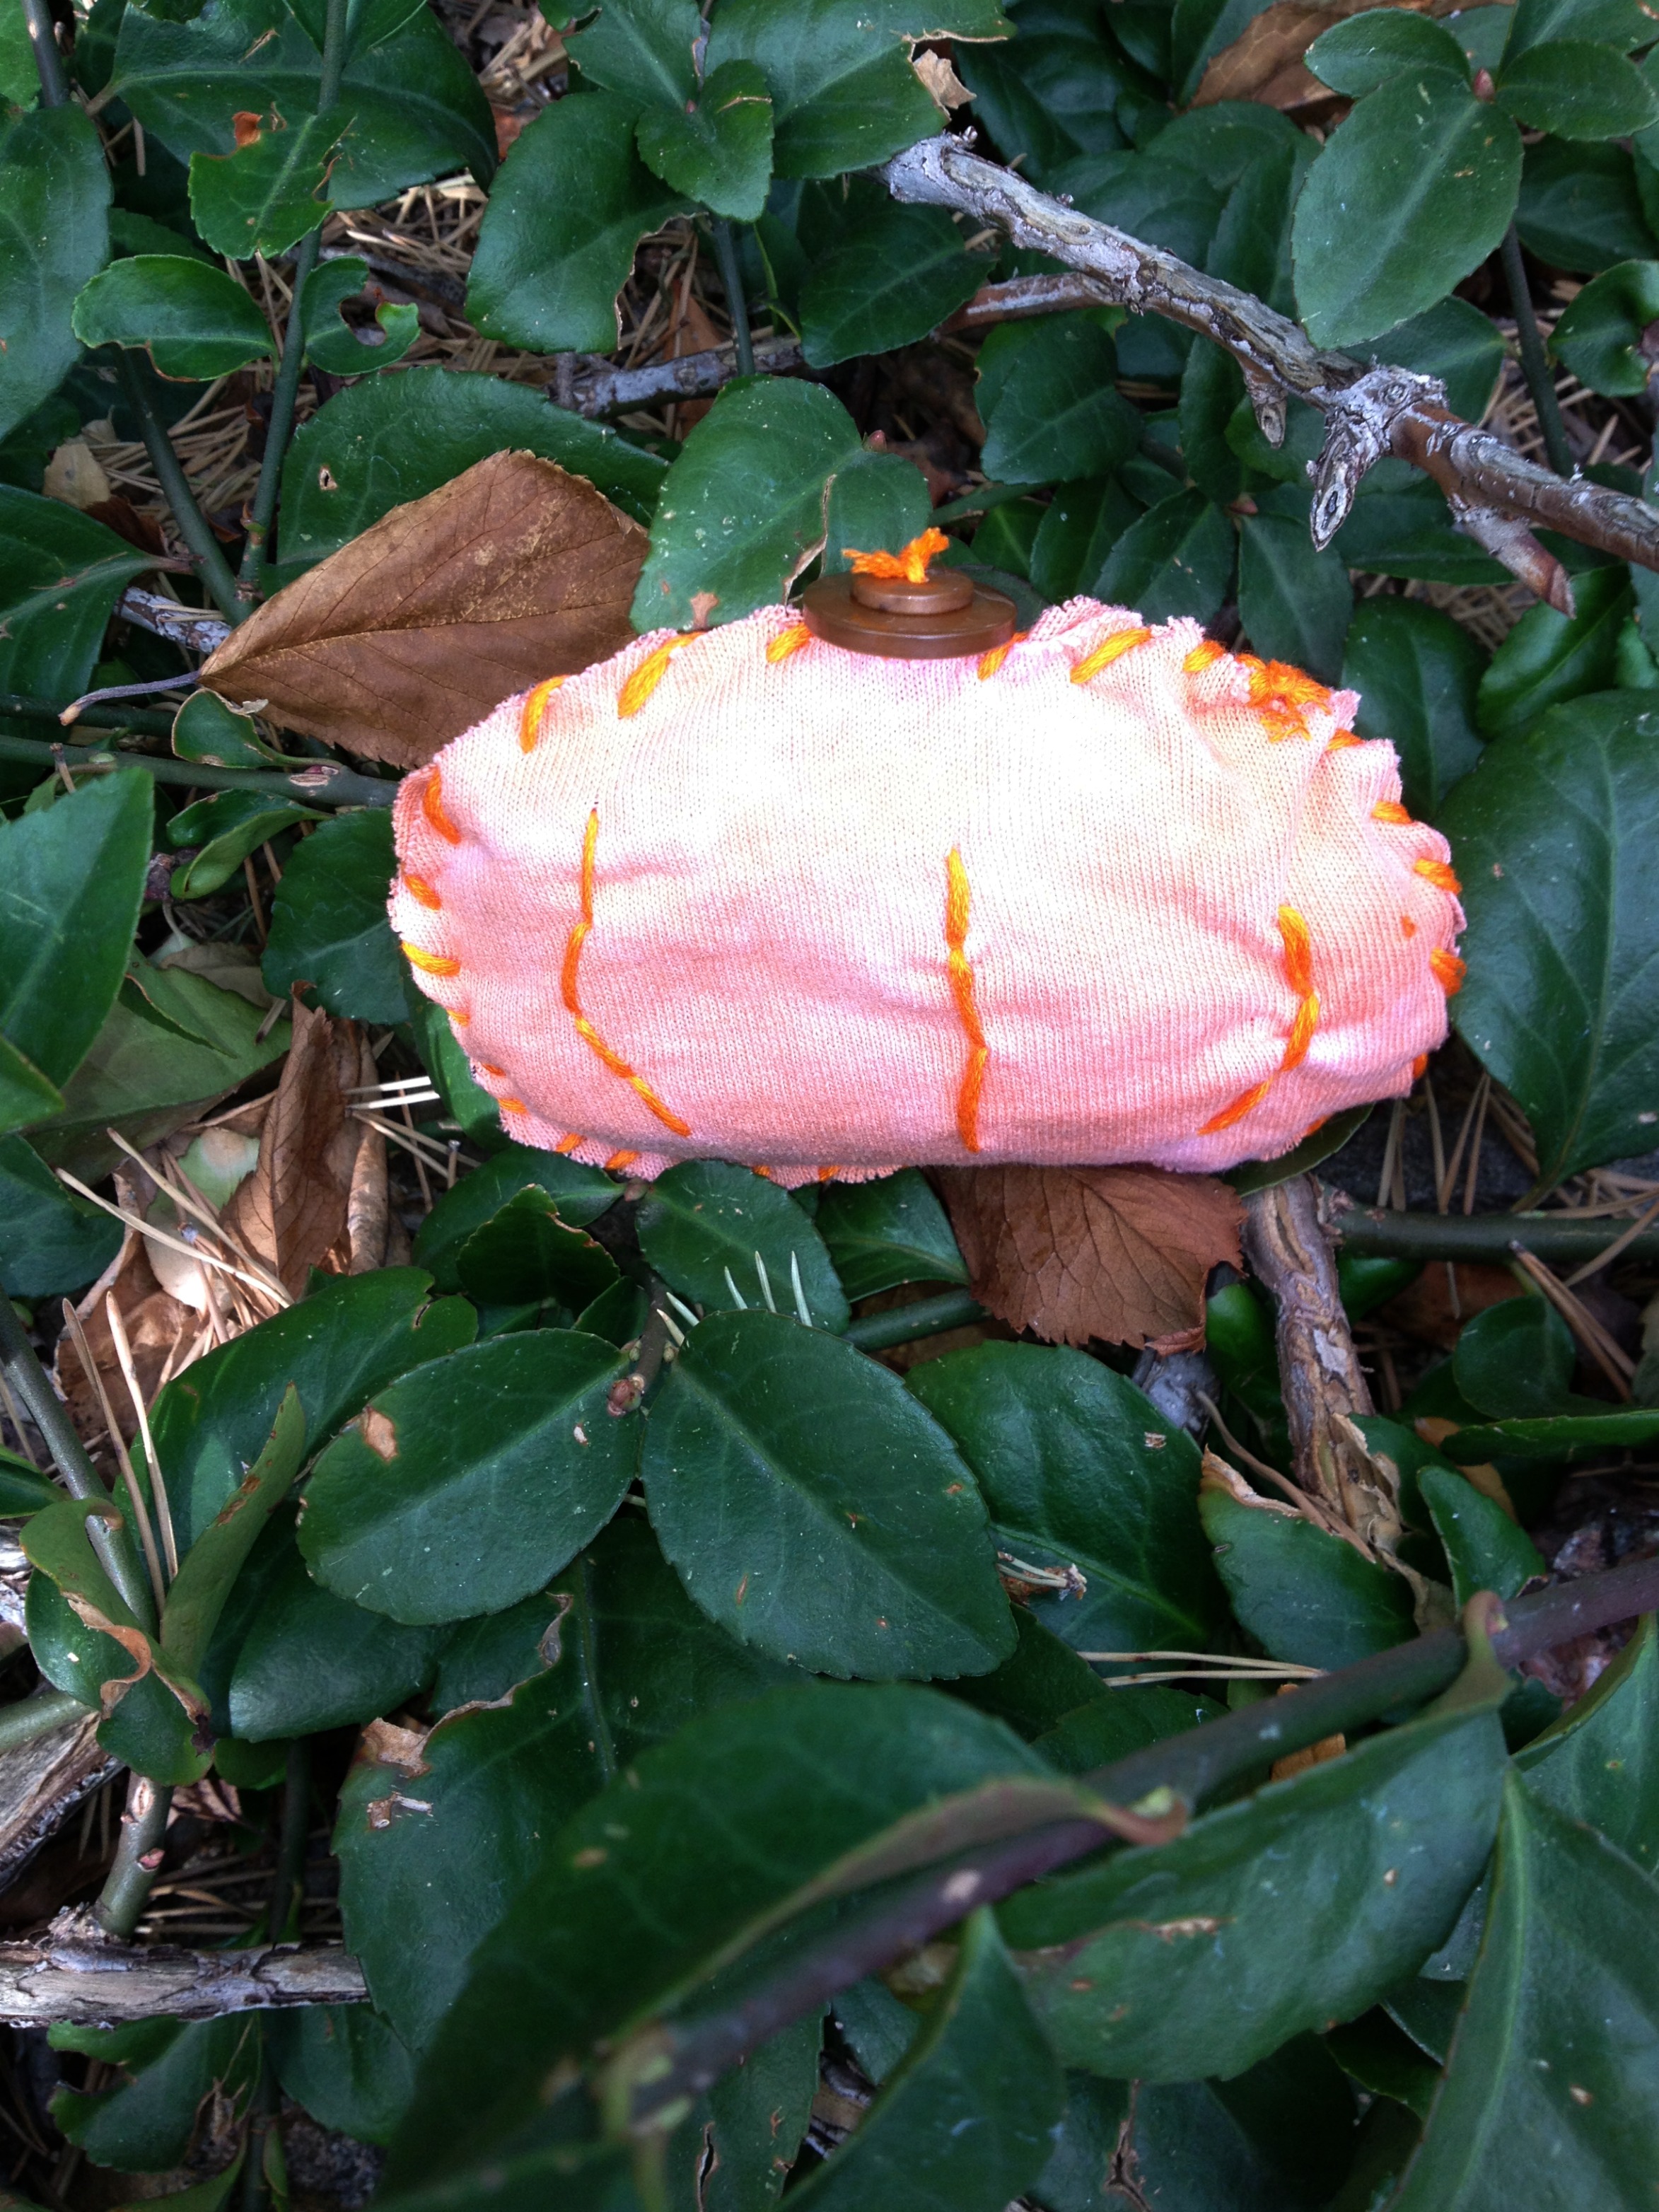
I matched up the fabric and drew on the top the shape of a little pumpkin. Then I cut the shapes out at the same time so they would match up for stitching. I stitched around the outside and stuffed the guts with a grocery bag. I love to use recycled items when I am crafting. I stitched on a two button stem (using Laura Kelly Bold Brown buttons) which I think really puts the mini decor into the “cute as a button” category. Now I want to make about 5 more because they look like they are growing on the vines when I put them outdoors.
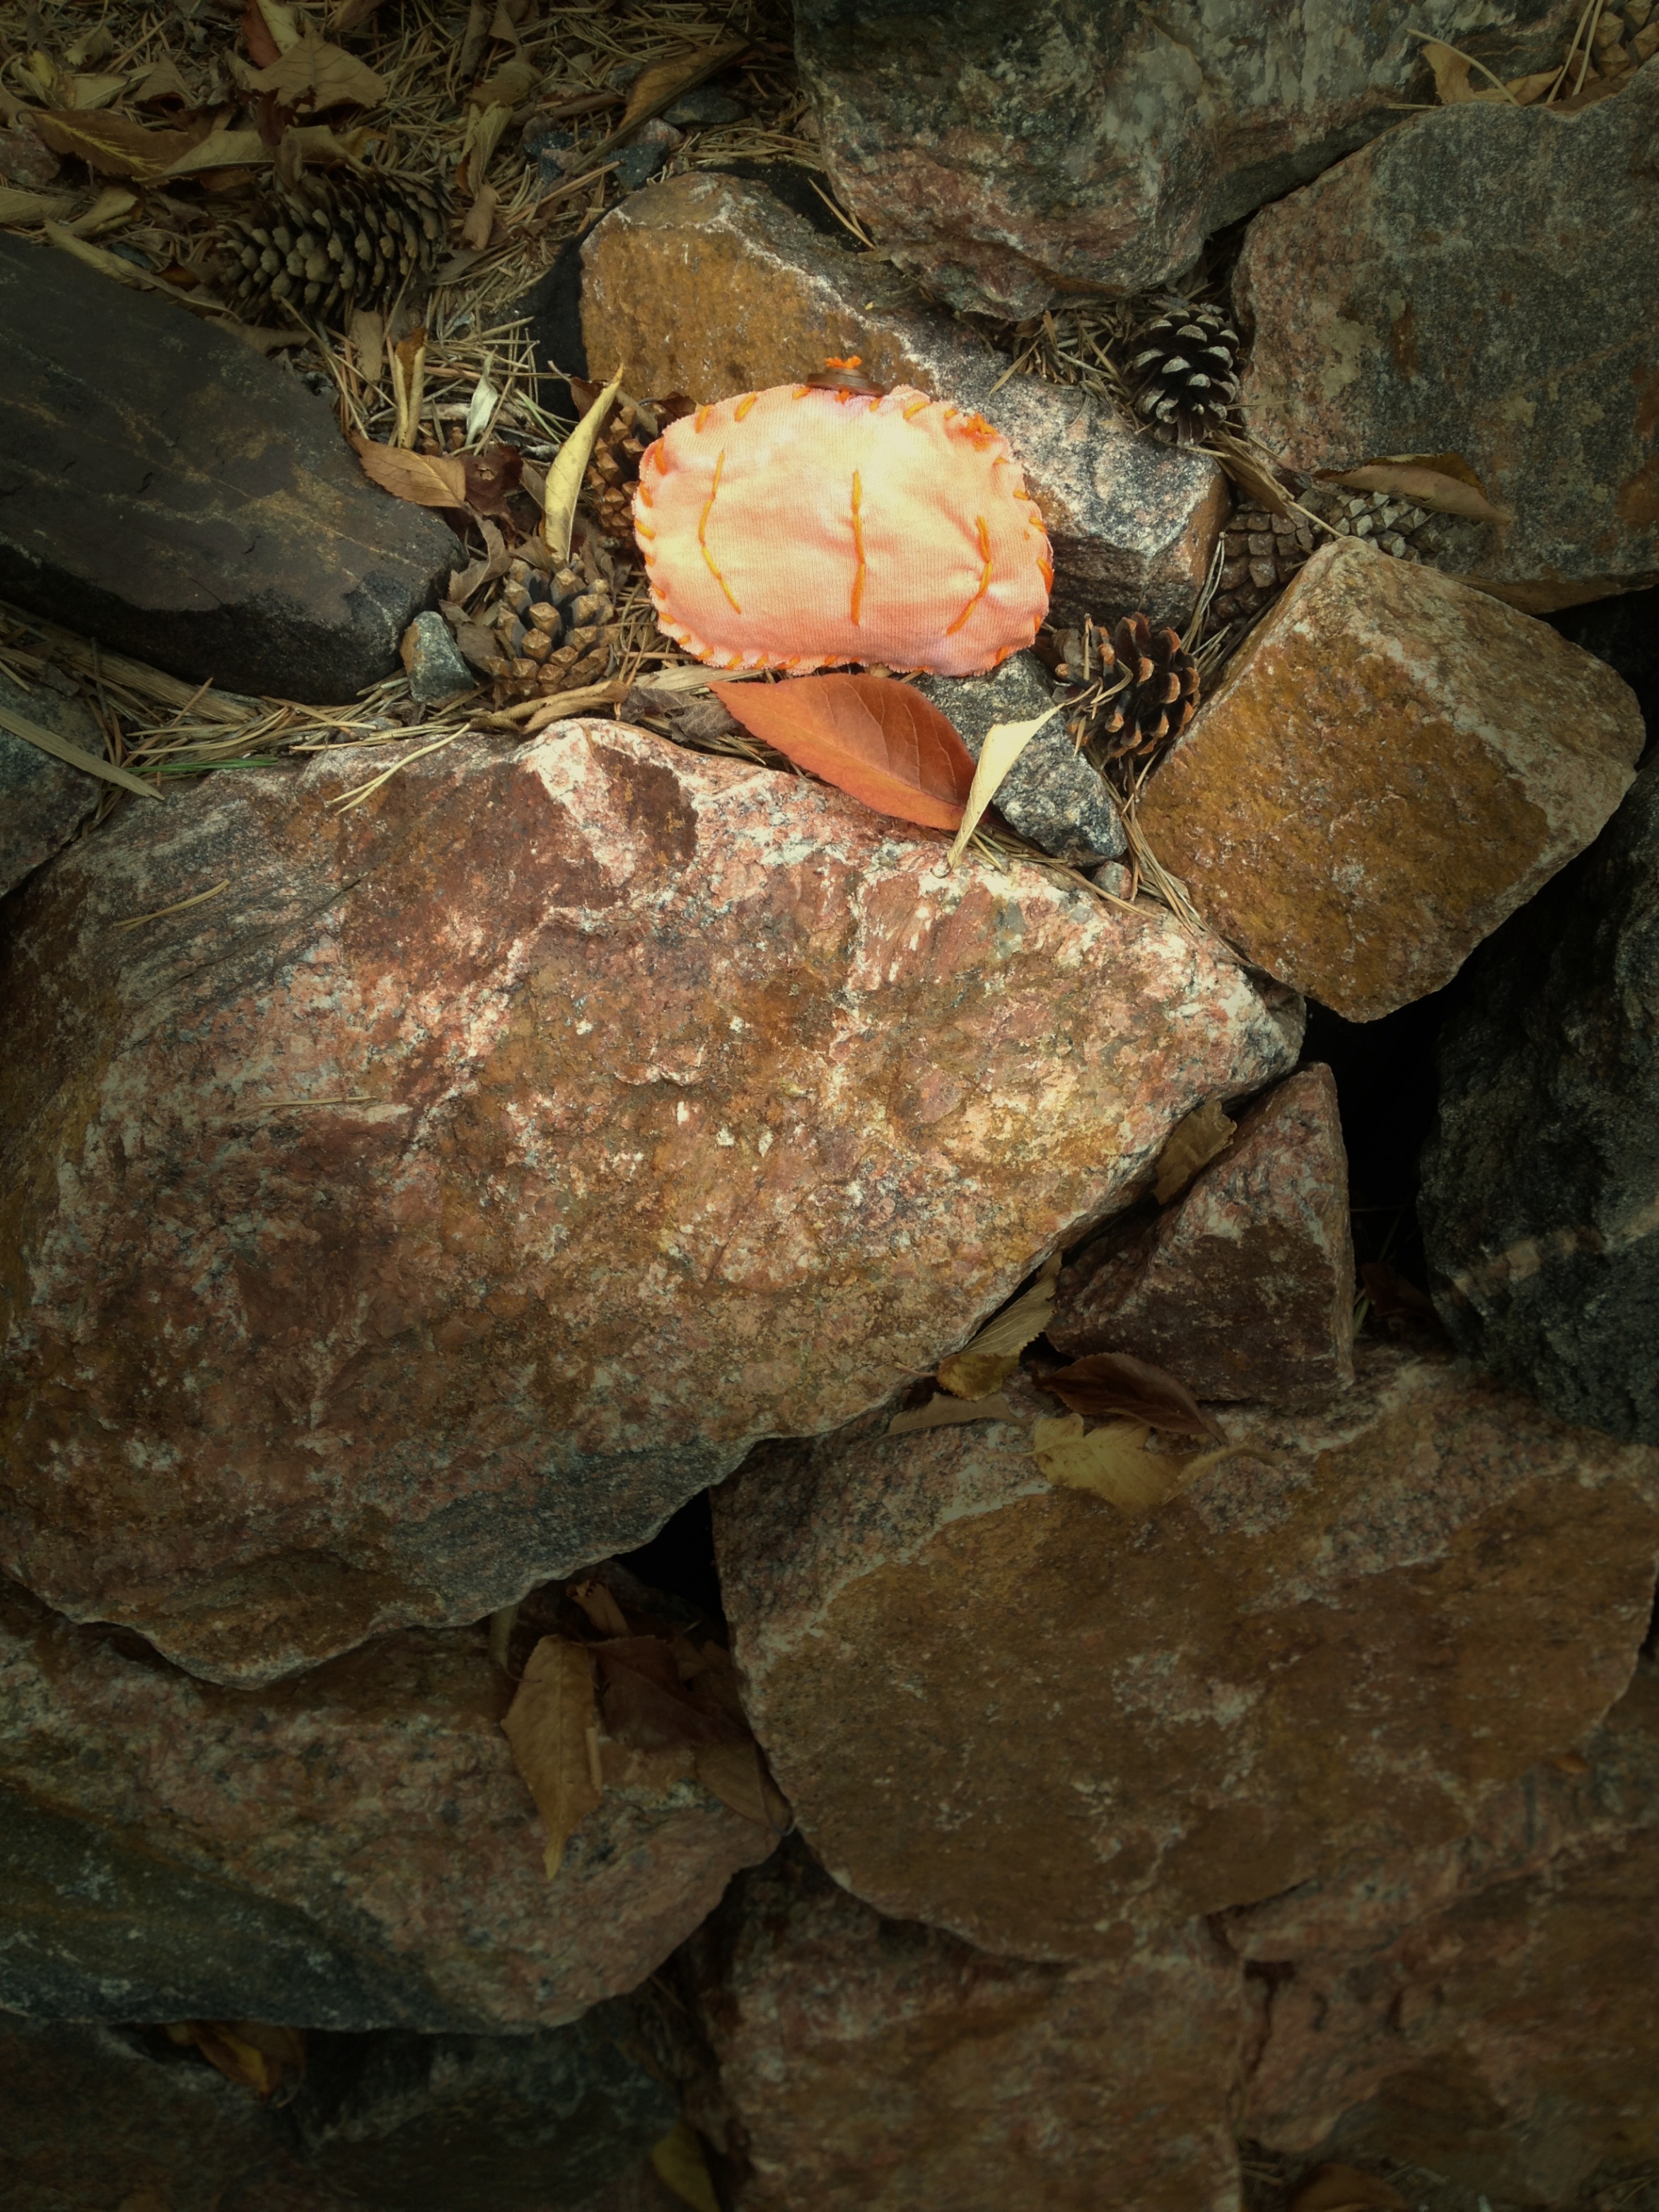
I also really like the way it looks outside on the fairy wall in the back yard. Maybe I will spray it with the stuff I use to waterproof my boots and leave it out to see how long it makes it in the weather. I think that a bunch of them around the fairy wall would be really fun and magical over the next few weeks.
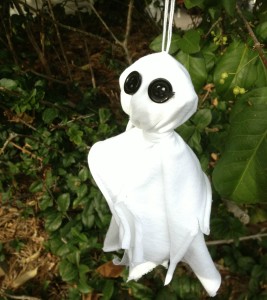
I used the white scraps from the t-shirts too to make…a ghost of course. I am sharing that project on my blog today.
Happy Fifteen MINUTE Crafting,
Laura
Bats are definitely not cute in my opinion but Button Bats are! Especially when there made “spooky cute” using Buttons Galore Haberdashery Buttons.
These bats are simple to make and can be a fun addition to any Halloween decor.


Like Me on Facebook!
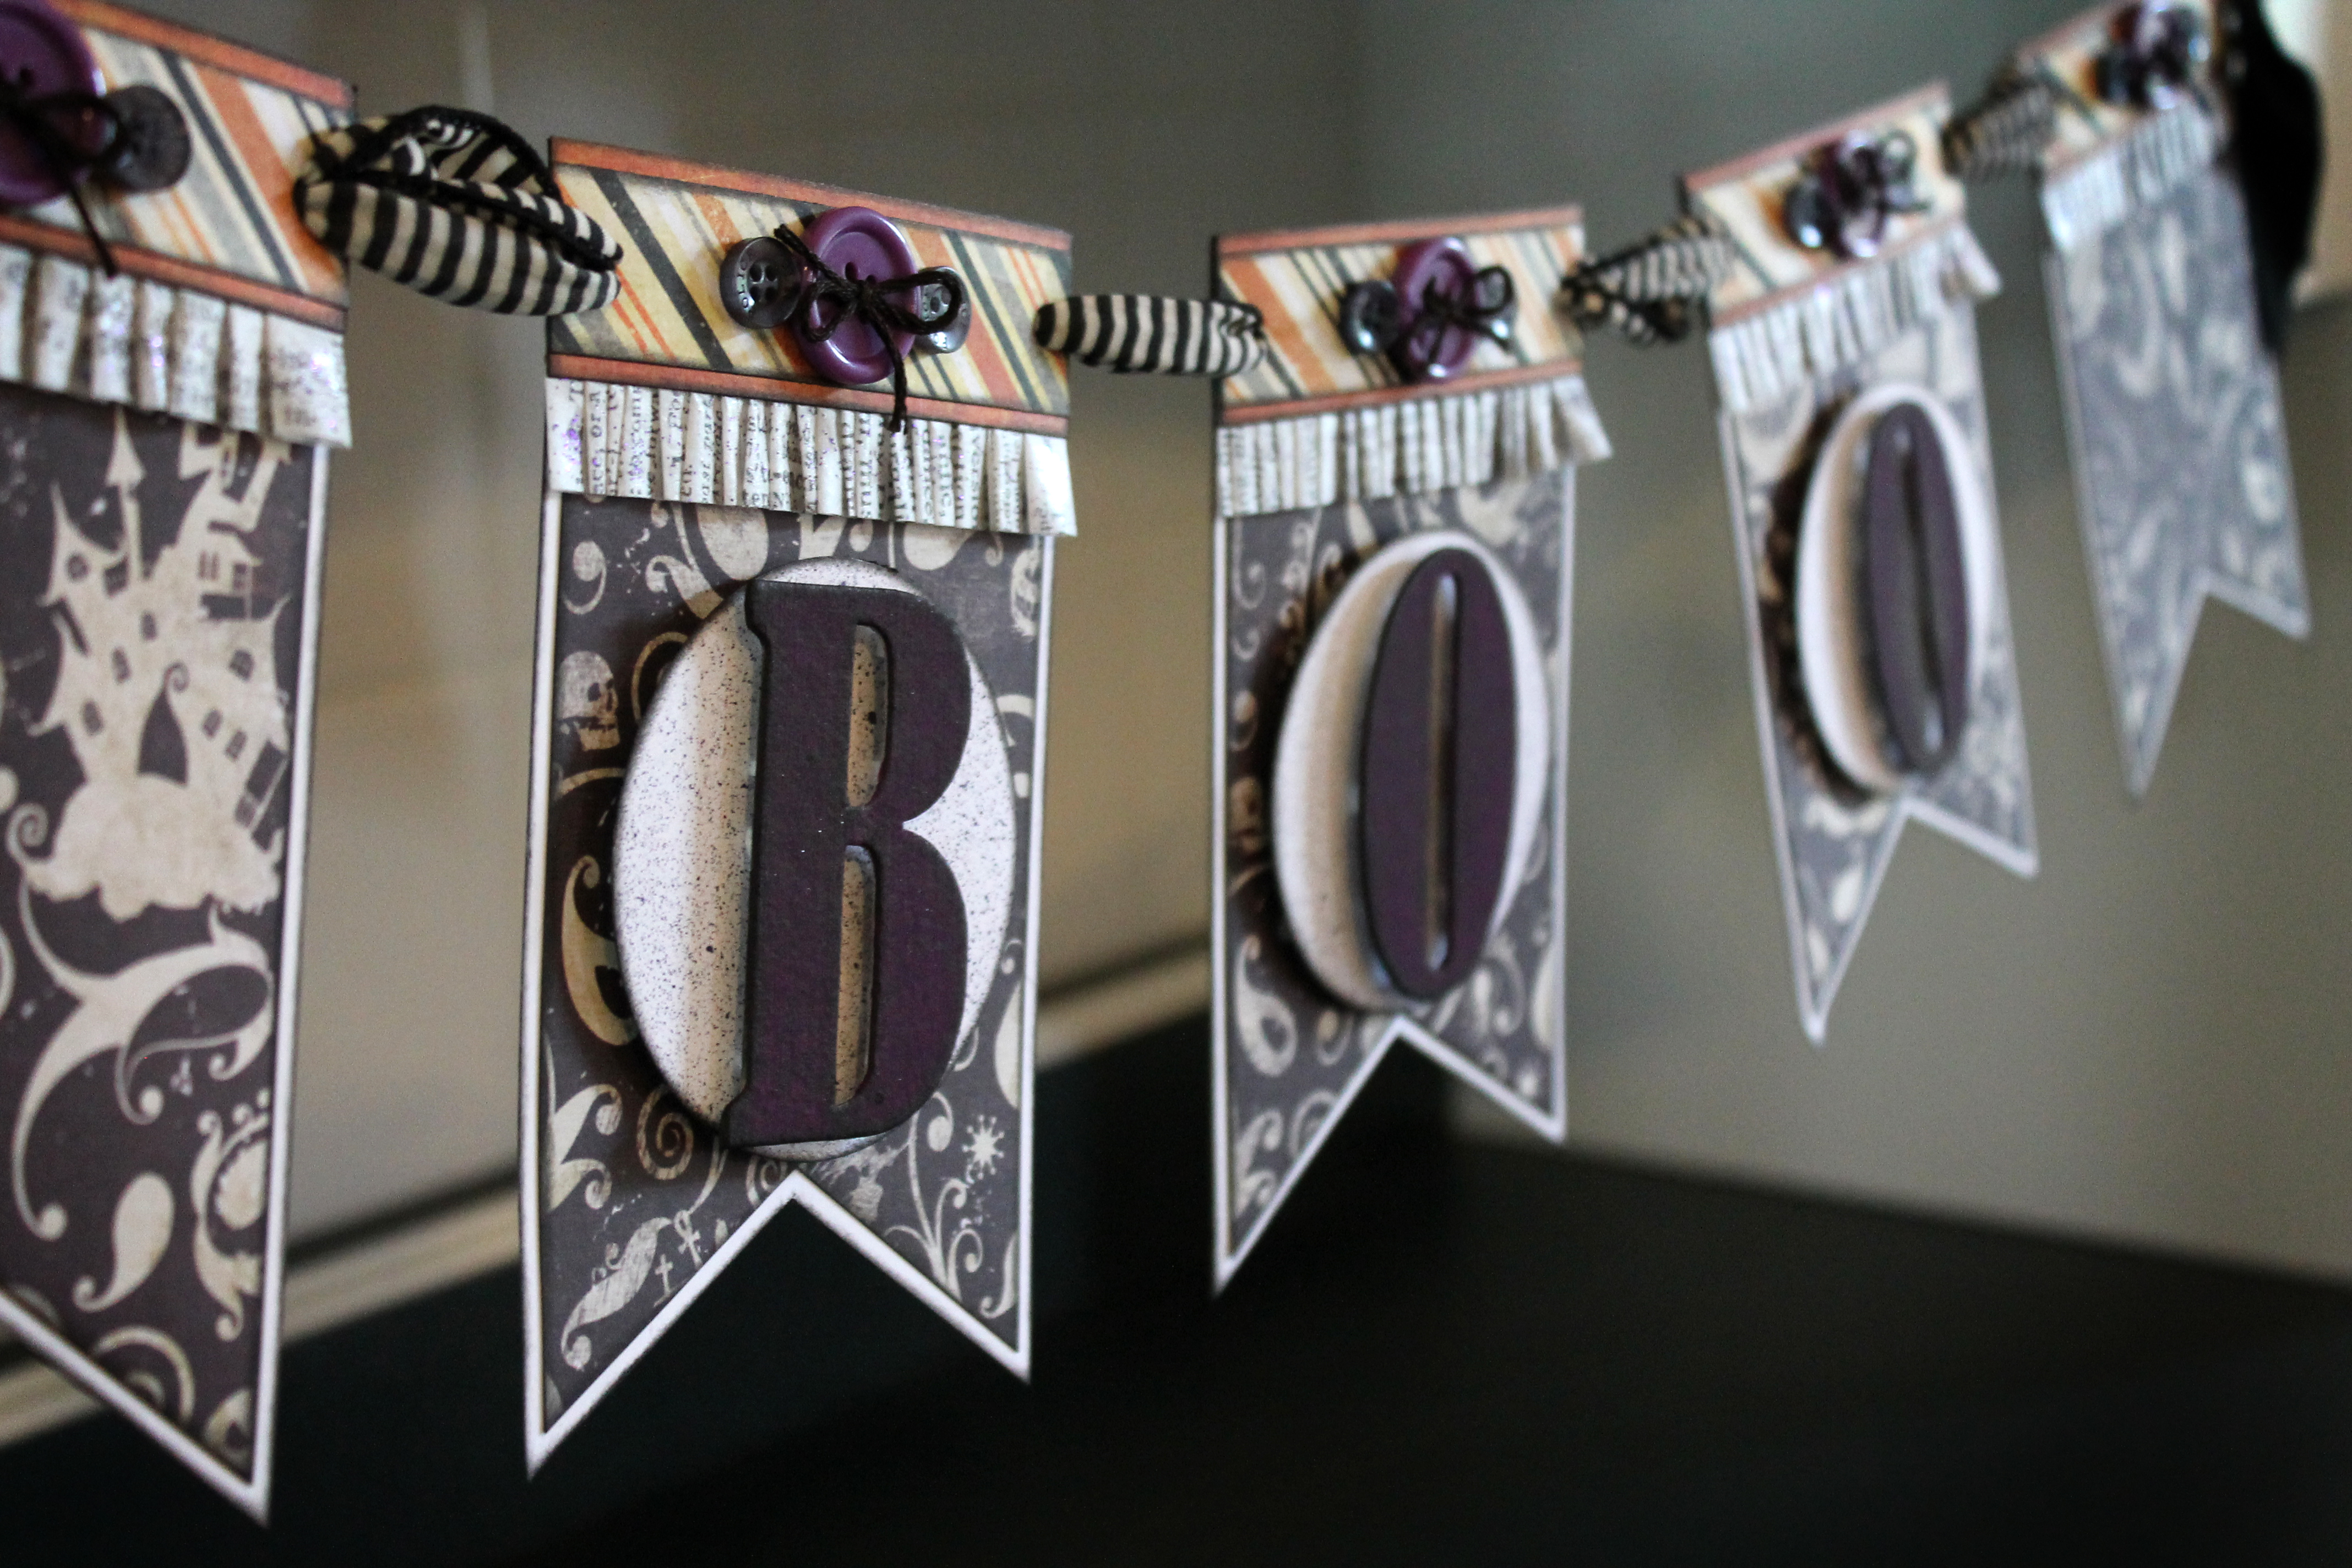
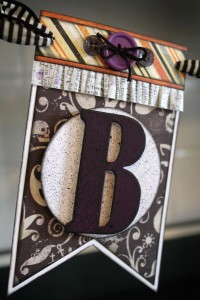
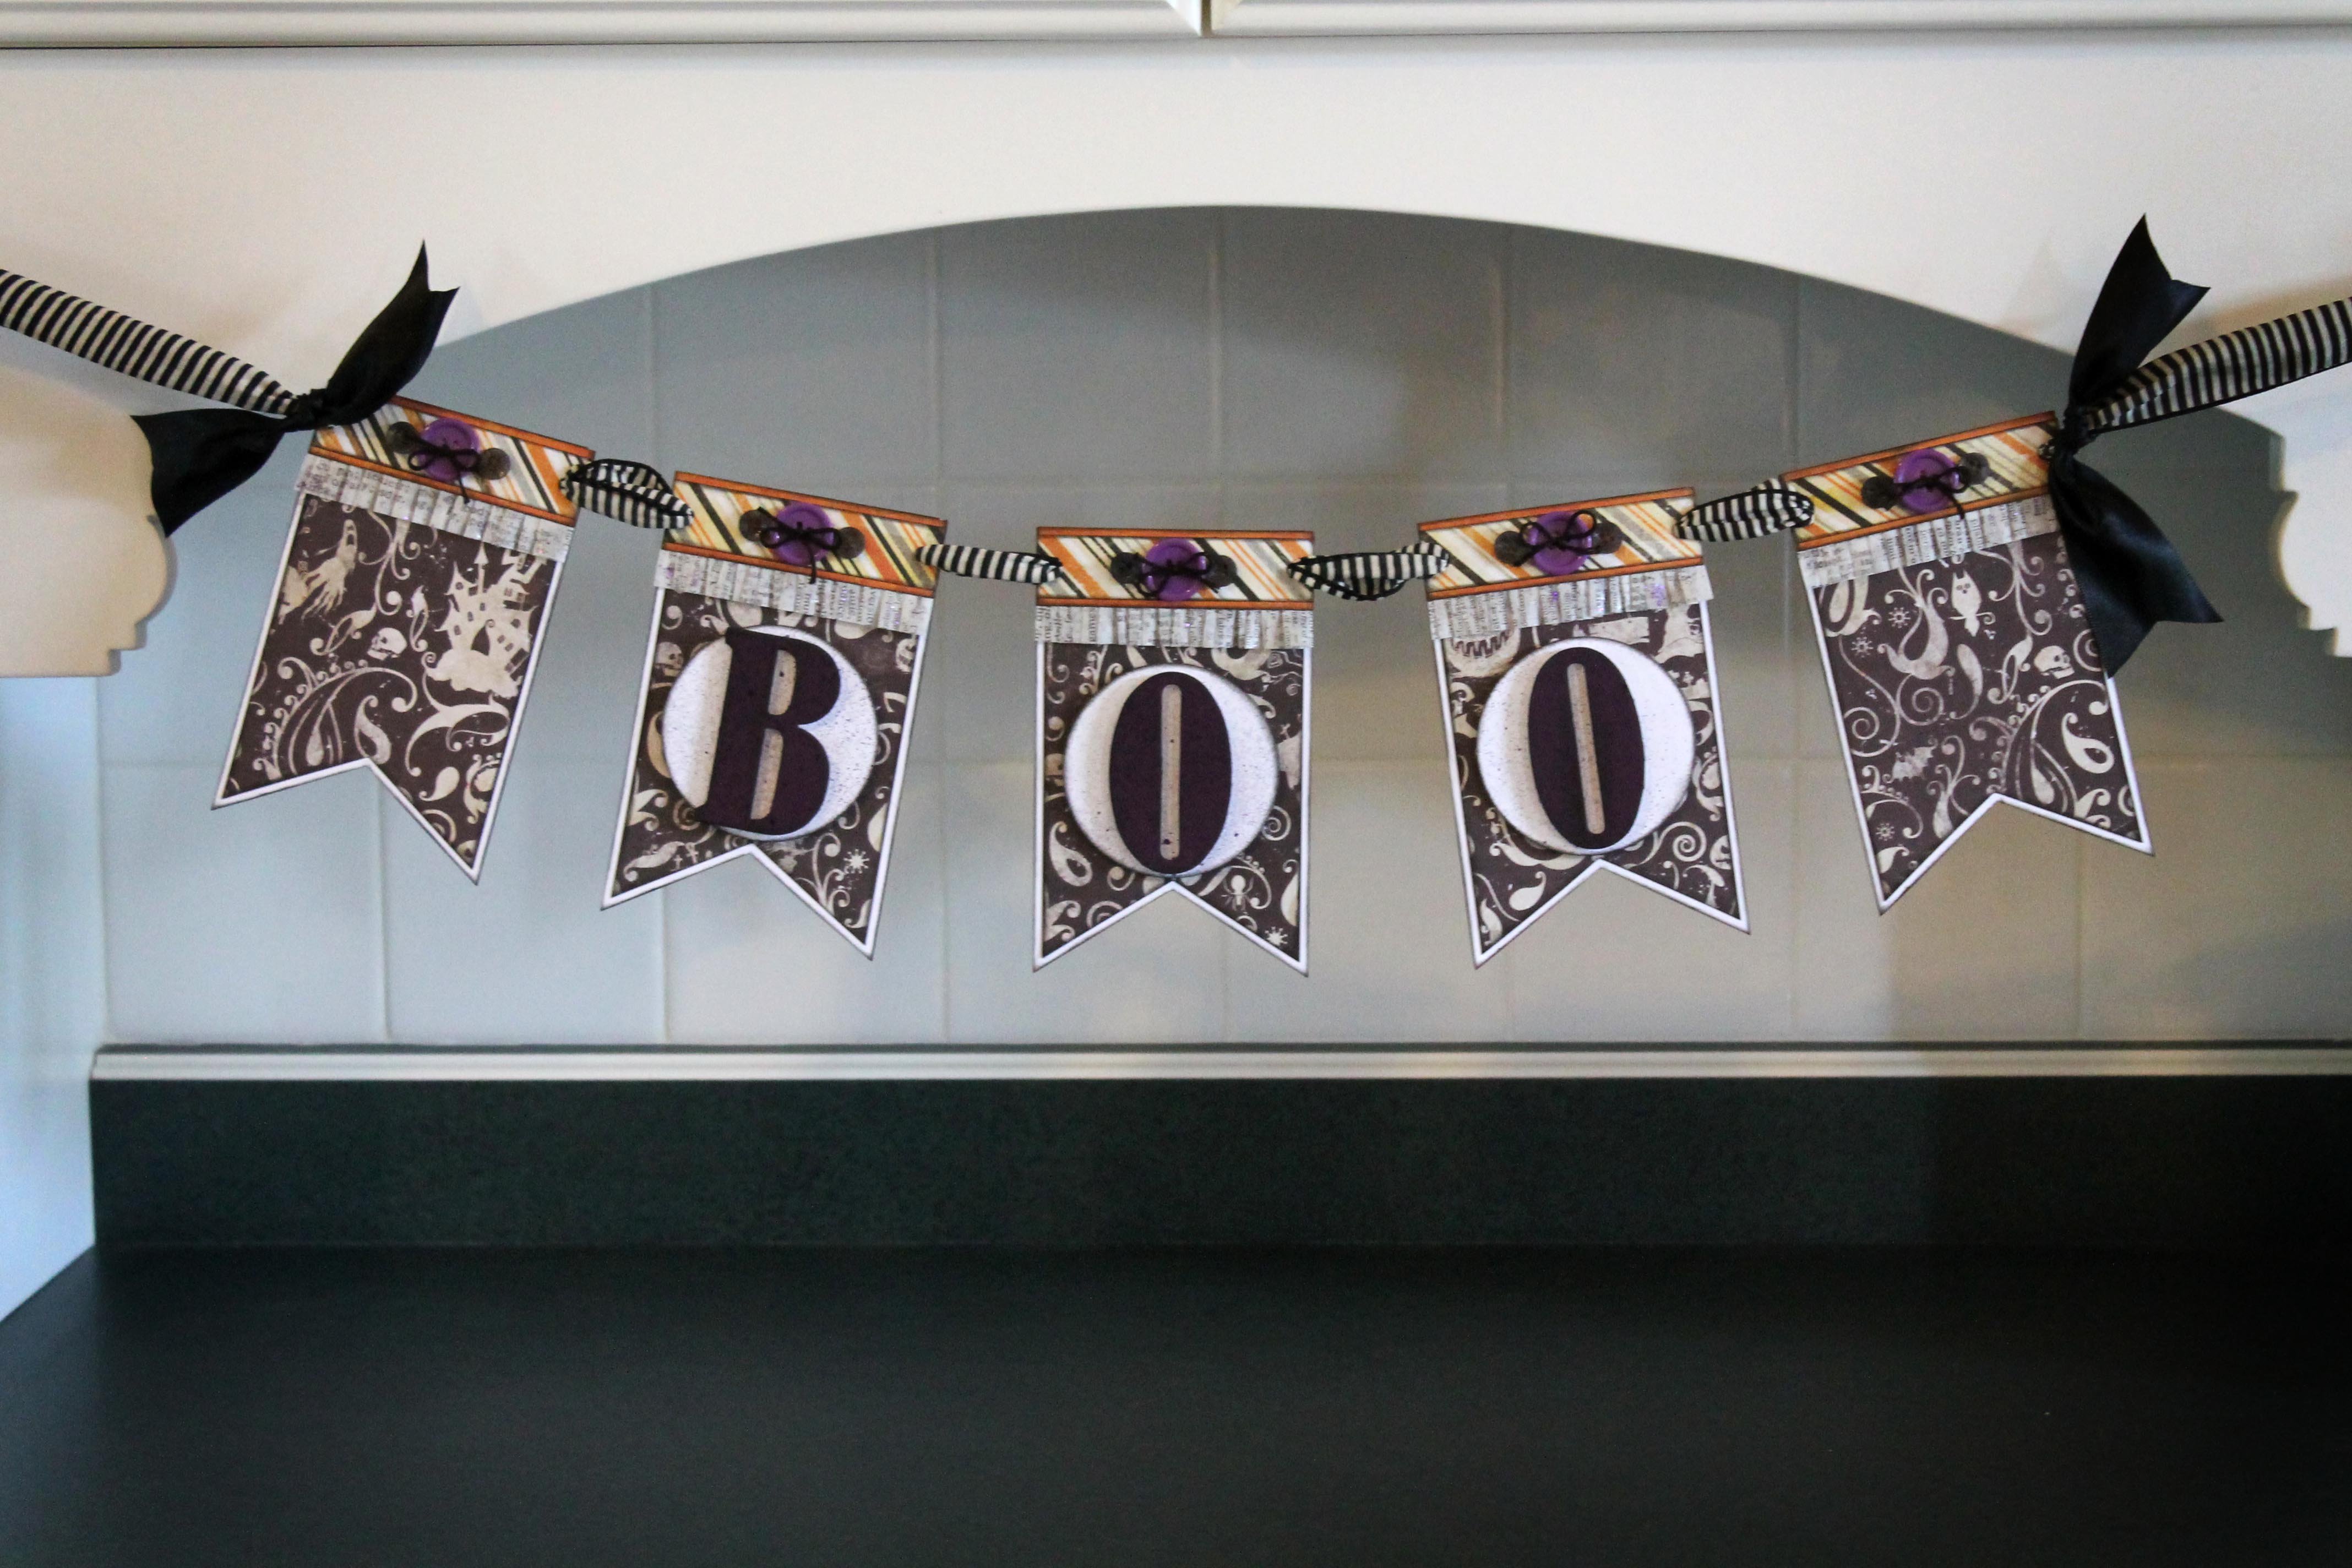
Do you have an upcoming Halloween Party that could use a BOOtiful Halloween Banner?
Or maybe you would just like to add some flair to your home for all those cute little Trick or Treaters. A Halloween Banner is easy to make and can make all the difference in your holiday decor. This BOOtiful Halloween Banner is created using paper crafting supplies that you probably already have.
I generally start with a solid base for my banners. This BOOtiful Halloween Banner has a chipboard base that is covered in white cardstock.
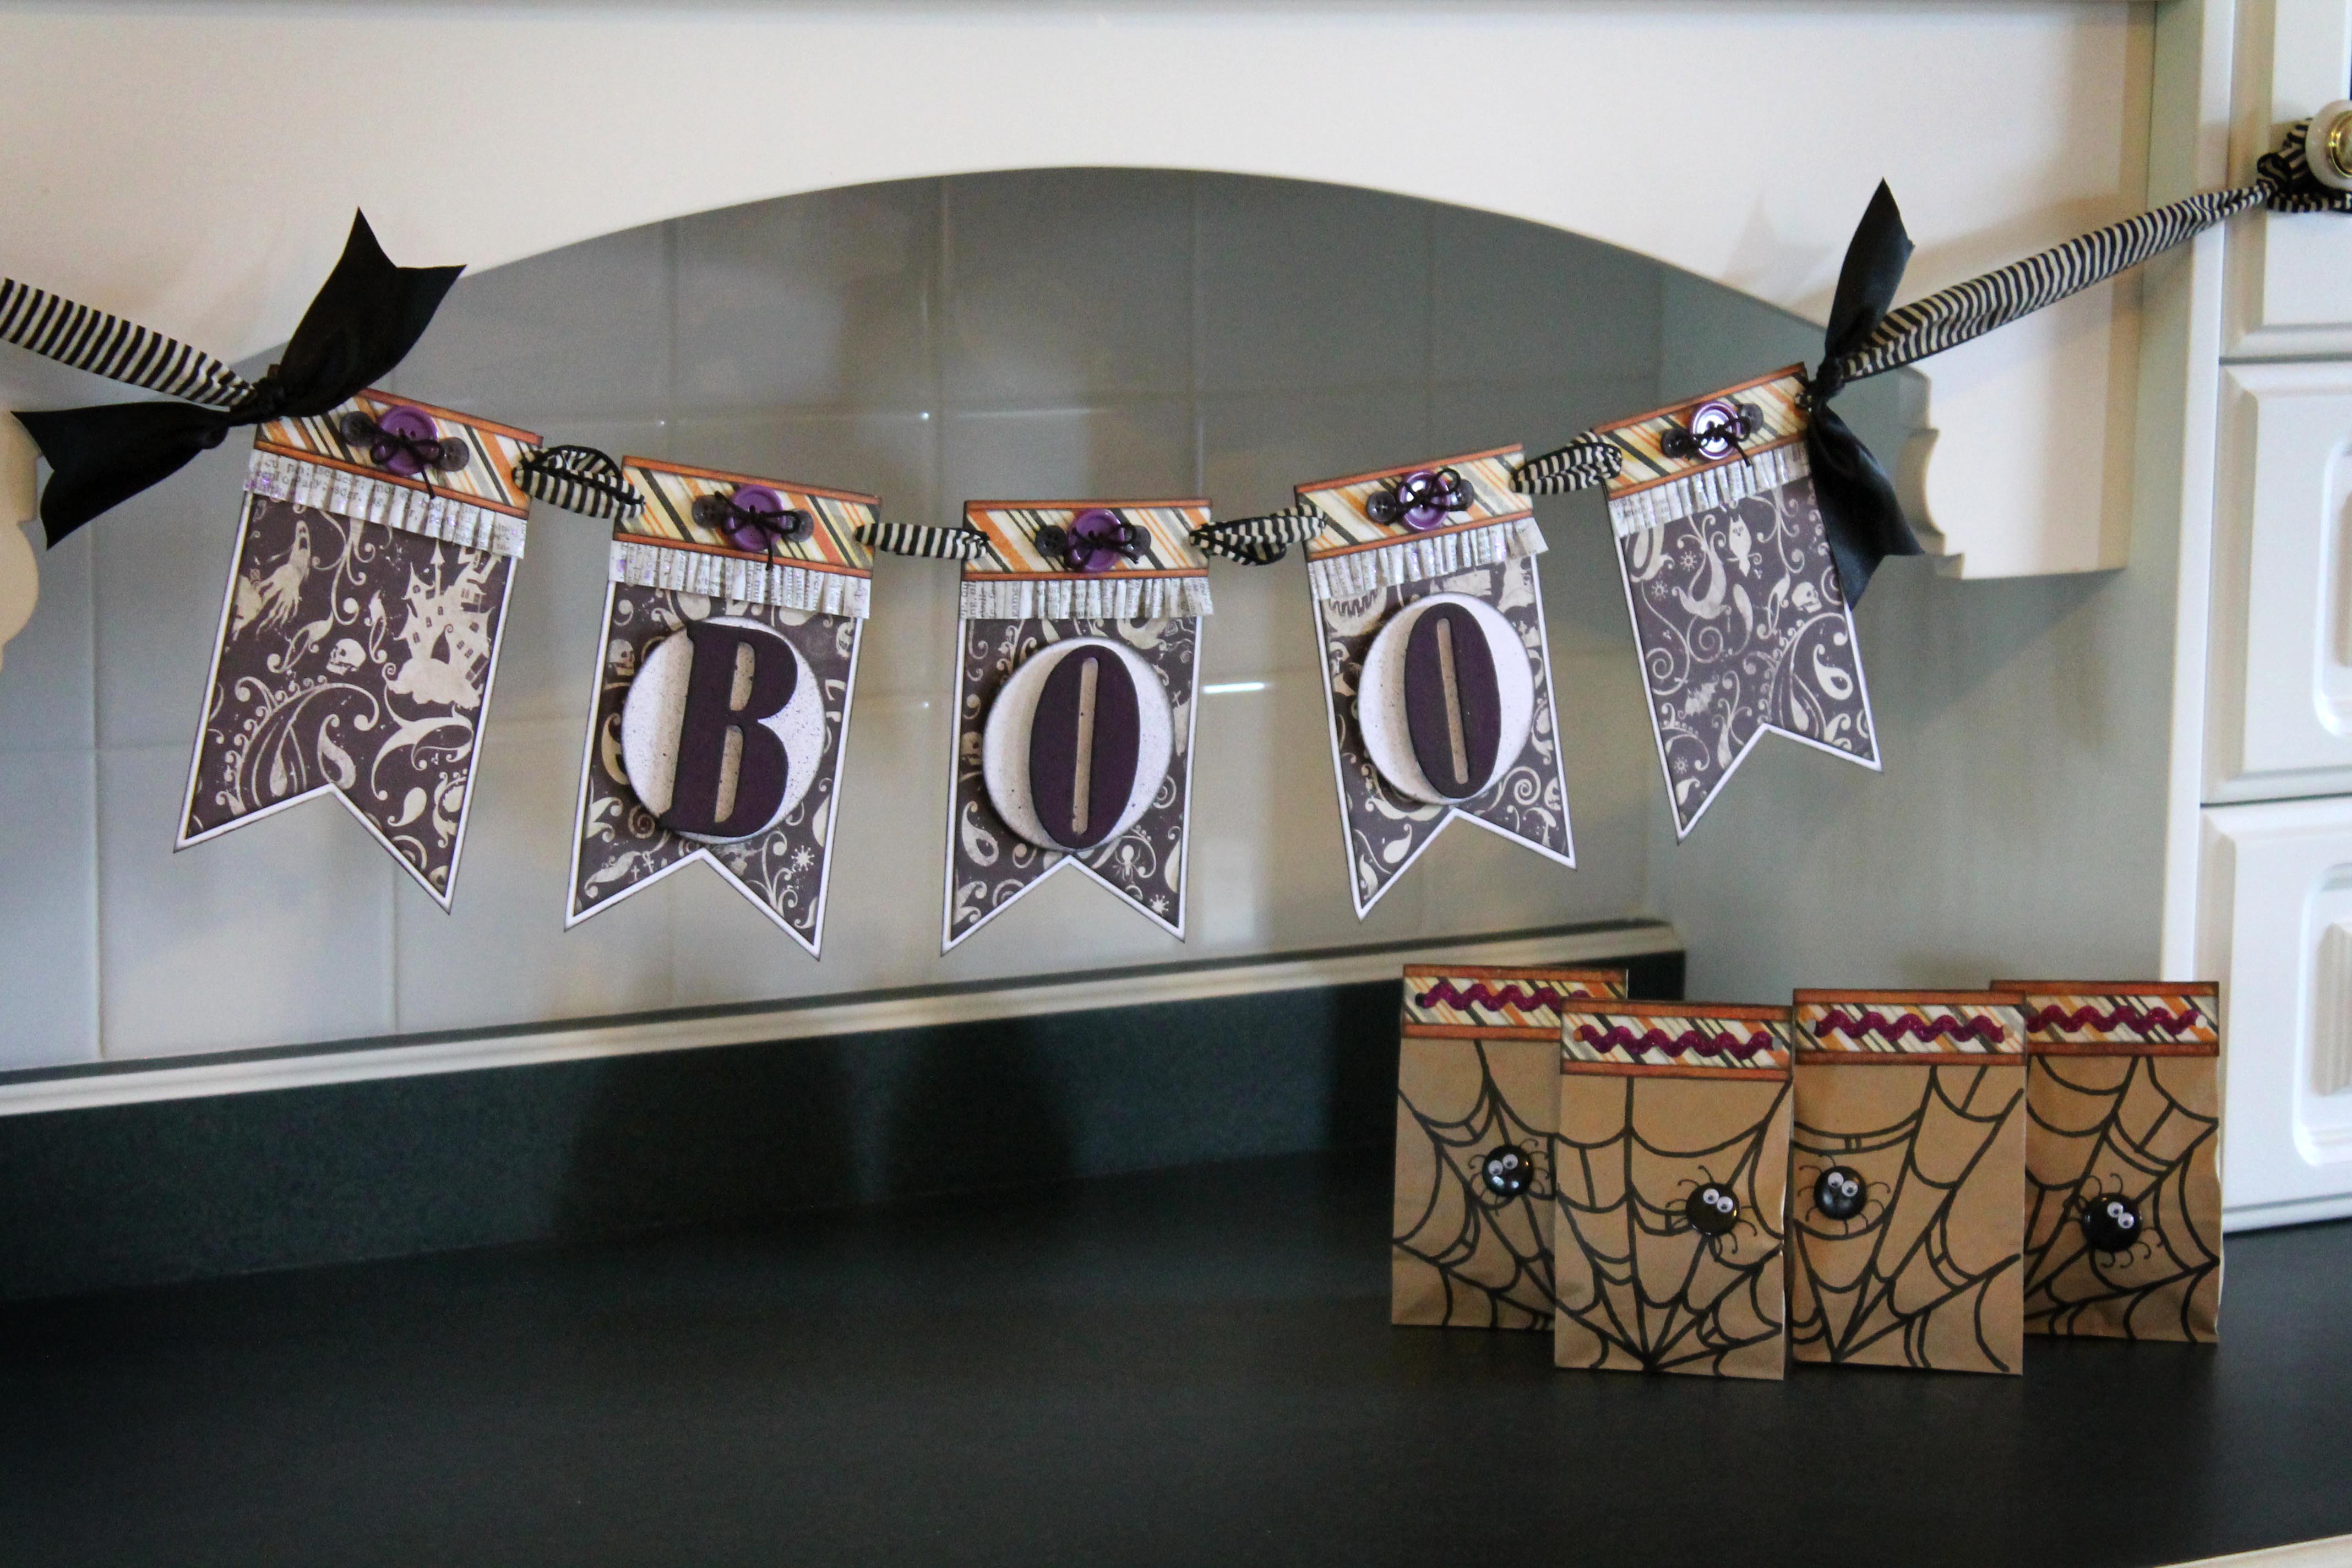
Here is what I used to create this BOOtiful Halloween Banner:
When I create anything that may have some wear and tear. I make sure that I use the proper adhesives. For projects like this BOOtiful Halloween Banner, there is nothing better than Glue Dots to keep everything exactly where you want it.
Thank you for stopping by and I hope your Halloween is filled with fun, candy and maybe even a BOOtiful Halloween Banner.
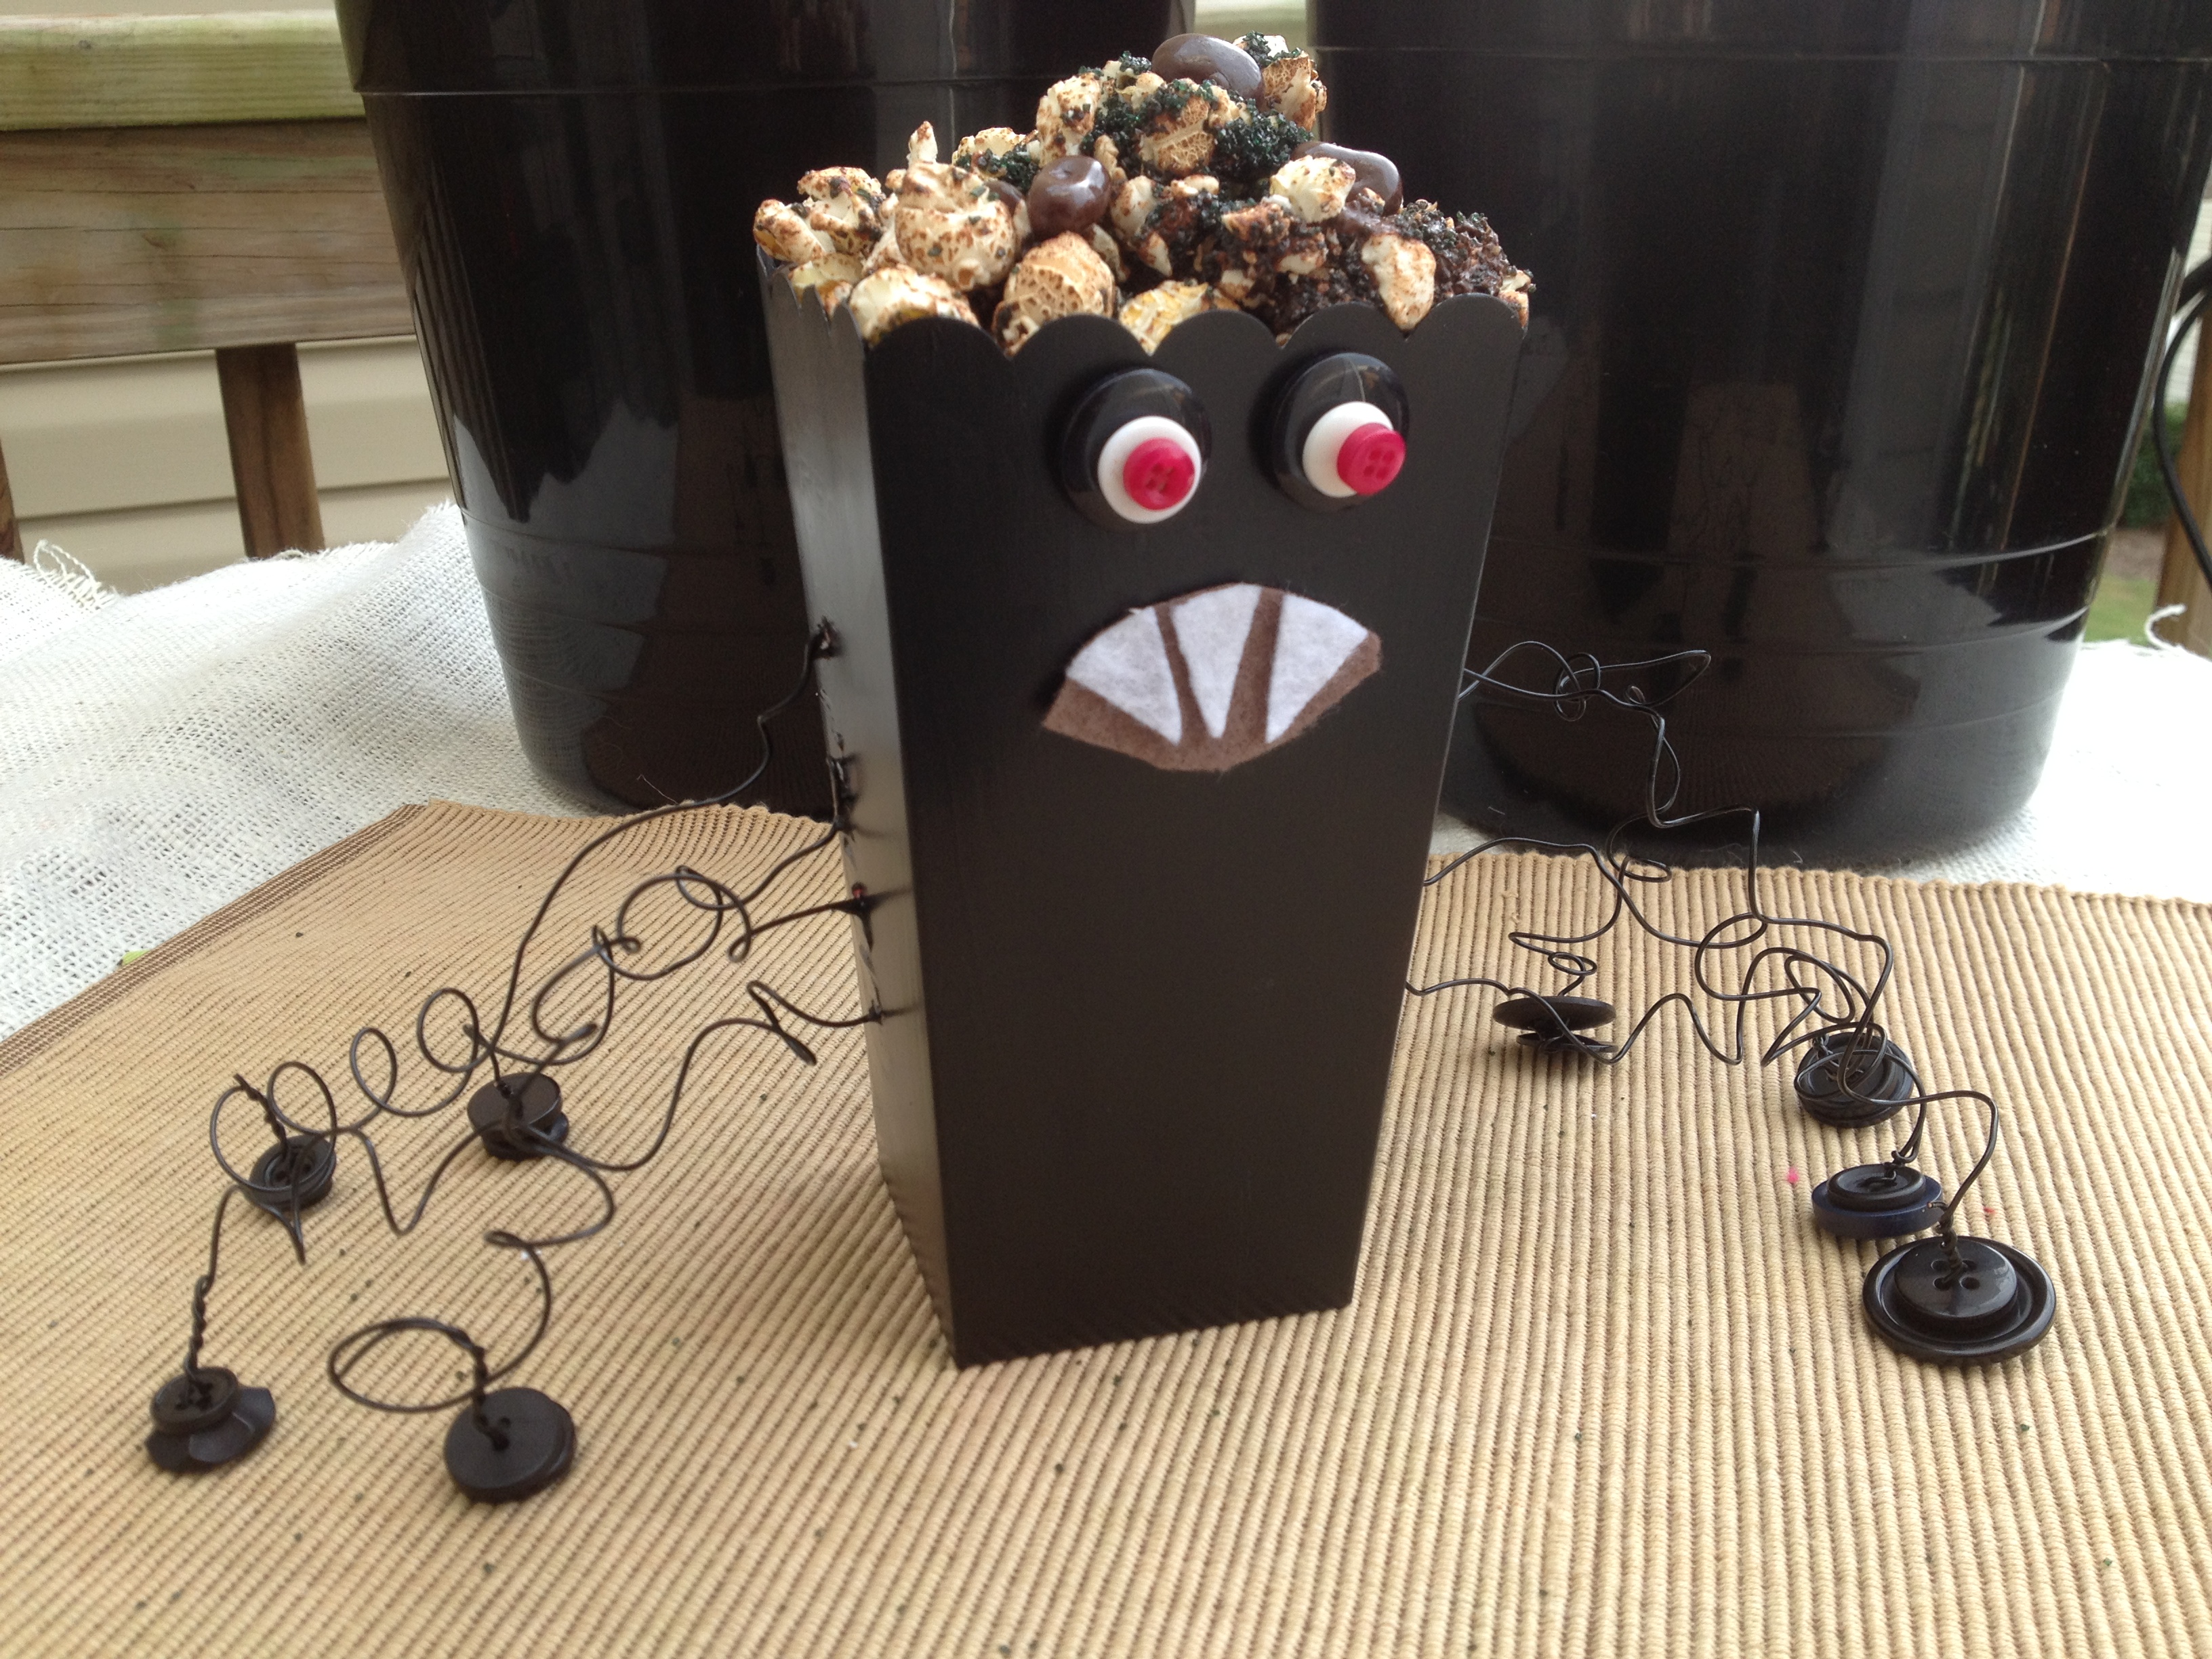
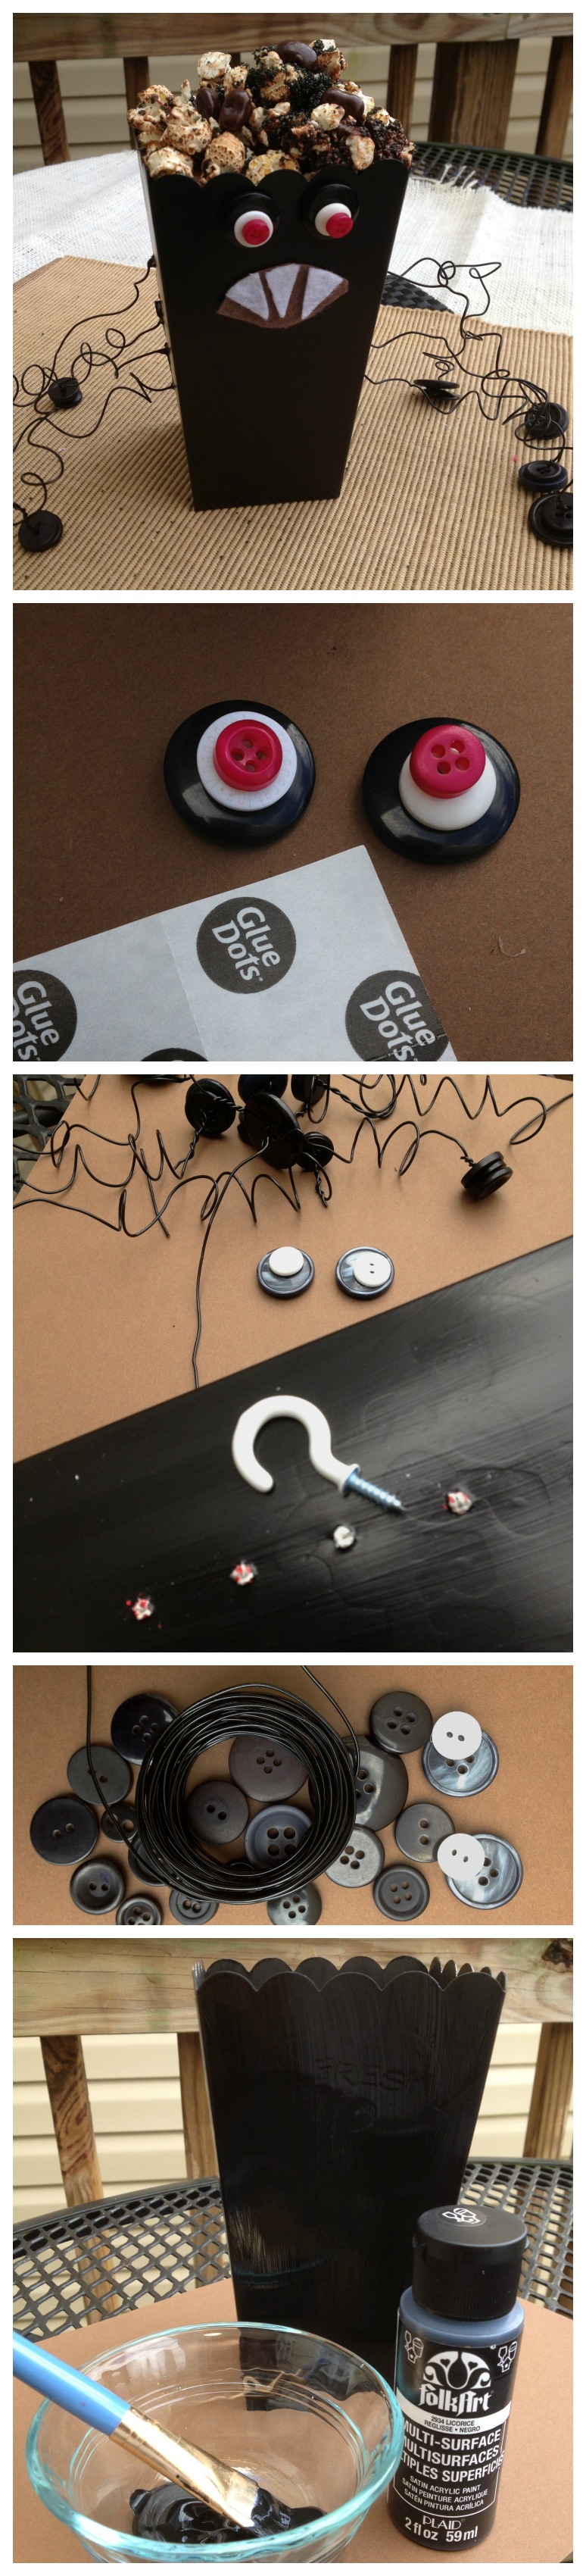
EEEK! It’s a great big SPOOKY Spider. No wait, it’s just a popcorn box in disguise. This Halloween treat box is a creation that I made for the Halloween Movie Popcorn Box Party Hop.
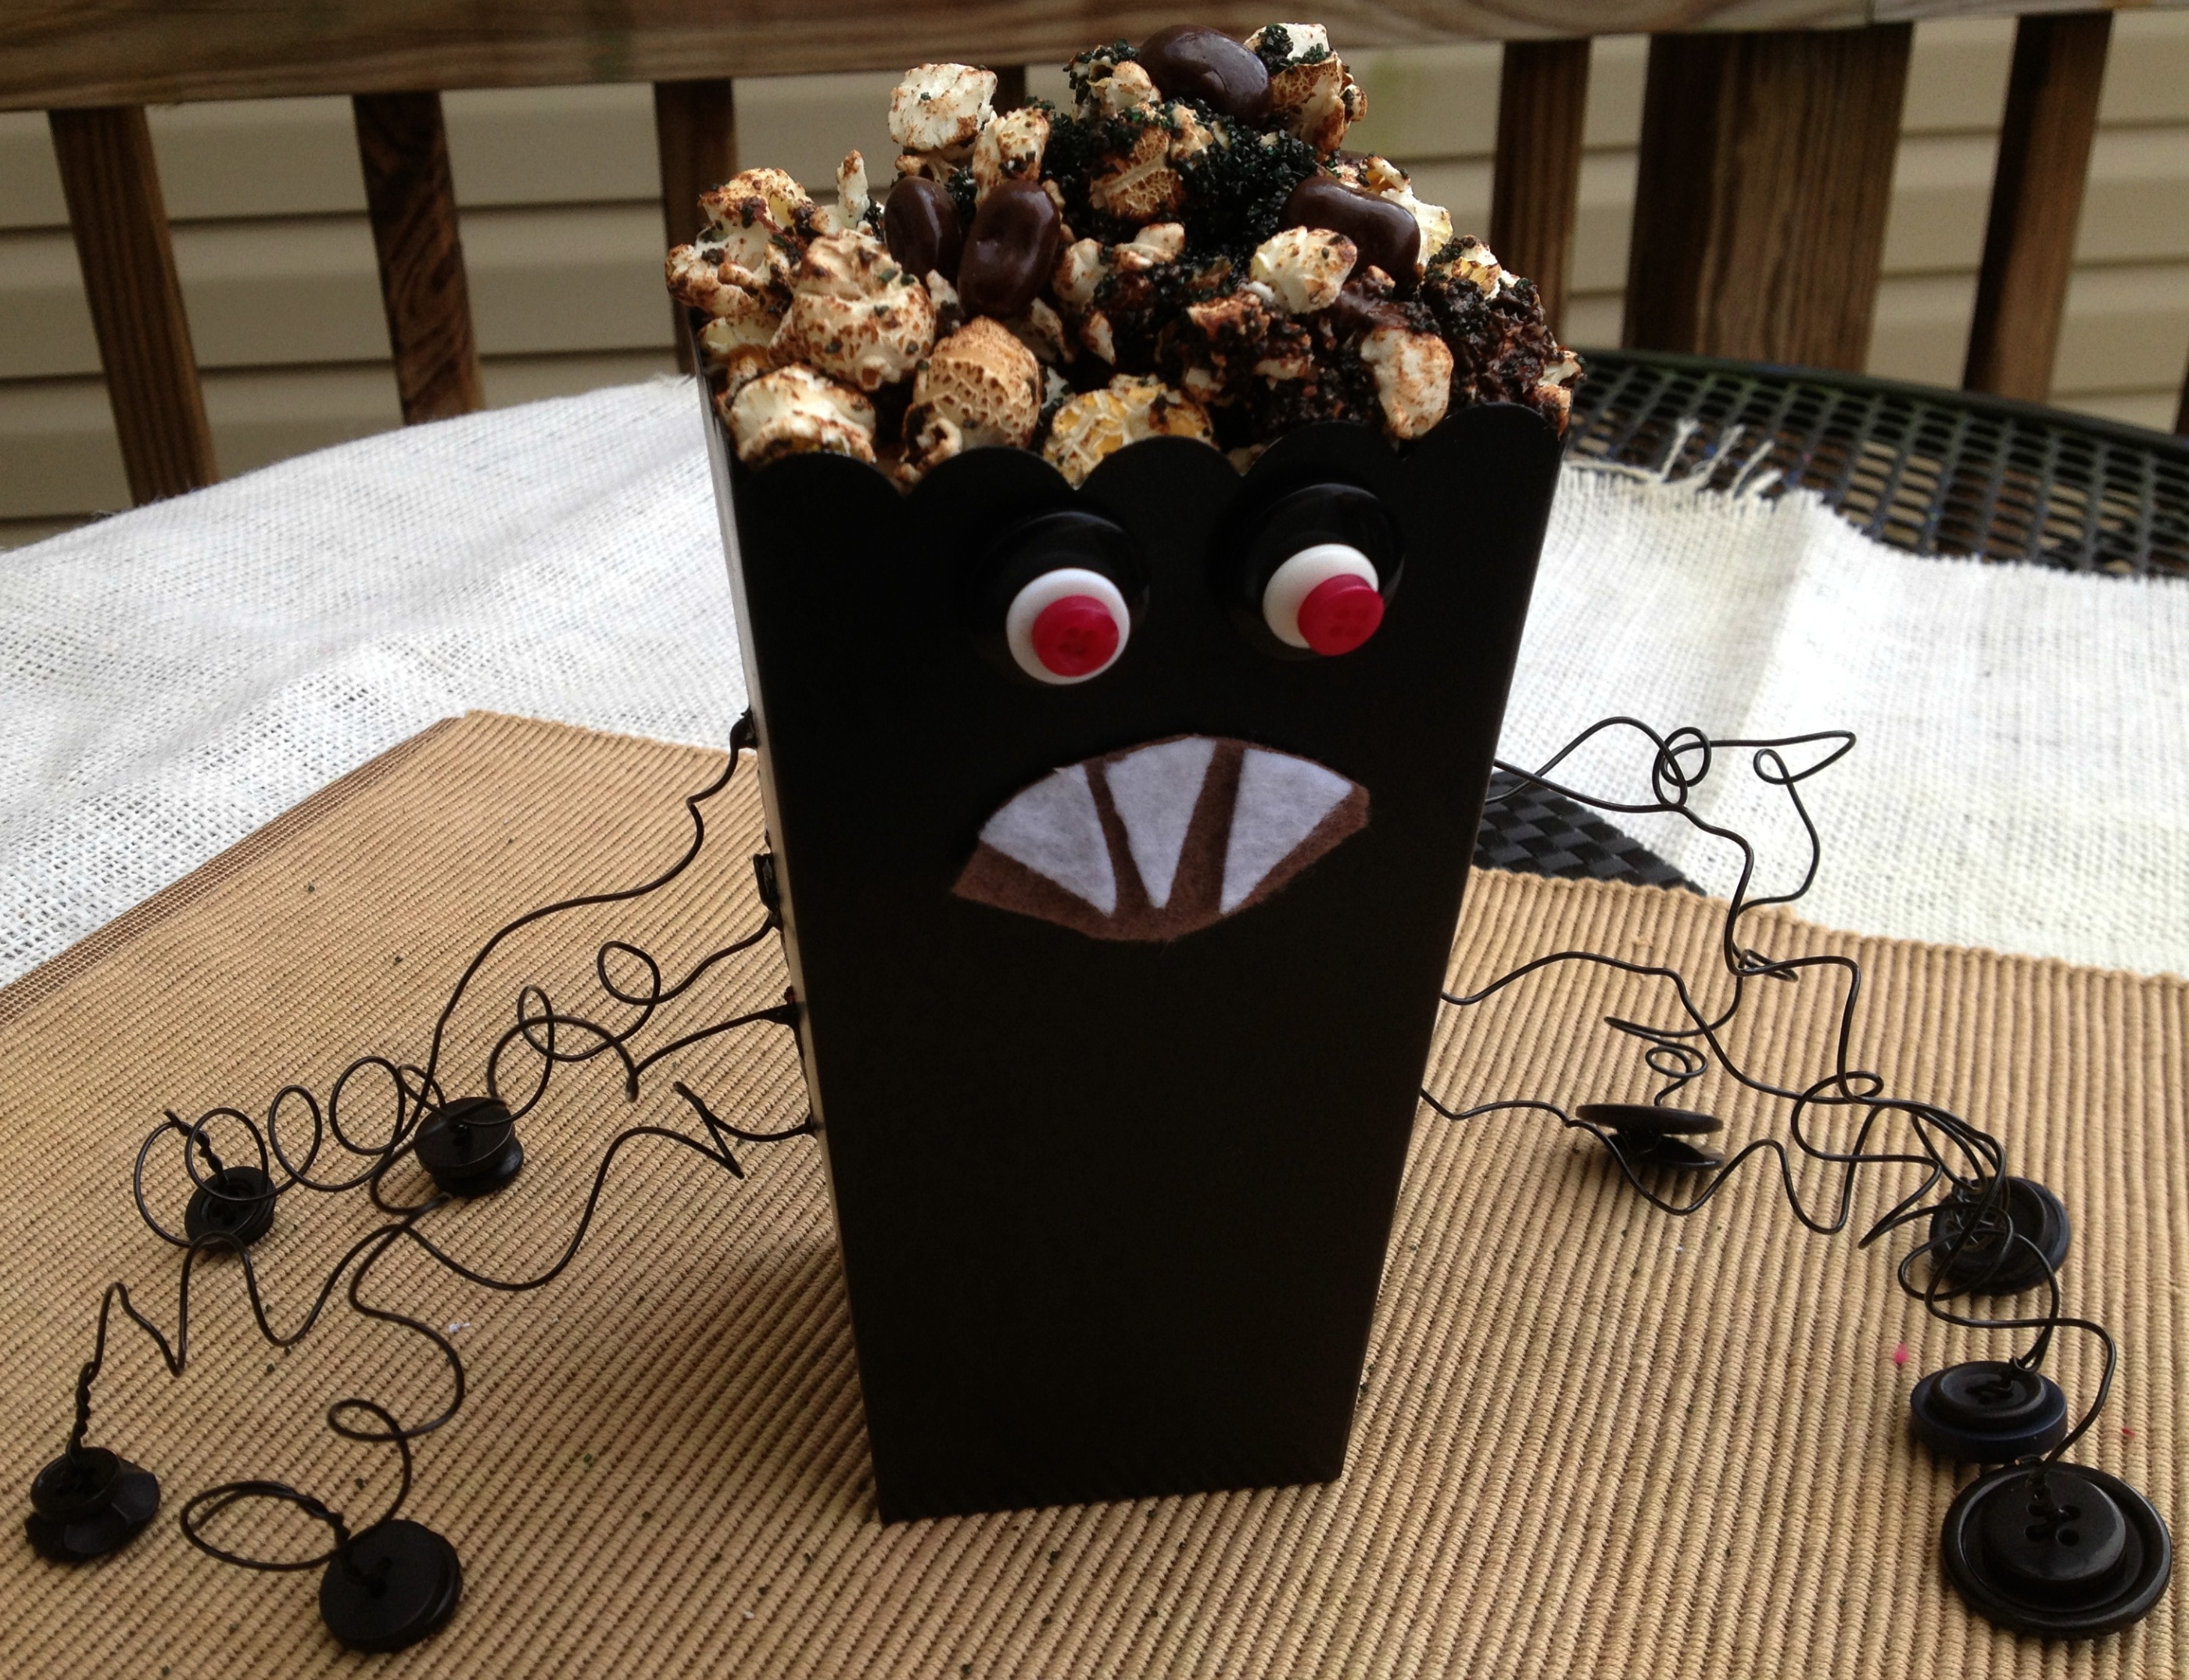
There are more than 30 popcorn boxes in this blog hop party that have been transformed into creations for Halloween. Lots of them use buttons from Buttons Galore as each of the designers was provided with a little package of Halloween colored ones from Laura Kelly’s collection.
Materials used for Spooky Spider:
![]()
I painted this one with Plaid’s Folk Art paint (Multi Surface Licorice) and then embellished with wires for legs and Laura Kelly’s Black Beauty buttons for feet and eyes. To get the wire into the sides, I poked holes with a sharp screw in hook. To fill it up and make it yummy, I added a mixture of popcorn that I shook up in chocolate and black sugar. I also added in some chocolate covered cherry Jelly Bellies to make it a little more fun.
Check out the many other fabulous projects. Lots of them were done by our awesome Buttons Galore design team members and others by creative designers, artists, and bloggers.
Happy Popping Around,
Laura
Paper crafting can be fun and easy with novelty buttons. A few pieces of paper and a sentiment to convey your message, ribbon, a touch of buttons and VIOLA! A quick, cute and simple card you made yourself
Stay tuned for the next card in this series. It is equally as cute and just as simple as this one to make. Check out the website for sales on the buttons.

Wooden pumpkin crafts are great for autumnal home decor. I created a whole patch of pumpkins for display in my home. I am in love with the pumpkin frame and the way it stands out in the patch. I guess it is partially due to the adorable photograph I placed in the frame . It is my oldest son and the photo is from 14 years ago, but I really do think the frame is adorable too.

I created a button stack for a stem with my Laura Kelly Bold Brown buttons and love the way the stem turned out.

To find out more about making a whole patch of wooden pumpkin crafts, visit my blog post today.
Happy Decorating for Halloween,
Laura
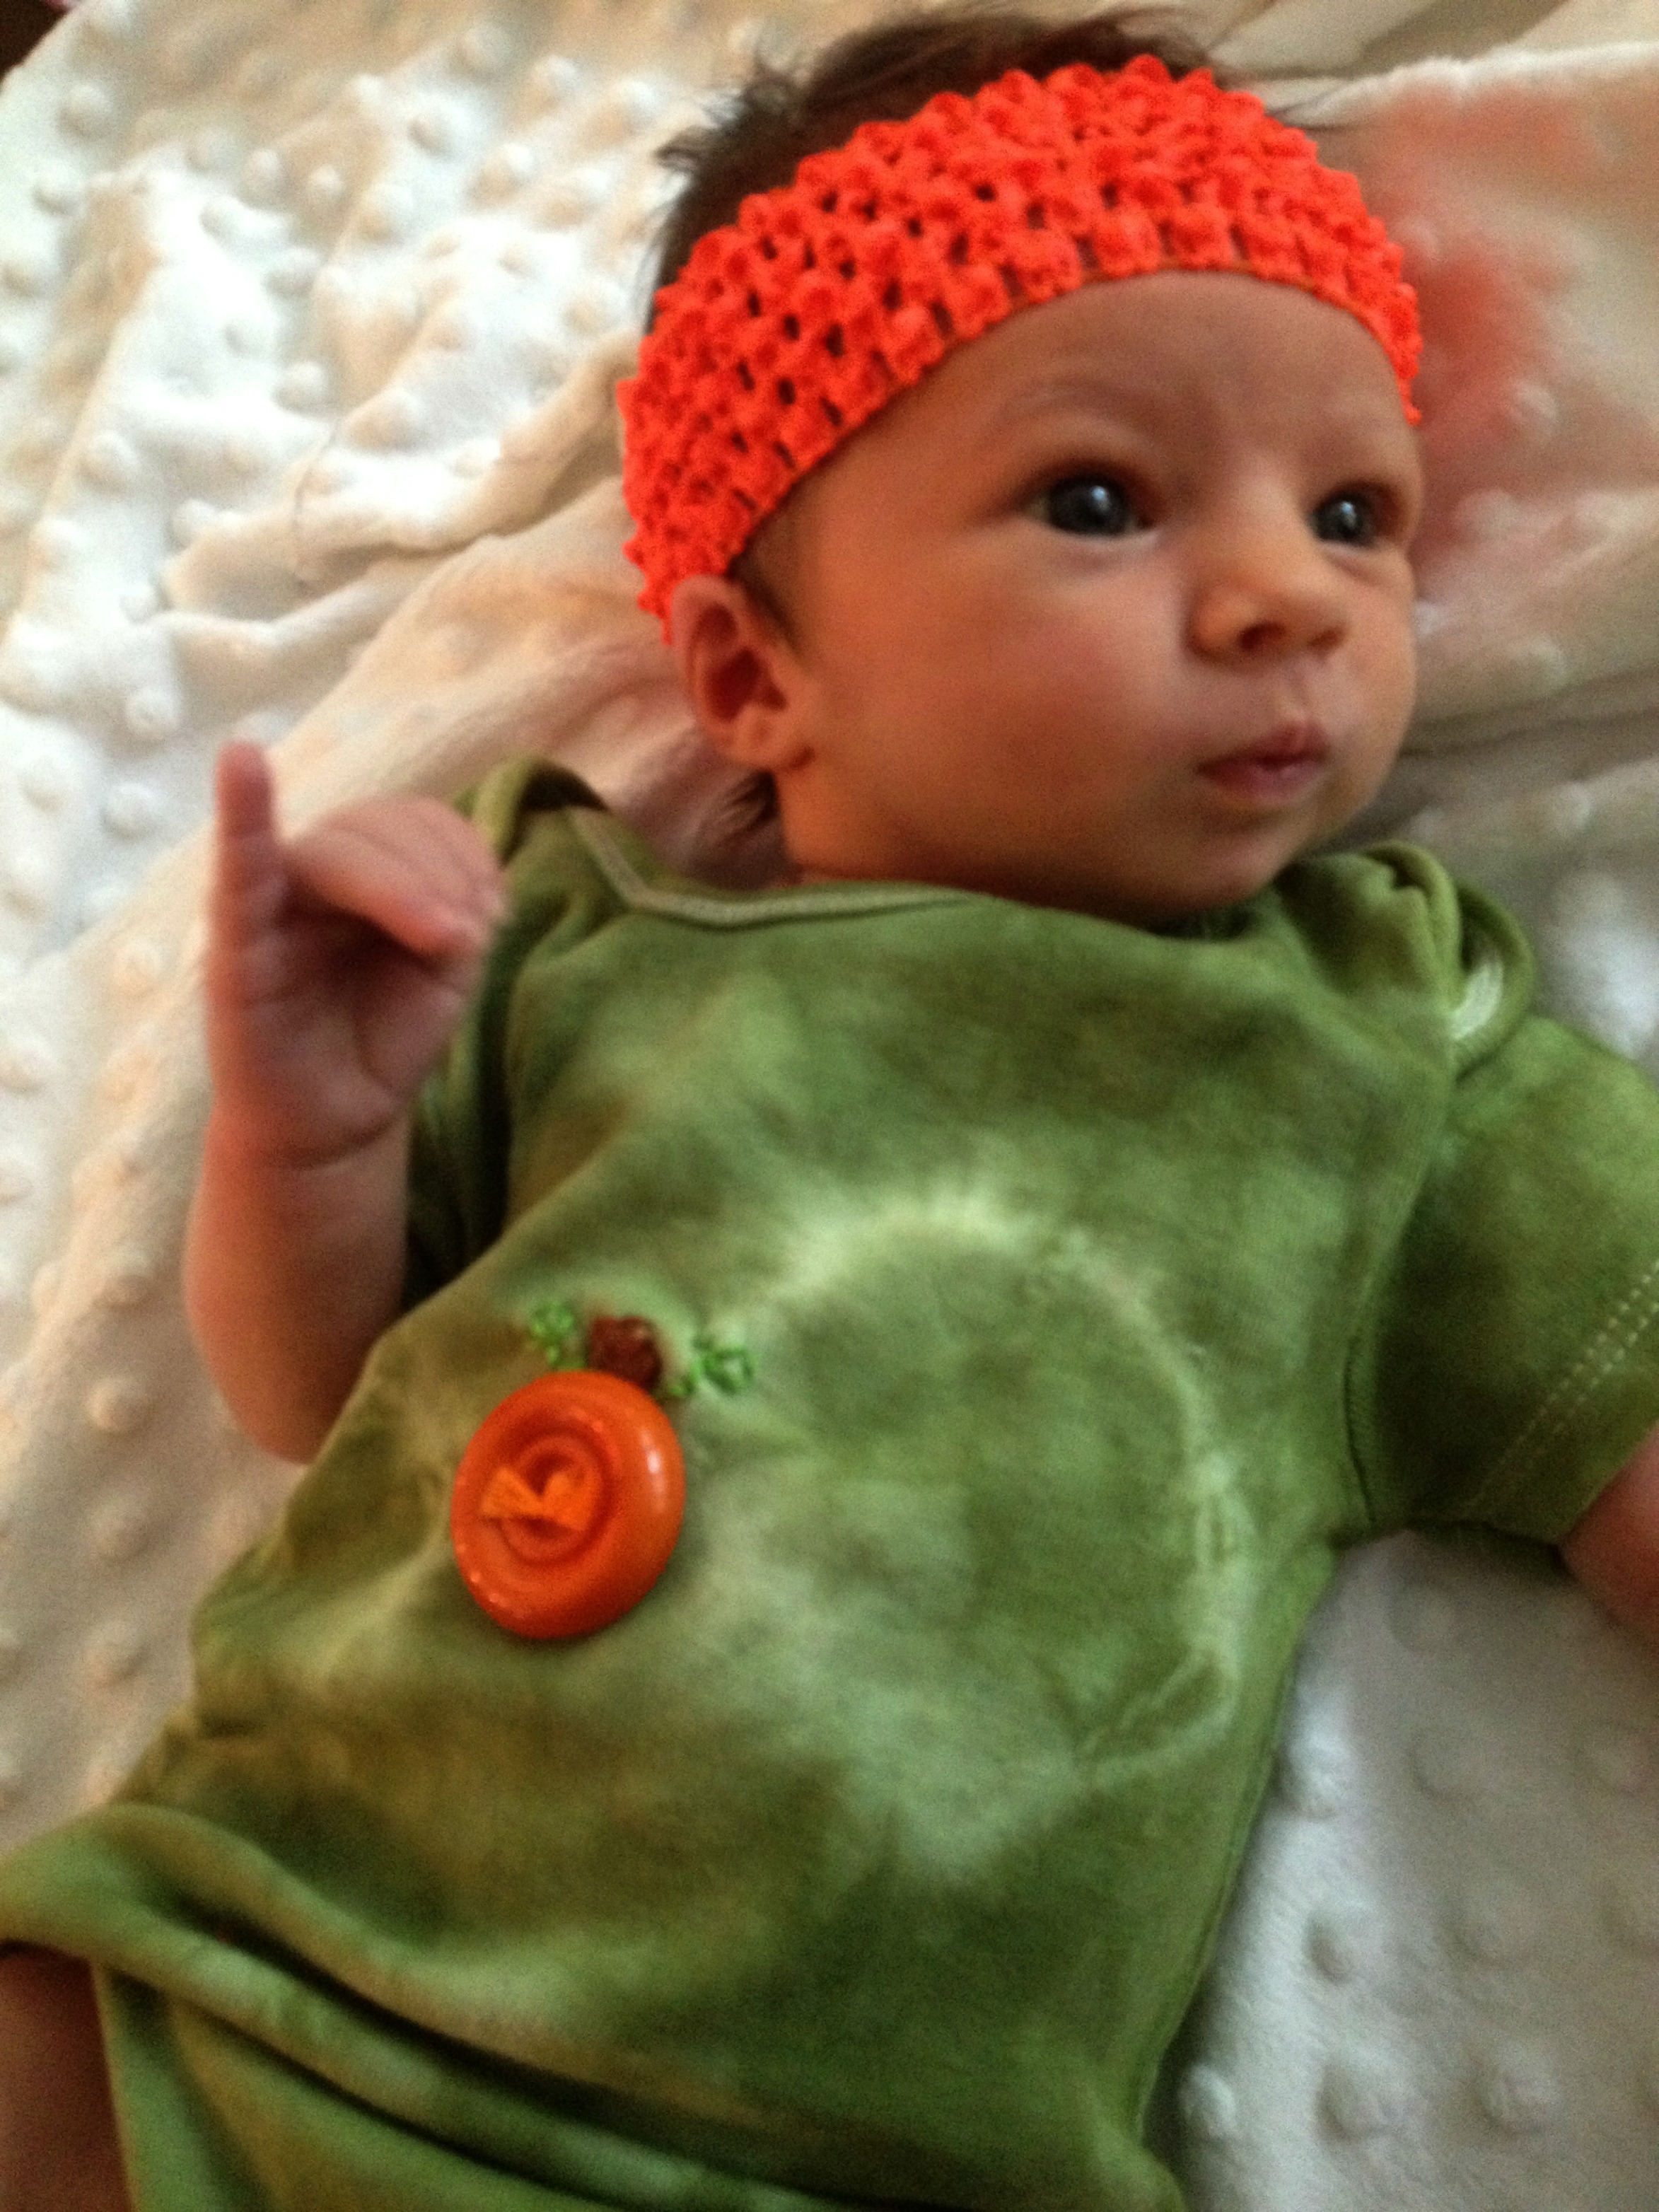
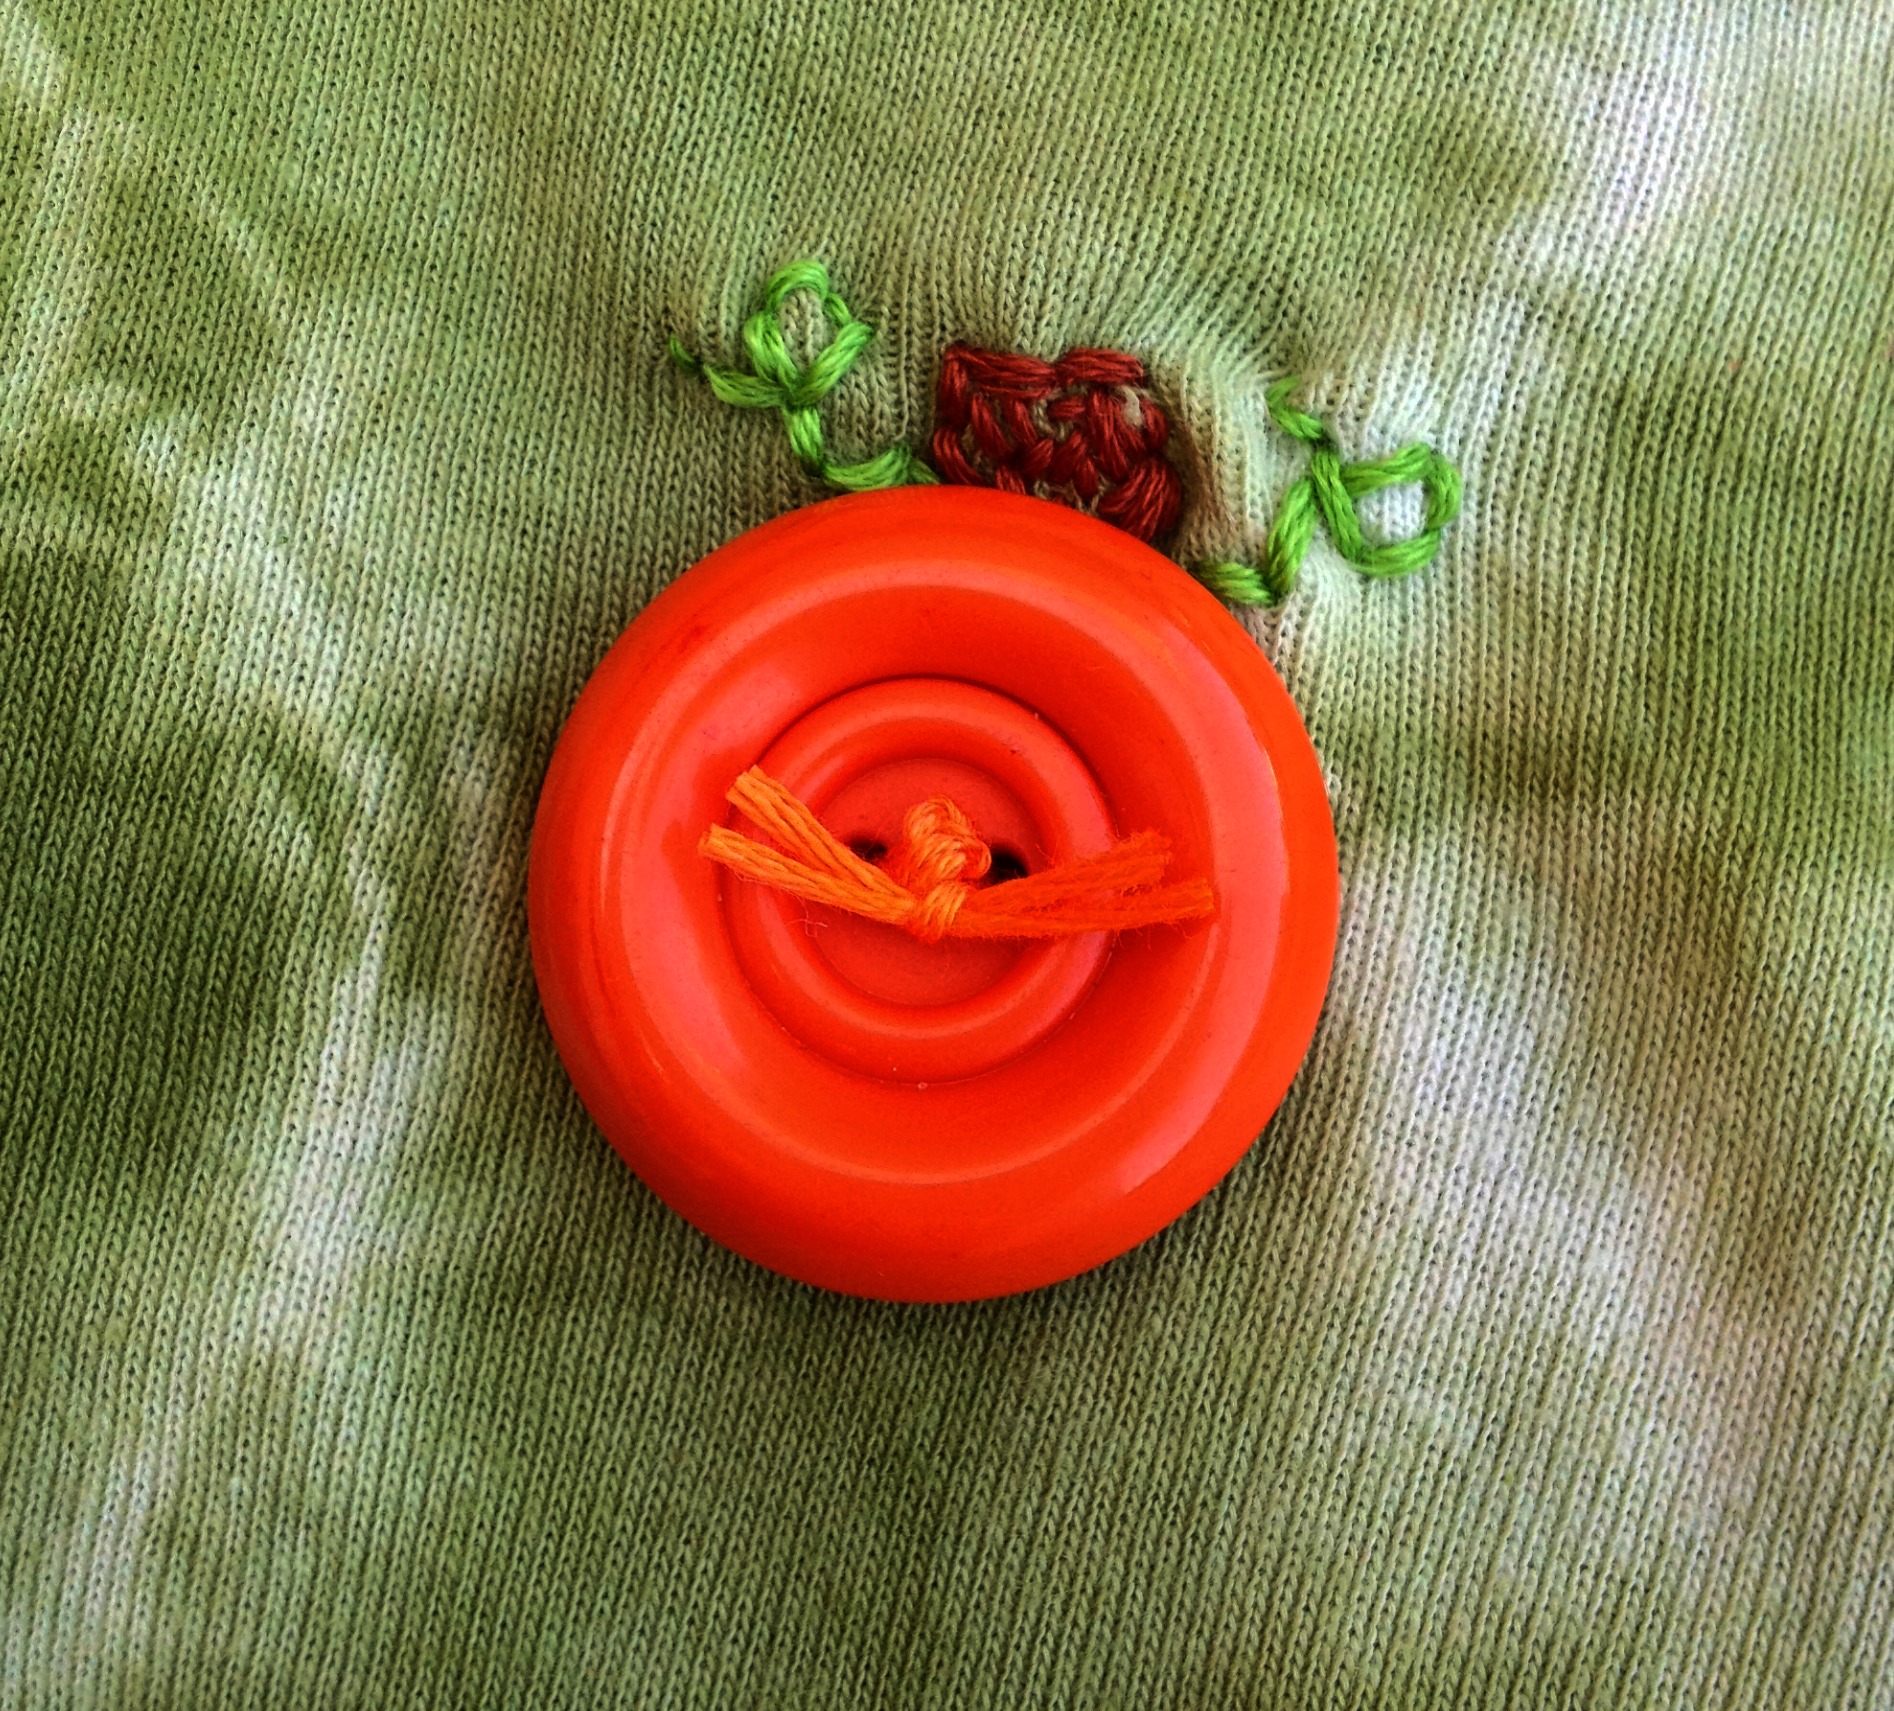
Babies are so adorable when they are dressed to celebrate the holidays. This pumpkin onesie creation for Halloween is super cute as well as quick and easy.

All you need is a onesie, embroidery floss and a large Outrageous Orange button . If you want to put your pumpkin on a green onesie and you can’t find one, you can dye one. That is what I did first. I used Rit Dye’s Apple Green and tie dyed it in a mason jar.

It is best to embroider the stem and vines first and then add your button. My favorite floss is embroidery floss by Coats and Clark! I think the little pumpkin is just simply so adorable. So make your little pumpkin a onesie today.
Happy Pumpkins, Buttons and Stitching,
Laura