Header

Archive | Baby

Straight from Heaven Baby Nursery Wall Decor [Free Template]

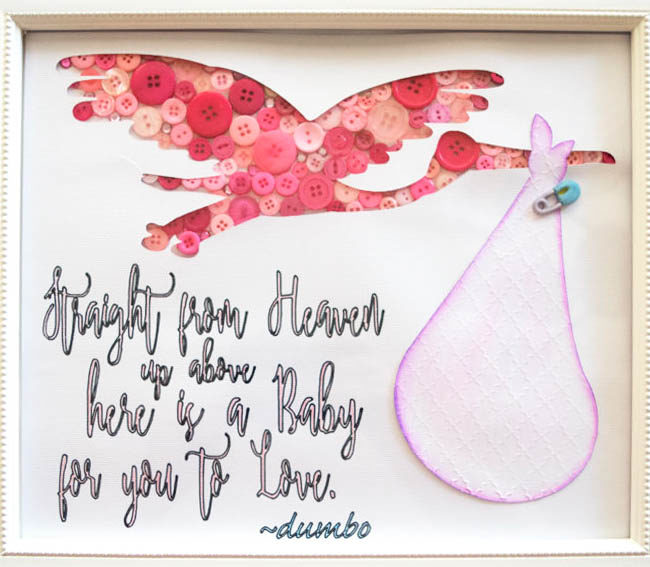
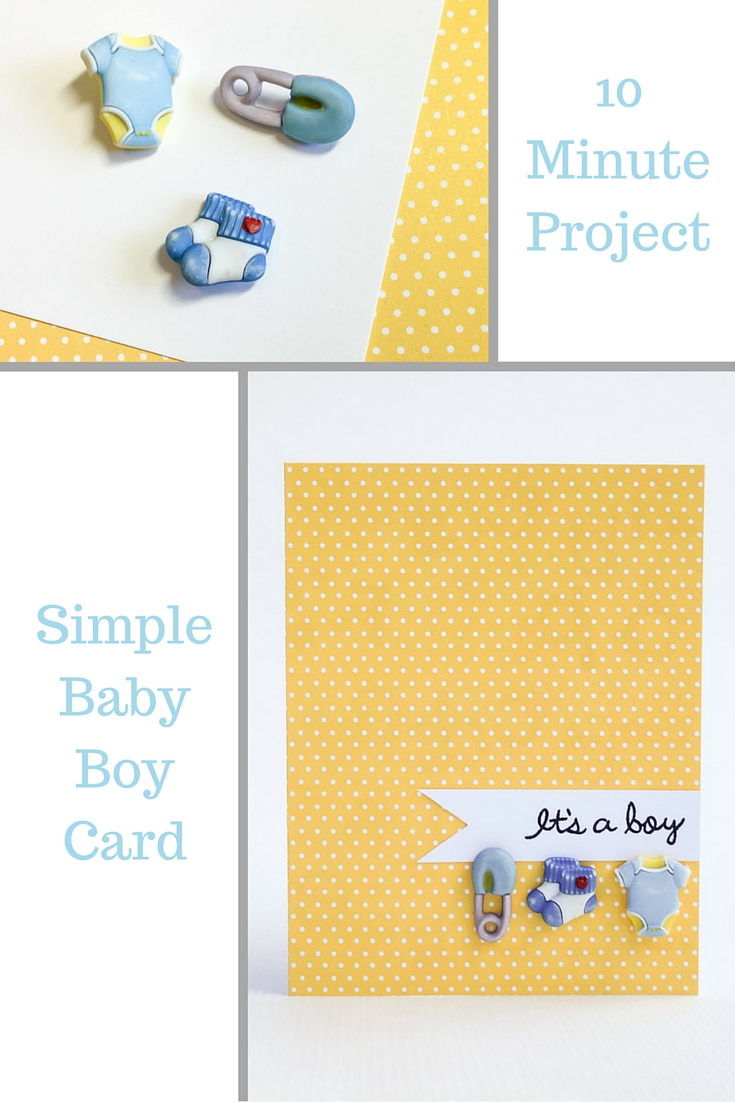
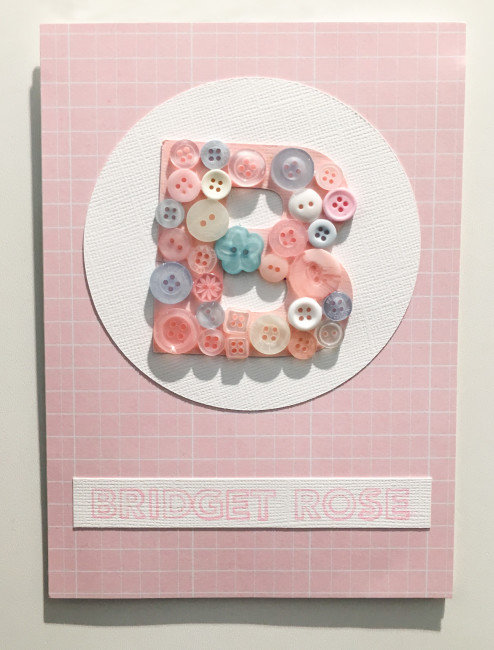
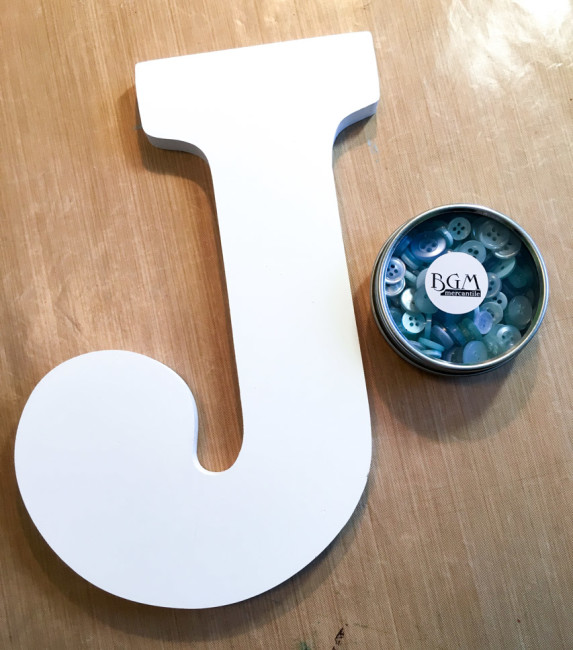
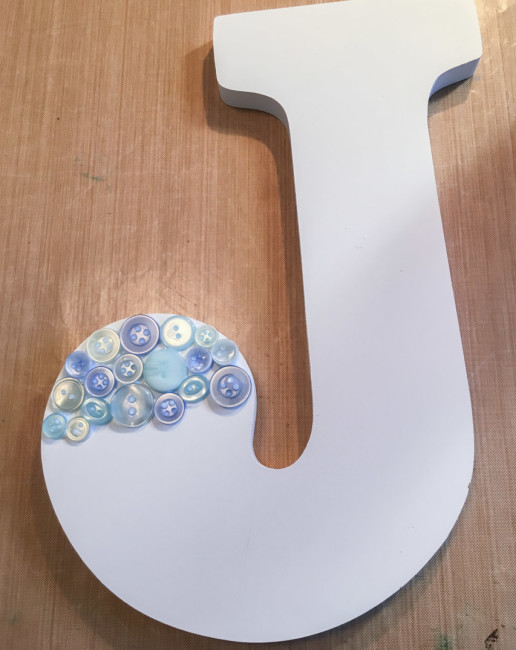
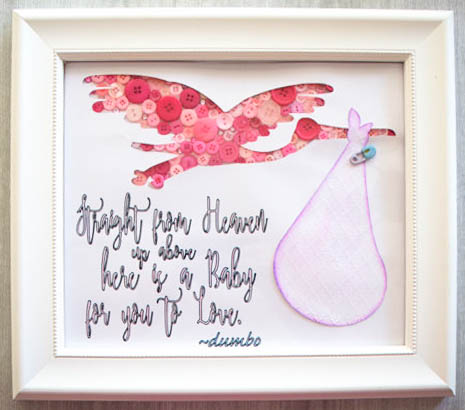
Hello! Kelli here. I am excited to share this sweet button nursery decor with you today! A dear family member is having her first baby soon – a girl! My family member is a Disney fanatic, and so I thought this sweet little project would be just right up her alley for nursery decor.

I wanted to create a button silhouette, but sometimes it can be difficult to get those round buttons to fit into a certain shape.  I solved the problem and saved some time by using a cut out to go over the buttons, giving it nice crisp lines.

straight-from-heaven-baby-girl-nursery-decor-650x434

Supplies needed:

Step one:

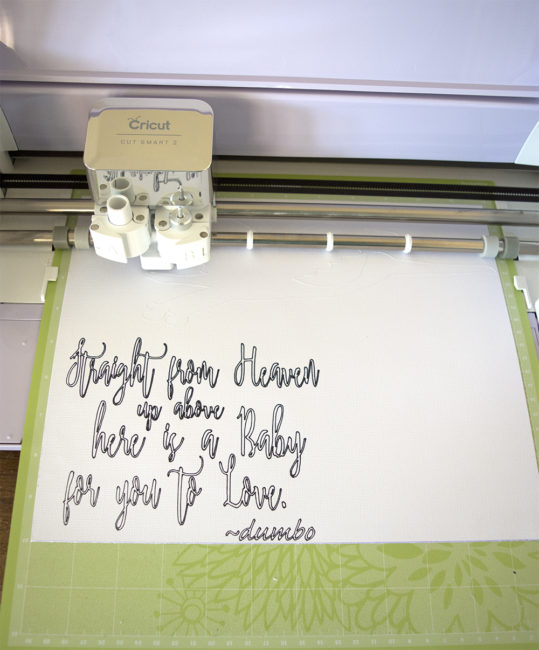
Start by printing out the design templates. I used three sheets of 12×12 cardstock. The heavier the cardstock is the easier this project will be. The first sheet you print should be the quote with the stork outline. The second sheet will be the bag cutout, and the third sheet will be blank.

You can download the PDF templates here:

Step two:

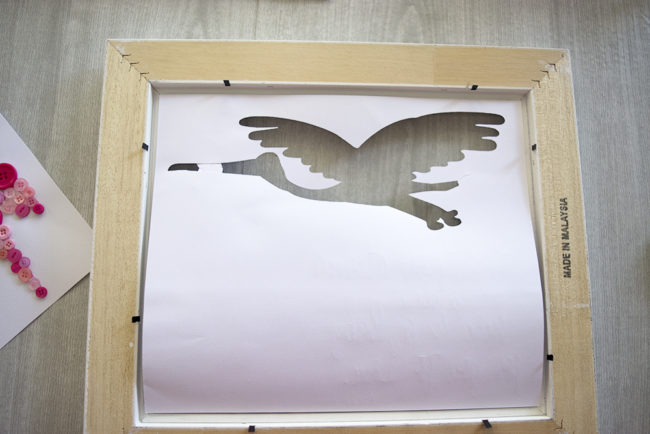
Cut out the stork outline. Use a sharp knife or the point of your scissors to poke a hole in the center of the stork, and then cut it out. Alternatively, if you have a Cricut or a Silhouette cutting machine, you can upload the template into the machine’s software and use the machine to draw the lettering and cut out the stork for you, which is what I did.

Step three: 

Lay the sheet with the cut out stork on top of the blank sheet of cardstock. Use it as a template to trace the outline of the stork onto the blank sheet.

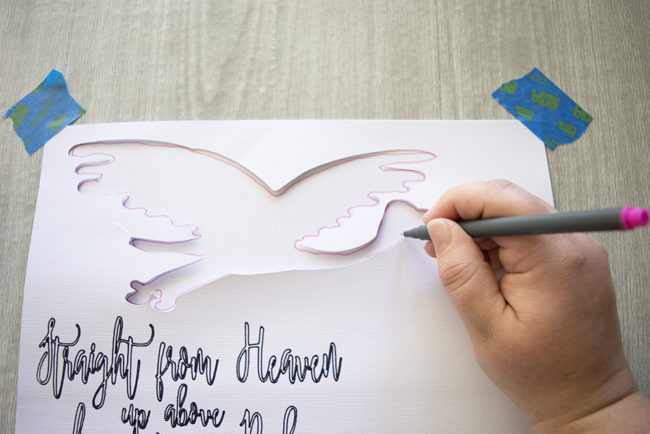
The outline will give you an idea of where the buttons need to be placed.

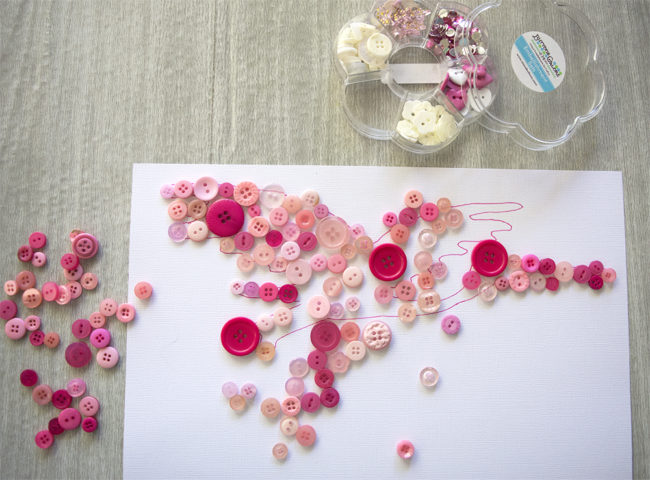
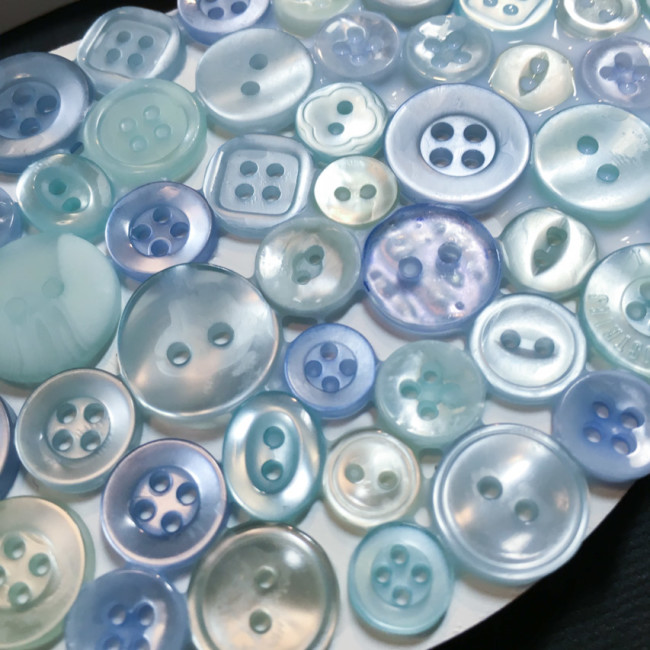
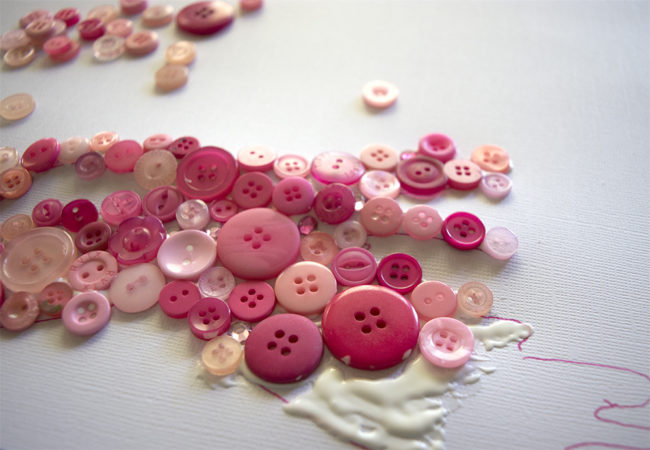
Glue pink buttons to the blank sheet of cardstock, filling in the stork outline. You don’t need to worry about going outside the lines with the buttons.

Step Four:

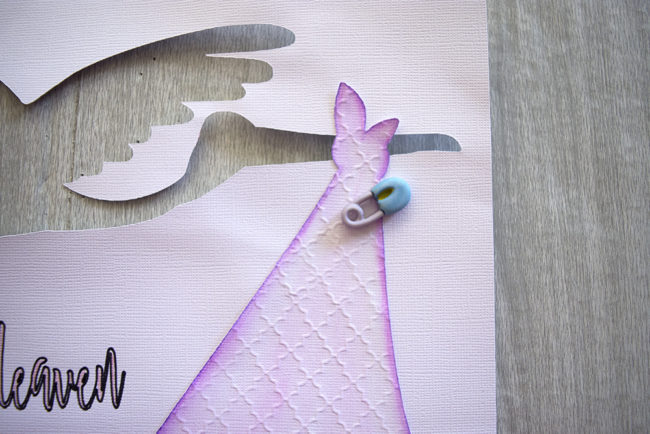
Cut out and color the stork’s bag. I ran it through my manual die cut machine with an embossing folder to give it a little bit of extra depth. Alternatively, you could use a patterned paper to print the bag template on for an extra something. Glue the stork bag onto the cardstock sheet with the cutout stork silhouette,  making sure to line up the knot on the bag with the stork’s beak. Glue an adorable clothes pin button to the bag. (Cut off the shank first with scissors or a shank remover.)

Step five:

Layer the pages into your picture frame.  First, the stork cutout sheet goes in face down.

Lay the cardstock sheet with the glued buttons on face down on top of the first sheet, and line them up.  Replace the frame back and you’re done!

Now your buttons have a perfect silhouette line without any fuss, and you have some adorable nursery wall art for a sweet new baby.  Change the pink buttons to blue ones for a boy (or yellow if you don’t know the baby’s gender), and it works for both!


0

Quick Flower Banners for a Girl’s Room

Buttons are a great way to add detail to home decor projects. This flower banner project uses them to finish off the flowers and banners that make a plain valance into a pretty accent for a girl’s room.

Flower Banner

Supplies:

My daughter’s room has had this simple white valance since I first designed her nursery before she was born. She’s nearly 14 now, and it seemed time to change it up a bit. She loves everything with flowers, so I thought a flower banner would be an easy and fun way to add some more color to her room.

Flower Banner-1480

To make this flower banner, cut the number of triangle banners you think that you’ll need from burlap or cotton fabric. Die cut the flowers from felt and  hot glue them to the front of the banners. Hot glue a button into each flower center to finish it.

Cut a length of jute twine that is long enough for your window. Fold over the top of each banner, lay the string into the crease, and hot glue the fold down. Once all of the banners are glued onto the string, finish each banner with two buttons.

Flower Banner-1478

If you are decorating on a budget – or even if you aren’t – this is a great way to add some style to a simple valance. And because it isn’t permanent, it can be easily removed for washing the valance, or redecorating. Make one today!

2

Clean & Simple Baby Boy Card

A handmade card is the perfect finishing touch to a gift for a new baby. With the Buttons Galore 3D “Baby Hugs” collection of buttons by Vicki Schreiner, it’s fast and easy to make cards like this simple baby boy card! The only supplies needed are paper and buttons and a pen.

Supplies for Baby Boy Card

Supplies Needed:

That looks like a long list, but it’s really just a package of buttons, two sheets of cardstock, and some glue. I used a sentiment stamp for adding “it’s a boy” but it could easily be added with just a marker.

Simple Baby Boy Card

Assembling this card is simple – and fast! Just cut a piece of white cardstock sized 8.5″ x 5.5″ and fold it in half to make a card base. Cut a piece of yellow patterned paper that is 4.25″ x 5.5″ and glue it to the front of the card base.

Cut a 3/4″ strip on the leftover white cardstock to make the sentiment strip. Use scissors to snip the ends of it to create a banner. Write or stamp the sentiment on it, and glue it about 2/3 of the way down the front of the card.

Simple Baby Boy Card

For the final step, use scissors or a shank remover to cut the shanks off of the 3D buttons. Glue the buttons down with a white glue like PPA Matte Adhesive or Aleene’s Tacky Glue.

This quick and simple baby card can be make in less than 10 minutes. This simple design can be adapted to many other occasions (like birthdays and weddings) as well with the help of our other 3D button collections such as Sweet Delights or our wedding collection.

Simple Baby Boy Card using 3D buttons by Nancy Nally for ButtonsGaloreAndMore.com - great quick baby shower card or to welcome baby!


0

Clean & Simple Baby Card with a Button Monogram

Today we are continuing with the theme that we started on Monday of using button monograms for babies! Only this time, the button monogram is the central piece on a clean & simple baby card.

If elegant and simple is more your style than the typical baby cutesy, this card may be just what you are looking for. The pastel color palette and the use of the buttons add delicate touches of a baby theme, but the overall design is understated, simple, and more mature.

Button Monogram Baby Card

Supplies:

  • Buttons Galore Lt Blue/Light Pink/White Color Blend buttons
  • Simple Stories “So Fancy” patterned paper
  • White textured cardstock
  • Pink textured cardstock
  • Cricut Explore Machine and cutting files
  • Arial Black font
  • Tsukineko Memento Ink in Angel Pink
  • Hero Arts Clearly Kelly “Kelly’s Outline Alphabet” stamps

Directions:

Cut and fold a card from the white cardstock. Adhere pink patterned paper to the front.

Using the die cutting machine, cut a large circle from the white cardstock. Adhere to the top front of card.

Cut a strip of white cardstock wide enough for the alphabet stamps to fit on. Stamp name on it, trim ends, and adhere to bottom of card front. (If necessary, use two strips placed one on top of the other for longer names.)

Using Arial Black font, cut the monogram from the pink cardstock. Cover the monogram in buttons, using white clear-drying glue. Adhere the monogram to the middle of the white circle.

With the monogram and baby’s name, this clean & simple baby card would be great for a baby announcement, shower invitation, or mom’s thank you cards!

0

Button Monogram Wall Art

A new baby, whether it is yours or someone else’s, is always a great reason to make something! And what could be cuter than button monogram wall art?

This fun project uses two key components – a wood monogram letter like the kind available at most craft stores, and two tins of our beautiful Sea Glass buttons. I really love these buttons – their beautiful blue/green translucence really makes me want to go down to the shore and hunt for glass!

Button Monogram wall art supplies

Supplies:

Lay down areas of glue in sections, and fill the letter in with buttons. Don’t be afraid to lay down a nice thick layer of glue so the glue will come up the button holes when the buttons are pressed down into it. When the glue is dry, this creates “prongs” that grab onto the buttons and help hold them in place more securely.
Button Monogram Wall Art construction

The areas between the buttons don’t need to be even or really tiny. While it looks uneven viewed very close up, unless a gap is extremely large it won’t look awkward when viewed from a reasonable viewing distance.

Button Monogram Wall Art close up

For the finishing touch (and to add the baby theme to the button monogram), tie a nice large bow out of the white ribbon. Attach it on top of the buttons on the button monogram using hot glue. Cut the stem off of a Ducky button, and hot glue that on top of the bow.

Button Monogram Wall Art embellishment

This button monogram project can be made in any color, and would make a great gift or baby shower decor. Hang it on a nursery wall, a bedroom door, or prop it up on a dresser top!

Button Monogram Wall Art

0

ScrapFest – Welcome Baby Girl Purse Card

Allie Gower has created a Welcome Baby Girl Purse Card using the It’s a Girl Button Assortment, an Archiver’s Exclusive.

ScrapFest – Welcome Baby Girl Purse Card

Archivers Logo

Buttons Galore is heading to Archivers Mall of America for ScrapFest 2013.

Join us for fun make and takes each day of ScrapFest.

Use It's a Girl Buttons to create a Welcome Baby Girl Purse Card.

Supplies for  Welcome Baby Girl Purse Card

  • It’s a Girl Buttons, Archiver’s Exclusive
  • Fl0wer – K & Company
  • Cardstock – Bazzill
  • Patterned Paper – Doodlebug Design
  • Lori Whitlock’s Purse Card – Silhouette Online Store
  • Adhesive – Scott Craft Glue, Glue Dots

Instructions

  1. Die cut card parts from cardstock and Doodlebug Design Paper (Sugar & Spice) and assemble using Scott Craft Glue.
  2. Add K & Company Flower.
  3. Adhere It’s a Girl Buttons with Glue Dots.

Please note that all of these supplies used to make the ScrapFest projects are readily available in your local Archivers, and many of them are available in the Archiver’s Annex Online. Projects will be on display in the Archiver’s at the Mall of America.

See more of Allie’s work at her blog, My Card Party.

0

Powered by WordPress. Designed by WooThemes