Header

Tag Archives | Holiday Frame

Frame a Patriotic Rustic Flag for July 4th!

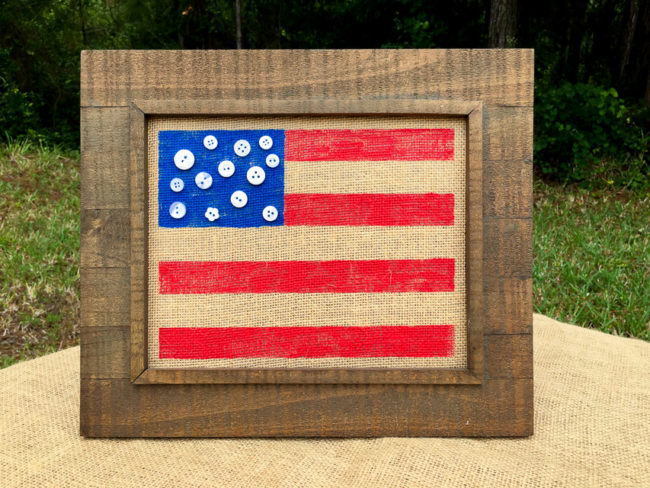
It’s time to make another addition to our holiday frame project! This time, we’re creating a rustic flag insert for the frame that will be perfect for showing your patriotic pride for the 4th of July or the upcoming Olympics!

(For those new to the series, the holiday frame project is a 8″x10″ frame that I’m creating a series of decorative inserts for to celebrate various holidays and occasions. To see previous installments in the series, click here.)

Rustic Flag Frame

Supplies:

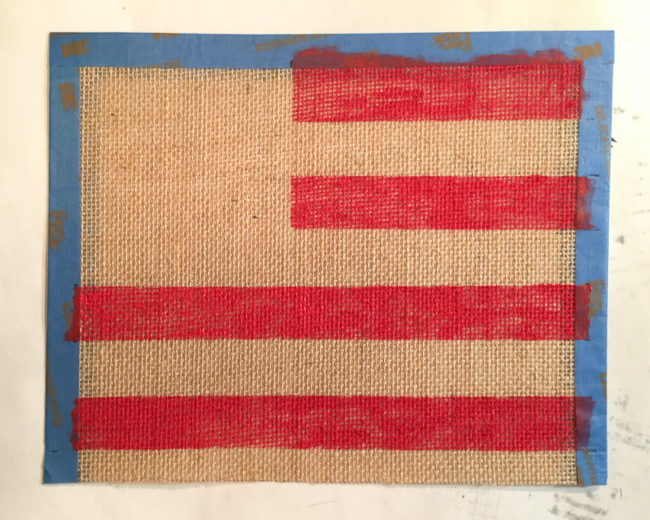
The hardest part of making this rustic flag project is…the math! To start, you are going to need to measure the opening on your frame, and decide how much border you want around your frame. Then use the painter’s tape to mask off the edges right up to the area that you want to paint.

Divide the remaining vertical area by 7 to determine the width of the stripes on the flag. Use painter’s tape to mark off the bottom stripe and fill in the stripe with paint. Remove the tape right away. While the stripe dries, determine how wide you want your blue area for the stars (I suggest about 40% of the width). Then mask it off with vertical strip of tape to protect it while you paint the top two red stripes. Measure down from the top to create your first stripe, lay down a piece of painter’s tape to protect the “white” stripe, and fill in the red stripe with paint. Remove the tape immediately after painting.

Letting each stripe dry before painting the next one, continue measuring and masking with tape before taping, until all 4 red stripes are painted.

Holiday Frame Flag in progress

Once all of the red paint is dry, then you can lay down painter’s tape to paint the blue area.

Holiday Frame Flag in progress

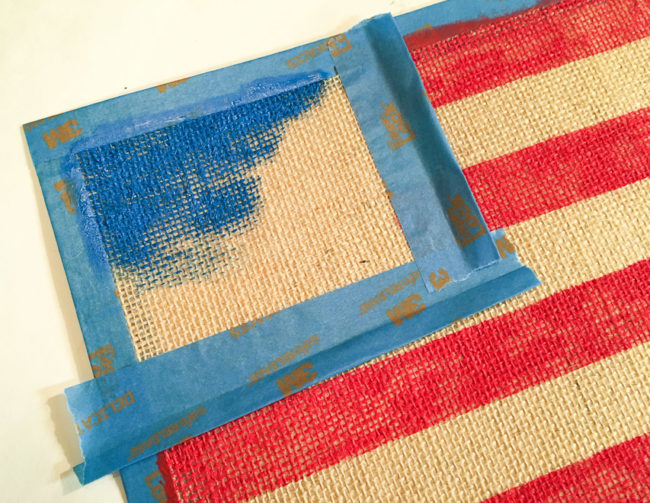
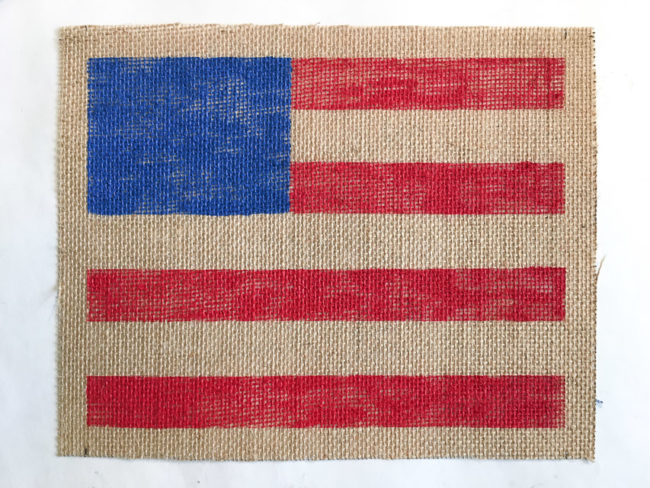
Peel the tape up as soon as you are finished painting, while the paint is still wet. Because of the open weave of the burlap, your paint will appear “patchy”, since in some places it will fill in the weave and in some it won’t. This adds to the rustic feeling of the project!

Painted Rustic Flag on Burlap

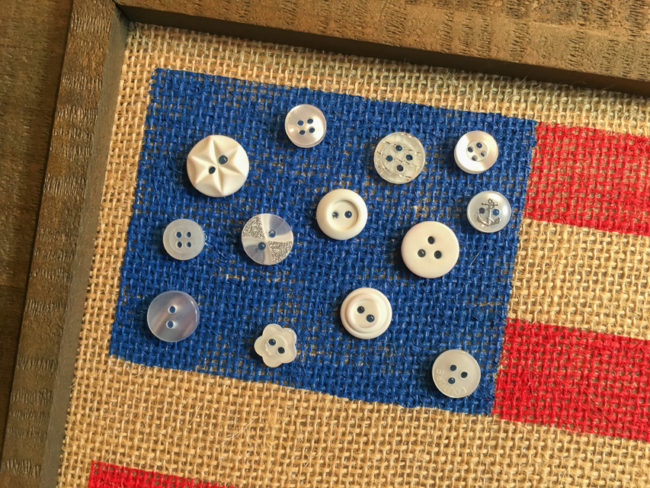
The final step is to select 13 small to medium sized white buttons from the Patriotic Mix of Button Basics. Arrange them in a random way in the blue area, and use a hot glue gun to attach them to the flag.

Flag buttons close-up

Now you’re all ready to put your flag in your frame and celebrate the 4th of July or cheer on Team USA for the Olympics this summer!

Rustic Flag frame is great home decor for the 4th of July! Created by Nancy Nally for Buttons Galore.

0

Holiday Frame: A Floral Welcome Frame

For those of you following along with the holiday frame project, there may be times when you don’t want a seasonal element in it. Today, I’m here to show you a welcome frame design for your frame for those in-between times of year!

Welcome frame featuring 28 Lilac Lane products by May Flaum from Buttons Galore. Easy photo frame home decor project.

This simple design makes use of beautiful elements from our 28 Lilac Lane “Attic Findings” kit, as well as 3D die cut elements. All of the paper elements are created from a single paper pad for easy coordination of colors and designs.

To create this welcome frame project, the background paper was cut to 8″ x 10″ to fit the frame opening. Then the crochet trim from the Attic Findings kit was cut to create the border and glued in place. The word “welcome” was die cut (sized to just slightly more than 5″) and the edges were inked to provide a drop shadow before adhering it as well.

Welcome frame featuring 28 Lilac Lane products by May Flaum from Buttons Galore. Easy photo frame home decor project.

The three flowers were sized to about 2.25″ in diameter, and then cut from different papers. (The stamens on two of the flowers were cut from another flower design that wasn’t used on the frame.) The edges of the pink flowers were inked, and then the flowers were assembled.

The finishing touch on the flowers were the embellishments from the Attic Findings kit. Each flower got its own touch of contrasting color. The buttons were threaded with embroidery floss and tied off before adhering to give them a finished look.

Supplies:

This welcome frame is a beautiful way to fill your holiday frame in between holidays! In case you’ve missed them, don’t forget to check out the previous installments in the holiday frame series. What holiday would you like to see added to the series next?

1

Christmas Photo Frame Project

Remember that Autumn photo frame I shared awhile back? Well, it’s past time to decorate it for Christmas! This rotating seasonal decorative frame is so easy to to decorate to bring a seasonal spark to your home decor.

Christmas seasonal photo frame

Supplies:

Instructions:

Cut an 8″x 10″ piece of the background fabric. Iron Heat n’ Bond to it to stabilize it.

Use die cut machine to cut tree and phrase out of glitter iron-on. Iron in place on on background.

IMG_2626

Carefully remove shanks from snowflake buttons using scissors or a button shank remover. Adhere on Christmas tree in random pattern using hot glue gun.

For an brighter look than the gold and white theme, try making ornaments out of bright red buttons!

red button ornaments

Trim off any excess interfacing around the edge of the fabric.

Insert the sheet into the frame, and enjoy your Christmas photo frame!

Christmas photo frame

I’ll be back in January with a seasonal Valentine’s addition for your frame! In the meantime, we’ll have plenty of exciting things going on here on the blog as the Craft & Hobby Association in early January gets closer…starting with a big announcement tomorrow (Monday) here on the blog! Don’t miss it!

CHA News promo

1

Celebrate Fall with a Festive Holiday Frame!

Welcome to our new Holiday Frame series! This is the first in a series where I will be creating interchangeable inserts for a photo frame to provide year round seasonal decoration for any room in your home!

This 8″ x 10″ frame can stay out all year round, and the interchangeable inserts can be easily filed away when the seasons change until it is time to use them again.

Our first design, with the word “Autumn” and pumpkins, can take you through the fall season and both the Halloween and Thanksgiving holidays.

Autumn Frame

Supplies:

  • Burlap Sheet
  • Cotton Quilt Fabric (green and orange)
  • Heat-n-Bond Ultra
  • Glitter Iron-on
  • Cricut Explore machine
  • Chipboard Sheet
  • Button Bonanza in Natural
  • Kraft thread or twine
  • 8″ x 10″ frame

Instructions:

  1. Trim burlap sheet to 8″ x 10″ size to fit frame.
  2. Adhere Heat-n-Bond Ultra to reverse side of fabric by ironing. Cut out pumpkins with Cricut Explore machine.
  3. Cut strip of green fabric for the bottom of frame. Snip ends of it to look like grass.
  4. Autumn Frame close upCut the word “Autumn” from glitter iron-on material.
  5. Iron all of the cut pieces onto the background.
  6. Stitch buttons onto the pumpkins.
  7. Remove glass from photo frame. Insert the completed burlap sheet, backed with a sheet of chipboard to replace the thickness of the glass.
  8. Display and enjoy!

The buttons provide dimension to the design, as well as providing some brown that ties the design to the frame.

Come back in mid-November for the next installment in the series – for Christmas!

0

Powered by WordPress. Designed by WooThemes