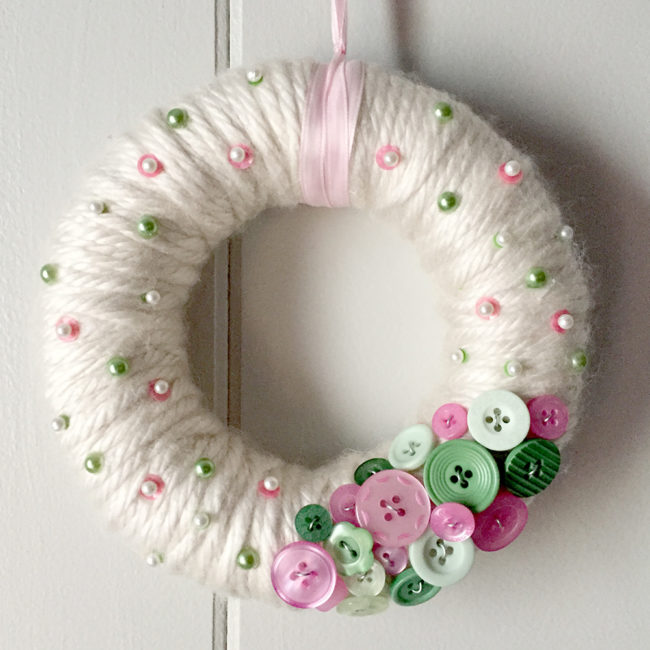
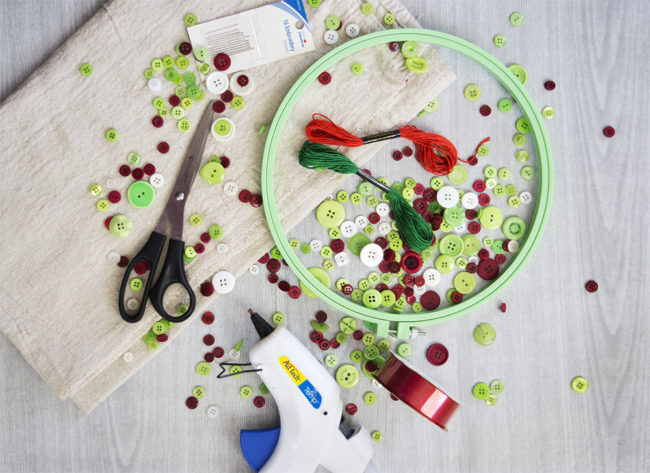
A beautiful wreath is an essential part of complete holiday decor. This yarn wrapped button wreath helps welcome guests to your home and allows you to express your creativity as well! Continue Reading →

A beautiful wreath is an essential part of complete holiday decor. This yarn wrapped button wreath helps welcome guests to your home and allows you to express your creativity as well! Continue Reading →
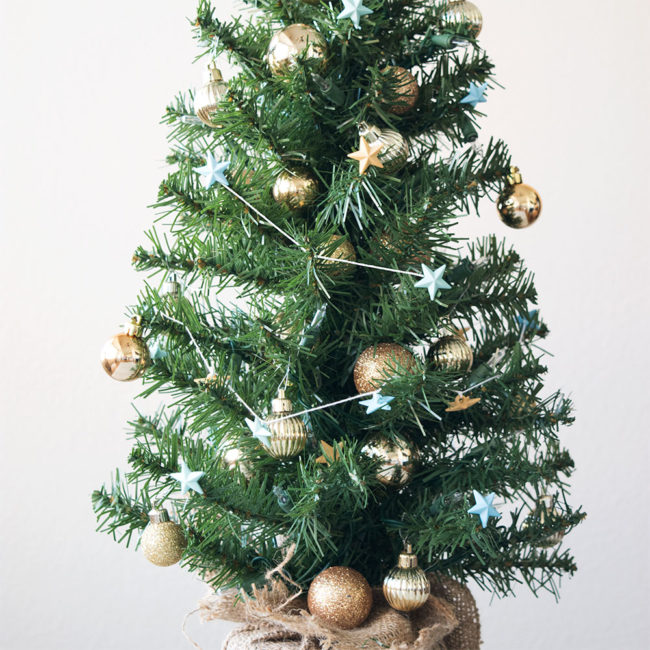
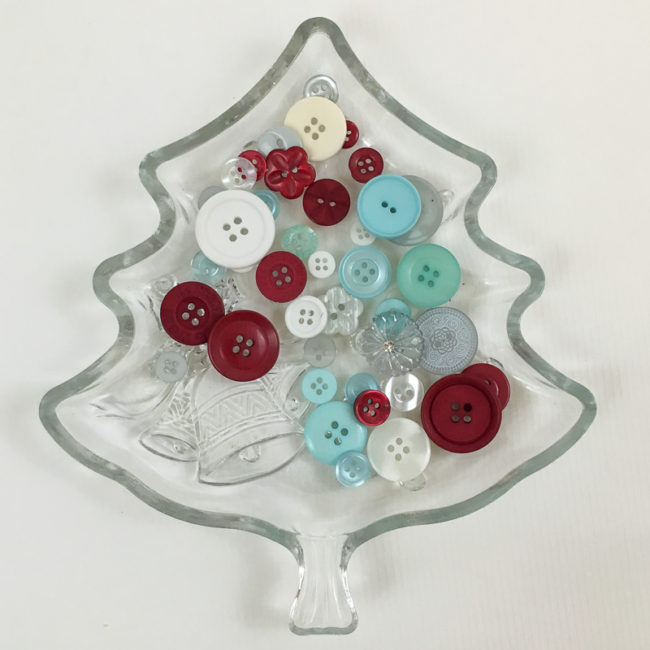
My favorite holiday decorations are lovely Christmas trees. I have my big full-size Christmas tree, of course. And several medium sized trees. But I also have at least a dozen cute little mini trees throughout the house. I think that the adorable little mini trees are just as fun to decorate as the bigger ones. Sometimes the small size ornament selection is lacking and they all seem the same from store to store. So I like to get creative and make my own! Continue Reading →
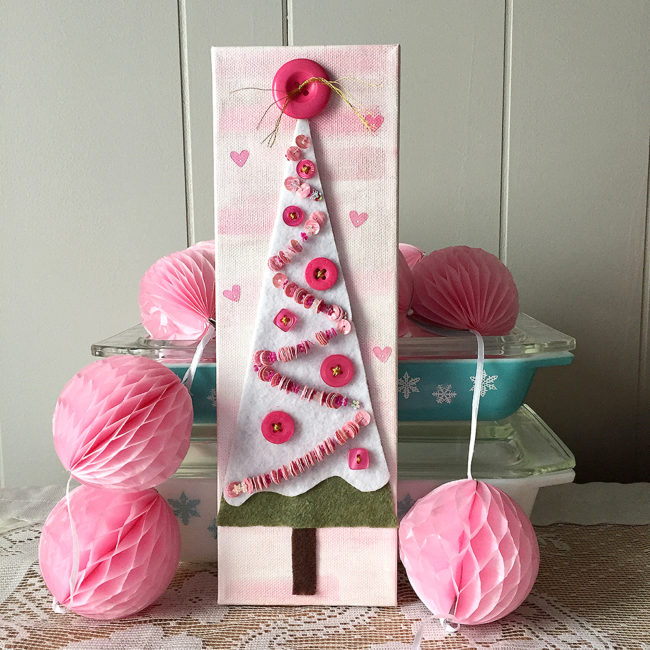
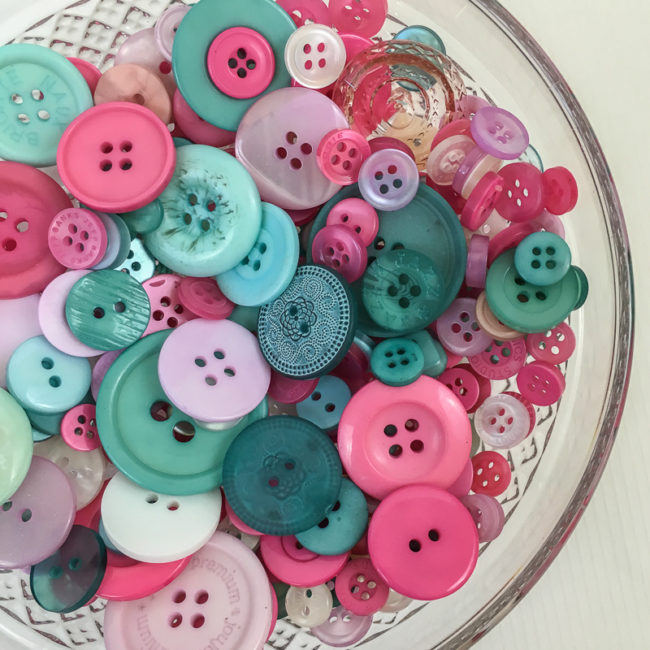
Do you love crafting for the holidays but just can’t stand making everything red and green? Good news – pink is trending this Christmas! Add this pretty pink Christmas tree decor to your decor to change things up a bit this holiday season! Continue Reading →
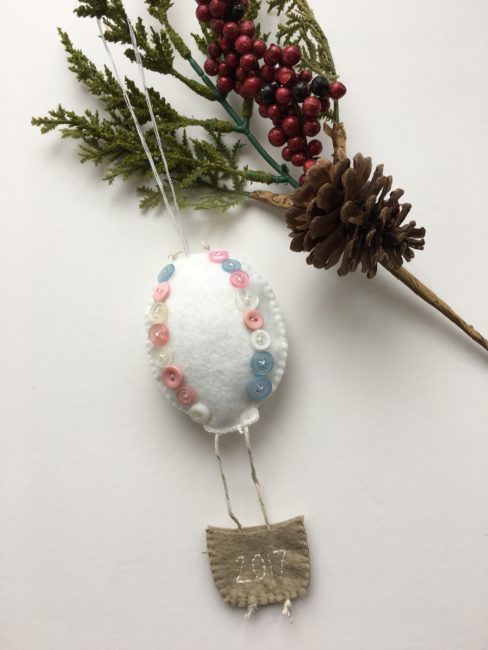
It’s Aimee here today with a simple little hot air balloon ornament, easy enough for the most novice of stitchers to complete. Gift this DIY Baby’s First Christmas Ornament to a friend’s newest little one or hang it on your tree to celebrate the new little life in your home! Continue Reading →
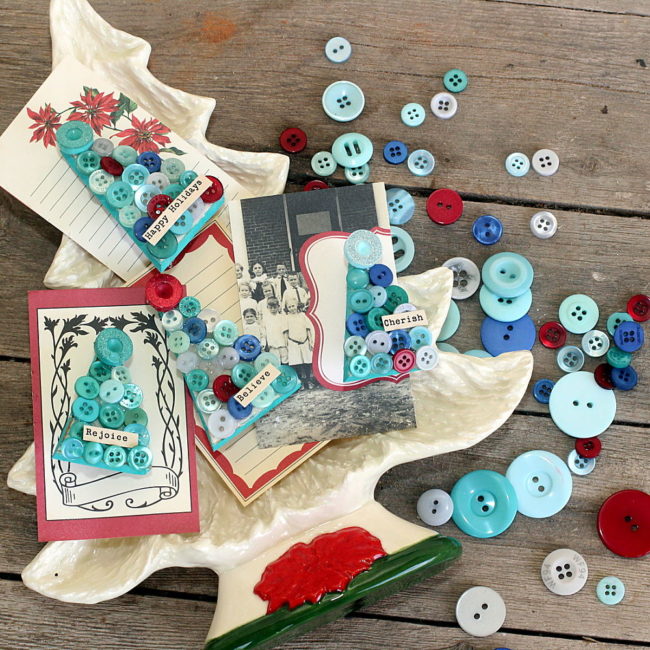
Hi, it’s Connie here today with the Buttons Galore & More design team sharing some really cute, wintery Christmas tree pins. These pins were created using a beautiful mix of buttons called “Winter Wonderland“. They are beautiful and perfect for this project! Continue Reading →
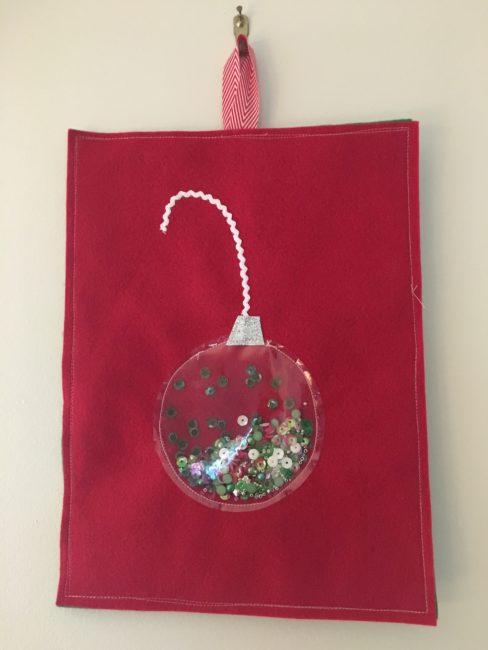
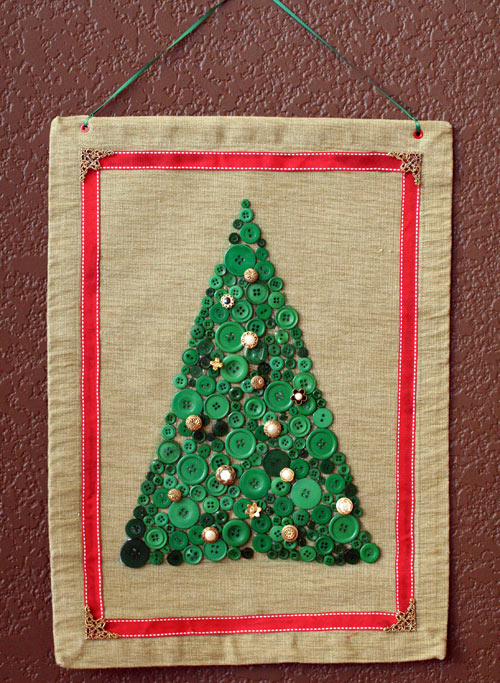
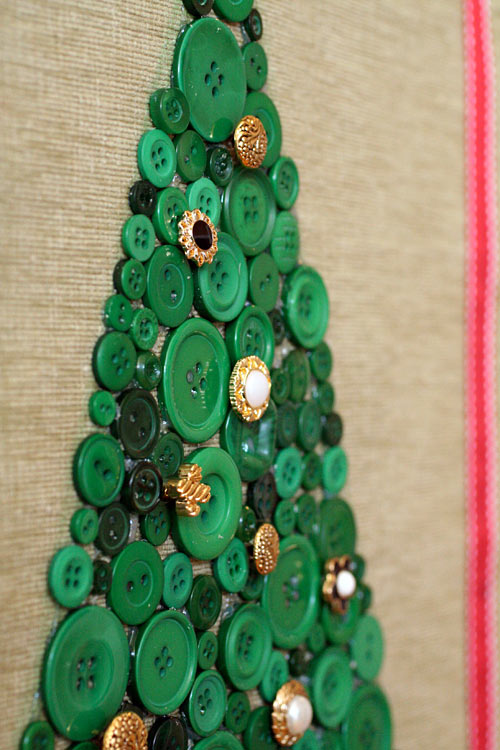
Aimee here and today I bring you a simple sewing project with all the directions you need to make a simple wall hanging, with just a little bling, just in time for the holidays! Continue Reading →
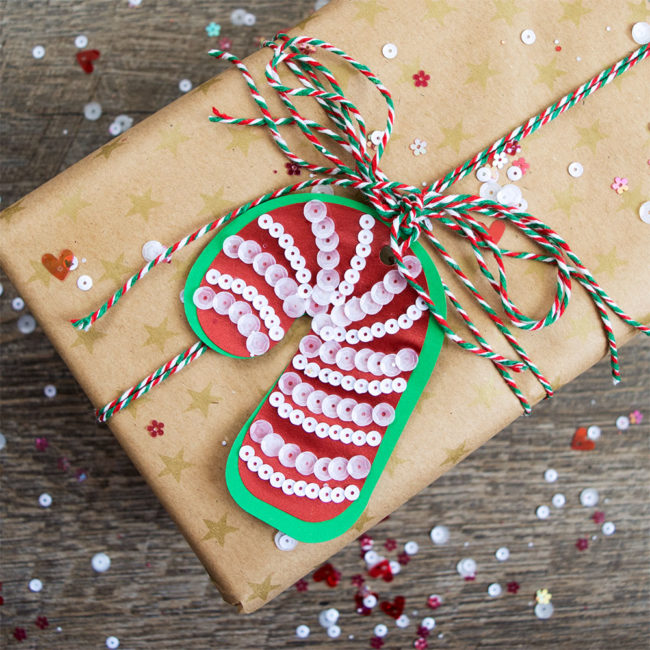
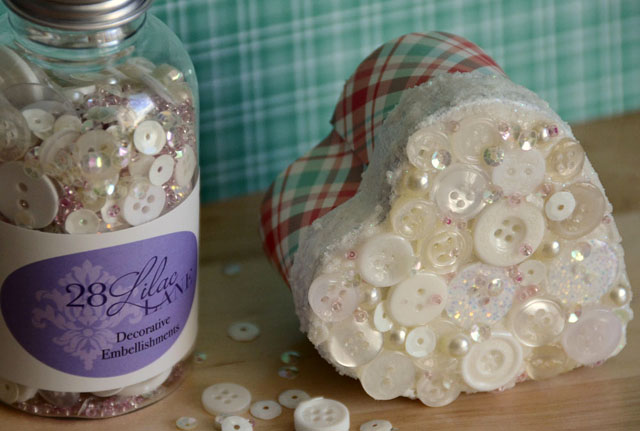
One of my favorite things during the holiday season are handmade gifts. But even more fun than making just the gifts, I love to make the tags and even the wrapping paper to wrap the handmade gifts in. I start making my holiday gift wrap and tags super early in the year and I put them on everything! These fun 28 Lilac Lane Candy Cane Sequins were perfect to make candy cane Christmas gift tags! It’s such a lovely mix of red and white sequins for the holiday season. The candy cane gift tags turned out so festive and cute. It’s the perfect little tag for a cute little package! Continue Reading →
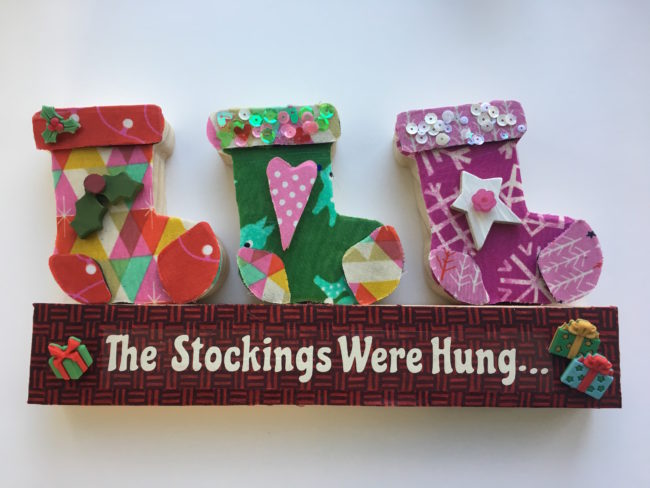
Hi! It’s Aimee here with a great project to add to your Christmas mantle decor this year. Using the new stockings set, I added a little fabric and some button bling to dress up these simple wood decor pieces. Continue Reading →

Hi, it’s Connie here with Buttons Galore & More design team! I have a fun and festive project to share today using “Christmas Tree with Presents“, one of the new Foundations Decor pieces that are now available from Buttons Galore. The 28 Lilac Lane O’Christmas Tree embellishment bottle added some green sparkle alongside some really cute Buttons Galore 3D Christmas buttons. Continue Reading →
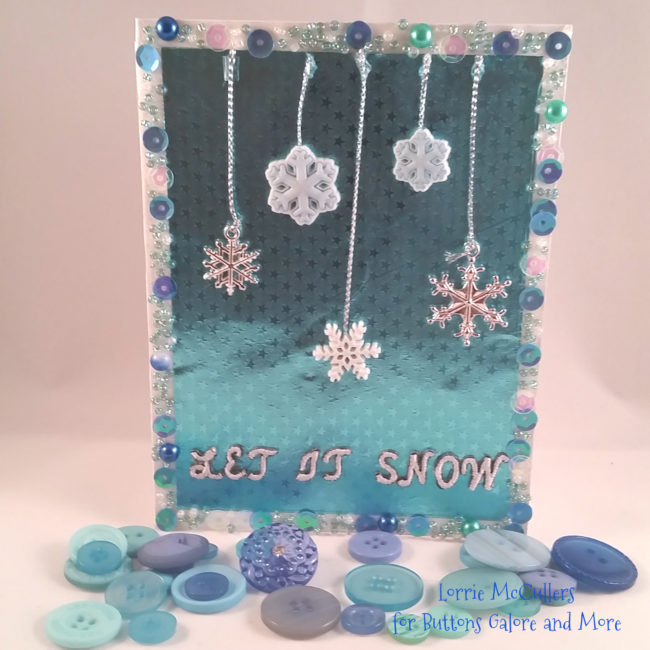
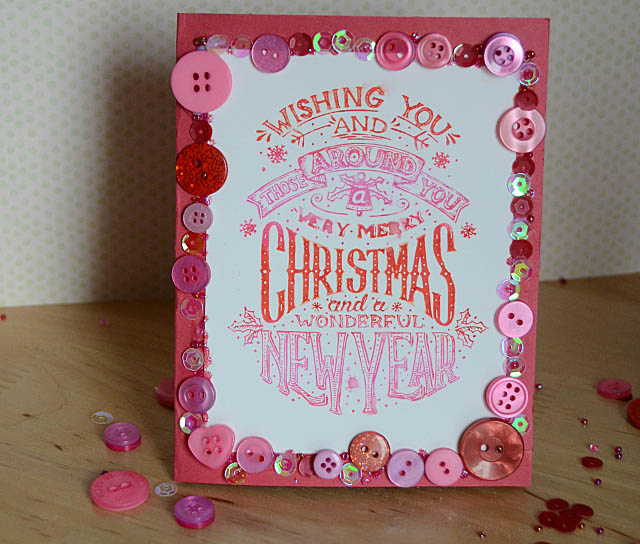
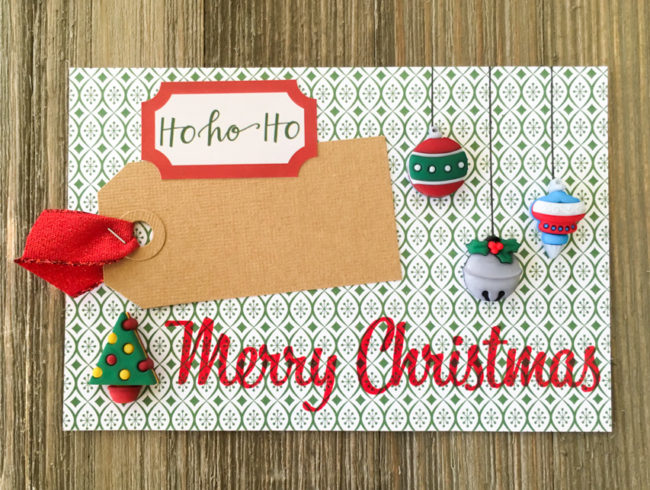
Nothing says Christmas like a flurry of snowflakes! Using adorable buttons and a beautiful sequin mix from Buttons Galore and More, I am getting into the Christmas spirit with this Let It Snow Christmas card. Continue Reading →
I’m not quite ready for Christmas just yet, but it’s never too early to start planning! Snow is not my most favorite thing in the world. It’s wet and much too cold for this desert girl! I’m a summer fan for sure. However, I do love beautiful snowflakes. Every year I decorate my kitchen with lovely, sparkly snowflakes. I always say that it’s my favorite kind of blizzard! This year I have plans to put a small white tree in the kitchen, decorated with more snowflakes, of course. I wanted to make some of the ornaments myself, and the adorable snowflake buttons in the Snowflakes Value Pack were just perfect for the task of making snowflake ornaments! Continue Reading →
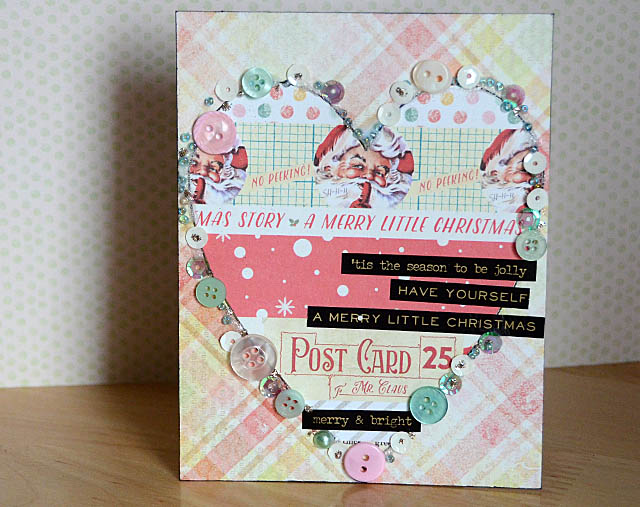
Hi, Connie here with Buttons Galore & More design team sharing a Snow Globe Christmas card using the Holly Jolly embellishment kit by 28 Lilac Lane. It is never too early to start thinking of creating special, one-of-a-kind Christmas cards for those special people you love. Our 28 Lilac Lane collection has put together embellishments kits that take the guess work out of creating special cards. Holly Jolly is the Christmas embellishment kit that is full of festive embellishments that will make beautiful cards – the cards people will want to keep and display! Continue Reading →
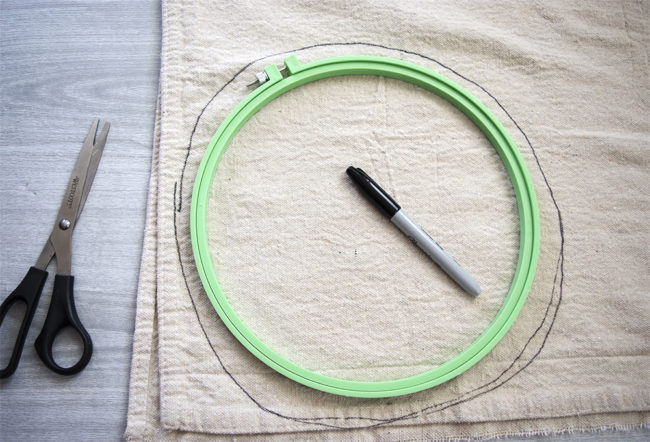
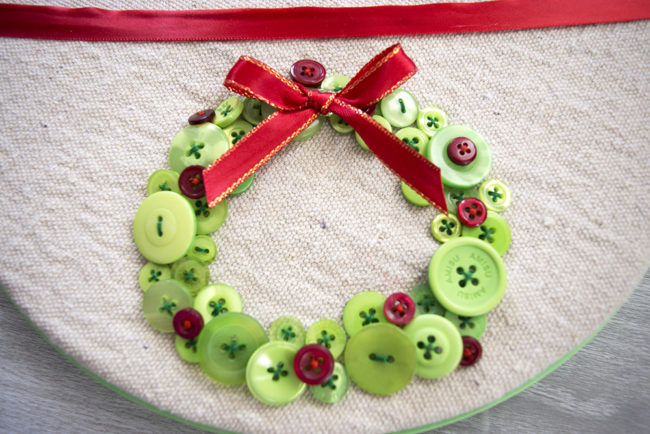
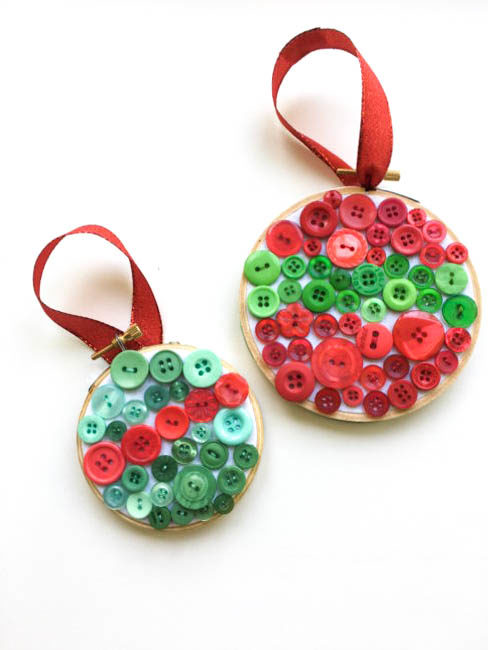
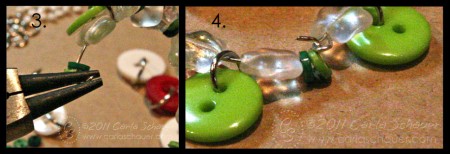
You can celebrate a little bit of Christmas in July by crafting this fun and easy Embroidery Hoop Christmas Card Holder. This simple craft is a great way to get your kids involved and teach them basic button sewing. It will look so cute on the wall holding your Christmas cards! You can customize it by changing the button shapes, or colors to suit your decor needs.

To start making your embroidery hoop Christmas card holder, lay your embroidery hoop on your fabric and trace around the outside edge of the hoop. Don’t trace right along the edge of the hoop, since you want the fabric circle to be bigger than the embroidery hoop. The circle doesn’t need to be perfect. You will need two fabric circles. I used a canvas drop cloth that I already had, but you could also use a cotton fabric or even burlap. You don’t want the fabric to have too much stretch though, since it needs to hold the weight of the buttons and the cards firmly.
Cut out the circles of fabric, and then cut one circle in half. Don’t waste too much time trying to get the cuts perfect. You won’t even be able to tell if they are or not once the project is finished!

Finish the straight cut edge of your half circle by gluing ribbon to the edge and folding it over.
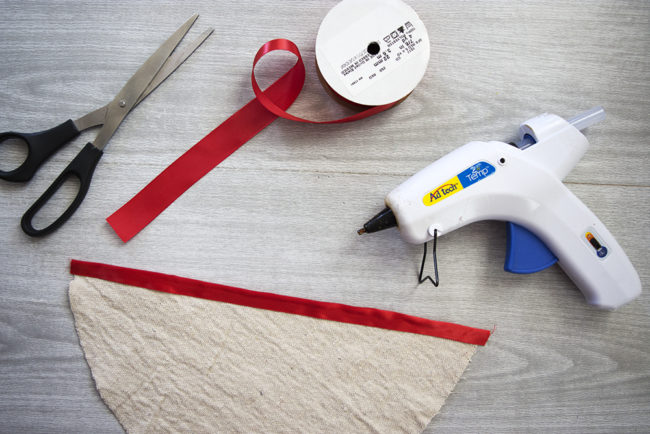
Trace a small circle onto the half circle of fabric. I used a wide mouth mason jar lid to trace the circle for my wreath.It was a perfect size. You can make your wreath bigger or smaller as desired.
Stretch the half circle fabric piece into the embroidery hoop for stability. Sew green buttons around the circle that you traced on the fabric. Tie a knot in your string and start under the fabric. Bring the needle up through the button and back down into the fabric.
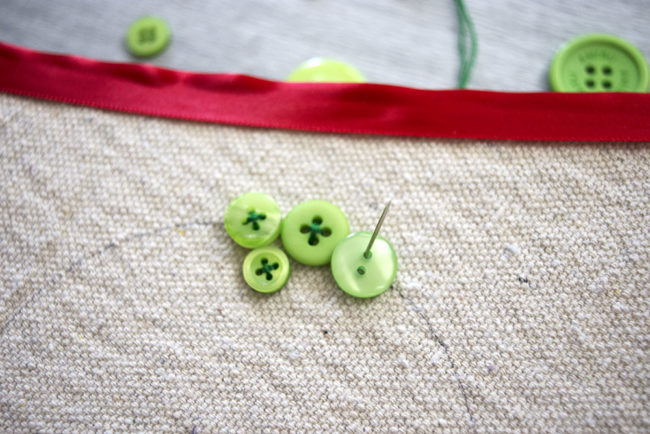
Repeat this step again so that your button is firmly attached to the fabric.

I used big buttons and small buttons around my wreath for some visual interest, and I used green buttons from both the Contemporary Christmas mix and the Button Bonanza Christmas Mix to vary the colors.
Use a few small red buttons for berries in the wreath. Sew them randomly into the green buttons using the red thread.
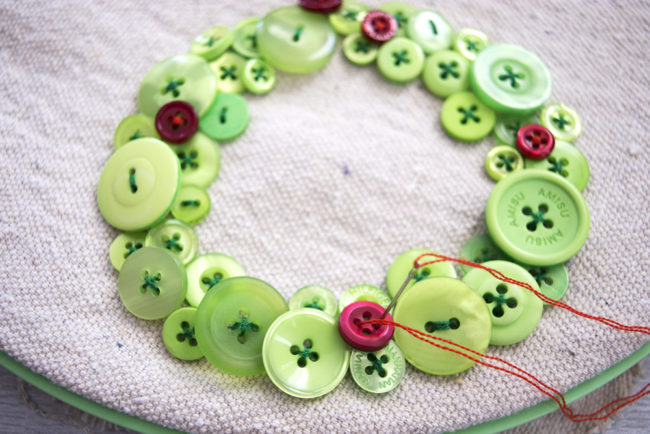
Add a small red ribbon bow to the button wreath. You can sew the bow to the wreath with your red thread, or you can use hot glue to attach it.
Lay your button wreath half circle of fabric over the full circle you cut in step one, and stretch them into the embroidery hoop. This creates the pocket for your cards to go into. Trim any extra pieces of fabric on the back of the hoop. Hang your completed embroidery hoop Christmas card holder on your wall!
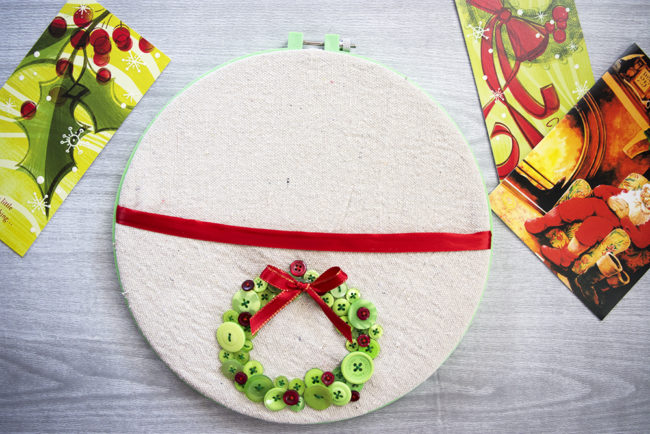
You can fit quite a few cards in one hoop, but if you typically get lots and lots of cards from your friends and family, you might want to make a couple of these fun hoops and hang them in a fun arrangement on the wall.
I think I will make two more hoops and put a Christmas tree shape on one, and perhaps some Christmas holly on another. The buttons are such a fun and cute way to add the colorful shapes to the fabric. Do you do any Christmas in July crafts? If Christmas in July isn’t your thing, this fun card holder can be customized to any time of the year! Create a fun button flower shape and hang it on the wall year round to hold other special occasion cards you might receive, or even just to hold your mail!
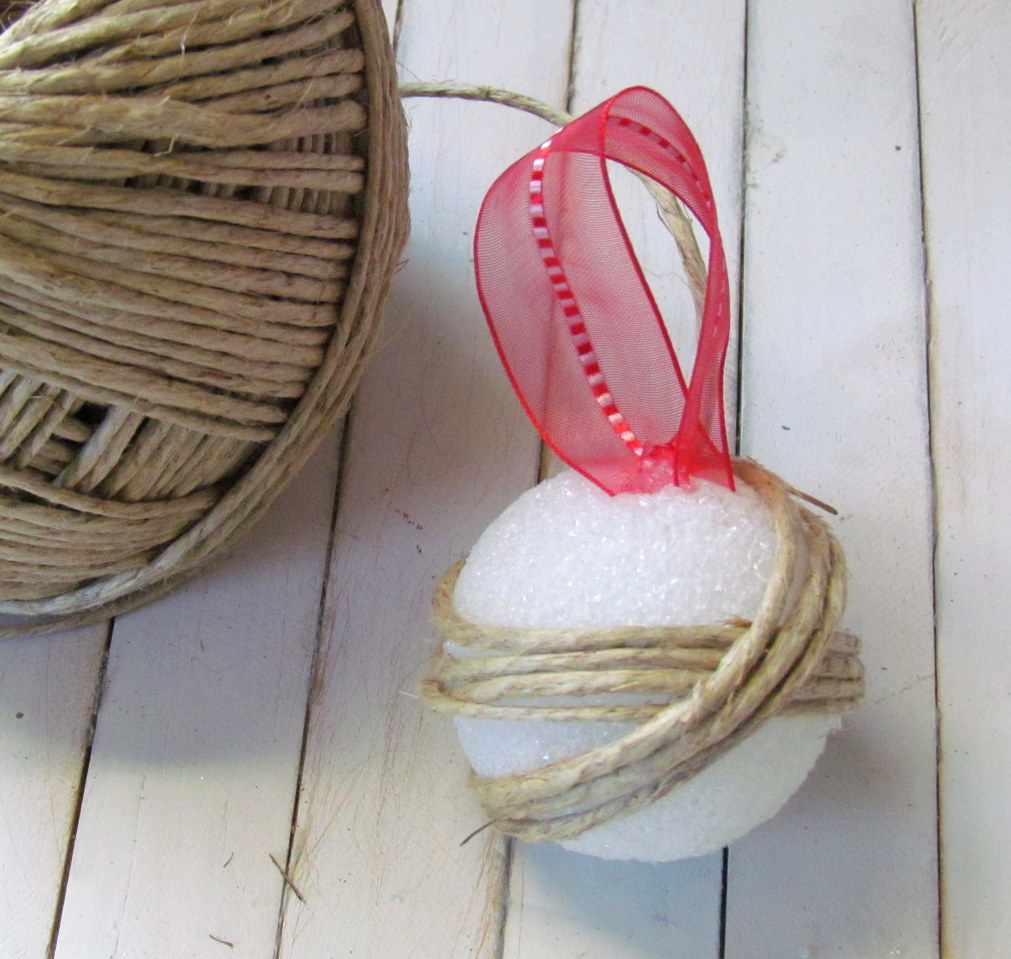
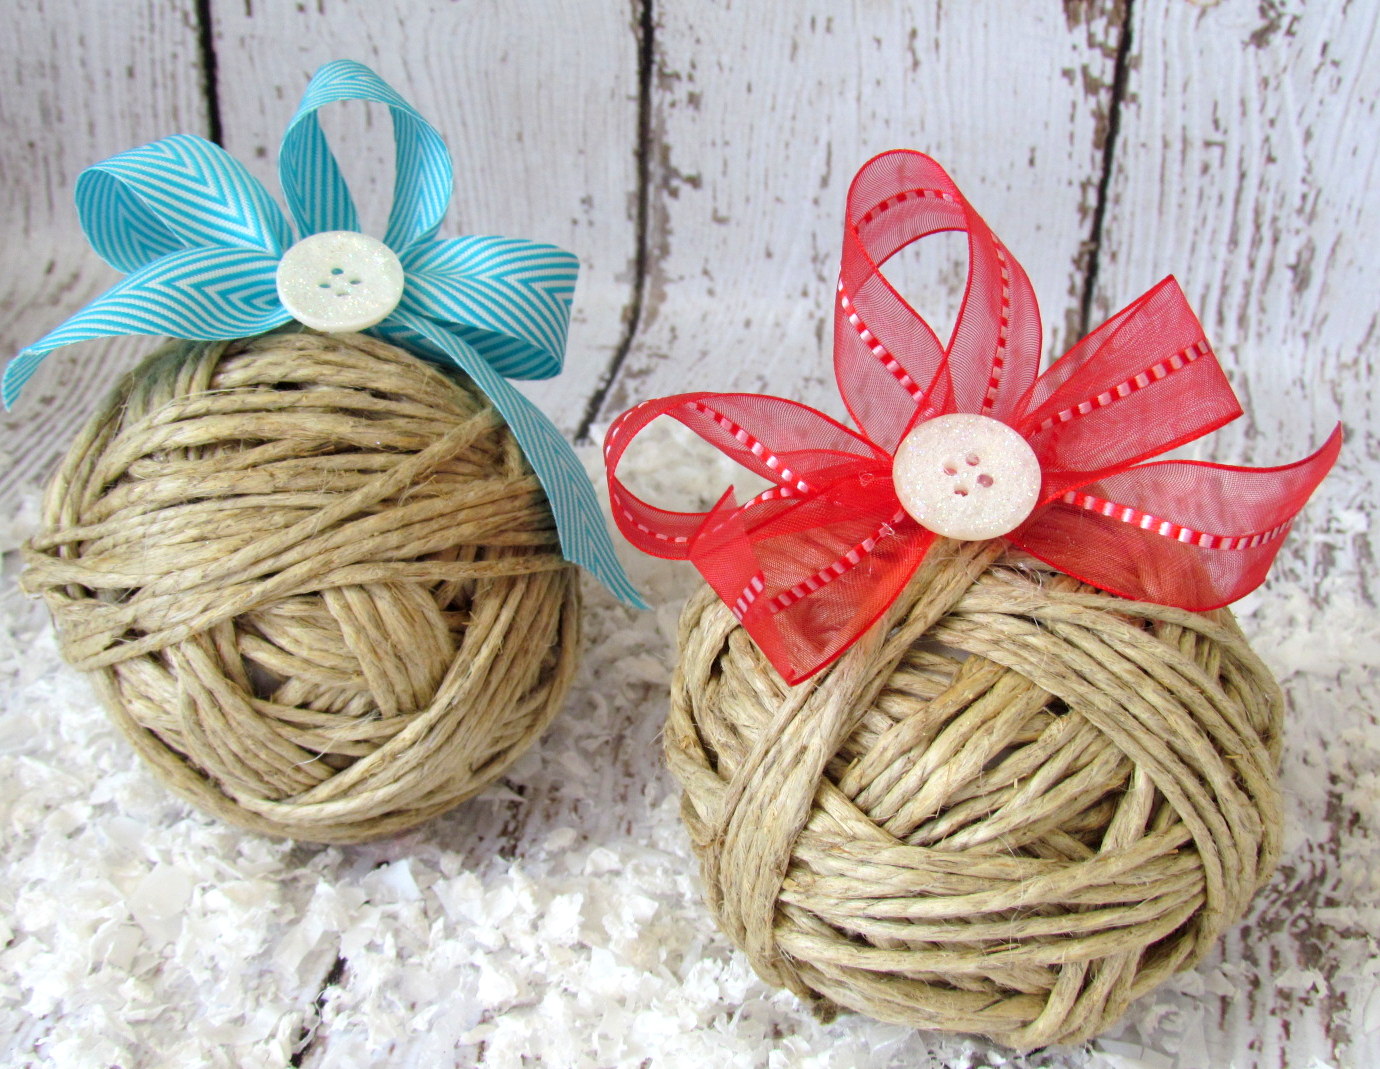
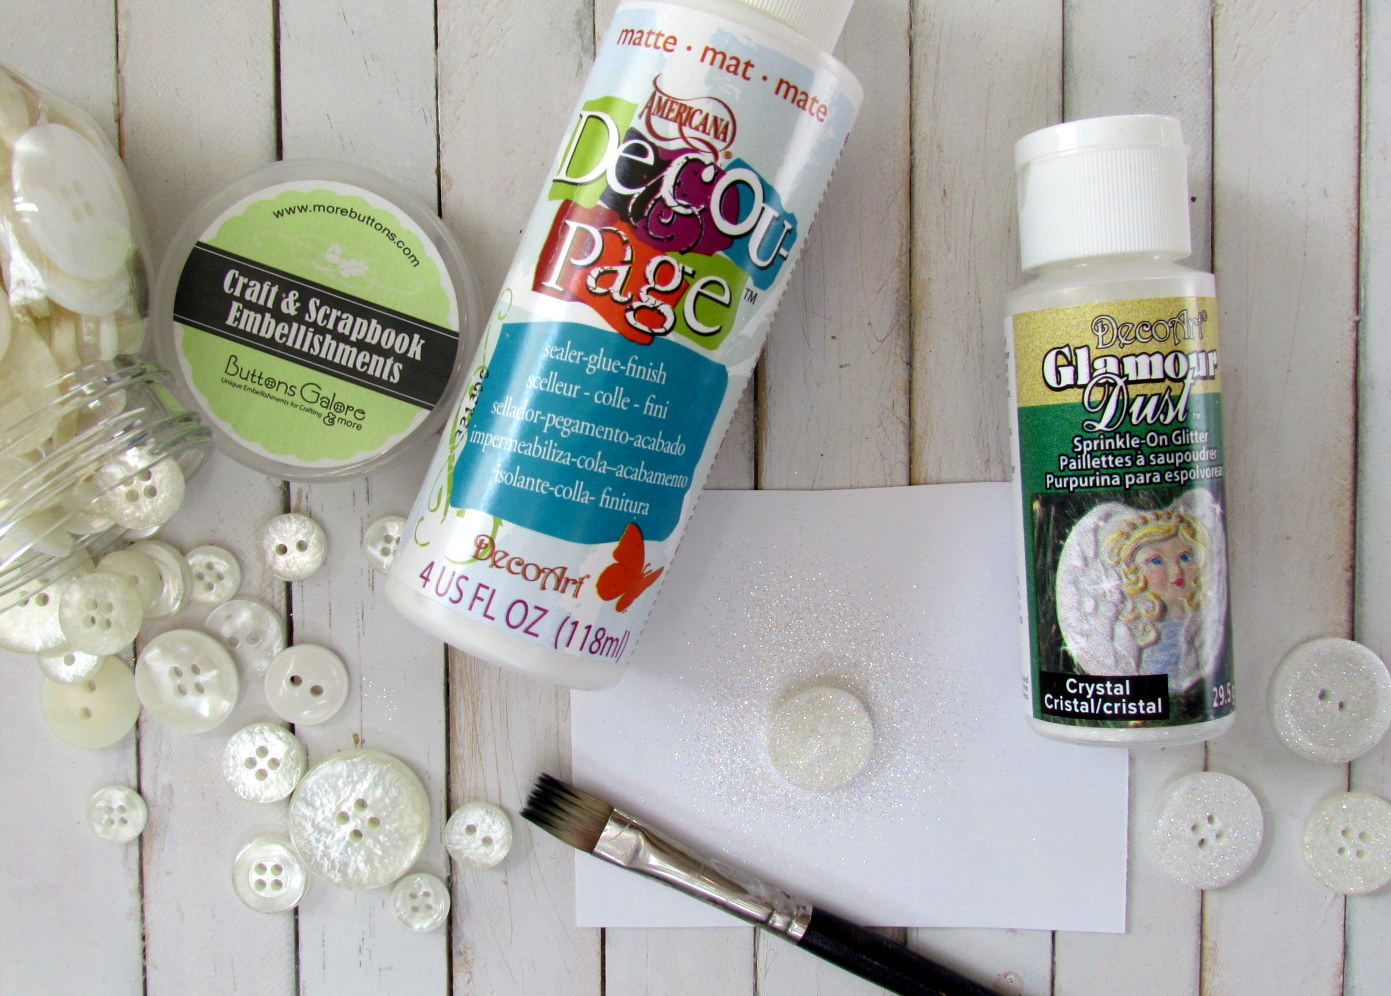
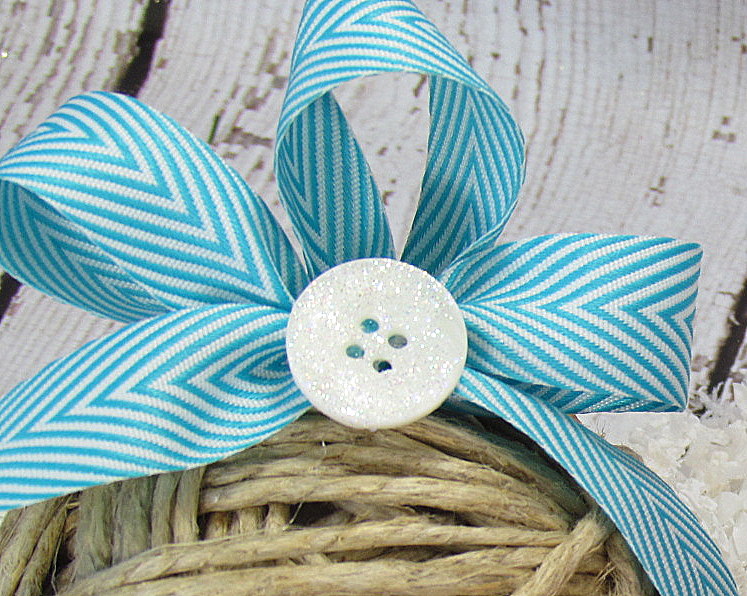
Hi everybody! It’s Lorrie here from the Buttons Galore and More design team, and today I am here to show you a fast and fun way to craft a Christmas tablescape for your holiday gatherings. This holiday decor project is amazingly easy — the kids could even help out with this one!
To start your Christmas tablescape, wrap a styrofoam ball once with ribbon. Cut and glue the ends of the ribbon. Continue wrapping the styrofoam ball with ribbon until the entire ball is covered.
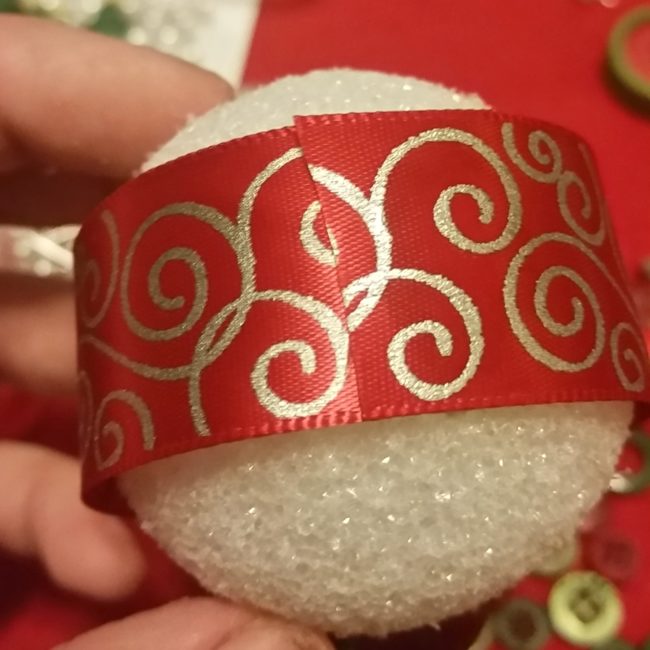
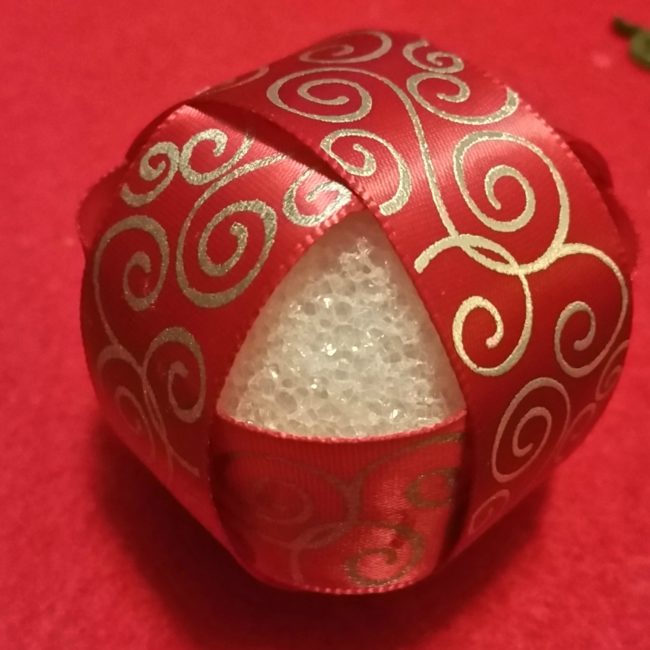
Once the styrofoam ball is entirely covered in ribbon, glue buttons to the ribbon in a variety of patterns. (Before gluing down shank buttons, use a pair of scissors or a button shank remover to cut the shanks off.)
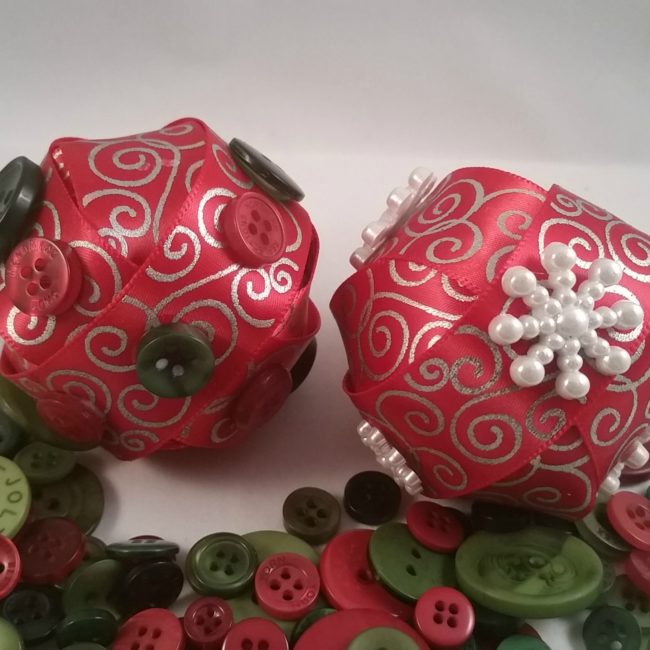
Repeat the previous steps until you have made enough balls to fill a jar or vase for your Christmas tablescape. To display your balls, fill the bottom of the vase with a mixture of red and green buttons (such as Buttons Galore “Christmas” Button Bonanza, and then add your new ornaments!
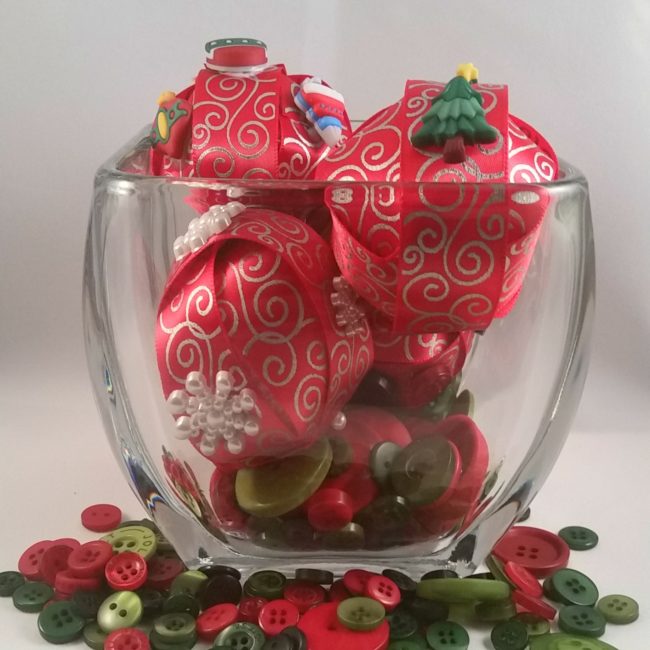
This Christmas tablescape project is so quick to make but would add so much to your holiday table, mantel, or coffee table. Of course, if you prefer a more trendy color scheme for your holiday decor, try pairing these buttons with white ribbon and our Contemporary Christmas button mix for a touch of lime green and light pink. It also doesn’t have to be just for Christmas — you could always make the same craft using different ribbon and buttons for various holidays or for every day use!
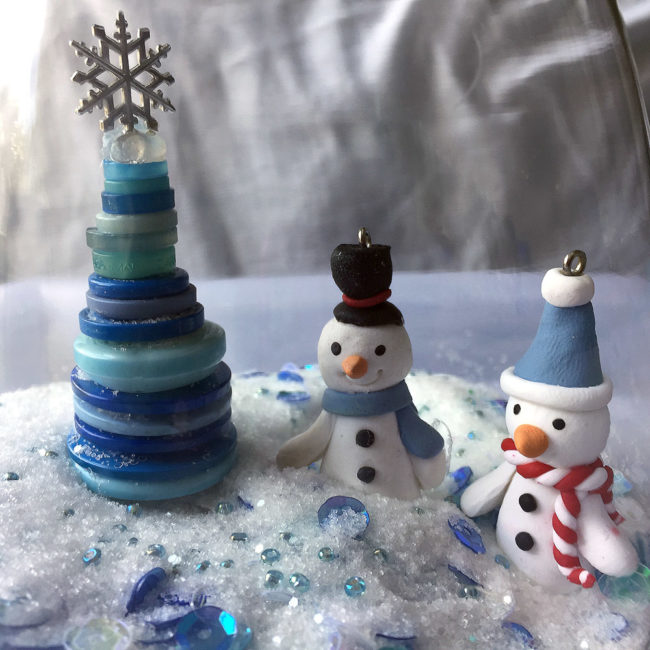
It’s Christmas in July! I’m thinking cool thoughts and making cool things, like this sweet snow scene in a jar!
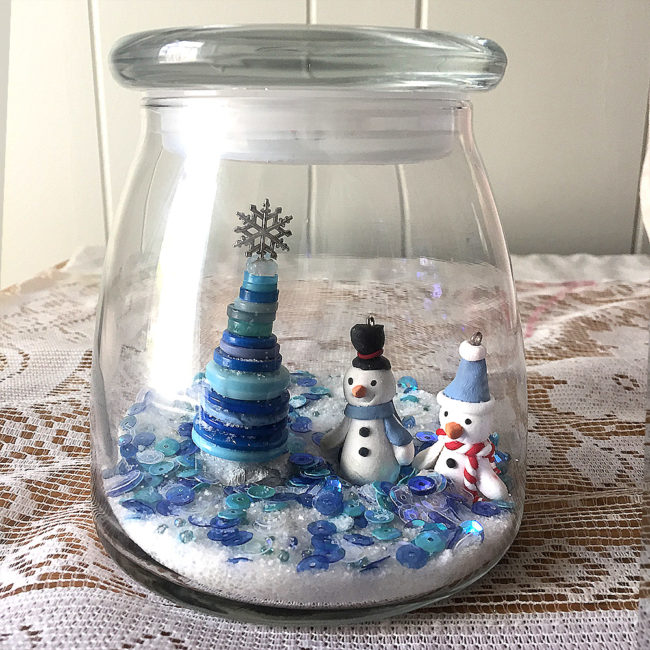
Begin by rolling up a 1″ ball of aluminum foil, and then press it down to make the ball flat on the bottom. Cover the foil with a layer of white paint and allow to dry. To make the button tree, cut 6″ to 7″ inches of wire, and fold in half. Start with one of the snowflakes in the embellishment kit to attach as the tree topper. To keep the snowflake centered, apply some glue to hold it in place. Continue adding buttons from smallest to largest until it is to the height you desire. Twist the remaining wire and trim. Leave just enough wire to place in the hole of your snow hill with a dab of glue.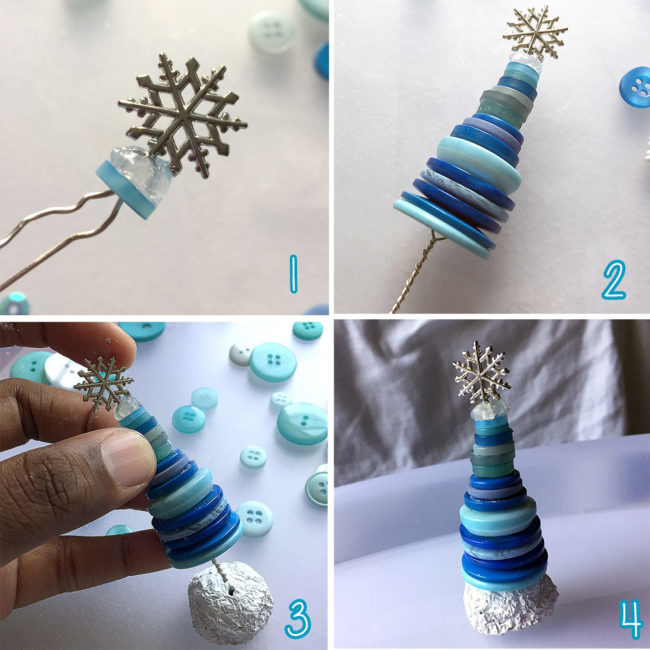
Glue the snow mound, along with any other little holiday figures you may have to the bottom of your glass jar. 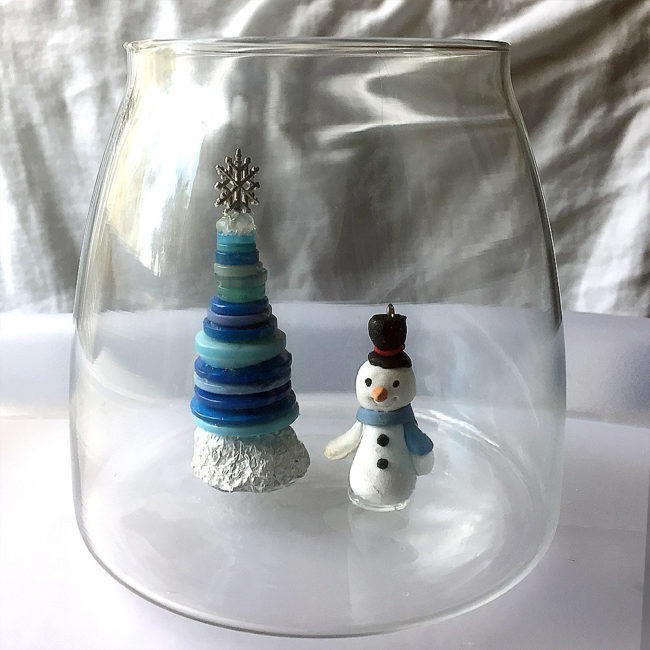
The last step is to add some sparkle and ‘snow’. Pickling salt may sound like a strange item to use in crafting, but it’s really awesome because it’s bright white and looks so much like snow! Also, the salt is heavy and will keep the sequins and beads from settling directly to the bottom of the jar. Pour in as much salt as you want until it reaches a height that makes you happy. Add sequins and beads from the kit, and then give the mixture a gentle swish from side to side to mix things up. That’s it! Your scenic snow jar is complete.
Have fun and experiment with various jar sizes and embellishments to decorate your home or give as gifts. This project takes just a little time and very basic craft skills. I hope you’ll give it a try if you’re looking for something quick and easy to craft up for the holidays.
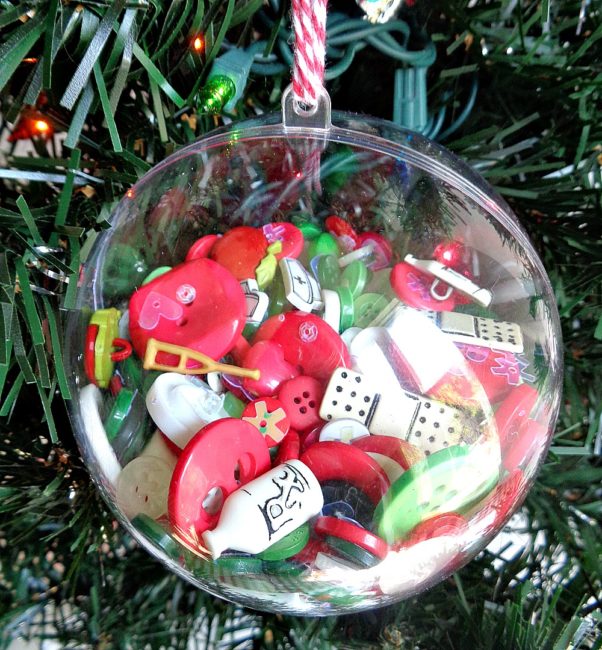
Hello Everyone! This is Katie from the Buttons Galore & More Design Team and today I have a fun button filled ornament project for you to make if you are loving Christmas in July!
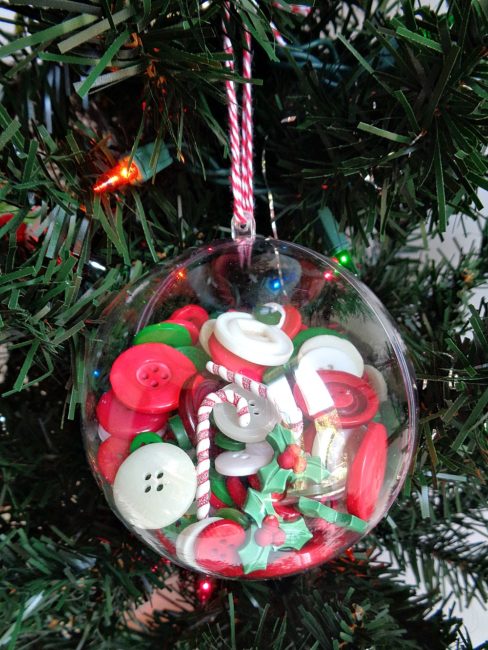
The great thing about this button filled ornament project is that it doesn’t involve any type of special tools or glue. Because of that, these button filled ornaments are super easy to put together and would be the perfect project to make with your kids. In addition, since this project requires no drying time and is only three steps, you can make a ton of these ornaments over the course of a weekend!
To decorate my ornaments, I used a combination of buttons and sequins. With that being said, I decided to stick with a traditional color palette of red, white, and green. So, in this tutorial, you will see buttons and sequins in those particular colors. But if you want to experiment with a more non-traditional palette, you could try using the The Merriest Button Bonanza, the Winter Wonderland Button Bonanza, the Contemporary Christmas Button Basics, or the Winter Flurries Button Basics.
So, to find out how to make your own button filled ornaments, keep reading below!
Supplies
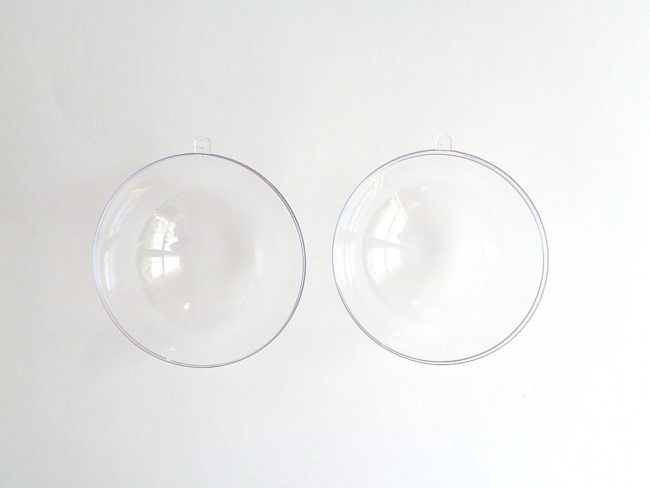
Step 1: Take apart the two sides of your clear ornament ball, and clean out both halves. (The reason why we are doing this is to make sure that there is no dust or small particles in your ornament.)
If you are using another type of clear ornament ball, simply take off the top and run it under some water to clean out the inside. But using the type of ball that separates into two halves is best as it lets you put larger items inside the ball.

Step 2: Fill up your ornament with buttons, sequins, seed beads and whatever else floats your boat! In the ornament above, I used the following: “Christmas” Button Bonanza, “Holly” 3D Buttons, “Sugarplum” 3D Buttons (I used the candy canes from the pack), and the 28 Lilac Lane ”Winter Wonderland” Embellishment Bottle.
When doing this step, I recommend filling up only one side of the ornament ball. Filling up only one side of the ornament will make snapping the two halves of the ornament back together much easier.
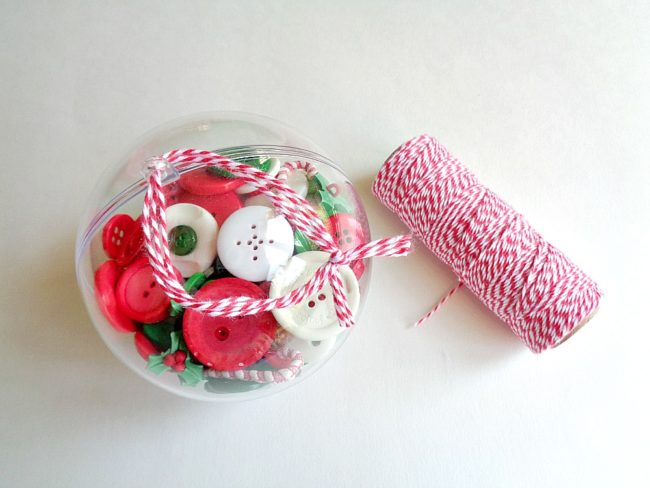
Step 3: Once your ornament has been filled, gently snap the two halves back together. Then tie on a string or ribbon to the top of the ornament.
Once you are happy with how your ornament looks, you are ready to hang it on the tree!
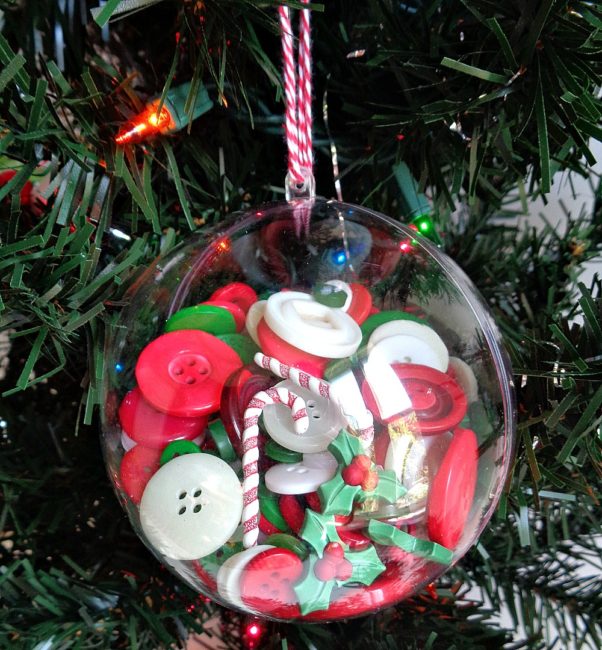
These button filled ornaments were so easy to make and were so much fun to put together! Creating this project actually got me really excited for Christmas!
While creating this project, I started thinking about how these ornaments would make great gifts for co-workers, family, or friends. If this is something that you are considering, then you could personalize these ornaments even more by adding buttons related to that person’s career or hobby. For example (like shown in the last photo above), if you are giving this ornament to a nurse, you can mix in some buttons from Buttons Galore and More’s “Doctor Doctor” button set.
If you made these Button Filled Ornaments, what color or style of buttons would you use?
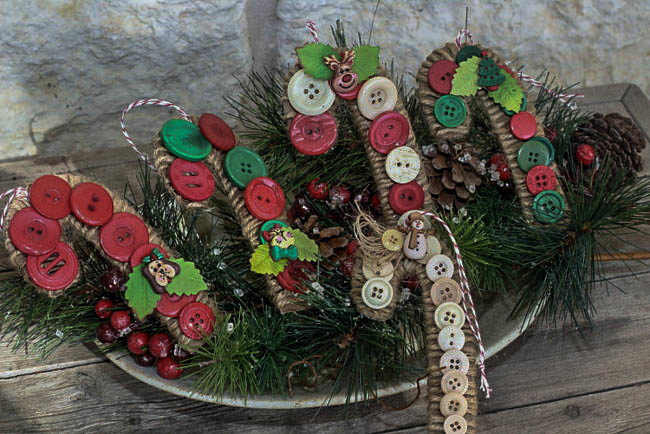
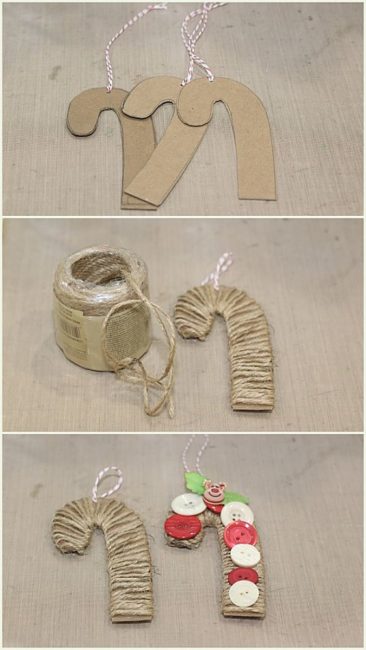
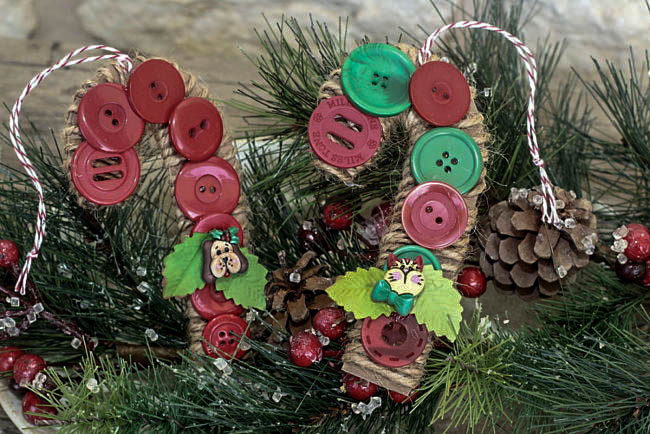
Hi, it’s Connie here with the Buttons Galore & More design team. We are celebrating Christmas in July, with handcrafted ornament ideas to create with the family. Looking for a DIY Christmas ornament that is easy for little hands to make? These DIY candy cane ornaments with big red, green and white buttons are easy for little hands to pick up and glue down.
These DIY Christmas ornaments are fast and are very kid friendly to create!
 Instructions:
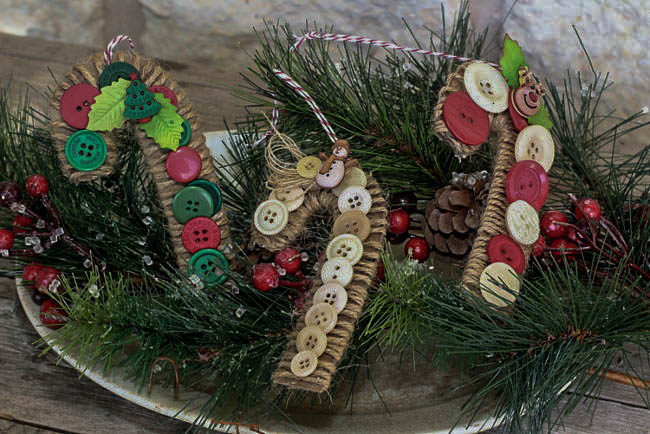 The candy canes are wrapped with jute loosely. Once the big buttons are adhered the jute is nice and secure.
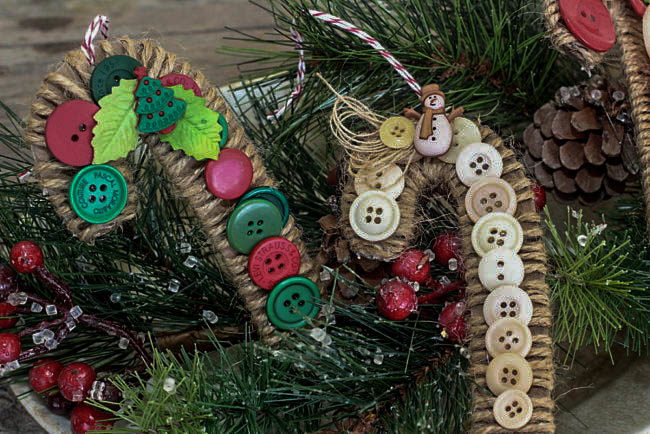 You may be familiar with our color mixes of flat buttons, but did you know that Buttons Galore & More also makes the cutest 3D buttons? Today, I’m using some called the Holiday Fun collection, that include snowmen, Christmas trees, stars, deer, and a cat and dog, just to name a few. They are so fun, just like their name! I snipped the shanks off and added these cute “Holiday Fun” buttons to the candy cane ornaments. Paper holly leaves are tucked in behind the “Holiday Fun” buttons.
These ornaments are great for gift exchanges and teacher gifts. Decorating a gift bag is another way to use these candy cane ornaments!
 I’m looking forward to adding these handcrafted candy cane ornaments to my little Christmas tree this year, mixed with some real candy canes. That is sure to make everyone happy!
Supply list:
Thanks for stopping by~
Connie Mercer/DT Member
July has come and that means we are half-way to Christmas! Even though the heat index is out of this world, it’s never too early to start working on Christmas crafts, ornaments and decor. I’ve got an easy button Christmas ornament craft that is simple for even the most beginner seamstress to do. All you need are a few easy-to-find supplies and a cozy spot to sew, and you are ready. This is a super craft for children learning to sew also.
Here’s what you need:
Put your cotton fabric scraps inside the hoop and gather up your buttons and sewing supplies.
You can attack this little project a couple of different ways, by planning ahead or by winging it! I prefer to go ahead and lay out all the buttons ahead of time, so I have an idea of how many I will need. Or you can just choose the buttons you want as you go. Either way works!
No matter how you decide to proceed, you do need to sew down the center row first. For the smaller hoop, it works best to make a center line with 4-5 buttons of equal sizes. For the larger hoop, it’s fun to mix and match and make it look a little zig-zag. Use one strand of a corresponding embroidery floss color and sew each button down with at least 2-3 stitches. After you have your center row stitched down, it’s time to start filling in the top and bottom of the hoop.
To finish, cut your white fabric about one inch from the outside of the hoop and hot glue it to the inside of the hoop back. Then you can hide all your stitches by cutting out a piece of scrapbook paper and gluing it to the edge of the hoop back. Use the ribbon from the embellishment kit for hanging your ornament, and find a fun place to display your new ornaments!
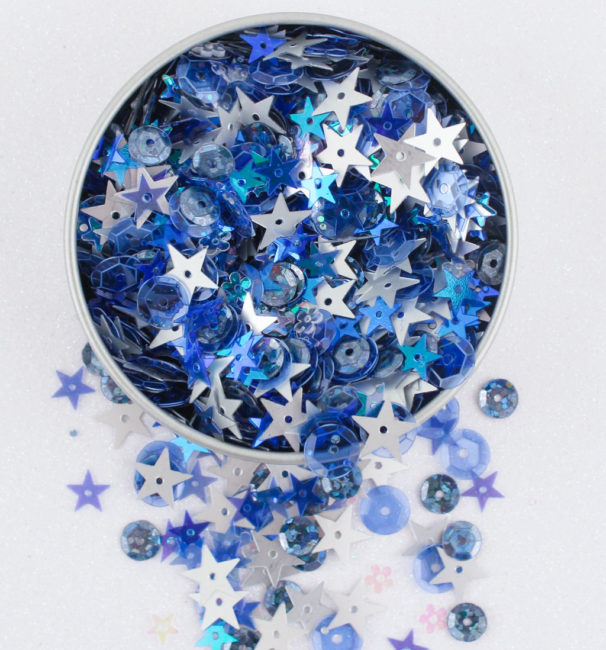
We have an exciting announcement today for fans of our beautiful sequins: New 28 Lilac Lane Premium Sequin Tins by designer May Flaum are available now on our web store! This new collection of six sequin tins includes fun sequin options for fall and winter holidays, as well as for vacation and everyday.
First, let’s take a look at Bon Voyage…a red, white and blue mix that includes 5 different kinds of sequins and features blue stars and white hearts! Use it for patriotic projects, scrapbooking trips to national monuments, and many other things!
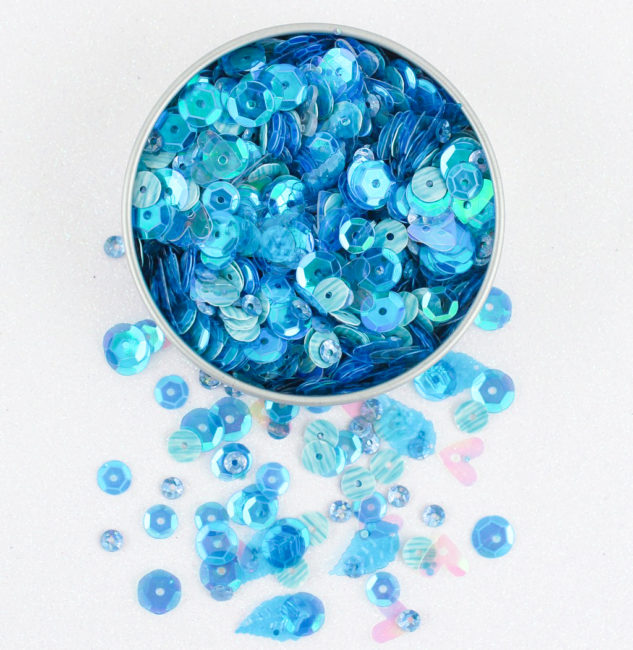
Next up is Mermaid Tale! In beautiful shades of turquoise blue, Mermaid Tale features pretty leaf shapes and stunning white sequins with blue tiger stripes. This mix is perfect for those beach or pool themed projects. (Or mermaids, of course!)
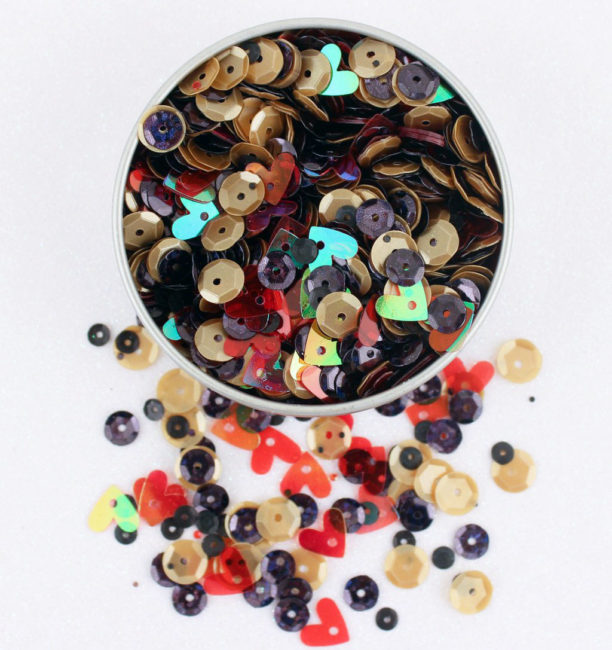
Pet lovers will love the new “Happy Place” sequin tin! This new sequin mix features red heart sequins, large gold sequins and a mix of brown sequins. Happy Place will be perfect for your pet projects, celebrating your love of autumn, or sending greetings to your favorite guy!
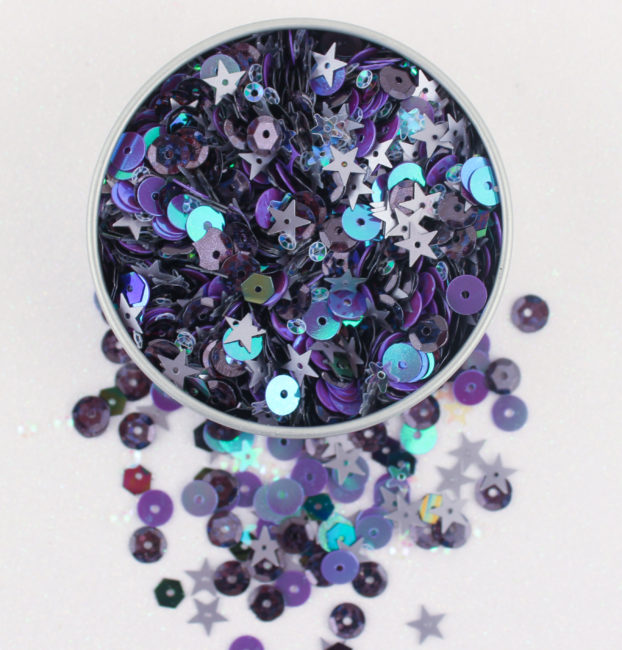
Halloween is coming fast, and we’ve got the Haunted House sequin tin for that! In a trendy purple and silver palette for Halloween, its clear and silver stars are paired with several shapes and sizes of purple sequins to create a mix that will give your projects the perfect spooky touch!
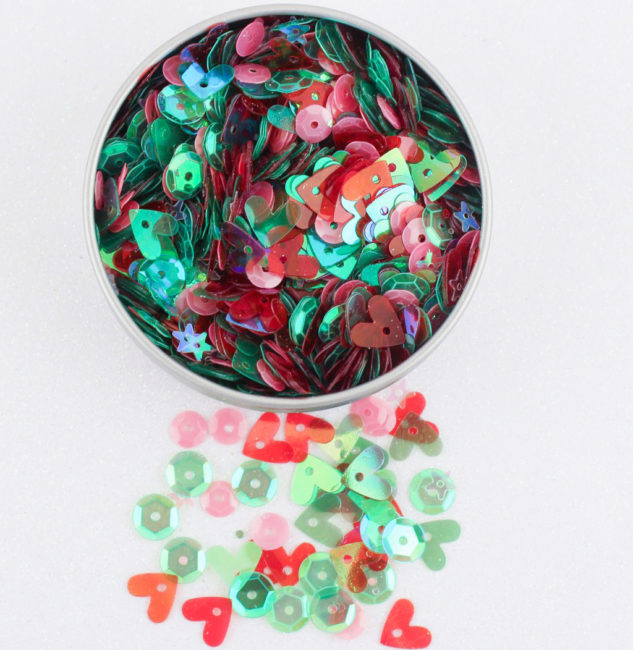
Of course, before we know it the Christmas tree will be going up…and you’re going to love the Retro Holiday sequin tin! This festive Christmas sequin tin features red and green hearts, clear stars, green sequins, and pink sequins (this year’s hot Christmas color!).
But just one holiday collection isn’t enough, so we’ve also got the shimmering Festival of Lights! This mix includes three different star sequins (silver, blue, and clear), clear flowers, and two types of blue sequins (large clear and deep blue metallic). This mix is perfect for many winter holidays (such as Christmas, Hanukkah, and New Year’s Eve).
All of these new premium sequin tins come packaged in a brush metal tin containing 30 grams of sequins, and are available now from our online store. Don’t miss out!
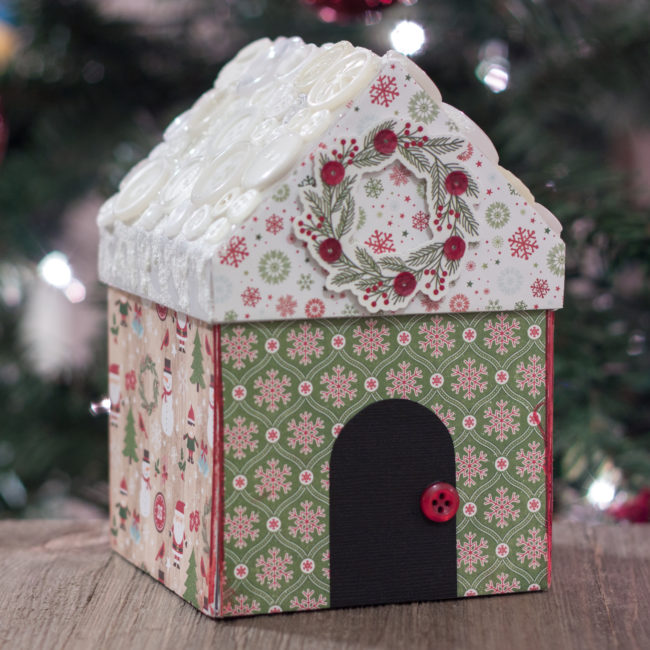
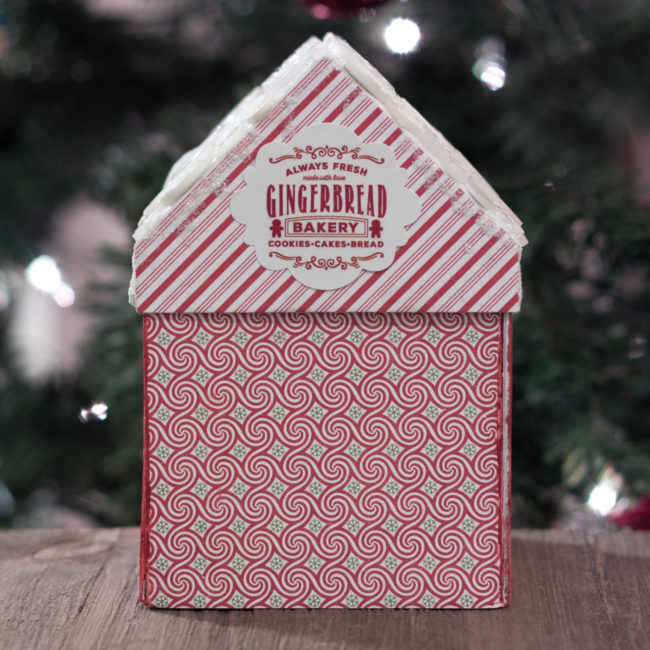
It’s a gift box…it’s Christmas decor…it’s a Christmas album! Today, we are closing out our Christmas projects with a Christmas Village Gift Box that is beautiful holiday decor while it hides a few secrets!
Supplies:
This project is based on an “explosion box” by DCWV. Take the lid off, and it opens up to hide a small gift inside and also show a few mini album pages!
All of the sides of the box are covered in fun patterned papers that were applied decoupage style with white glue. Once the glue dried, embellishments were added. The “door”was cut from black cardstock and glued on, along with a button handle. The wreath sticker had sequins added to it before it was attached with foam dot adhesive to give it depth. And on the rear, a sticker announces the house as a gingerbread bakery!
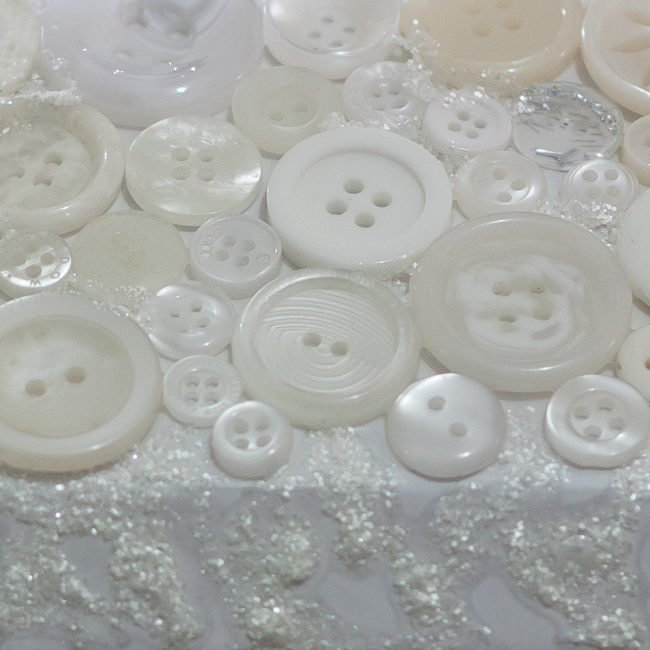
The roof top of my Christmas village gift box was left blank when the papers were decoupaged on the rest of the house. The blank white surface gives the appearance of snow, but was pretty boring. A collage of white buttons, interspersed with white glitter glue, gives the roof some fun texture! I used a combination of several of our most popular white and ivory button assortments to create my roof, but any one of them would work fine by itself.
I applied the buttons only to the two large surfaces of the roof, and then dripped the glitter glue like icicles down the sides onto the two small edges. I also dripped the glitter off the rear edge of the house. The great thing about this technique is that there is no “wrong” way to do it, since it is supposed to look messy and random.
This fun little Christmas village gift box with buttons up on the roof top will decorate your holidays long after it is opened! Have a happy holidays, everyone!

TExt
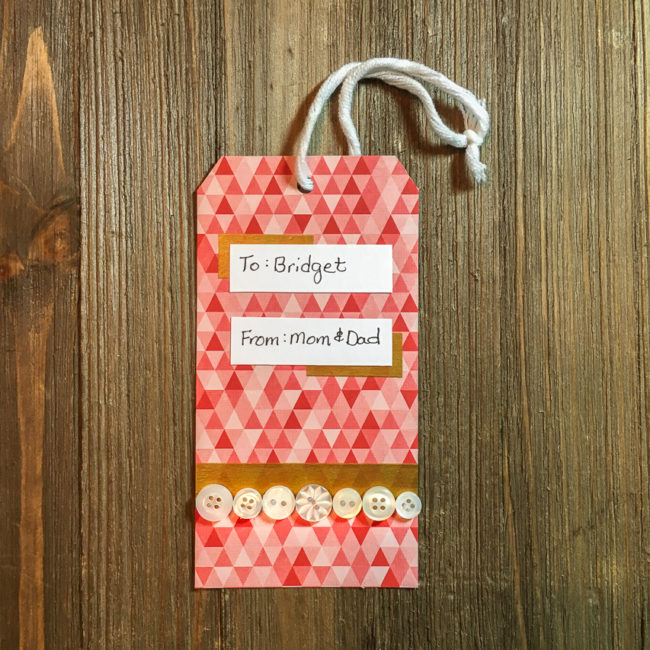
Think buttons aren’t a match for modern style? Our 28 Lilac Lane “Winter Wonderland” embellishment bottle, paired with washi tape, makes a quick and easy modern Christmas gift tag that will add sparkle and style to your special gift this Christmas!
Supplies:
To create the tag base, cut the 6×6 pad in half to create a 3×6 piece. Snip off two corners to create the top of the tag, and then use a hold punch to create the hole.
Lay a strip of the gold washi tape across across the tag about 2/3 of the way down from the top. Cut two more small strips and position them one to each side closer to the top.
Select buttons to create a row across the tag along the bottom of the washi tape. Adhere the buttons using white glue or a hot glue gun.
From the white cardstock, cut a 5/8″ strip. Write the to/from information for your gift on it, and then snip the pieces off of the strip. Adhere them using paper adhesive.
Cut a length of yarn. Loop it through the tag’s hole and tie it off to attach your gift.
This modern Christmas gift tag only takes a few minutes to make, but will definitely brighten up your Christmas wrapping for someone special!
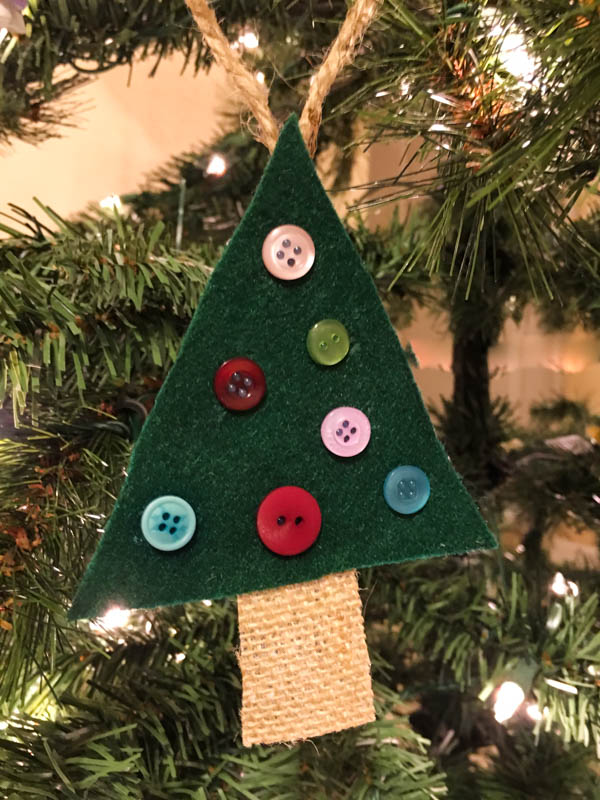
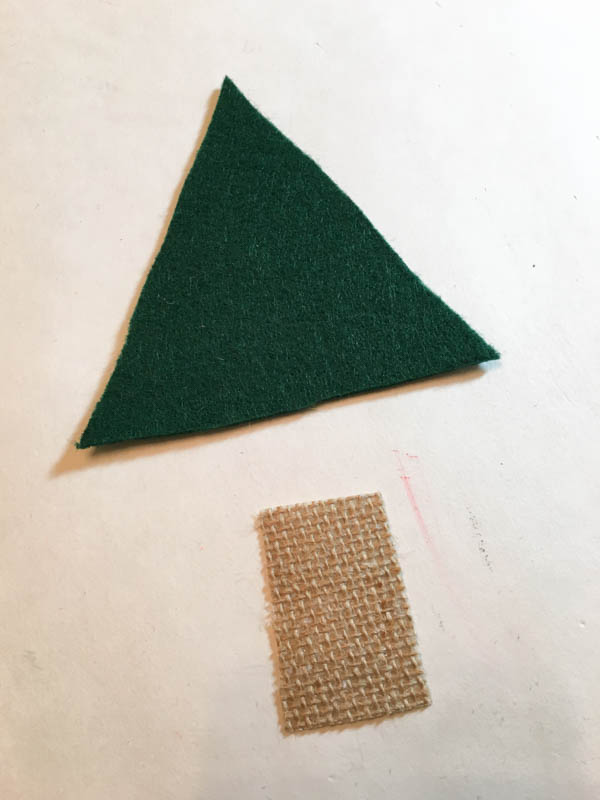
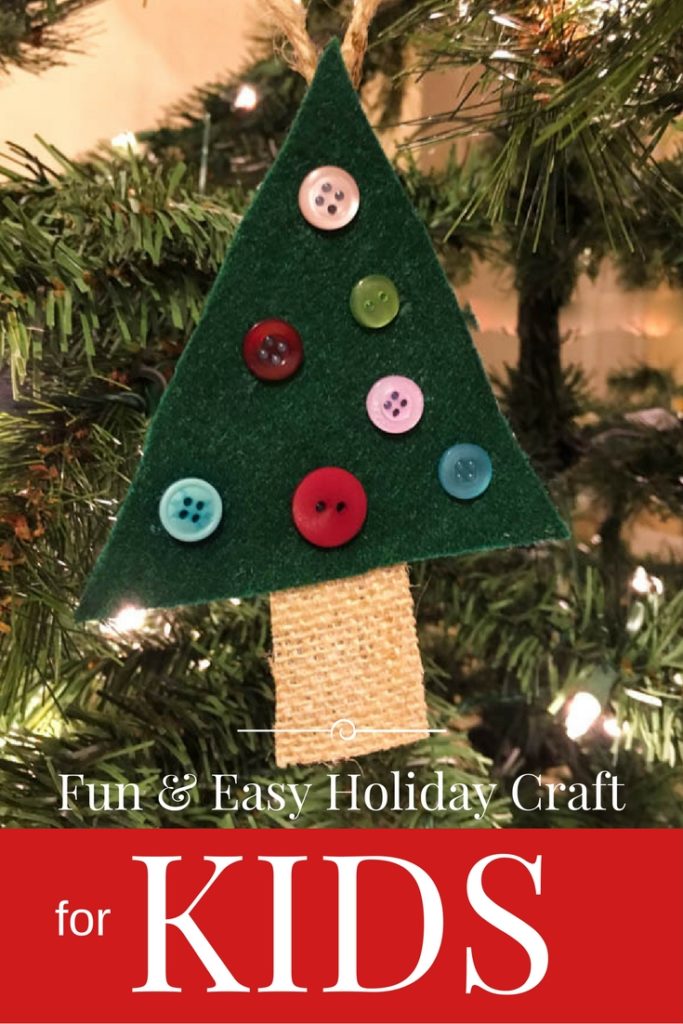
Looking for an activity to entertain the kids this Christmas? Our felt Christmas tree ornament project is quick and easy, and perfect for kids of all ages! Better yet, it’s a great (and affordable) activity for doing with large groups for parties and class activities.
Supplies:
Any felt will work for this project, but I chose to use the heavier Eco-Fi Plus because it stands up better to the weight of the buttons than thinner felts and hangs better as a result.
Constructing these tree ornaments are fast and simple. They are created from two simple shapes cut by hand from felt and/or burlap. Older children can draw and cut their own shapes, and the shapes can be pre-cut for younger children.
Assembling the tree parts (and adhering the buttons) can be done with hot glue or with a clear drying white glue, depending on the age of the kids making the ornaments. The hot glue will dry faster, if the ornaments need to be moved or hung quickly. Or, to make the project even more educational, practice some sewing skills and sew everything together!
Choosing different buttons will make each kid’s felt Christmas tree ornament look unique! For a fun country Christmas look, I decorated my felt Christmas tree ornament with buttons from our new Button Bonanza called “The Merriest”.
To complete your ornament, it needs a hanger. I made a loop of twine and attached it to my ornament with hot glue. Ribbon or yarn could also be used.
This easy and fun felt Christmas tree ornament will provide fun for the whole family, and the kids will love creating their own personal design for it! These ornaments would also make beautiful custom gift tags (with the addition of an address label sticker on the back for writing on) for grandparents that can be saved and treasured for years to come.
Are you going to button up your Christmas tree this year?
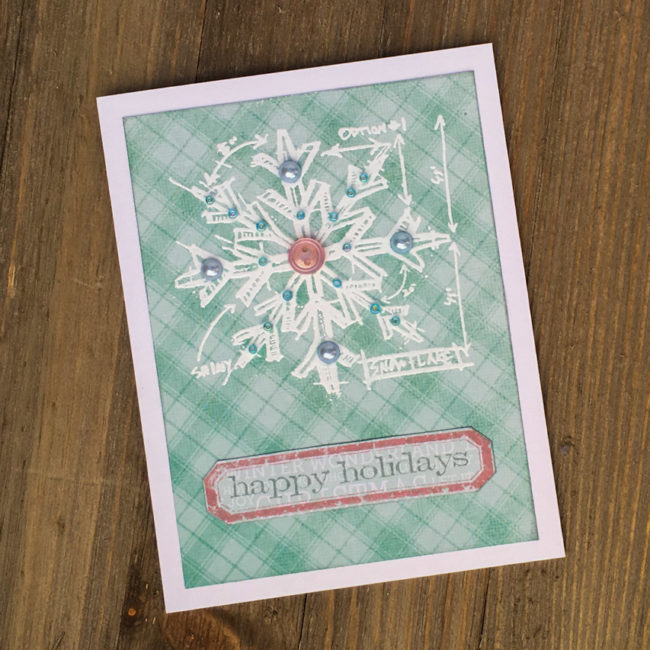
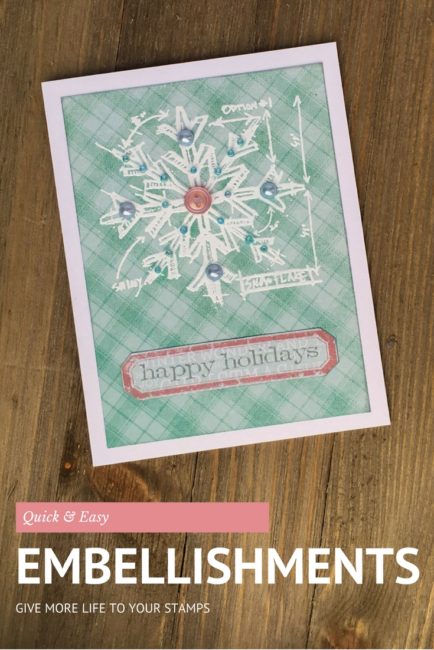
Stamps are a great investment because they are a tool that can be used over and over again. However, using them over and over again can quickly get boring…so how do you spice things up and put the fun back in your stamps again? 28 Lilac Lane has the answer!
Supplies Needed:
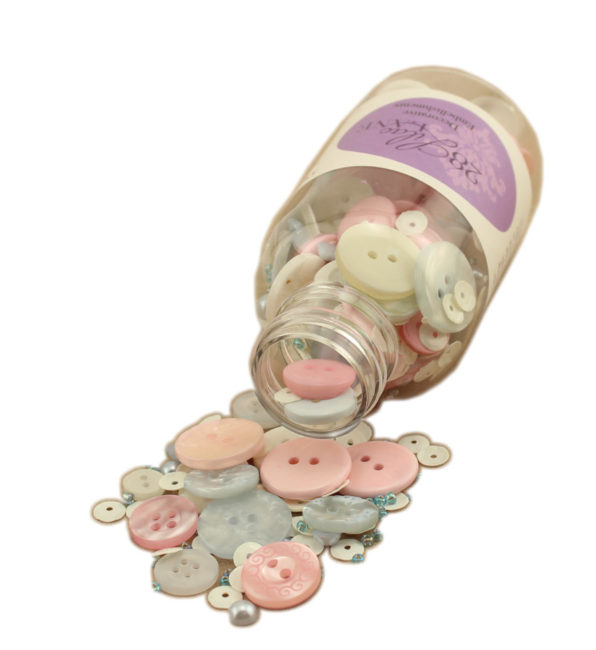
One of my favorite ways to make my old stamps look new again is to embellish them! And with the 28 Lilac Lane embellishment bottles, I have the choice of seed beads, sequins, flat back pearls, and buttons to embellish my stamps.
I chose the Cotton Candy bottle because it matched my paper pad. [The 28 Lilac Lane “Cotton Candy” embellishment bottle is available at the our online store, Scrapbook.com, A Cherry On Top, Ellen Hutson, Simon Says Stamp, Create for Less, and others, or check your local retailer].
To create this card, I first made a card base by folding a half sheet of letter sized cardstock. Then I cut a 3.75″ by 5″ piece of the blue plaid paper, and inked the edges in Iced Spruce before adhering it in the center of the card front.
Next I used embossing ink to stamp the snowflake design on the top of the card front, and heat embossed it with white embossing powder. Once the heat embossing was cool, I selected embellishments from the Cotton Candy bottle and adhered them with small dots of clear drying white glue.
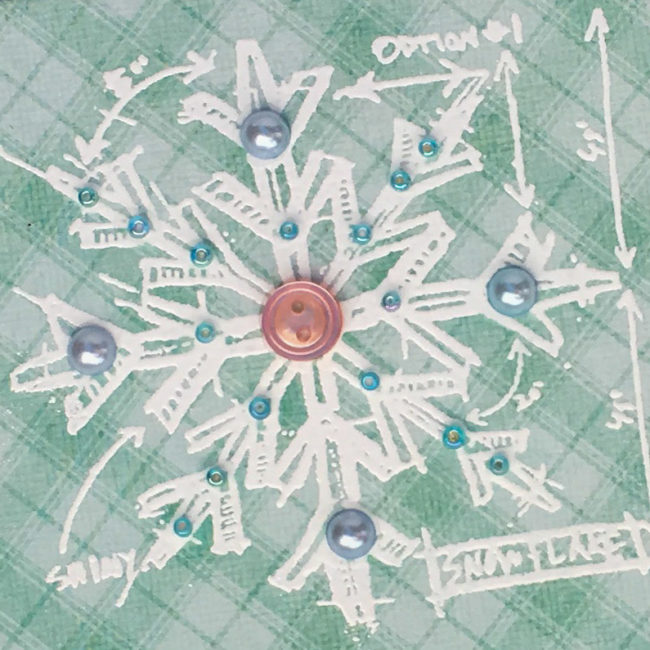
The sentiment on the bottom of the card front was created by first stamping the label outline in Victorian Velvet on the pale turquoise patterned paper. Then I cut out the label using scissors, close to the edge of the stamped label. I stamped the sentiment in Iced Spruce, and adhered the label to the card front.
What stamps do have that could be given new life with embellishments?
What’s sparkly, shiny, and shimmery all over? It’s a 28 Lilac Lane Christmas, of course! Here’s a round-up to all the projects that you need to make your Christmas a 28 Lilac Lane Christmas!
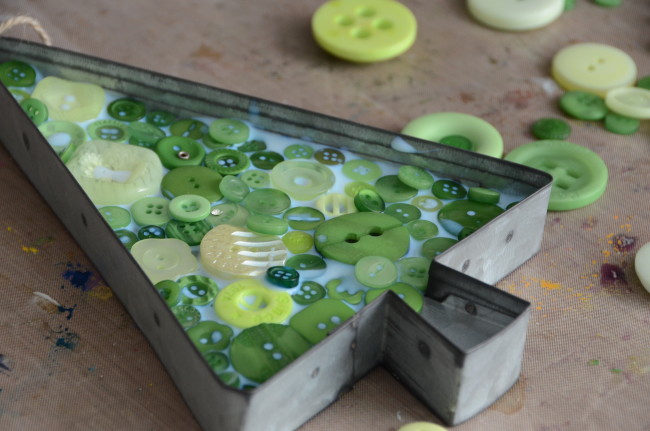
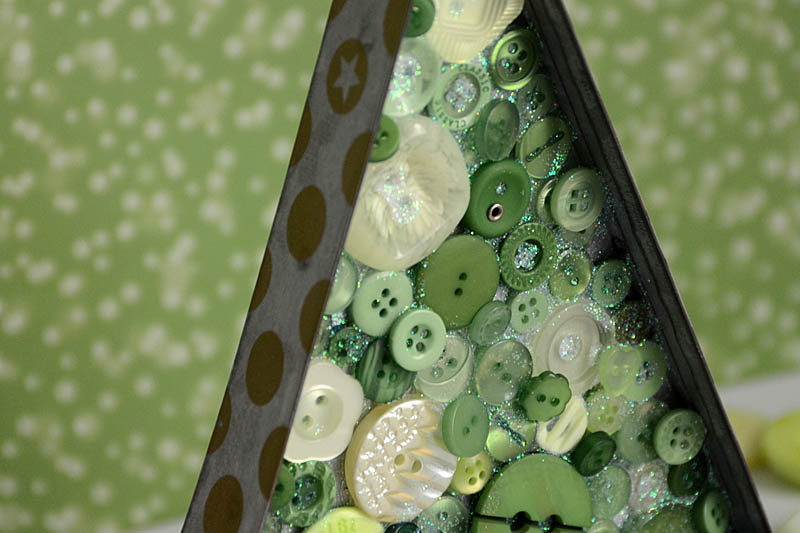
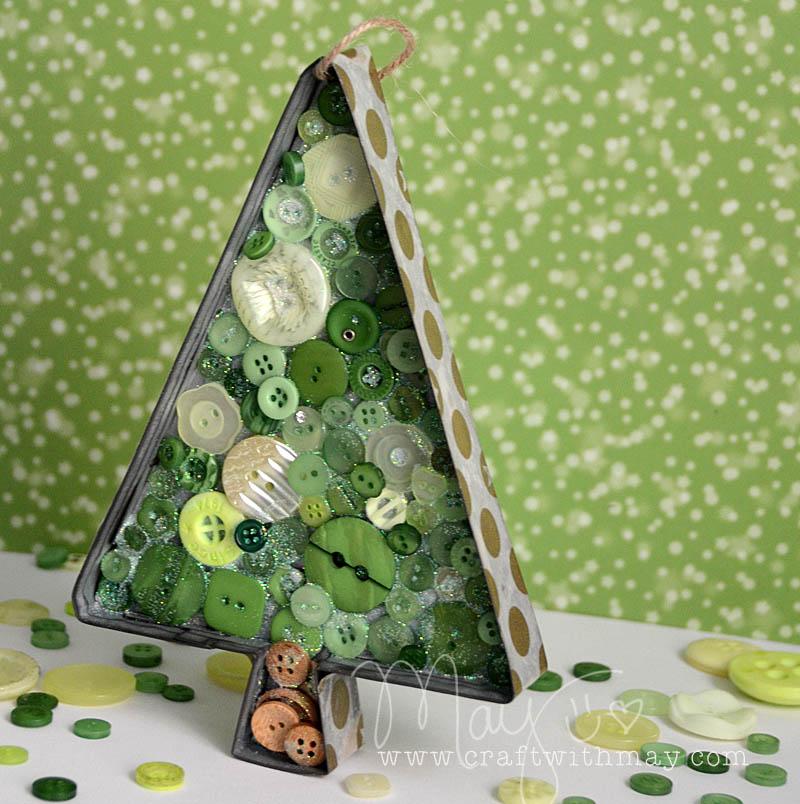
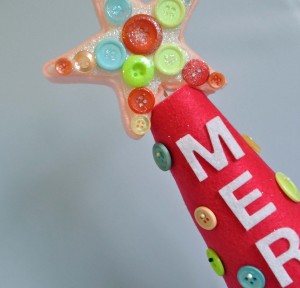
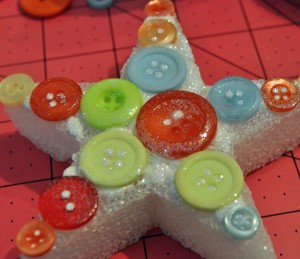
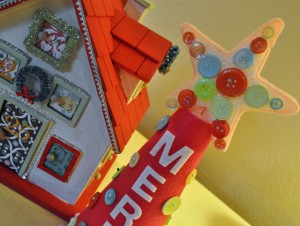
No 28 Lilac Lane Christmas would be complete without a tree! This little wooden Christmas tree bought from a craft store got a touch of alteration – including some 28 Lilac Lane button bling – from designer May Flaum to make it extra special.
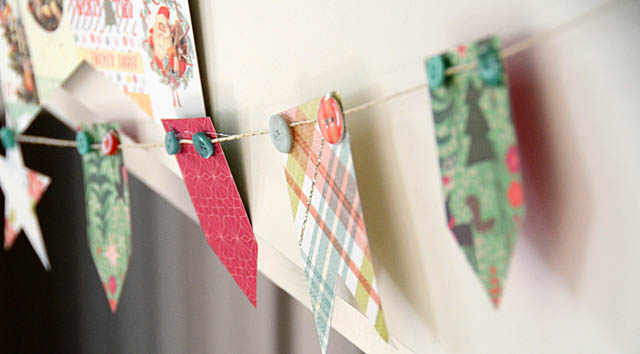
But why stop at a tree? Deck the halls with buttoned up banners that are fun and easy to make!
The gifts that go under the tree need their own sparkle too, and with 28 Lilac Lane, your gifts will look festive and gorgeous! A clean and simple understated look to your gift box is easy when you top it with charms and buttons:
Or go for a more luxurious look, with a button and jewel encrusted top like this one by 28 Lilac Lane designer May Flaum that is rich and feminine! This is one gift box that won’t be going in the trash after the gift is opened!
Since not everyone can get our Christmas wishes in person, how about some Christmas cards?
To see a video on how to make these two beautiful cards, and get information on a free card making class at Scrapbook.com that uses 28 Lilac Lane, visit May Flaum’s blog!
Or, if bright retro is more your style…try our funky paper pieced trees card:
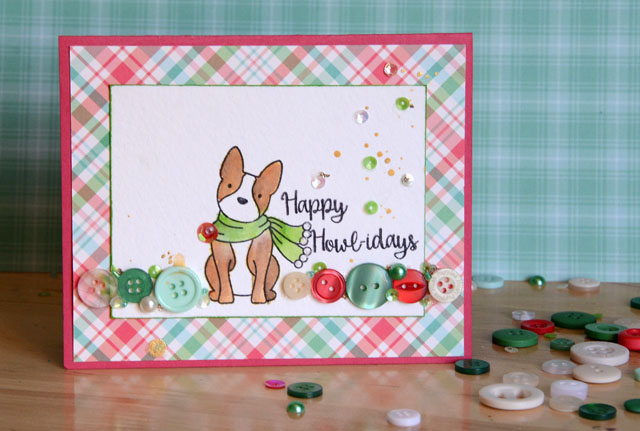
A button border makes any project a little more special. The 28 Lilac Lane one on this Happy Howl-idays card is spiced up with pearls and sequins for some extra bling!
Have you made a 28 Lilac Lane Christmas project? Please share a link in the comments! We’d love to see it!
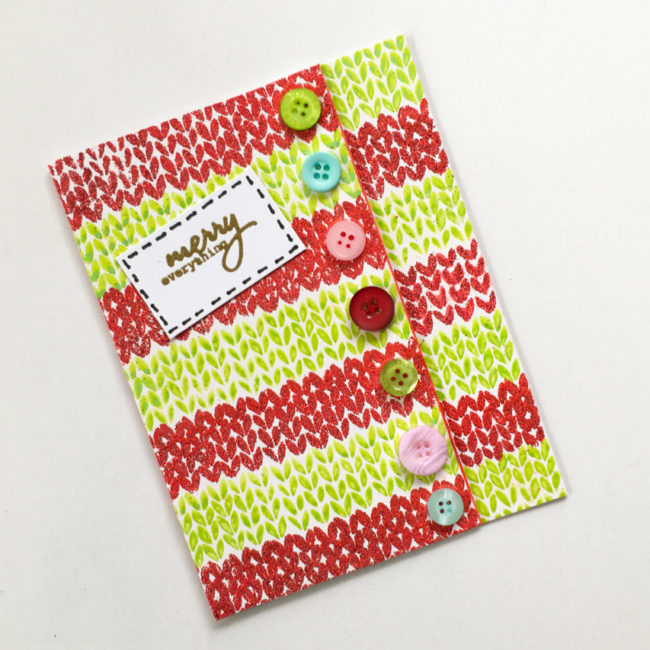
Nothing’s more fun at Christmas than an ugly Christmas sweater. So why not send one to a friend in the form of an ugly Christmas sweater card for the holidays?
Supplies Needed:
This card’s technique is simple – just creating two strips of paper by stamping the sweater knit stamp over and over, alternating the color and embossing it. The Twisted Citron ink is embossed with clear embossing powder, and the red is clear embossing ink that is heat embossed with Red Tinsel powder. The strips need to alternate to create the effect on the front of the card.
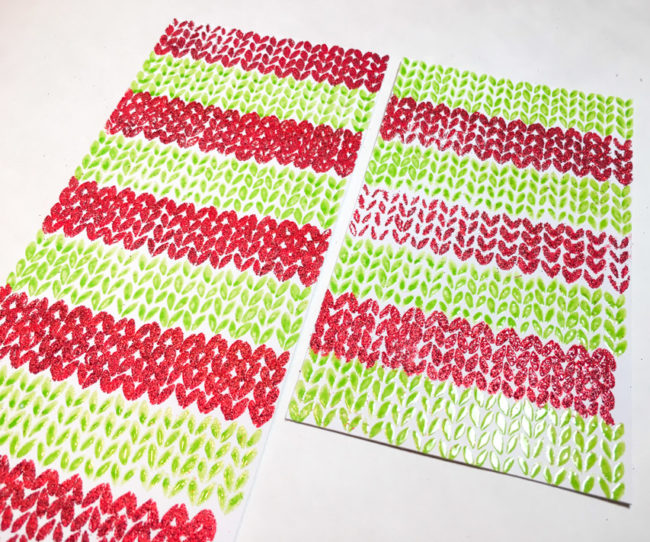
Doing all that stamping and embossing while changing colors takes a bit of time, but the result is a great effect!
Once strips are made, they can be adhered to a card base. Start by attaching the one on the right side of the front. Position it, glue it down, and then trim off any excess. The front is layered, with the left side overlapping the right panel, so there’s no need to worry about how wide the panel is on the card front.
To emphasize the layered effect and create bulk in it as if it really is a sweater placket, adhere two inch wide strips of paper underneath the right edge of the left panel before attaching it to the card front. This will slightly raise the area under the buttons up, creating depth and shadow that look like a true sweater! For a little extra shadow, run a dark red pen or inkpad along the paper edge where the pieces overlap as well.
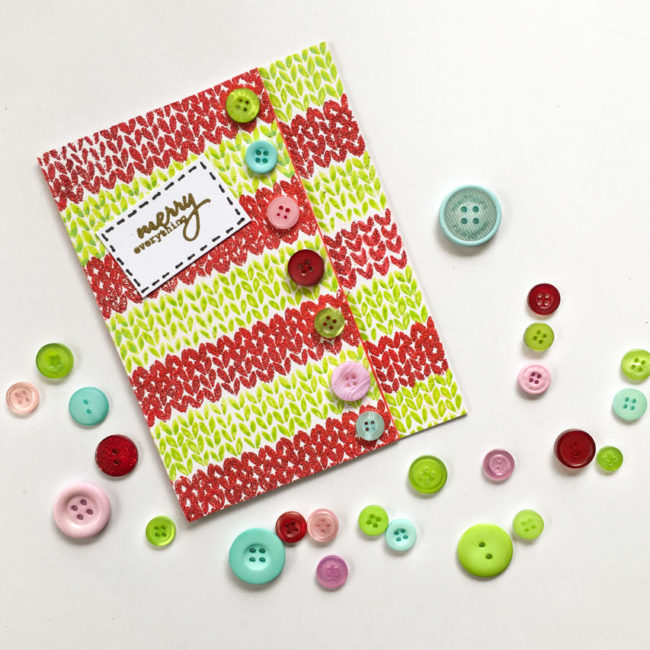
Now that your sweater has a placket, it needs buttons to fasten it! “The Merriest” Button Bonanza has red and green shades that match the card base. Adding in the the pink and blue shades that are also in the assortment looks a bit random on top of all of that red and green, and is the perfect way to “ugly” up your ugly Christmas sweater card. Glue your buttons down with a clear drying adhesive like PPA Matte Adhesive.
The finishing touch is the “patch” that has the sentiment on it. Just stamp and emboss the sentiment, and then draw stitching lines around it with a pen. Adhere it at a jaunty angle to your sweater’s “front” and you are done!
Who do you know that needs an ugly Christmas sweater card? Send them one today!
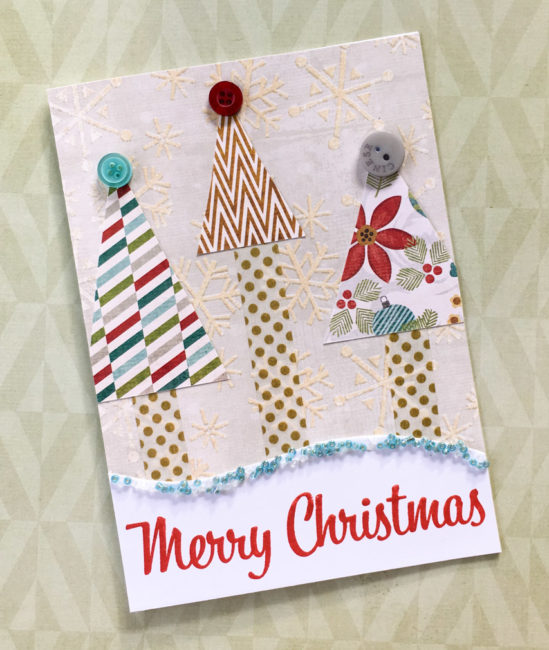
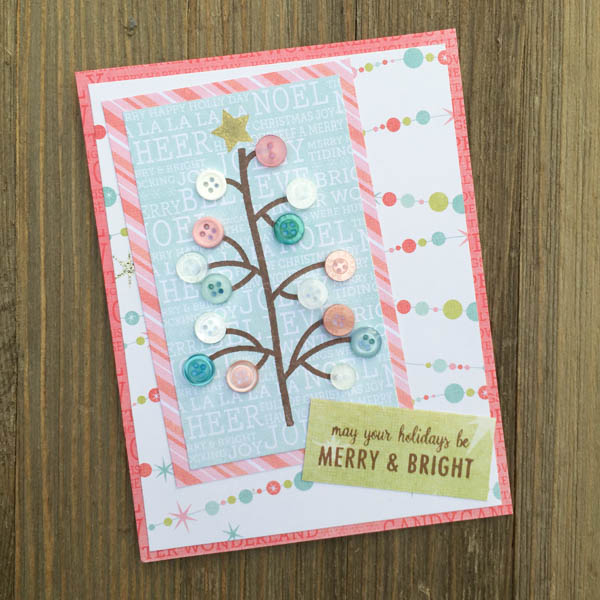
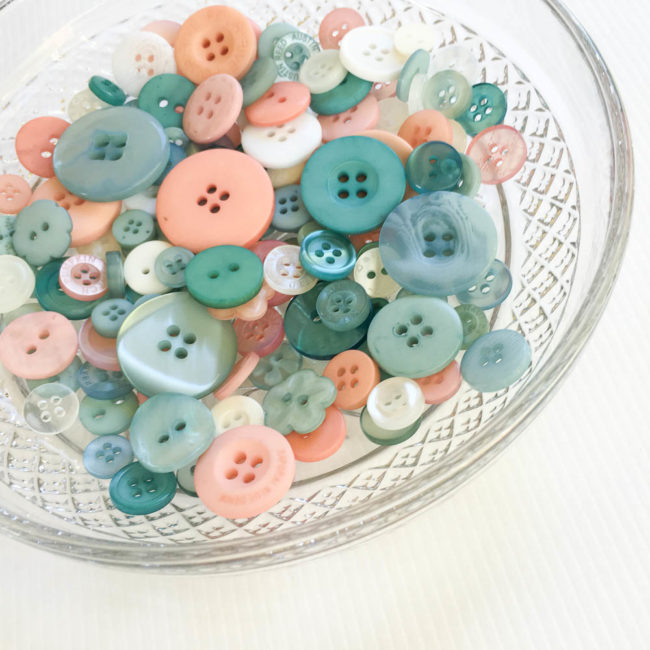
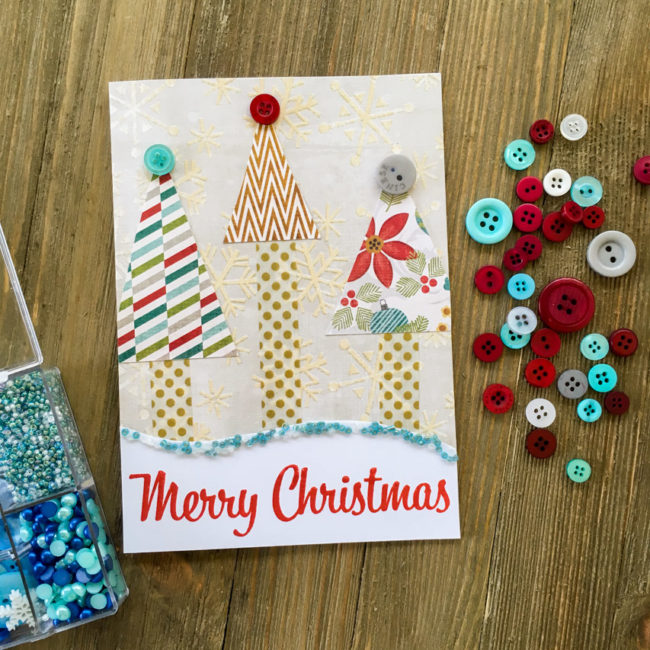
Christmas isn’t just green and red anymore…pink and blue are also becoming more part of the palette. Today, I’m going to show you how to create a beautiful pastel Christmas tree card with our versatile new “Coral Reef” Button Bonanza bag!
Supplies Needed:
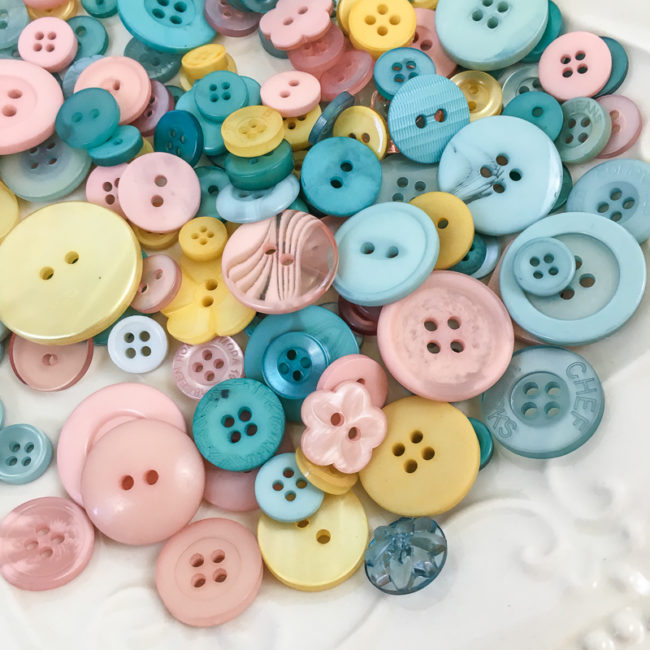
This card uses our new “Coral Reef” Button Bonanza to create a fun pastel blue and pink Christmas look that is super trendy and oh-so-pretty! The shades of pale blue, soft rose pink, and white are perfect for a retro pastel Christmas tree card look.
Making this card is fast and easy, but with the gorgeous patterned papers and the pearly button accents, it looks anything but plain!
To begin your card, cut the pink background for your card base to 4.25″ by 5.5″. Then cut the garland paper to 4″ by 5.25″, and adhere it on top of the pink base. Next, get out a blank card base and adhere the layered background to the front of it.
Stamp the Christmas tree in brown ink on blue text pattern paper, and then add the star in gold at the top. Trim closely to the tree in a rectangle shape. Adhere the tree block on top of the pink striped paper, and trim it to leave a small border around the edges of the tree.
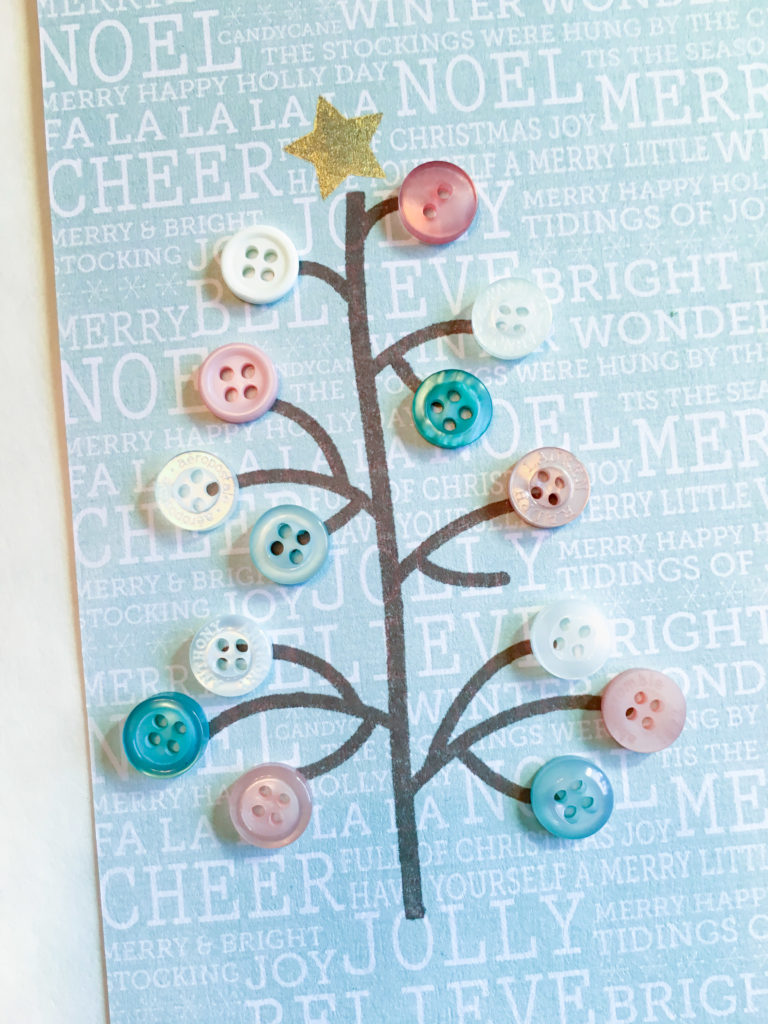
Select buttons from the Coral Reef collection, and use PPA Matte Adhesive (or other clear glue) to adhere them to the tree. Once the glue is dry, attach the tree block to the card base, angled in the upper left corner.
Stamp sentiment on green patterned paper, and trim to size. Adhere in lower right corner.
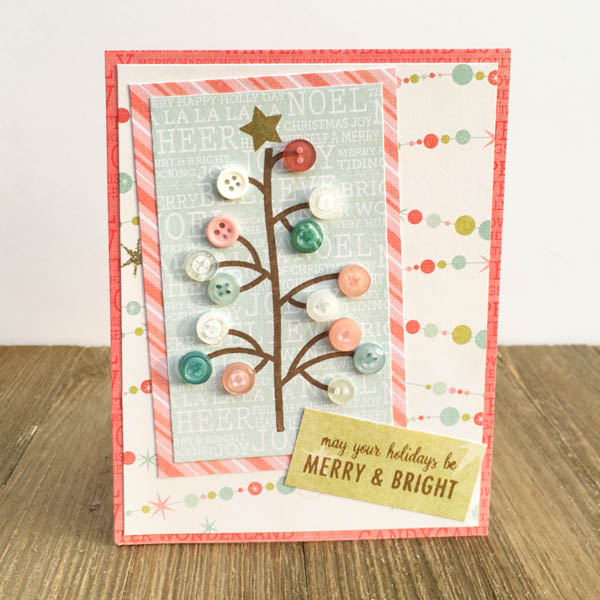
This pastel Christmas tree card design could be used to create seasonal trees all year round – pretty spring blossom colors mixed with bright green, fall colors, or all white for a snow covered winter tree! What season’s tree will you button up?
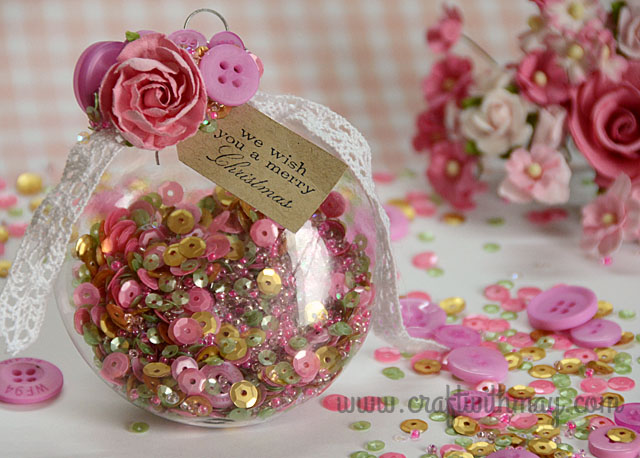
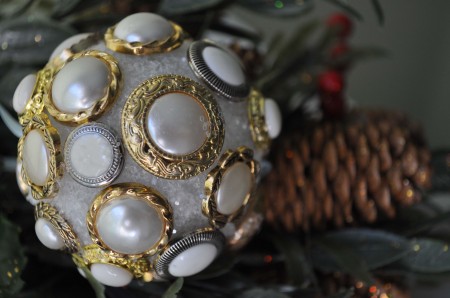
Pink is hot, hot, hot for Christmas this year! Today we’re sharing a beautiful rose Christmas ornament by 28 Lilac Lane designer May Flaum that will add a brilliant touch of pink and gold to your Christmas tree.

May’s rose Christmas ornament is created with one of her six brand new 28 Lilac Lane shaker mixes that have just been released. This pink and gold shaker mix is called – you guessed it! – Rose Garden. This gorgeous mix will take you from a retro pastel Christmas, into Valentine’s Day, or use it to create beautiful girly embellishments year-round!
And now, May herself will show you how it is done!
![]()
With the holidays fast approaching I am always looking for hand crafted gift ideas and special homemade touches. These new shaker mixes are great for so many projects including homemade ornaments. In this video tutorial I will walk you through creating a lovely rose garden ornament perfect for my aunt who loves pink & gold at the holidays.
Here’s a closer look at my finished DIY rose Christmas ornament project!
![]()
Don’t miss the chance on our Black Friday Sale to get May’s 28 Lilac Lane embellishment bottles for 15% off! Use code EMB15 through Friday, November 25th to save on all your favorite bottles from the collection. Don’t miss out on the new ones like Savannah Stroll, Winter Wonderland, and Coral Reef!
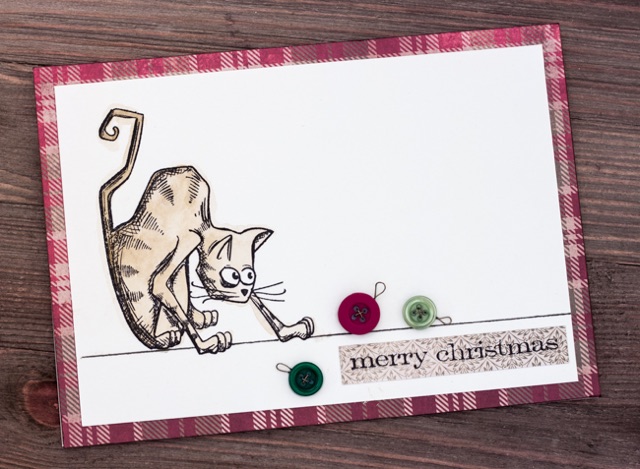
We’re cat owners at our house, and as anyone who owns a cat knows…it makes Christmas decorating extra, well, interesting. We decorate, the cat un-decorates. So today, my project is a Merry Christmas cat card that celebrates that annual feline-human war of December!
Supplies:
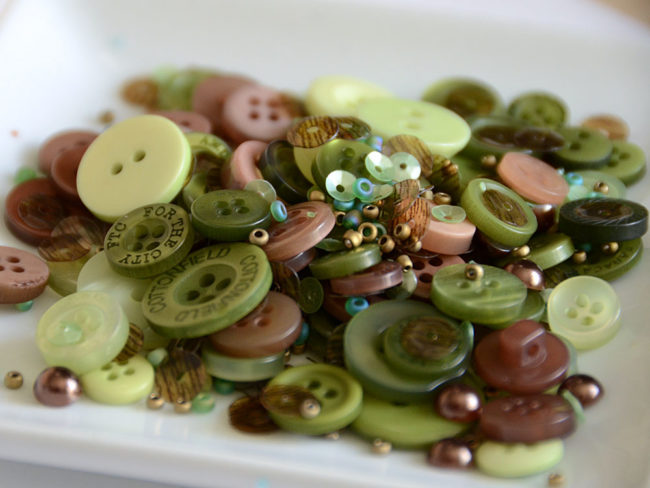
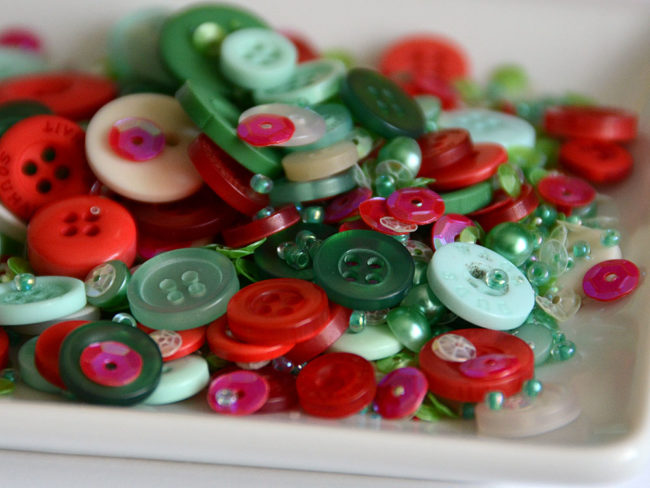
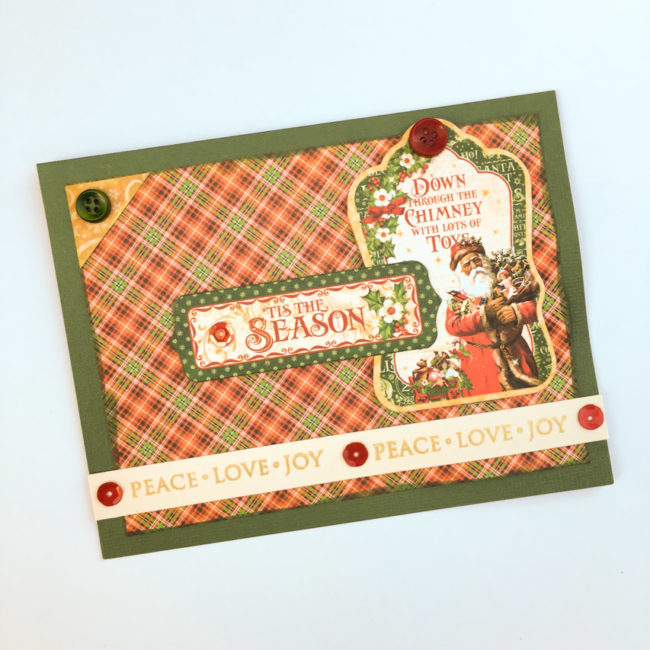
This Christmas cat card has a very simple design. It’s featured embellishments are Christmas ornaments made from buttons from the “Tis the Season” Button Bonanza that is brand new for this holiday season. Featuring deep red and green tones that are accented by a light sage green shade, “Tis the Season” is a versatile button mix for almost any holiday craft project.
Instructions:
Cut a piece of watercolor paper to 4.5″ by 6.5″. Use Archival ink to stamp the Crazy Cat.
Use a ruler and the black pen to draw the line across the bottom underneath the cat. Don’t draw through the cat’s paws!
Scribble on a scrap piece of watercolor paper with the Distress Crayon. Using your waterbrush, pick up some of the color and use it to watercolor the cat.
Cut a piece of patterned paper to 5″ by 7″ and ink the edges. Adhere the watercolor paper centered on it. Cut a piece of cardstock to 7″ by 10″. Fold in half to make a 5″ by 7″ card, and adhere card front to it.
Cut a strip of patterned paper 1/2″ wide. Stamp the sentiment on it, and trim the ends. Adhere to bottom right of card.
Select three buttons to serve as your “ornaments”. Thread the holes on the buttons with German style wire. Use the tail of the wire to create a loop for the ornament’s “hanger” before snipping off the excess wire.
Use liquid glue like PPA Matte Adhesive to glue the button ornaments in place.
Since it mostly relies on bulk supplies like buttons and tools like stamps to make, this Christmas cat card could easily be made in quantity. Simply substitute cardstock or a variety of patterned paper for the paper used for the matted background and the sentiment strip. and you can make this card over and over with a Button Bonanza and your stamp! And since it is fast and easy to make, your cards will be done in no time!
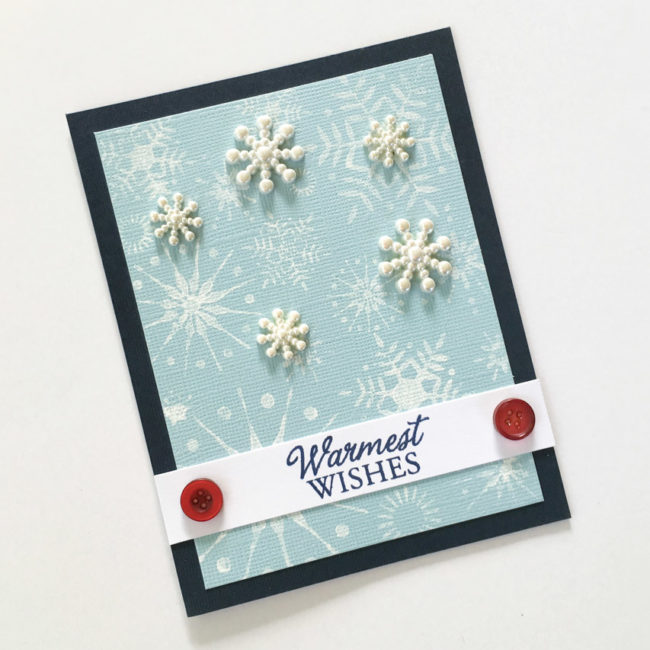
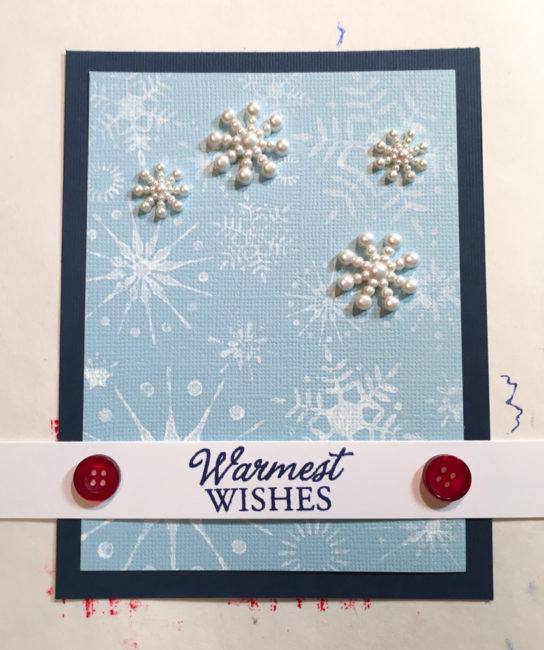
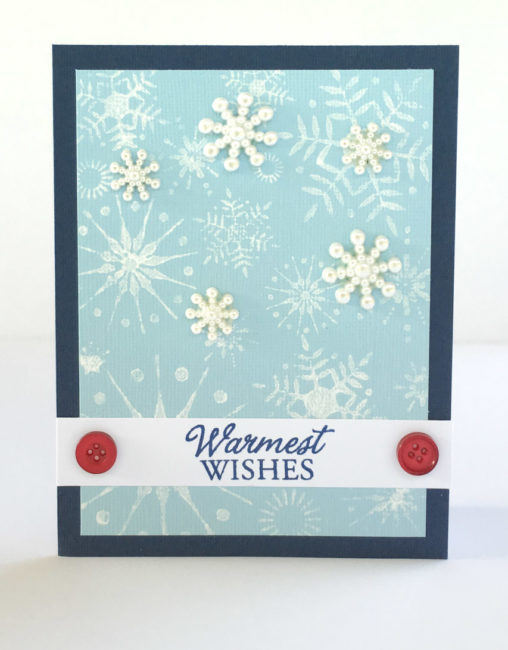
Tis the season to be jolly! Today I’m here to show you how to combine two of our holiday products that have a turquoise toned blue in their palette to make a fun retro Merry Christmas card!
Supplies Needed:
This project pairs seed beads from our beloved 28 Lilac Lane “Let It Snow” embellishment kit with buttons from our new “Cool Winters” Button Basics. With similar tones of blue, these two coordinate together beautifully to add a pop of trendy color to holiday projects of all kinds.
This card is 5″ by 7″, so to start my retro Merry Christmas card I cut the snowflake background paper to that size.
Next, I cut a 5″ wide strip of white cardstock that was a few inches tall. I stamped “Merry Christmas” on it with red ink, centering the image near the bottom. Then I used scissors to cut the top of the sentiment block into a wavy design.
To create the beaded edge, I started by spreading a bead a white glue along the edge. Then I sprinkled seed beads over the glue until it was covered, and set the sentiment block aside to dry.
Cutting the trees is easy! I simply used three scraps of paper and cut them into various sizes of triangles. The tree “trunks” are made from washi tape (but could also be made from strips of paper). Some of the tree triangles hung over the edge, so I just snipped them off. Once those elements were adhered in place, then I used liquid glue to adhere three buttons as toppers for the trees.
Once the glue holding the seed beads was dry, then I adhered the sentiment block across the bottom.
To finish my card, I used white cardstock to make a blank card and then adhered the finished card front onto it.
I hope this cheery little retro Merry Christmas card greeting will help you brighten the holidays of someone special!
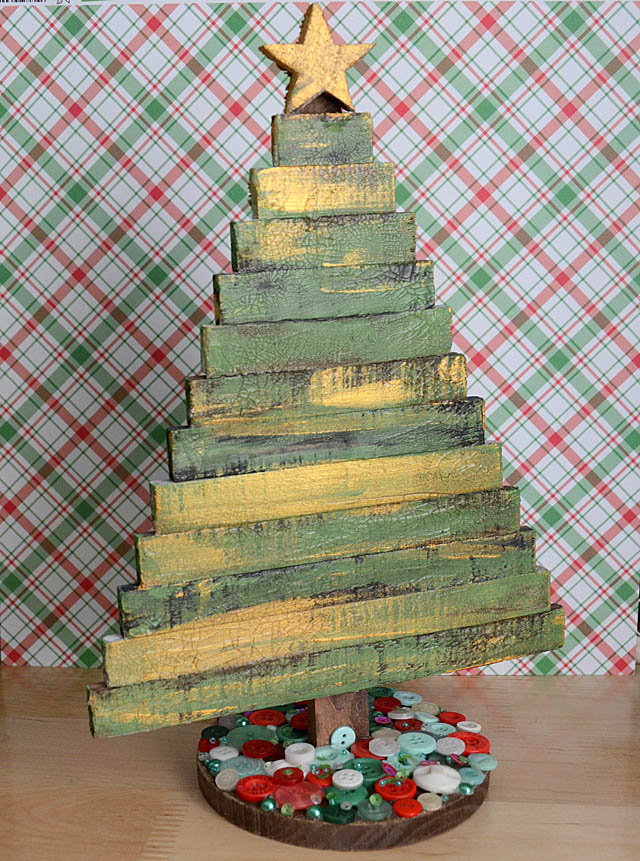
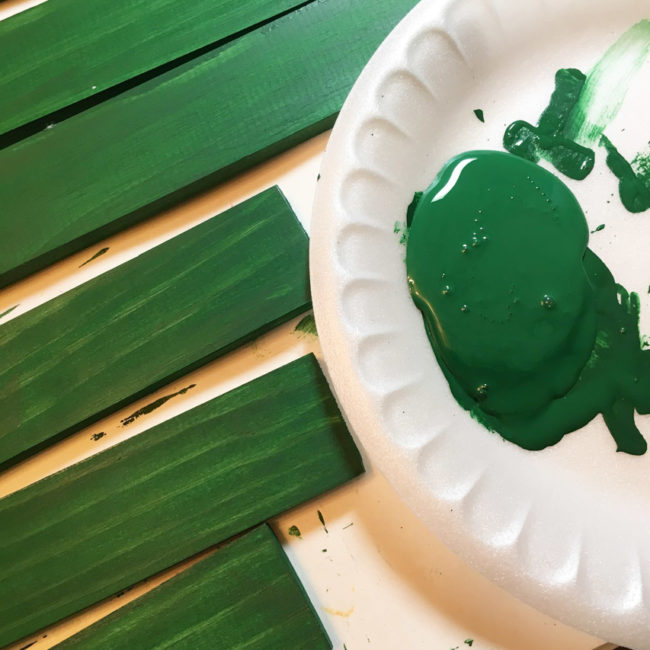
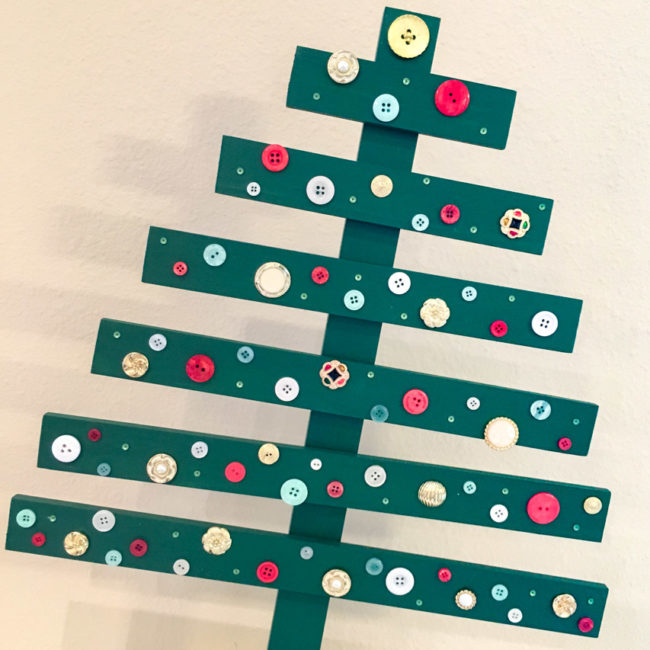
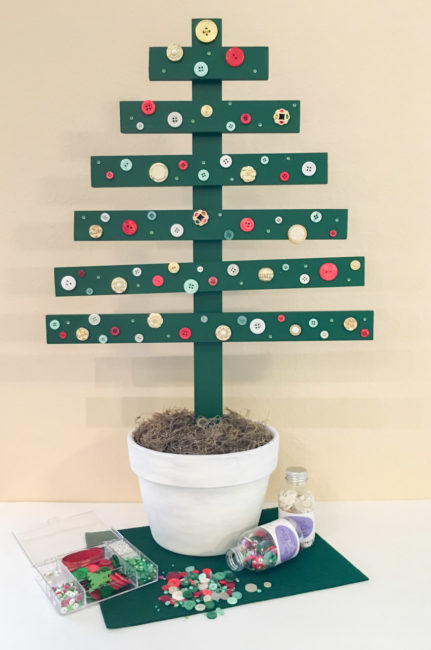
Welcome to the Handmade Holidays blog hop at Buttons Galore! We’re sharing a faux wood pallet Christmas tree to decorate a desk or tabletop…but this tree is hiding a very useful secret!
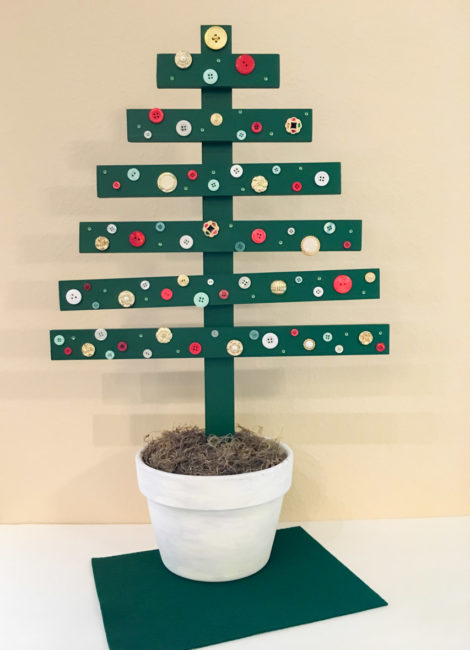
This fun little pallet Christmas tree is equally at home in a dorm room, or a farmhouse style decor. But at 17″ wide and more than two feet tall, it’s a challenge to store after all the gifts are opened. Or is it?
By using Industrial Strength Velcro to assemble the pallet Christmas tree instead of glue or nails, I made it able to be completely disassembled! Just pull apart the Velcro and instead of a big awkward tree, you’ve got a small bundle of wood that can be much more easily packed in an ornament box!
Disassembly also allows the flower pot – which is deliberately not seasonally decorated – to be used year round for flowers or other seasonal decorations when it isn’t being used for the tree.
Supplies Needed:
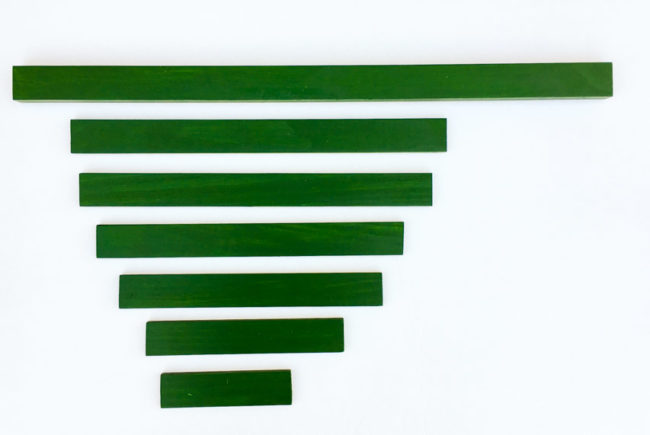
I started by cutting the craft wood into the following lengths: 6″, 9″, 12″, 14″, 16″ and 17″. Then I trimmed the 1″ x 2″ pine board to 26″ in length.
I used the Americana satin paint (made by DecoArt) in multiple thin coats applied with a foam brush to get a nice smooth finish on the boards.
After the paint was dry, I laid out my boards in the arrangement for the tree. Then I started decorating my tree! I used Button Shank Removers to cut off the stems from the Haberdashery buttons, and filled in around them with buttons from the 28 Lilac Lane bottles and kit. Tiny green sequins from the Yuletide Greetings bottle added nice little sparkly highlights around various areas of the tree, too!
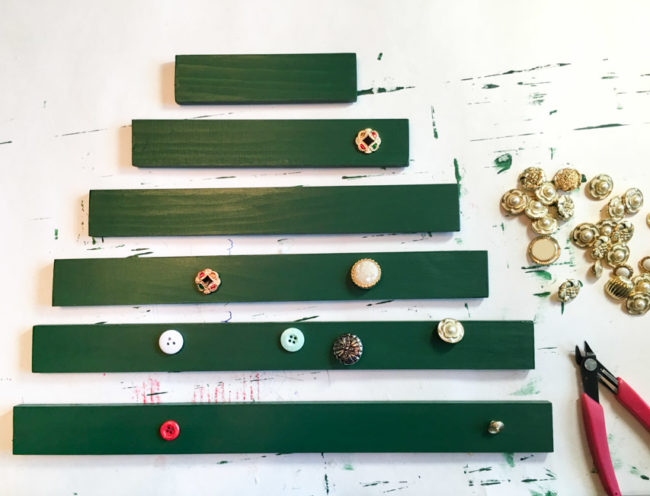
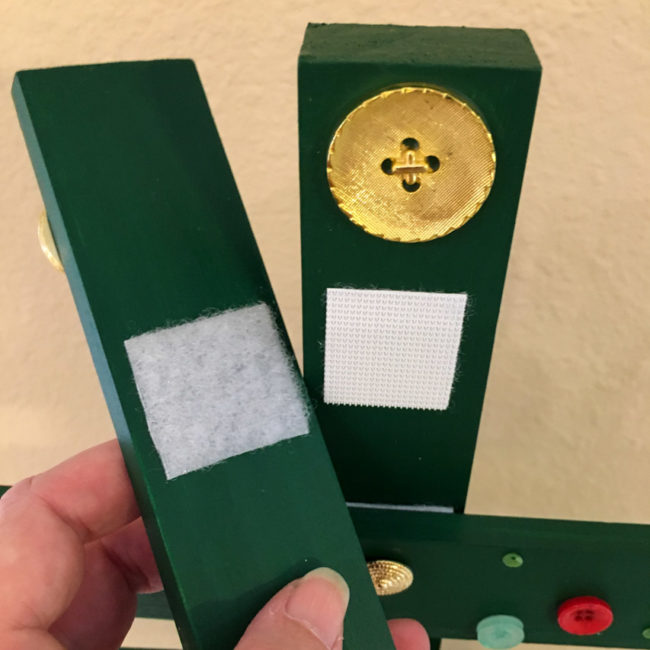
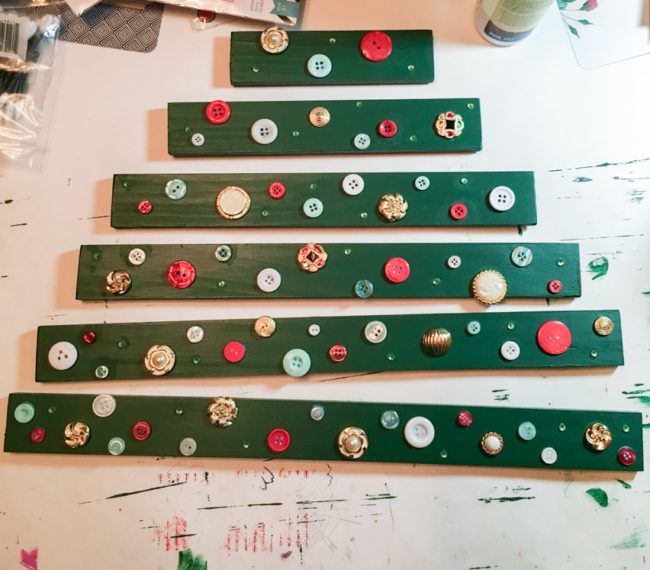
When it was all glued down, I was left with this! Notice how I hung some of the button “ornaments” off the edges of some of the wood branches to add some interest.
Attaching the branches to the stem was super easy with the Velcro. First, I cut 1.25″ squares from the Velcro. Then I measured and placed a mark at the center of the back of each “branch”. I peeled one side of the Velcro and adhered it centered vertically on the branch, using the center mark to get it centered left to right.
Then I peeled the second side of the Velcro and pressed the branches into place on the tree’s “trunk”. Once they were in place, I glued a big gold button to the top of the trunk as my tree’s top.
Painting the pot is fast and easy! I just dipped a paintbrush in water and then into the white chalk paint. This diluted the paint and when it spread, it created a whitewash effect. In areas that it didn’t spread as much as I would like, I just dipped the brush in water again and used the water to dilute the paint a bit more.
To create a second layer of paint for a mottled effect in the whitewashing, I repeated the technique with the more cream colored chalk paint. This time I just dabbed the paint instead of trying to fully cover the pot, and it created the textured look below.
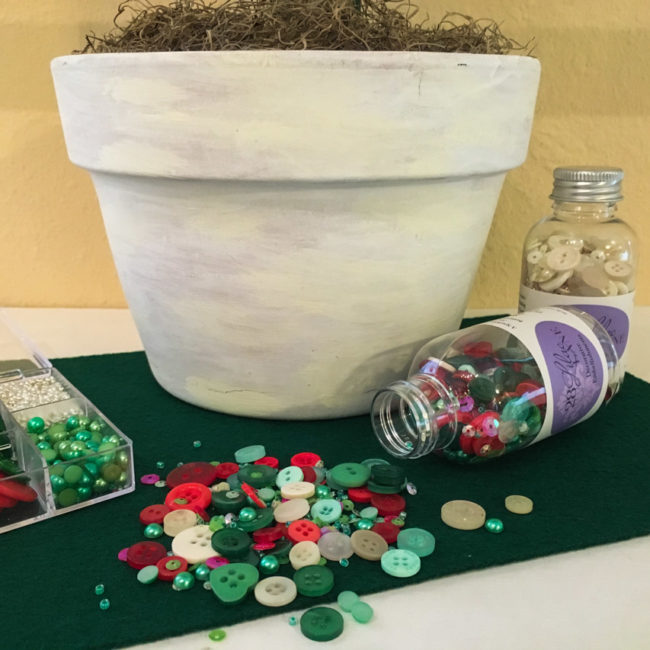
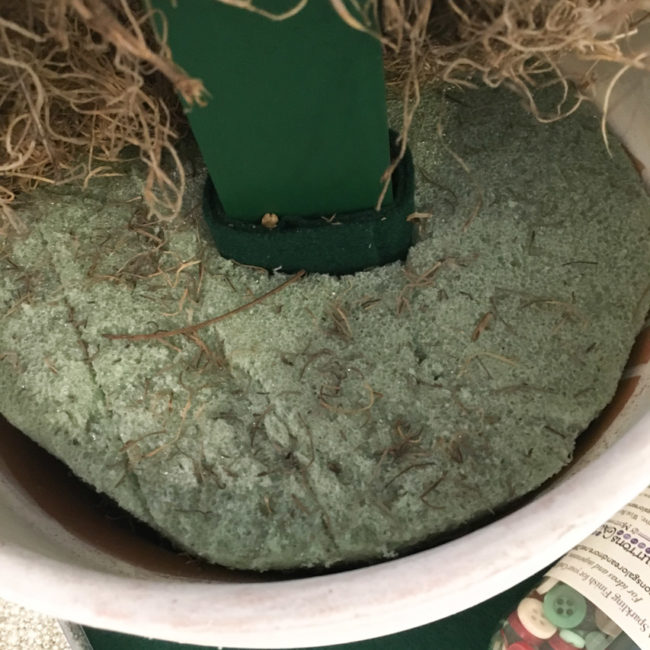
The base is part of what makes the pallet Christmas tree collapsible. I trimmed the foam so that it fit nicely into the pot, and then carved a hole down the middle of it for the tree trunk. To make the fit nice and snug, I wrapped the trunk in a strip of felt. This method makes the fit adjustable as wear and tear erodes away the foam base!
For the finishing touch, to hide the foam, I covered it in a layer of moss.
This faux pallet Christmas tree is the perfect decoration for a buffet table, an office, or a kid’s bedroom! There’s so many places to use it…where will you put yours?
Now, it’s time to get hopping to see more holiday decor ideas. But before you go…how about a giveaway? Here’s a peek at the huge assortment of prizes that are up for grabs!
Use the Widget below for your chance to enter!
Thanks to all of our fellow sponsors!
Now…click here to visit the next stop on the hop – or click below to see the entire hop list:

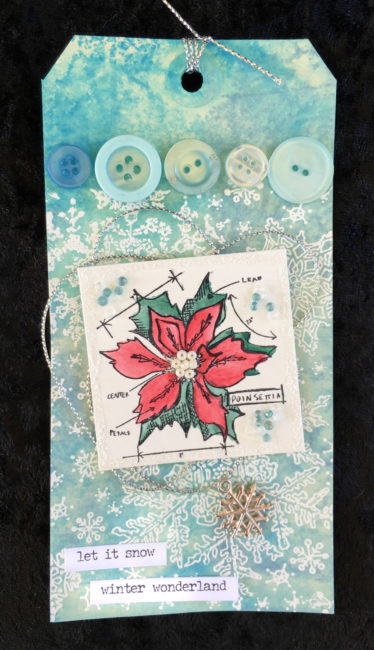
It’s November and that means…the leftover trick or treat candy has been eaten (at least at our house)…and it’s time to jump full on into Christmas trees and snowflakes and all things Christmas! For our readers that like to personalize their gifts, today I’ve got a holiday gift tag that will be remembered long after the holiday is over!
Supplies:
The background on this tag was created by inking a craft mat with the four shades of blue Distress Ink, spritzing it with water, and then dragging the tag through it. A heat gun helped to speed the drying process. The nice thing about this technique is that if you don’t like the effect that you get, you can add and remove color by spritzing the tag with water, or adding another layer of color, until you get just the effect that you are happy with.
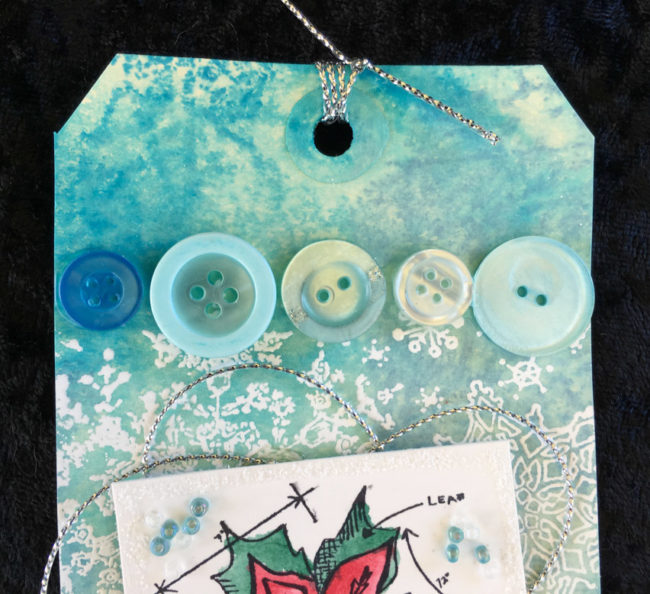
Once the background was thoroughly dry, I stamped the snowflake stamp with clear embossing ink and heat embossed it with white embossing powder. Since the stamp was not as tall as the tag, I made sure that I started the stamp at the bottom of the tag. Using the PPA Matte Adhesive to glue a line of buttons across the area where the snowflakes stop disguised the transition area from snowflakes to plain background.
Next, I stamped the poinsettia stamp in Archival ink on watercolor paper, and colored it in with watercolors and a waterbrush. Finally, I trimmed it to a size that would work on the tag.
It’s not very visible in the photos, but I used Stickles to create a border around the outside edge of the poinsettia square to add a little extra glint of sparkle to the tag. I also used various colors of seed beads from both of the embellishment kits to create some dimension in some areas and create the flower’s center. (The seed beads in our kits adhere beautifully with the PPA Matte Adhesive, which is what I used here.)
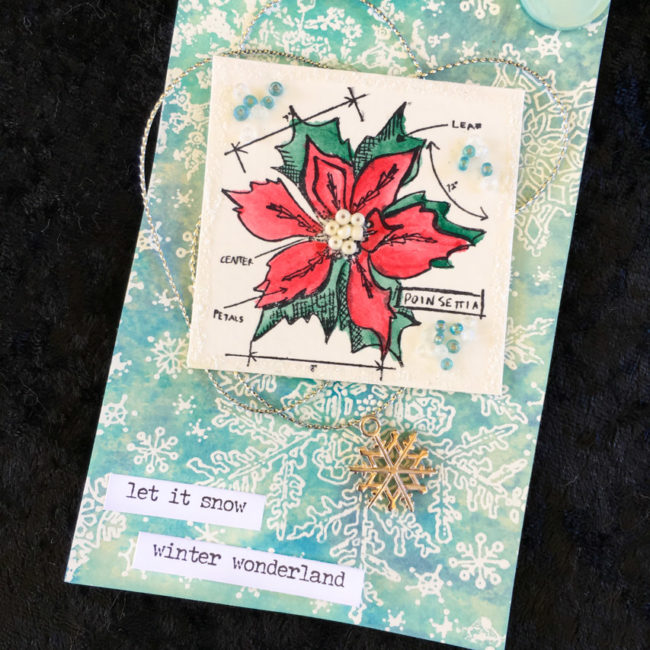
The trickiest part of assembling this holiday gift tag is getting the loops of silver string and the poinsettia layered and adhered. I laid down a pool PPA Matte Adhesive in the middle of the tag, and created my string loops by passing the string through the glue area repeatedly. Then I pressed the poinsettia block down on top of it and when it dried, everything was adhered together!
At first glance, it looks like the snowflake charm is looped through the string but if you look closer…it is not. I simply glued it on with the loop laying over the string. This helps everything lay a little more flat and stay adhered better.
The final touch on my holiday gift tag are the two phrase stickers I added in the bottom corner. If you didn’t want to put the to and from information on the reverse side, these strips could have it instead.
In only a few weeks, December will be upon us! For many scrapbookers, that means recording our December holiday celebrations in special page-a-day pocket scrapbooks. Our 3D buttons are a fun and simple way to add embellishment to your December album!
Most of us using pocket scrapbooks for our December album will have at least a few 4×6 cards in our album to highlight important topics or days. This journaling card could hold very large number stickers to put focus on a special date (such as #25) or the kraft colored tag could be used for journaling space!
Supplies:
To make this card, I cut a 4″ x 6″ piece of patterned paper. Then I stamped “Merry Christmas” on the bottom right and embossed it with clear embossing powder. After I die cut the tag from cardstock, I looped ribbon through the hole, and secured it with a staple. I adhered the tag in place and laid the sticker in place on top of it.
The buttons were the final touch. These buttons are shank buttons, so I had to use button shank removers to give them a flat back. Before gluing them down, I used a pen to draw “strings” from the top of the card to the locations of the baubles that I wanted hanging. Then I glued all three buttons down on top of the drawn strings, and also added the Christmas tree in the bottom left corner.

Supplies:
I also started this 3×4 card by stamping the sentiment in the upper part of the white box. Then I added the washi strips in the bottom part of the box, trimming them so they fit the decorative shape of the bottom corner. I die cut the small holly leaves and adhered them, adding small red buttons as berries. Finally, I cut the shanks off of two 3D present buttons and glued them down in the bottom right corner using PPA Matte adhesive.
Whether you are using a kit or doing it yourself, we’ve got the perfect buttons for your December album. Visit the Christmas category on our website, or our new section to see our latest releases to find great options for your album!
October is flying by, and that can only mean one thing…that chill in the air is going to bring snow soon – and Christmas!
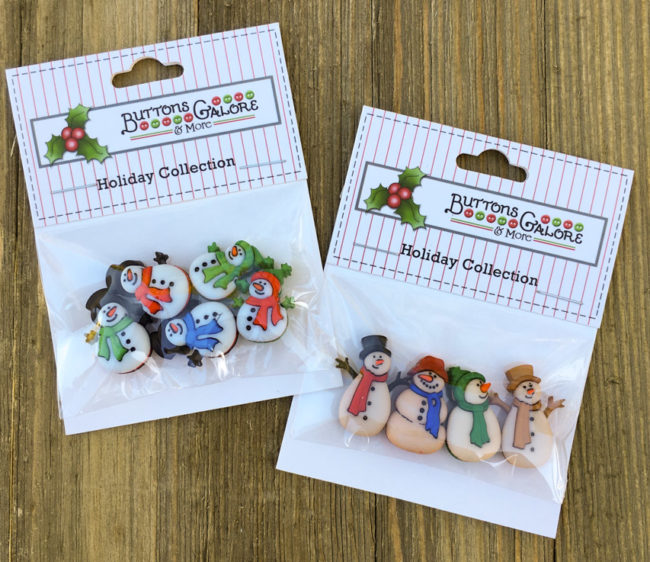
Today we’re excited to be announcing new 3D buttons that are perfect for your winter and Christmas crafting. We’ve got snowmen and snowflakes perfect for all of your project needs. (And don’t miss the peek at the end of even more new holiday goodness!)
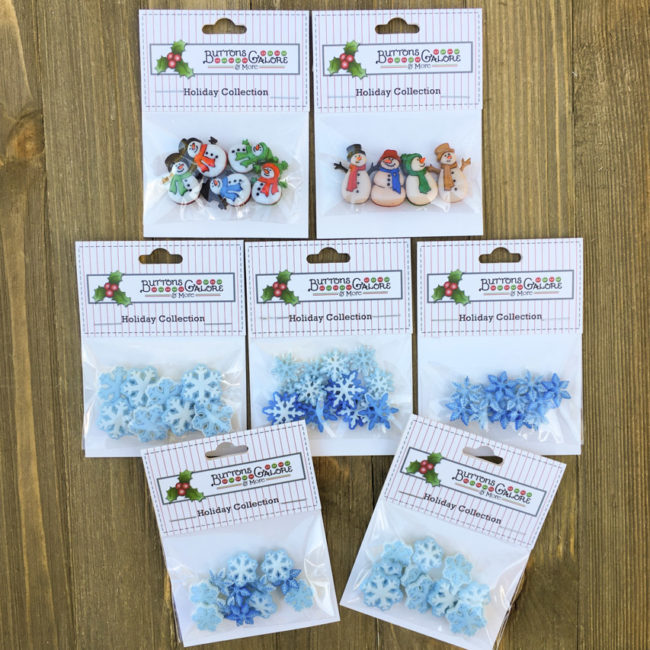
Adorable snowmen are a holiday must-have, and we’ve got two versions – a bright one and a more rustic one. No matter what your style…we’ve built the snowman for it!
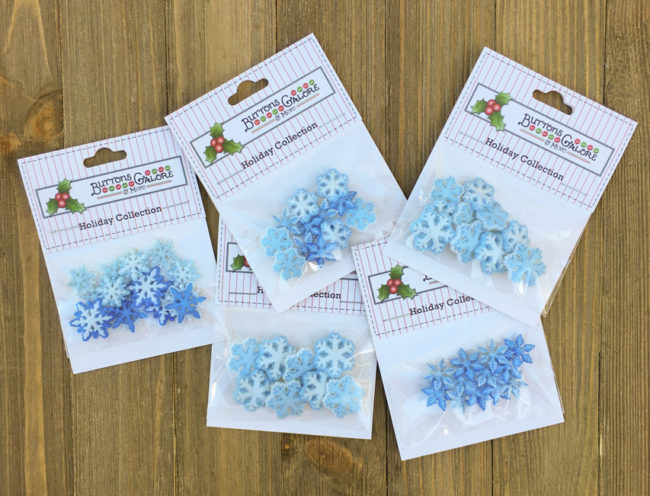
If you are dreaming of snow…snow…snow…in your winter holidays (and your winter craft projects), we’ve got a huge new selection of 3D snowflake buttons!
Our new 3D snowflake buttons come in three different styles that are available in several sizes and shades of blue. Packaged in five different assortments, there’s a perfect one for your needs no matter what your project!
All of these buttons, except for the snowflakes on the far left above, have shank backs for sewing them on to projects. But for crafters who prefer flat backs, the shanks can be easily removed with scissors or a button shank remover. (The set of snowflake buttons that doesn’t have shanks has a flat back and holes that can be used for sewing it onto projects.)
In addition to our snowflakes and snowmen, we’ve also got a great selection of new 3D Christmas designs such as gingerbread men, Christmas trees, stars, adorable holiday icons, and more!
All of our new holiday 3D buttons are available now on our website – click to see the entire selection!
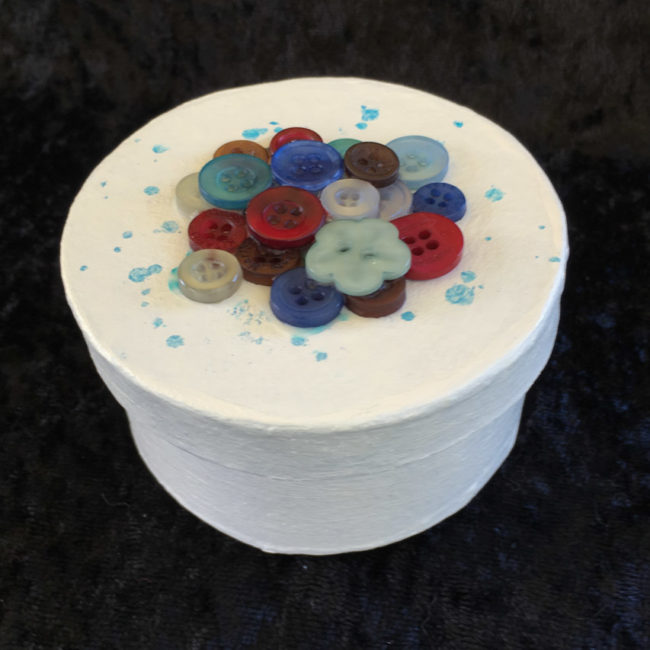
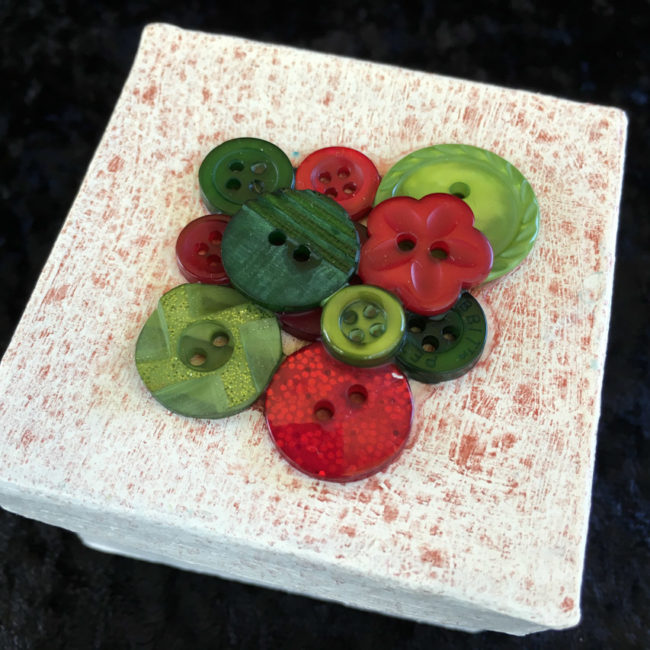
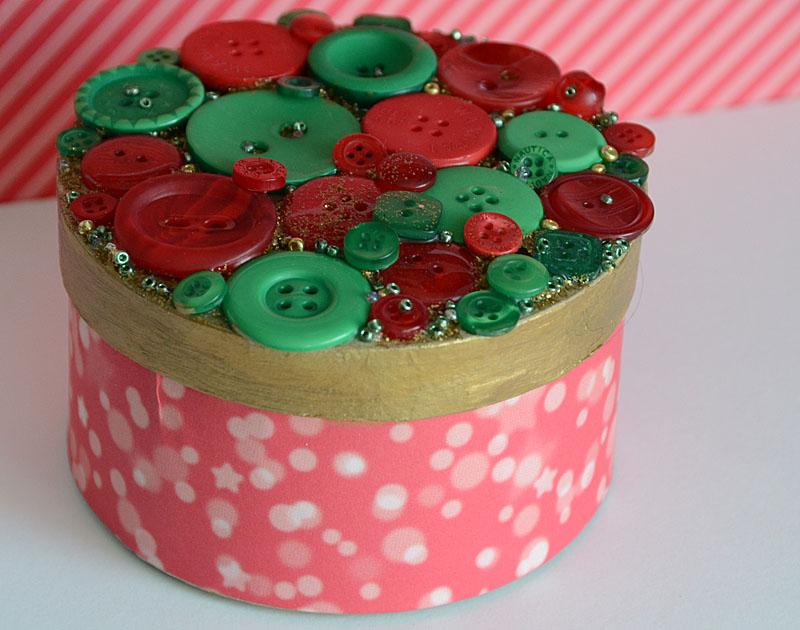
October is half over and that means it’s beginning to look a lot like Christmas in most crafter’s work spaces! Today, we’re going to share a few ideas of how to embellish a Christmas gift box with buttons to make your gifts look extra special.
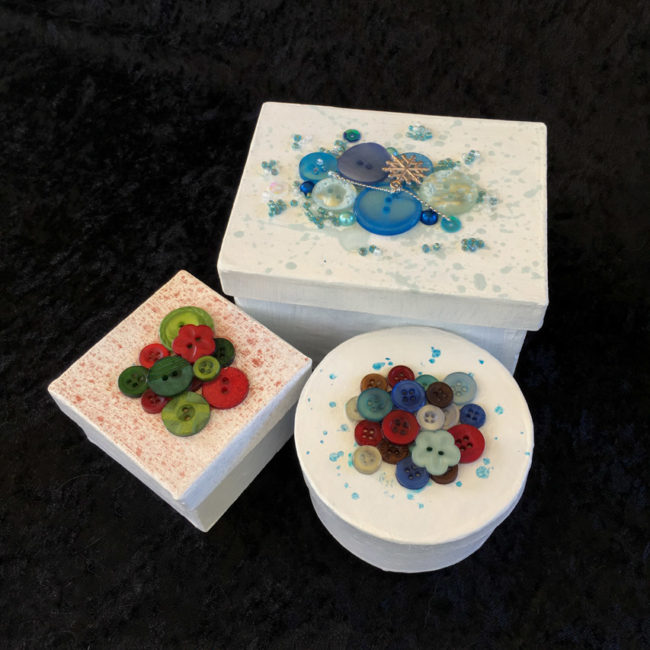
All of these boxes are created from paper maché boxes that are painted with white acrylic paint. Then the tops of the boxes were splattered with spray ink or paint to add some color, before buttons and other embellishments were added.
The large rectangle Christmas gift box is created with embellishments from the 28 Lilac Lane “Let It Snow” embellishment kit. To create this embellishment collage, I started by laying down a pool of white glue in the middle of the lid. Then I placed the large items first, creating the arrangement of the buttons. I filled in around the buttons with the small embellishments like the sequins and beads, creating a feeling of an explosion of embellishment spreading across the lid. For the final touch, I glued the snowflake charm from the “Let It Snow” kit on top of the button collage.
Supplies:
For the round box, I used the new “Winter Wonderland” Button Bonanza. I started this one by making the first layer of buttons. Then, once that layer had dried securely in place, I glued a second layer of buttons on top of the center of the first layer.
Supplies:
I used the same technique on the square box, creating a two layer collage of buttons one layer at a time. The key to making the prettiest collage is to vary the size and type of the buttons that you use. Also, it helps to balance the colors. On this box, the center has one of each color, and then there is an outer ring that shows the green shades alternating with red.
Supplies:
Grab some boxes…grab some glue…this project only takes a few minutes to make beautiful holiday gift packages. And it’s so easy that the kids can help out. What are you waiting for? Button up a few holiday gifts!
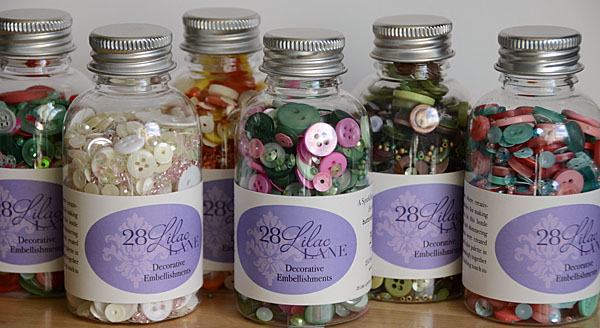
I could not be more excited to announce six brand new 28 Lilac Lane embellishment bottles. I’ve added in new sequin sizes, all new colors, and I am thrilled with how these beautiful mixes turned out. From scrapbooking to mixed media canvas projects to decorations for the holidays – there is a lot to love in these mixes and I hope you enjoy creating with them as much as I do!
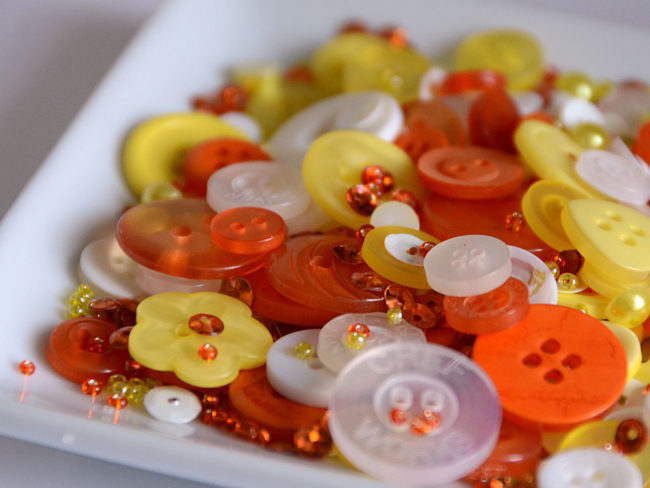
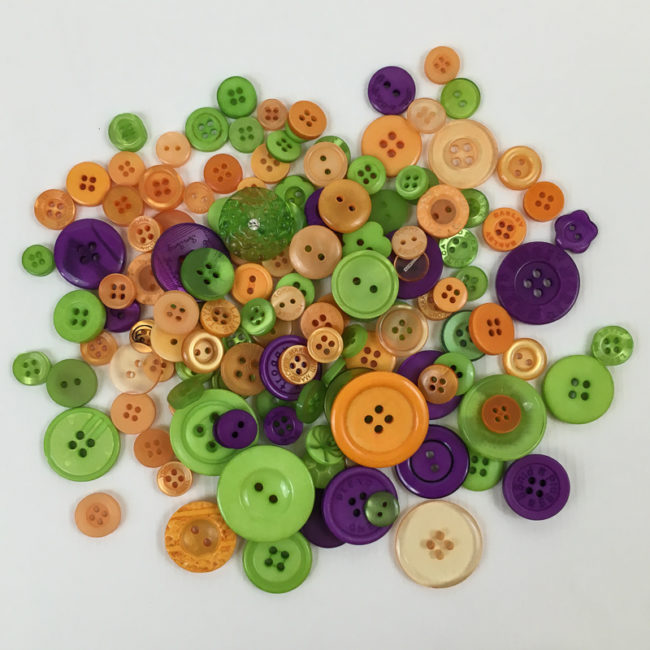
Candy Corn is inspired by my favorite fall treat, all yummy shades of yellow, orange, and white just perfect for Halloween crafting and so much more. From citrus inspired creations to bright summer scrapbooks this mix will be perfect year-round. The best part? This mix is calorie and guilt free.
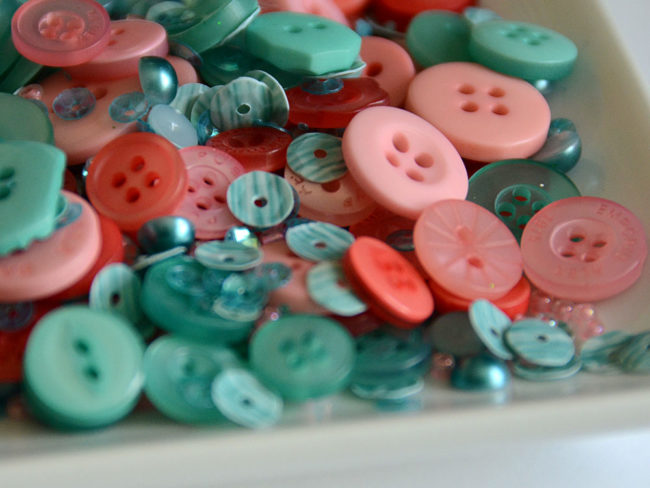
Coral Reef is full of rich aqua hues and shades of coral – blending together beautifully for a bright and beautiful mix. Feel like stepping outside the box? Try this embellishment mix for some non-traditional color palette Christmas crafts!
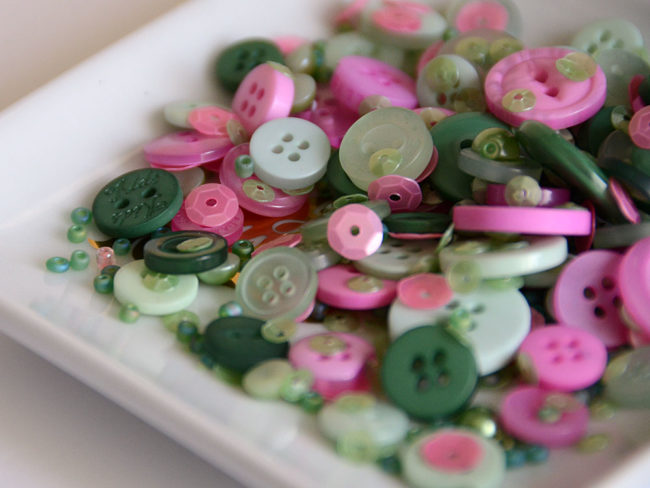
Savannah Stroll is inspired by the flowers and greens in one of my favorite cities. A city so perfect in spring time, I wanted to capture some of my favorite shades and bottle them up to use on all kinds of creative projects. From the soft green beads to the pink buttons I love every part of this lovely mix.
Through The Woods is as the name implies, a stroll through the woods! My favorite element in this mix is the woodgrain sequins. I can’t get enough of them and I love all of the rich green and brown hues not only for my camping and hiking scrapbook projects, but for all kinds of nature inspired creations!
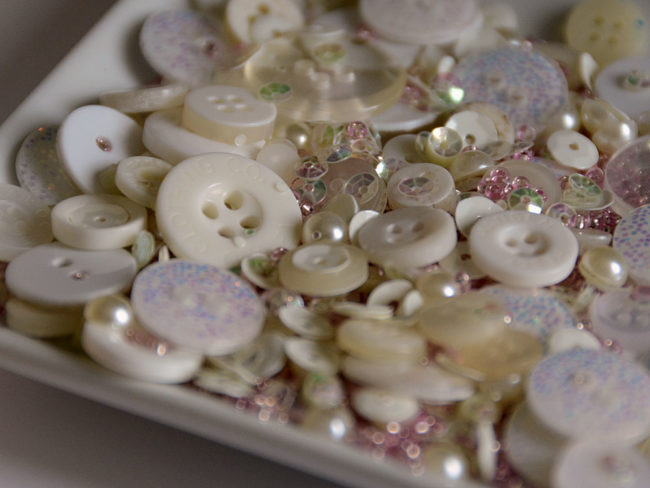
Winter Wonderland is inspired by bright fluffy fresh snow and all the shades of a white Christmas. While it doesn’t snow here, it seemed like the perfect name for such a mix. Of course if you’re simply needing more white in your embellishment stash or you have a special bride you wish to create something special for this would also be the perfect mix for you.
Yuletide Greetings is a season I can’t get enough of! From decking the halls to making things merry, I’m always in for a good traditional holiday mix like this. I am especially excited about all of the shades of green in this mix.
These new 28 Lilac Lane embellishment bottles are shipping now, so check with your local retailer about availability!
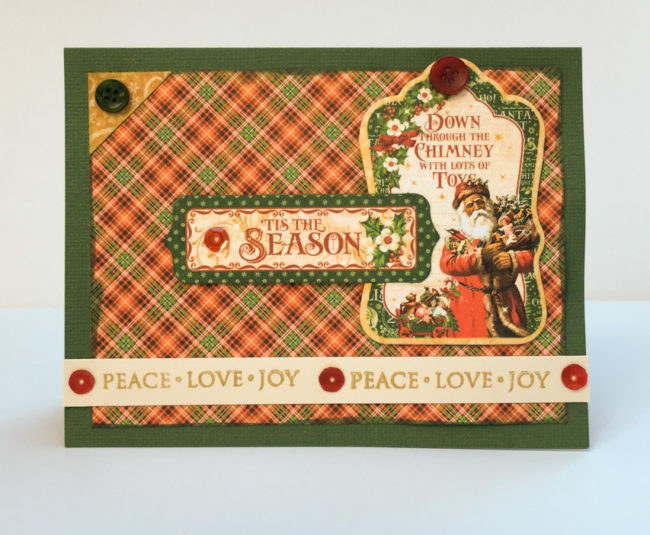
We’ve got Christmas cards on the brain here at Buttons Galore! Since World Cardmaking Day the first weekend of October is the unofficial launch of the holiday card making season, we’re sharing another card idea today to help your Christmas card planning. Our buttons, sequins, and beads are the perfect easy and affordable embellishment to use for making loads of Christmas cards.
Supplies:
Creating this Christmas card is quick and easy with buttons, and pre-coordinated paper and embellishments.
Start by cutting a piece of plaid paper that is 5″ by 3.75″. Ink the edges with the green Fluid Chalk and adhere it in the center of the front of the card base.
Cut a triangle from the gold paper, and adhere it in the upper left corner of the plaid paper block.
Adhere the large chipboard piece in the upper right corner of the card. Adhere the “Tis the Season” tag layered on top of it, using foam adhesive dots for the end not on top of the chipboard.
To create the bottom text strip, cut a 1/2″ strip of cream cardstock. Use the Shimmer ink to stamp the sentiment twice across it, leaving room in the middle for a button. Adhere across the bottom of the card.
Using the PPA Matte Adhesive, place small dots of adhesive on the stamped strip and the sentiment tag. Press sequins into them and allow to dry. Also use the Matte Adhesive to adhere the buttons on the corner frame and the chipboard embellishment, and allow to dry.
“Tis the Season” Button Bonanza is perfect for vintage color schemes, and if brighter is more your style, don’t miss “The Merriest” Button Bonanza, with bright green, bright red, and pastel pink & blue! We’ve got your Christmas cards buttoned up!
World Cardmaking Day is coming soon, and that means lots of crafters will be starting to think about making Christmas cards! Today’s holiday card idea uses 3D buttons to create dimension on a snowflake card that only takes minutes to make!
Supplies:
The key elements of this card’s design are very simple – a snowflake background stamp, stamped with acrylic paint, and 3D snowflake buttons. Layered together, these elements create a design this is simple, elegant, and dimensional.
To begin your card, cut a 5.5″ x 4.25″ background for the card from dark blue cardstock. Then cut a 5″ by 3.75″ layer of the light blue cardstock. Paint the snowflake stamp with the acrylic paint dabber, and stamp it onto the light blue cardstock. One dry, adhere the light blue cardstock layer on top of the dark blue layer.
 For the sentiment strip, cut a 3/4″ strip of white paper. If you stamp in the middle of that strip and then adhere it before snipping off the ends, it is easy to get your sentiment perfectly centered on the card front. Then you can arrange the red accent buttons around the edges of the sentiment strip and they will also be perfectly spaced!
For the final touches on your card, remove the shanks from the 3D buttons using a button shank remover. Then adhere the the snowflakes with liquid glue in random places on the card front. You can choose to place them to accent a specific stamped snowflake (as I did in the upper right of my card) or randomly in open areas between the stamped designs.
This holiday snowflake card is quick and easy to make. If you’d like to produce this card in volume for your holiday card list, these pearl snowflake buttons are also available in bulk via custom order from our customer service department.
The new product introductions keep coming! Today we’re introducing 6 new colorways of Button Basics, our button candy bags that are just the right size for making fun projects. The new additions to the Button Basics line-up include two seasonal offerings for fall and Halloween, two blue assortments for winter and Christmas, and two new trend-based color groupings.
First, let’s take a closer look at Fall Festival! This beautiful assortment of browns, leaf green, rusty orange, and mellow yellow will have you yearning for a cup a cider and the crunch of leaves under your feet.
For Halloween, we think you’re never too old to love to Trick or Treat! Shades of light orange and green combined with pops of bright purple make this the perfect collection for the cutest Halloween projects on your block.
Blue is a hot color for Christmas, and we’re bringing it to you with Cool Winter! This mix adds a sophisticated shade of red to a cool mix of pale blue and white to create an elegant mix that will work for cards, ornaments – and even holiday party wear.
Are you “blue” this Christmas? Then Winter Flurries is the collection for you! Not content with just on shade of blue, this collection gives you an entire range of shades from deep midnight to pale ice to choose from so you’ll be able to find exactly the shade you need for your festive Christmas or winter project.
If you are a fan of heathered pastels – especially the colors of the year for 2016 – then you’ll love our new trend mix Bohemian Style. With rose pink, blue, and a pop of sunshine yellow, this trend mix matches well with current home decor, fabric and fashion color trends so you can create up-to-date looks.
And finally, we have Party Time! This bright and happy combination of teal and bright pink with touches of white is perfect for parties, fashion, and everyday papercrafting projects.
Which of the new Button Basics is your favorite? You can get all of these new Buttons Basics on sale for $1 off from now until September 10th. That’s a great deal at $5.99 each! Why choose just one? Get yours now!
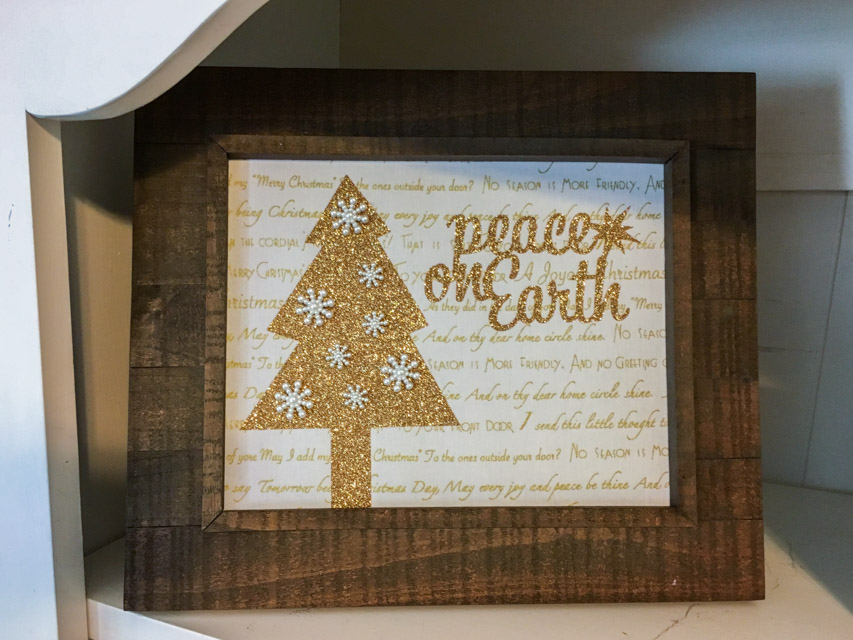
Remember that Autumn photo frame I shared awhile back? Well, it’s past time to decorate it for Christmas! This rotating seasonal decorative frame is so easy to to decorate to bring a seasonal spark to your home decor.
Supplies:
Instructions:
Cut an 8″x 10″ piece of the background fabric. Iron Heat n’ Bond to it to stabilize it.
Use die cut machine to cut tree and phrase out of glitter iron-on. Iron in place on on background.
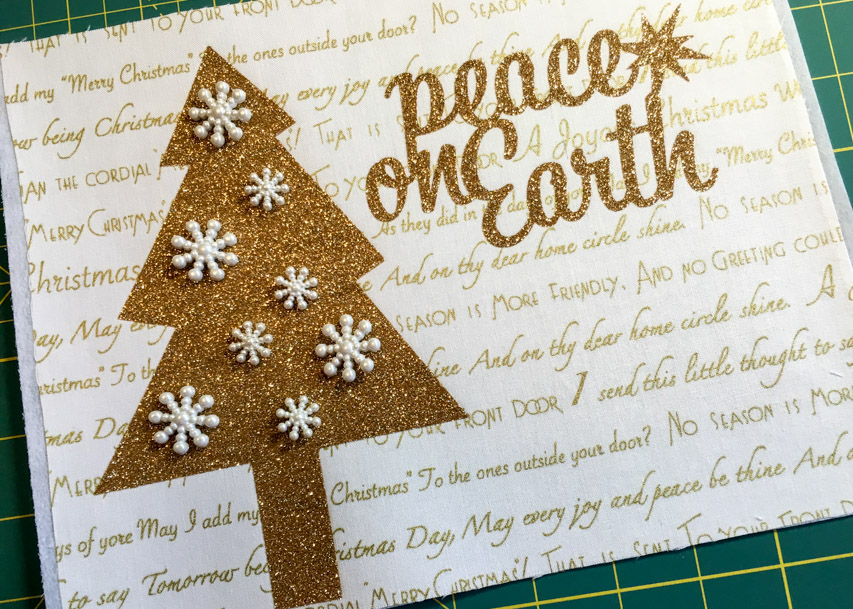
Carefully remove shanks from snowflake buttons using scissors or a button shank remover. Adhere on Christmas tree in random pattern using hot glue gun.
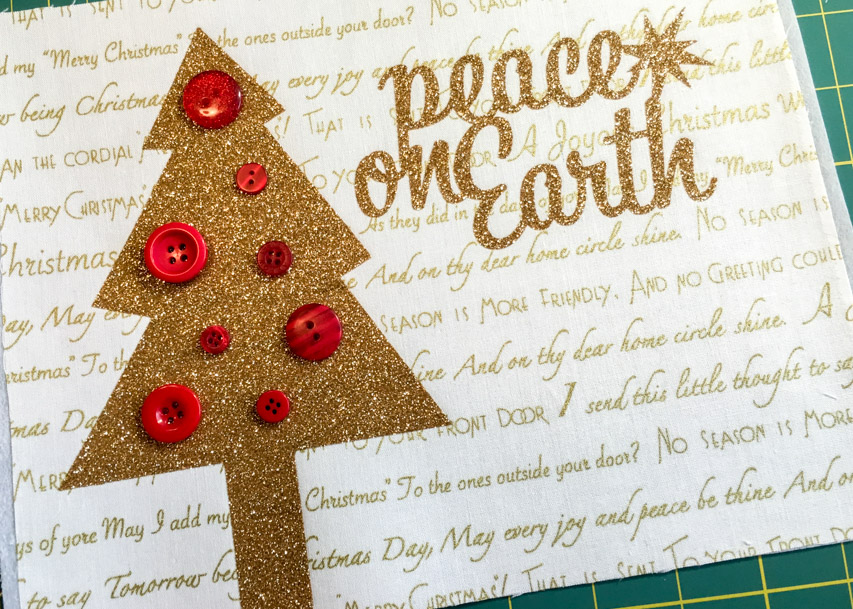
For an brighter look than the gold and white theme, try making ornaments out of bright red buttons!
Trim off any excess interfacing around the edge of the fabric.
Insert the sheet into the frame, and enjoy your Christmas photo frame!
I’ll be back in January with a seasonal Valentine’s addition for your frame! In the meantime, we’ll have plenty of exciting things going on here on the blog as the Craft & Hobby Association in early January gets closer…starting with a big announcement tomorrow (Monday) here on the blog! Don’t miss it!

When it comes to gift giving, I love to put handmade touches on the wrapping when giving store bought items and one of my favorite ways to do this is with a decorated box. I’m known for making these gift boxes and in fact, the perfect item to decorate the top with is buttons! Today I’ll share with you just how easy this can be.
Supplies:
Step by step:
1. Remove the lid from the box and paint the sides, or cover in patterned paper. For this box I covered the bottom in patterned paper, and painted the top edge with gold acrylic paint.
2. Place a good amount of liquid adhesive onto the lid top, keeping it away from the edges. If some spills over, simply wipe away or brush back onto the top.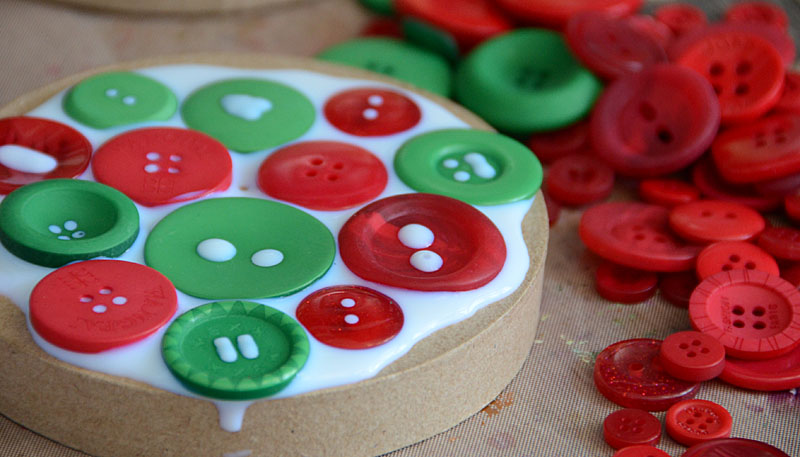
3. Begin by placing a few large buttons, then fill in areas. For a box like this I like to start at the middle and work out. Layer on a second layer of buttons if desired.
4. Once you are happy with your buttons, sprinkle something tiny like the seed beads that I have used on this box. This fills in any gaps and adds a great layer of texture and fun added dimension as well.
5. Allow the lid to fully dry before placing a gift inside the box, closing, and gifting!
If you’re wondering what to do with all of the metal christmas tree ornaments and décor shapes showing up in the local craft store the answer is simple: button them up! I had so much fun with this Christmas tree ornament project – and it really is simple and fun to do. In fact, my kids (8 and 10 years old) have made these kinds of projects themselves as well! Of course my favorite buttons these days are the color blends – and this is a perfect project to showcase them.
Supplies:
Steps:
Step 1: Cover the outside with washi tape.
Tip: Seal the edges with matte finish liquid adhesive so that it doesn’t come loose.
Step 2: Put a thick coat of liquid adhesive inside the shape. If there are unsealed edges be careful to either keep the adhesive away from the edge.
 Step 3: Fill the shape with buttons! I used wood buttons for my trunk, and the beautiful green buttons all over the tree area.
Step 4: Layer a few small buttons if there are bigger gaps showing, just add a bit of liquid adhesive to the back of them when you set them on.
 Step 5: Finish by sprinkling a bit of glitter if desired – this adds sparkle and will fill in any small crack areas.
Christmas is coming faster than it seems – there’s only 73 more days left! It’s time to start thinking about crafty holiday projects like cards, gift wrap, and home decor if you don’t want to be scrambling at the last minute.
This Christmas gift tag will make a festive addition to any package or bag. With plenty of room on the back to write a message and the recipient’s name, it’s practical as well as pretty. The wire heart is finished off and brightened up by a button, which also serves as a convenient anchoring point for the embellishment.
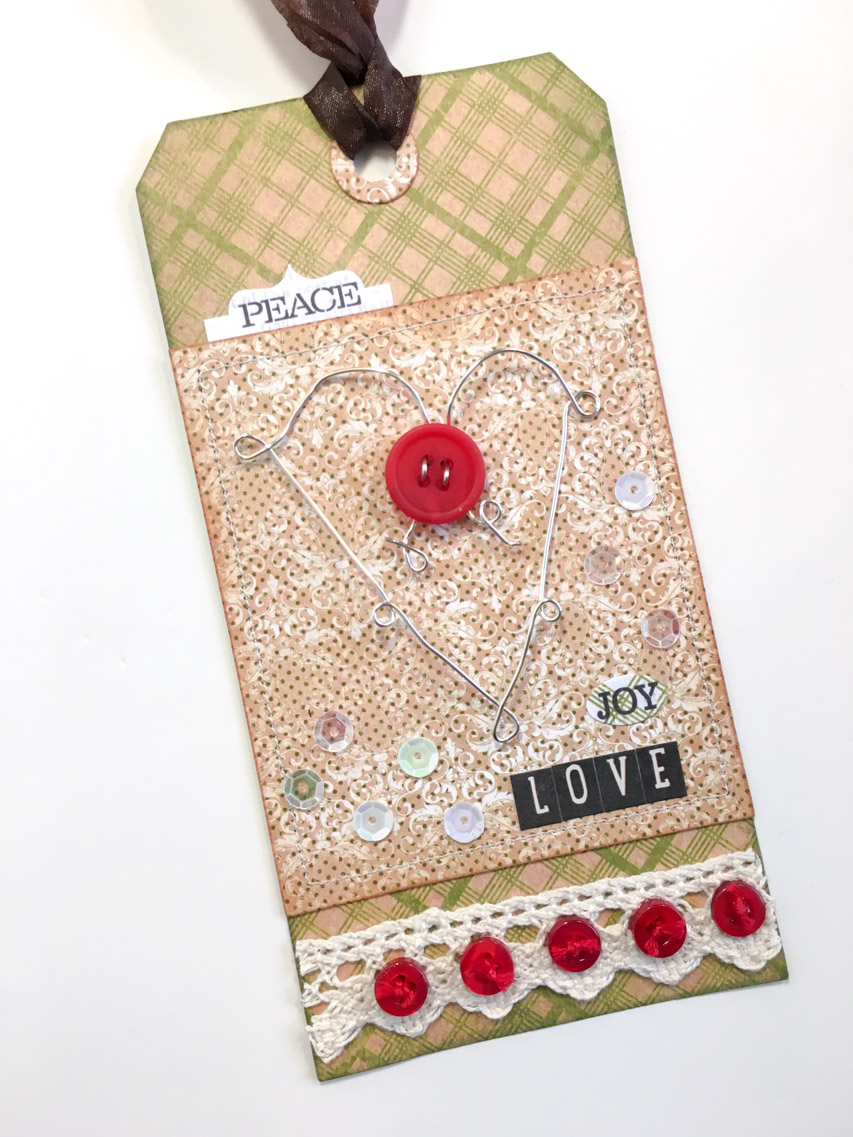
Supplies:
To begin the tag, use your die cutting machine to cut tags and hole reinforcer from the two different papers.
Trim the top off of the brown patterned tag to turn it into a rectangular panel. Stitch the edges of the panel with your sewing machine.
Ink all edges. Glue down the hole reinforcer and the stitched panel.
Glue crochet trim to bottom of tag. Thread small buttons and glue on top of trim.
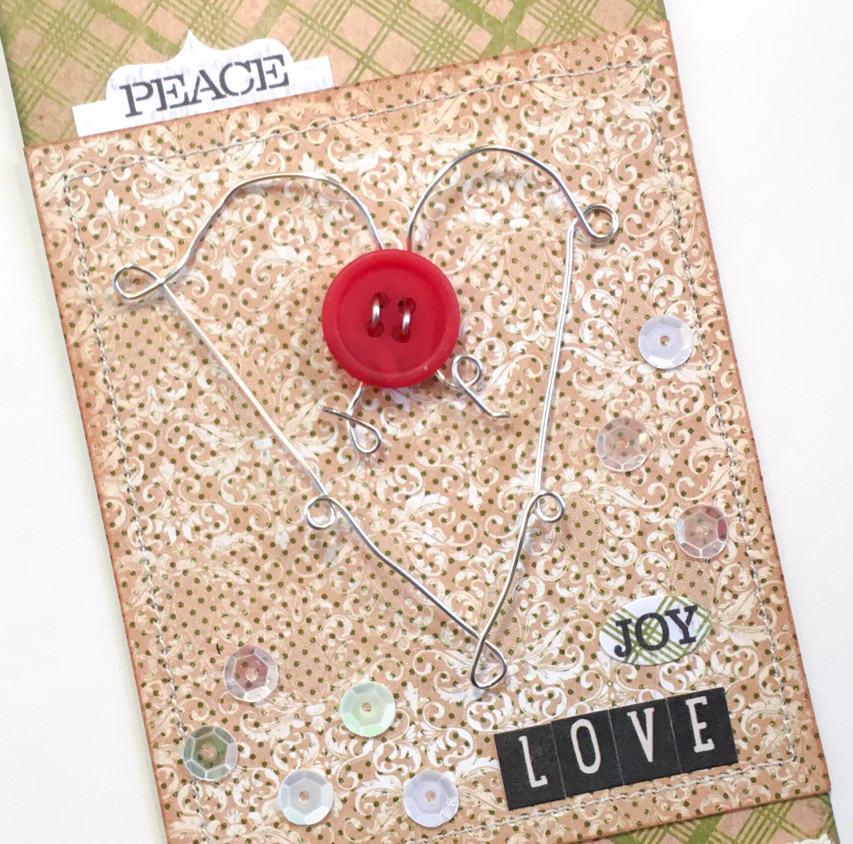
Create the wire heart using wire and jewelry pliers. (Grab wire with tip of pliers and twist to create loops.) Anchor wires together at “v” of heart by threading them through holes of a 4 hole button.
Use hot glue gun to adhere the wire heart to the tag, using the button as the anchor point.
Adhere word and letter stickers on tag. Glue sequins randomly around the wire heart.
Thread ribbon through the tag.
The kraft, plaid, and buttons give this Christmas gift tag a cozy Christmas look. Pair it with a generic red or kraft bag or gift wrap to dress up a basic package!
Check out these adorable Christmas tree ornaments made from scraps of green ribbon and Laura Kelly buttons in Radical Red and Passionate Pinks (and one yellow)!
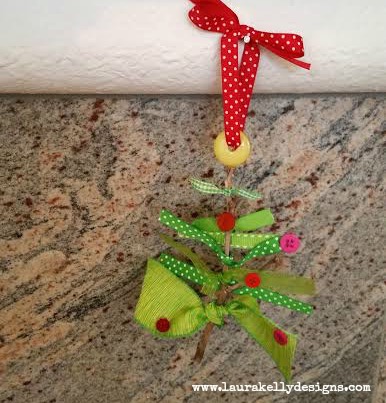
So cute, so easy and so much fun! The Aleene’s Quick Dry formula in the Always Ready bottle (available at Joanne’s) makes crafting things like this easy peasy. I am in love with the stuff!
Here are the simple directions:
This is a great craft for kids. Here are lots of other DIY ideas for celebrating the season with kids too!
And you can enter to win a fabulous contest too!
Happy Creating for the Holidays,
Laura
Holly here from Ribbons & Glue sharing a Button Christmas Card with you today to show you how easy it is to embellish your Christmas cards this year with Buttons Galore buttons.

To make this Button Christmas Card, I used a Pebbles in My Pocket Mistletoe cut file, Pearl Buttons for berries and gorgeous May Arts Ribbons.
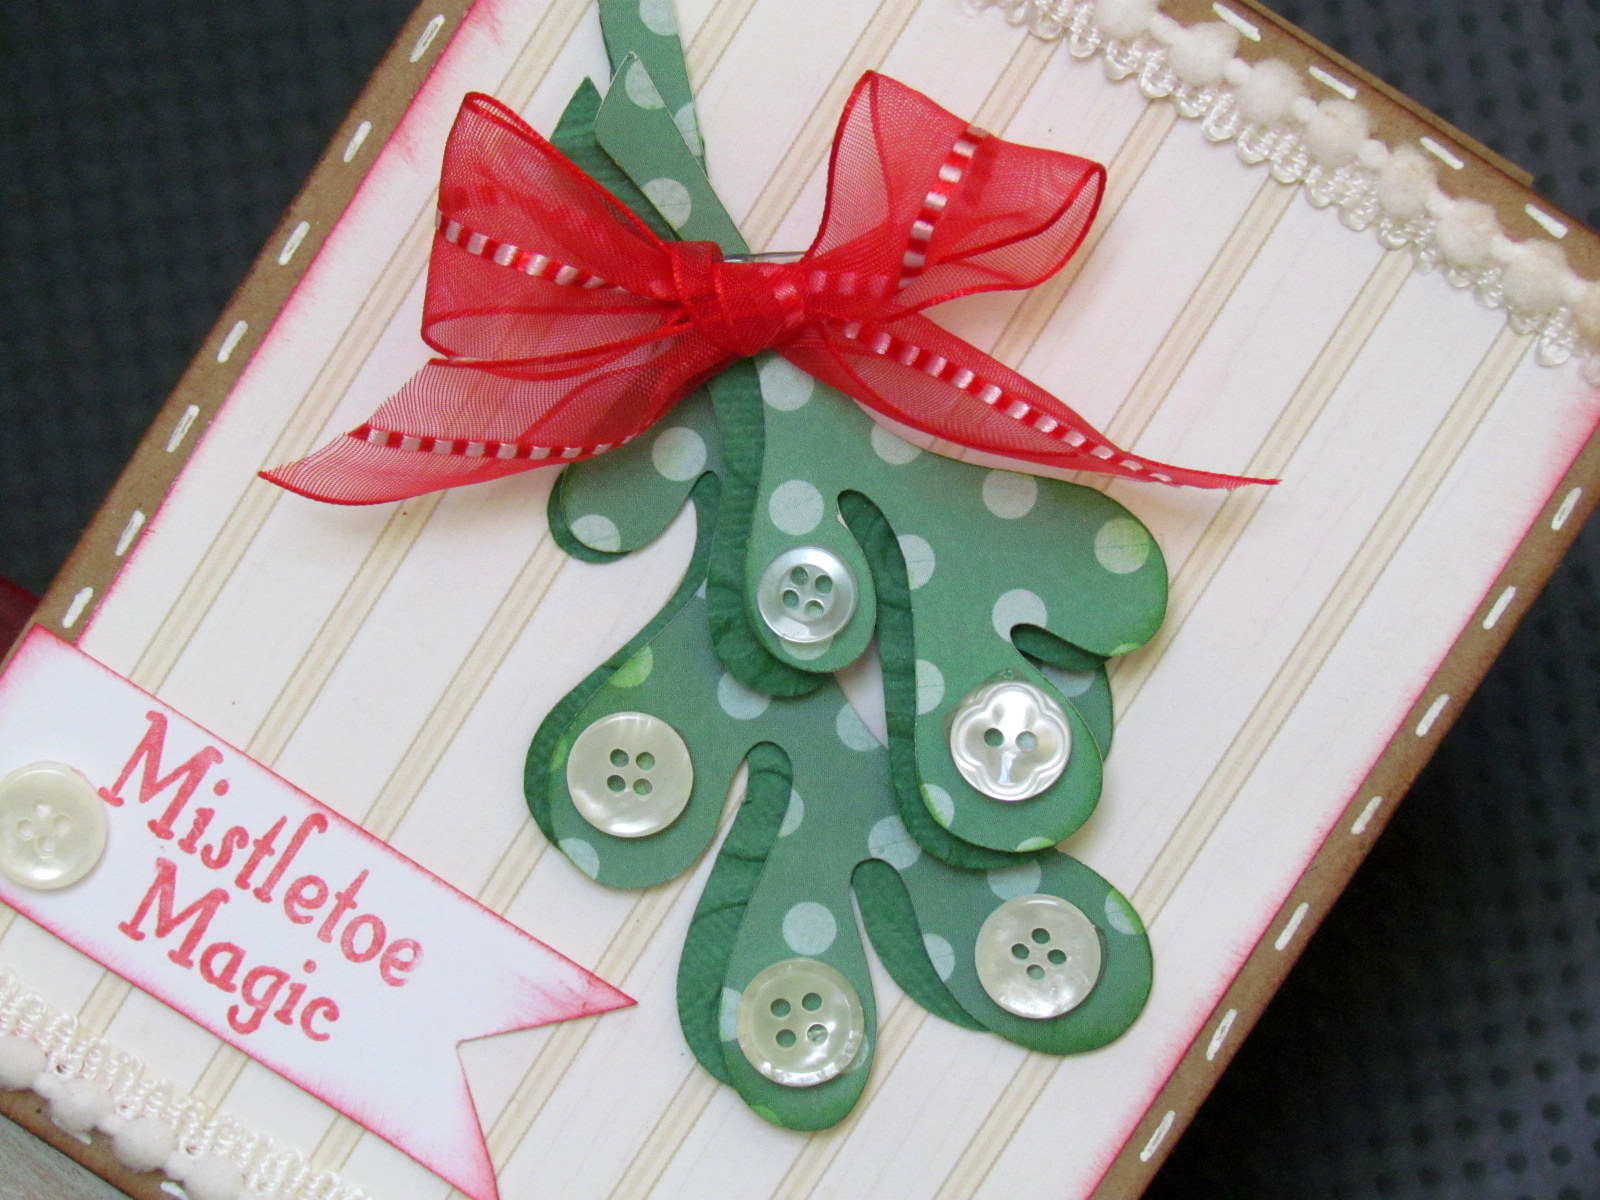
It really is easy to a add dimension on to your cards with simple buttons.
For more Christmas Inspiration, check out my blog Ribbons & Glue.

Like Me on Facebook!
Holly here from Ribbons & Glue sharing with you how to make Rustic Christmas Ornaments with Glitter Buttons for your tree this year by using Hemp Cord and Pearl Buttons from Buttons Galore.
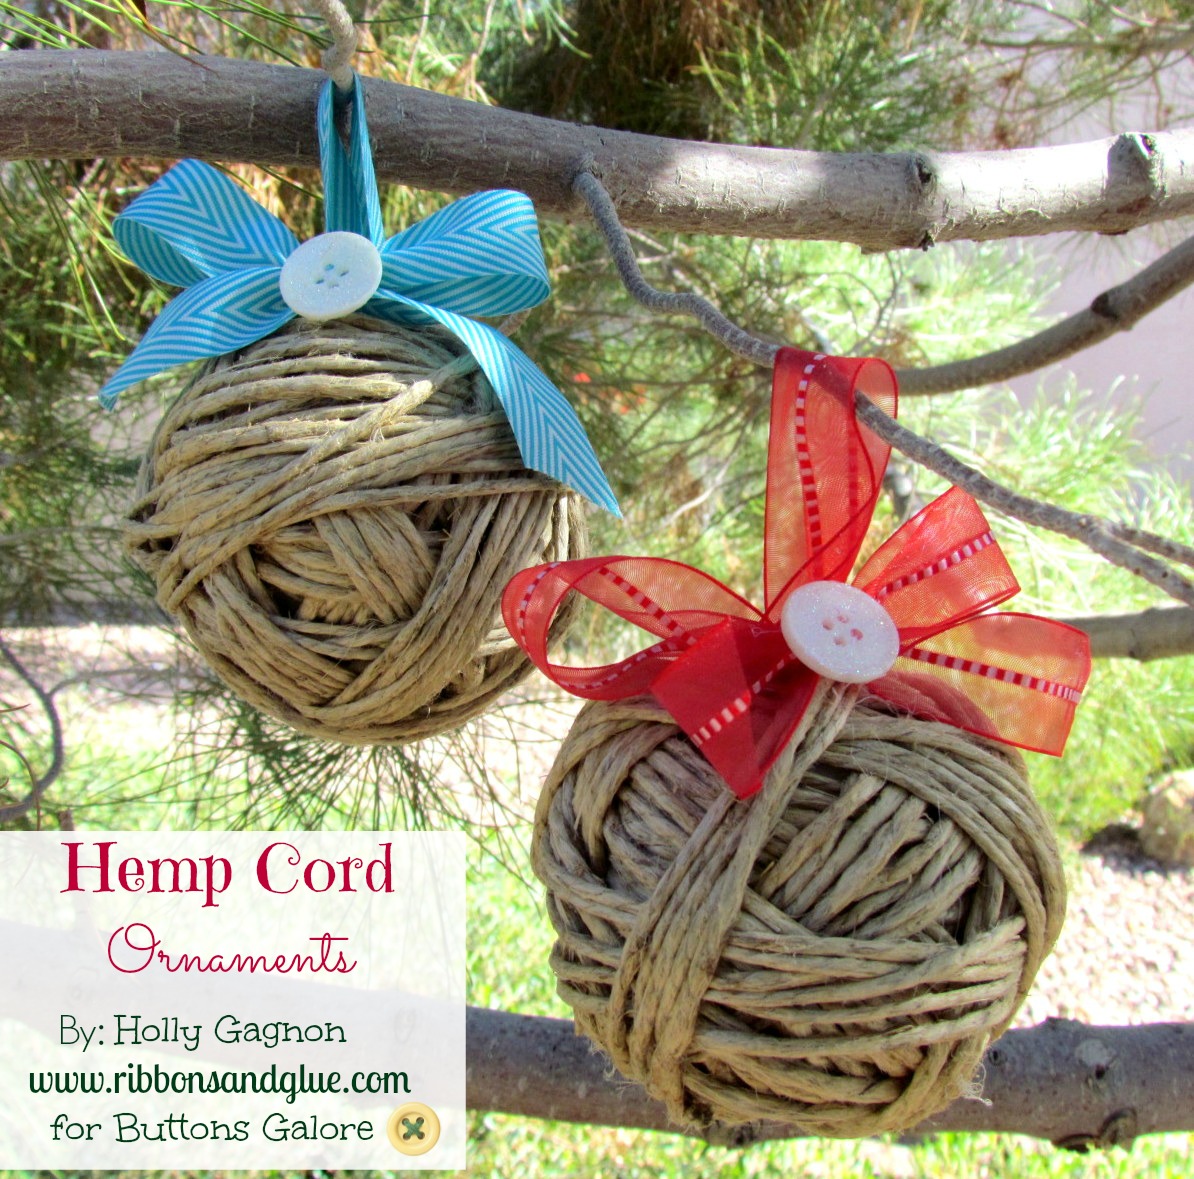
I love the feel of cozy, rustic Christmas Decor. You can find pine cones, tree branches, birdhouses and various things wrapped up in hemp cord along with lots of glitter around my house during the Holidays.
To add a little sparkle to my rustic Christmas Ornaments, I made glitter buttons.
So pretty! The glitter just adds a little sparkle to your cozy, rustic Christmas decor.
For more Christmas Inspiration head over to my blog Ribbons & Glue.
 Like Me on Facebook!
I love to make holiday trees with buttons and Styrofoam cones. It’s such an easy project and the possibilities are endless! This year I created some merry and bright trees using brightly colored felt and buttons (and a little glitter of course!) You can make the trees in any color combination, to coordinate with your decor.
 Supplies to make holiday trees:
Instructions

![]()
I hope you make holiday trees for your home.

The CSI Project has partnered with us this week. They have a set schedule of events and this week they will feature tutorials using buttons. We are sponsoring a FANTASTIC GIVEAWAY – a $100 of goodies. To win the goodies you need to link to the linky party on the CSI site. There are two other opportunities to win a prize – leave a comment on this page and we will do a drawing at the end of the week and one for our new facebook friends. Entries must be received by midnight November 10th, 2012.
Our design team will also have button projects posted on their blogs this week. Please stop by and visit them.
Each of
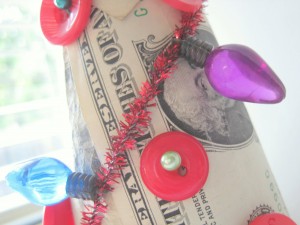
Money doesn’t grow on trees!!!….or does it? Check out this fun and easy way to give a money tree gift in a creative way.
Today I am excited to use a Styrofoam plus BUTTONS from Buttons Galore! Check out the supplies…
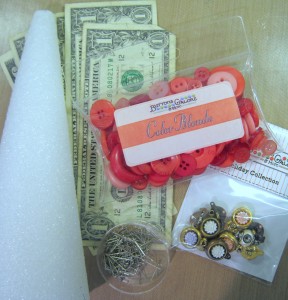
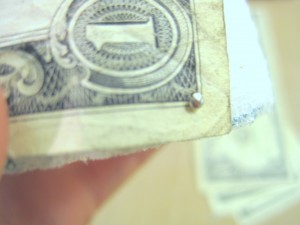
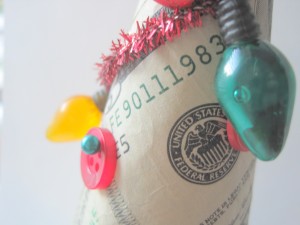
Begin by wrapping your cone in bills and securing the corners with sequin pins. Once you have all of the foam covered you can embellish to your heart’s content with buttons, colorful seamstress pins, tinsel chenille and more! Important to note that non of the items were adhered with adhesive because in the end this money tree is meant to be harvested so make it easy for the recipient to wrap and just use pins.
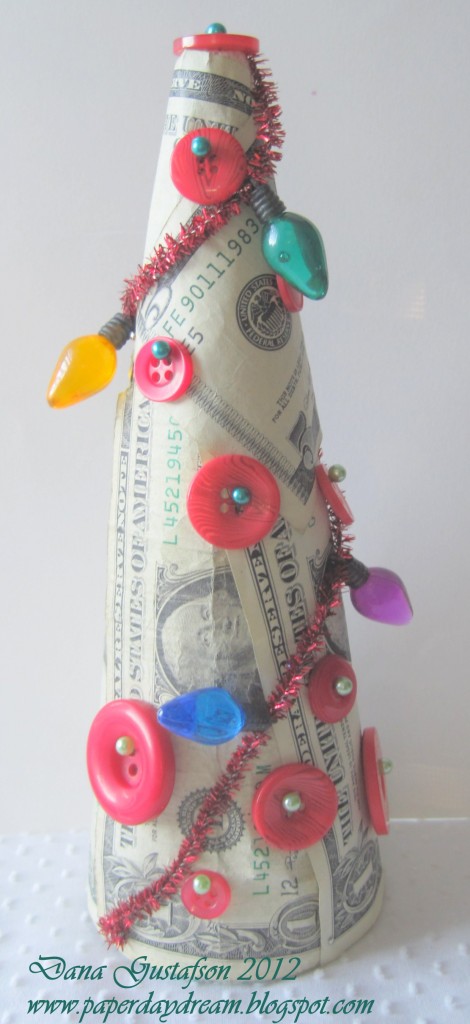
I love the glow on the “lights”!
Thanks for joining me today! I hope you will make a money tree for your next gift. No matter if it is a Christmas money tree, birthday money tree or a graduation money tree, the recipient will surely love a tree made of money. I know I would.

Today I bring you a Christmas Craft for your home. The Vintage Christmas Cube has an old world Christmas feel.
I love digging through my Buttons Galore buttons. I selected several from the Color Bulk buttons. This is a tree I purchased at a hobby shop (for train landscape). I simply adhered tiny buttons with Mini Glue Dots.


This is the full project.
I used a styrofoam cube from the Styrofoam Corporation. It’s about 3×3. I cut some papers (Authentique) 2 3/4″ square and applied them with Buttons Galore’s Beacon 3-in-1 glue. I’ve decorated some chipboard letters (Want2Scrap) with some sharpies that I received in my DT box. I then coated those with a layer of adhesive and some glitter from Donna Salazar. I finished the project off with a little bling (also Want2Scrap) and a Christmas tree that is decorated with what else … BUTTONS, using some mini dots, also from Buttons Galore. There are also some buttons held in place with a fancy pin (Maya Road).


It has long been established that nobody likes a skinny Santa, so make him regal and utterly unforgettable with some festive button embellishing!
Suitable for framing – I’m so excited to share with you a super craftilicious project, beckoning for buttons and a place of importance in your seasonal decor!

Armed with some of my favorite Buttons Galore & More products, and a smattering of extras, then this project is READY for fun…

In case you’ve never par taken in the mini canvas WRAP – {OMG! So FUN!} Here’s a quick breakdown of how to do, exactly that:
1.) Prepare to wrap a mini canvas by facing the “opening” or backside of the canvas, to the blank, or backside, of desired decorative paper.
2.) Score fold lines around the edge of canvas and cut flaps, so that the ends can be glued onto the “traditional” front surface of the canvas.
3.) Glue flaps down so that paper fits snug and clean around the edges. (The desired printed side should be exposed)
4.) Using a ruler guide, make a small “x” opening across the solid paper, exposing the recession from the original back of canvas.
5.) Crease and work edges so that paper will wrap snugly. Glue flaps to exposed wood and canvas.
6.) Using two sewing pins at opposing points, push from the inside of opening, so that the pin tip comes through at the two opposing corners.
7.) Cut 1.5′ length of embellishing wire and thread through, following the pin holes, from the inside of canvas “box”, out. This will be the spine of the ornament.
8.) Cut a small square of coordinating paper to fit inside opening and glue. Finish the inside lip of the box with decorative tape or paper. Fill with snowflakes, etc.
9.) Cut a matching acrylic square to fit on top of the entire front of the ornament. Using clear glue, adhere. Use clamps, if desired, to make a secure seal.

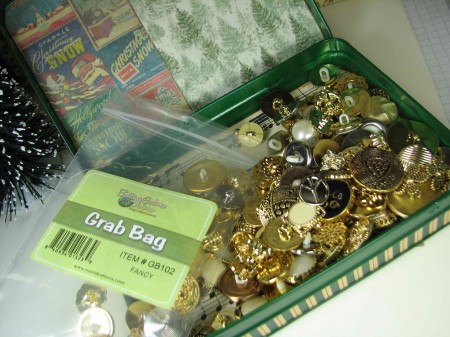
Glue Santa image to the top of the acrylic and embellish edges with buttons, shanks removed, from Buttons Galore & More, Gold and Silver Grab Bag.

Create a ribbon flower to embellish ornament:
1.) Cut a length of red and white gingham ribbon, sew the ends together to create a cuff.
2.) Sew a running stitch around one end of the cuff. Tie off and cut excess.
3.) Tighten ribbon to create bloom. Tie not and cut excess.
4.) Embellish with transparent button and bakers twine.
Enjoy! {But WAIT – there’s more!}

1.) Make a pretty angel “dangly” for ornament using two Start Up – Angels.
2.) Add color using alcohol ink and a blank alcohol ink pen, to add color directly to Start Up material. {No sanding required!}
3.) Sketch out angel robe in color of choosing.
4.) Add accent values, but allow ink to “do it’s thing”, making sure each color is dry before adding more ink.
5.) Change color by merely wiping pen onto scratch paper, until color doesn’t transfer, then change color.
6.) Build face, hair and suggestion of song book and wing definition. If results don’t please you, simply wipe surface with alcohol blending solution and let dry.
7.) Don’t overwork – just let the angle appear!
8.) Repeat steps for second angel and sandwich over wire with glue and glue dots, so that painted angels will be visible from both sides of ornament.

Embellish wire with beads of your choosing. Tie a festive ribbon from Buttons Galore & More Red and White Gingham Ribbon and thread through wire, so that it sits on top of the ornament. Add more beads or desired accents to the top of the ornament.

When complete, add ornament to your tree or use in window display to let the big man you’ve been VERY good this year!
Happy Holidays!
Buttons Galore & More products used:
Gold and Silver Buttons – Grab bag
Red and White Gingham Ribbon – 1″

You’ve spent all that time shopping for (or making, I hope) that perfect gift. Then you carefully wrapped it so that it was beautiful. Don’ ruin it by putting on a store-bought gift tag, when you can made one that is lovely and a keepsake in it’s own right in just a few minutes.
It’s really inexpensive to make them, too! The Christmas Themed button packs are only a $1 and you get 10 buttons- so each tag cost me about $.25 to make. I like being thrifty!
You’ll need:
To make the base, I die cut some decorative sparkly paper. I cut smaller tags using a manilla folder (recycling) and then I used the corner of my ink pad to “color” the edges a bit. I also stamped my “to” & “from” before adhering it down with the Craft Dot and Go.
Now, some of the Chrismas Morning buttons really are BUTTONS, so I needed to remove the shanks using the Precision Diagonal Craft Cutters. The shanks are plastic on this set, so it was easy to do. Just make sure you cup your hand around the part you are removing so that it doesn’t fly off and hit you in the eye! (OK, I was channeling “A Christmas Story” there for a minute. But DO protect your eyes, alright?)
Use the Mini Glue Dots to add your embellishments, and then complete with a bit of twine for attaching or hanging. In no time, you’ll have a set of lovely tags that are worthy of your presents!

Christmas button gift tags

I know this is a little “patting myself on the back” but I thought I’d share a project I recently made and have posted on my blog at vickiodell.com.
There is a Mrs. Claus too and I’m thinking I might go back and add buttons to her dress.
You’ll find all the buttons you need for this project on our website at www.buttonsgaloreandmore.com.
Christmas Tree Button Collage by Jen Goode
Make your own pretty Christmas Tree decor with buttons. You can add any extras you like including button ornaments and mini garland. I created this holiday button decor using an old placement that I recycled to create the background piece. I love it when a project is completed without sewing a single thing!
Materials you need:
Christmas Tree Button Collage - close up
How to make this Button Collage Christmas Tree holiday decor

I recently made a video that is a great project for quick and easy Christmas gift giving; Crochet Dishcloth Embellished with a Useful Button.
Useful button? How does THAT work? Well, you’ll just have to watch the video to find out! :)
PS. This video started out as a “Freebie” project to our new facebook fans. To get all of the special goodies we offer on facebook please visit our FACEBOOK PAGE
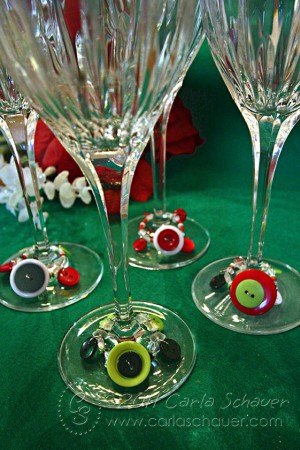
As holiday party season rapidly gets underway, one of the tasks the party host(ess) needs to consider is how guests can keep track of their drink glasses. One of the best ways to accomplish this is by using drink charm. Plus, it looks fancier than the plastic cup/black marker method.
I started by using a coil of memory wire, cut into 4 rings with wire cutters. With a couple jewelry tools, some frosted beads, and my Buttons Galore & More buttons, I had my charms made in no time at all.
Supplies and Instructions:
Buttons Galore & More buttons (Christmas Button Bonanza, Rainforest Button Bonanza, Winter Holiday Micros, and Rainforest Mix Micros)
Frosted and clear star and bicone-shaped beads
Red seed beads
Silver jump rings
Silver wire
Round nose jewelry pliers
Wire cutters
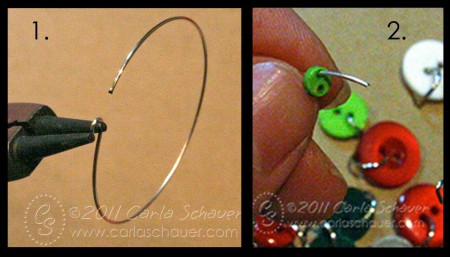
Each charm has a different combination of buttons and beads, and each has a unique focal button set. I used fairly traditional Christmas colors in this set, but the charms can be made to coordinate with any party theme.

Our Design Team Member Laura Bray needed a little inspiration for using up some gold and silver buttons from our Gold and Silver Grab Bag … so she grabbed a can of spray paint and created some adorable wall art. You can read all about how she did it in her blog post Button Decor.
I think that one or two buttons in a small frame would be an excellent idea for an ornament too, don’t you?

About this time of year, my kids get the itch to start making gifts for friends, teachers, and grandparents. I came up with a kid-friendly craft that will enable them to give a gift they’ll be proud of- and it’s a great way to share those wallet-size photos from school pictures!
I used a manual die-cutting machine for this (the Spellbinders Grand Calibur) because my kids, ages 6 and 10, know how to use it independently and frankly the results are great! But you can use hand punches if you like, instead.
Supplies:
First, have your kids cut large circles in 3 1/2″ or 4″ size for the bases. Then, cut the “wreath” portion by positioning the 3″ or the 3 1/2″ die and centering the 2″ die into the middle. Use a piece of painter’s tape to keep it from shifting around while you run it through the machine.

Save that area that is punched out- we’ll use it on the back!
Next, cut a piece of ribbon at least 6″ long and glue it to the base.

Take your wallet-size photos and position them so the face is centered in the middle. Cut away the excess with scissors. use a dab of glue to secure the photo to the wreath, then add more glue to the entire thing and glue it to the base.
Now to decorate! Use a little more ribbon to make a bow, and add a decorative button. Then glue little buttons around the wreath as ornaments.
While that’s setting up, write the child’s name and year on the Angel Start-up and glue it to that center from the first step. Lastly, glue that to the back of the ornament so that both sides are festive.

You’ll have such a good time crafting together as a family, and the kids will be so proud that they made the gifts themselves!

Button Snowball by Laura Bray
These super simple snowballs, made of buttons, are perfect for a romantic Christmas decor theme. Hang them in your tree, stack them in a bowl, tuck them into a wreath or give them as gifts.
Supplies:
Instructions:
Tip:
If you want to use the snowballs as ornaments, thread a ribbon through the ball, using a long doll needle. Be sure to add the ribbon before gluing on the buttons!
The buttons are OUTSIDE of the box, friends! {And… inside, too!} For your creative consideration, I’ve mixed things up with a crafty menagerie of buttons, Start Ups, Ribbon and more!
Buttons Galore & More products used:
Just to help set the Christmas mood, I created a “beyond the box” scrapbook project, within… {wait for it…!} a darling altered box! The PERFECT assignment, to help stimulate crafty projects to give this season… {or KEEP for yourself!} Armed with assorted materials from Buttons Galore & More, and miscellaneous extras, just kicking around the craft room… I made this fun, interactive memorabilia box to share with all of you!
Spray paint and embellish metal box with color and papers of choice. Contemplate BUTTONS!
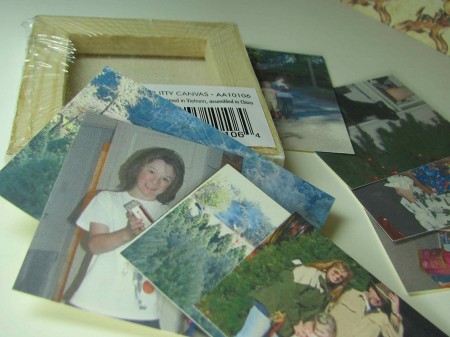
Reduce and print photos on a small scale to create accordion album to fit into mini canvas. Choose several photos to highlight your subject and print at normal scale.
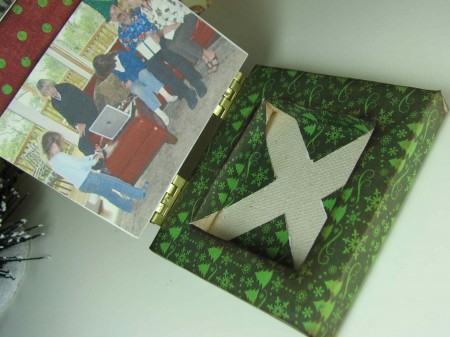
Wrap mini canvas so that the backside is covered completely by the paper. Glue flaps to the front of the canvas, as tightly as possible. Using a sharp blade, score an “x” across the covered backside of the canvas, exposing the inside. Fold triangular flaps down and secure with glue to create an open box type of frame. Cut a piece of chipboard to cover the entire frame and screw two sets of hinges to the front of the chipboard, after it’s been decorated, to create a “lid”.
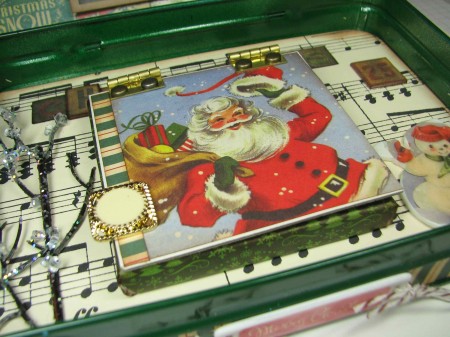
Embellish cover of canvas box with a stunning button of your choosing!
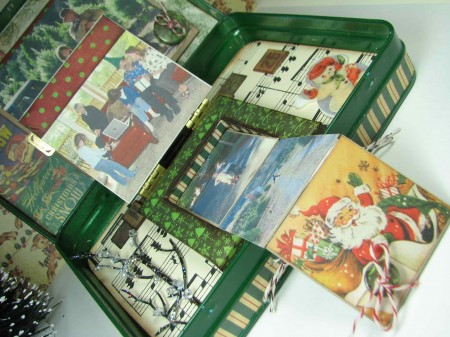
Acclimate small scale pictures to work in an accordion motion. Secure with glue and tape. For opening, pull attachment, add button, glued and sewn with clear thread, for strength.
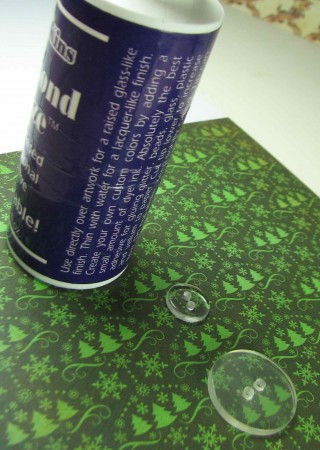
Customize clear buttons with clear, dimensional glue and decorative paper. Cover underside of button with glue, place on desired pattern from paper and gently push the excess glue out from under the button, then let dry. Once dry, cut the excess paper away from the button, re-poke the holes and embellish with baker’s twine.
![]()
Create packing tape transfers with desired printed images to fit onto Start Up shapes. Apply directly to Start Ups with clear glue and let dry.
![]()
Embellish box, as desired.
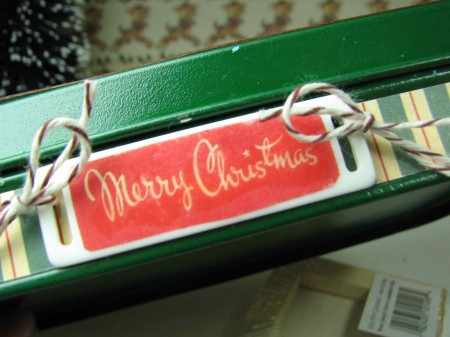
Yes, indeed! I’ll say the Holidays are off to a mighty happy start! Let the CRAFTING begin!
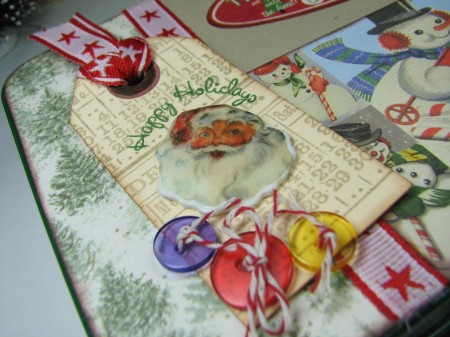
Thanks for letting me share this joyfully button festooned project with you!

Congratulations to our Button Bonanza Christmas Bag winner!!
Those are so cute. I ran into some pipe cleaners the other day and was thinking about how I could use them. Just found your site from Facebook!
I spotted these super adorable chenille stem flower ornaments on Pinterest recently and KNEW I had to share them with you. They were created by the super talented Diane Gilleland of Crafty Pod.
Not only are they ornaments but they could be turned into a brooch or ring to wear or even lovely package and card embellishments. Sooo many uses for such an adorable project!
Learn how to make your own Chenille Flower Ornaments with Diane’s complete tutorial and pick up a Button Bonanza Christmas Bag to make plenty of Chenille Flowers for everyone!
Want a chance to win a free Button Bonanza Christmas Bag? Just leave a comment on this post by Wednesday 11/2/2011 at 5pm for a chance to win one package. We will draw a random comment and announce the winner on our Facebook page Wednesday evening.
To see some of the photos Buttons Galore and More pins please visit our Pinterest Profile.

Making holiday gift tags is a great way to personalize gift wrapping using Buttons Galore & More buttons along with leftover bits and pieces from other projects. I used 2 larger paper scraps, die-cut and misted with Clearsnap Smooch Spritz, as the bases for these tags.
For this tree-themed tag, I used Haberdashery Collection Wood Buttons. It’s easy to change the color of the wood buttons using dye ink. I love that the buttons almost have a “stained” look to them. I just pressed the buttons into the ink pad until I was satisfied with the color and let them dry a few minutes. After gluing the buttons in a tree shape, I tied a ribbon and an embroidery floss scrap to finish the tag.

I used the Snowman Parts buttons from the Holiday Collection to make the second gift tag. I edged 3 white circles (1.5, 1, and .75″) in light blue ink and used them to build the snowman base on the left side of the tag. Then the addition of the hat, black buttons, mittens, and sign Snowman Parts gave him his dimension. A face and arms drawn with Clearsnap Smooch, and a scrap piece of dotted ribbon completed the scene.
Have fun with your button stash this year and add some whimsy to gift packaging!
Thanks for stopping by!

Button Snowman Ornament
Need and ornament for a gift, package topper or an ornament exchange? Why not make your own this year. Button Ornaments are a great and inexpensive solution. I made a few dozen while catching up on my favorite tv shows. The buttons I used come in a great storage jar that also makes it easy to craft on the go. For me on the go is not in my crafting cave. I also made a cute wreath using green and red buttons. Stop by http://365daysofcrafts.com after Halloween to check it out.
To make this cute and simple snowman you will need:
a wire cutter
14-20 guage wire. approx. 24 inches
one orange bead ( barrel or bicone)
two brown or black beads for mittens
Various size black buttons (5- 8)
White buttons ( 18-26)
I used buttons from a jar in the Portrait Collection
Directions
Cut a 12 in piece of wire. Make a loop or add a crimp bead at the bottom. Stack white buttons on to desired height. Wrap a six inch piece of wire around to form arms. Attach beads for mittens and cut off any excess. Cut off a3 inch piece of wire and attach orange bead as the nose. Stack on more white buttons and then add largest black button to form brim of hat. Stack on more black buttons to make hat. Use the remaining wire to form a loop as shown.
Tada! A snowman button ornament. If you would like to see more of my work please visit http://365daysofcrafts.com
Toodles, Niki

I know that school is just starting but wouldn’t this make a great craft for holiday parties? You can find the instructions on the Martha Stewart website here.
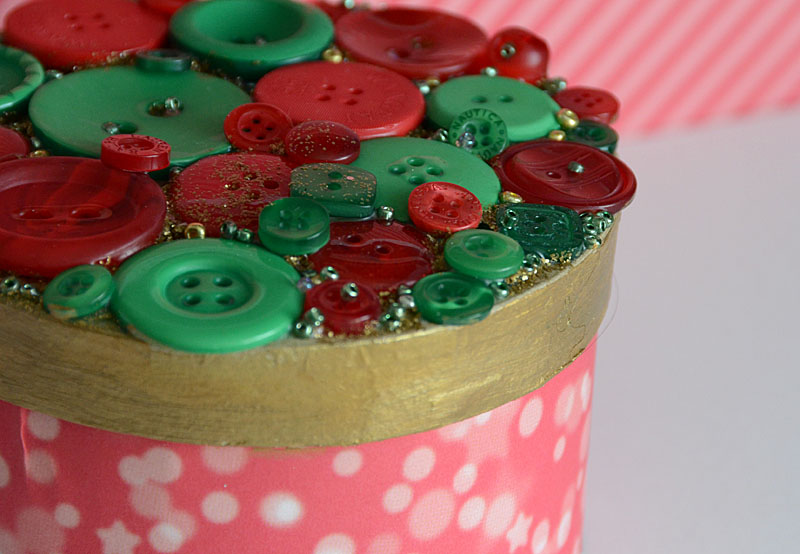