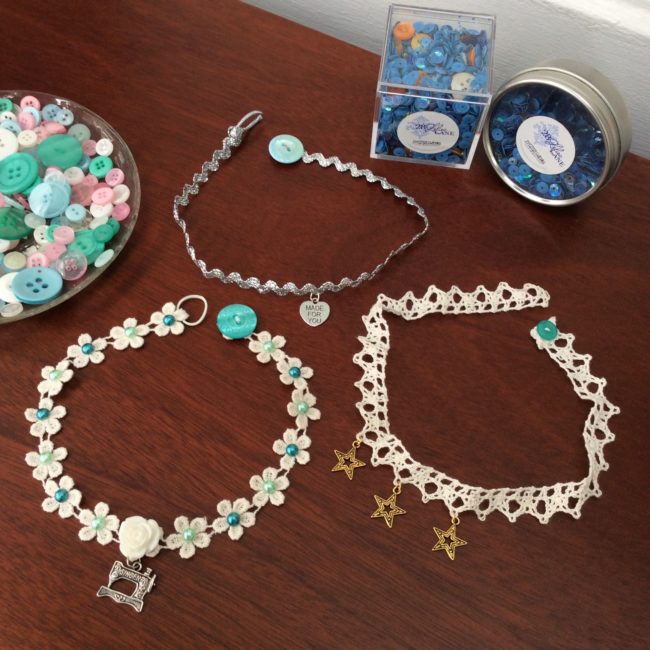
Make fun necklaces with the lace trim found in our 28 Lilac Lane Kits. It is easy to embellish the trim with the pearl flat backs, charms and resin flowers that can be found in each of our Embellishment Kits.

Make fun necklaces with the lace trim found in our 28 Lilac Lane Kits. It is easy to embellish the trim with the pearl flat backs, charms and resin flowers that can be found in each of our Embellishment Kits.
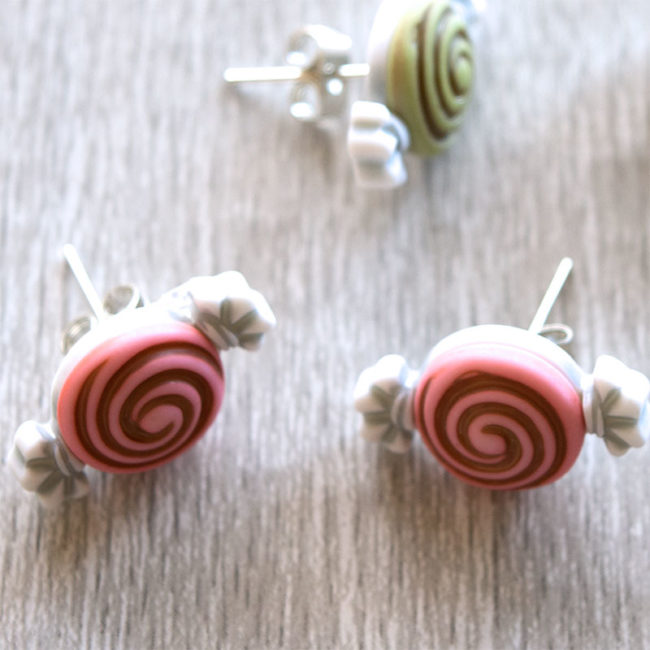
I love wearing fun holiday jewelry, but sometimes it can be expensive or difficult to find! Especially considering the limited amount of time you can wear cute holiday jewelry! Buttons make really great jewelry options, and it’s so easy and inexpensive to make your own earrings using your favorite holiday buttons. I turned these sweet “Candy Treats” 3D Buttons into some simple, but adorable DIY candy earrings in just a few minutes! With all of the cute Buttons Galore 3D holiday buttons, there are so many adorable options for your own holiday style! Continue Reading →
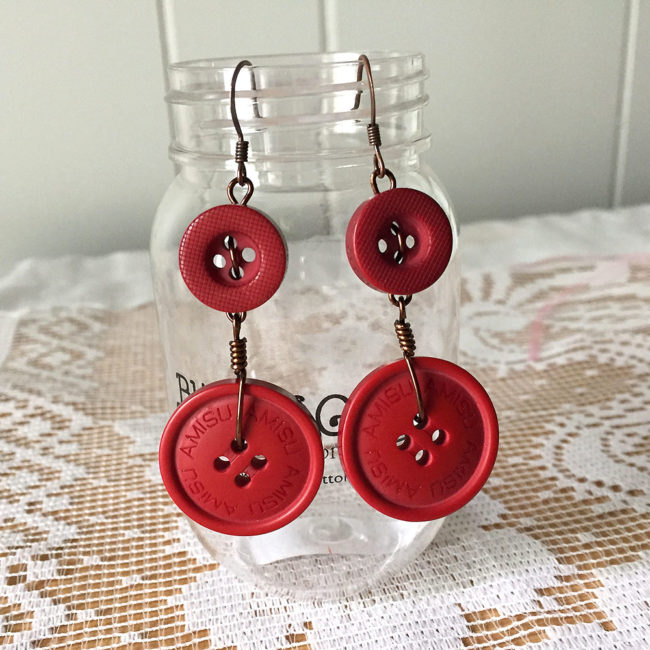
Hi! It’s Anaya from the Buttons Galore & More Design Team. With the holidays fast approaching, you’ll surely want to dress to impress for all of the upcoming parties and celebrations. If you’re like me, you get tired of showing up in the same old boring earrings. Well, today I’ve got the perfect project for you – DIY Dangle Earrings! Continue Reading →
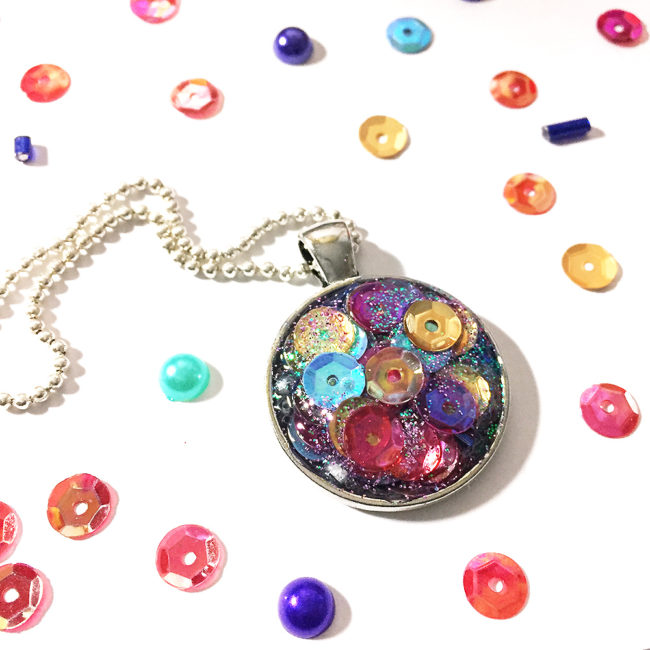
Who doesn’t love an invite to good party? I know I do! When you walk through the door (fashionably late, of course) you can be the center of attention in this quick, easy to make sequin pendant necklace! Continue Reading →
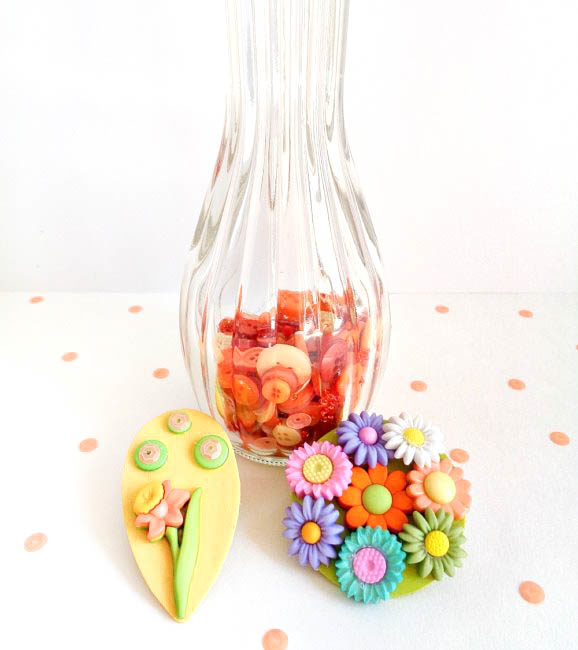
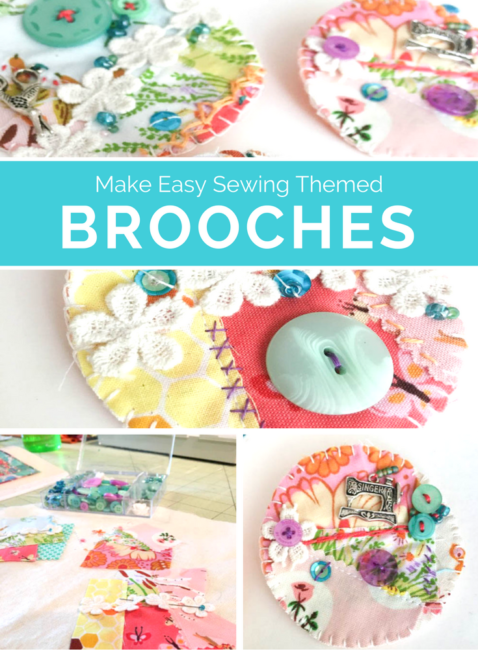
Hello button lovers! This is Katie from the Buttons Galore & More Design Team, and today I have a fun DIY flower button brooches project if you are someone who is just not ready to make that transition into the fall season!
Now, as a fall season girl at heart, I know making flower button brooches sounds a bit weird in September. However, there are those folks who just love spring and summer. If this is you, then these flower button brooches should make the fall season a bit more bearable and make those warm cardigans a bit cuter! Continue Reading →
My project today is a sweet little pendant necklace that comes together pretty quickly and makes a great gift.

Don’t be daunted by the idea of sewing on the beads! It’s true that sewing beads can be a little fiddly because of their tiny size, but once you get the hang of it, it’s a great beginner project for jewelry making.
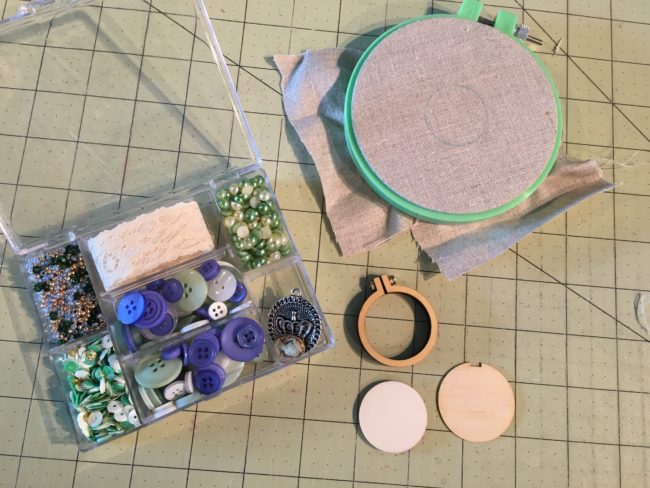
Here’s what you need to make this little beaded pendant necklace:
Put your scrap of fabric inside your embroidery hoop for sewing and outline the inside circle of the mini embroidery hoop with a pencil onto your fabric. Using the little cameo from the 28 Lilac Lane set, use craft glue to glue this to the center of the circle you just outlined. Let dry completely before moving on.
After your cameo is completely dry and securely attached to your beaded pendant, take a small plate (or use the lid of the Tea Time set) to pull out the beads. From your divisible embroidery floss, pull out one thread strand and thread your needle, making sure to leave a knot in the end. Sew a row of the larger green beads around the edge of the little cameo. Then repeat with the gold beads and then the blue beads.

To finish your beaded pendant, position the mini hoop on your design and draw a cutting line approximately 1/2 inch around the hoop. Cut it out. Place the cut design on the center plate. Then place the mini hoop on top and push it down to secure it. Flip it over and using a hot glue gun, place the glue around the inner edge. Push the fabric down in a circular motion. Add glue to the backing piece on the inner edge. Position it on the back of the hoop with the notch top and center.
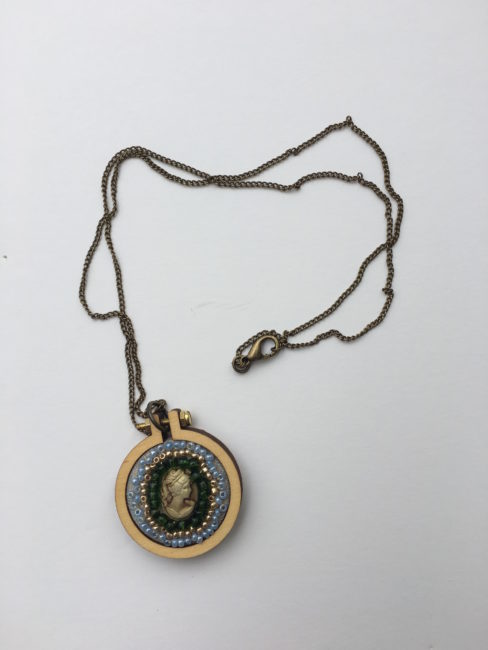
You can either add a jump ring to your beaded pendant for your necklace chain to go through or thread the chain through the bolt in the center of the hoop.
Voila! You have a sweet little beaded pendant necklace ready to wear on a fun night out or to gift to a friend!
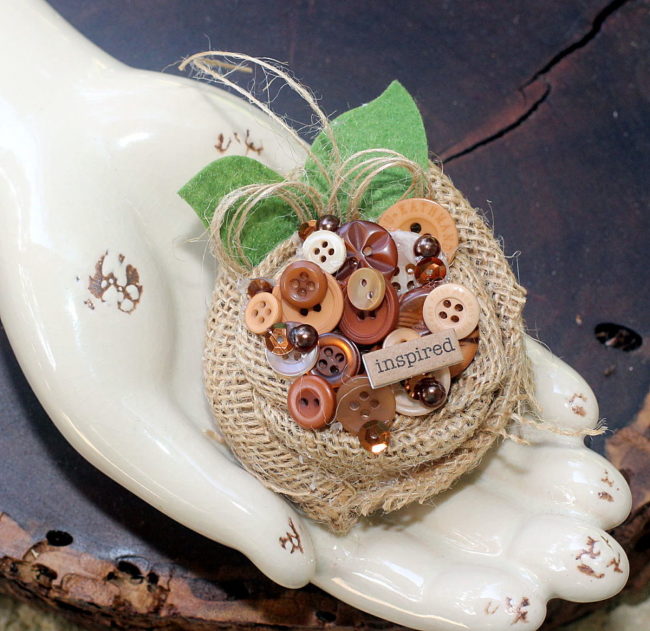
Hi, Connie here with Buttons Galore & More design team! Today I will be sharing an idea using the Toasted Graham Embellishment Bottle by 28 Lilac Lane. The contents of the bottle remind me of graham crackers, buttons in rich brown tones along with seed bead and sequins. Taking beautiful embellishments and adding them to clothing to accessorize is a favorite project of mine. Making a DIY button brooch, to add to a denim shirt or straw hat, is where I started!

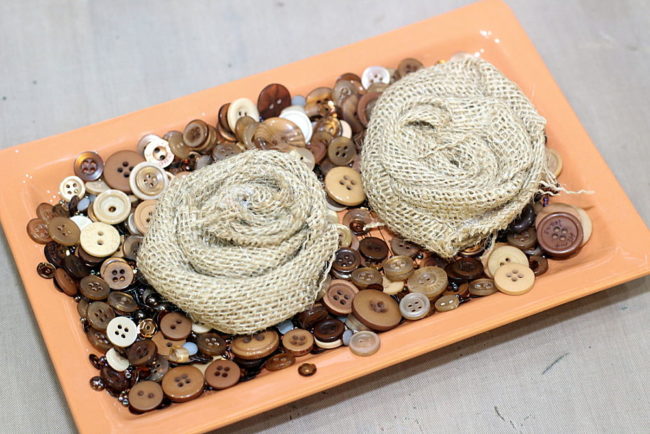
Take a small piece of burlap and twist it, to make an easy to create rose flower to serve as the base of the brooch. Coat the ends with a strong glue to keep them from fraying, and mount the burlap flower on a circle of felt, so the flower will not unravel.
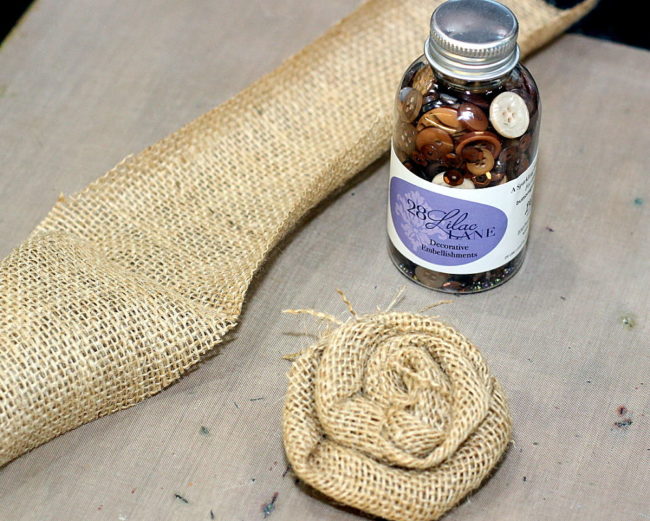
Now comes the fun part! Pour the contents of the Toasted Graham embellishment bottle on a dish (so you can see all of the pretties that are in it), and start selecting the buttons for the center of the DIY button brooch.
Using a strong glue, start gluing down buttons, sequins, pearls and beads onto the brooch. Overlapping the buttons and tucking in the sequins under the buttons will make a beautiful looking brooch. Add felt leaves and twine to finish off the brooch. Glue a pin onto the back of the brooch, making it easy to attach to a shirt or hat.
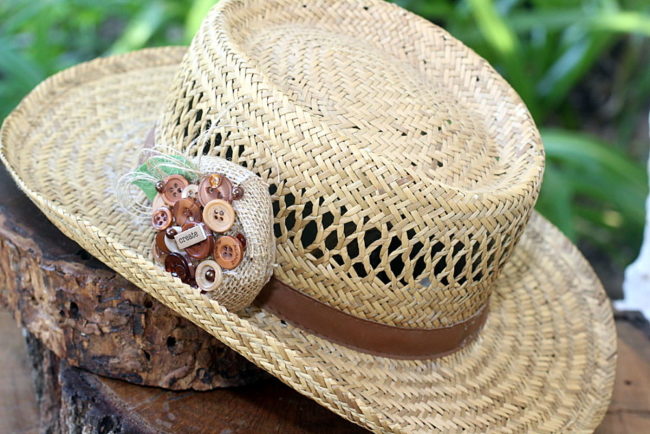 I love how the “create” brooch looks on this straw hat. It’s such a fabulous look for the fall season! Just attach it to the hat, using the pin that was glued to the back of the brooch.
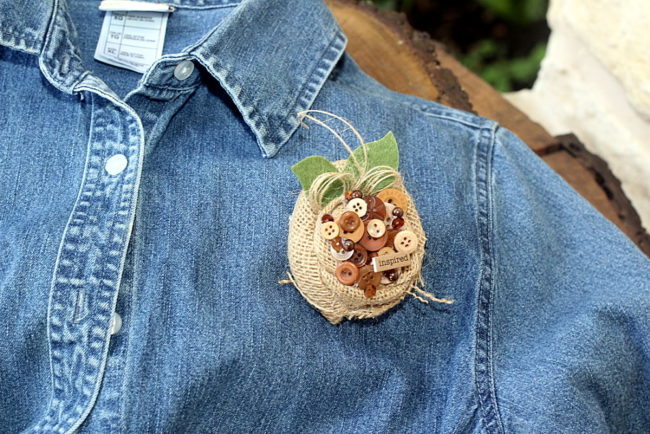
Here is the”inspire” brooch on the denim shirt. I love this look!
I hope you will give the 28 Lilac Lane embellishment bottles a try and create something to add to those hats, sweaters and shirts like I did!
Supplies Used:
28 Lilac Lane “Toasted Graham” Embellishment Bottle
Felt (leaves and back of brooch)
burlap
strong glue
word sticker
twine
Thanks for stopping by~
Connie Mercer/DT Member
I’m constantly on the look out for fun accessories. But what I love more than looking for cool things is making my own. If you feel the same way, I have a beginner project to help you accessorize. In just a few easy steps, you can make sequin safety pin jewelry!
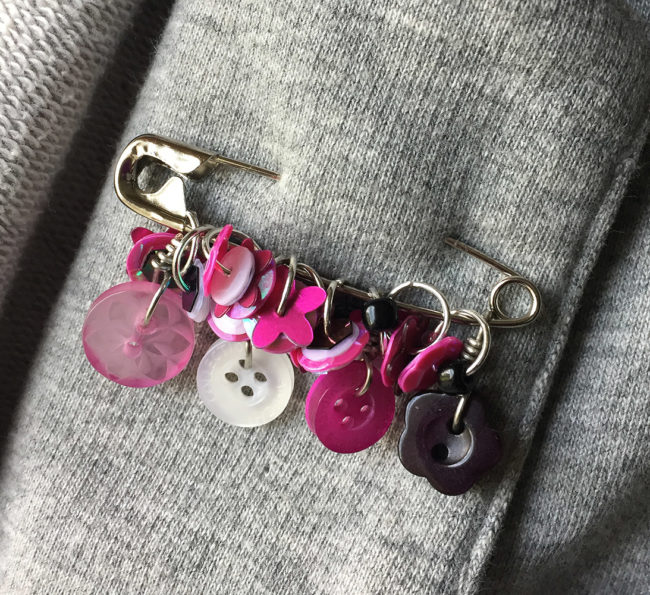
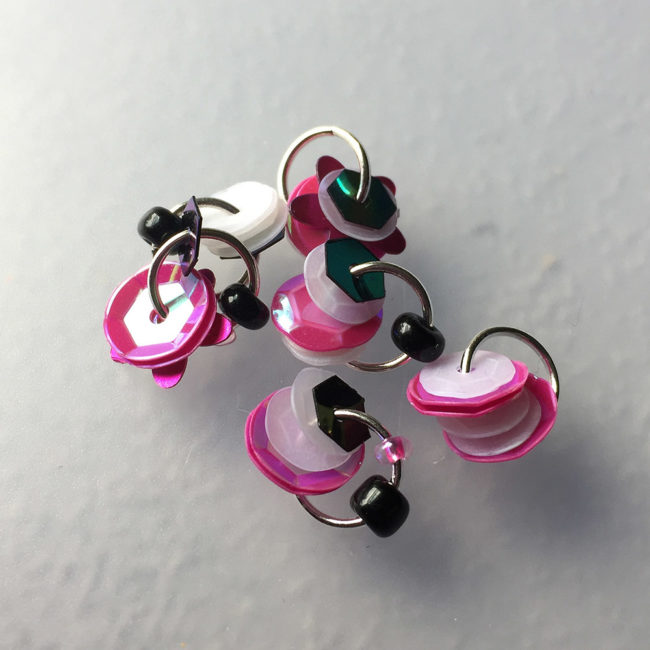
To start making your sequin safety pin jewelry, open the 8mm jump rings with jewelry pliers and add about 4-6 sequins to each ring along with a bead or two if you’d like. The rings will move around a lot if you start adding them to the pin as you go, so you may find it easier to just make a pile of completed jump rings.
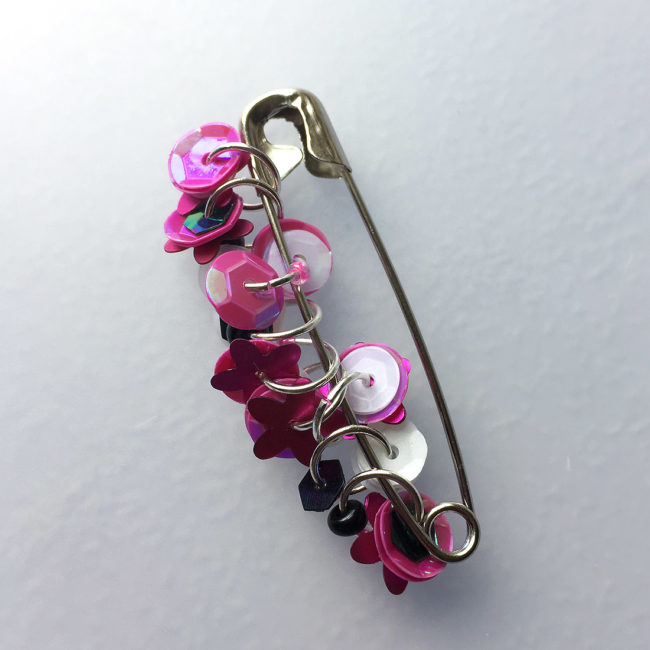
Once you have about 10-12 rings finished, add them to the safety pin. The jump rings should be added to the immovable side of the pin. At this point the pin will look pretty awesome as is, but I just love to add buttons to everything! I find the buttons not only give the pin a unique look, but they will also help keep the jump rings from floating around the loop at the end of the pin.
Cut a 5 inch length of wire. Place wire through one of the buttons holes. Bend one end of wire toward the back of the button. Twist that wire around 3-5 times and trim it. Cut the other piece short, but leave enough wire to create a loop.
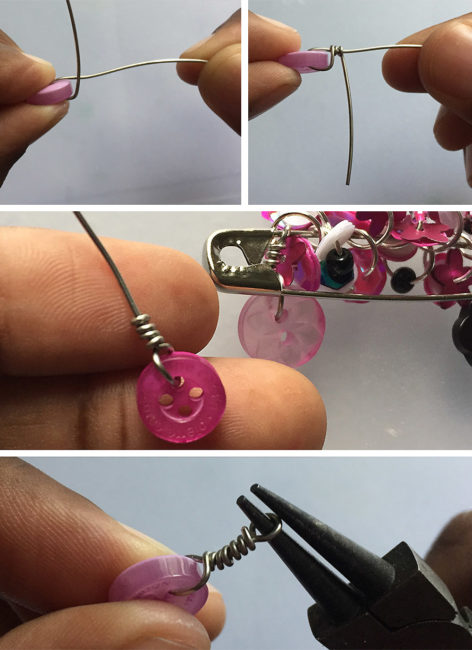
Be sure to add a button before the first jump ring and behind the last ring on the pin. This will keep the jump rings from sneaking past the loop and getting away.
And your sequin safety pin jewelry is done!
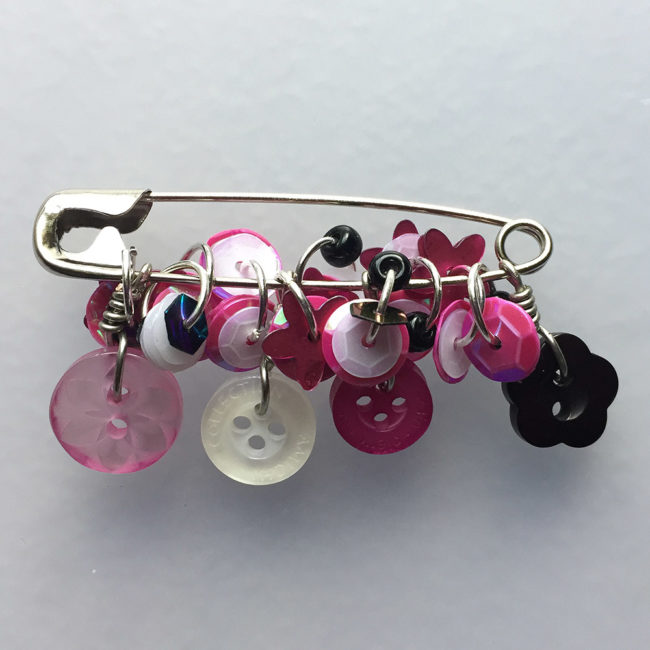
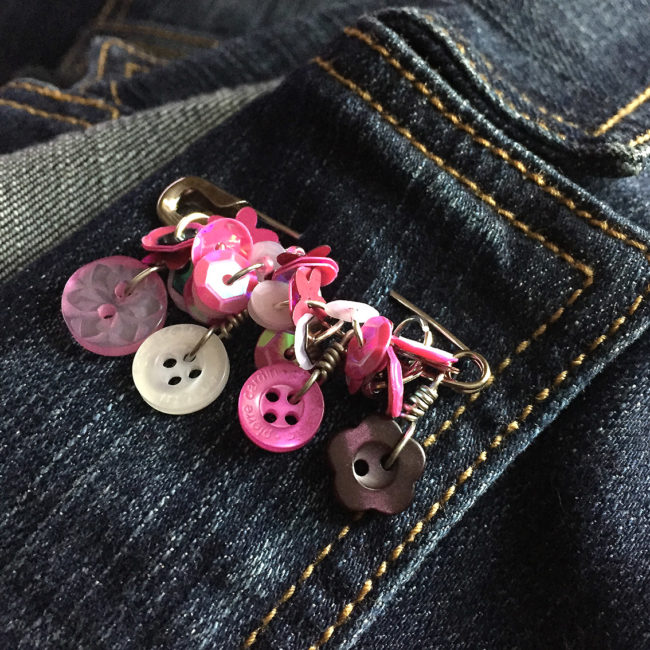
There are so many options and color combinations available that I have already made myself a nice variety of sequin safety pins! I hope you find this to be a fun and easy way to bring a unique jewelry touch to an old shirt, jacket, or backpack.
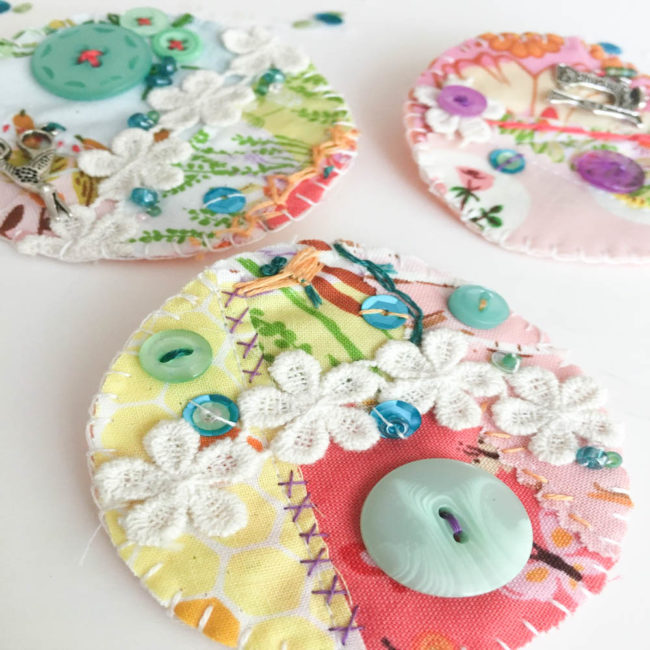
These little crafty brooches make a great quick and easy gift for the lady in your life who loves to sew and create. Use up some scraps of fabric, spread your creative wings and add some bling with a sweet 28 Lilac Lane embellishment kit.

Here’s the supplies you will need:
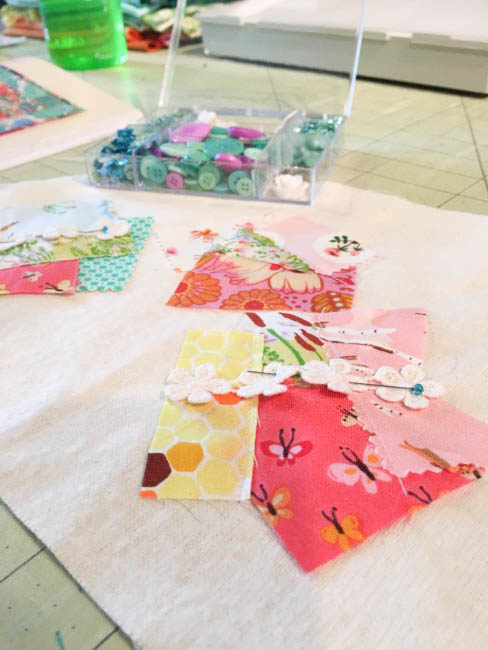
First, I laid out my backing fabric (I used a thicker cotton muslin that I had in my stash, but just a general cotton or even felt would work fine too). With a jar lid I had, I traced an outline of my circles onto the top of the fabric. Then I gathered up some various scraps of fabric and laid them out within the outlined circle. I used my sewing machine to sew down a few of the seams, but this could easily be done by hand with just a back stitch using a single strand of embroidery floss.
Next up, I laid out different elements from the 28 Lilac Lane “Sew Crafty” embellishment kit. The kit includes some trim, sequins, beads, buttons and a few charms. The trim lends itself greatly to being used as a typical trim or even cutting off each flower individually. This is where you can be creative and every brooch you make will be different!
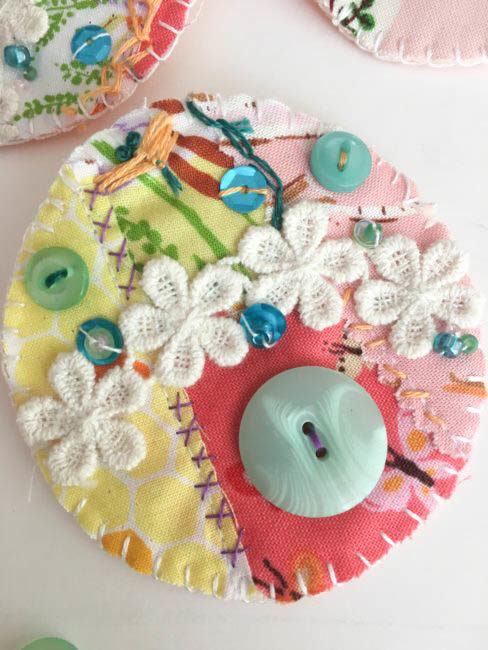
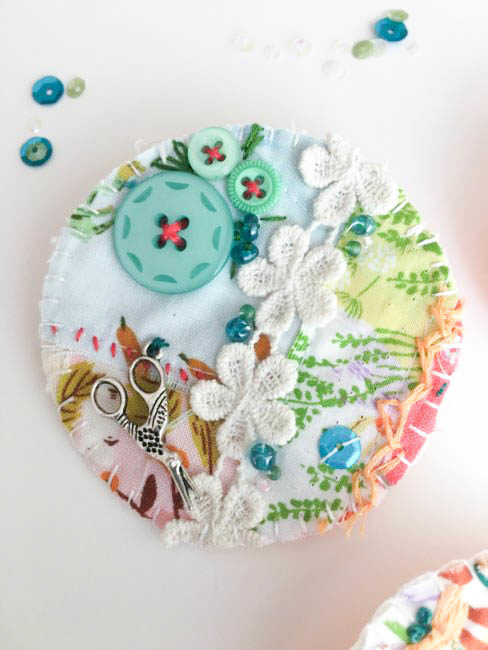
On a few of the seams I chose to add some simple embroidery stitches. I used two strands of divisible embroidery floss for all of my stitching. I made simple X’s, seed stitches, and a chainstitch. I sewed down the trim with a single strand of white embroidery thread and just stitched down on the flowers where the stitches won’t be seen.
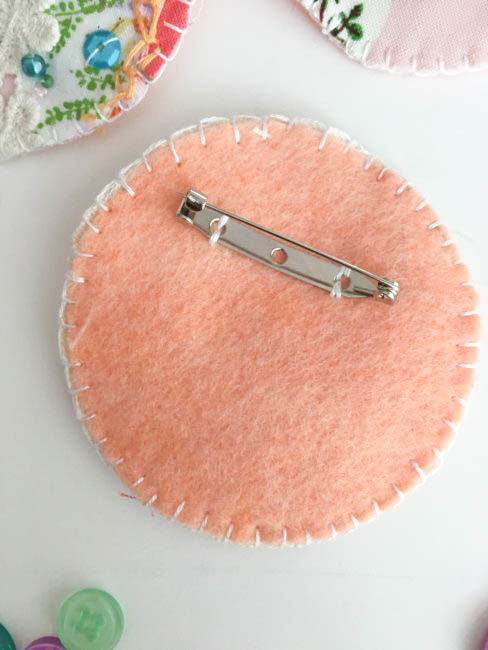
To finish out my crafty brooches, I took some felt and using the same jar lid cut out the felt and the brooch circles. The pin backs I used can be either sewn or glued down. I sewed down the pin back onto the felt.
Finally, I matched the top and backs of the brooches with wrong sides together. The brooches were sewn together using a buttonhole stitch to stitch the two layers together around the edge. There you have it!! Sweet little crafty brooches ready to wear!
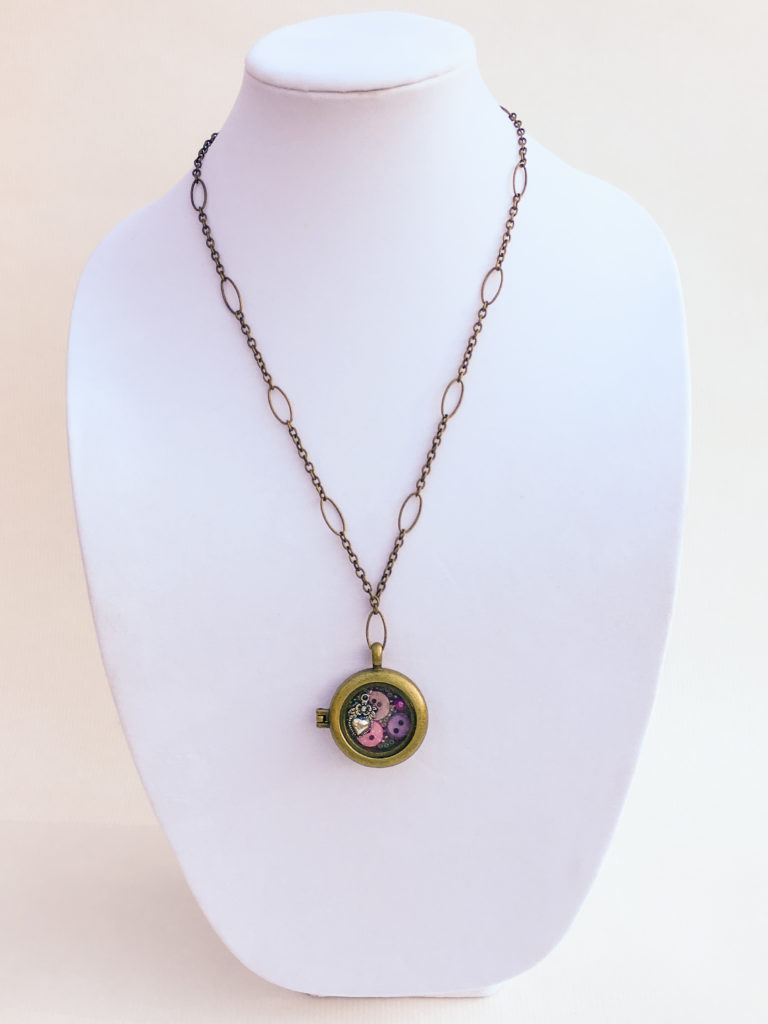
Christmas shopping time has arrived…and so has Christmas gift crafting time! A custom piece of jewelry is the perfect DIY holiday gift for a friend or family member…and with 28 Lilac Lane embellishments, a surprisingly easy one!

Supplies:
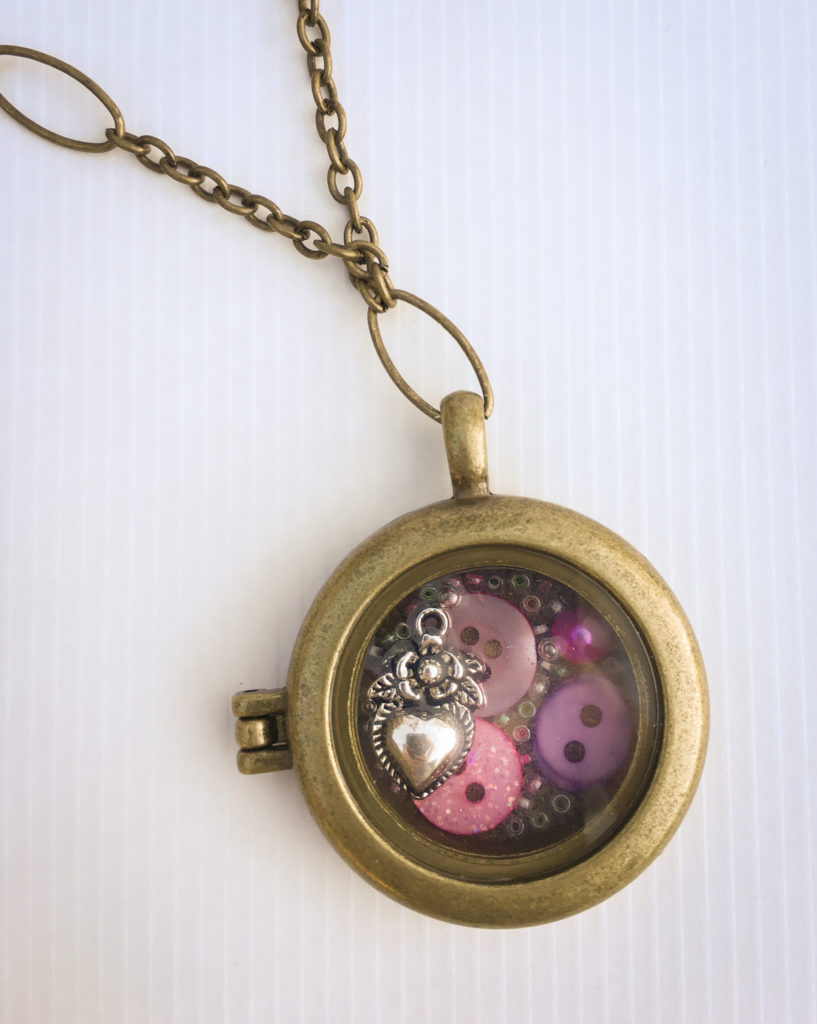
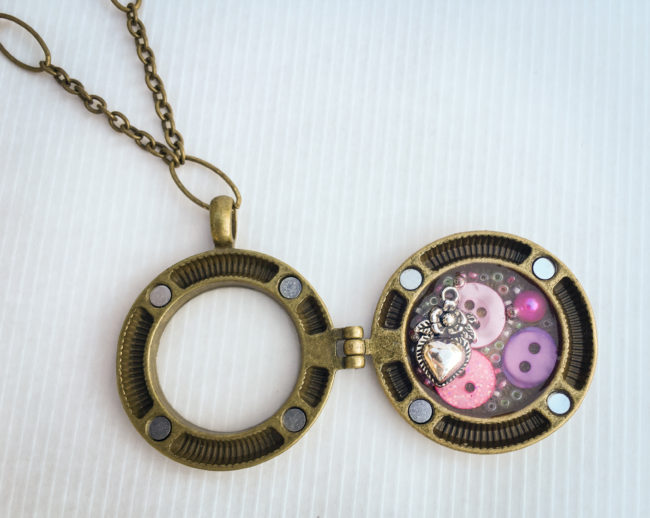
This locket is built using a very simple process. Fill the bottom of the locket with a single layer embellishments. Start with the large items (the buttons) and then fill in around them with the small items like the beads and pearls. Vary the color and placement of the items. Select a charm but don’t place it in the locket just yet!
Once you are satisfied with the placement of your bottom layer of embellishments, get out your Ice Resin. Following the directions on the package, use the Ice Resin to fill in a layer of epoxy on top of the layer of embellishments. Stop filling when the layer is just slightly covered. Before the resin dries, press the charm that you saved earlier into the top of the epoxy. It should just be slightly embedded, protruding out the top of the epoxy layer.
To create the ribbon embellished chain, thread a large needle (or a knitting darning needle) with the ribbon. Then weave it in and out of every other link the chain so that it is threaded into it. Tie the ribbon off to the chain at each end.
The fun thing about these DIY holiday gift lockets is that they can be created for any theme or color scheme, to perfectly match the recipient it is intended for! To see a different interpretation of this project in a pink color scheme, check out our previous mixed media locket article.
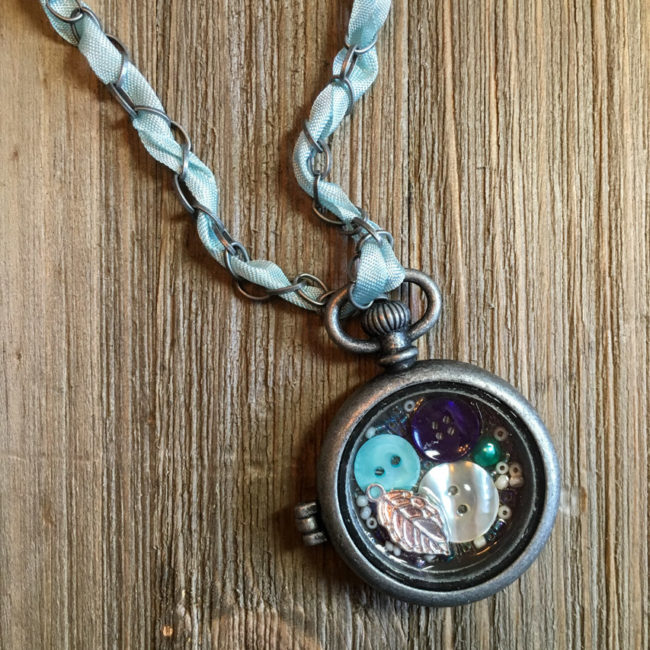
Think our 28 Lilac Lane buttons are too beautiful to hide at home in your craft room? We do too! That’s why I made this this beautiful locket that showcases some of my favorite elements from the collection. This mixed media locket is a fun and eclectic piece of button jewelry that will let me show off my love of crafts in a fashionable way.
Supplies needed:
This mixed media locket is created by encasing 28 Lilac Lane embellishments in Ice Resin, a clear drying epoxy that is available in single use syringe dispensers. It’s a fast and easy project that can easily be completed in an hour or so, except for allowing dry time for the epoxy.
To make my design, I started by arranging the large colored items – the buttons and the flat back pearl – inside the locket. Once I was happy with how they looked, I gently filled in around them with the seed beads. This part of the process requires patience, as sometimes it means placing the beads one at a time.
Once the bottom layer of embellishments is placed, I selected a charm to place on top and set it aside.
Working with the epoxy was something I’d wanted to do for awhile but I was, I admit, a bit intimidated to try it. It turned out to be very easy – just push the plunger down to get the amount that you want, and stir! Once the epoxy was mixed well, I poured it over the bottom layer of embellishments to cover and hold them in place in the locket. Then I quickly pressed the charm down on top of the epoxy, so that it was just barely embedded and stuck out from the top. (Be very careful to not get your fingers in the epoxy! I suggest dropping the charm in and then using a toothpick or other tool to nudge it into place.)
Once the resin is dry, you can add a chain to your locket. Then you can wear and enjoy your mixed media locket masterpiece to share your love of crafts – and 28 Lilac Lane – through fashion!
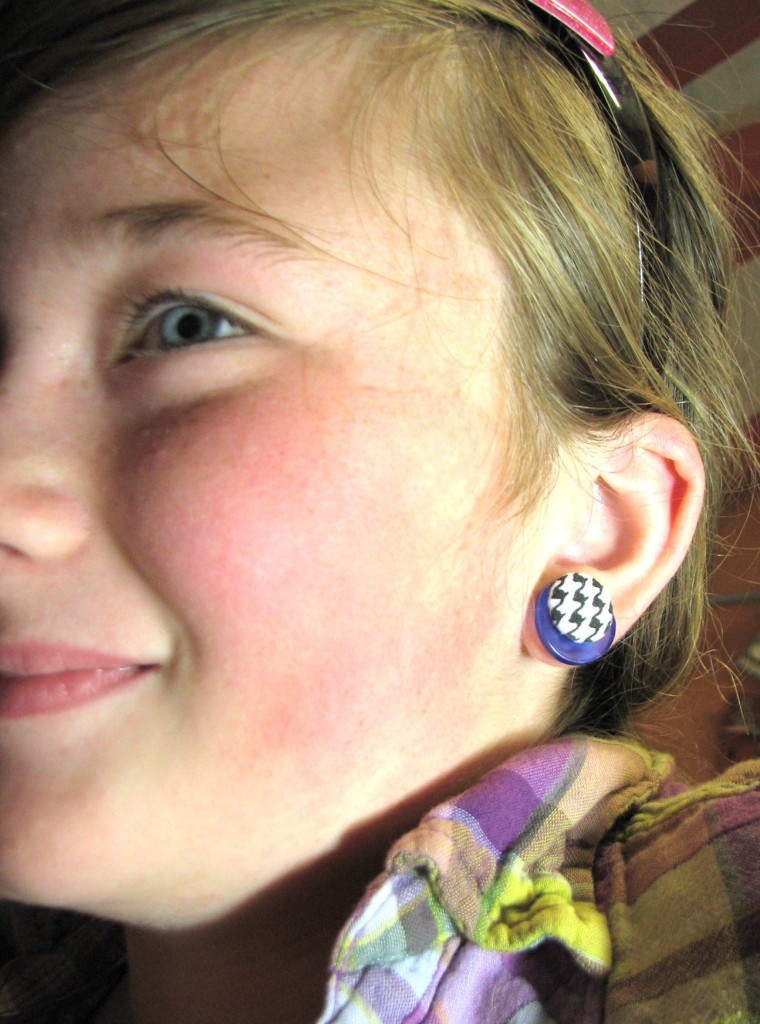
Don’t have pierced ears? I have the solution. Make faux pierced earrings. This is a great back to school project for your tween who wants to have pierced ears. If you’re not already buried in the reality of “back to school,” brace yourself… {It’s COMIN’!}
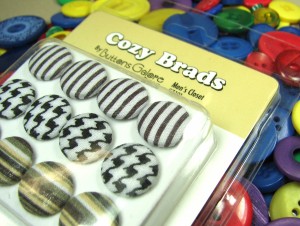
Here’s a quick and easy way to do a fun bit of fashion craft with a sweet lil’ student, BEFORE things get ALL about the backpacks and hand sanitizer… Cozy Brads “faux” pierced earrings, for back to school!
Blueberry Pie, Color Blends Pillow Pack
Ultra Thin, Paper Crafting Magnets
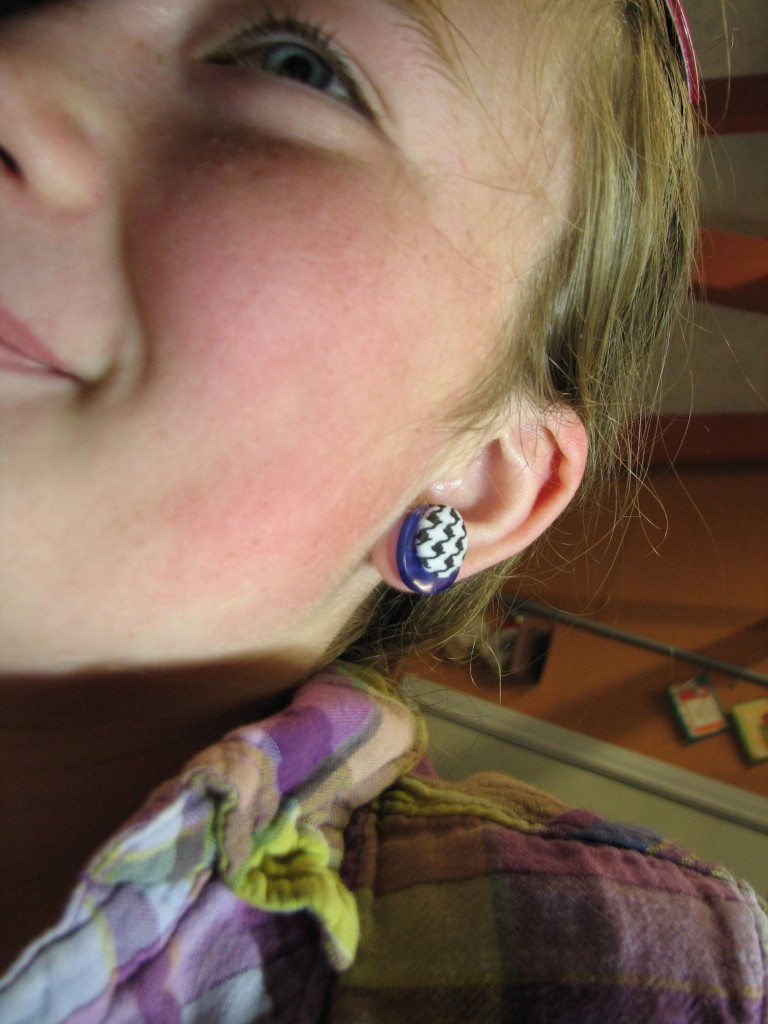
This adorable little fashion model is eagerly awaiting the opportunity to showcase PIERCED earrings, but since she’s not quite ready for the real thing, we made some, less invasive, faux earrings with gorgeous buttons and super, trend-setting HOUNDS TOOTH brads from Buttons Galore & More!
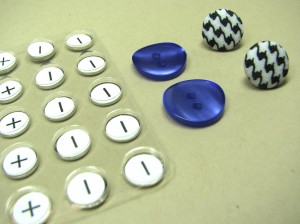
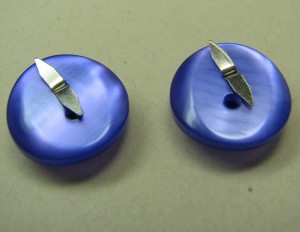
You’ll never look at buttons, brads and magnets the same! Thread the “legs” of one of the brads through one, of a two-holed button, of your color choice.
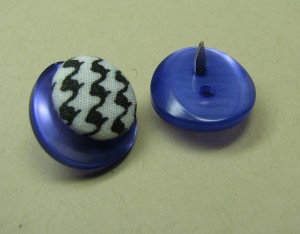
Flatten the brad legs, just as you would through a piece of paper, then apply a dab of Quick Grip adhesive.
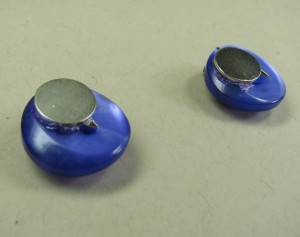
Set magnets in the glue, adjusting the placement against the brad’s legs. Having the natural attraction of the magnet AND the adhesive creates an excellent bond. Allow time to dry and then rub off excess.
Working from two-holed buttons will allow for a stunning, off-set accent, to the excitement of the hounds tooth pattern.
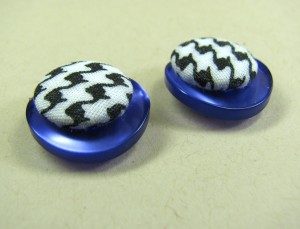
The “fashion model” seems satisfied with the results of her faux pierced earrings!
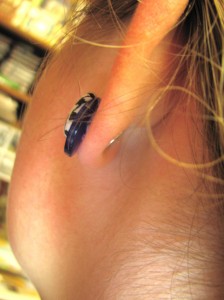
You can barely see the opposing magnet on the back of the ear lobe. With these ultra thin magnets, there is just enough strength in the bond to keep the earring secure, but not enough to make it uncomfortable! The model wore her faux pierced earrings for the day, comfortably! These will DEFINITELY be a part of the first day of school wardrobe for THIS girl!
Just THINK about how YOU can customize some “faux pierced earrings” of your own! HUGE possibilities! Have FUN!
Hi y’all! Allie here… I got my hands on some of Button’s Galore’s Start Up craft shapes this week, the Large Circles. I had such fun making some charms with these blank circles. These blank craft shapes are blank poly plastic pieces that you can stamp on, rub on, ink, paint or embellish with anything you desire. I decided to get creative with some napkins and stamps, and some spritz.
I really love these blank craft shapes! They come in lots of shapes and sizes, from flowers to tags, to sliders and frames, and even holiday shapes. There are even start up packs, and collections including a variety of sizes. They are perfect for every project.

This picture shows the separate layers of the napkins I’m using. For my charms, I just used the very top layer.
![]()
I decided to collage with napkins. I start by separating the layers of the napkin, so I’m working with the top designer layer. I use Claudine Hellmuth’s Matte Medium from Ranger, with a flat brush. Some people like to use a wet Q-tip to “cut” through the napkin, but I prefer to tear, and sand off any excess.
I used a little round file to clean out the holes in the charms. You can use any decoupage medium, whatever you prefer. I also like to seal the top when I’m done.
![]()
I skipped a few photos, but this is what happens after the decoupage step. I stamped the Large Circles with an Itty Bitty bicycle stamp from Unity Stamp Company. I used Jet Black Stazon ink from Tsukineko. I also lightly tapped around the edges of the Large Circles with the same black Stazon Ink. Once the ink was set, I gave the Large Circles a light spritz with Mr. Huey’s Gold spray from Studio Calico.
Use your favorite spritz, or you could even make your own.
You can add anything you like to these little charms. I put a jump ring on each of them, and added little trinkets and bling. The metal pieces and the little pearls are from Ideaology, and are designed by Tim Holtz. I added bling to the sprocket, on the second row, the charm on the left. I love a little sparkle, don’t you?
Add some bling, little trinkets or baubles.
You could attach these charms to a chain, a hoodie, or anything you like. You can even keep it simple, and just thread it onto some crepe ribbon, as shown below. This ribbon is from Creative Impressions.
![]()
SUPPLIES AND MATERIALS
We have a ton of plain colored pony tale holders around the house. This is fine for me, but for my little princess, sometimes a plain ponytail just isn’t enough. Instead of buying a ton of different decorated rubber bands, make them yourself using buttons with the loophole in the back. It’s easy, quick and gives you the opportunity to customize the look of your little hair pieces. (This would even be great for grown up princesses, using some pretty shiny or elegant buttons ~ wink).

Ponytail holder made with a button

Make a ponytail holder using buttons

Pink flower button ponytail holder
The best part about these button ponytail holders is that I can change the buttons to make a whole new look at any time. There’s no glue or cutting… just pulling the rubber band through the button back and voila! You could add more than one button if you’d like, but I think you’d need a little bigger rubber band. I used a small 1.5″ diameter rubber band for this example. This would also be a fun project for kids to make!
What quick and fun projects do you like to use buttons for?
This buttoned handbag is simply beautiful. If you have a little bit of time and basic sewing skills you could create it yourself. Check out the buttons in our haberdashery line.

http://pinterest.com/pin/121949102380039596/
 The pin it to Win It Contest ends on Friday and we would not want you to miss out on great inspiration, and a chance at being a GUEST DESIGNER or winning a prize.
We are celebrating spring and what better way to do it than with Pinterest. The site makes our hearts swoon— we use it as a creative kick-start, to figure out what’s for dinner, and to get inspired by gorgeous color combinations for our own projects.
Now we’d like to turn the spotlight on YOU & your creativity. Show us your BUTTON-inspired pinboards!! At the end of the contest we will send the Pinterest user with our favorite pin collection a tote bag filled with fabulous & inspiring crafting supplies. If you are the creator of our very favorite button project, you will receive an invitation to be a guest designer for a mutually agreed upon month at Buttons Galore & More and receive $25 worth of products of your own choosing from the Buttons Galore & More site. In addition, your creation will be featured on our website and in our newsletter — reaching thousands of crafters around the world who will turn your idea for a fabulous project into reality.
WHAT YOU NEED TO DO
Be sure you follow Buttons Galore and More on Pinterest. Create a new Pinterest board entitledButtons Galore Pin It To Win It Party.
Fill that board with at least 4 pins (feel free to add more!).
-2 of the pins must be of your favorite projects from the Buttons Galore blog
-2 pins must be of your own creations featuring buttons of any kind.
All the pins (even those not from ButtonsGaloreandMore.com) must have a caption explaining the pin’s relation to the party.Is it your favorite color mix? An awesome project? A card created by you? Your favorite scrapbook page? Tabletop decor?
All the pins (even those not from ButtonsGaloreandMore.com) must be hashtagged with both #buttons and #pinitparty.
Once your party pinboard is complete, enter the contest by posting a link to the pinboard in the comments section of April 2nds post Titled Pin it to win it starts TODAY.
This contest launches on April 2, 2012, and will run through 5 p.m. April 27, 2012. The Pinboards will be judged on originality, creativity, adherence to the contest rules, and a general sense of style, appreciation for all things interesting, authentic, and fun.
Note: You must be a member of Pinterest.com to enter, and you must be following ButtonsGalore. If you do not have a Pinterest account, you can sign up for one here or request an invitation in the comments section.
The Buttons Galore Party Pinboard Contest (the “Contest”) is sponsored by Buttons Galore and More (“Sponsor”).
ONE (1) GRAND PRIZE: A gift bag filled with craft supplies approx. retail value $75.
ONE (1) FIRST-PLACE PRIZE: approx. retail value $25
All federal, state and local laws and regulations apply; void where prohibited. PRIZES MAY BE SUBJECT TO TAX; ALL APPLICABLE TAXES ARE THE RESPONSIBILITY OF THE WINNER.
ELIGIBILITY: The Contest is open only to individuals, eighteen (18) years or older at time of entry, who are legal residents of the United States and Canada, excluding the Province of Quebec. Employees and Creative Team Members of Buttons Galore and More, their immediate families (defined as parents, children, siblings, spouse and grandparents), and those domiciled with any of the foregoing are not eligible.
ENTRY: All entrants must submit a Pinterest board entitled Buttons Galore Pin It Party, containing at least 4 pins, 2 of the pins must be of your favorite projects from the Buttons Galore blog and 2 pins must be of your creations featuring buttons of any kind.
Submissions to the Contest must be received by April 27 2012 at 5:00 p.m. Eastern Time (“ET”) in order to be eligible; entries received after that date will be deemed ineligible to win. Sponsor is not responsible for lost, late, inaccurate, incomplete, damaged, illegible, or misdirected entries.
Each entry must be submitted on an individual basis (i.e., no team, joint, or corporate entries) the entries created by the contestan must be the original creation of the submitting participant.
Entries may not contain profanity, nudity, pornographic images, violent images, anti-competition messages, illegal material, or material that violates the rights of third parties. Entries may not include confidential information, trade secrets, trademarks or copyrighted material belonging to any person or entity other than the entrant absent a suitable license or permission agreement, proof of which is required. Entries containing any forbidden matter or material otherwise deemed by Sponsor to be inappropriate will be disqualified. Online entries will be deemed submitted by the authorized account holder of the email address submitted at time of entry. One entry per person; multiple entries will be disqualified.
JUDGING: The Creative Team members and editors will select the winning entry based equally upon the criteria of originality, creativity, adherence to the contest rules, and a general sense of style appreciation for all things interesting, authentic, and fun.
By entering, you agree to be bound by these Official Rules, and that the decisions of the judges are final and binding in all respects. Judging will be completed by April 30, 2012, and potential winners will be notified by Pinterest comment on or before May 1, 2012. Sponsor reserves the right not to select any winning submissions based upon the quantity or content of submissions.
If required winner announcement is not in contact with Buttons Galore within seven (7) business days of notification, or if notification is returned as undeliverable, any prize will be forfeited and an alternate winner will be selected.
PRIZE AWARDS: Prizes will be awarded within sixty (60) days after winner verification. No prize substitution or transfer is permitted, except that Sponsor reserves the right to substitute a prize of equal or greater value for any reason. Sponsor is required by law to report prize values to taxing authorities; all taxes and any other incidental expenses on prizes are the sole responsibility of each winner.

Good Morning! Today I thought it would be fun to bring you a tutorial on how to create a wire wrapped ring using a button from the Genuine Vintage Button Tin as the focal piece. In addition to the button you will also need:
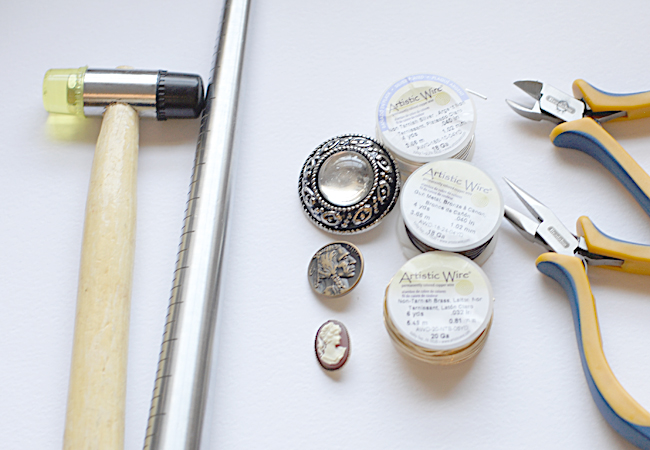
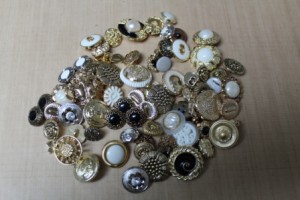
Supplies needed for an assortment of rings
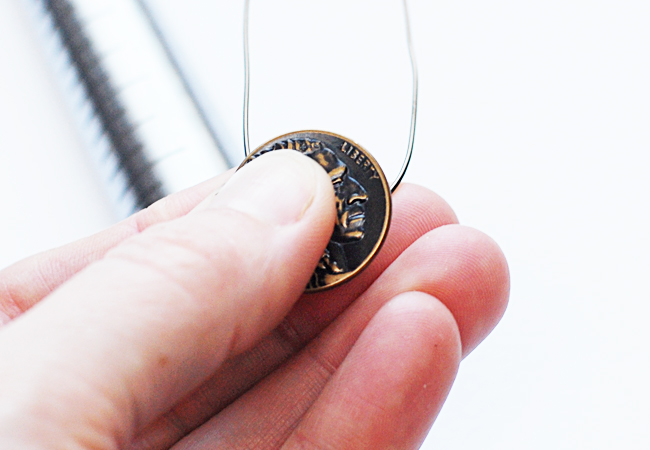
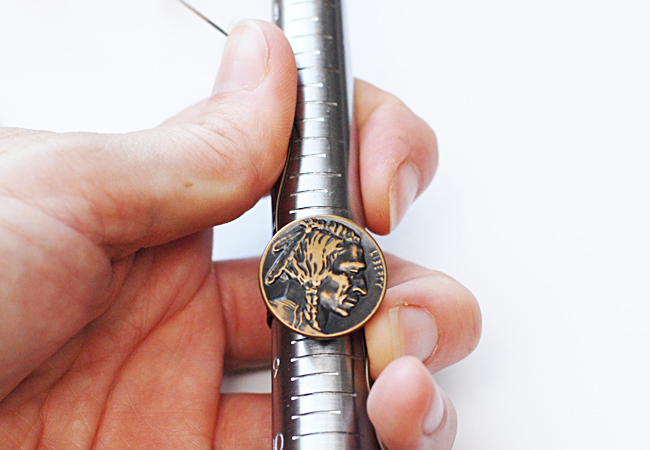
Begin by cutting a 20" length of wire. Run it through the shank on the back of the button, centering the button in the middle of the wire. Bend the wire into a gentle "U" shape.
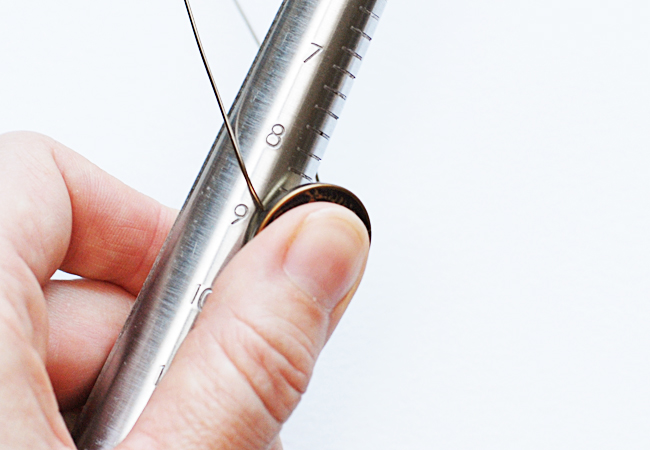
Place the center of the button onto the ring mandrel one full size larger than you need for the finished ring size. Here you can see that I need a 7 1/2 ring so I am beginngin at a size 8 1/2 on the ring mandrel.
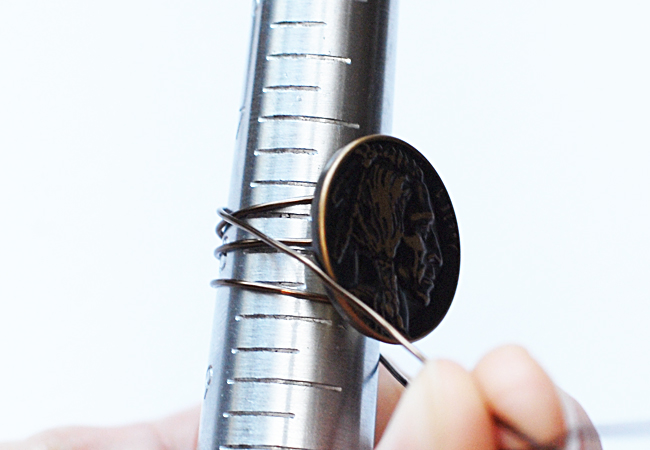
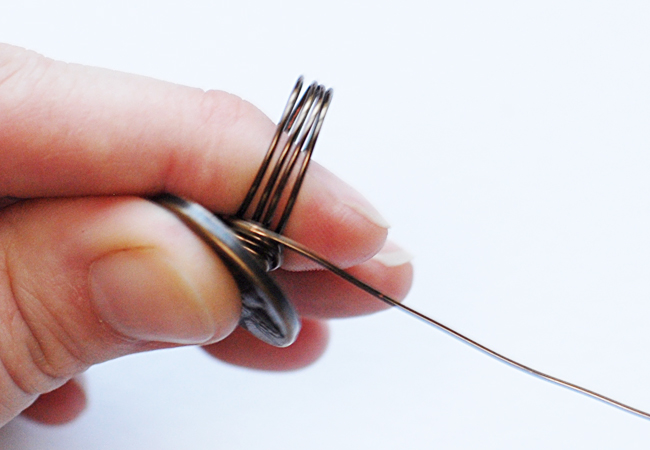
Wrap the wire around the top and bottom of the button the mandrel so that you have four wraps around the mandrel.
Pull the ends of the wire perpendicular to the mandrel and pull tightly to draw the wrapped sections to the center of the button.
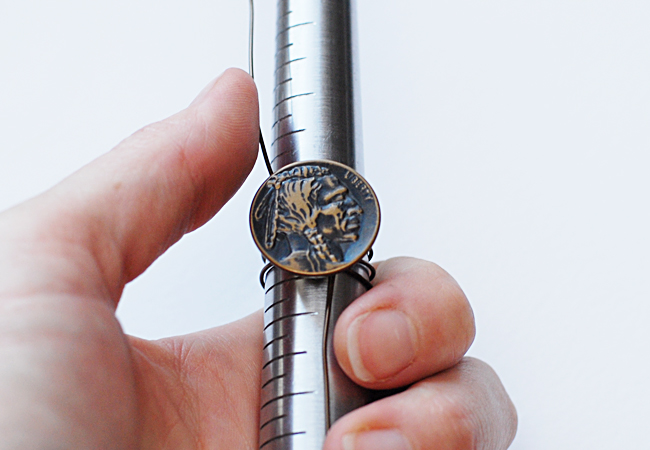
Begin to wrap the wires clockwise around the shank of the button. Wrap until you have atleast four wraps around the bottom, keeping pressure and tension on the wires at all times.
Again holding the wires perpendicular to the mandrel, remove the ring from the mandrel.
Pinch the button and the wire wraps between your nondominant thumb and forefinger.
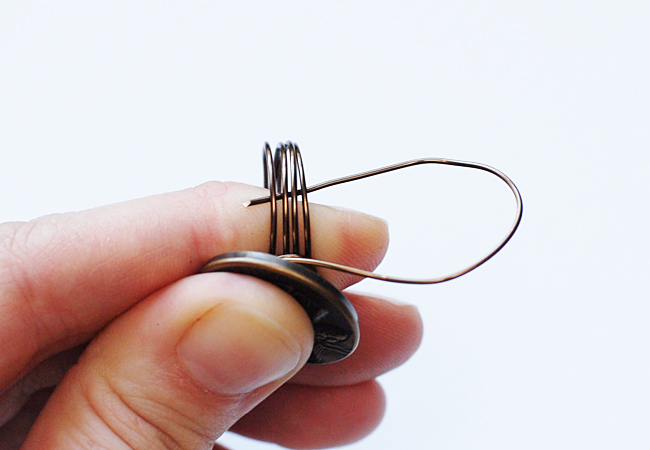
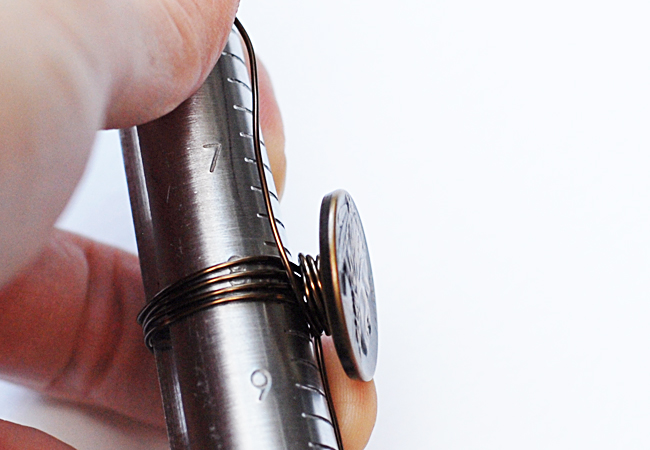
Using your dominant hand, wrap the end of the wire under the four wraps, then back up and around the wraps.
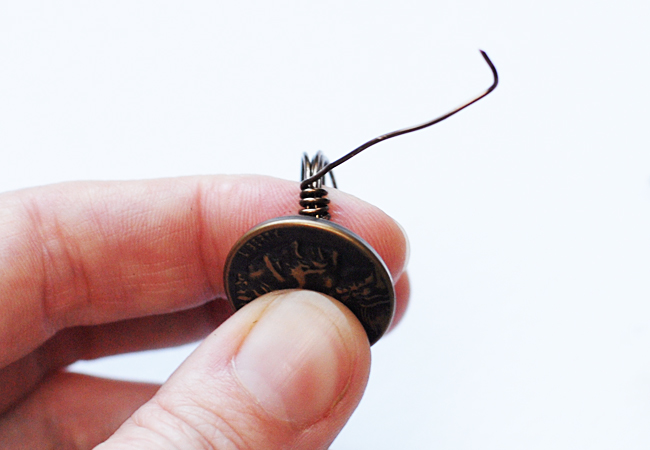
Continue to wrap three or four more times, pulling tightly each time. Make sure to keep the four wires flat against your index finger for a more comfortable fit.
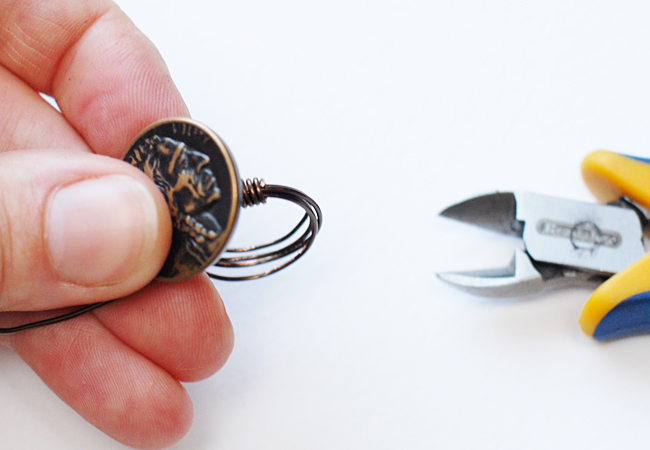
Using wire snips, clip end of wire close and press clipped end down using chain nosed pliers. Repeat wrapping on other side of ring.
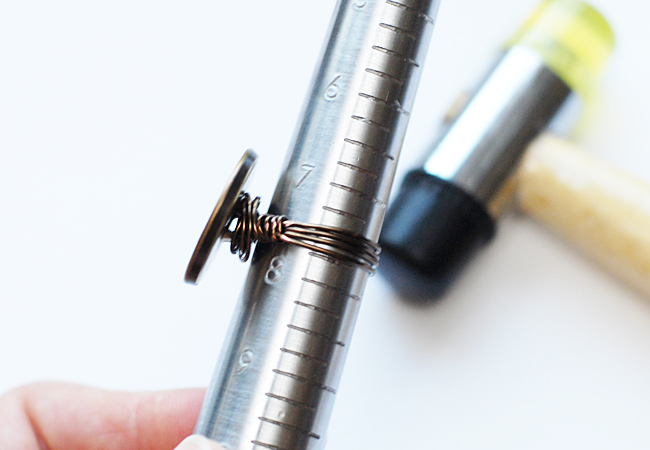
Place wrapped ring back on mandrel and being to hammer ring down mandrel. Remove ring, flip it and hammer it back down toward thick end of mandrel to make sure both sides are fully formed.
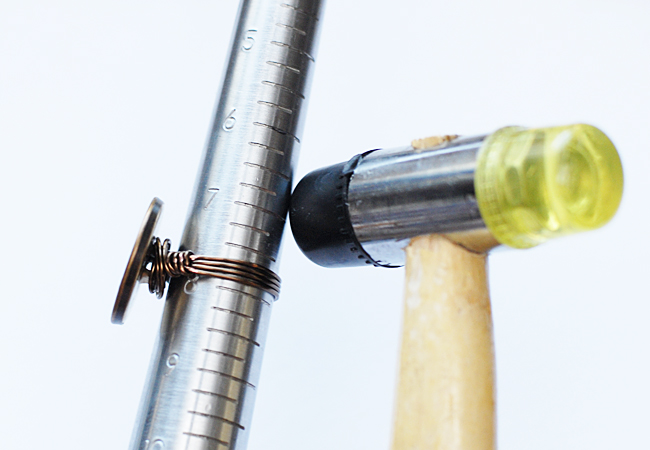
Tap around entire ring from side of button to side of button to work harden wires and make sure that the wires are going to lie flat.
Finished Vintage Button Wire Wrapped Ring
I hope you have enjoyed my first button jewelry project here on the Buttons Galore & More Blog! Be sure to add us to your reading list or subscribe so that you don’t miss out on the next one I have planned. It’s one that you will not want to miss!!! :)
K
P.S. Don’t forget to enter our PIN IT TO WIN IT CONTEST!
Buttons Galore and More is pleased to start a new segment featuring Guest Designers. Not only do we have a fantastic Creative Team working diligently behind the scenes to bring you fabulous projects, we are bringing in some extra talent too. I hope you will enjoy their creativity, crafty ideas and be as inspired by them as I am. Our first Guest Designer is Melony Bradley, her work has graced the covers of many crafting and lifestyle publications. Please enjoy her post below. If you would like to check out more of work visit her blog or her etsy shop.

Finished Bracelets
I am loving all the adorable versions of this throw back craft from my childhood I am seeing all the web these days. When I got a stash of Granny’s Button Box stitched buttons from Buttons Galore and More in the mail last week, I knew I had to give this old craft a new try and incorporate these adorable buttons.
wood sticks and buttons
The concept is rather simple. Wood can be manipulated when soaked in water since it tears down the wood fibers. So, grab some jumbo craft sticks and lets get started.
Boil Craft sticks
First, bring a pot of water to a boil. Turn off the burner, Insert the craft sticks and let them soak for about 10-15 minutes. Put a few more in the water than you will think you need. I broke a few not being patient while trying to bend them.
broken sticks
Once the sticks are soaked. Grab some appropriate sized glasses or plastic cups and patiently work them into the glass. Work slowly if you don’t want to end up with a lot of broken sticks like I did. It takes a little patience to get the hang of it
sticks and glasses
These have to set up for 24 hours to completely dry. While they are drying, go ahead and grab some acrylic paints and pattern papers to coordinate with the buttons. I used Americana Acrylics by DecoArt and some older random simple printed patterned papers.
Paint and Buttons
Here is another step you can do while waiting for the sticks to set up, On the wrong side of the patterned paper, use a pencil and a jumbo craft stick to trace it.
Make a template
cut out the template
Use a pair of scissors to cut the paper out.
cut out papers
Once the bracelets have dried, gently remove them from the glasses.
paint bracelets
Paint the bracelets in the colors of your choice.
Collage Pauge
Use a decoupage medium like collage pauge and a foam brush to apply the papers to the front of the bracelets. Allow the medium to dry and gently sand the edges of the papers even with the wood.
Now comes the fun part! Glue some rhinestones in the center of the stitched buttons using a tacky glue like Aleenes Original Tacky Glue.
Glue the buttons to the front of the bracelet and let dry.
Finished Bracelets
My bracelet’s didn’t turn out as snug as I wanted them to be, so I used some chain and jump rings to pull them a little closer in. I can still fit them over my hand without using a closure such as a lobster clasp but that still be another option. Learning from this, make sure you use a glass or cup that is slim enough if you want to skip this step!
Live Life Creatively,
Melony
When this package of antique buttons arrived. I immediately knew what they were going to be. Button Earrings! The antique buttons are elegant and sophisticate. You will be surprised at how quick and easy it is to make button earrings.
Supplies:
Earring Post (Clips optional)
Instructions:
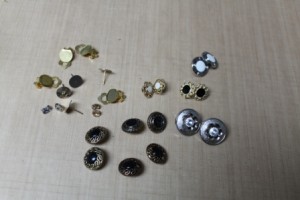
Match up buttons into earring pairs; there are so many great options.
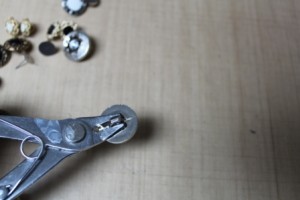
Remove shanks off backs of buttons.
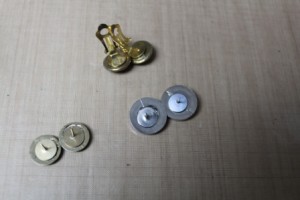
Glue earring backs (or clips) onto back of buttons; let dry.
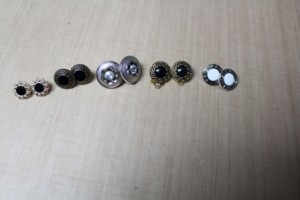
Done….finished in a flash….quick and easy earrings made in a FLASH! Make them today and wear them tonight! Enjoy this super easy project!

Upcycled Jewelry with Buttons and Hardware
While cruising around Pinterest this week I found this adorable jewelry project that I just had to share! I love the mix of buttons and the hardware, don’t you?
You can find the complete tutorial over on Olives Bites.

Button Embellished Lariat Style T-Shirt Necklace
Here is my second version of the T-Shirt necklace made with buttons. My first T-Shirt necklace was the Button Embellished T-Shirt Necklace and you can read more about it by clicking on the title.
To find out how to make the t-shirt portion of the necklace visit Whole Living or there are a few companies such as consumercrafts.com who sell the strips of colorful cotton all cut up and ready to go. And BTW one package of the Accessory Loops made BOTH necklaces. ;)
Why yes, I DID take the easy way out! AGAIN!

To make this style of necklace I cut all of the t-shirt strips (just one snip on each strip to make a long T-Shirt strand) and threaded the buttons on.
Getting the fabric through the shank of the button is a little tricky and I used a wooden skewer to push the fabric through the hole. It’s a tight enough fit that you don’t have to tie knots to hold the buttons in place.
To finish it off – tie a knot in the ends of the t-shirt strands.
To wear this style necklace fold the strands in half and lay it around your neck. Feed the ends through the fold and adjust to your liking.
The buttons I used are from the Gold and Silver Grab Bag.

Button Embellished T-shirt Necklace
T-shirt necklaces are super popular right now. I really like them… but then again, I like my jewelry to be kind of big and chunky!
To find out how to make the t-shirt portion of the necklace visit Whole Living or there are a few companies such as consumercrafts.com who sell the strips of colorful cotton all cut up and ready to go.
Why yes, I DID take the easy way out! :)
To add the buttons I simply cut one of the black t-shirt strips and threaded the buttons on and then tied the ends together again. The buttons I used are from the Gold and Silver Grab Bag.

On some of the smaller buttons it can be kind of tricky to get the fabric through the shank of the button. I pushed it through with an awl just until I got enough fabric through to grab hold of and then I pulled it through with a pair of pliers. This technique tends to stretch the cotton out so you’ll have to cut a little off the length when you tie the ends together again.
Twist the t-shirt strands together and adjust the placement of the buttons to your liking. You can put the whole necklace over your head in a single loop or double it like I have here and use a clasp ring that opens (like the ones you find in the office supply store) and closes to secure the ends.
Super easy, super trendy and a great way to wear your favorite buttons!

Are you looking for a little something special to wear to celebrate Halloween? A bead and button bracelet might be just what you are looking for!
There is a video Button Bracelet for you to see the basics of how this goes together.

And I used the Button Bonanza packs in Black and Orange along with a strand of coordinating beads.

This is a close up of the bracelet about half way done.

Now all you need is your favorite Halloween candy!
These Start-Ups from Buttons Galore & More are the perfect itty bitty blank canvas for making a great big statement. Whether an accent for a larger project or a stand-alone piece, these nifty little shapes are great for embellishing.
For my Start-Ups Challenge project, I chose the Large Tags because I thought they would make a fantastic pendant. The holes are pre-drilled so attaching a chain or ribbon is simple.

What I really like about the Start-Ups is that they can be made either complex or streamlined, depending on the project. I chose a lettuce green alcohol ink to color the tag shape, applied with a small scrap of felt.

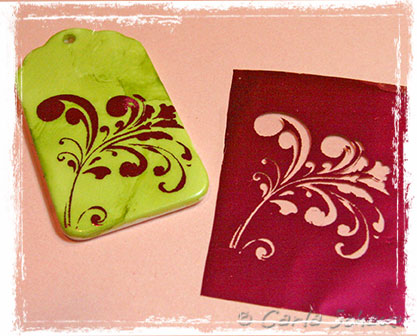
I then cut a swirl shape from a set of double-sided adhesive designs (Design Adhesives by Clearsnap) and applied one side to the bottom corner of the tag.
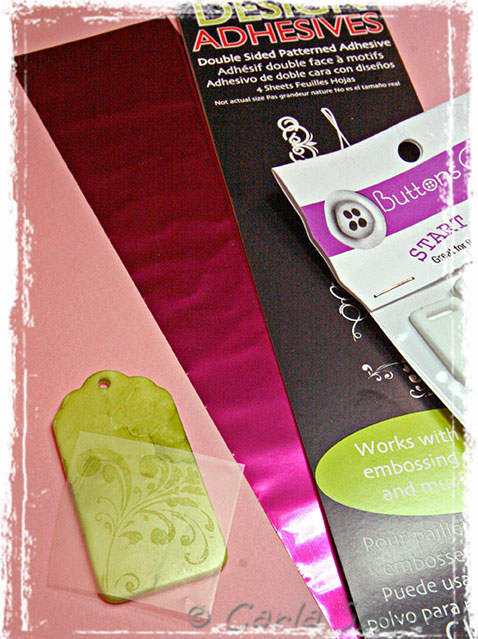
A small piece of thin pink foil (also by Clearsnap) was pressed into the adhesive design and 3 turquoise crystals were glued to the upper right corner. If desired, a clear varnish can be applied before gluing the crystals in place.
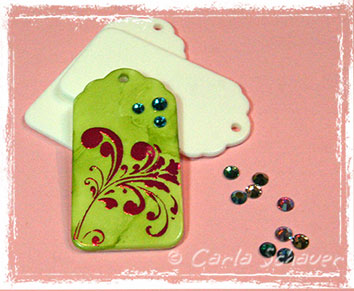
I added a 9mm silver jump ring through the pre-drilled hole, and attached my pendant to a chain I had in my stash. I love that I can have custom jewelry in less than an hour!
Thanks for stopping by!
Carla Schauer

Stamping with Start-ups
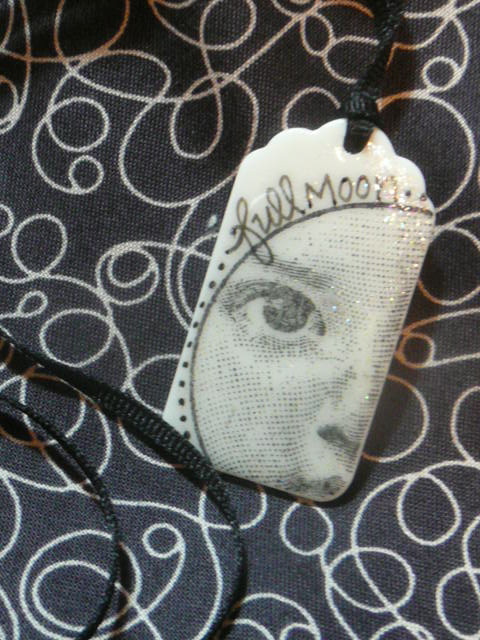
There was a full moon last night and I was crafting all night with my daughter. A perfect time to do some Start Ups samples. This was my first time playing with the new Start Ups surfaces. After a few mishaps… I fell in love with them and have to have more, NOW!
Basically all you need is your favorite stamp (this one is my moon face from Inkadinkadoo – and ladies, it’s old!), fine sand paper and Staz On ink. I added in a Faber Castel PITT pen, because I can resist lettering a bit. Just sand the surface down a bit, just to rough it up and take the shinny coating off , dust it off and stamp. I stamped this off center and I loved the way it came out. I added the text and a few dots and let it dry a bit. To make sure it’s coated well, I added a layer of DG3 from Judikins. It needs to dry overnight… so don’t touch it, let it dry. I sprinkled in a bit of Ultra Fine Prisma Glitter for the moons sparkle and went to bed. The DG3 will go right up to the edge of the start up but won’t drip over the edges. If it did, you could lightly sand it again when you were done. If you do coat with the DG3, use a silicon mat ( or splat mat ) – it won’t stick and will peel right off.
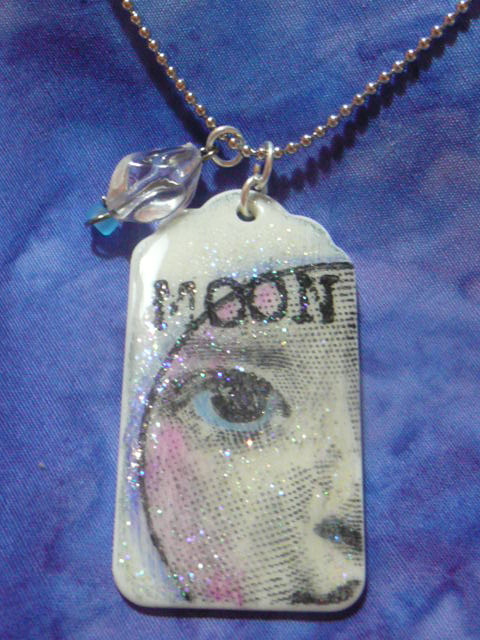
This one was basically the same technique but I waited for the Staz On to dry for about 15 minutes and then used colored pencil to add a little hint of color. I then stamped the word MOON over the moon face, coated with the DG3, sprinkled with glitter and let it dry again overnight. I finished it off with a crystal bead and a ball chain. I love the way these came out and I can’t wait to try more shapes.

Start Ups Mixed Media Charms
I loved playing with the Start Ups that I received recently. I started with the Large Tags because I thought they were the perfect size for a necklace pendant. I haven’t used my Alcohol Inks in a while, so I pulled those out and decided on Greens, Blues and Purples.
The first background I created was a tie dye effect – the alcohol ink has a fluid movement on the Start Ups surface and I almost couldn’t stop layering the colors and watching them blend together!

Tie Dye Butterfly Necklace
I added a chipboard butterfly from K & Company and Making Memories letter stickers to spell the word FLY.

Stamped Mixed Media Charm
For the next background, I dropped Alcohol Ink on the surface of the Start Ups, then blotted off with a paper towel to create a watercolor effect. I stamped over the background with StazOn Jet Black Ink and set the ink with my Heat Tool. I added a touch of Starlight Stickles on the dragonfly, the word sticker COURAGE, a flower with gem and a black gingham ribbon compete this mixed media necklace.

Glossy Monogram Charm
The third background was similar to the second, but I sanded the dry alcohol ink to distress the finish. I then stamped with musical notes and finished with a large monogram M that was painted black and topped with a thick coat of Glossy Accents.
I inked around the edge of each of my Start Ups mixed media charms with black StazOn ink and then set it with my Heat Tool.
Add a jump ring and some ball chain and you are ready to wear your mixed media necklaces – or give them as gifts!
Thanks for stopping by! -Beth Watson

Free Form Bead Weaving with Button Closure
Every once in a while one of our Design Team members creates a project that’s either published or promoted in another way and we like to share them here.
It feels a little different this time because I’m usually the one promoting one of my DT members but this time it was ME who got a little publicity that I wanted to share!
Why? Because I want to encourage my fellow crafters to think of using buttons in lots of different ways… even high end jewelry.

The Emmy Necklace: Free Form Bead Weaving
This is the necklace I created for the Emmys and the photo above shows the button closure.
Here are some related articles:
DIY-ing the Emmys: The Gown, Shoes and Accessories
The Emmy Necklace – Free Form Bead Weaving: Tips for Choosing Beads
Start Ups from Buttons Galore and More might just be my favorite product from the site! I love their smooth, white surface….. like a canvas just begging to be painted upon. I rifled through my sticker stash in order to come up with this easy-peasy faux cloisonne technique.

Faux Cloisonne
To make these, I simply peeled a sticker off of the sheet and applied it to the Start-Ups, burnishing it down a bit with a fingernail. Then I colored in the lines using my alcohol based markers.
When the ink was dry I added a coat of Mod Podge Dimensional Magic over the whole thing to pull off the Cloisonne effect. Or, like in this example, you can choose to do only one area to add “pop” to your piece.
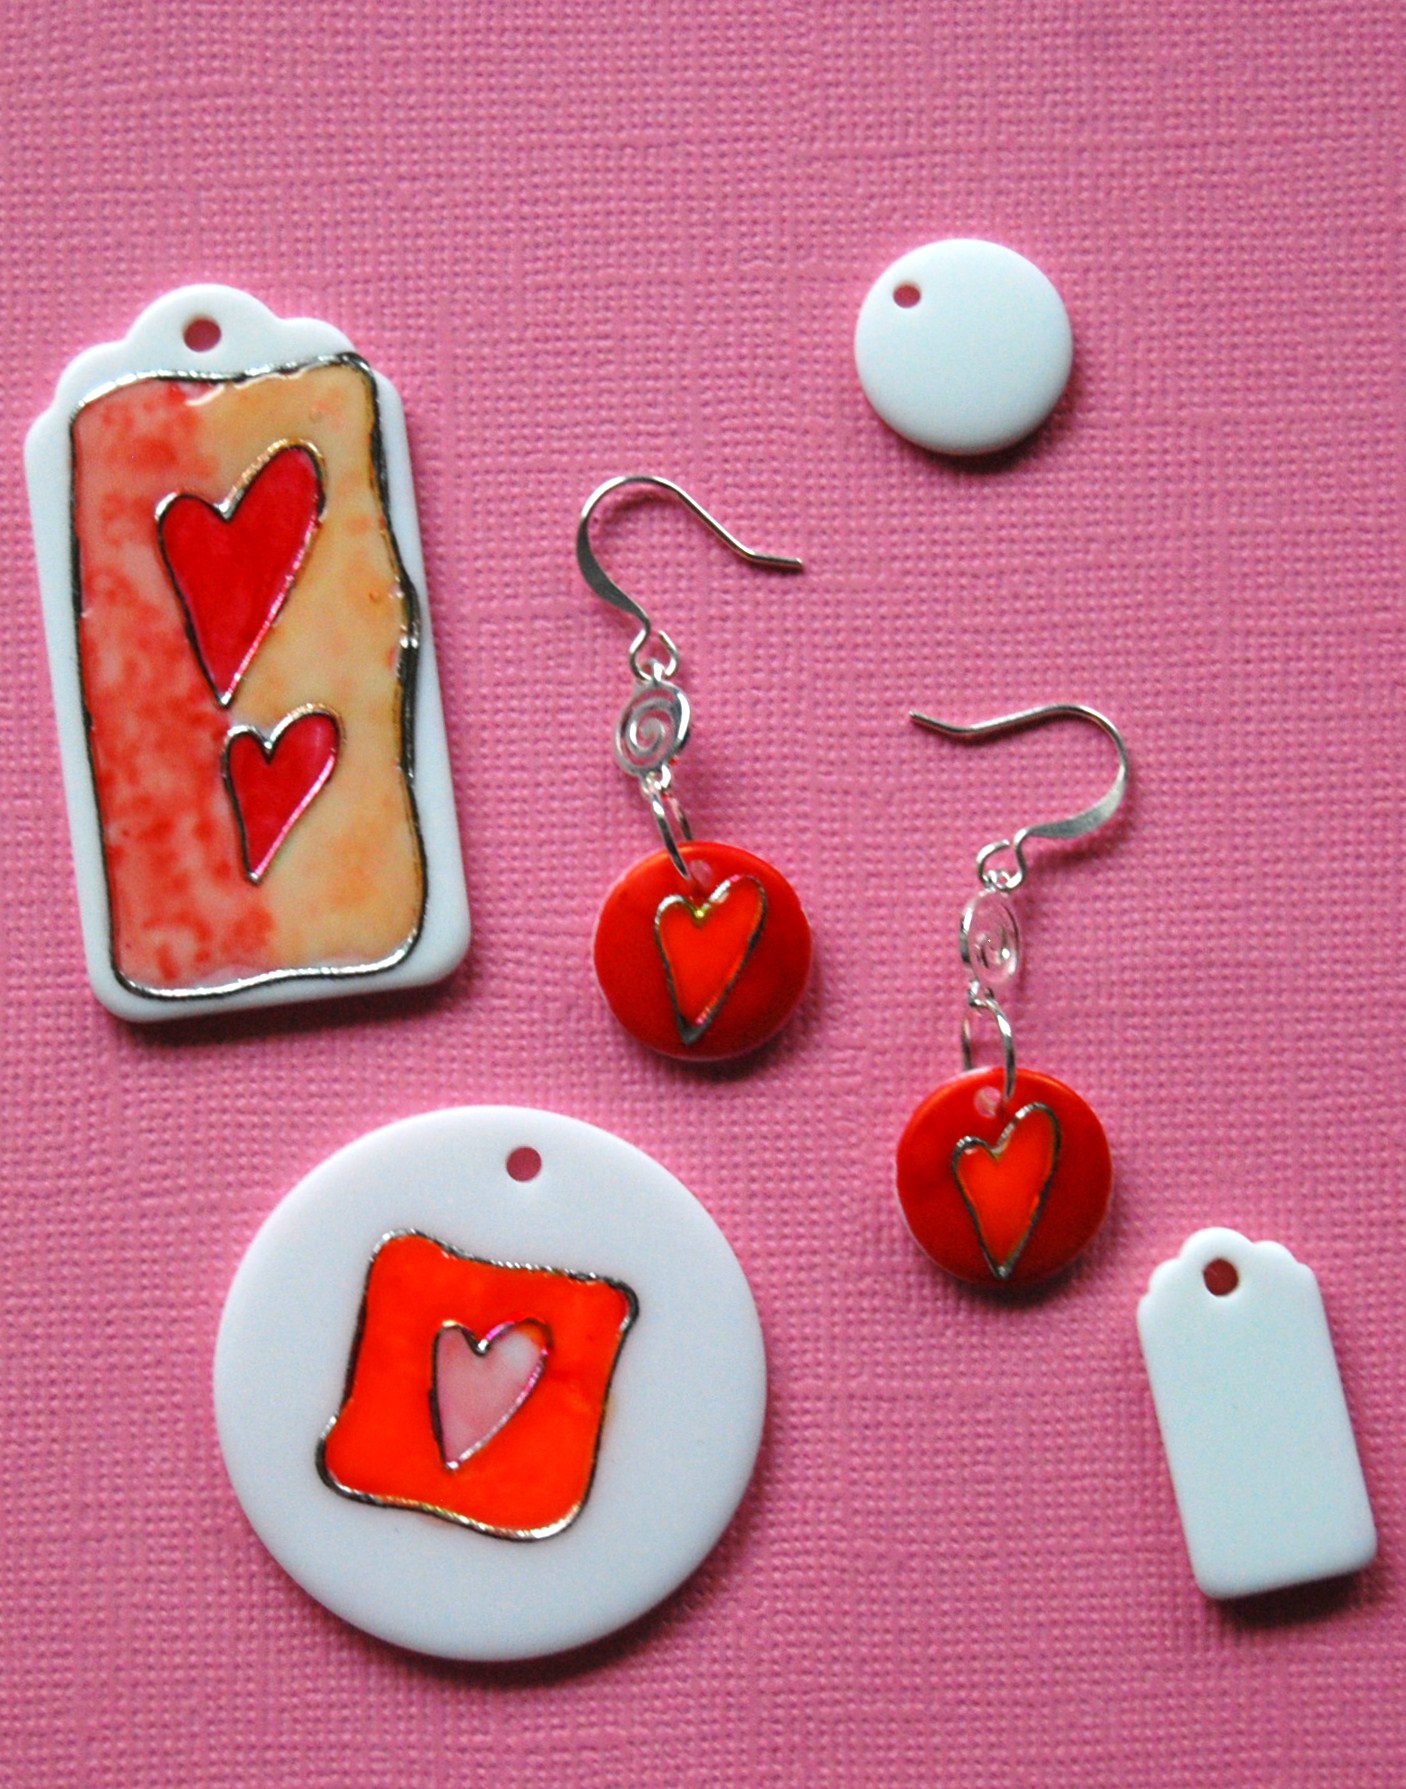
Once the Mod Podge Dimensional Magic is all dry, add jump rings and earring findings and you are ready to roll. (If you leave some areas without the Dimensional Magic, I’d suggest spraying the pieces with a coat or two of Krylon Triple Thick in order to keep the ink from scratching off in the future.
No one needs to know you raided your paper crafting stash to make your jewelry!

Button and Fabric Circle Brooch
How on earth can something so easy be so darn cute? A little felt, fabric, thread and of course, a button.
Be sure to visit the Cluck Cluck Sew blog for full instructions.

Orange and Blue Button Necklace
I love the color combo used to make this necklace!
While it’s not a complete tutorial you can find the basic rundown of how this necklace was made over on Craftster. If you have any experience making jewelry a quick run down is all you need.
I think that our Button Bonanza: Summer Time would be a perfect choice for this.
Or what about the Button Tote: Cornucopia for more of a Fall look? Maybe with an antique gold or brass chain? Oh yeah. I like that idea…. might make one myself! :)

Pink and red button necklace
Here is the product of a recent experiment. I think it turned out rather well, don’t you?
I haven’t turned this into a tutorial yet but I will… maybe it’ll even be a video! But until then I can tell you that it’s one single length of strong quilting thread with the buttons threaded on.

Zinnia Style Button Brooch
I was tooling around the web recently, minding my own business when I happened upon this tutorial by Diane Gilleland of Crafty Pod over on Craft Leftovers.
I’m madly in love with these little zinnias with button centers. Check out the tutorial here to see how quick and easy they are to make.
If you ask me this is the PERFECT time of year to make a batch of them to wear… or to give!
I’ll take one in red please! :)
Try these bright and cheerful buttons for YOUR zinnia brooch

“Tulip” button jar

“Citrus” button jar

Buttons Galore and more on TV with Vicki O'Dell
Our very own Design Team member (ME!) appeared on a local Cleveland TV show in June to show viewers how easy it is to make a one of a kind button bracelet.
While there is a can of old collected buttons in a tin can shown – and they are fine to use – you may not find enough buttons in the colors you need or you may not want to use Grandmas buttons on a piece you will give away.
Our Button Bonanza packages hold enough buttons to make 2-3 bracelets and they come in lots of colors!
While some people look at jewelry as investment pieces, keeping them to wear long-term over the years, I love bright funky jewelry that I can wear as my mood or the trends change.

Button web ring
This particular piece I made in under 10 minutes, using supplies I had on hand, buttons from the Mixed-Color Grab Bag from Buttons Galore & More, a large metal jewelry finding, a ring blank, and a 6 inch piece of wire.
I started by choosing buttons of different colors and sizes. The Grab Bags are fun to use because the colors and sizes are all mixed together and it’s easy to just pluck several different buttons from the same package. The Button Bonanzas and Button Totes would also work well to get the same look.
After choosing my buttons, I strung the wire up from the bottom button through one hole of each, then bent the wire and strung it back down through one different hole of each button. I wanted the funky look, so for my piece it didn’t matter which hole I used or whether the button had 2 or 4 holes, I was going for the wacky stacked look. After the buttons were strung, I fed both ends of the wire through the jewelry finding and twisted the ends of the wire together to secure, clipped the extra wire off, and pressed the twisted ends as flat against the jewelry finding as possible.
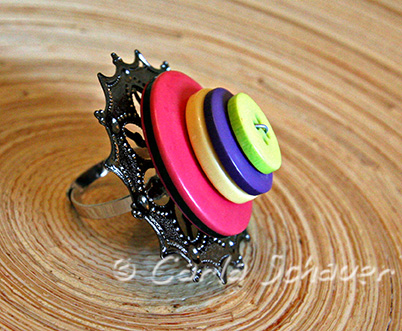
I decided to use the piece as a ring, so I glued it to a ring blank using a heavy duty, multipurpose glue. I could have also used it as a pin, a pendant, or a hair accessory. The sky is the limit when making button accessories. Have fun!
It may be a little early to start thinking of fall leaves… but maybe not.
Last week I introduced you to Start Ups here and I made an easy “metal” piece to put on all sorts of Mixed Media or Scrapbooking projects.

This week I used the Start Up Leaves and my trusty collection of Ranger Alcohol Inks to create multi-colored fall leaves.

The colors I used were Oregano, Butterscotch and Red Pepper.
Oh, the possibilities!
What would YOU use Start Up Leaves on?

“Amazing Plastic Crafty Goodness” is what they really ought to be called! :)
What are Start Ups? They are small, white plastic shapes. Perfect blanks for lots of scrapbook, mixed media and even jewelry projects.

Button name plate
My very first Start Ups project. :)
I spray painted the blank silver and let it dry, then I rubbed my thumb over it to take out some of the shine. I stamped VICKI with a small set of alphabet stamps and Staz On ink in black. Finally, I gave it a quick spray with a Matte Sealer and it’s all ready to go on… well, WHATEVER I want to make! I love that it looks like an old piece of metal. Cool!
Keep checking back as I continue to explore all of the crafty fun to be had with these little gems!
And click HERE to see the available shapes of Start Ups that Buttons Galore and More Carries!

Drink Charms by Laura Bray
This is a fun new twist on drink charms for parties AND the charms double as a charming party favor as well.
You can read all about how to make these lovely drink charms on Design Team member Laura Bray’s Blog post here.

All around the web I’m seeing that fellow crafters, designers and artists seem to be taking time out to clean up their creative spaces.
It’s also a GREAT time to be thinking of little gifties and gift tags that you could use the rest of the year. Don’t think so? Read the rest of this post that was originally published on my blog. (You can visit my NEW blog here: www.vickiodell.com)

Button Earrings
Here is a pair of earrings I made as a last minute, I’m walking out the door right now, kind of thing.

Monochromatic Button Pin and Button Gift Box
Working with monochromatic color schemes is a quick and easy way to design a project. You don’t have to worry about the colors not coordinating.
This pin is going to be for Mother’s Day. My mom sent me a link to the dress she is wearing and I thought the pin would be a great surprise. If I know my mom well and I think I do, she will also save the box and re-use it. If she does that will make me happy.

Beachy Button Bracelet Set
These blue buttons caught my eye right away. I love the beach and these buttons have the color and shimmer of the ocean on a summer day. They are aptly named “Sea Glass”. I have a big container of natural beads left over from some beachy home décor projects I made last year, and they seemed a perfect complement to the “Sea Glass” buttons. With the addition of some copper findings and chain, I had the supplies for my bracelet.

Button Bonanza - Vintage
We are sooo excited to be re-launching the blog this week that we’re going to have TWO give aways!!
The first give away will include Button Bonanza – Vintage and a copy of Button Ware by the fabulous Amy Barickman. Yup, two prizes for the first give away.

Button Ware by Amy Barickman
And no jumping through hoops either… all you have to do is leave a comment to enter! Easy Peasy.
We’ll use random.org to choose a winner on Tuesday at around 6pm. Good Luck!!

Button bracelet
Here is a video I made a little while back showing how to use buttons to make an adorable charm bracelet. I hope you like it!