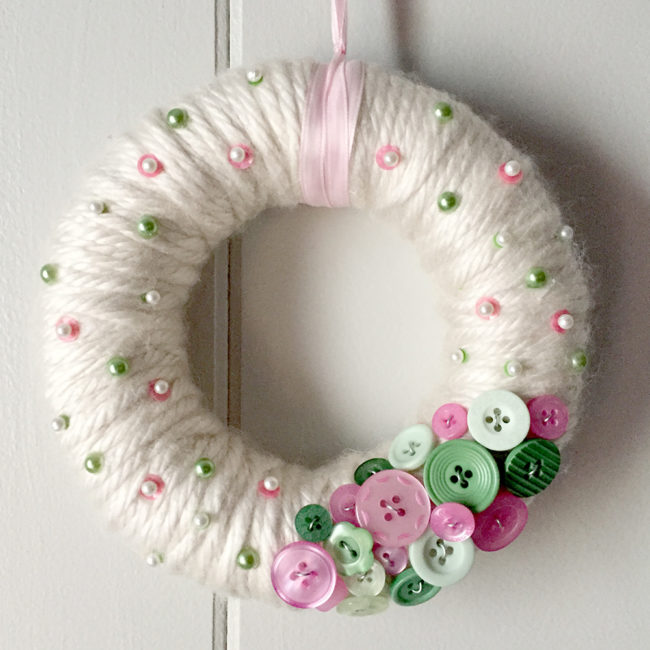
A beautiful wreath is an essential part of complete holiday decor. This yarn wrapped button wreath helps welcome guests to your home and allows you to express your creativity as well! Continue Reading →

A beautiful wreath is an essential part of complete holiday decor. This yarn wrapped button wreath helps welcome guests to your home and allows you to express your creativity as well! Continue Reading →

My favorite holiday decorations are lovely Christmas trees. I have my big full-size Christmas tree, of course. And several medium sized trees. But I also have at least a dozen cute little mini trees throughout the house. I think that the adorable little mini trees are just as fun to decorate as the bigger ones. Sometimes the small size ornament selection is lacking and they all seem the same from store to store. So I like to get creative and make my own! Continue Reading →
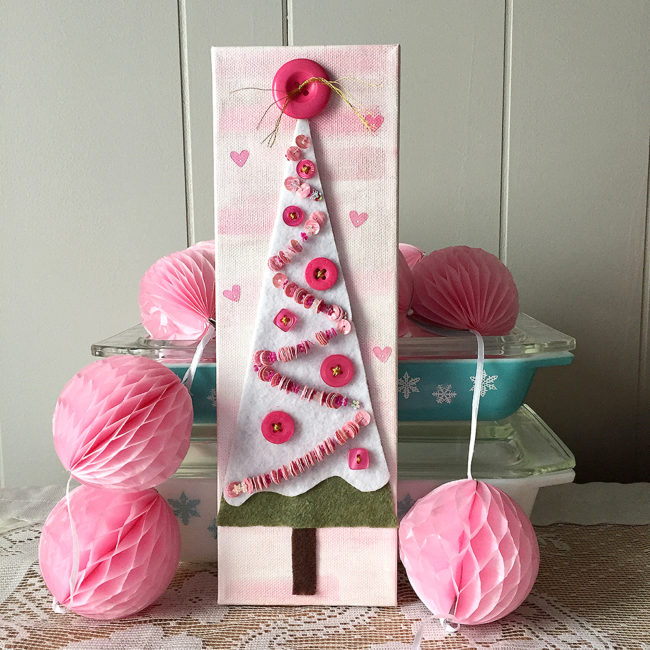
Do you love crafting for the holidays but just can’t stand making everything red and green? Good news – pink is trending this Christmas! Add this pretty pink Christmas tree decor to your decor to change things up a bit this holiday season! Continue Reading →
Aimee here and today I bring you a simple sewing project with all the directions you need to make a simple wall hanging, with just a little bling, just in time for the holidays! Continue Reading →
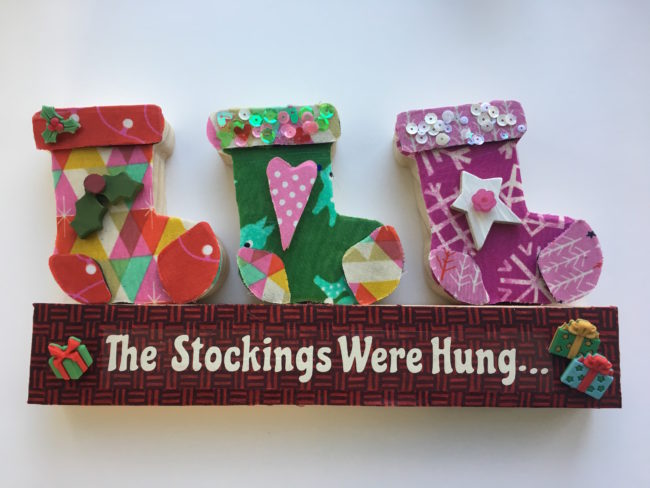
Hi! It’s Aimee here with a great project to add to your Christmas mantle decor this year. Using the new stockings set, I added a little fabric and some button bling to dress up these simple wood decor pieces. Continue Reading →

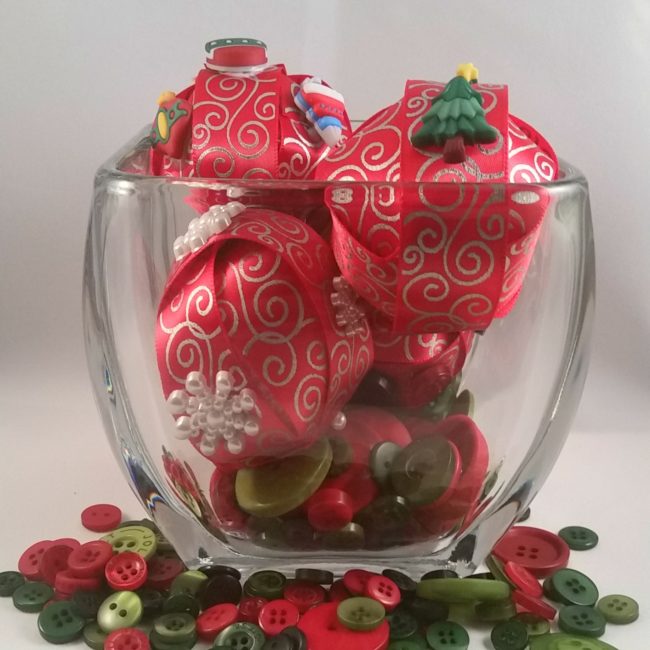
Hi, it’s Connie here with Buttons Galore & More design team! I have a fun and festive project to share today using “Christmas Tree with Presents“, one of the new Foundations Decor pieces that are now available from Buttons Galore. The 28 Lilac Lane O’Christmas Tree embellishment bottle added some green sparkle alongside some really cute Buttons Galore 3D Christmas buttons. Continue Reading →
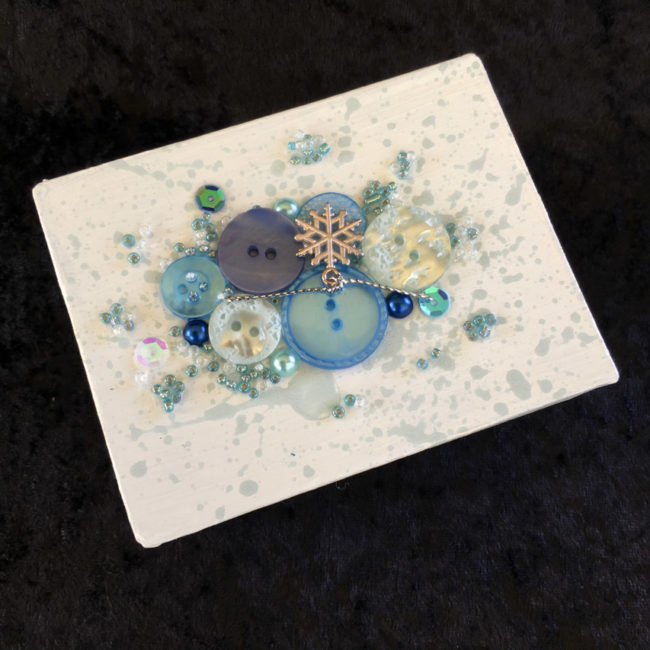
I’m not quite ready for Christmas just yet, but it’s never too early to start planning! Snow is not my most favorite thing in the world. It’s wet and much too cold for this desert girl! I’m a summer fan for sure. However, I do love beautiful snowflakes. Every year I decorate my kitchen with lovely, sparkly snowflakes. I always say that it’s my favorite kind of blizzard! This year I have plans to put a small white tree in the kitchen, decorated with more snowflakes, of course. I wanted to make some of the ornaments myself, and the adorable snowflake buttons in the Snowflakes Value Pack were just perfect for the task of making snowflake ornaments! Continue Reading →
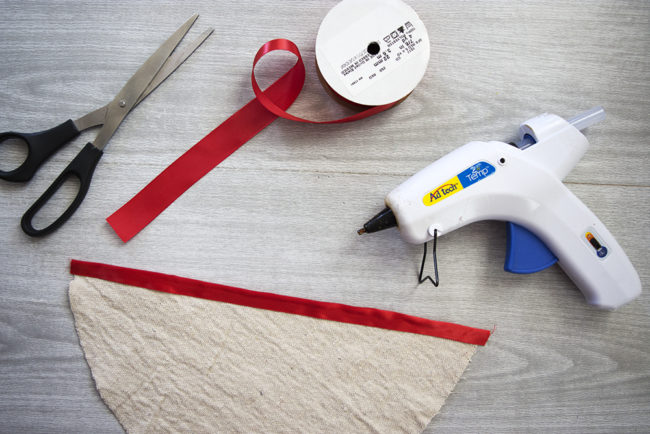
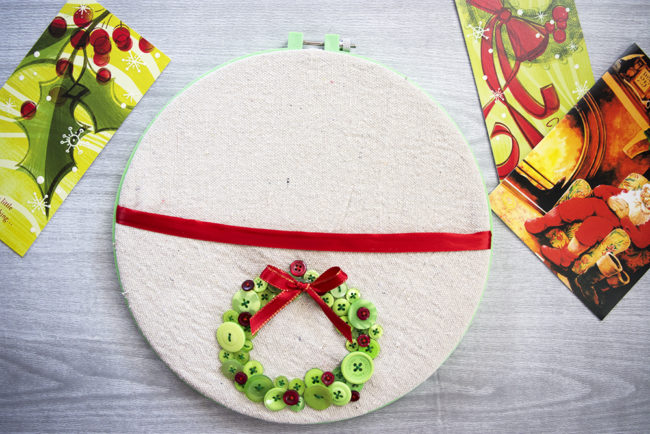
You can celebrate a little bit of Christmas in July by crafting this fun and easy Embroidery Hoop Christmas Card Holder. This simple craft is a great way to get your kids involved and teach them basic button sewing. It will look so cute on the wall holding your Christmas cards! You can customize it by changing the button shapes, or colors to suit your decor needs.

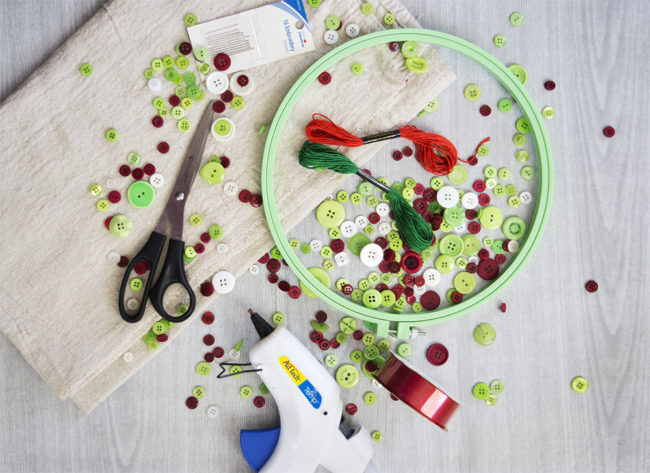
To start making your embroidery hoop Christmas card holder, lay your embroidery hoop on your fabric and trace around the outside edge of the hoop. Don’t trace right along the edge of the hoop, since you want the fabric circle to be bigger than the embroidery hoop. The circle doesn’t need to be perfect. You will need two fabric circles. I used a canvas drop cloth that I already had, but you could also use a cotton fabric or even burlap. You don’t want the fabric to have too much stretch though, since it needs to hold the weight of the buttons and the cards firmly.
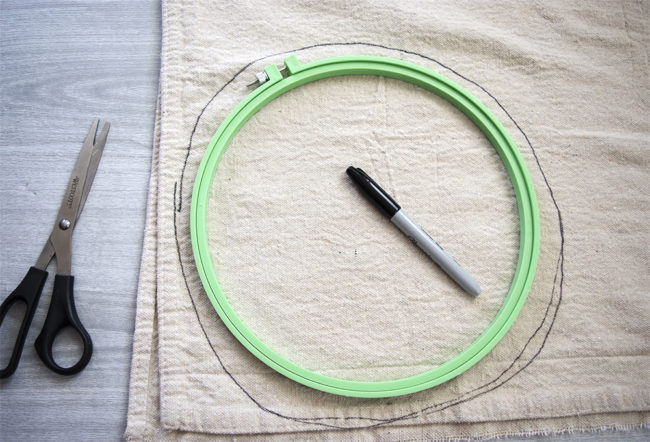
Cut out the circles of fabric, and then cut one circle in half. Don’t waste too much time trying to get the cuts perfect. You won’t even be able to tell if they are or not once the project is finished!

Finish the straight cut edge of your half circle by gluing ribbon to the edge and folding it over.
Trace a small circle onto the half circle of fabric. I used a wide mouth mason jar lid to trace the circle for my wreath.It was a perfect size. You can make your wreath bigger or smaller as desired.
Stretch the half circle fabric piece into the embroidery hoop for stability. Sew green buttons around the circle that you traced on the fabric. Tie a knot in your string and start under the fabric. Bring the needle up through the button and back down into the fabric.
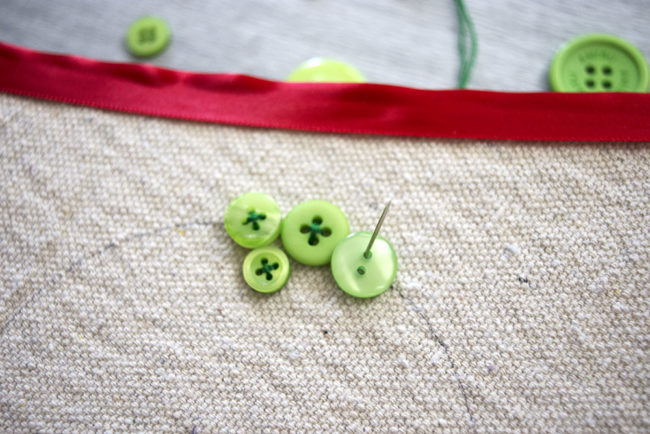
Repeat this step again so that your button is firmly attached to the fabric.

I used big buttons and small buttons around my wreath for some visual interest, and I used green buttons from both the Contemporary Christmas mix and the Button Bonanza Christmas Mix to vary the colors.
Use a few small red buttons for berries in the wreath. Sew them randomly into the green buttons using the red thread.
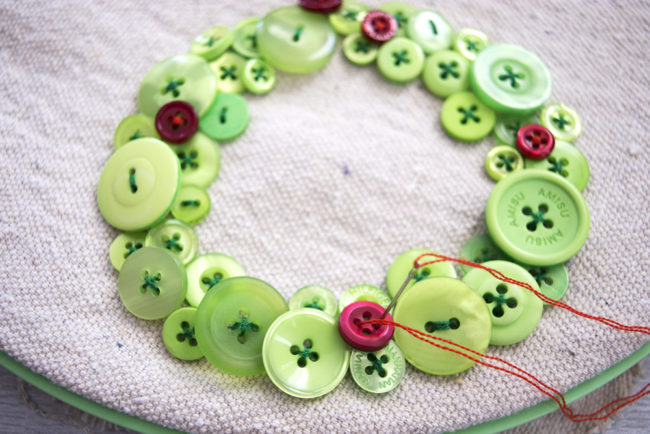
Add a small red ribbon bow to the button wreath. You can sew the bow to the wreath with your red thread, or you can use hot glue to attach it.
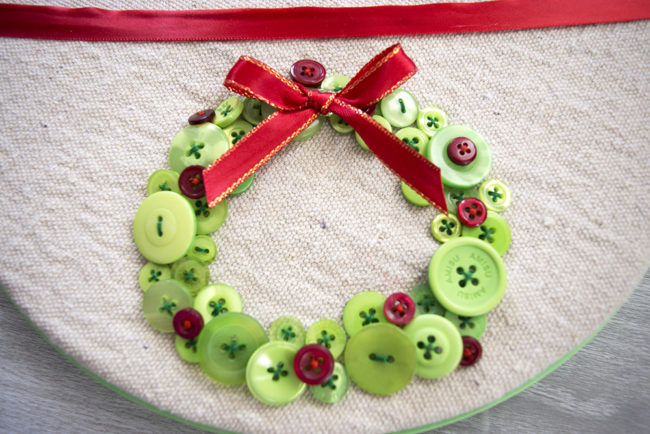
Lay your button wreath half circle of fabric over the full circle you cut in step one, and stretch them into the embroidery hoop. This creates the pocket for your cards to go into. Trim any extra pieces of fabric on the back of the hoop. Hang your completed embroidery hoop Christmas card holder on your wall!
You can fit quite a few cards in one hoop, but if you typically get lots and lots of cards from your friends and family, you might want to make a couple of these fun hoops and hang them in a fun arrangement on the wall.
I think I will make two more hoops and put a Christmas tree shape on one, and perhaps some Christmas holly on another. The buttons are such a fun and cute way to add the colorful shapes to the fabric. Do you do any Christmas in July crafts? If Christmas in July isn’t your thing, this fun card holder can be customized to any time of the year! Create a fun button flower shape and hang it on the wall year round to hold other special occasion cards you might receive, or even just to hold your mail!
Hi everybody! It’s Lorrie here from the Buttons Galore and More design team, and today I am here to show you a fast and fun way to craft a Christmas tablescape for your holiday gatherings. This holiday decor project is amazingly easy — the kids could even help out with this one!
To start your Christmas tablescape, wrap a styrofoam ball once with ribbon. Cut and glue the ends of the ribbon. Continue wrapping the styrofoam ball with ribbon until the entire ball is covered.
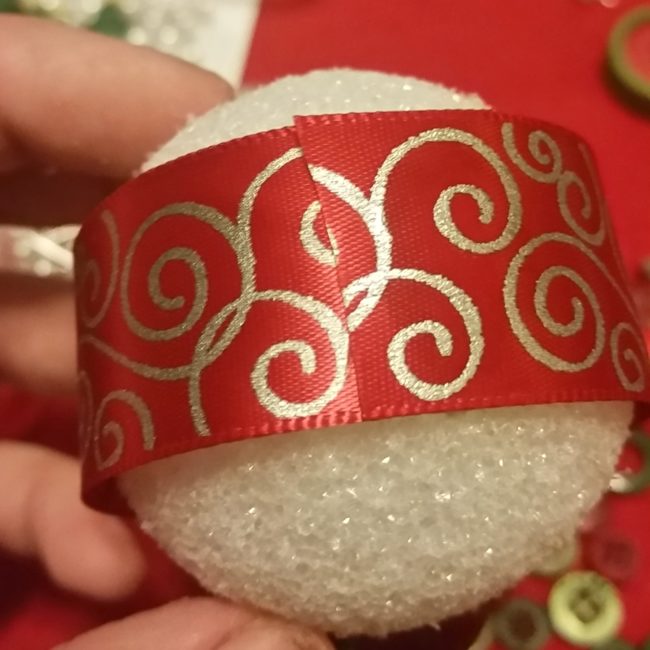
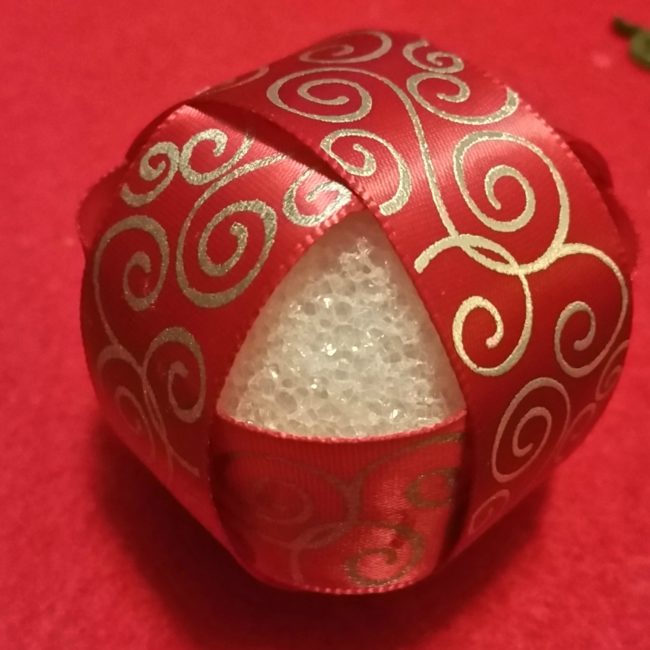
Once the styrofoam ball is entirely covered in ribbon, glue buttons to the ribbon in a variety of patterns. (Before gluing down shank buttons, use a pair of scissors or a button shank remover to cut the shanks off.)
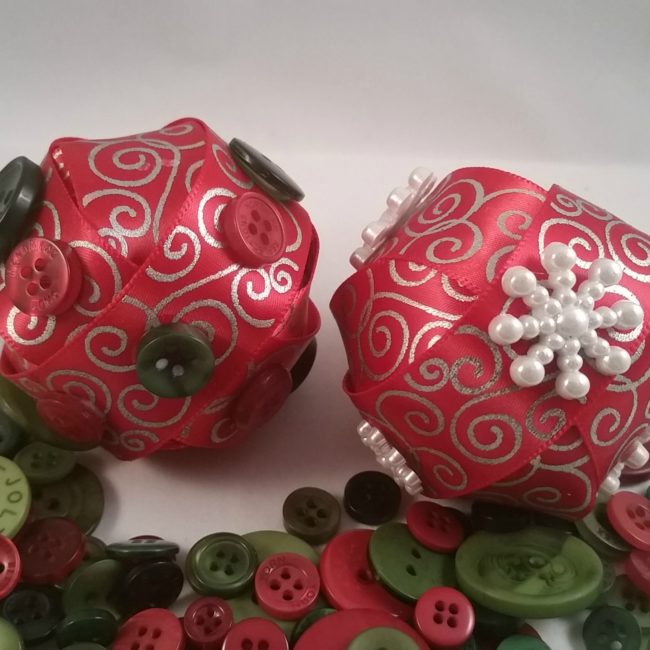
Repeat the previous steps until you have made enough balls to fill a jar or vase for your Christmas tablescape. To display your balls, fill the bottom of the vase with a mixture of red and green buttons (such as Buttons Galore “Christmas” Button Bonanza, and then add your new ornaments!
This Christmas tablescape project is so quick to make but would add so much to your holiday table, mantel, or coffee table. Of course, if you prefer a more trendy color scheme for your holiday decor, try pairing these buttons with white ribbon and our Contemporary Christmas button mix for a touch of lime green and light pink. It also doesn’t have to be just for Christmas — you could always make the same craft using different ribbon and buttons for various holidays or for every day use!
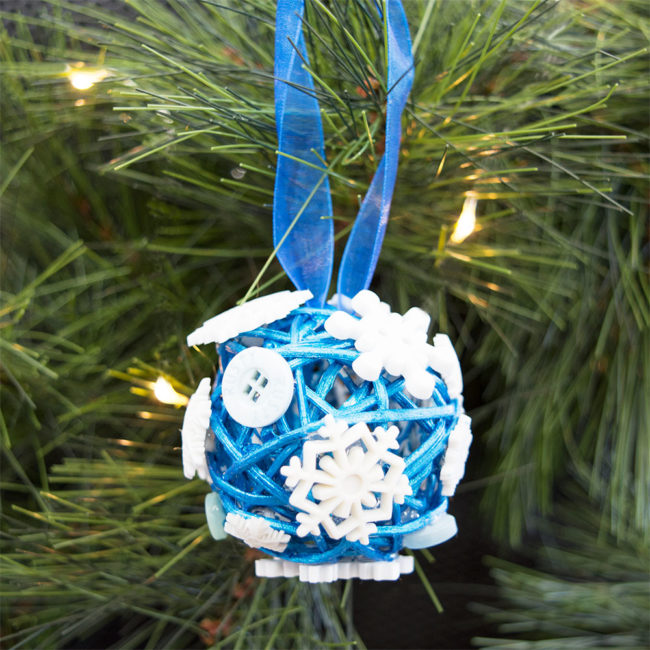
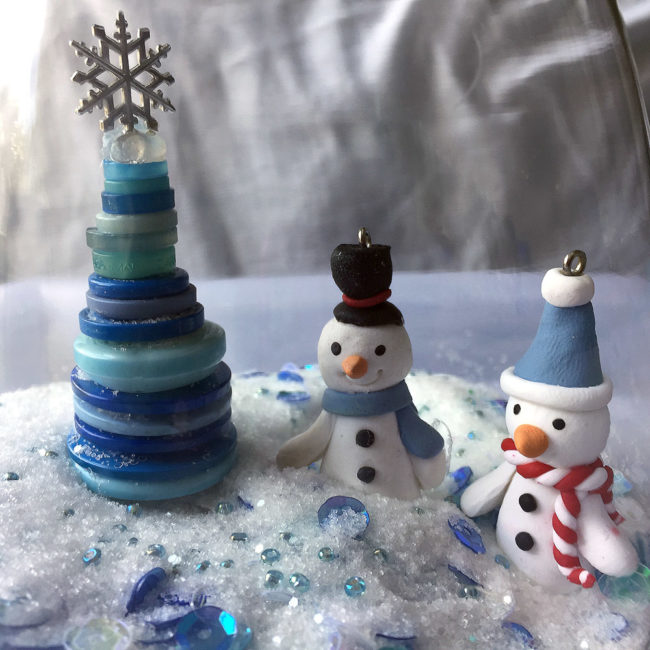
It’s Christmas in July! I’m thinking cool thoughts and making cool things, like this sweet snow scene in a jar!
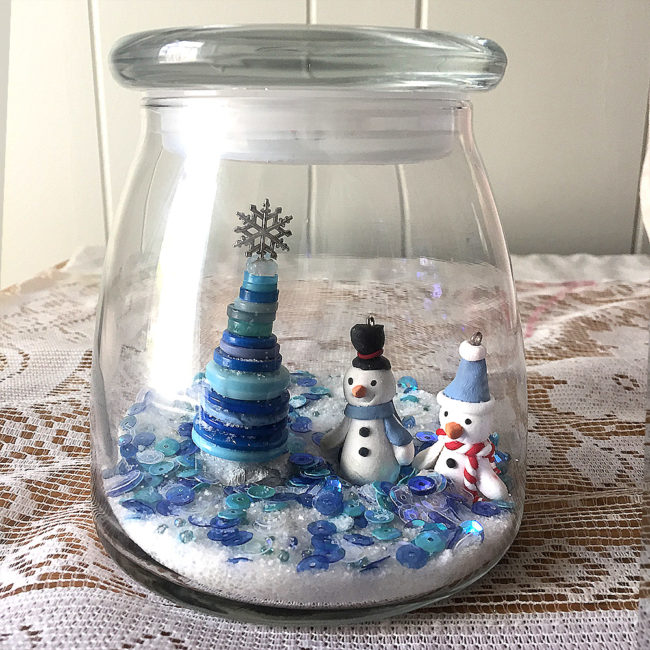
Begin by rolling up a 1″ ball of aluminum foil, and then press it down to make the ball flat on the bottom. Cover the foil with a layer of white paint and allow to dry. To make the button tree, cut 6″ to 7″ inches of wire, and fold in half. Start with one of the snowflakes in the embellishment kit to attach as the tree topper. To keep the snowflake centered, apply some glue to hold it in place. Continue adding buttons from smallest to largest until it is to the height you desire. Twist the remaining wire and trim. Leave just enough wire to place in the hole of your snow hill with a dab of glue.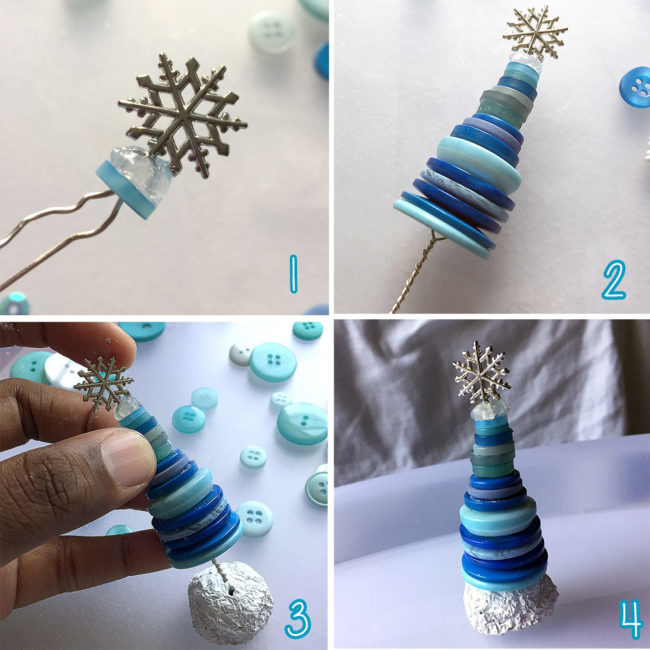
Glue the snow mound, along with any other little holiday figures you may have to the bottom of your glass jar. 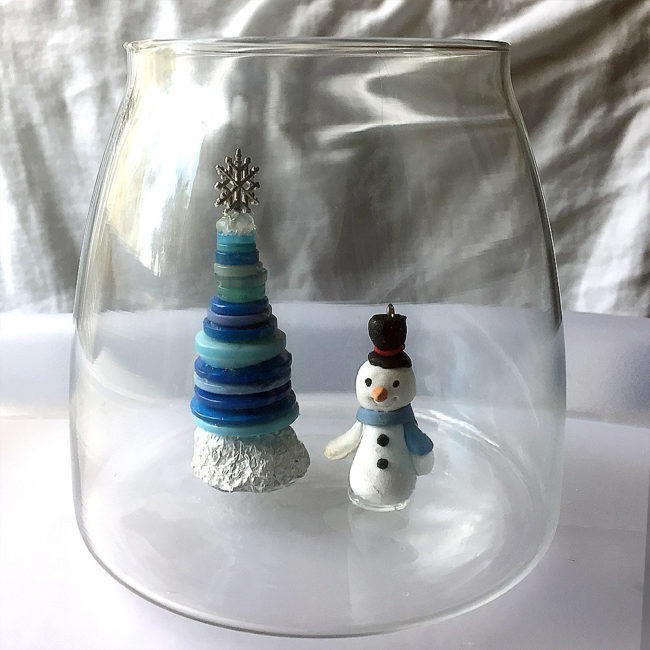
The last step is to add some sparkle and ‘snow’. Pickling salt may sound like a strange item to use in crafting, but it’s really awesome because it’s bright white and looks so much like snow! Also, the salt is heavy and will keep the sequins and beads from settling directly to the bottom of the jar. Pour in as much salt as you want until it reaches a height that makes you happy. Add sequins and beads from the kit, and then give the mixture a gentle swish from side to side to mix things up. That’s it! Your scenic snow jar is complete.
Have fun and experiment with various jar sizes and embellishments to decorate your home or give as gifts. This project takes just a little time and very basic craft skills. I hope you’ll give it a try if you’re looking for something quick and easy to craft up for the holidays.
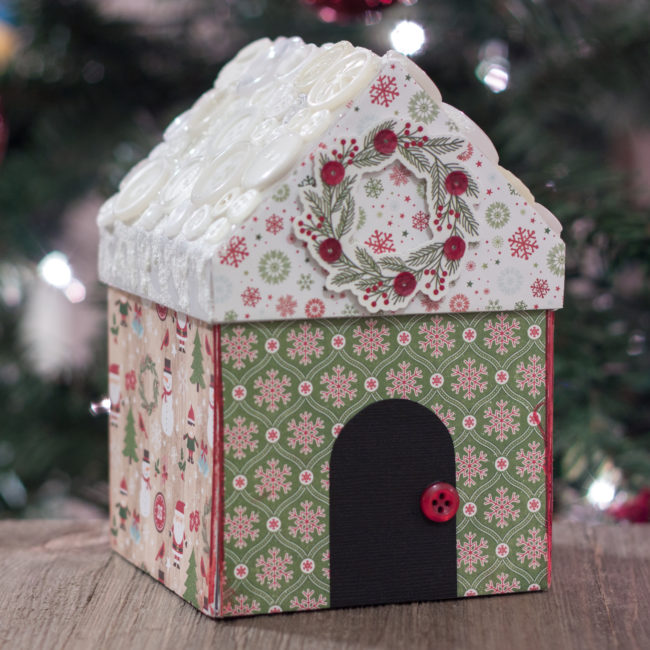
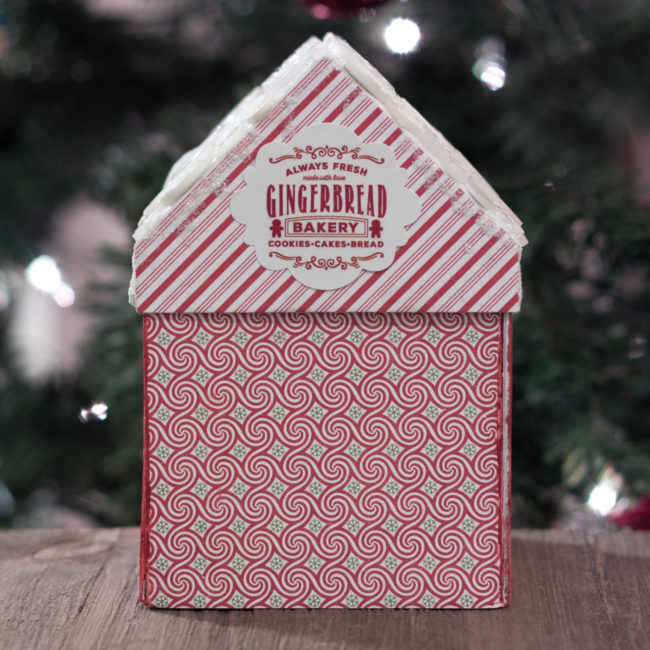
It’s a gift box…it’s Christmas decor…it’s a Christmas album! Today, we are closing out our Christmas projects with a Christmas Village Gift Box that is beautiful holiday decor while it hides a few secrets!
Supplies:
This project is based on an “explosion box” by DCWV. Take the lid off, and it opens up to hide a small gift inside and also show a few mini album pages!
All of the sides of the box are covered in fun patterned papers that were applied decoupage style with white glue. Once the glue dried, embellishments were added. The “door”was cut from black cardstock and glued on, along with a button handle. The wreath sticker had sequins added to it before it was attached with foam dot adhesive to give it depth. And on the rear, a sticker announces the house as a gingerbread bakery!
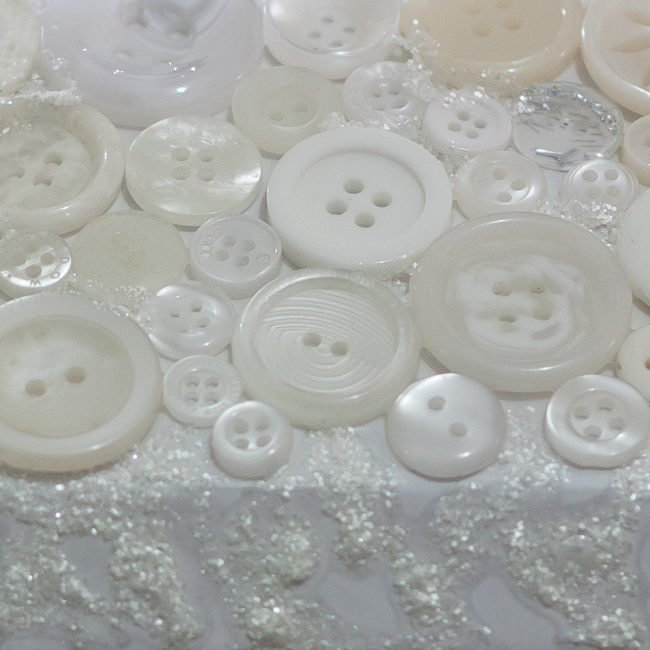
The roof top of my Christmas village gift box was left blank when the papers were decoupaged on the rest of the house. The blank white surface gives the appearance of snow, but was pretty boring. A collage of white buttons, interspersed with white glitter glue, gives the roof some fun texture! I used a combination of several of our most popular white and ivory button assortments to create my roof, but any one of them would work fine by itself.
I applied the buttons only to the two large surfaces of the roof, and then dripped the glitter glue like icicles down the sides onto the two small edges. I also dripped the glitter off the rear edge of the house. The great thing about this technique is that there is no “wrong” way to do it, since it is supposed to look messy and random.
This fun little Christmas village gift box with buttons up on the roof top will decorate your holidays long after it is opened! Have a happy holidays, everyone!

TExt
What’s sparkly, shiny, and shimmery all over? It’s a 28 Lilac Lane Christmas, of course! Here’s a round-up to all the projects that you need to make your Christmas a 28 Lilac Lane Christmas!
No 28 Lilac Lane Christmas would be complete without a tree! This little wooden Christmas tree bought from a craft store got a touch of alteration – including some 28 Lilac Lane button bling – from designer May Flaum to make it extra special.
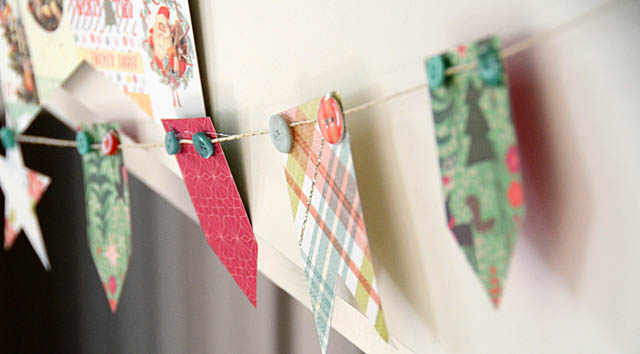
But why stop at a tree? Deck the halls with buttoned up banners that are fun and easy to make!
The gifts that go under the tree need their own sparkle too, and with 28 Lilac Lane, your gifts will look festive and gorgeous! A clean and simple understated look to your gift box is easy when you top it with charms and buttons:
Or go for a more luxurious look, with a button and jewel encrusted top like this one by 28 Lilac Lane designer May Flaum that is rich and feminine! This is one gift box that won’t be going in the trash after the gift is opened!
Since not everyone can get our Christmas wishes in person, how about some Christmas cards?
To see a video on how to make these two beautiful cards, and get information on a free card making class at Scrapbook.com that uses 28 Lilac Lane, visit May Flaum’s blog!
Or, if bright retro is more your style…try our funky paper pieced trees card:
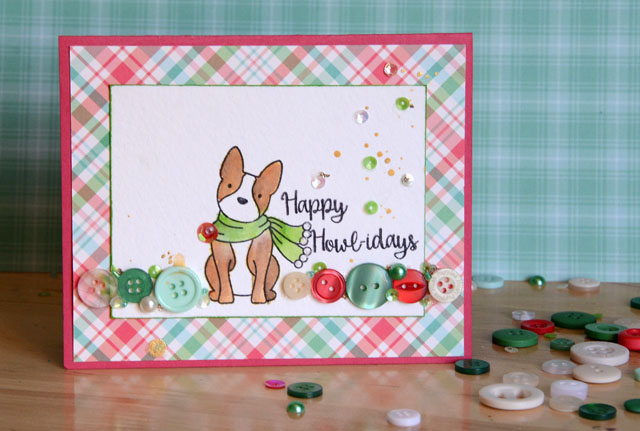
A button border makes any project a little more special. The 28 Lilac Lane one on this Happy Howl-idays card is spiced up with pearls and sequins for some extra bling!
Have you made a 28 Lilac Lane Christmas project? Please share a link in the comments! We’d love to see it!
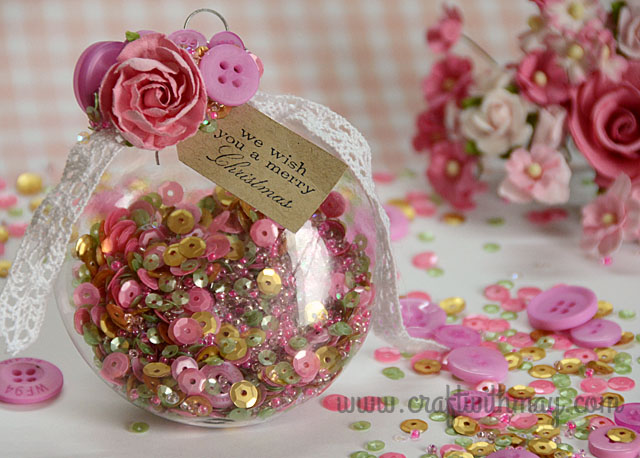
Pink is hot, hot, hot for Christmas this year! Today we’re sharing a beautiful rose Christmas ornament by 28 Lilac Lane designer May Flaum that will add a brilliant touch of pink and gold to your Christmas tree.

May’s rose Christmas ornament is created with one of her six brand new 28 Lilac Lane shaker mixes that have just been released. This pink and gold shaker mix is called – you guessed it! – Rose Garden. This gorgeous mix will take you from a retro pastel Christmas, into Valentine’s Day, or use it to create beautiful girly embellishments year-round!
And now, May herself will show you how it is done!
![]()
With the holidays fast approaching I am always looking for hand crafted gift ideas and special homemade touches. These new shaker mixes are great for so many projects including homemade ornaments. In this video tutorial I will walk you through creating a lovely rose garden ornament perfect for my aunt who loves pink & gold at the holidays.
Here’s a closer look at my finished DIY rose Christmas ornament project!
![]()
Don’t miss the chance on our Black Friday Sale to get May’s 28 Lilac Lane embellishment bottles for 15% off! Use code EMB15 through Friday, November 25th to save on all your favorite bottles from the collection. Don’t miss out on the new ones like Savannah Stroll, Winter Wonderland, and Coral Reef!
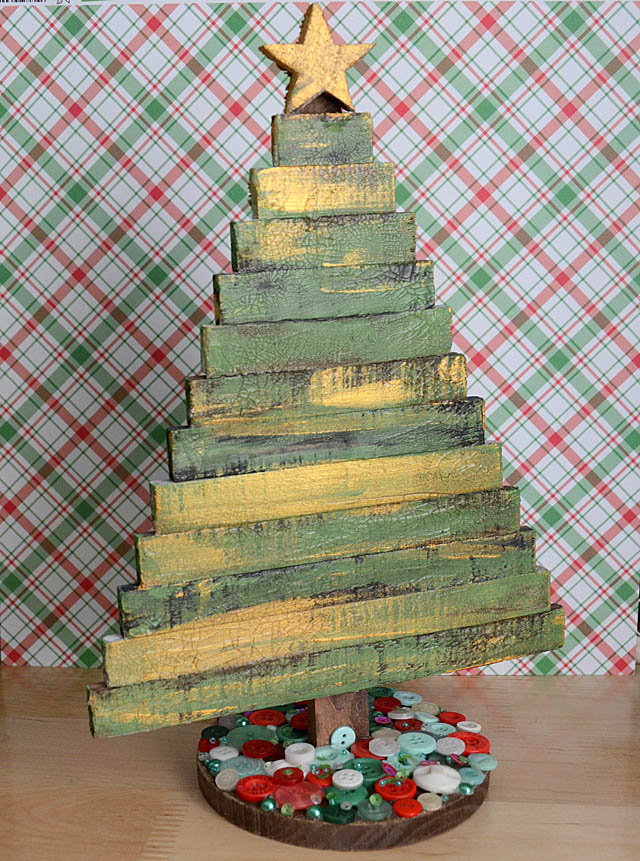
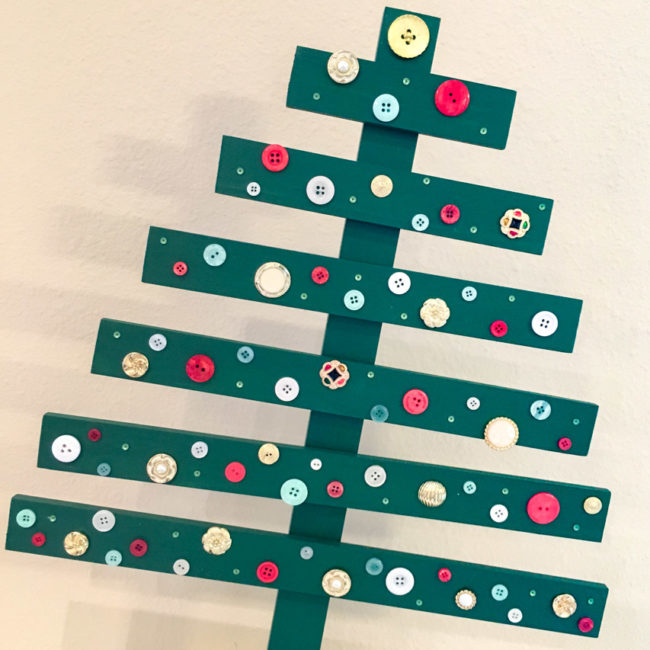
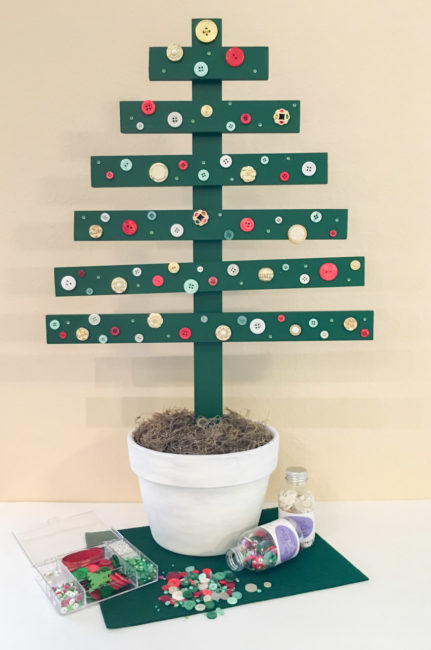
Welcome to the Handmade Holidays blog hop at Buttons Galore! We’re sharing a faux wood pallet Christmas tree to decorate a desk or tabletop…but this tree is hiding a very useful secret!
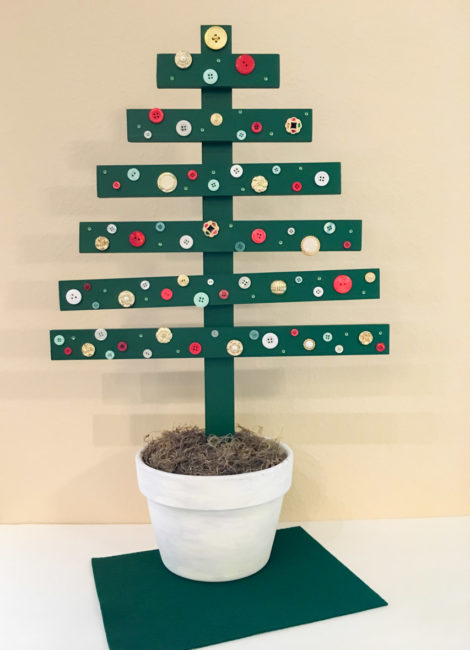
This fun little pallet Christmas tree is equally at home in a dorm room, or a farmhouse style decor. But at 17″ wide and more than two feet tall, it’s a challenge to store after all the gifts are opened. Or is it?
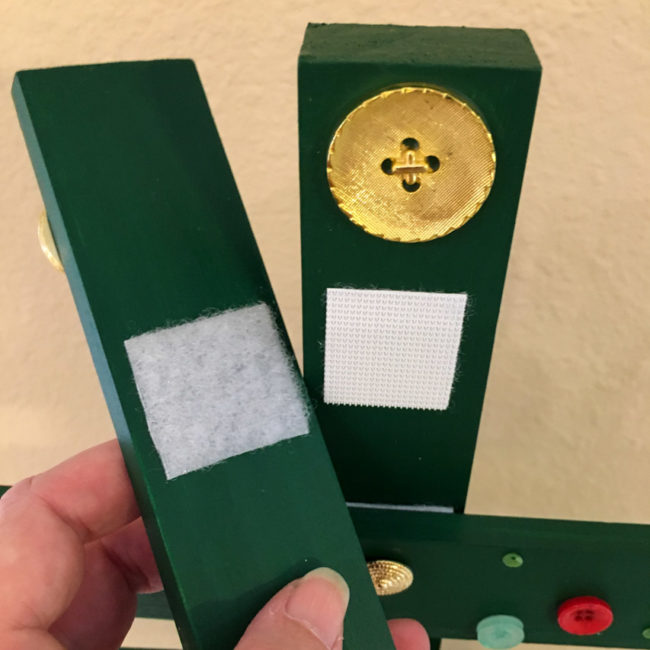
By using Industrial Strength Velcro to assemble the pallet Christmas tree instead of glue or nails, I made it able to be completely disassembled! Just pull apart the Velcro and instead of a big awkward tree, you’ve got a small bundle of wood that can be much more easily packed in an ornament box!
Disassembly also allows the flower pot – which is deliberately not seasonally decorated – to be used year round for flowers or other seasonal decorations when it isn’t being used for the tree.
Supplies Needed:
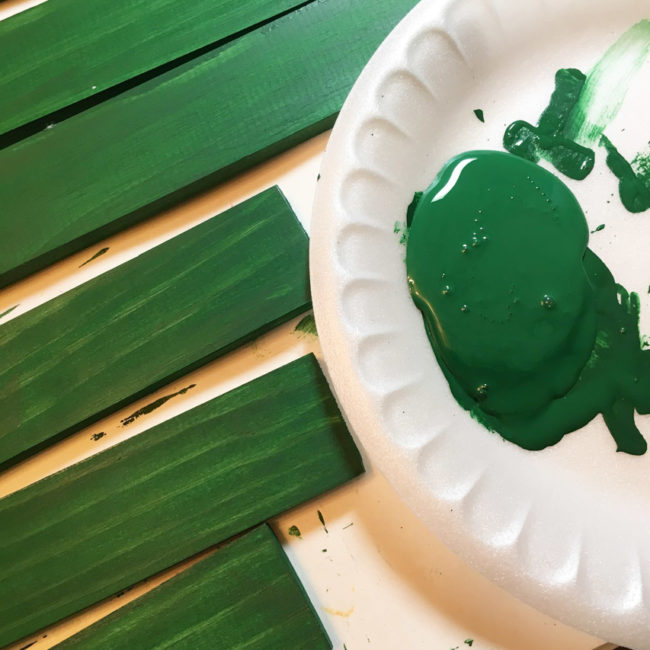
I started by cutting the craft wood into the following lengths: 6″, 9″, 12″, 14″, 16″ and 17″. Then I trimmed the 1″ x 2″ pine board to 26″ in length.
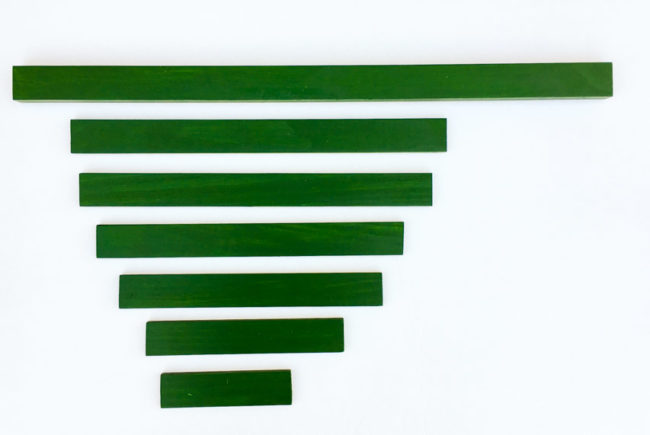
I used the Americana satin paint (made by DecoArt) in multiple thin coats applied with a foam brush to get a nice smooth finish on the boards.
After the paint was dry, I laid out my boards in the arrangement for the tree. Then I started decorating my tree! I used Button Shank Removers to cut off the stems from the Haberdashery buttons, and filled in around them with buttons from the 28 Lilac Lane bottles and kit. Tiny green sequins from the Yuletide Greetings bottle added nice little sparkly highlights around various areas of the tree, too!
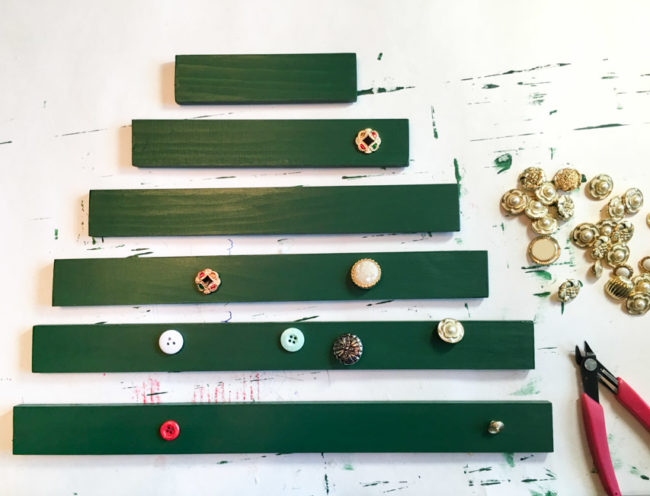
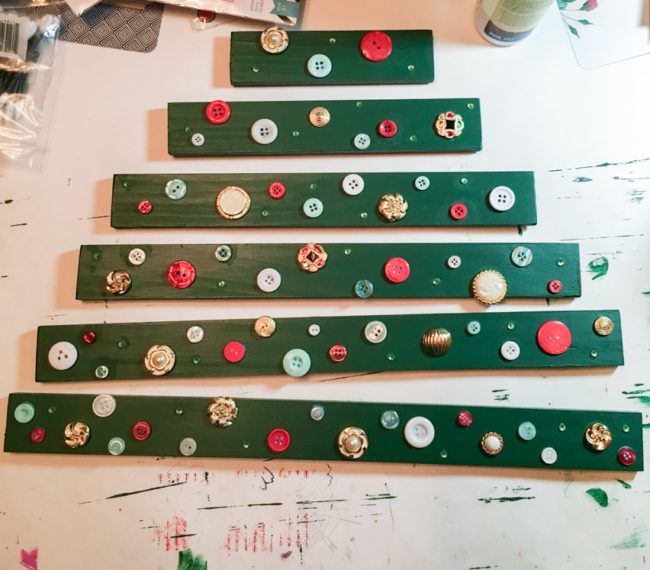
When it was all glued down, I was left with this! Notice how I hung some of the button “ornaments” off the edges of some of the wood branches to add some interest.
Attaching the branches to the stem was super easy with the Velcro. First, I cut 1.25″ squares from the Velcro. Then I measured and placed a mark at the center of the back of each “branch”. I peeled one side of the Velcro and adhered it centered vertically on the branch, using the center mark to get it centered left to right.
Then I peeled the second side of the Velcro and pressed the branches into place on the tree’s “trunk”. Once they were in place, I glued a big gold button to the top of the trunk as my tree’s top.
Painting the pot is fast and easy! I just dipped a paintbrush in water and then into the white chalk paint. This diluted the paint and when it spread, it created a whitewash effect. In areas that it didn’t spread as much as I would like, I just dipped the brush in water again and used the water to dilute the paint a bit more.
To create a second layer of paint for a mottled effect in the whitewashing, I repeated the technique with the more cream colored chalk paint. This time I just dabbed the paint instead of trying to fully cover the pot, and it created the textured look below.
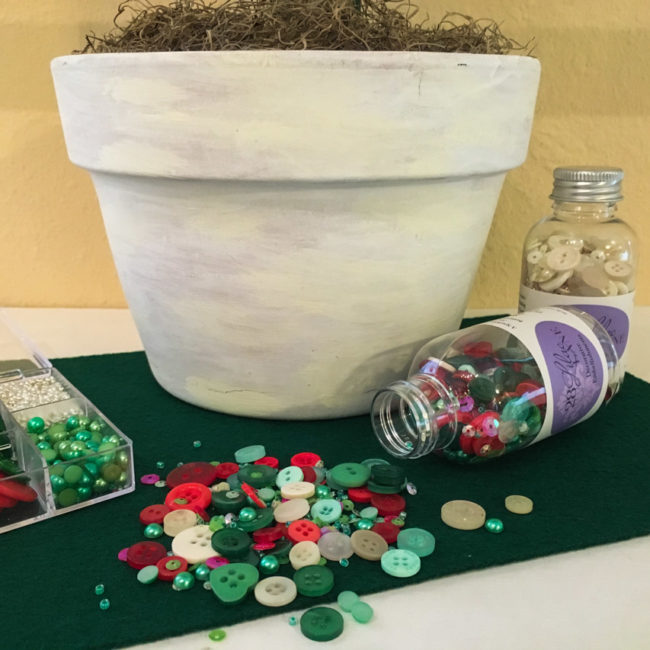
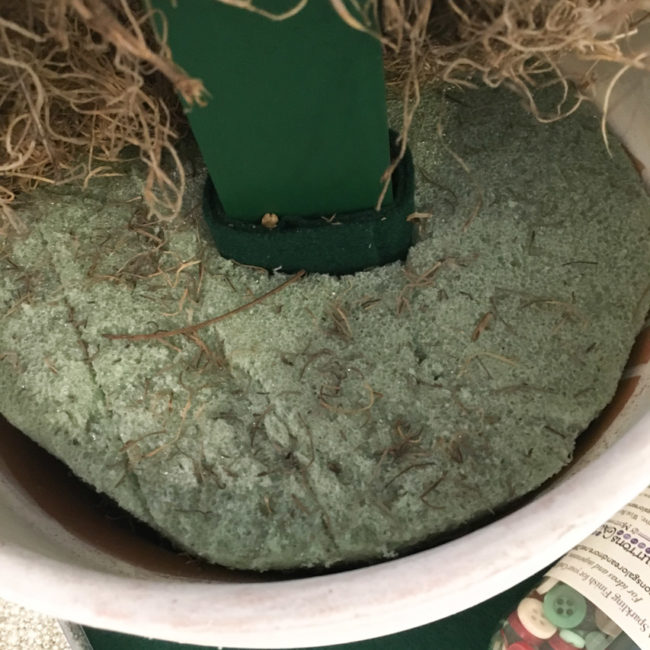
The base is part of what makes the pallet Christmas tree collapsible. I trimmed the foam so that it fit nicely into the pot, and then carved a hole down the middle of it for the tree trunk. To make the fit nice and snug, I wrapped the trunk in a strip of felt. This method makes the fit adjustable as wear and tear erodes away the foam base!
For the finishing touch, to hide the foam, I covered it in a layer of moss.
This faux pallet Christmas tree is the perfect decoration for a buffet table, an office, or a kid’s bedroom! There’s so many places to use it…where will you put yours?
Now, it’s time to get hopping to see more holiday decor ideas. But before you go…how about a giveaway? Here’s a peek at the huge assortment of prizes that are up for grabs!
Use the Widget below for your chance to enter!
Thanks to all of our fellow sponsors!
Now…click here to visit the next stop on the hop – or click below to see the entire hop list:

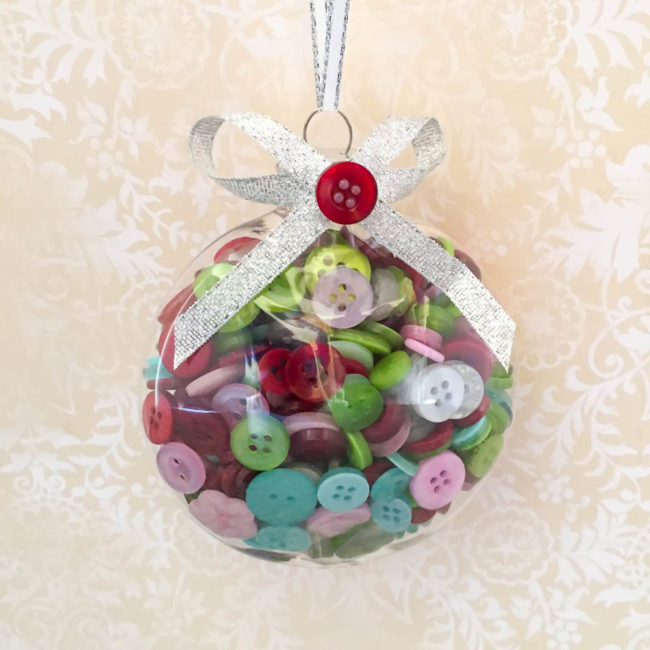
The days are ticking down to the start of the holiday season! Today, we’re going to kick off the holiday crafting season with a fun Christmas ornament full of buttons!
Supplies:
To make this ornament, I started with a clear acrylic Christmas ornament from a local craft store. These sorts of ornaments are widely available during the holidays and have removable tops because they are designed to be filled. The one I chose to work with was round, flat, and about 3/4″ thick.
For my buttons for this project, I had three beautiful new holiday Button Bonanzas to choose from! I chose “The Merriest”, a delightful combination of pastel blue, light pink, lime green, bright red and white. These colors will have beautiful pop against the dark green branches of a Christmas tree!
Making my button filled Christmas ornament was super simple! I started by filling the ornament with a selection of small buttons from “The Merriest” and replacing the top.
To decorate the top, I first wrapped a small piece of silver ribbon around the neck of the cap and secured it with my hot glue gun. Then I made a bow by looping another length of the ribbon, and secured it with the hot glue as well. Finally, I used hot glue to attach a button to the center of the bow.
This cute Christmas ornament is just a pretty decoration – it also doubles as a fun little gift for a crafter! After it’s done being decorative for the season, the recipient can just remove the top of the ornament to empty it out and enjoy using all these gorgeous button colors year-round.
Who do you know that would love a buttoned up Christmas ornament this year?
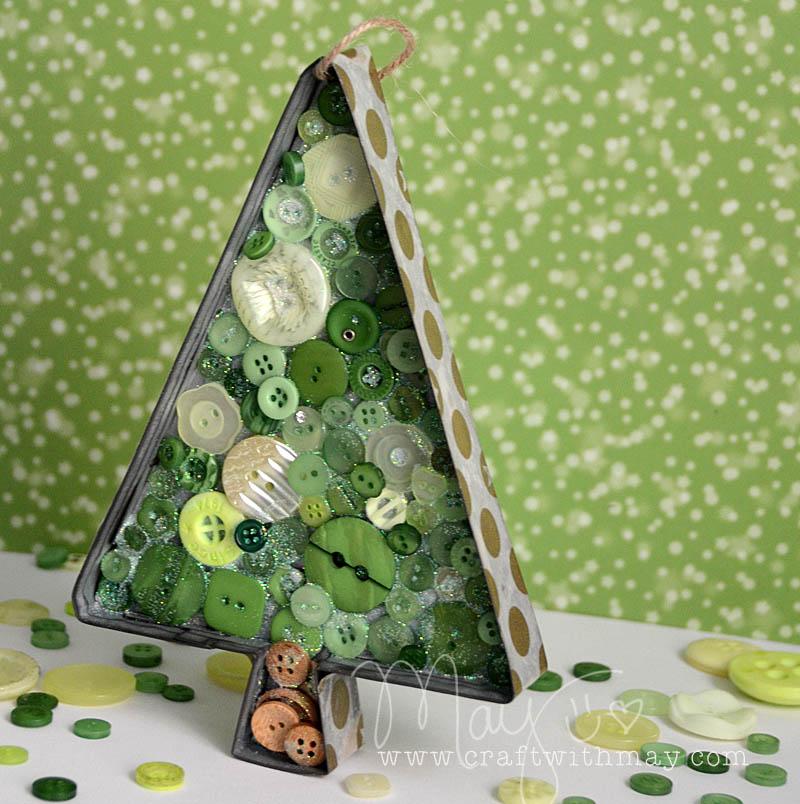
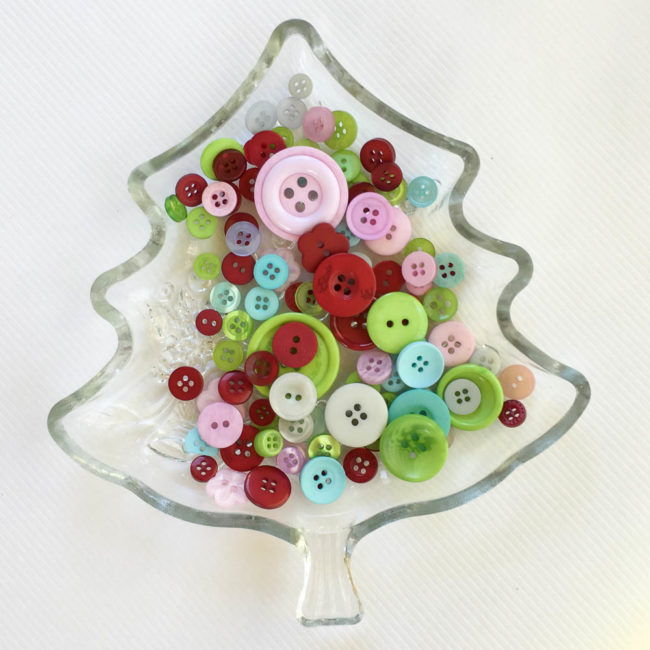
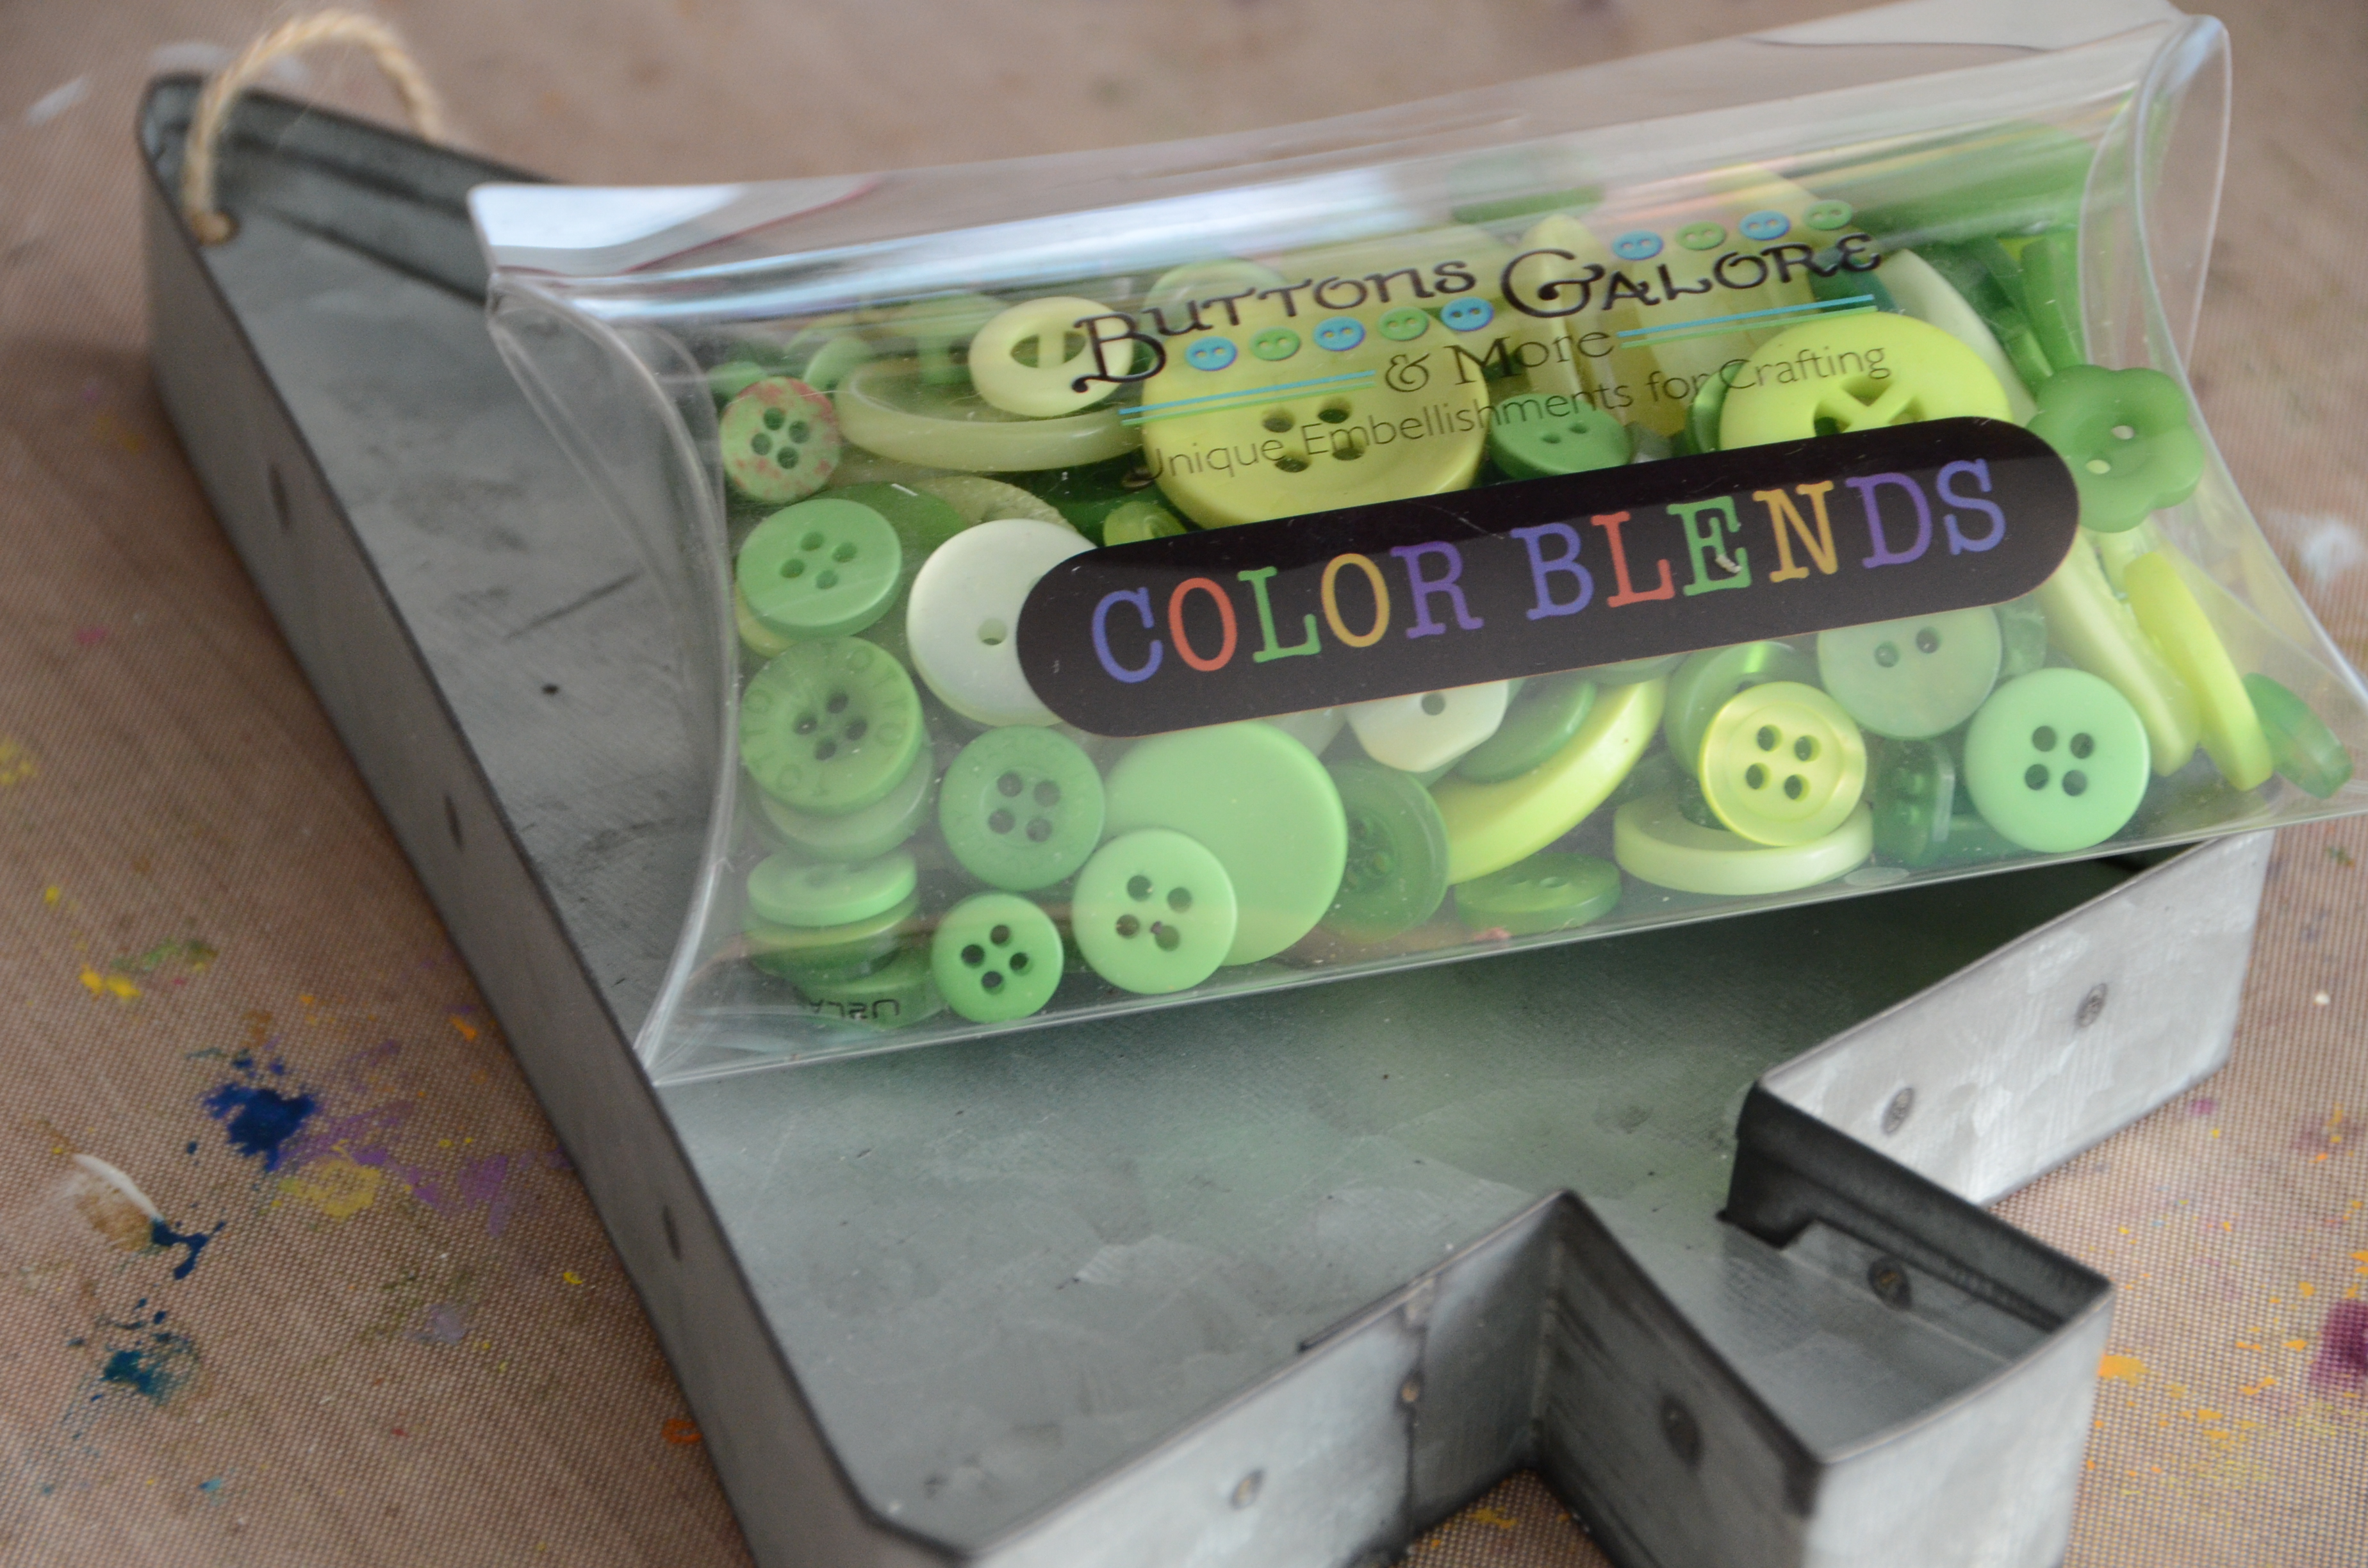
If you’re wondering what to do with all of the metal christmas tree ornaments and décor shapes showing up in the local craft store the answer is simple: button them up! I had so much fun with this Christmas tree ornament project – and it really is simple and fun to do. In fact, my kids (8 and 10 years old) have made these kinds of projects themselves as well! Of course my favorite buttons these days are the color blends – and this is a perfect project to showcase them.
Supplies:
Steps:
Step 1: Cover the outside with washi tape.
Tip: Seal the edges with matte finish liquid adhesive so that it doesn’t come loose.
Step 2: Put a thick coat of liquid adhesive inside the shape. If there are unsealed edges be careful to either keep the adhesive away from the edge.
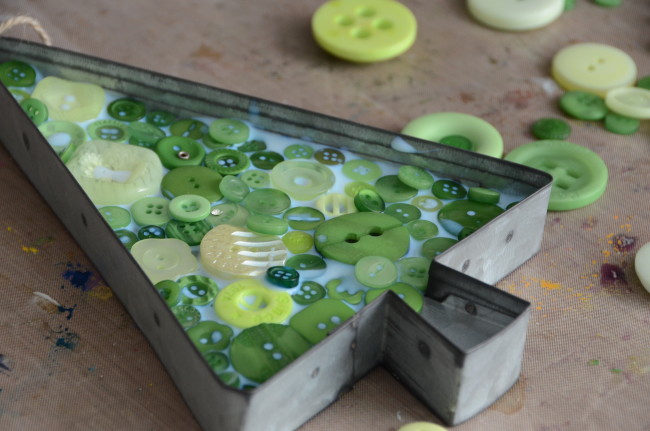 Step 3: Fill the shape with buttons! I used wood buttons for my trunk, and the beautiful green buttons all over the tree area.
Step 4: Layer a few small buttons if there are bigger gaps showing, just add a bit of liquid adhesive to the back of them when you set them on.
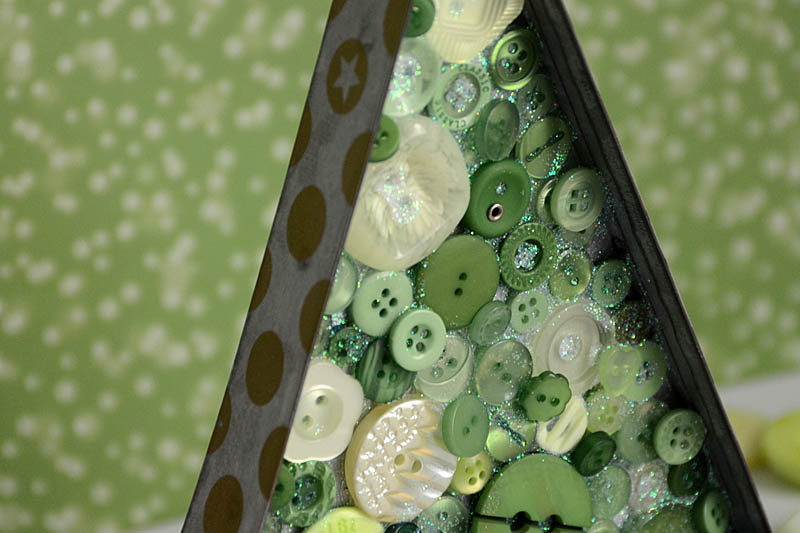 Step 5: Finish by sprinkling a bit of glitter if desired – this adds sparkle and will fill in any small crack areas.