Header

Archive | Back to School

Sequin Filled Bookmarks Shake Up Your Summer Reading

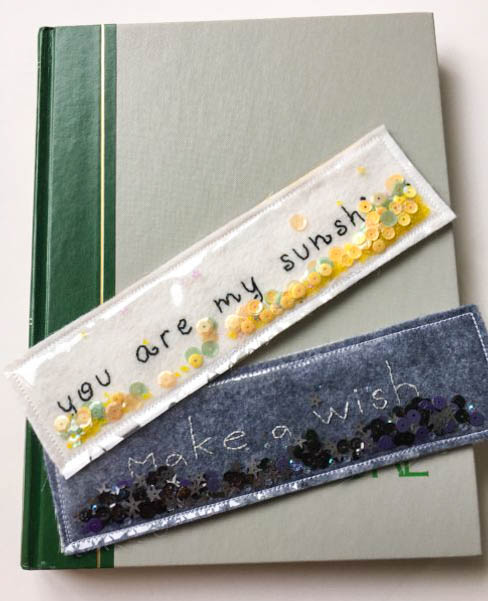
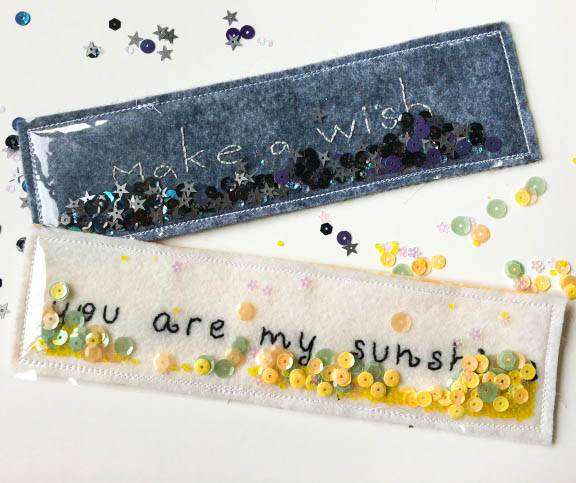
Aimee here with a great beginner sewing project for adults and children! These sequin filled bookmarks make a perfect little gift for all the book-lovers in your life.

sequin filled bookmarksHere’s what you need to make your own sequin filled bookmarks:

LL628_Pastel Dreams Quartet

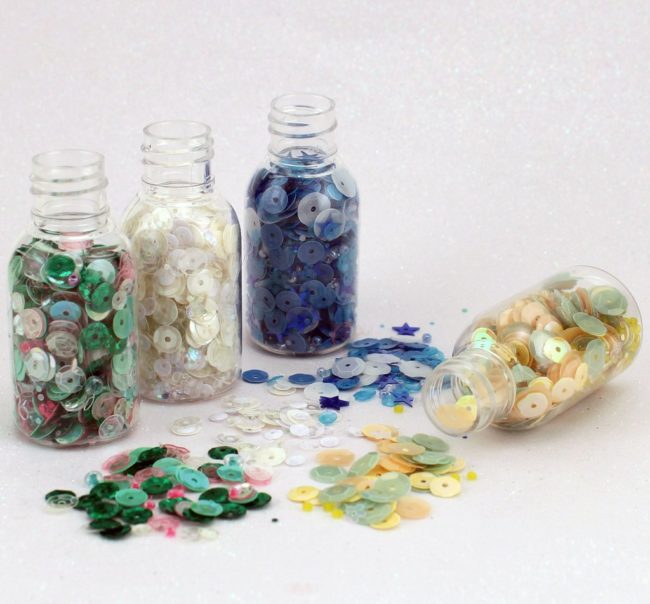
This project uses two gorgeous new 28 Lilac Lane sequin products: the “Haunted House” Premium Sequin Tin, and the yet-to-be-officially-announced“Pastel Dreams” Sequin & Bead Quartet that is pictured above. (Yes, you are getting a sneak peek of a new product today!)

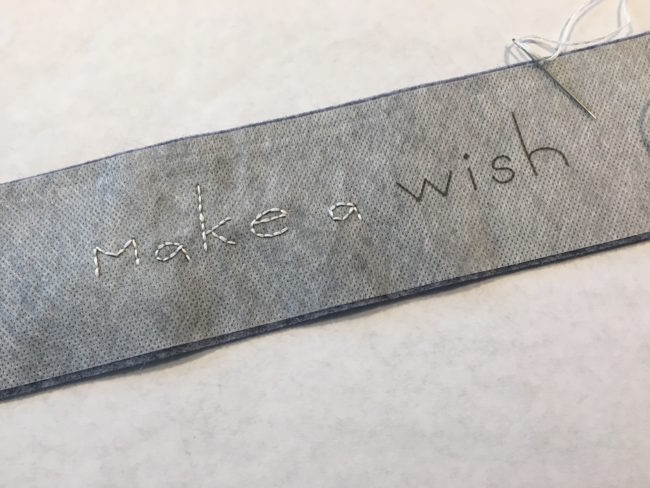
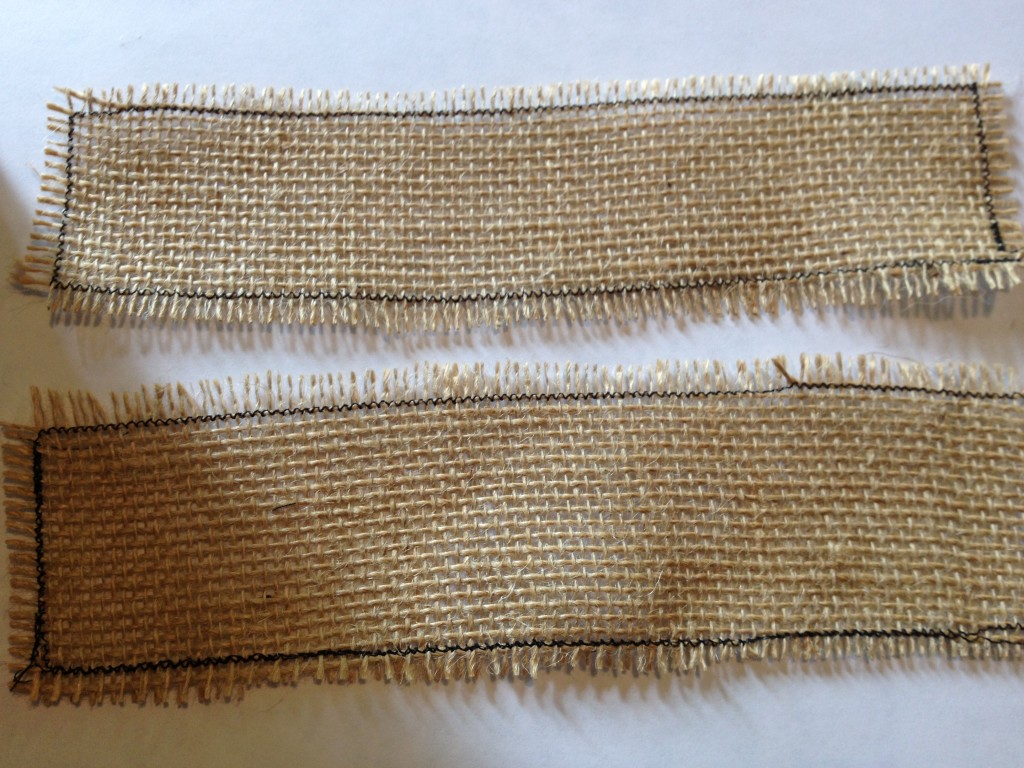
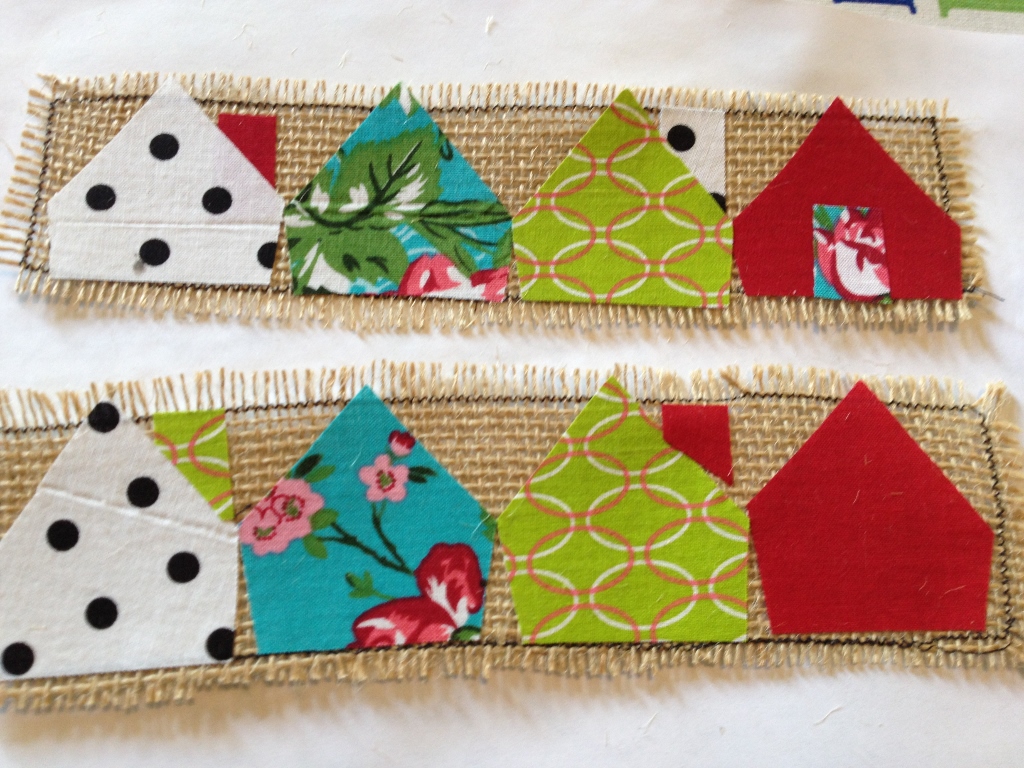
To begin, take your pattern (linked in the supply list) and using the dotted lines cut out your felt, clear vinyl and fabric pieces. To transfer the embroidery design to the felt I recommend using Fabri-Solvy. To use, print out the pattern following the directions on the package, tear off the backing and place your rectangle on top of the corresponding felt. Using three strands of embroidery floss; stitch through the felt and the Fabri-Solvy along the text with a back stitch.

Don’t want to embroider? You can easily adapt this project by printing the pattern onto cardstock. Cut out your bookmark along the dotted lines and continue the following directions. Most sewing machines will sew just fine through paper.

Now it’s time to put your sequin filled bookmark together. Lay your three pieces in this order: fabric (wrong side facing up), your felt embroidered piece (or your piece of printed card stock) and your piece of clear vinyl. Use a Wonder Clip or even a small clothespin to hold the layers together, and take it to your sewing machine.

Start your seam on the bottom long edge, making sure that you are leaving a hole to put the sequins and beads in. Stitch all along the three edges about 1/4 inch from the edge. (Tip: if you have a walking foot, this is a great project for using it.) Fill up your bookmark with the sequins and beads. I used roughly one tablespoon. Take it back to your machine and sew up the hole and all the way around the sides again. (This sewing could also been done by hand but it will be more time consuming, of course.)

sequin filled bookmarks

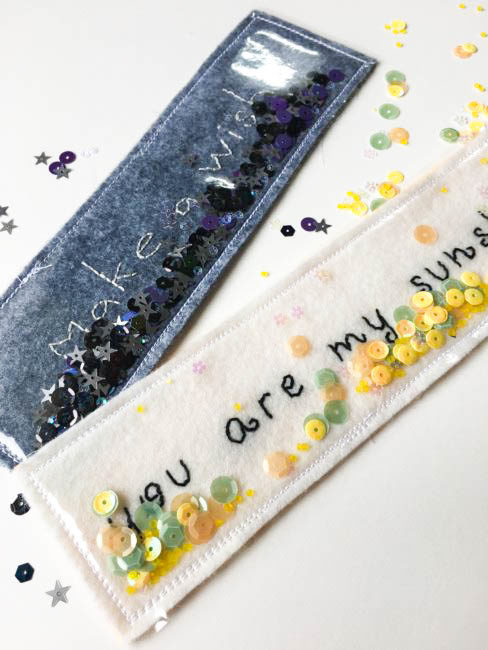
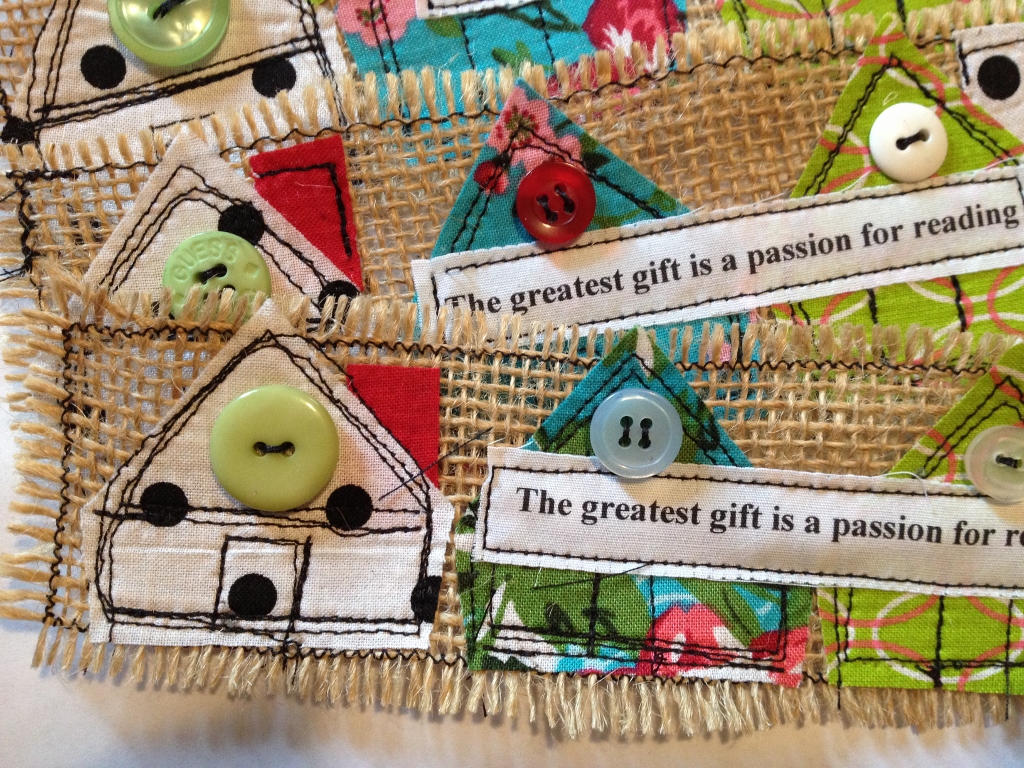
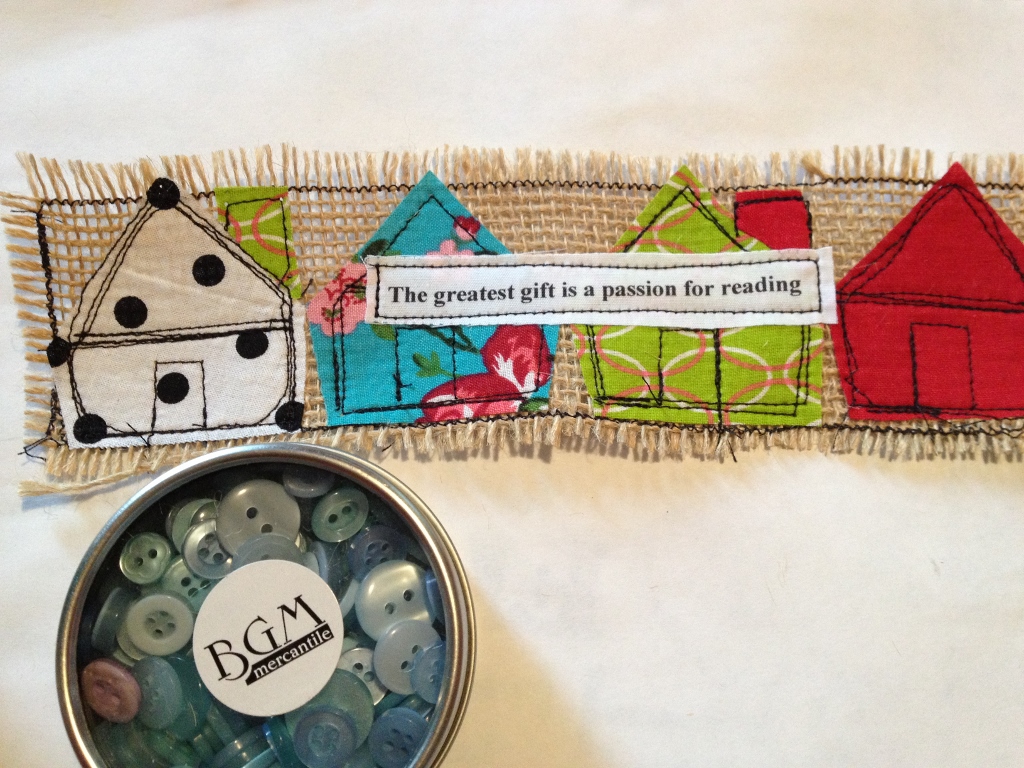
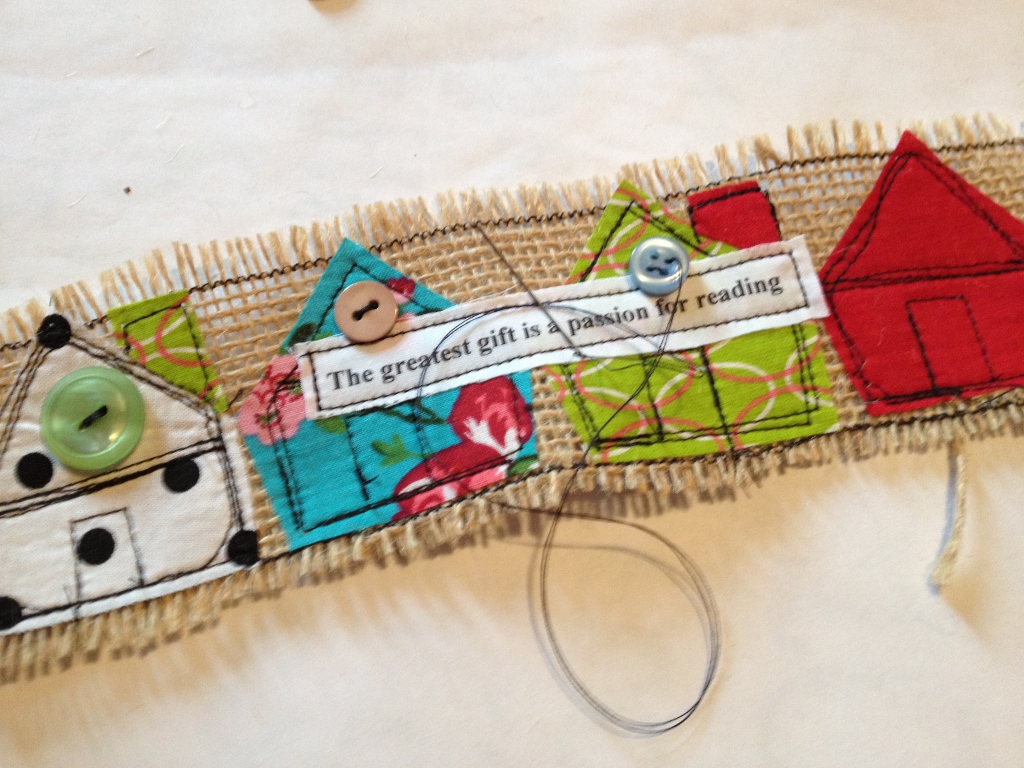
There you go! Your sweet sequin filled bookmark is all ready for your next great summer read. (These also make fun back to school teacher gifts, too, if you change up the sentiment on them!)

sequin filled bookmarks

0

Make A Pretty Button Basket for a Teacher Gift!

It’s that time of year to think about a teacher gift! Today’s project will show you how to take an inexpensive basket available at any craft or discount store, and turn it into a beautiful back-to-school teacher gift.

Teacher Gift Basket

Supplies:

The basket that I used was a simple wood woven one that started out as unfinished wood. It cost less than $3 at a local craft store! It was the perfect size to hold a 15 ounce potted plant from the local home center.

woven basket

Start your teacher gift basket project by using a paint brush to apply the wood tint or stain to the basket. Be sure to use the brush to push the stain down into the cracks in the weaving so the basket’s original color won’t show through! Wipe off any excess tint and leave to dry.

While the basket is drying, select from your Button Bonanza bag a grouping of buttons that are approximately the same size and that will fit around the front edge of the basket. (You only want to do the front edge of the basket so that the handle will still be able to be put down.)

Once the basket is dry, use a hot glue gun to adhere the buttons around the top edge of the front of the basket. (Make sure to leave clearance for the handle to go up and down!)

A beautiful bow is the final touch to make your basket special. Tie a bow using some ribbon and snip off the ends at an angle. Use the hot glue gun to adhere the bow to the front of the basket.

Your completed teacher gift basket can be used to deliver a wide variety of gifts to teacher: a small plant, an assortment of snacks or school supplies, or useful goodies like hand sanitizer and wet wipes.

Teacher Gift Basket with Plant

Change up the color scheme a bit (such as by trying red buttons with green ribbon) and this basket will make a great way to deliver a small gift for Christmas or another occasion!

What occasion will you make a button gift basket for?

0

Make a Flower Pot Pencil Holder for Teacher!

On Tuesday, we shared a tag that is perfect for giving a back-to-school gift to your new favorite teacher. Stumped for an idea for a gift to attach it to? We’ve got the perfect gift idea – an easy to make Back to School Flower Pot Pencil Holder that is a pretty as it is useful!

Back to School Flower Pot Pencil Holder for teacher gift or classroom decor. | Nancy Nally for ButtonsGaloreAndMore.com

Supplies Needed:

This flower pot pencil holder is made from a basic small clay flower pot, available at any home center or craft store, that is painted with chalkboard spray paint. To spray paint items like this, I use a scrap of 1×2 board left over from a project and turn the pot upside down onto the end of it. Then I can take the item outside, hold it extended arm’s length away from me, and rotate it while spraying. This gets me good coverage with minimum mess and clean up, and I can get all the edges. To let it dry, I just prop the stick up against something with the pot still on top of it.

Once the painting is complete (I recommend two light coats) and dry, the rest was super fast and simple! Just grab a hot glue gun and get to work gluing the buttons around the top rim of the pot. Cut the shanks off of the apple buttons, and insert one of them periodically. Make sure to use enough glue that they are attached securely!

Back to School Flower Pot Pencil Holder for teacher gift or classroom decor. | Nancy Nally for ButtonsGaloreAndMore.com

Finally, rub the bottom area with the side of a piece of chalk and then clean it off to “prime” it so that it can be written on. I chose to write the teacher’s name but you could also write instructions like “please return”. That’s one of the best things about using the chalkboard paint for this design – it’s not just classroom themed, it’s also useful!

The flower pot pencil holder will likely have a small drainage hole in the bottom of it. If you are concerned about things falling out through the hole when the pot is moved, cut a small circle of cardboard (such as from a recycled cereal box) and glue it into the bottom of the pot.

School will be here before you know it! Grab your 3D Apple Buttons and Primary Button Bonanza and start crafting your flower pot pencil holder for a beautiful classroom!

0

Hit the Books with a Back to School Tag!

With July 4th gone, that means for many of us the summer is officially half over. It’s already time to start thinking about back to school! Our cute back to school tag is perfect for teacher gifts, first day of school lunches, and decorating backpacks!

Back to School tag with button collage | Nancy Nally for ButtonsGaloreAndMore.Net

Making this tag is so quick and simple – the kids can help! Die cut the tag base and hole reinforcer out of patterned paper, and glue them together. Attach tab and alphabet stickers across the bottom of the tag. (Instead of “hello”, you could substitute a name, or the year if you’d like!)

To make the button collage on our back to school tag, use a die cut machine (I used my Cricut Explore) to cut an apple shape out of red cardstock that matches the “Red Hot” buttons. Spread a nice thick layer of the PPA Matte Adhesive all over the fruit of the apple. Begin to fill it in by carefully selecting various sizes of the buttons to fill as much of the space as possible. Push the buttons down into the glue to make them really secure!

Teacher Tag for Back to School | Nancy Nally for buttonsgaloreandmore.net

Once the glue is dry on your apple collage, glue it in place on your tag! For the finishing touch, slip a piece of ribbon through the tag’s hole and secure it with a staple.

To make this back to school tag double-sided, select a double-sided paper (like this one) for your tag base. Or cut a second tag from the die and glue them back-to-back.

Whose back to school are you going to make awesome with an apple button collage tag?

Supplies Needed:

  • Buttons Galore “Red Hot” Button Basics
  • Bella Blvd “Tiny Tots” Alphabet Paper
  • Bella Blvd “Simply Spring” Eggstravaganza (plaid paper)
  • Bella Blvd “Tiny Tots” Treasures & Text stickers
  • Momenta kraft alphabet
  • Red Cardstock
  • Sizzix Tim Holtz Alterations “Tag & Bookplates” die
  • Cricut Explore machine & apple cutting file
  • PPA Matte Adhesive
0

Back to School Photo Frame by Lorrie McCullers

Today we’re joined by designer Lorrie McCullers, who is sharing a back to school project that is both a countdown calendar and school picture frame! 

It’s back to school time! And what better way to keep track of time until the big day than with a countdown frame?

back to school frame I used three sets of buttons for this project: the School Value Pack, the Primary Grab Bag, and the Primary Tiny Round Buttons. I also used a pre-colored acrylic frame so there was no need to paint!

buttons galore buttons

Supplies needed:

Buttons Galore School Value Pack
Buttons Galore Primary Grab Bag
Buttons Galore Primary Tiny Round Buttons
Deflecto acrylic 5”x7” frame
Aleene’s Liquid Fusion glue
button shank remover
dry erase pen
computer and printer (optional)

Directions:

  • Choose your larger buttons first. That way, you can fill in the empty spaces with smaller buttons.

  • Some of the buttons in the School Value Pack and the Primary Grab Bag have shanks on the back. To have your buttons lay flat to the frame, remove the shanks with a button shank remover.

  • Apply Aleene’s Liquid Fusion to the back of each button. Don’t apply too much or the glue will ooze out the sides of your buttons! Let dry for about 24 hours.

  • Print (or handwrite) a countdown for the first day of school, such as “____ days until school begins” or “School starts in ____ days!”

  • Keep track of the days with a dry erase marker. Acrylic frames are so great because you can just write on and wipe off!

school-picture-frame

After school starts, you can then use your project as a frame for that first day of school picture of your kiddo! Since the dry erase marker comes right off, you can use this frame year after year. This is a great project for kids to help with as well as a fun gift idea for a favorite teacher!

Lorrie McCullers is a paper crafts designer who blogs at Forty11 Designs. She is a Craft & Hobby Association Designer Member and currently designs for Etch All and Deflecto Crafts. To see more of her work, visit her blog

0

It’s Time for a Back to School Photo Frame!

Today we are joined by blogger/designer/instructor/author May Flaum, from www.craftwithmay.com, who is sharing a back to school project with us. – editor

When I have supplies not being used, I try to envision a purpose and make it useful. In this case I had a small 5×7 chalkboard that has been sitting around way too long. Since I don’t see myself using it as intended, I decided to convert it into a photo frame for this school picture.

May Flaum button frame

This is one of my favorite ways to use buttons, and it’s a super quick and easy project too! It will work on any flat wood frame, and I love how it turned out. The less you think about perfect button placement, and the more you just fill the space and enjoy – the better it will turn out!

I worked with the beautiful Vintage Vogue buttons and I really liked how quick and easy they made this project.

Buttons Galore Vintage Vogue buttons

Supplies Needed:

How-to:

1. Paint frame with white paint if desired

2. Apply a liberal amount of liquid adhesive around the wood frame.

May Flaum button frame step 3 3. Start with large buttons, place at random in a few places. Then fill in spaces with medium and small buttons.

May Flaum button frame step 4 4. Add more adhesive as needed, place buttons until all spaces are full. If there are any awkward gaps, layer a button on top! Once satisfied, set aside and let it dry fully before adding a photo.

May Flaum button frame close up

To learn more about May Flaum, see more of her projects or take one of her online classes, visit www.craftwithmay.com

0

Button Up a Teacher Gift in a Flash

Earlier this week I shared this project on my blog for Craft Lightning.  It shows you how to button up a teacher gift in a flash which makes it perfect for Fifteen MINUTE Friday!  Score!!!

I used the buttons from the Laura Kelly BRIGHTS collection.  You can get them HERE!

Jar_Wire_Buttons

Just think of all the things you could put in a jar that a teacher would love.  Here are my top ten ideas!

  1. Candy or Gum
  2. Desk Supplies
  3. Gift Cards
  4. Markers
  5. Lotions and Body Spray
  6. Sprinkles for Cookies
  7. Homemade Drink Mix
  8. Colored Pencils
  9. Sharpies
  10. BUTTONS!!!

Isn’t is adorable with all the other fun jars?

CraftLightning_RecycledTeacherJars

Teacher appreciation is coming up soon.  Are you ready?  I think you should recycle some jars and add a few buttons to create some handmade awesomeness for those who care for your kids all day every day!

Cheers,

Laura


0

Felt Flower Clips

These cute little felt flower clips are great to create and make for Teacher Appreciation and Mothers Day gifts.  They are easy and fun!

Felt Flower Clips BGM

You only need  BUTTONS (I used my Laura Kelly Brights Mix) giant paper clips (could use little ones too of course), felt (I used Kunin Group) and Aleene’s Max Tacky Glue.  Cut out your felt flower layers then glue them together.  Add a few buttons and wa-lah, you have super cute clips that can be used to hold paper together.

Steps

They make great bookmarks too and would be fun packaged with a journal or a cookbook or a gift card to a book store.  I love this one packaged with a writing journal to give to a teacher.

Journal

What other ways can you think of to use these giant clips.   I wonder how they would work to hold bags of chips closed.

Happy Creating,

Laura


1

Movember Mustache Craft for guys

mustache notebook craft idea movember

Movember is here again,  and it is a great  time to make crafts for guys.  Former Designer for Buttons Galore and More designer friend Jen Goode of  http://www.100directions.com designed a mustache stamp wheel from Clearsnap so you can get your mustache creativity going all over the place. AND, she has  asked a group of designers to create whatever they’d like to make, showcasing this fun craft tool and her stamp.  One of my favorite things to do with the rollagraph is to make my own pattern paper.  I used a piece of kraft card stock to make the cover or this journal.  My son is in 5th grade and they have to keep a reading journal.  I thought this would be perfect for him.  Man was I right.  He took it to school last week and I have a request for 4 more.

Materials to make Movember mustache craft:


Movember mustache craft idea supplies


I used the Sharpie markers to make my own name plate, The thin Glue dots to adhere the buttons, and the name plate.  The rollagraph to create the pattern paper for the cover and scissors to trim the edges.  You can use a craft knife too.

Mustache craft with name plate

3

Retro Cherry Shoe Clips

Sometimes I feel like September is really new year.  Back to school time calls for getting organized and cleaning out closets.  As I was purging my closet, I found a pair of cute, polka dot shoes.

Shoes Before

On their own they are pretty cute but, being the crafter I am, I couldn’t leave well enough alone so I was off to the studio to create some jewelry for my shoes.

Shoe Clips Beauty

You can buy shoe clips blanks at most craft stores. Buy a dozen.  I promise you are going to be addicted to the craft once you find out how easy it is to do.

As for buttons, Buttons Galore & More’s large supply of novelty buttons means the possibilities are endless.  Turn your favorite pair of shoes or pumps into cute retro shoes with cherries, decorate your child’s shoes with back to school buttons, or get a jump-start on the holidays and make some Christmas themed shoe clips.  By simply adding shoe clips, you can turn one pair of shoes into endless looks.

Supplies for shoe clips

Instructions for shoe clips

1. Glue a novelty button onto a plain button.  Set aside to dry.

Glue novelty buttons onto shoe clip

2. Once buttons are securely glued together, attach your button creation to the shoe clip blank.  Make sure the button is glued onto the clip so that when you clip it onto your shoe, the design is oriented in the way you want it.

Glue button onto shoe clip

TIP: Once you have glued the button onto the shoe clip blank, set it upside down onto a clean surface to dry.  This will keep the buttons from sliding off the shoe clip while drying.

3.  Once the clip is dry, attach it to your shoes and skip down the street.

Shoe Clip Close-Up

To get more button craft tutorials, recipes, and lifestyle tips, visit my blog at www.laurabraydesigns.com.

Visit Laura Bray Designs at http://laurabraydesigns.com

0

Quilting Arts Bookmarks

Bookmarks up close (1024x768)

Quilting Arts Bookmarks – A recent post on Facebook asked “do you give teacher appreciation gifts for teachers at the beginning of the new school year?” While completing a quilted inspired pillow recently, it occurred to me that I could use the scraps to create a fun bookmark that any teacher would love and appreciate.

Quilted Arts Pillow 1 (2)

I am seriously loving the Dresden applique look that I am seeing on so many inspirational blogs and Pinterest.  Some inexpensive fabrics sold by the fat quarter caught my eye at Walmart the other day and I knew they would be perfect for this Dresden pillow project. I cut lots of Dresden shapes using a pattern and had several leftover.

Leftover Dresden shapes

How to make Quilting Arts Bookmarks:

So, what to do with these fused pieces of shaped fabric? Quilting Arts Bookmarks, that is what.  How about creating a row of houses on a burlap bookmark? (I had this out already too since I created the pillow back and front from burlap).

Cut house shapes from fabric

Trace a rectangular shape onto burlap using a cardstock rectangle pattern (mine were approximately 2 1/2″ x 9.” Leave some room on both the short and long edges for fraying. I used a permanent black marker to trace my shapes. You can also use a rotary cutter and self healing mat in lieu of the cardstock pattern if you wish.

Traced burlap (1024x746)

Cut the shapes out and zig zag stitch the edges approximately 1/4″ from edge to leave some room for fraying. once you fray the edges, the stitches will stop further fraying.

Sewn burlap edges

Now you can use your iron and pressing surface to fuse the house shapes to the burlap. Peel off the paper backing and fuse in place.

8.20.13 053 (1024x768)

Now its time to back to the sewing machine and free motion stitch the house details. Often, you will notice that artists who free motion stitch intricate details such as text, intricate shapes (think animals, arm-chairs,etc) will use a free motion foot. But I have discovered that you can stitch simple free motion shapes with your regular sewing foot. After you have stitched your details, its time to sew on your inkjet fabric sentiment.

Inkjet fabric quote

You can purchase specialty inkjet fabric that is paper backed so it’s easy to use with most inkjet printers. I love this sentiment because its so basic, but I also found another great one that would be perfect for educators. “If you can read this, thank a teacher.” How true!!

Buttons Galore and More (1024x768)

Last but certainly not least and once again the perfect finishing touch, add buttons from a variety of the wide selection from Buttons Galore and More with a hand sewing needle and thread.

Sew on Buttons (1024x768)

Make the Quilting Arts Bookmarks in multiples using your fabric scraps, burlap and buttons to thank those  teachers for all the hard work they do!

Live Life Creatively,

Melony

0

Organizing with Nautical Buttons

Try organizing with nautical buttons.

Keep your supplies stored in style this year!

Create a fun storage tray for pencils.

Supplies for Organizing with Nautical Buttons

Additional Supplies

  • Patterned Paper – Tommy Collection, Cardstock (Honey, Cranberry, Outdoor Denim), Burlap Ribbon, Chipboard Arrow – all from Close To My Heart
  • Bling – Want2Scrap Sleek Strips Silver Rhinestones
  • Twine – Doodlebug Design Doodle Twine
  • Ink – Copic R46, R29, C3, C4, Blender (0) and SP05 Multiliner, Cantaloupe and Bahama Blue Memento Dye Ink (Tsukineko)
  • Adhesive – Scor-Tape (Scor-Pal Company) and AdTech Adhesive Hot Glue
  • 3d Pencil Box with Wrap SVG – Designed by Jamie Cripps (Silhouette Online Store)

Create a fun storage tray for pencils.Create a fun storage tray for pencils.Create a fun storage tray for pencils.

Directions:

  1. Cut two outer panels, one of the Tommy themed paper – one of Outdoor Denim (both from Close to My Heart). Adhere together with Scor-Tape. Save leftover patterned paper – on the back there is a word strip that is used in the embellishments. Note – the Outdoor Denim liner is a special addition – it gives the box a little bit of added sturdiness.
  2. Color numbers of choice using Copic Marker R29 and R46. Add shadows with C3 and C4. Add accents with Blender pen and Copic Multiliner.
  3. Cut insert from Honey Cardstock. Assemble and attach to the outer portion of the box.
  4. Cut band from Cranberry Cardstock.
  5. Loop twine through Anchor button and tie through red button. Adhere red button to Ship’s Wheel button using AdTech Adhesives hot glue.
  6. Adhere burlap ribbon and buttons with AdTech Adhesives hot glue.
  7. Ink Chipboard Arrow (From Lucky Level 2 Assortment – Close To My Heart) with Cantaloupe Ink and edge with Bahama Blue Ink (Tsukineko – Memento Dew Drop). Adhere with AdTech Adhesives hot glue.
  8. Choose sentiments from leftover Tommy paper and “pink” edges. Attach to burlap using AdTech Adhesives hot glue.
  9. Outline numbers with Sleek Strips Silver Rhinestones.

Create a fun storage tray for pencils. 

Note – for additional assistance assembling the box, Jamie has a wonderful tutorial on her blog.

http://www.jamielanedesigns.blogspot.com/2013/07/pencil-box-with-wrap.html

 Thanks for joining me today. Hope you have fun getting organized in style.


* * * * * * * * * * * * * * *

Linking up with Transformation Thursday


TT logo

1

Buttons and Back Packs

Instead of jewelry this week, I’m playing with paper and buttons. I must say, buttons and back packs go together pretty well!

Buttons and Back Packs

Buttons and Back Packs

Buttons and Back Packs

I created the backpack and inked the edges with Tea Bag ink. I dyed a wooden button and cut the shank off. The bag was then decorated with patterned papers and fun embellishments. To lift the bag up a little, I created little feet by gluing Coffee and Rustic Coconut Shell buttons together.

Now, it’s time to fill it with goodies for the teacher!

Buttons for Back Pack

HAB701-2

Hand Carved Wood Buttons

Additional Supplies

Canvas Shapes, Wood Shapes and Cork Tags (Little Yellow Bicycle), Champagne Cardstock, Tea Bag Ink, Patterned Paper (Close To My Heart), Brads (Creative Impressions), Twine – My Mind’s Eye), Letters (EK Success), Flower (Petaloo), Back Pack Template (SVGCUTS.COM)

Adhesive – Scor-Tape and AdTech Hot Glue Gun and Glue Sticks

3

Back to School Embellished Pencil Pouch

Send your kids back to school in style with my embellished pencil pouch.  Who wants plain old school supplies when you can have some with a little flair?  You daughter will love showing off this little pencil pouch to her friends this school year.  The best part is that it only takes a few minutes to add this little embellishment.  You could coordinate a backpack or other back to school accessory to go with the pencil pouch as well.

back to school embellished pencil pouch

Back to School Embellished Pencil Pouch Supplies

  • Pencil pouch (mine came from the Dollar Tree)
  • Felt (I used zebra stripes felt)
  • Button in your choice of color
  • Needle and thread
  • Scissors, Sizzix die cutter, or other ways to cut circles

Back to School Embellished Pencil Pouch Instructions

I have a treat for you all today.  I am not going to just tell you how to make this great back to school accessory….I am going to SHOW you.  Come on over to my house and grab a glass of sweet tea.  Sit back and watch this short (less than 4 minute) video to see how to make a pencil pouch of your own.  The video is captured live and is just me sitting and crafting along with you all.  It is the equivalent of you coming to a crafting party at my house…if it was possible to squeeze all of y’all in here.  So come on over and craft along with me.

http://www.youtube.com/watch?v=kHod6JPk3Nc

Did you have fun?  Come back anytime y’all and craft with me via video.  I love inviting my readers into my home with fun live videos.  Plus when it is live there is no retakes.  Just me, the camera, and some crafty fun.  I have included a close up shot of the finished flower embellishment below in case y’all had a hard time seeing it on the video.

back to school embellished pencil pouch-001

I hope you will add these fun flower embellishments to your daughter’s back to school supplies this year.  What a fun and unique way to carry your pencils and even books.  Grab some felt and have fun going back to school this year.

3

Back to School Homework Organizer

It’s back to school time already!  How can that be?  Every year I promise myself I’ll be more organized, so this year I designed a homework organizer for my daughter to keep all her homework supplies in.  It’s so cute, I think my daughter might even be motivated to do her homework!

Make a Back to School Homework Organizer with Buttons Galore

Supplies for homework organizer

  • Wood crate
  • Paint-I used Apple Barrel Paint in Parrot Blue
  • Red Buttons
  • Glue
  • Red glitter
  • Markers
  • Small piece of green felt
  • Letter stencil

Instructions for homework organizer

1. Paint the crate.  Set aside to dry.

Make a Back to School Homework Organizer with Buttons Galore

2. Once crate is dry, sketch an apple shape on the front of the crate.

Make a Back to School Homework Organizer with Buttons Galore

3. Fill the shape with buttons, using glue craft glue to secure the buttons onto the crate.

4. While glue is still wet, sprinkle glitter over the apple shape.  This will fill in the holes between the buttons and give it some sparkle.  Instead of loose glitter, you can also use glitter glue to fill in the spaces.

Make a Back to School Homework Organizer with Buttons Galore

5. Using a marker, draw a stem on your apple.

6. Cut out a small leaf shape from the green felt and glue it onto the stem.

7. Using letter stencils and markers, spell out school or your child’s name onto the crate.

Make a Back to School Homework Organizer with Buttons Galore

Thanks for getting crafty with me today!  For more button crafts, stitching and lifestyle ideas visit me on my blog at www.laurabraydesigns.com.

Logo copy


1

Rit Dye and Buttons oh my!

Create colorful back to school projects with Rit Dye and Buttons Galore and More. We are co-hosting a blog hop with Rit Dye featuring back to school items for students of all ages. Below you will find directions to this project, links to the other projects and a Rafflecopter entry form to win a GREAT prize package valued at over $100.

Create a wooden gift box for the teacher and add a gift card to their favorite school supply store.   The box can be reused on the teacher’s desk to hold miscellaneous items.

It is easier than you would thing to dye wood.  Rit has a page dedicated to tips on dying wood and wicker.

Back to School Rit Dye Project with Buttons

Materials to create a Rit dyed wooden gift box:

  • Wooden box available at local craft stores.
  • Rit Dye in Aqua
  • Glue Gun and glue sticks
  • Back to School Buttons, Tutti Fruity
  • Misc.  Paper towels, plastic grocery bag, sand paper, disposable container for dye.

Directions to make the wooden gift box:

  1. If the box has rough edges you can sand them smooth with sandpaper.  Wipe off dust with a damp paper towel.
  2. Dip the box in heated dye.  Tap to remove excess.
  3. Place a paper towel on a plastic bag.  The paper towel is used to gather excess dye.
  4. Once the wood is dry you can add the button embellishments.

If you would like to order any buttons from the site click this link to the Buttons Galore and More store and enter the discount code of RIT20 for 20% off your order.  Use all caps or the code will not work.

Don’t forget to enter our Rit Dye and Buttons Galore and More Giveaway

Rafflecopter giveaway

If you want to view the designers blogs you can also click the links below.

6

Apple of My Eye Storage Jar

AppleJar

Teachers are so important and appreciate them lets them know it.  There are lots of great ideas of way to show your teachers how much you care about them but this one is fun because you can make it and then fill up the jar with treats!

ButtonApple

I filled the jar up with Sharpie Markers because I think almost every teacher would LOVE to get a jar full of bright fun colors of my favorite permanent markers.

To make the apple, I used a pattern and cut out an apple from black foam core.  You can get the pattern here is the free printable download (that also has a word search to keep your kids busy while you use the hot glue)!

Wordsearch

I covered it with Radically Red buttons from my collection and made the stem with ribbon then attached it to the jar, all with Adtech hot glue.

AppleSteps

When it was done, I started thinking of all of the things that could be put in the jar that teachers would love!  What do you think they would like most?

For another fabulous way to use the apple made of buttons, visit my blog.

Happy Creating,

Laura


2

Fifteen MINUTE Friday – Boxtops for Education Collection Jar

It is August and that means back to school time. Boxtops for Education is a fabulous program that helps lots of schools with funding to purchase things for the students and classrooms.

BoxTops

Sometimes finding a place to keep them until the children take them in is the tricky part. Here is a fun way to upcycle a Mason Jar into a fun home for the cutout Boxtop pieces until it is time to send them in. Use hot glue and add buttons, ribbons and whatever else you have around the house that is fun to decorate the jar in a way that you like having it out as a reminder to clip and save.

If you fill the jar up, here is a fun sheet to tape the cutouts to for sending them in so you can hang on to your jar.

BoxTops_BlankSchool

Happy Fifteen Minute Friday,

Laura

1

Sew a Button and Burlap Pencil Case

Sew a button and burlap pencil case for the guy in your life. It’s just right for the high school graduate who is heading off to college in the Fall or it would also be a great Father’s Day gift.

button and burlap Button & Burlap Pencil Case II

I know I’m always trying to keep my husband organized and he’s always looking for pens and pencils. Do you think there’s any chance a button and burlap pencil case is going to help?  Naw, I don’t think so either, but it’s fun to make!

Supplies needed for a button and burlap pencil case

  • Burlap cut to 7.5″  x 8″
  • Velcro (R) Brand Sew-On Fasteners cut to 7″ long
  • Ribbon cut to a length of 8″
  • Buttons – the Haberdashery line has some great masculine colors!
  • Basic sewing supplies

Instructions for sewing a button and burlap pencil case

1. Sew ribbon onto burlap parallel to the side that measures 8″. Place it approximately 1.25″ from the edge of the burlap.

Ribbon Onto Burlap

2. Sew the Velcro (R) Brand fasteners onto the 7.5″ inch sides. (These will be perpendicular to the ribbon.) I like to leave the top of the case without finishing it. The rough edge gives it a more masculine touch!

Sew on Fasteners

3. Fold in half, right sides facing (the side that you sewed the ribbon onto is the “right” side). The 7.5″ edges should be even. Press with an iron.

4.  Sew the short sides closed.

Sew Closed

5. Clip the corners and turn the bag right side out.

Sew On Button

6. Sew buttons onto ribbon. I know it’s a bit harder to sew them on when the case is sewn, but it’s best to leave this step for last, so you can see the best placement for them.

www.laurabraydesigns.com

1

Teacher Appreciation Gifts – Make Upcycled Button Rulers

Teacher Appreciation Gifts are pondered often in this house.  You want something they can use and need.  Being a former teacher I know it is not another apple themed gift.  Well, this quick, bright and happy project really measures up! Just in time for Teacher Appreciation Week.  With the loop on the end it is easy to hand and even easier to find.  The bright buttons really make a difference.

Upcycled Button Ruler

Materials Teacher Appreciation Gifts :

You will need a wooden ruler (or a yardstick), Laura Kelly colored buttons, a 6 inch piece of ribbon and HOT GLUE (My fave is Ad tech)!

How to make Teacher Appreciation Gifts:

While your hot glue gun is warming up, lay out your buttons in the pattern that you want to use in the length of the ruler.  You can stack them a bit if you like the depth.

One at a time, glue, the buttons to the ruler, straight down the middle so the numbers can still be read.

Once your button are securely adhered, create a loop with the ribbon and glue it to the back to create a way to hang it up.  If you want to cover the ribbon with more buttons, go for it.  I did.  :)

ButtonYardstickTwo

You can also line the ruler with ribbon first and then add buttons.  It makes cute Teacher Appreciation Gifts  too.

ButtonYardstickOne

Happy Celebrating Teacher Teacher Appreciation.  Celebrate with gifts for Measuring for Accuracy and Simply Creating Bright & Fun Things!

1

Upcycle a Can into a Pretty Pencil Holder with Buttons

This project will keep the kids busy and help the environment! Upcycle your empty food cans into containers for various storage and use buttons to create a fresh, fun look. You can create any kind of pattern or look with just a few easy-to-find materials. I created a pencil holder out of a spaghetti sauce can.

First, I covered  it with some fabric. Then I embellished the top edge with a swag design of pink and purple buttons. (Optionally, you can line the inside of the can as well.) I’ve created a number of different pencil and school supply containers using fabric or paper, so whichever you like best will work great!

upcycled can to pretty pencil holder

upcycled can to pretty pencil holder

Materials you need to upcycle the can:

Steps to make your own button embellished upcycled can pencil holder:

  1. Measure and cut fabric to fit the outside of the can.
  2. Cover the can with your choice of fabric & adhere with glue.
  3. Add a swag pattern to the top of the outside edge of the can using glue and twine.
  4. Adhere buttons in place, alternating colors.
  5. Make small bows of twine and glue at the top of each swag.
glue twine to can

glue twine to can

create a scalloped swag design with twine

create a scalloped swag design with twine

add buttons to twine

add buttons to twine

add more buttons

add more buttons

make a bow out of twine and glue on the can - I got a little too much glue on my fingers

make a bow out of twine and glue on the can – I got a little too much glue on my fingers

The best part about upcycling empty cans is that they are small.  This allows you to use your left over craft scraps to make some neat, decorative containers. Mix and match your scraps with your favorite button colors to create a whole collection of pretty pencil holders and other organizing containers. Plus these are easy enough that your kids can make their own too!

0

Powered by WordPress. Designed by WooThemes