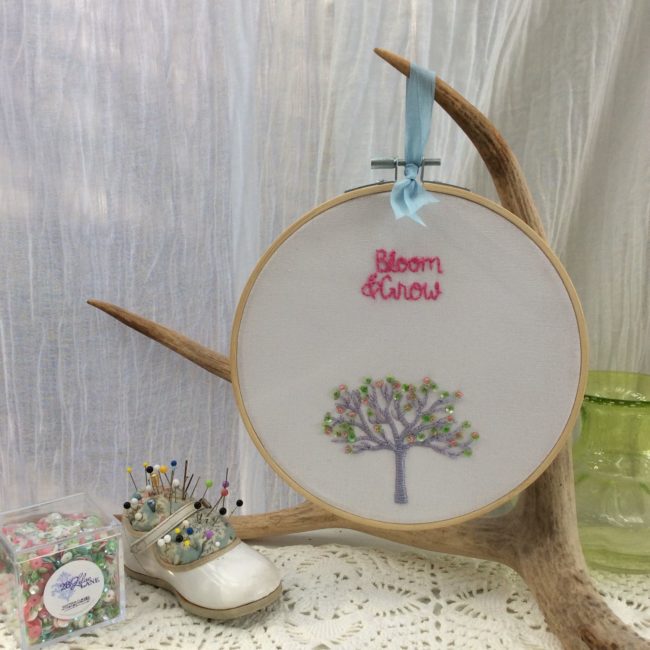
Tiny beads and sparkly sequins are the perfect companion to embroidery art.

Tiny beads and sparkly sequins are the perfect companion to embroidery art.
Hello Everyone! This is Katie from the Buttons Galore & More Design Team, and today I will be showing you how to make a fun handmade gift that can be given during the holiday season!
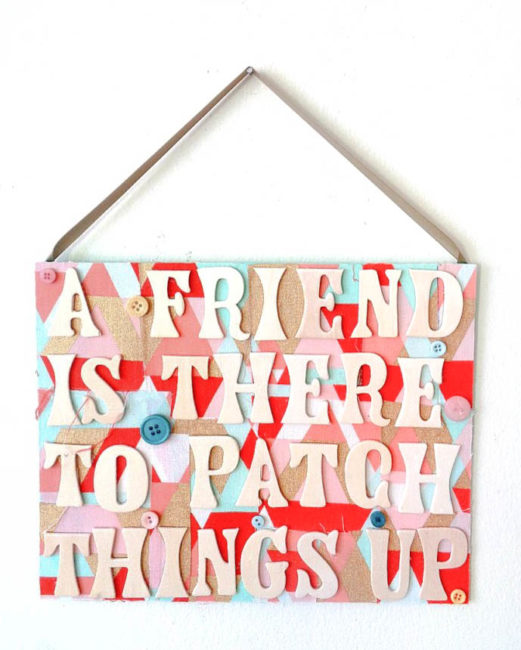
As a gift-giver, I have always loved making handmade signs for my friends and family. This is because handmade signs are super easy to make and are so fun to personalize. Also, from a gift-giving perspective, handmade signs can be very inexpensive to make if you are on a tight budget. With all that in mind and with the holidays fast approaching, today I am going to show you how to make a DIY Friendship Sign. Continue Reading →
Hi, Connie here with the design team sharing a Victorian framed art piece using Victorian accents by Buttons Galore & More. The themed button selections were the perfect accent for this framed art piece. The beautiful thing about these Victorian accent buttons is that you can change the color so easily. Spray paint works great!
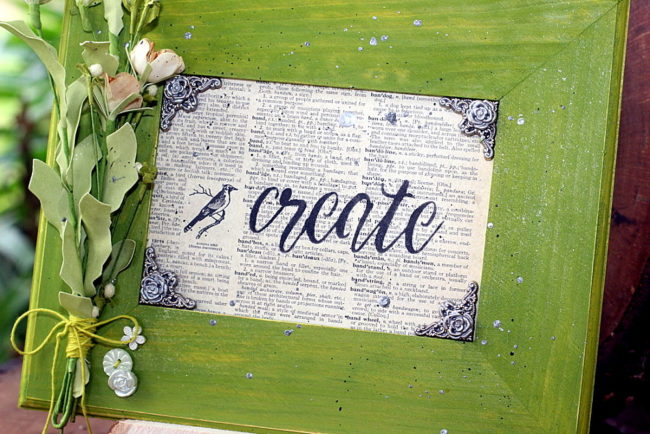
The frame was painted with acrylic paint and sanded to create a distressed finish for a vintage look and feel. The inside piece is vintage dictionary paper. I stenciled the paper with the word “create” in black acrylic paint. The silk flowers were wrapped with twine and then adhered to the side of the frame with strong glue.
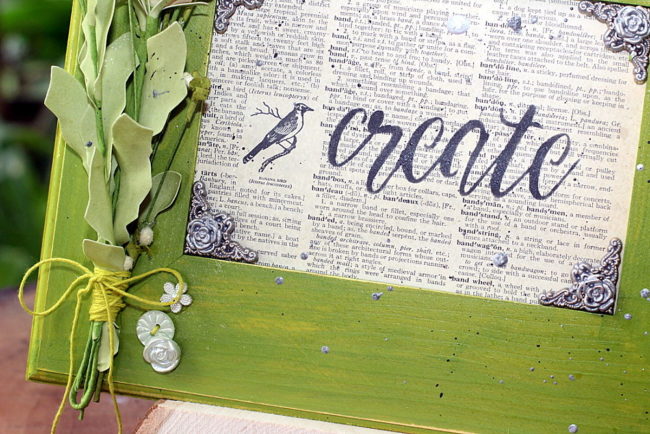 The Heirloom Keepsakes buttons were glued to the side of the flower cluster. They come in several different colors. I used the light green ones for this project.
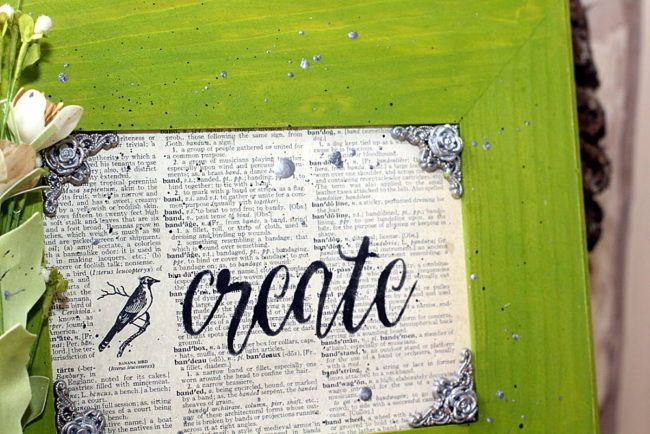
The Victorian Rose buttons and the Gold Filigree corners were spray painted a pewter color and adhered to each inside corner of the frame. The Filigree corner was attached first and then the Victorian Rose button next. The shanks were clipped off, using wire snips, to give a flat surface to adhere them.
To finish my Victorian framed art, the frame was splattered delicately with black and pewter paint. That process was achieved by spraying a puddle of paint, on a paper plate, and then using a toothbrush to splat the paint on the frame. It’s an old technique but still one of my favorites!
Supplies needed:
Thanks for stopping by~
Connie Mercer/DT Member
Hello Everyone! This is Katie from the Buttons Galore & More Design Team, and today I have a fun button pumpkin wall hanging project to get you in the mood for fall decorating!

This project is perfect to make if you are looking for an easy and inexpensive way to spice up your home décor for fall, halloween, and thanksgiving. I got the idea for this project when I saw a felt wall hanging designed for the 4th of July. However, instead of a pumpkin, the original wall hanging had a heart shaped flag made from felt and a few buttons. Personally, I thought the idea was cute but could be recreated in a simpler way. In today’s project, the whole DIY is only 3 steps and does not involve any sewing tools!
To decorate my button pumpkin wall hanging, I used two button sets for a majority of the project. Those two button sets were the 28 Lilac Lane ”Pumpkin Spice” Embellishment Bottle and the Buttons Galore Autumn Value Pack. Both of these button sets provided a wide variety of harvest/fall style buttons and worked really well together. My personal favorite out of both of these sets was definitely the 28 Lilac Lane ‘”Pumpkin Spice” Embellishment Bottle because you received a ton of beautiful orange colored buttons.
So, to find out how to make your own pumpkin button wall hanging, keep reading below!
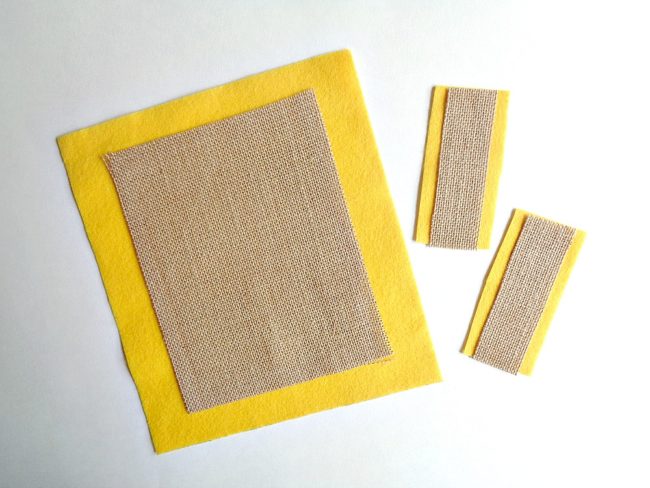
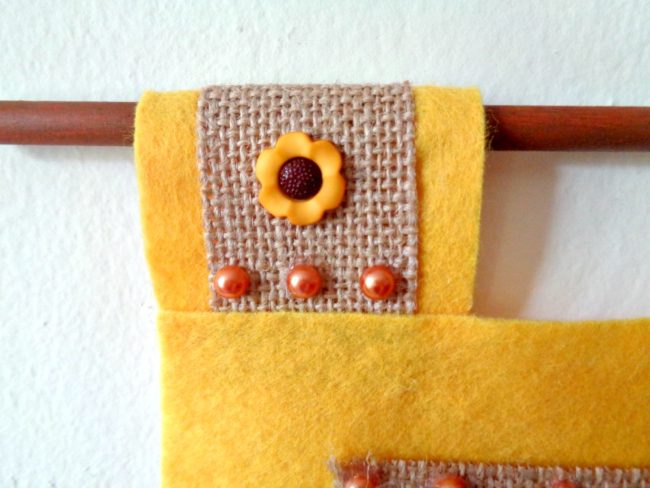
Step 1: Cut one piece of felt that measures 9 inches by 10 inches and two smaller pieces of felt that measure 2 inches by 3 ½ inches. Then cut out one piece of burlap that measures 6 ½ inches by 8 inches and two smaller pieces that measure 1 inch by 3 ½ inches.
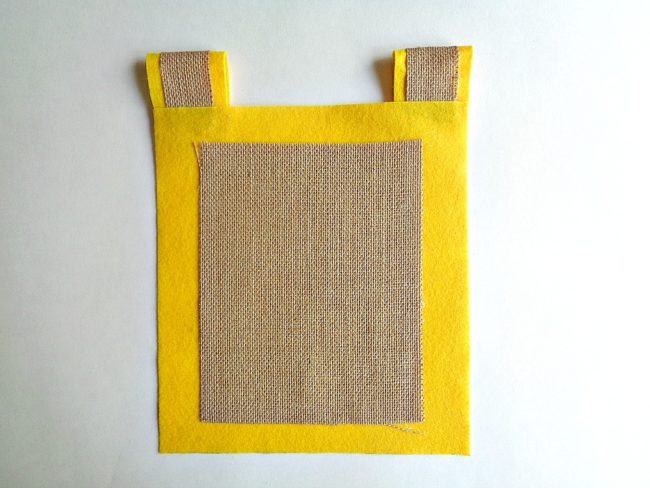
Step 2: Layer the larger piece of burlap centered onto the larger piece of your felt and glue it into place with your hot glue gun. Then layer the smaller pieces of burlap centered onto your smaller pieces of felt and glue them into place. Finally, create loops for your wall hanging by folding over the smaller pieces of felt/burlap and glue them in the corners of your larger felt piece.
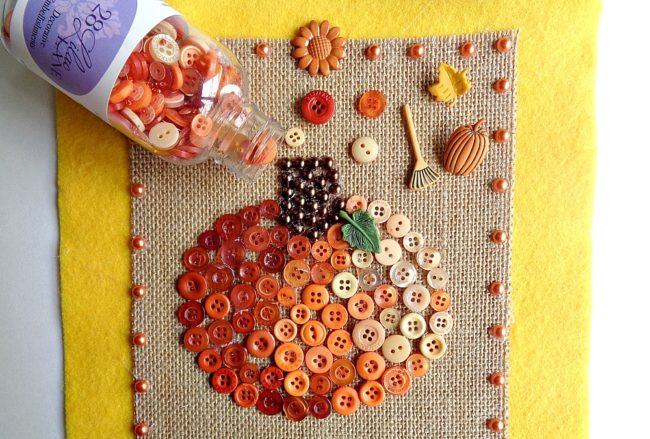
Step 3: Now take your pen and draw the outline of a pumpkin onto your burlap. Then begin gluing on your buttons around the outside of your pumpkin to create an outline and then fill in the middle with more buttons. For my pumpkin, I decided to go from dark to light buttons and then use shimmering half pearl flat backs for the stem. Finally, use the rest of your normal buttons and decorative buttons to decorate the rest of your wall hanging.
For my button pumpkin wall hanging I used the following:
Once you are happy with how your button pumpkin wall hanging looks, you are ready to hang it on the wall by sliding a dowel rod or wooden stick through the two loops!

I loved how this pumpkin button wall hanging turned out and I think it would look so cute as part of a gallery wall!
While creating this project, I did free hand the design of the pumpkin. However, if you are not comfortable drawing your own pumpkin (in step 3), you can always google ”pumpkin template” and print out a template to trace around. With that being said, if pumpkins are not your thing, you could always change the main image to be something else. For example, I think a leaf created from the 28 Lilac Lane “Toasted Graham” Embellishment Bottle would look really pretty.
If you made this pumpkin button wall hanging, what 28 Lilac Lane items would you use?
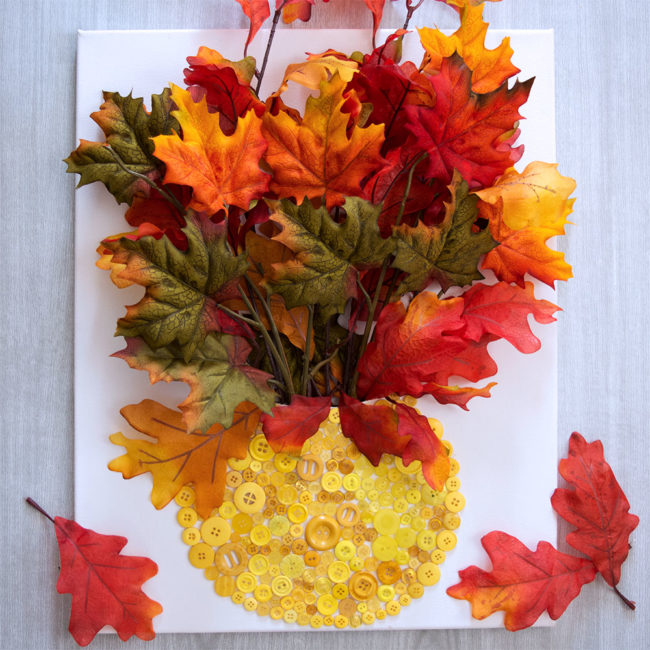
Autumn is one of my very favorite seasons. I love the cooler (but not cold) temperatures and the gorgeous bright colors that appear in nature. This Button Vase Fall Canvas wall art is the perfect project when you’re short on table space but want to add those beautiful fall colors to your home.
Use a pencil to draw (or trace) a simple vase shape to the bottom half of your blank 16×20 canvas.
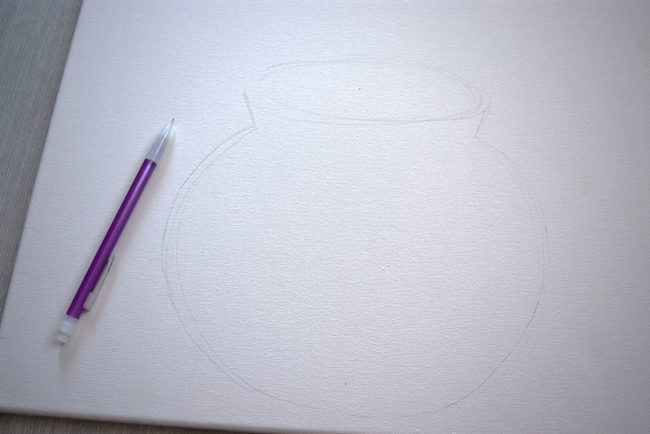
It doesn’t need to be perfect, just a rough outline so that you know where to place the buttons for the button vase. The buttons will cover up any pencil marks. I drew a round vase, but you can make it any shape you want. Whichever shape you use, make sure to keep it on one end of the canvas.
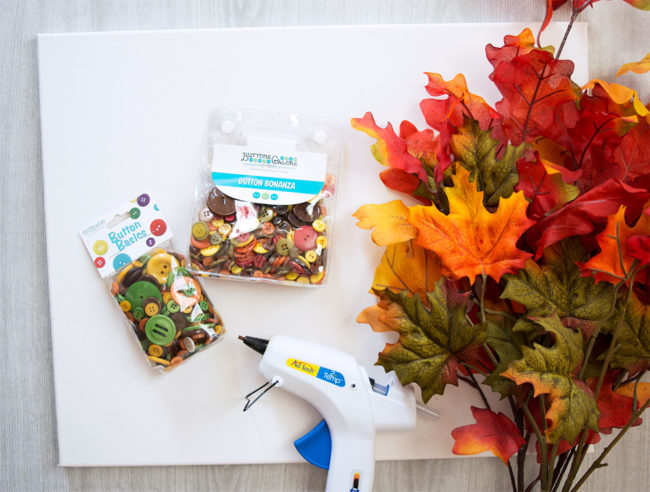
Glue buttons to the outlined vase you drew on the canvas. I used a hot glue gun to attach the buttons.
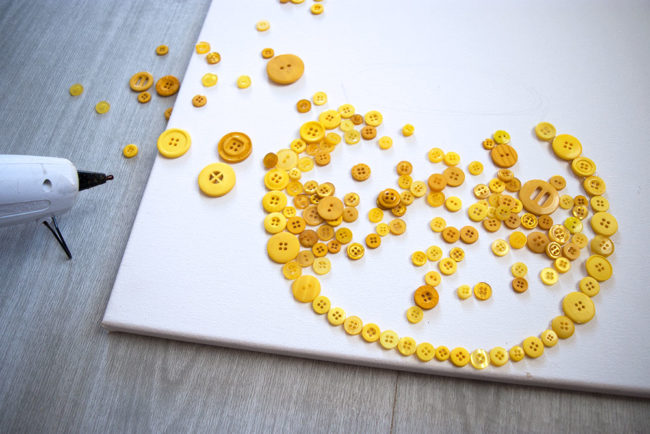
Because I was using Silk Autumn Leaves in my vase with beautiful red and orange colors, I made my vase Yellow to complement them. I used every yellow button in the Harvest and Fall Festival button sets to fill my round yellow vase. I liked that the shades of yellow in these two sets were in line with the yellow you’d actually see on fall leaves.
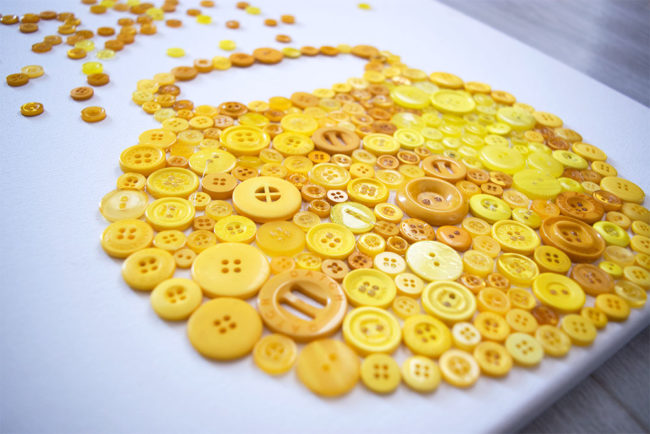
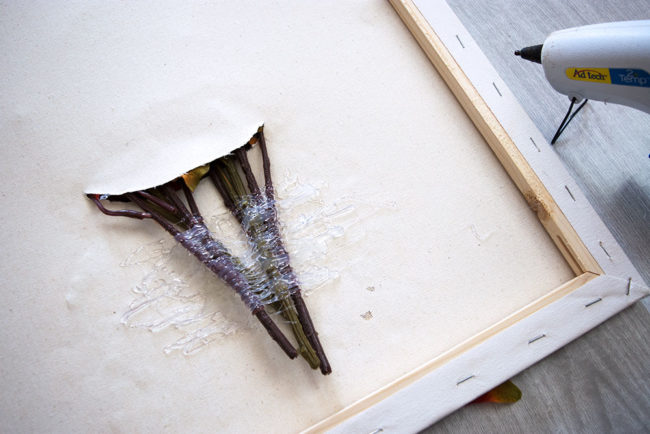
Don’t glue buttons inside the mouth part of the vase at the top but fill the rest of the vase.
Use a sharp craft knife to cut a line in the canvas just above the buttons in the mouth of the vase.
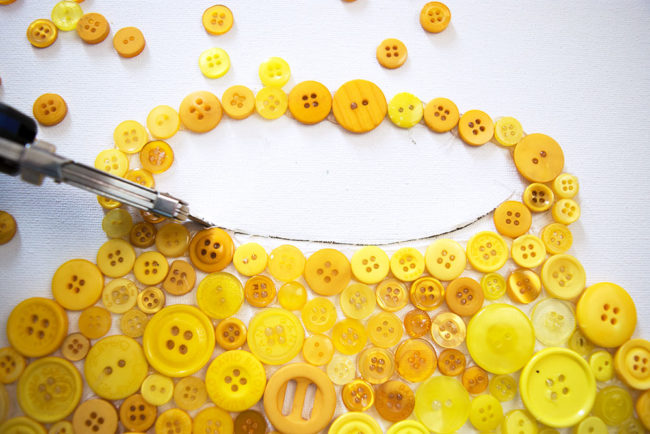
Insert your Autumn Silk Florals or Leaves through the hole in the canvas. Arrange them however you like. I find that the canvas vase looks best when it’s full. I used four Silk Leaf stems to fill my vase.
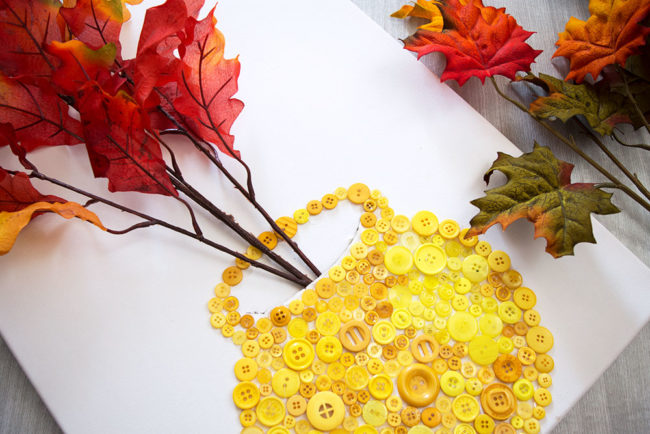
Turn your canvas over, and use hot glue to secure the stems in place for added stability. I used an entire small glue stick to fix my stems in place.
Use single leaves to fill in any blank spaces or gaps at the base of the stems. Secure them in place with hot glue.
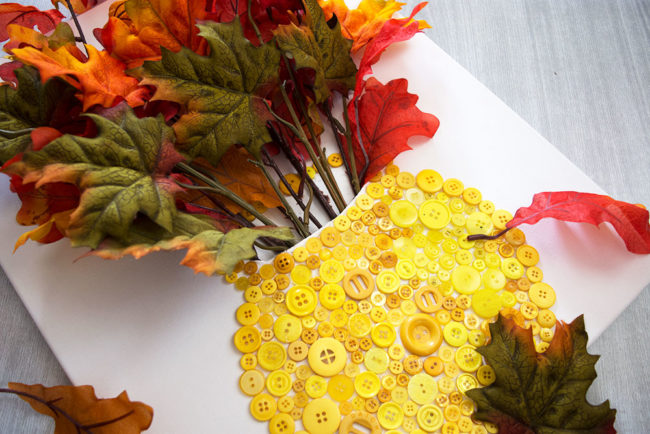
If you have some unruly leaves on the stems that aren’t laying quite right, a dot of hot glue can help secure them to the canvas in a more pleasing way.
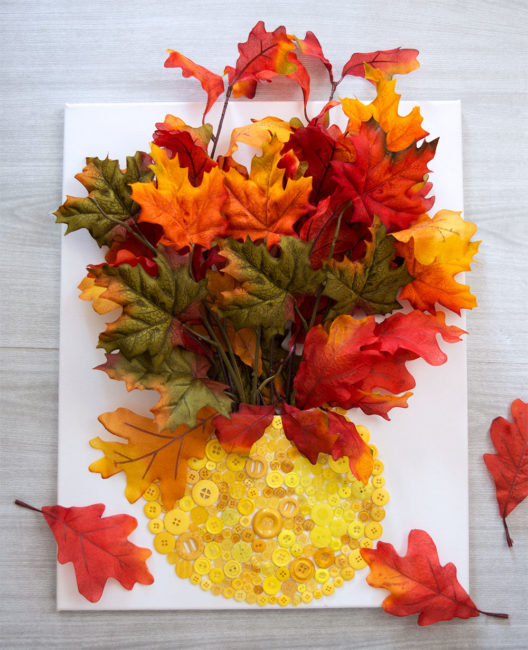
Hang your canvas on the wall, or prop it up on a table for a beautiful bright pop of autumn colors! I think that I will take a slightly smaller canvas and use the red buttons in the Fall Festival and Harvest button packs to make a smaller red vase with some pretty silk sunflowers! The pair will look great together with my fall decor. The possibilities are endless if you just change the color of the buttons for your vase to complement the flowers or leaves you have! Happy Fall Crafting!

This project combines two of my favorite things: coloring and sequins! Using a pre-printed canvas, markers, and new sequins from 28 Lilac Lane, I made a fun project that is an easy way to decorate an ocean-themed room. This project is so easy that even the kids can do it!
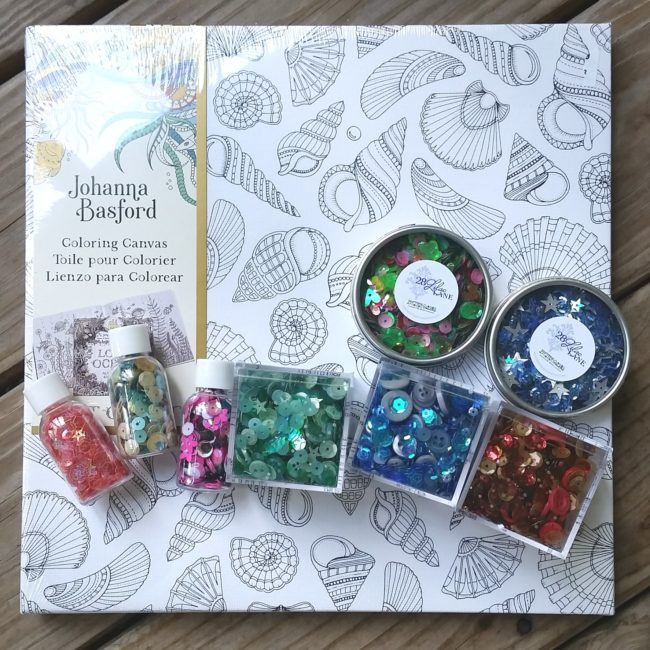
To make this project, you will need:
How to:
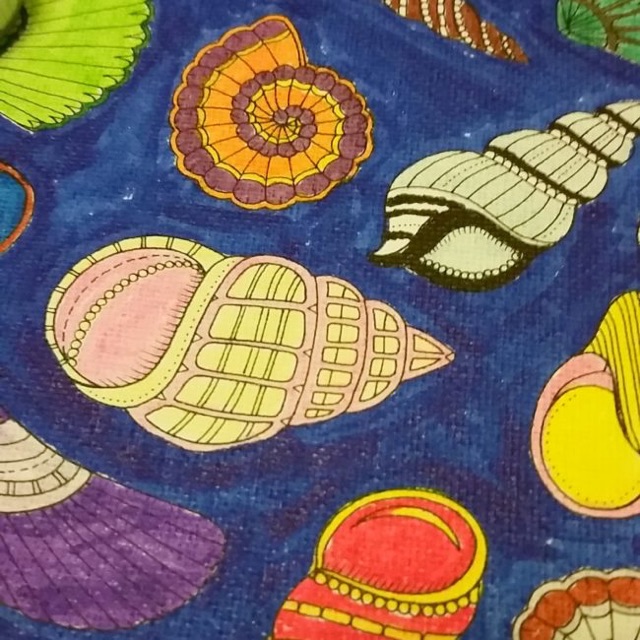
This canvas was so fun to make. I absolutely love to color so I really enjoyed getting out of coloring books and onto a canvas, and the addition of a little sequin bling just makes it even better!
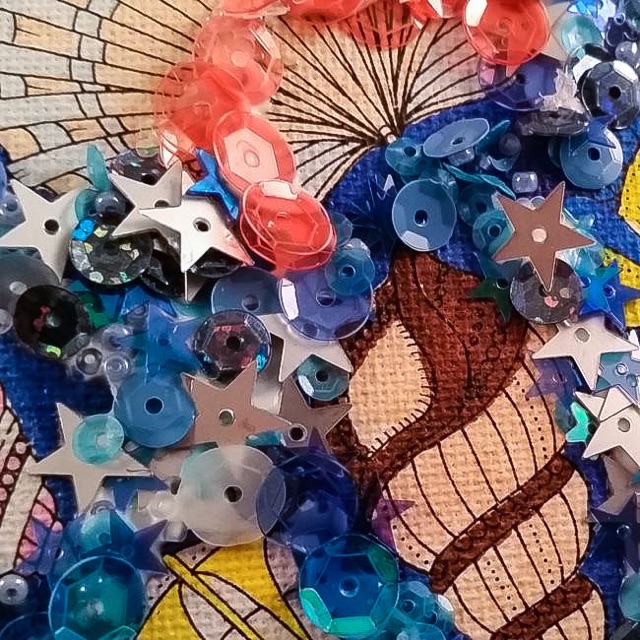
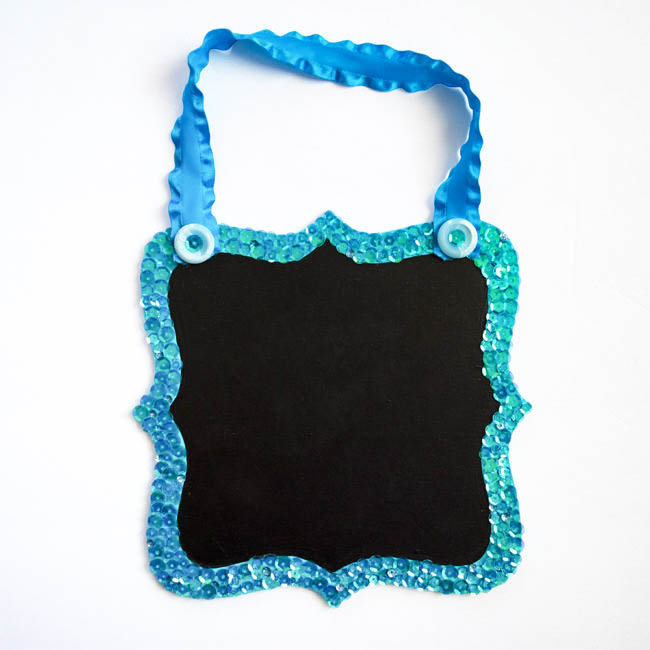
You don’t have to know how to sew to use sequins! Besides using them on cards, and in fun little shaker packs, you can glue sequins to just about anything for a fun shimmer and shine! I glued some gorgeous turquoise blue sequins from the new 28 Lilac Lane “Mermaid Tale” Premium Sequin Tin to a wood surface for a fun Mermaid Tale Sequin chalkboard. This craft is simple enough for a child to participate in as well!
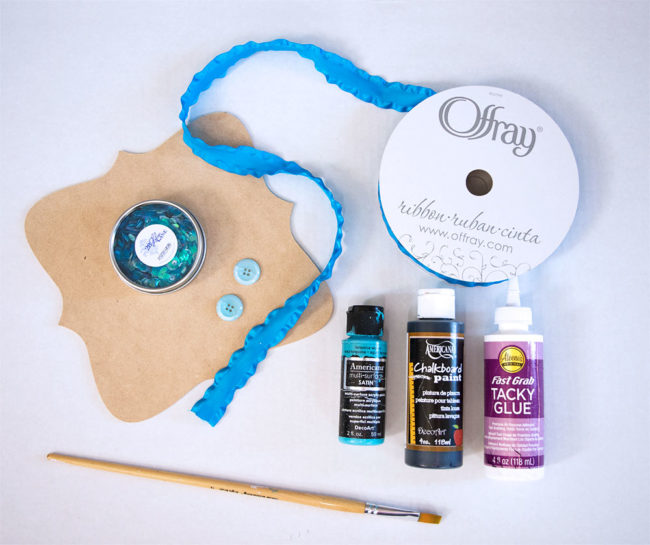
Paint the wood bracket shape with the acrylic craft paint. (This is a perfect step for little hands to help with!) I painted the front and back of my shape. Let the paint dry completely.
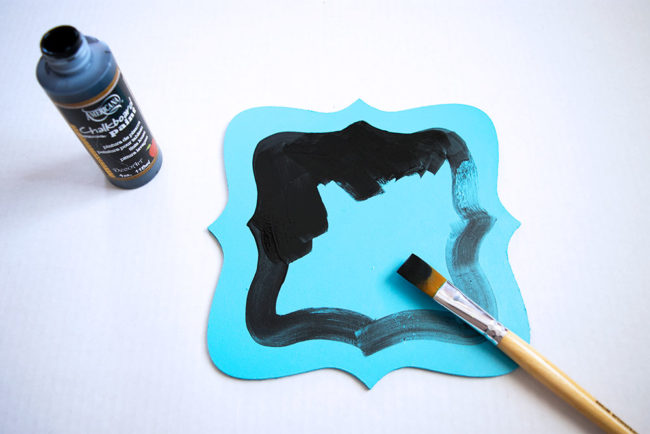
Paint the inside of the bracket-shaped board with black chalkboard paint following the instructions on your specific bottle. My chalkboard paint instructed to use two coats of paint and allow a relatively long cure time.
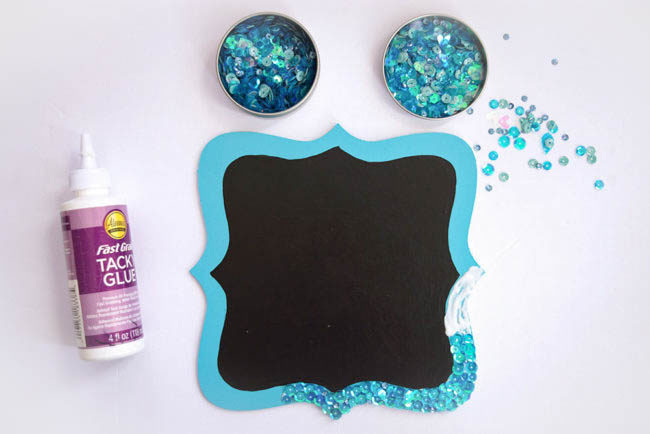
Glue the blue sequins from the 28 Lilac Lane “Mermaid Tale” Premium Sequin Tin around the outside edge of your bracket shaped board. I used three different size sequins from the tin all the way around the edge of the board. My kids had a lot of fun helping with this step! I had one helper finding the perfect sequins from the tin, and the other helper situating them just right on the glue I was spreading. In less than 30 minutes, we had the perfect Mermaid Tale border around our chalkboard!

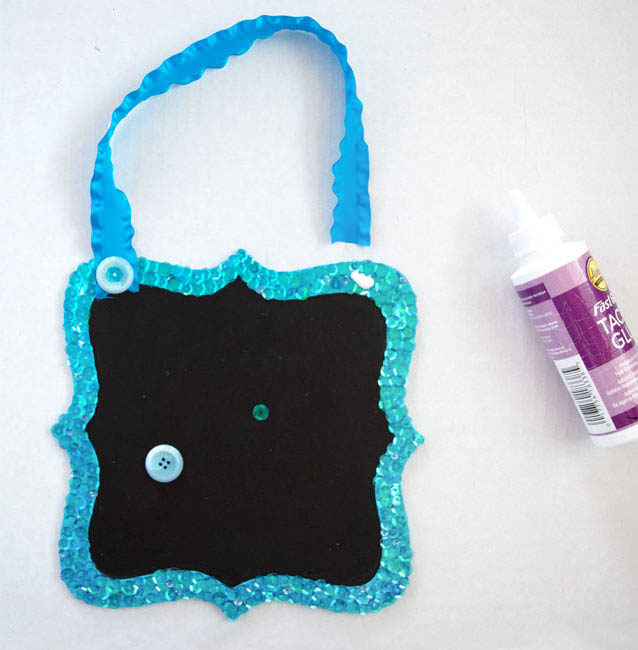
When your glue has dried completely, add a ribbon to hang your chalkboard. I cut a length of ribbon about 12 inches long. Add a dot of glue to the top of each side of the board, and add the ribbon. I glued a blue button to each end of the ribbon and added one more sequin inside each button (at the direction of my little helpers).
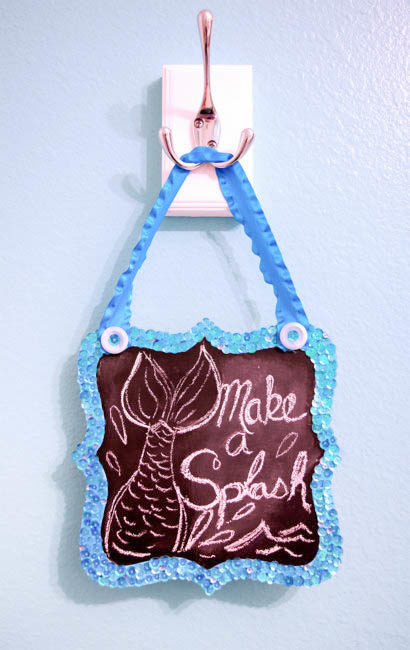
My daughter took the fun little chalkboard to hang in her room so she can write and draw her mermaid-y messages on it.
Using different sequin tins from the new 28 Lilac Lane Premium Collection could result in completely different little chalkboards. I want to make a house shaped Halloween themed one next, using the Haunted House Sequin Tin!
What shape and sequins would you use?
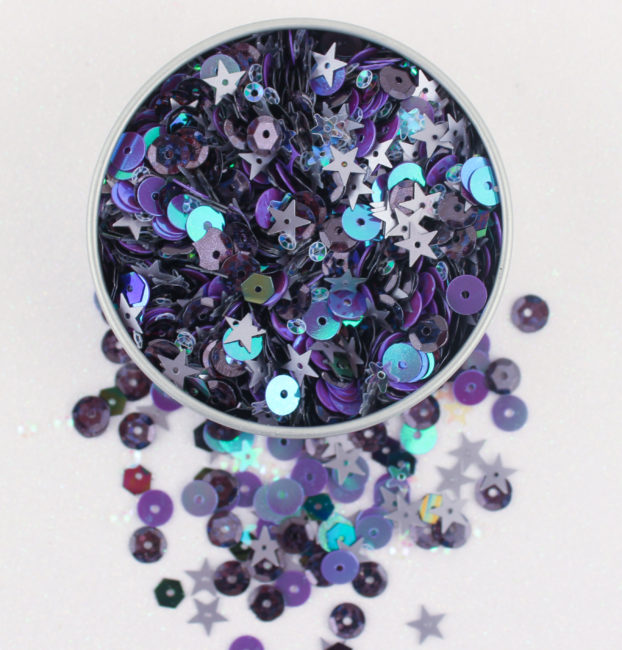
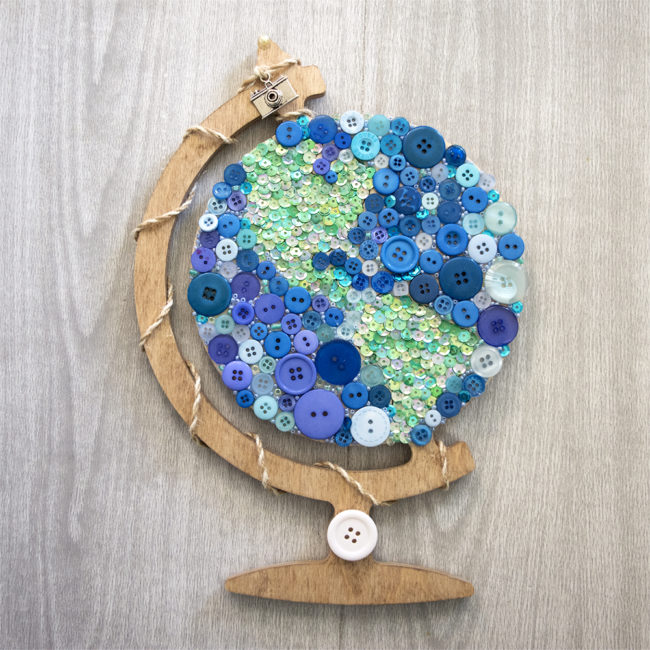
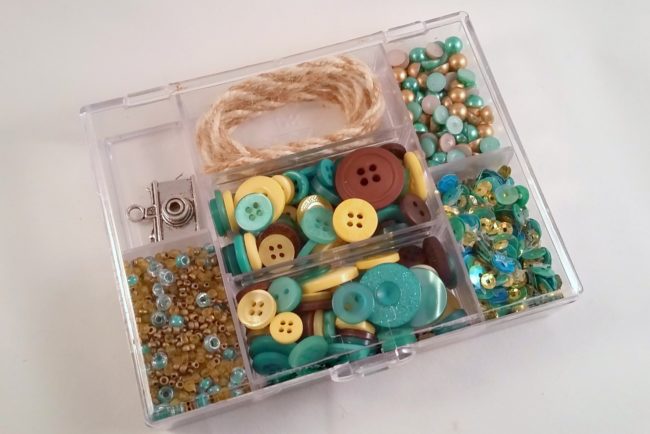
Hi! I’m Kelli, from the Craft Shack Chronicles blog and I’m so excited to be joining the Buttons Galore Design team! For my first project, I wanted to make a piece of home decor. I’m working on a gallery wall above my piano and I am having fun adding in lots of different colors and textures. You can easily add interesting depth and texture to your home decor pieces by using buttons and sequins to add color instead of paint. I used two 28 Lilac Lane kits to make this fun Button Globe Mosaic.

Draw the design outline onto the wood globe surface. You can trace it, transfer it, or freehand it. Draw the design onto the globe using a pencil. You won’t be able to see it when it’s covered in buttons and sequins so it doesn’t need to be perfect.
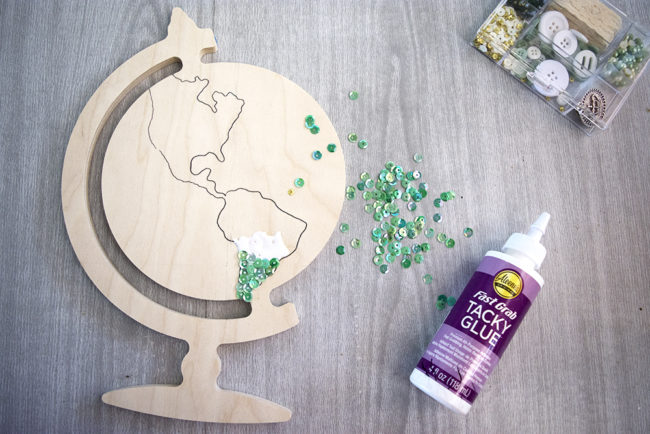
Use green sequins from both Lilac Lane kits to fill in the land shapes. Add a little bit of glue and spread it out. Drop the sequins onto the glue one at a time. I find it easy to use a toothpick to arrange the sequins in the glue but you could use whatever you have on hand.
The glue will dry clear, so you don’t need to worry if you get a little messy.
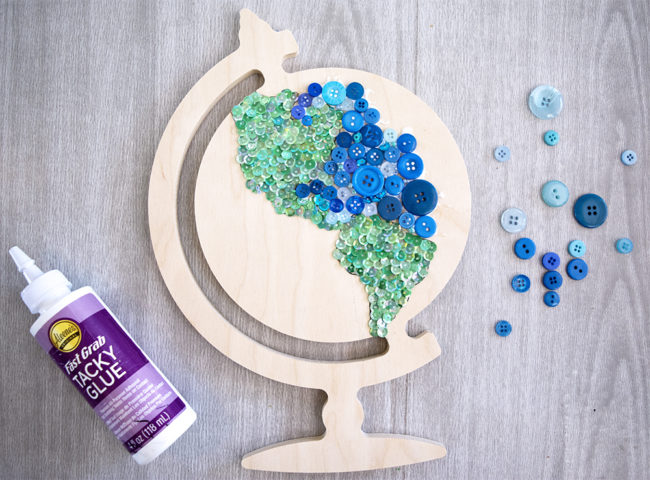
Fill the in the oceans with blue buttons. Try to mix large and small buttons into the mix to add interesting variations in the texture. The smaller buttons fit nicely in some of the small curves around the land, while the bigger buttons were easier to use further out in the ocean.
Cover the entire globe with buttons and fill in any gaps with seed beads, or blue sequins from the Lilac Lane Kits.
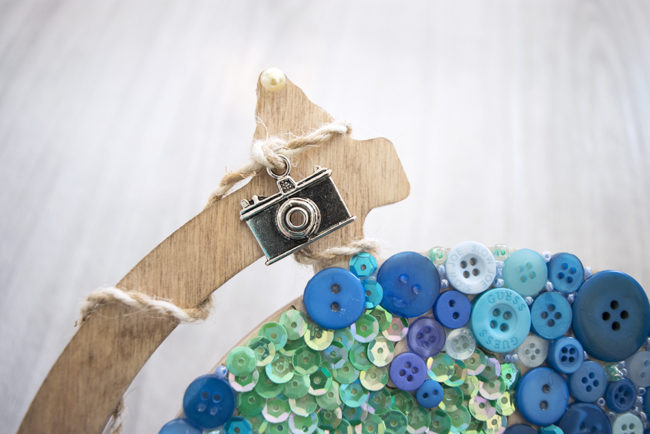
Use wood stain to finish the remaining wood part or fill it in with buttons that complement your home decor colors. Finally, use the beautiful rope trim from the Let’s Go kit to attach the camera embellishment from the same kit to the top of the globe. A big white button from the Tea Time kit was the perfect size to put on the globe base.
I’m thinking about adding a little red button heart in the general area where we live on the globe. Would you add it, or leave it as it is? I can’t decide! I’m so excited to hang my new Button Globe Mosaic on my gallery wall soon!
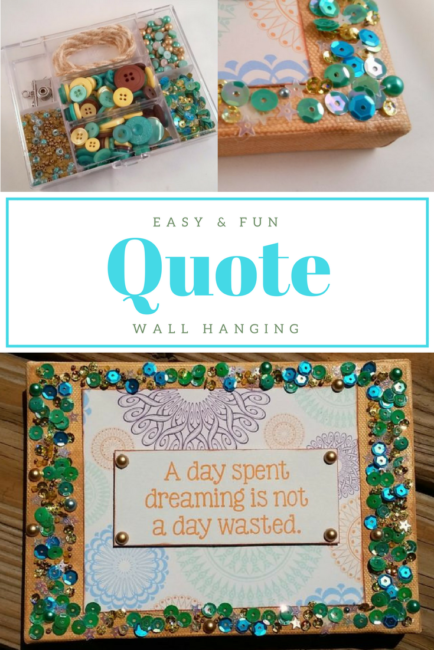
Hey y’all! It’s Lorrie here with my first project for the Buttons Galore team! Today I am sharing a cool wall hanging canvas featuring an embellishment kit from 28 Lilac Lane.

I had this cute quote that I loved and I wanted to show it off, so I decided to make a wall hanging using the quote and matching scrapbook paper on a 5″x 7″ canvas. Such an easy and fun project!
Supplies needed:
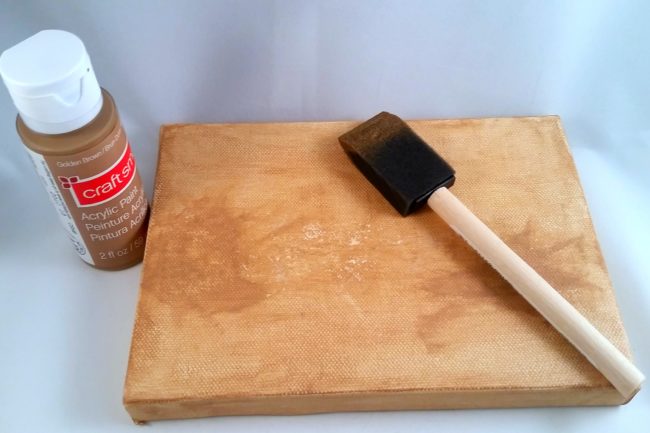
I started by painting the canvas using a light brown acrylic paint. I then cut out the quote and a 3″x 5″ piece of coordinating paper (the quote came from a sheet of quotes as part of a paper collection), and inked the edges.
I attached the paper to the canvas using double-sided tape. Then I used adhesive foam dots to “pop up” the quote — this is an easy way to add dimension to your paper projects. Next came the fun part: adding the embellishments from this adorable “Let’s Go” embellishment kit by 28 Lilac Lane!
I will let you in on a little secret — I am not a big fan of liquid adhesives. I use them on projects, but they aren’t my favorite, mainly because here in the hot, humid south they take forever to dry. So to hold the sequins and beads from the embellishment kit onto my wall hanging, I used my not-so-secret weapon: red liner tape! Red liner tape is a double-sided tape that holds just about anything. It is the perfect alternative to liquid glues.
I applied red line tape to the edges of the canvas, and then sprinkled the sequin mix onto the tape. Just like when you’re using glitter, sprinkle the sequins liberally onto your project, then pick up and shake the item to remove the excess. Once most of the tape has been covered, fill in any empty spaces with the tiny seed bead mix and pearls from the kit.
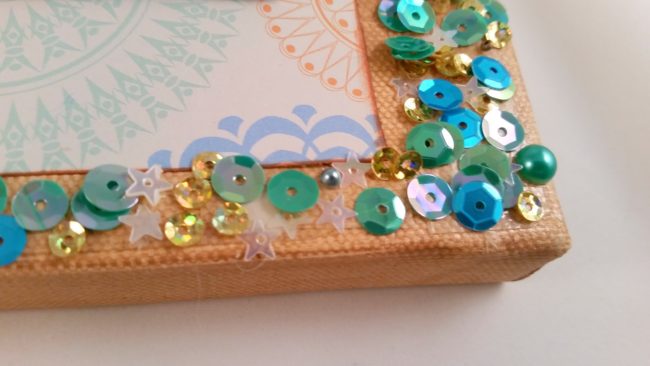
For the finishing touch, I placed gold pearls from the Embellishment Kit on each corner of the quote using mini adhesive dots.
Now you have a fun quote wall hanging that would look great on any wall in your home – and plenty of embellishments left over in your “Let’s Go” kit for lots more creative fun!
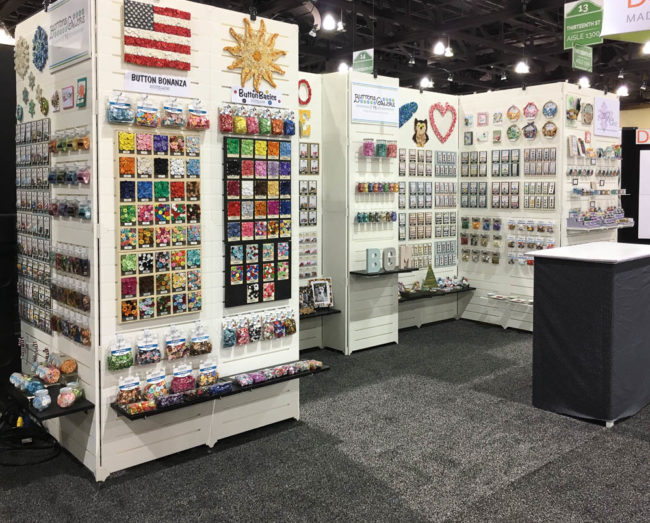
Today we’re sharing another project from our booth at Creativation. This button mosaic sun that I created brought a little bit of my home in the sunshine state to the show floor in rainy Phoenix!
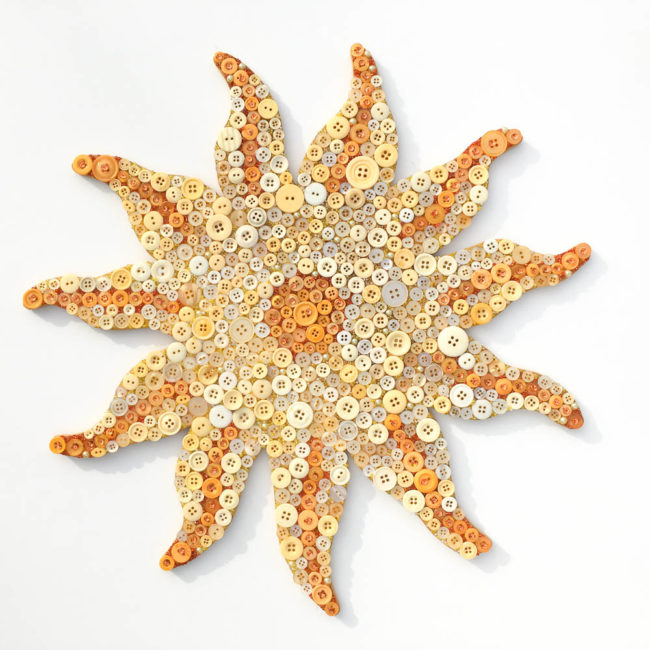
This sun looks yellow, but we call it….mango! It’s made with our “Mango Madness” color blend of buttons. This blend of delightful shades of orange and yellow is perfect for sunshine-y projects of all kinds.
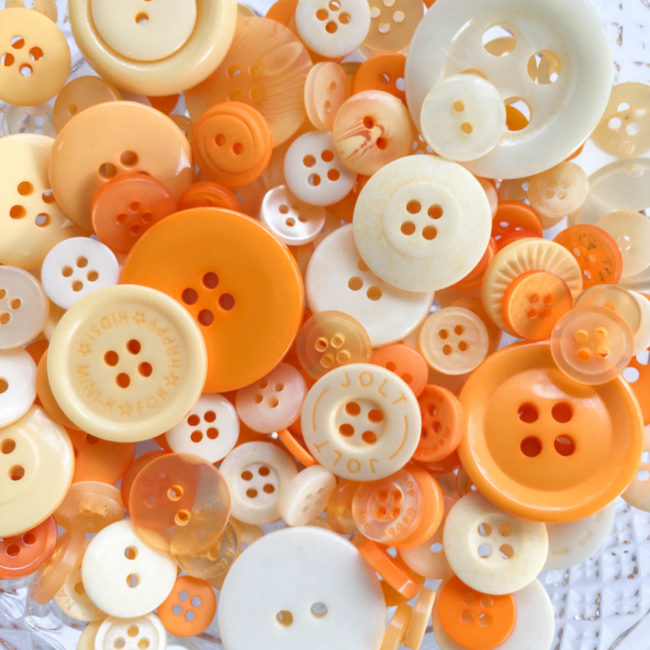
Although they don’t look at first like they are at all the same color palette, I combined the Mango Madness color blend with a 28 Lilac Lane embellishment bottle called “Candy Corn“. I only used seed beads. flat back pearls, and sequins from the Candy Corn bottle. Used in small doses with these tiny items, the colors work well together.
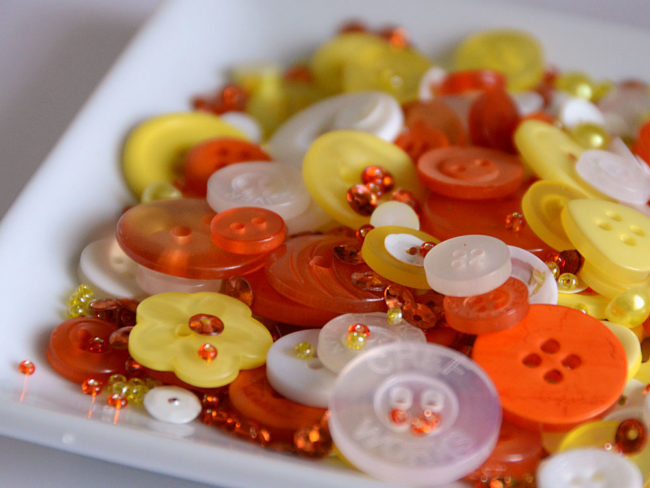 Button mosaics (or collages) are such a fun way to use buttons, and this one creates a beautiful piece of wall art home decor when you are done!
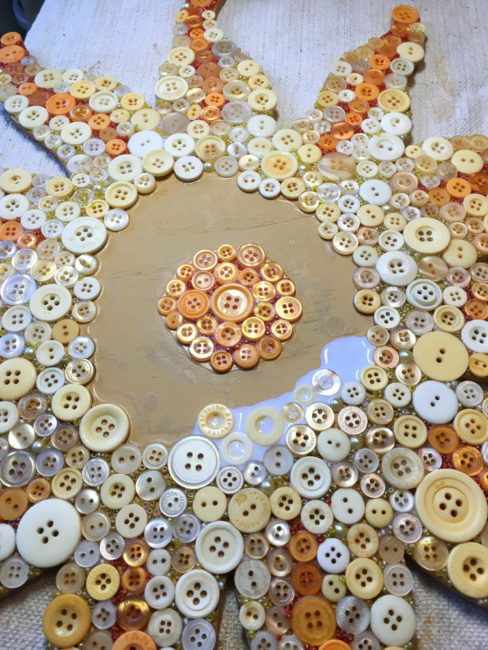
To get the full tutorial on how to make this piece of sunny wall art (or learn how to adapt this technique to make your own design), visit my website Craft Critique.
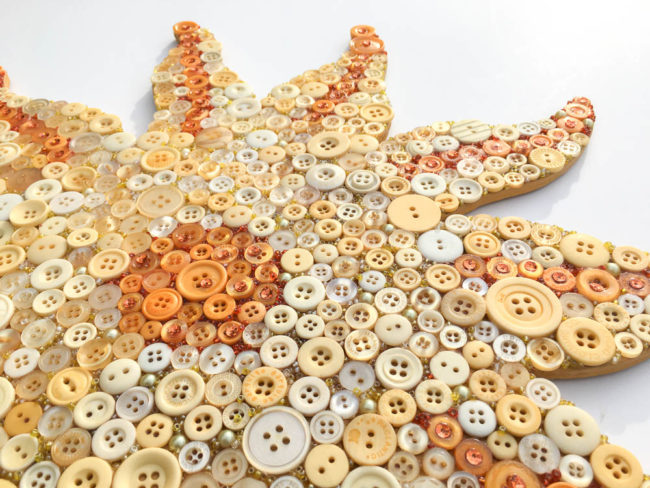
This project can be adapted to a lot of different shapes…how about an apple for teacher? Or a heart or flower for a tween room? The possibilities are endless! What will you make?
It’s time to share more of our Creativation booth projects! Chicken wire is so trendy right now and, paired with a button collage, it makes a gorgeous memo board!

This bright and fun button collage memo board is great decor for a kid’s room or nursery, a craft studio, or for displaying old family photos at a wedding or baby shower!
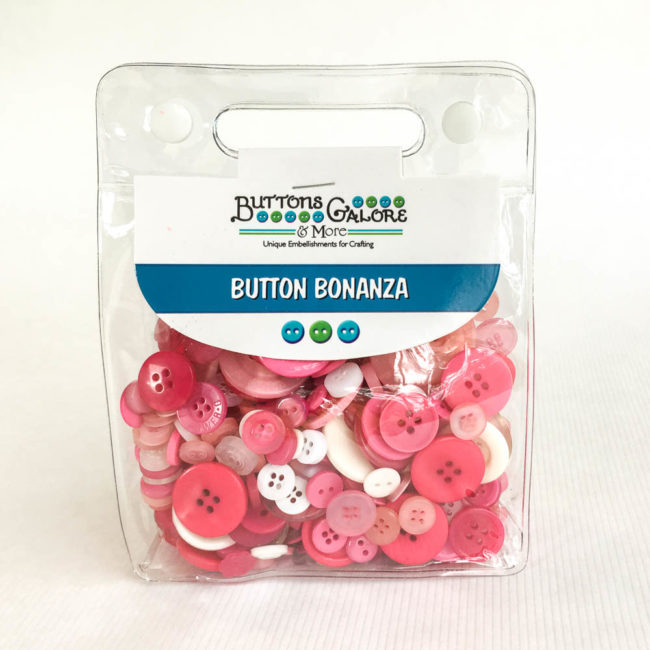
To make this heart memo board, which is about 17″ tall, it only takes two bags of our “Bubblegum” Button Bonanza buttons! This fun mix includes several shades of pink from pastel to brilliant fuchsia mixed with some white buttons. It’s perfect for everything from little girl projects to spring flowers – and of course, hearts!
The shades of pink in “Bubblegum” make a beautiful button collage on this heart memo board. The shades create a wonderful visually textured look on the frame – and there’s no worry about color matching since the shades are already pre-coordinated!
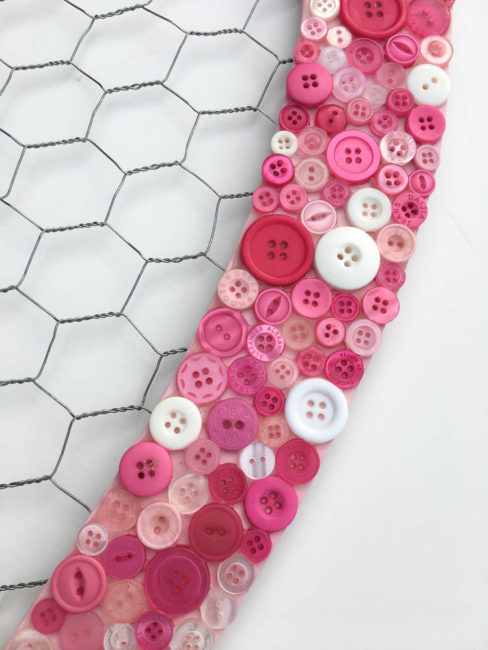
This memo board was created completely from scratch, starting with a piece of 1/4″ birch plywood. But it’s easier than you think to make, with only a few basic tools and techniques. To get the full tutorial, click here!
One of our favorite things about attending shows is the chance for our staff and some talented craft designers to show off in our booth the beautiful range of possibility that can be created with Buttons Galore products. So today, for those who weren’t at Creativation, we’re going to give you a peek into our booth at the show to see all of the gorgeous inspiration we shared!
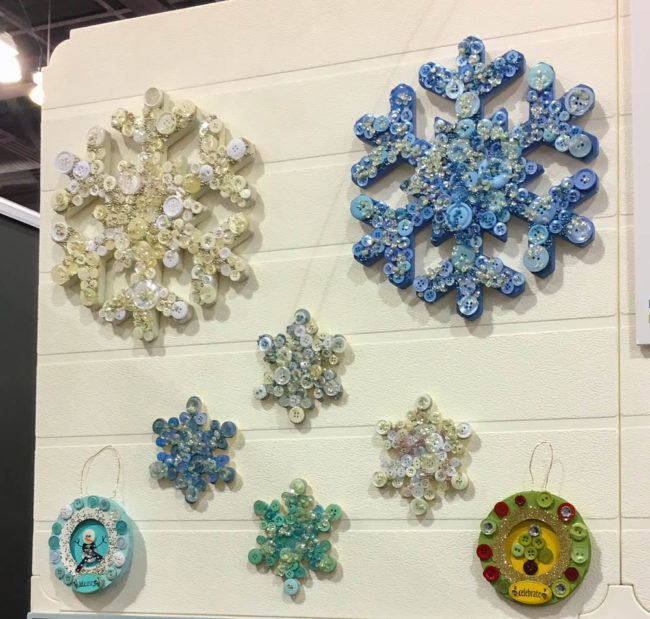
It may have been warm in Arizona, but inside the convention center it was snowing a blizzard in our booth! These snowflakes, created by Buttons Galore staff, show that buttons make gorgeous snowflakes of all sizes from tree ornaments to wall art.
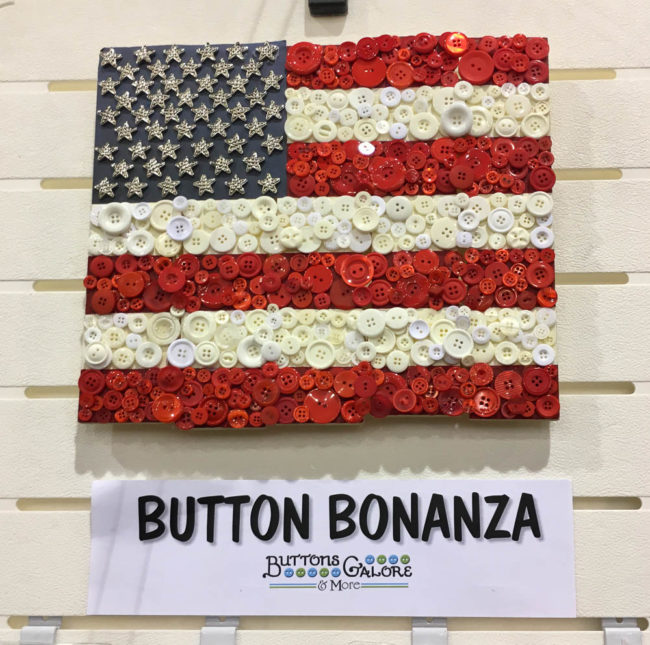
This American flag wall art piece, also created by Buttons Galore staff, combines our bulk buttons with our 3D decorative star buttons. It’s perfect for holiday decor for occasions like July 4th, or leave it up all year round for a patriotic touch of homespun decor.
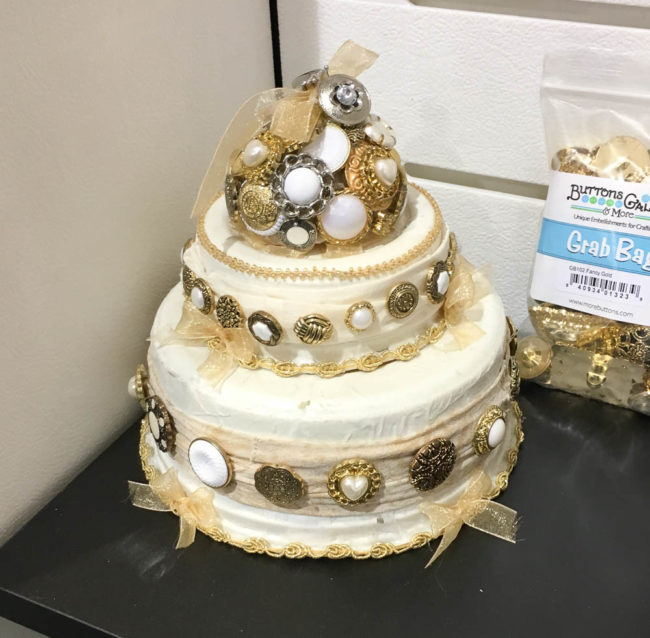
Speaking of special occasions, our decorative button grab bags are a beautiful and affordable option for creating decor for events like showers and weddings! This button cake, created by designer Jen Goode, is perfect for decorating a buffet table.
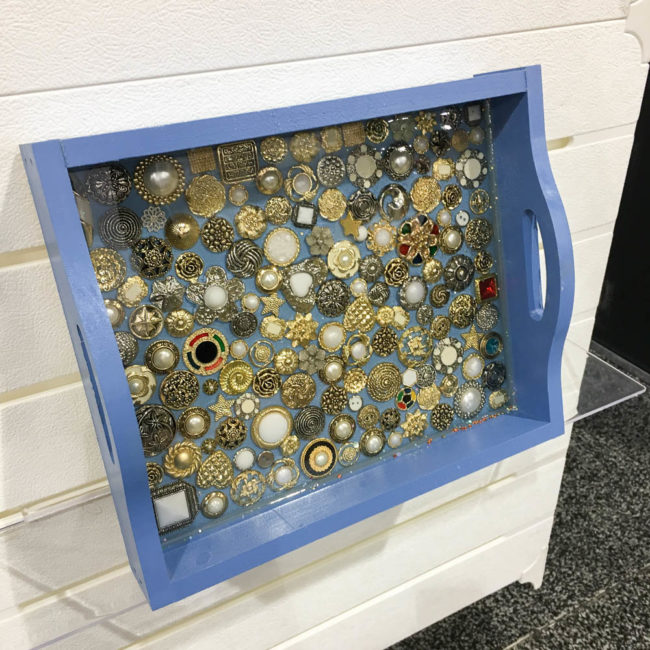
Love to entertain? Our decorative 3D buttons will make your tea time, cocktail hour, or coffee break oh so elegant! This tray project, by Buttons Galore staff, is quick and easy, too!
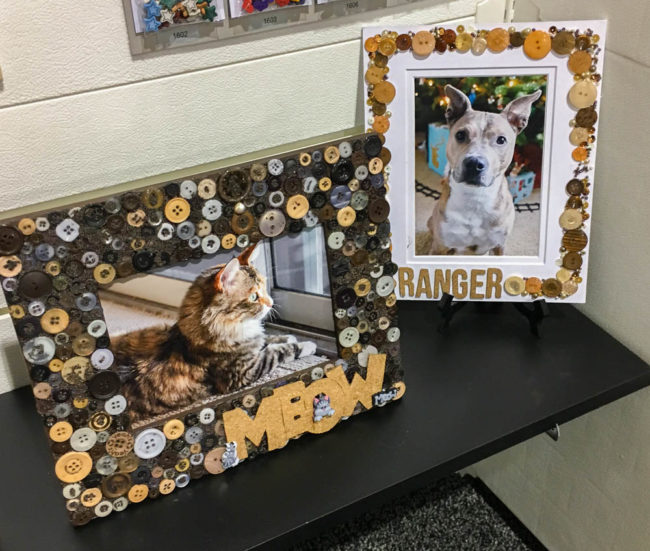
And let’s not forget our furry family members! Our booth went to the cats and dogs with these fun frames to display your favorite picture of your pet cat (by me) or dog (by 28 Lilac Lane designer May Flaum). For the instructions for the cat frame, click here.
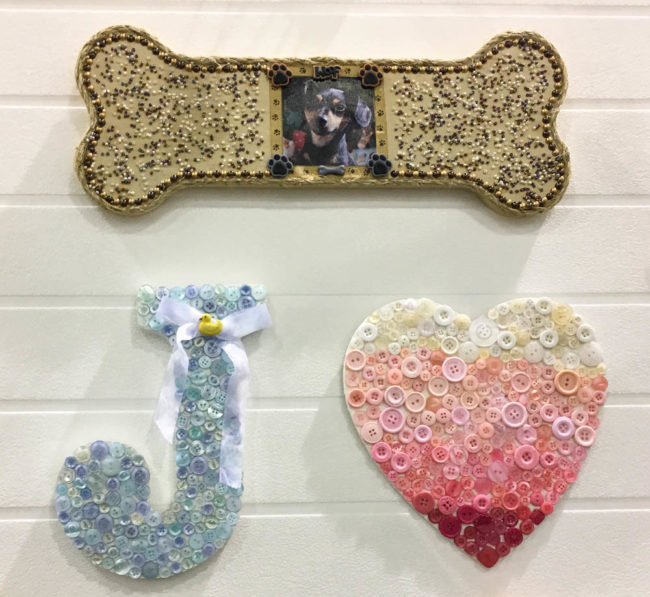
If you’d rather hang your pet photo on the wall, try out this dog bone wall art project by Buttons Galore staff!
This button monogram is easy to make and perfect for a nursery or kids room! (Click here for instructions.) Or create an ombre heart wall art piece for someone special to remember you by. (Click here for instructions.)
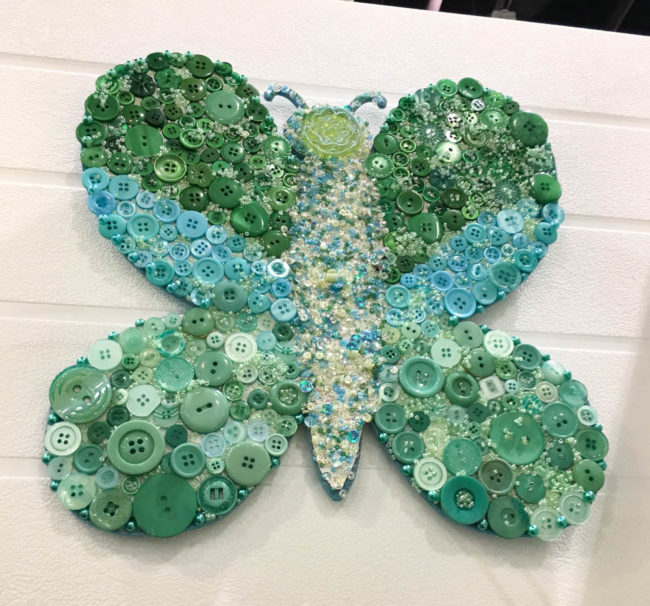
It seems everyone is in love with butterflies this season, and we agree! Our wall art butterfly, made by Buttons Galore staff, is great decor for a kid’s or teen’s room.
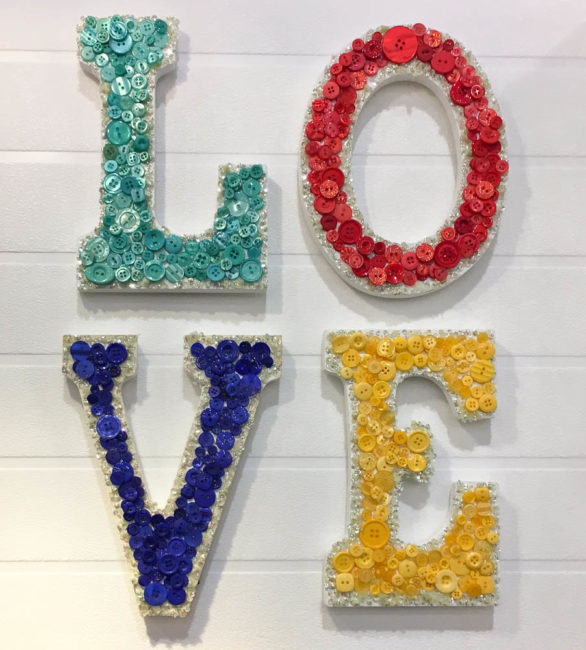
Text as wall art is very hot in home decor, and our staff decided to pay tribute to the greatest sentiment of all: love! These easy to make letters could be made in any colors to coordinate with the decor of a nursery or a shabby chic home decor.
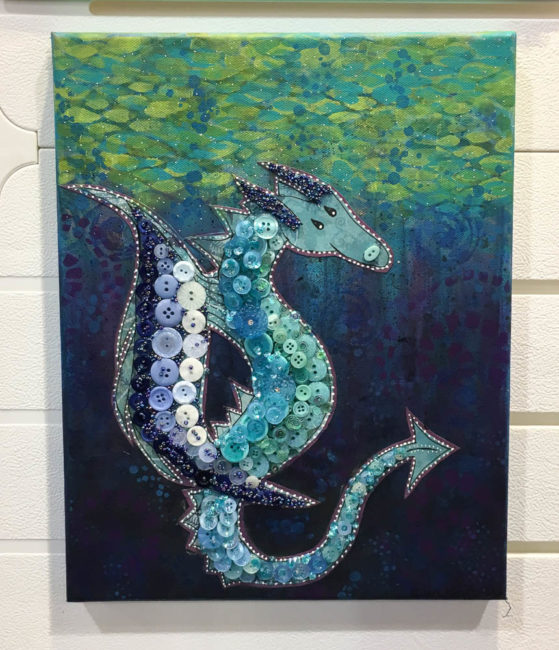
Our buttons are fabulous for working in mixed media, and designer Maura Hibbitts took them to canvas for us! This whimsical sea monster is full of texture and color!
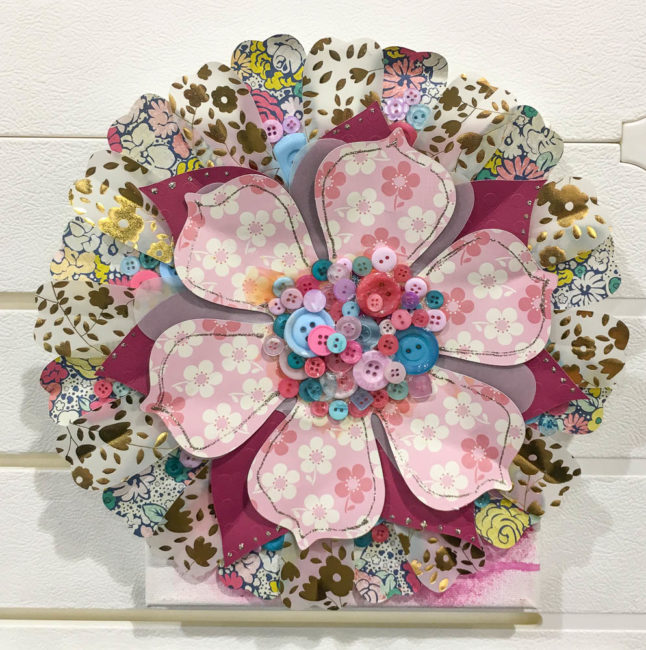
Last but not least, 28 Lilac Lane designer May Flaum shared her take on the 3D paper flower trend in our booth. Accented with a center of buttons, this flower will bring color and pattern to your walls or your party decor!
We hope that you enjoyed this peek at some of our booth projects from Creativation! Thanks to all of you who visited to see them in person!
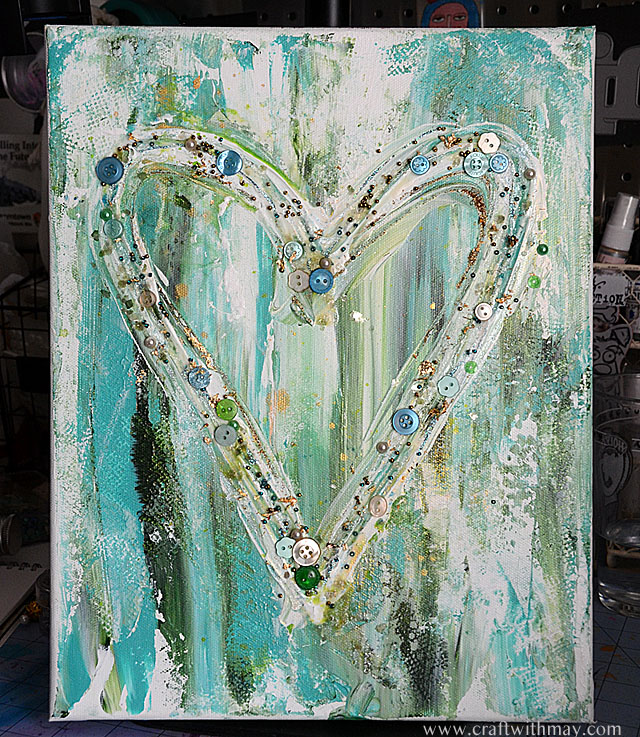
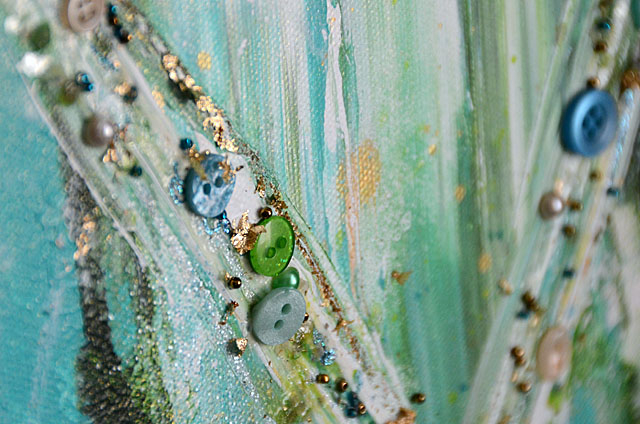
Whether you are looking for a last-minute gift idea, or to brighten your home decor for the new year…this mixed media wall art project by 28 Lilac Lane designer May Flaum is just the thing for your walls. It’s an easy home decor canvas that can be completed in just a few minutes, but packs a visual punch!
easy home decor canvas by May Flaum
Only a few basic supplies are needed for creating this project:
The mixed media technique for this easy home decor canvas is messy and random looking – and therefore very forgiving and difficult to screw up! Just smear the shades of paint in one direction across your canvas – and remember to make sure it is nice and thick for a beautiful textured look.
Next, use your palette knife to smear a shape into the paint. Use liquid adhesive to add your embellishments and gold leaf on top of the smeared shape. Finally, spritz with gold mist for an extra touch of shine!
easy home decor canvas by May Flaum
It’s that simple to create beautiful wall art! And don’t forget that May’s mixed media technique on this easy home decor canvas can be adapted very simply to many color schemes and shapes. Try the 28 Lilac Lane Hello Sunshine bottle with shades of yellow and white paint to create a beautiful moon for a nursery wall. Or create a heart in shades of pink using Pretty Princess to add a touch of artsy elegance to a dorm room. The possibilities are as endless as our color palette of 28 Lilac Lane embellishment bottles!
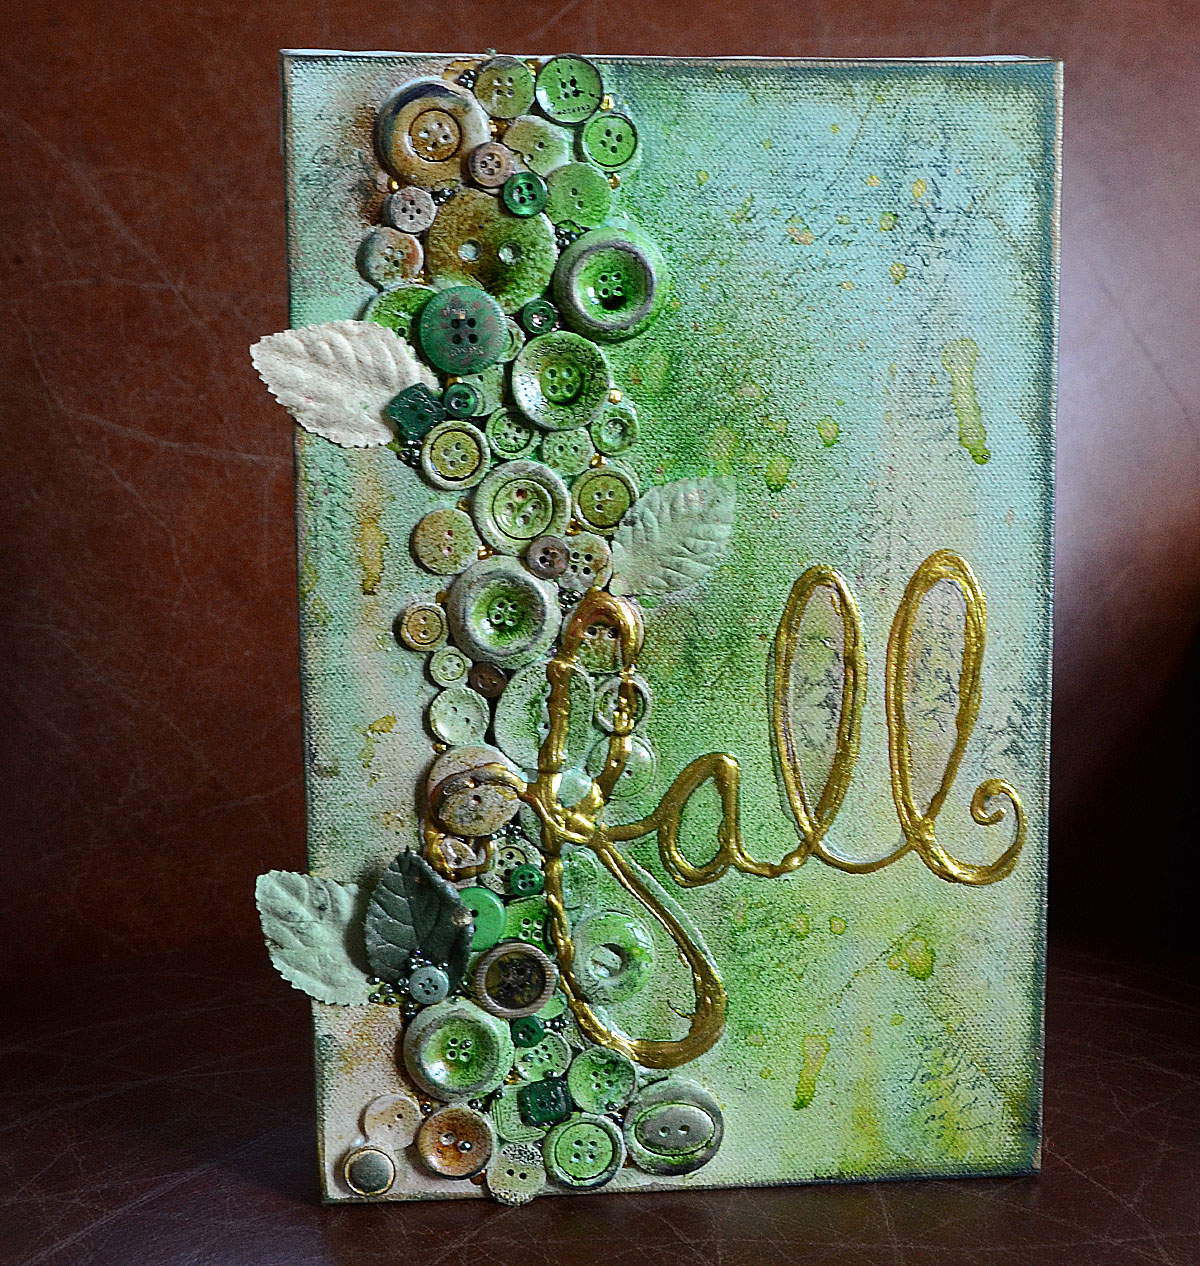
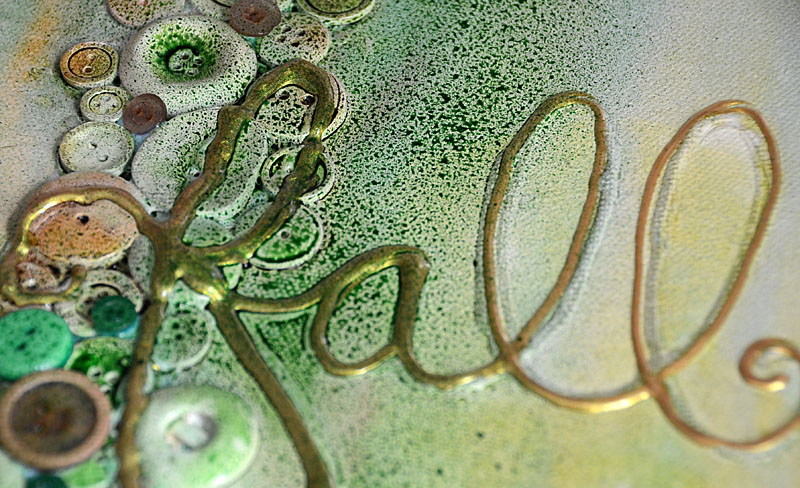
Fall is here, and it’s time to change out the summer decor for something more autumnal. May Flaum is joining us today with the perfect mixed media canvas to change the season on your walls in style. – editor
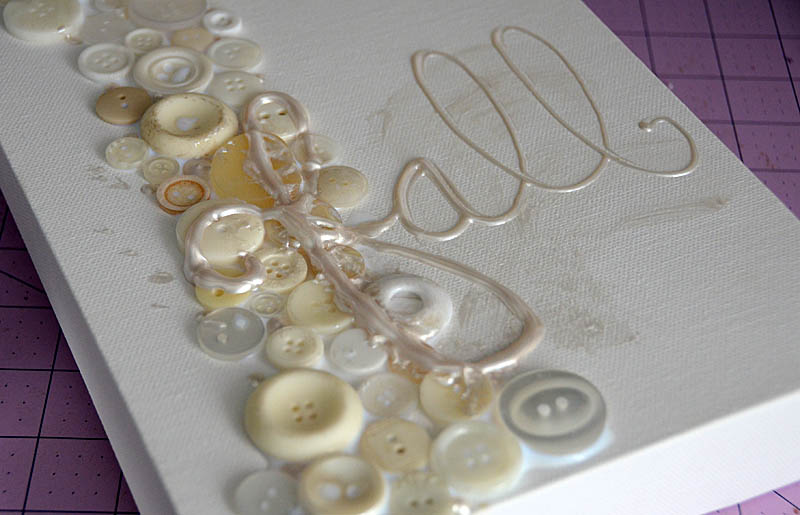
The beauty of this project is that it can be any color, subject, or size. Even better? It will allow you to use whatever color of buttons you happen to have a lot of! In this example I am working with the Ivory button bonanza bag, however I more often use a mix of buttons (often colors I don’t like or get too many of!). Everything is coated with gesso – so you can truly work with any colors you have!
Supplies:
Step 1: Apply a generous amount of liquid adhesive in the area you wish to place your buttons. Add more as needed.
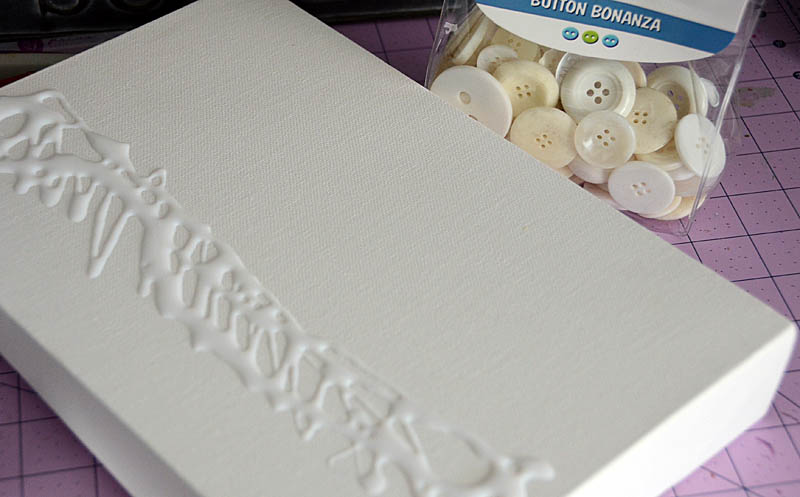
Step 2: Add buttons, beginning with larger ones and working smaller.

Note: From this step forward, you will need to let the project dry completely between every step.
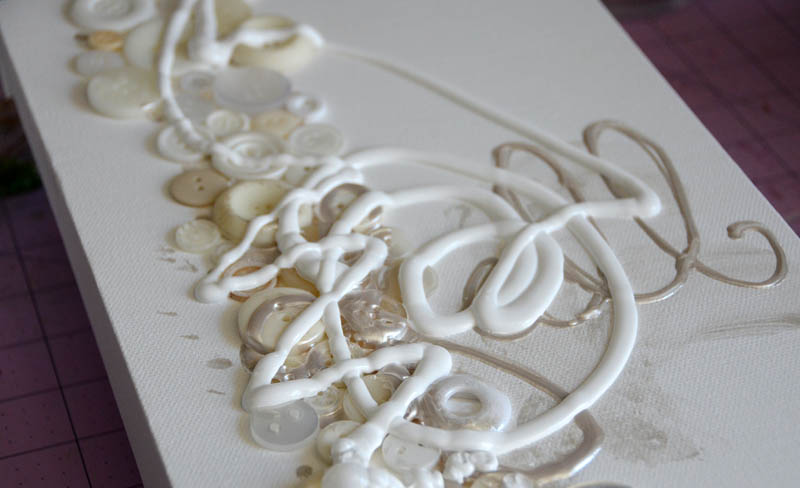
Step 3: Using a dimensional liquid product such as gel medium or a white or pearl dimensional paint pen, write your word.
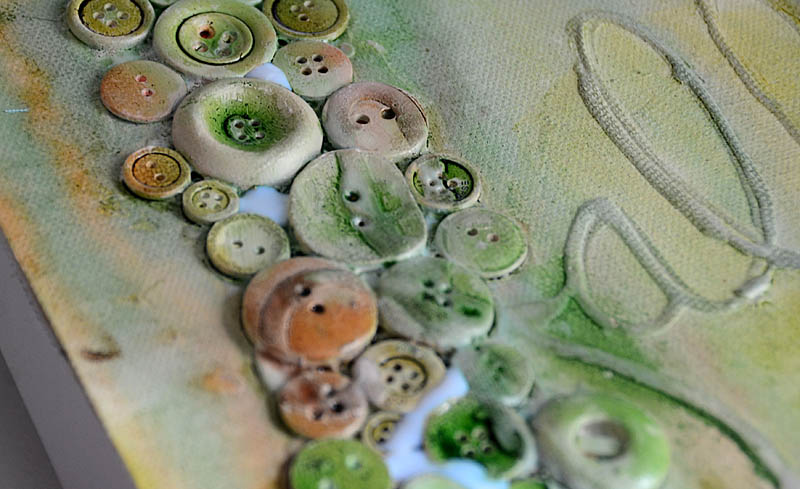
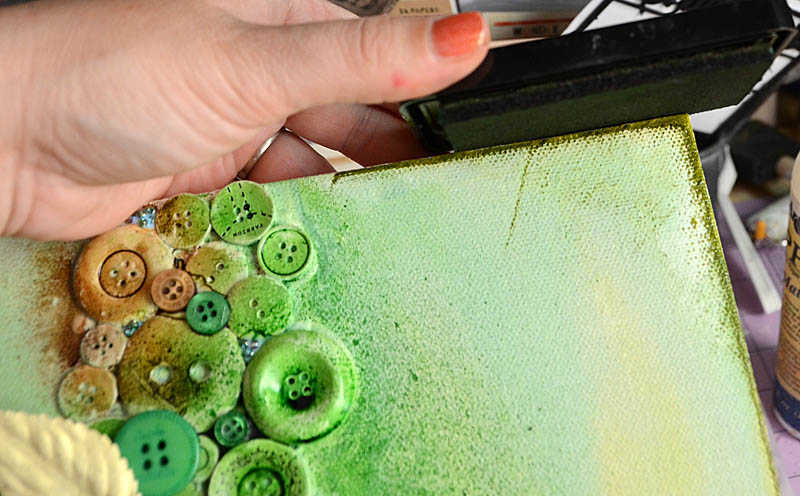
Step 4: Apply a good amount of gesso over the entire surface and work in so that everything is fully covered.
Step 5: Mist colors of your choice across canvas. Allow to dry and repeat this process until satisfied. If you’d like them to “run” then tilt canvas up on one side while wet.
Note: Depending on the brand(s) used and properties of your spray ink/colors results may vary. Don’t be afraid to repeat step 5 many times! If you don’t have sprays/mists, feel free to use any color media you have on hand such as watercolor or acrylic paint as a substitution!

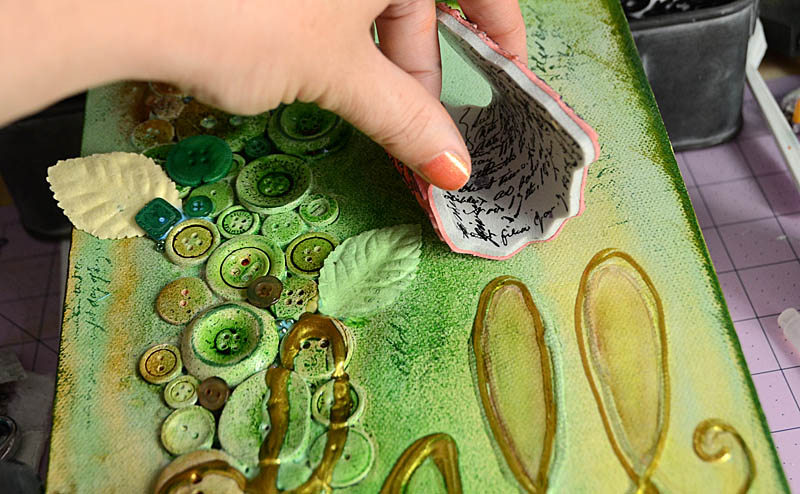
Step 6: Apply liquid adhesive in spots and gaps where you can add more buttons. Then add buttons in colors that compliment your design, as well as leaves or other elements that you’d like to feature.
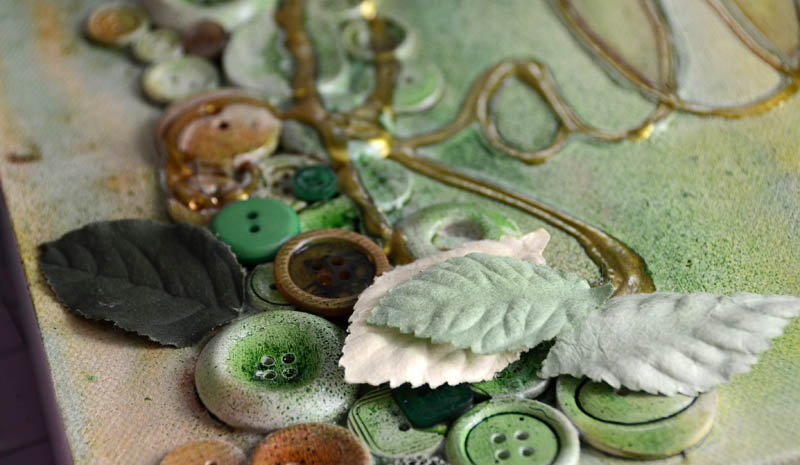 Step 7: Go over your word with gold dimensional paint or a pen to help it stand out, and spray a bit more color in a bold or dark color if desired.
Step 8: Use a permanent ink pad and ink the edges of your canvas. If desired, repeat this with multiple colors. For this canvas I used a dark green and a black.
Step 9: Use a script or other design stamp and permanent ink, and stamp randomly around the canvas. This works best with an unmounted rubber stamp, and adds a lot of depth to the project.

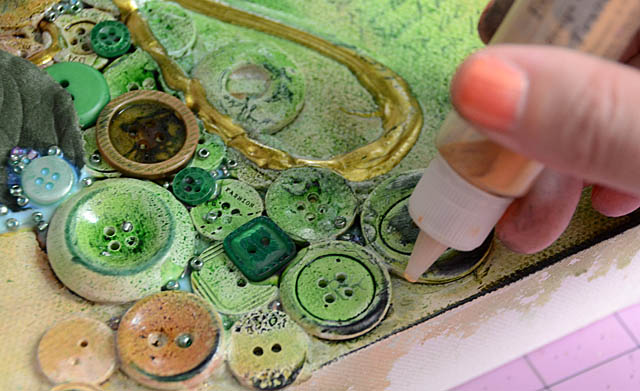
Step 10: Finish project by adding any finishing touches such as dots of gold paint, pearls, beads, rhinestones, and more.
What I love most about this project is that you can customize it so many ways, and for any size or theme you like. It’s a great way to use leftover buttons and other supplies you may have sitting around. I hope you give it a try!
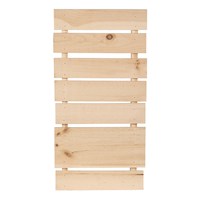
 The Autumnal Equinox officially starts September 22nd, 2013. It’s time to start thinking of all of the decorative projects you will be making to usher in this transitional season. How about making some Rustic Pallet Wall Art?
Walnut Hollow’s 14″ x 12″ Rustic Pallet
DecoArt Americana Acrylics in Espresso and Buttermilk
Fabric Scraps, wool felt scraps
Buttons Galore and More Laura Kelly Hand Dyed Buttons
Rub on sentiment
Wax candle, sanding block, sewing machine and thread, hand sewing needle and thread, tacky glue
Taking notice of the recycled wood pallet craze, Walnut Hollow recently introduced their new line of rustic pallets. I have to honestly say that I am super excited about all the cool possibilities for this line. Walnut Hollow came up all kinds of fun ideas for this line. These products can be ordered directly from Walnut Hollow’s website. By the end of December, you will be able to purchase them in Joann’s Fabrics and Crafts and in AC Moore in January.
24″ x 12″ Pallet
Rustic Arrow Pallet
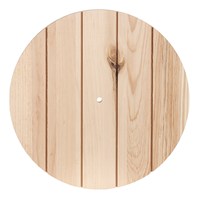
Paneled Wood Clock
These are just a few examples of the yummy surfaces offered in this product line. For this Rustic Pallet Wall Art project, I used the 14″ x 11″ rustic pallet.
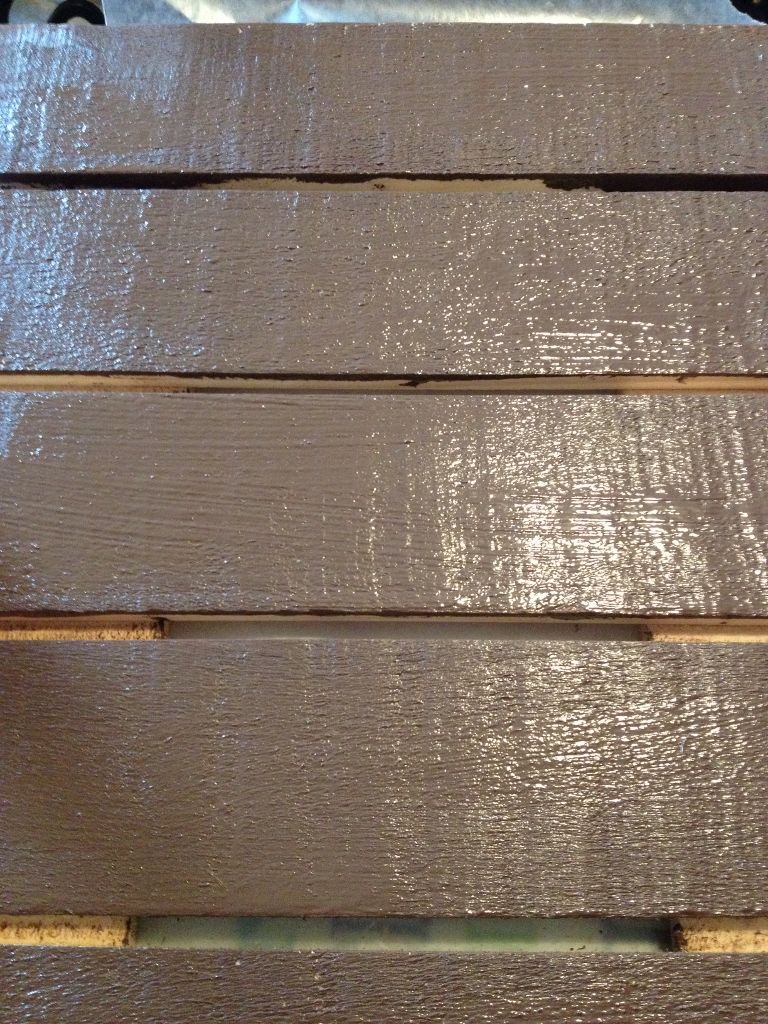
First I used DecoArt’s Americana Acrylics in Espresso to paint the front this brown shade. I waxed the surface once the pallet was dry in random areas and painted the surface Buttermilk.

Once I painted the entire surface of the pallet, I sanded the surface to reveal the distressed finish. Areas where the wax was applied will rub away easily resulting in a chippy looking finish. This technique also works well with Vaseline but the effect is a little more dramatic.

One of my favorite things to do with my leftover fabric and felt scraps is to create different sized circles and fuse the fabric circles to the wool felt circles. I use my sewing machine to play with the various stitches by sewing around the edge of the fabric to hold it in place on the felt. A button, sewn in the center makes the look complete. These are some of my favorite. I love the Laura Kelly Hand Dyed Buttons from Buttons Galore and More!

Use tacky glue to adhere the circles to the rustic pallet. Arrange an outer circle first, leaving a gap at the bottom so you can paint on a simple tree truck with the espresso brown paint.
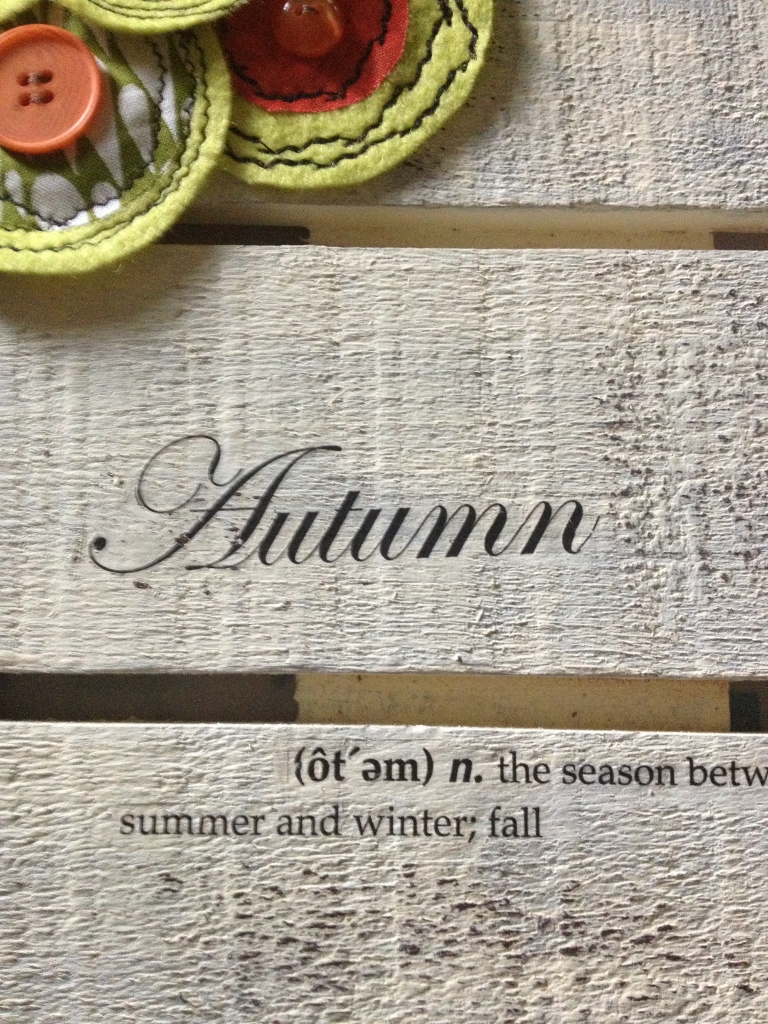
I finished the rustic pallet wall art with a couple of rub on sentiments to celebrate Autumn. This is wall art that you can display from the end of September into Thanksgiving before the holiday decorations go up! If you are not a huge fan of inside seasonal décor, use colors to coordinate with your home décor and a general sentiment instead. Then you can display it all year long!
Happy Autumn (soon),
Live Life Creatively,
Melony
Can you believe Mother’s Day is quickly approaching? It is right around the corner and I love to make a handmade gift.
I want to share this artistic canvas made just for “Mom” using vintage doilies from around the house.
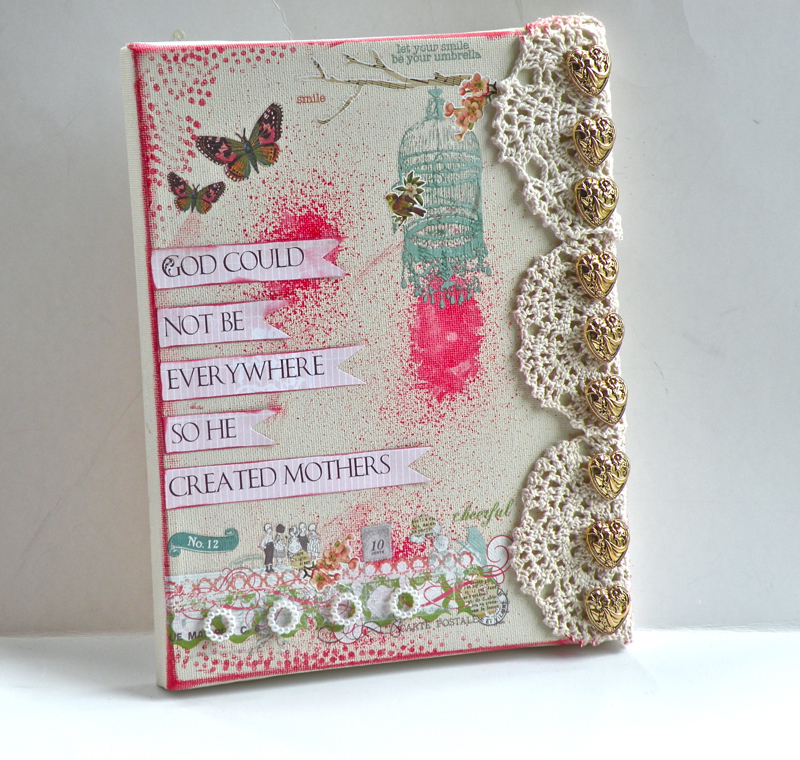
For this Canvas use an 8×10 canvas, and paint it with a sand colored acrylic paint.
After allowing the canvas to dry, take a craft spritz and carefully spritz canvas in random places. Set aside to dry for 10 minutes.
Using coordinating ink color, ink edges or canvas.
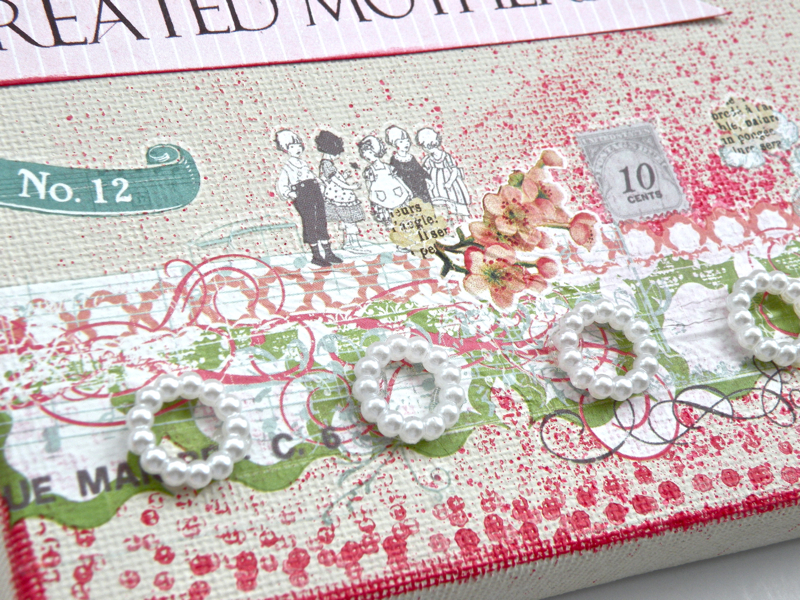
Take a pencil with eraser and dab into coordinating paint or ink, ink or paint onto canvas as shown in photos.
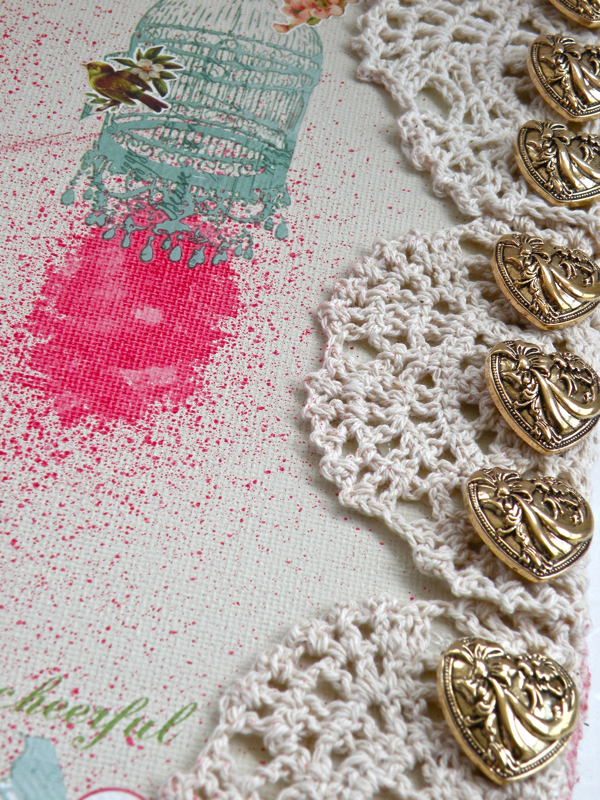
Adhere vintage doilies.
Grab some packages of beautiful Buttons’ Galore & More Vintage Gold buttons and apply buttons between doily stitches using hot glue.
Using rub-ons, carefully apply rub-ons in desired locations.

Using shank & pearl keepsake buttons, adhere over rub-on using hot glue gun.
Set canvas aside.
Choose a lightly colored patterned paper, using home printer, print quote onto page.
Trim out words and hand cut pennant edging.
Ink edges.
Adhere quote to canvas.
Wrap it up and give with love.
I hope you enjoyed the post today- Pinky: Buttons Galore & More Design Team