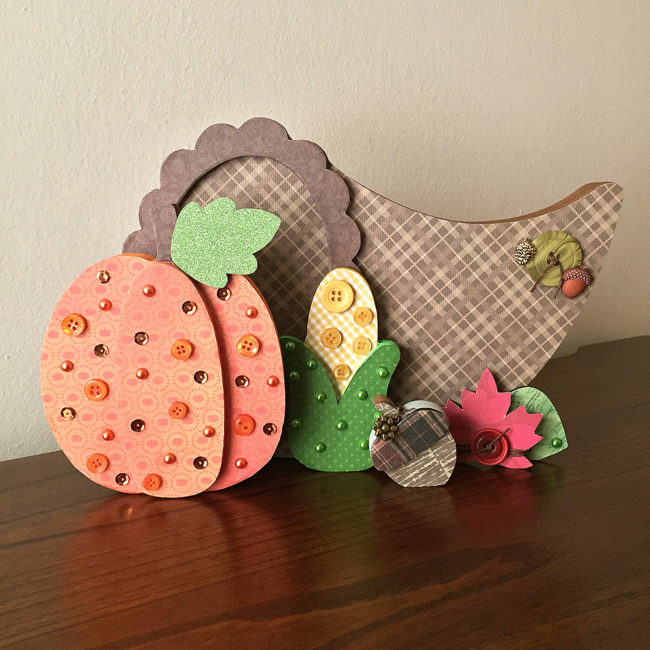
Thanksgiving will be here soon and the house will be full of relatives and friends. Why not create something to show off before dinner with this DIY thanksgiving cornucopia home decor set? Continue Reading →

Thanksgiving will be here soon and the house will be full of relatives and friends. Why not create something to show off before dinner with this DIY thanksgiving cornucopia home decor set? Continue Reading →
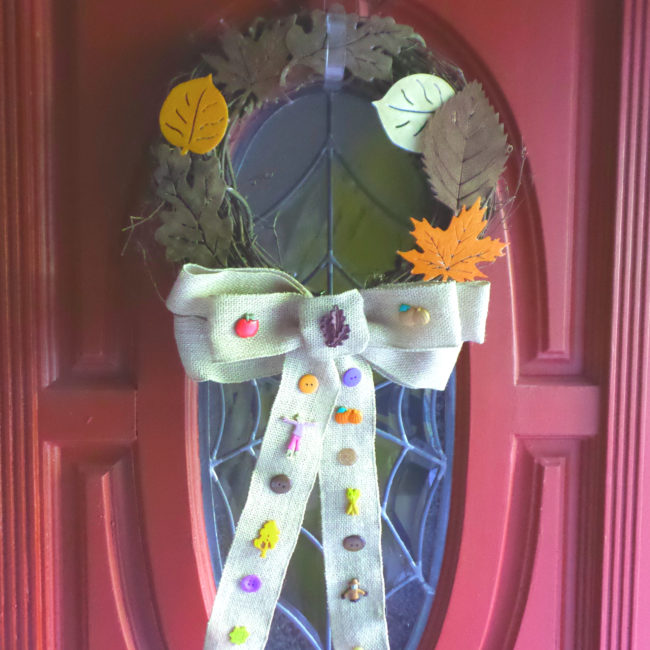
Hi everyone! It’s Lorrie here with a fall wreath featuring autumn-themed buttons from Buttons Galore & More! This fall wreath will look great on your front door to greet visitors, or on the wall inside your home to add some seasonal flair.
To make this easy fall wreath, I started with a grapevine wreath and a plain burlap bow that I picked up at my local craft store. I decorated the wreath itself with some plastic leaves that I painted in beautiful autumn colors. But the real fun starts with the bow! Continue Reading →
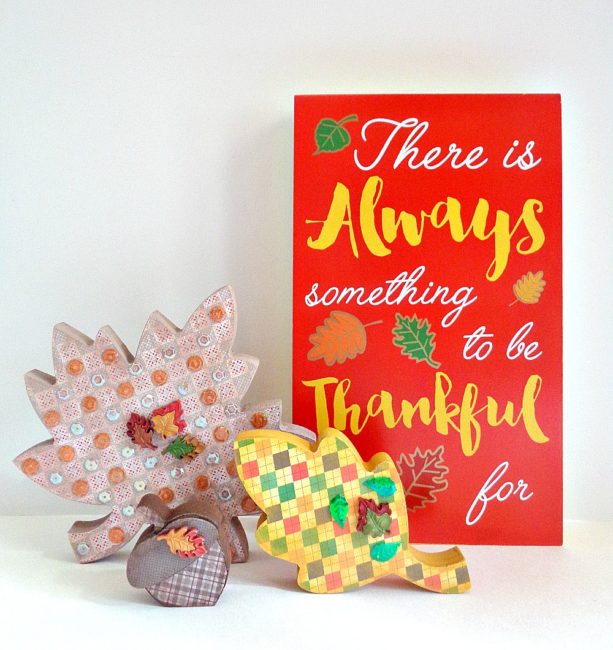
Hello Everyone! This is Katie from the Buttons Galore & More Design Team and today I will be showing you how you can decorate a new product available from Buttons Galore and More!
If you haven’t noticed, Buttons Galore & More has a new area on their website which is dedicated to home décor. This home décor is a new line of wooden products which are super easy to embellish and decorate. The nice thing about the new line is that you have tons of options for different holidays, themes, or seasons. Continue Reading →
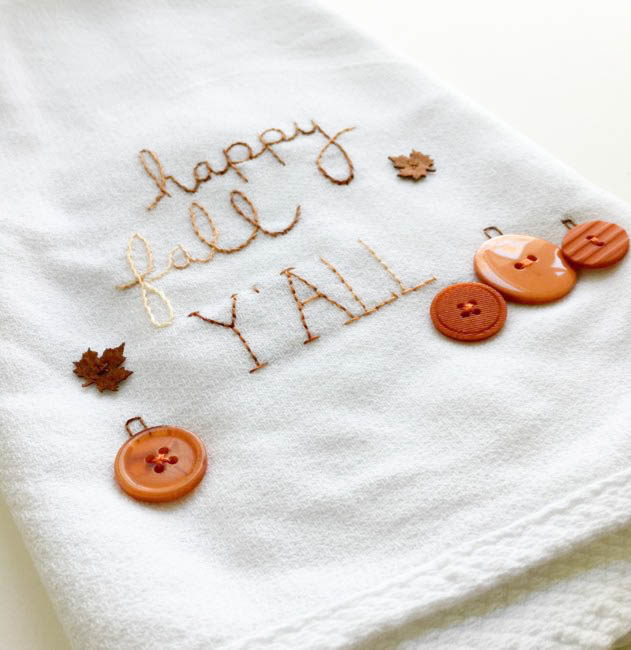 We’ve had so many crisp mornings lately, I have gotten so eager for fall! So bring on the pumpkins, acorns, orange and brown! Today’s project is a super quick embroidery project to add to your fall decor. Even the most beginner of embroiderers can easily stitch up this DIY fall tea towel. Continue Reading →
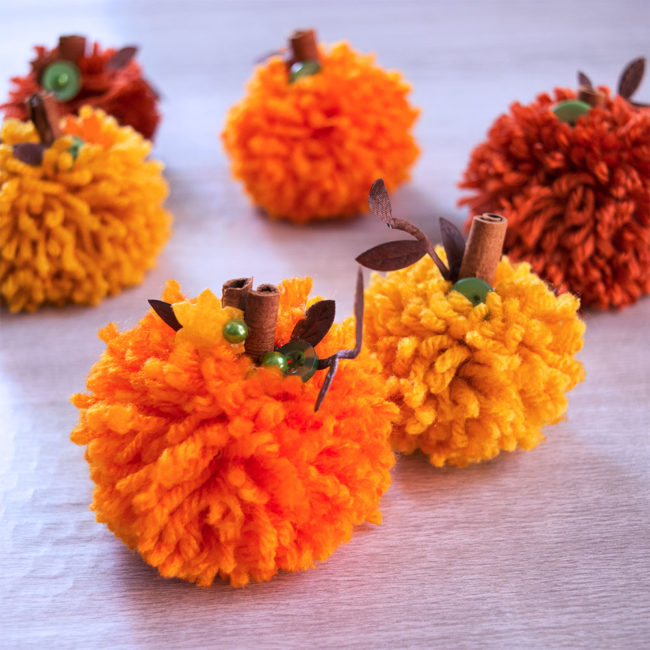
The weather here has started to cool down this week and so I’ve decided it’s time to bring out those pretty autumn colors. Pumpkins are my favorite seasonal decoration in the fall – I love using both fresh pumpkins and artificial pumpkins in my decor. Yarn pom poms are such a fast and easy craft to make. They can add a bit of whimsy to any decor. I wanted to make some DIY pom pom pumpkins to add to my fall decorations, and the beautiful Autumn Afternoon Embellishment Kit from the 28 Lilac Lane collection was the perfect addition to finish off these cute little poms! Continue Reading →
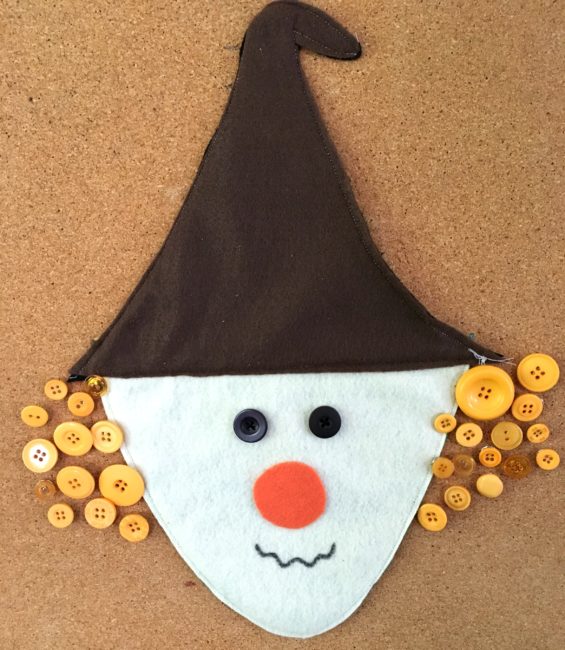
It’s hard to believe it, but fall is creeping upon us and with Fall comes holiday after holiday. Here is a fun and fairly easy fall countdown calendar project to count down the days till Halloween and/or Thanksgiving using some easy to find craft materials and of course…buttons!
Here’s what you need to make this fun, reversible witch and scarecrow fall countdown calendar.
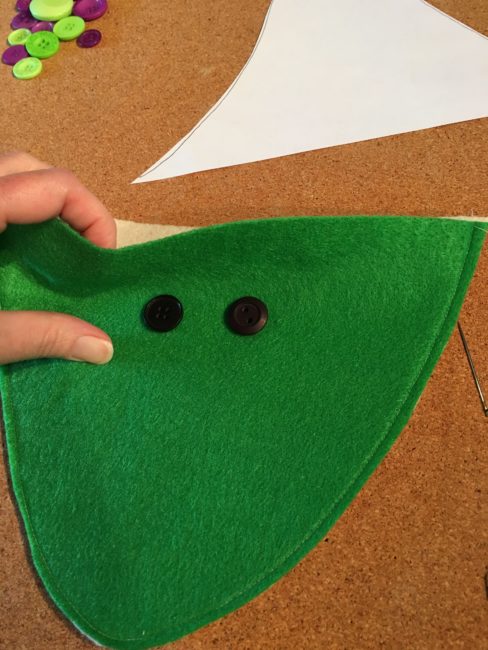
First, print out your patterns and cut out the felt according to the directions on the patterns. You will have 1 brown hat, 1 black hat, 1 green face and 1 tan face. If you are sewing your project together, go ahead and sew around the curved part of the face. Don’t forget to leave the top open! You will then need to sew your black button eyes onto the green face and onto the tan face.
If you are gluing your project, go ahead and glue the two faces together and then glue the black buttons for eyes onto each face. Let dry well before going on to the next step.
Cut out a wiggly, carrot shaped nose for your witch, along with a circle nose for your scarecrow. Attach them to your faces with craft glue. Use the black permanent marker to draw a mouth for each.
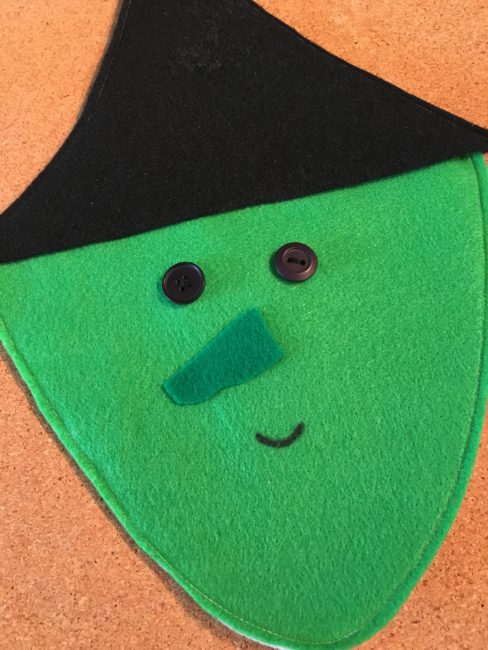
Next, if you are sewing your hats together, sew up and around the two sides, leaving the straight edge of the hat open. Then slide your face inside the two pieces of your hat and sew together; making sure to sandwich all the layers of the felt together when you are sewing.
If you are gluing, glue the hat pieces together and then slide the face inside the hat. You can attempt to glue these parts together, but I would recommend leaving them unattached. They will appear one piece when you attach it to the cork board.
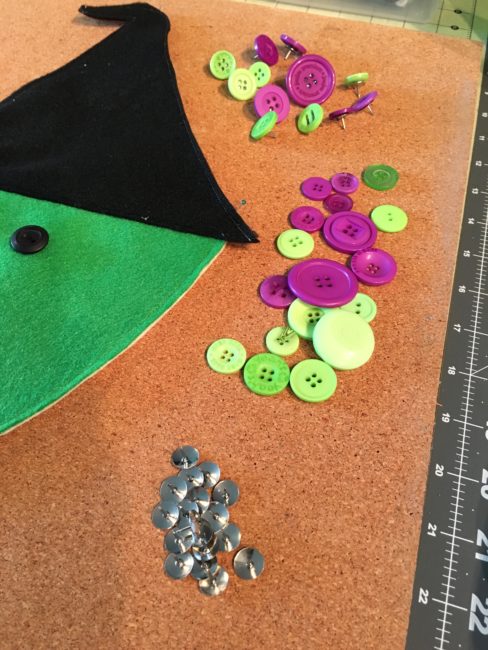
Heat up your hot glue gun and while it’s heating, separate your button pack. The witch hair uses 31 of the purple and green buttons and the scarecrow uses 28 of the orange from the Trick or Treat Button Basics BCB129. Glue the buttons on the thumb tacks and let them cool off.
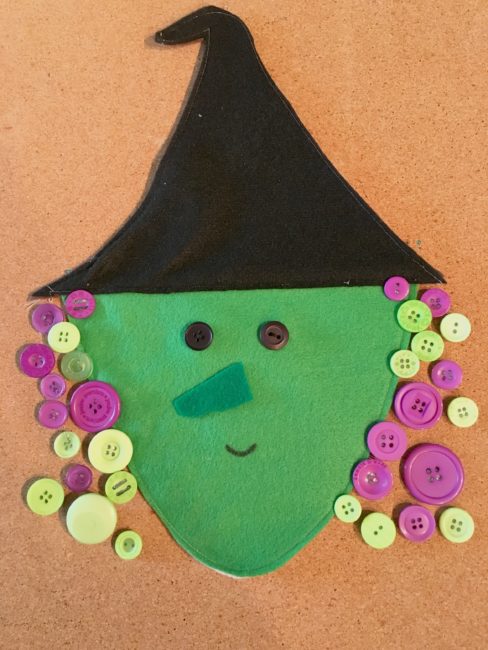
And there you have it! Attach your witch to your cork board with straight pins and either start out with all 31 buttons, taking one off each day until Halloween arrives, or add a button each day as it gets closer! Whichever you prefer!
Once Halloween is past, flip over your witch and start counting down the days till Thanksgiving!
Thanksgiving and Halloween are coming fast…make your fall countdown calendar today!
Hello Everyone! This is Katie from the Buttons Galore & More Design Team, and today I have a fun button pumpkin wall hanging project to get you in the mood for fall decorating!

This project is perfect to make if you are looking for an easy and inexpensive way to spice up your home décor for fall, halloween, and thanksgiving. I got the idea for this project when I saw a felt wall hanging designed for the 4th of July. However, instead of a pumpkin, the original wall hanging had a heart shaped flag made from felt and a few buttons. Personally, I thought the idea was cute but could be recreated in a simpler way. In today’s project, the whole DIY is only 3 steps and does not involve any sewing tools!
To decorate my button pumpkin wall hanging, I used two button sets for a majority of the project. Those two button sets were the 28 Lilac Lane ”Pumpkin Spice” Embellishment Bottle and the Buttons Galore Autumn Value Pack. Both of these button sets provided a wide variety of harvest/fall style buttons and worked really well together. My personal favorite out of both of these sets was definitely the 28 Lilac Lane ‘”Pumpkin Spice” Embellishment Bottle because you received a ton of beautiful orange colored buttons.
So, to find out how to make your own pumpkin button wall hanging, keep reading below!
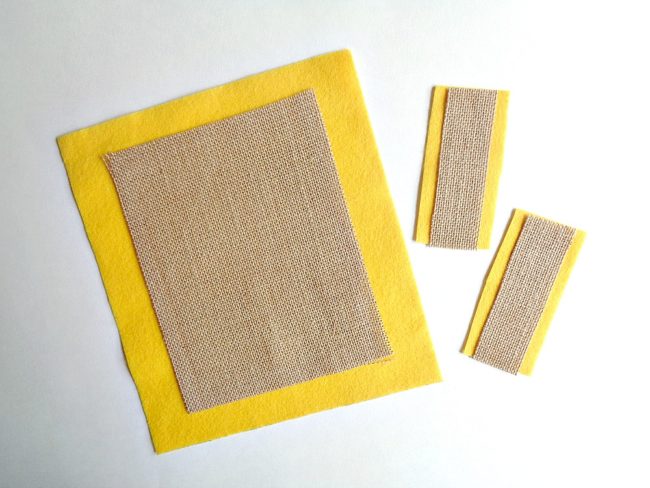
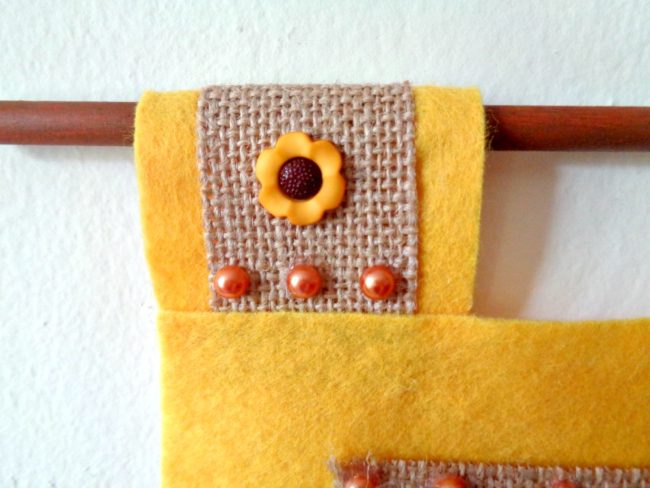
Step 1: Cut one piece of felt that measures 9 inches by 10 inches and two smaller pieces of felt that measure 2 inches by 3 ½ inches. Then cut out one piece of burlap that measures 6 ½ inches by 8 inches and two smaller pieces that measure 1 inch by 3 ½ inches.
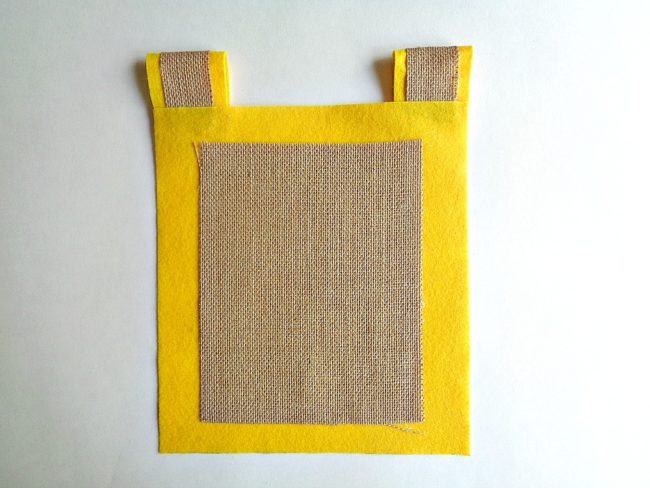
Step 2: Layer the larger piece of burlap centered onto the larger piece of your felt and glue it into place with your hot glue gun. Then layer the smaller pieces of burlap centered onto your smaller pieces of felt and glue them into place. Finally, create loops for your wall hanging by folding over the smaller pieces of felt/burlap and glue them in the corners of your larger felt piece.
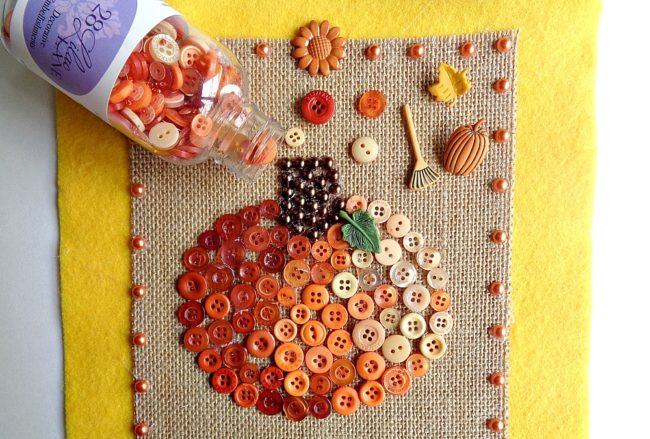
Step 3: Now take your pen and draw the outline of a pumpkin onto your burlap. Then begin gluing on your buttons around the outside of your pumpkin to create an outline and then fill in the middle with more buttons. For my pumpkin, I decided to go from dark to light buttons and then use shimmering half pearl flat backs for the stem. Finally, use the rest of your normal buttons and decorative buttons to decorate the rest of your wall hanging.
For my button pumpkin wall hanging I used the following:
Once you are happy with how your button pumpkin wall hanging looks, you are ready to hang it on the wall by sliding a dowel rod or wooden stick through the two loops!

I loved how this pumpkin button wall hanging turned out and I think it would look so cute as part of a gallery wall!
While creating this project, I did free hand the design of the pumpkin. However, if you are not comfortable drawing your own pumpkin (in step 3), you can always google ”pumpkin template” and print out a template to trace around. With that being said, if pumpkins are not your thing, you could always change the main image to be something else. For example, I think a leaf created from the 28 Lilac Lane “Toasted Graham” Embellishment Bottle would look really pretty.
If you made this pumpkin button wall hanging, what 28 Lilac Lane items would you use?
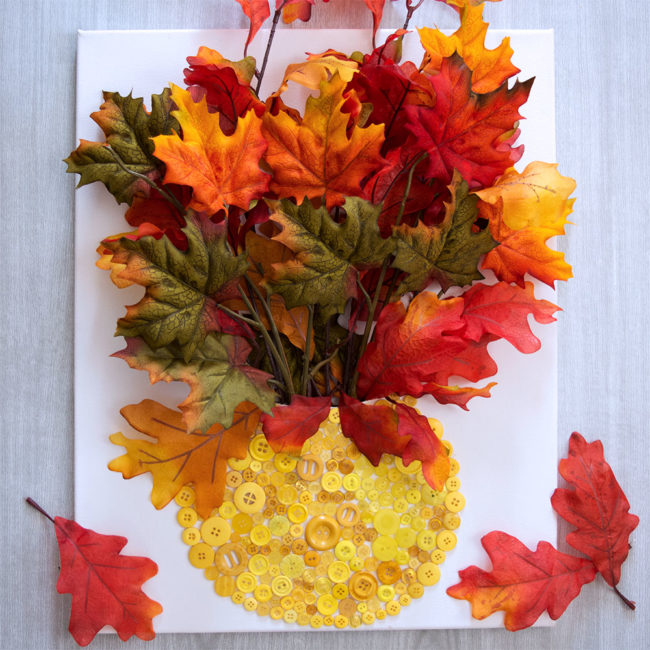
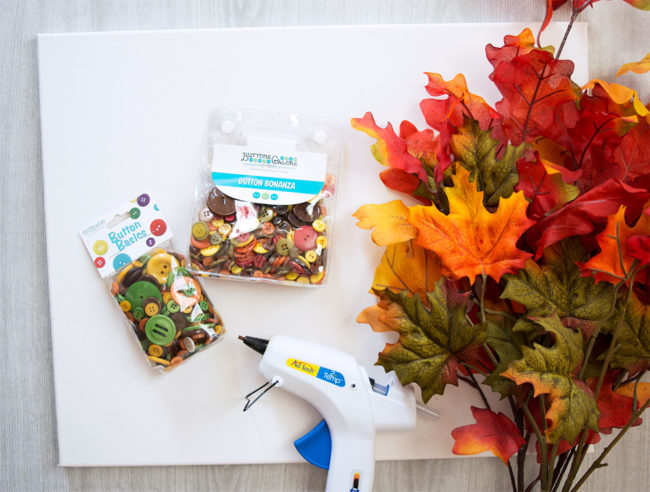
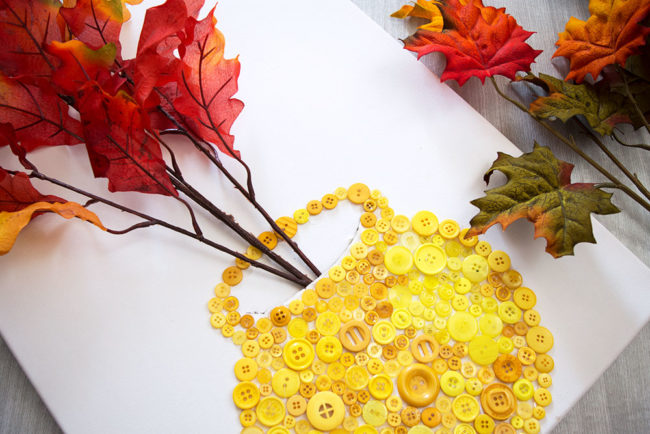
Autumn is one of my very favorite seasons. I love the cooler (but not cold) temperatures and the gorgeous bright colors that appear in nature. This Button Vase Fall Canvas wall art is the perfect project when you’re short on table space but want to add those beautiful fall colors to your home.
Use a pencil to draw (or trace) a simple vase shape to the bottom half of your blank 16×20 canvas.
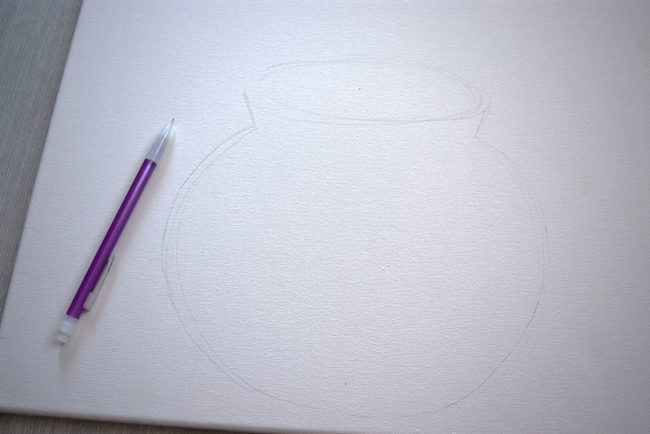
It doesn’t need to be perfect, just a rough outline so that you know where to place the buttons for the button vase. The buttons will cover up any pencil marks. I drew a round vase, but you can make it any shape you want. Whichever shape you use, make sure to keep it on one end of the canvas.
Glue buttons to the outlined vase you drew on the canvas. I used a hot glue gun to attach the buttons.
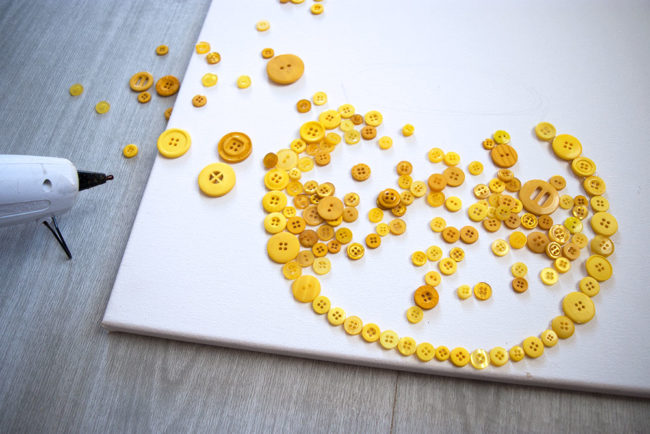
Because I was using Silk Autumn Leaves in my vase with beautiful red and orange colors, I made my vase Yellow to complement them. I used every yellow button in the Harvest and Fall Festival button sets to fill my round yellow vase. I liked that the shades of yellow in these two sets were in line with the yellow you’d actually see on fall leaves.
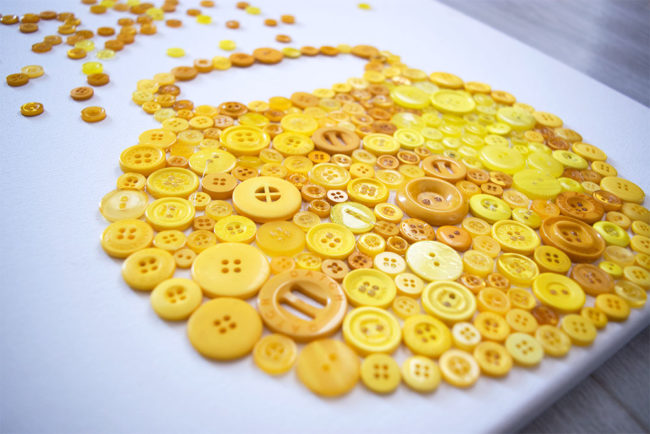
Don’t glue buttons inside the mouth part of the vase at the top but fill the rest of the vase.
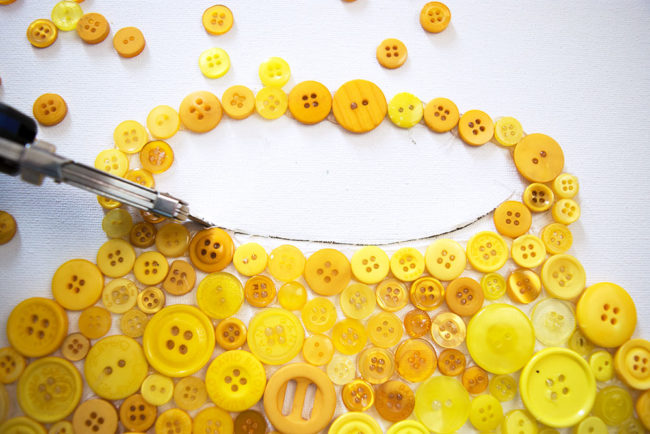
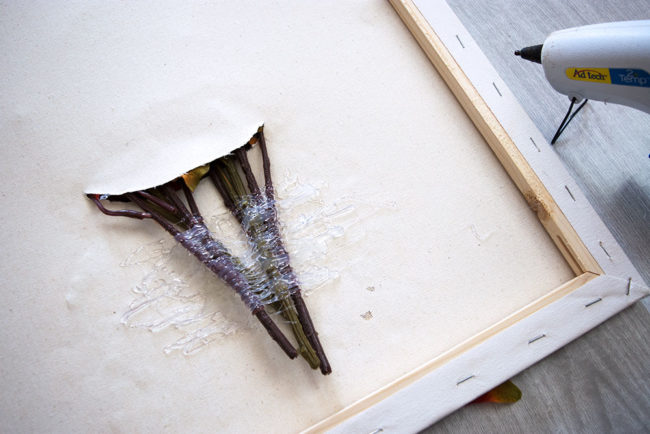
Use a sharp craft knife to cut a line in the canvas just above the buttons in the mouth of the vase.
Insert your Autumn Silk Florals or Leaves through the hole in the canvas. Arrange them however you like. I find that the canvas vase looks best when it’s full. I used four Silk Leaf stems to fill my vase.
Turn your canvas over, and use hot glue to secure the stems in place for added stability. I used an entire small glue stick to fix my stems in place.
Use single leaves to fill in any blank spaces or gaps at the base of the stems. Secure them in place with hot glue.
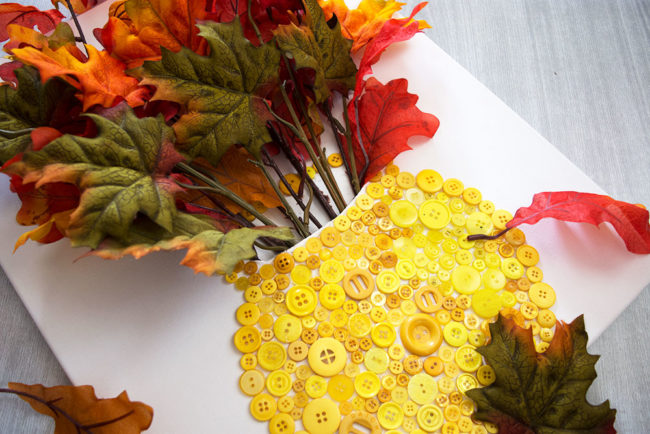
If you have some unruly leaves on the stems that aren’t laying quite right, a dot of hot glue can help secure them to the canvas in a more pleasing way.
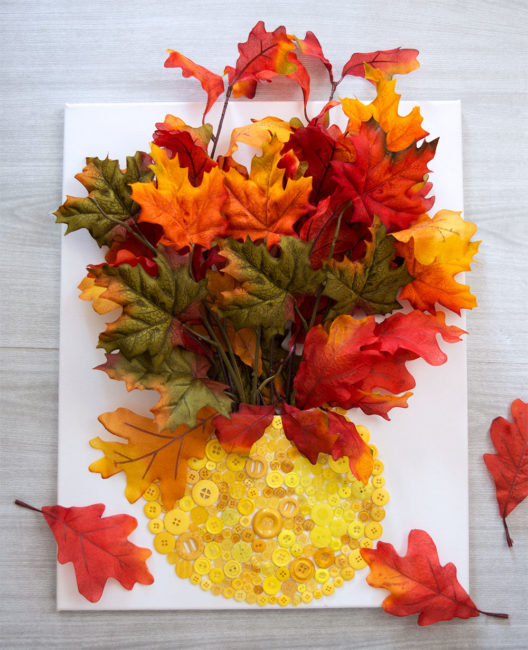
Hang your canvas on the wall, or prop it up on a table for a beautiful bright pop of autumn colors! I think that I will take a slightly smaller canvas and use the red buttons in the Fall Festival and Harvest button packs to make a smaller red vase with some pretty silk sunflowers! The pair will look great together with my fall decor. The possibilities are endless if you just change the color of the buttons for your vase to complement the flowers or leaves you have! Happy Fall Crafting!
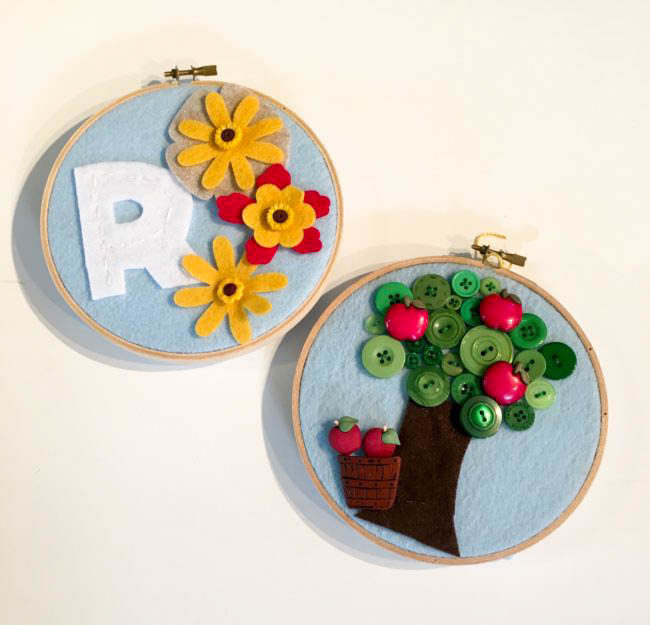
I’ve had the joy of teaching sewing in our community for the past few years to children of all ages. When people discover that I teach sewing to children, the first question they always ask is “what is a good beginner project?” This little hoop project is always my number one go-to project for anyone who has never used a needle and thread and wants to learn to sew. Even better, including buttons in the project ensures that they will also walk away with a great life skill for those days when a button pops off their shirt at the most inopportune time – and you know we’ve all been there!
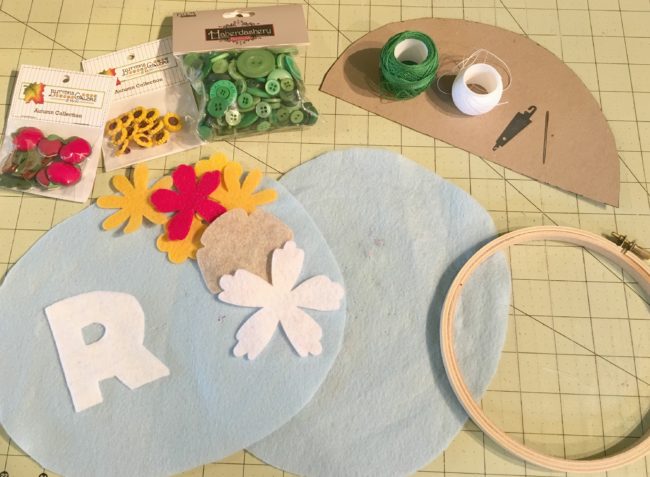
First up, let’s talk supplies. You will need the following to complete the two hoops:
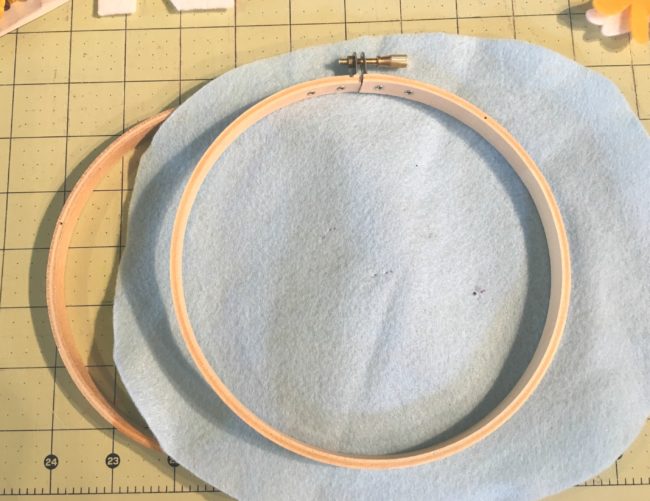
Now that you’ve gathered up all your materials, let’s get started and learn to sew! First, you need to find something to make a roughly 8-inch circle. Find a bowl or something round to trace around and cut your blue felt into two circles.
Next up, let’s set them in your embroidery hoops. This is often the most daunting thing for new stitchers, but all you need to do is make an embroidery hoop “sandwich”! Unscrew the bolt just a little and separate the hoops into two parts. Take the part without the bolt and lay it on your workspace. Then lay your blue felt circle on top of the bolt-less hoop and sandwich them all together by setting the hoop with the bolt outside the bottom hoop and the felt. Tighten up the screw and pull on the edges of the felt just a little to make everything tight.
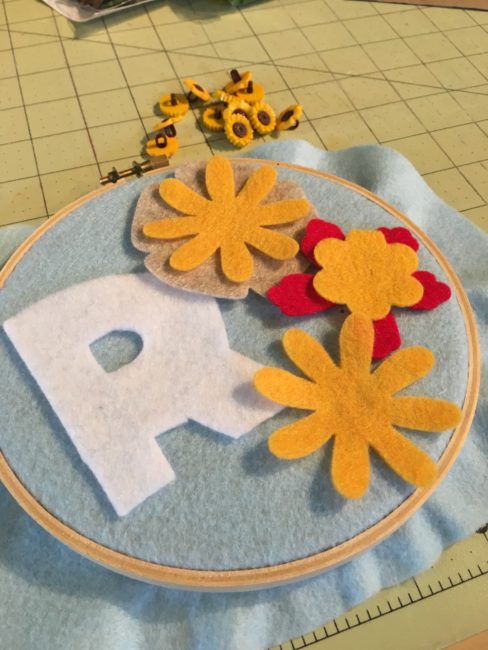
Now, print out the pattern page with your initial on it and cut out the correct initial for you. Use the paper pattern to cut out your initial with whatever color felt you would like. Then gather up your Sunflower buttons, the felt flowers, and your initial. Lay them all out on top of the hoop in whatever design you like best.
Now it’s time to stitch down your initial. Take your white thread and needle. Thread your needle and make sure to put a knot on the end! We are going to stitch down our initial with a running stitch.
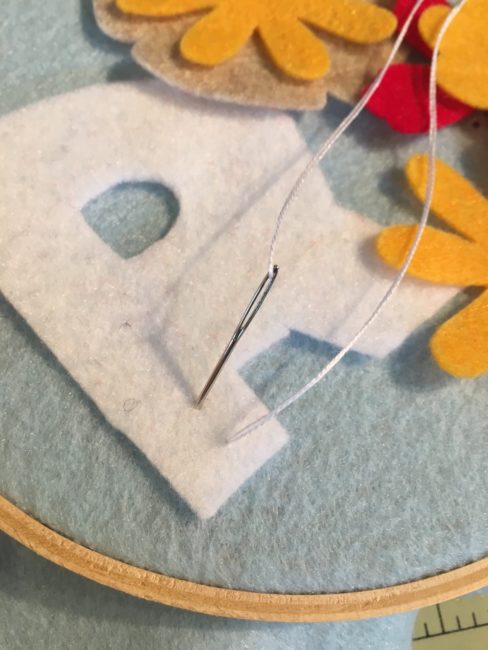
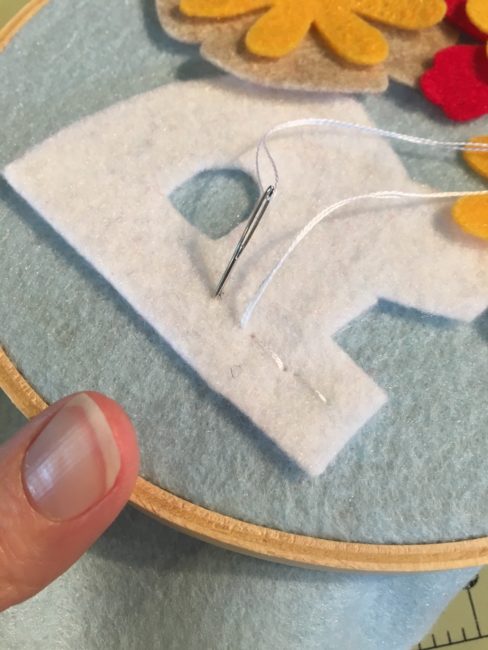
First up, bring your needle up from the bottom and pull gently until your knot stops the thread. Don’t pull too hard or you will pull your knot all the way through! Then bring your needle back down about a pinky finger width from where you started and pull the thread all the way through. Then bring your needle back up and then down as you stitch along the middle of your initial letter. Always remember to “follow your thread” and stitch with a rhythm of up and down.
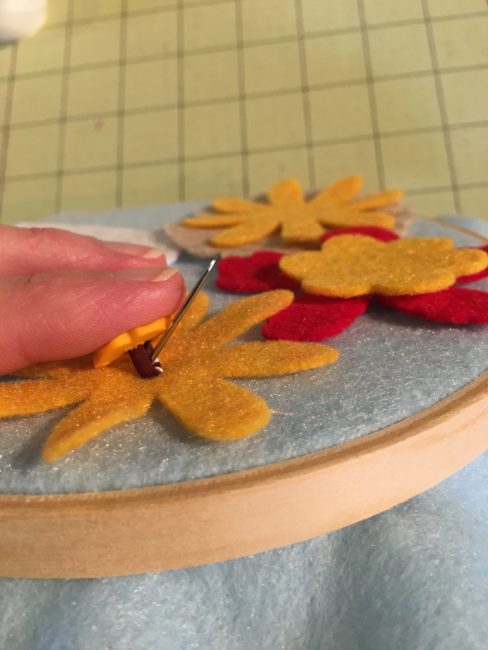
Lastly, grab your Sunflower buttons and lay them on top of your felt flowers. These are shank style buttons and can be a little more tricky for little hands to sew. Start out by bringing your needle up from the bottom and pull it all the way through till the knot stops you. Then take your button shank and thread it onto the needle and thread. Let it fall all the way down and then put your needle back through the top of the felt, pulling the button tight to the felt as you pull the thread from underneath. Continue to sew the button on a few more times and then move down to the next flower.
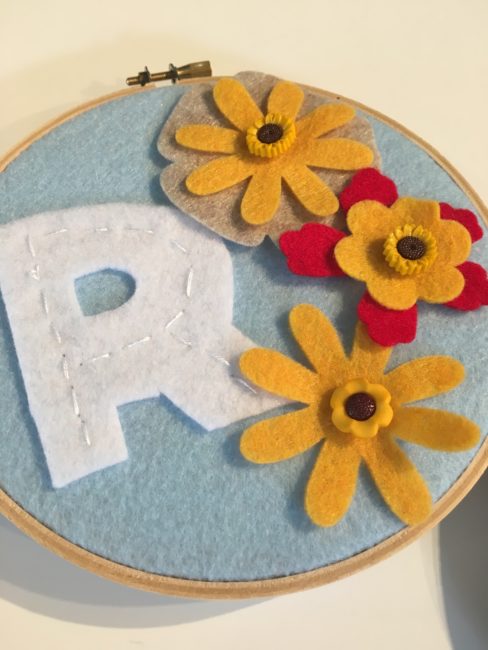
To finish off my hoops, I like to take a hot glue gun and glue the rim of extra felt around to the inside of the back. But sometimes I like to leave it open like a little ruffle fringe! Your choice!
Put a pretty ribbon through the top and you are done!
To make the tree, gather up a scrap of brown felt and cut out a little tree trunk. You have the option of sewing down your tree trunk with a running stitch or you can use some craft glue to glue it down.
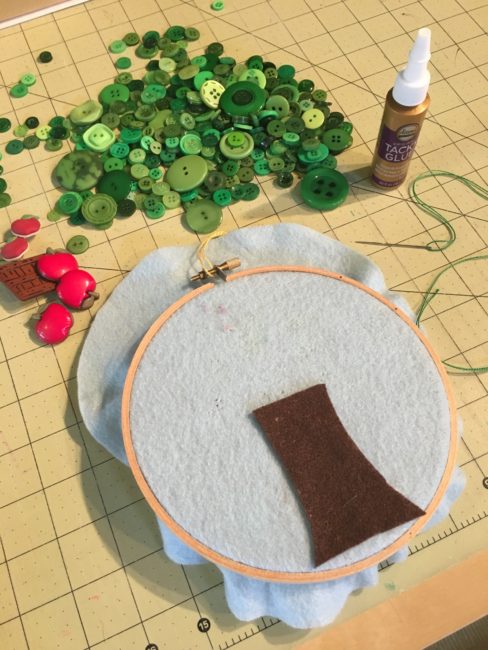
After gluing down the trunk, grab your green thread, a needle and the Apple Pickin buttons from the pack and stitch those down in random spots above your tree trunk. These are the same shank style as the sunflowers. Next, pour out your bag of Green Haberdashery buttons and choosing those that fit best, stitch down green buttons around your apples to fill in the tree.
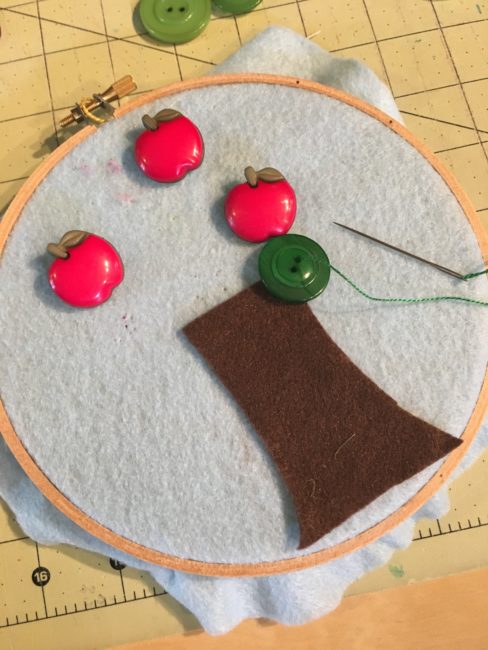
After you sew all the button “leaves” down, take your apple basket and apples and stitch those down near the bottom of the tree. Add a little ribbon for hanging, finish the back by gluing the felt edge to the back or leave it like a ruffle.
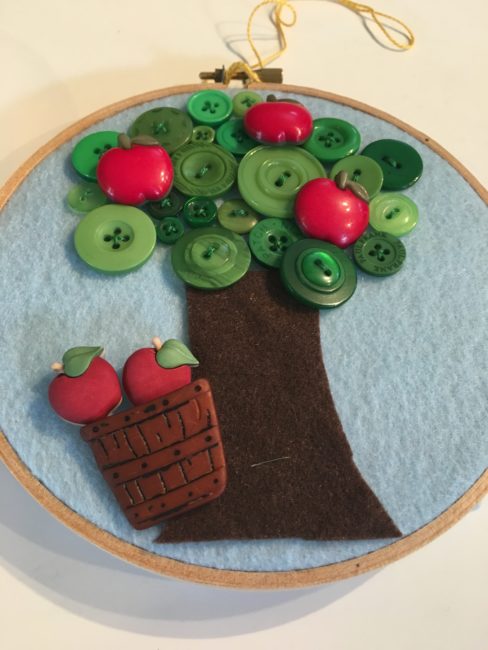
And there you go, two little Fall inspired hoops – these are perfect projects for beginning stitchers!
The calendar is about to turn October, and most of us are in full-speed Halloween crafting mode! In case you are still in need of some Halloween crafts inspiration, here’s a round-up of our favorite Halloween crafts using our favorite crafting embellishment – buttons, of course!
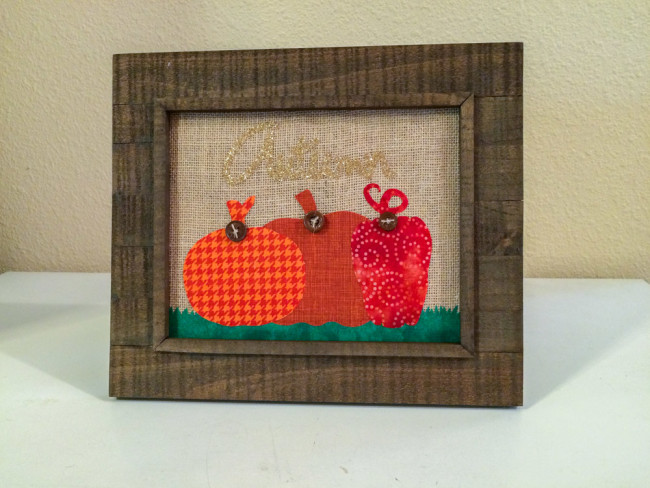
Our autumn frame is super easy to make with no sewing, and will make a great addition to your home decor or your buffet of candy treats. And it’s a great way to use up those fabric scraps!
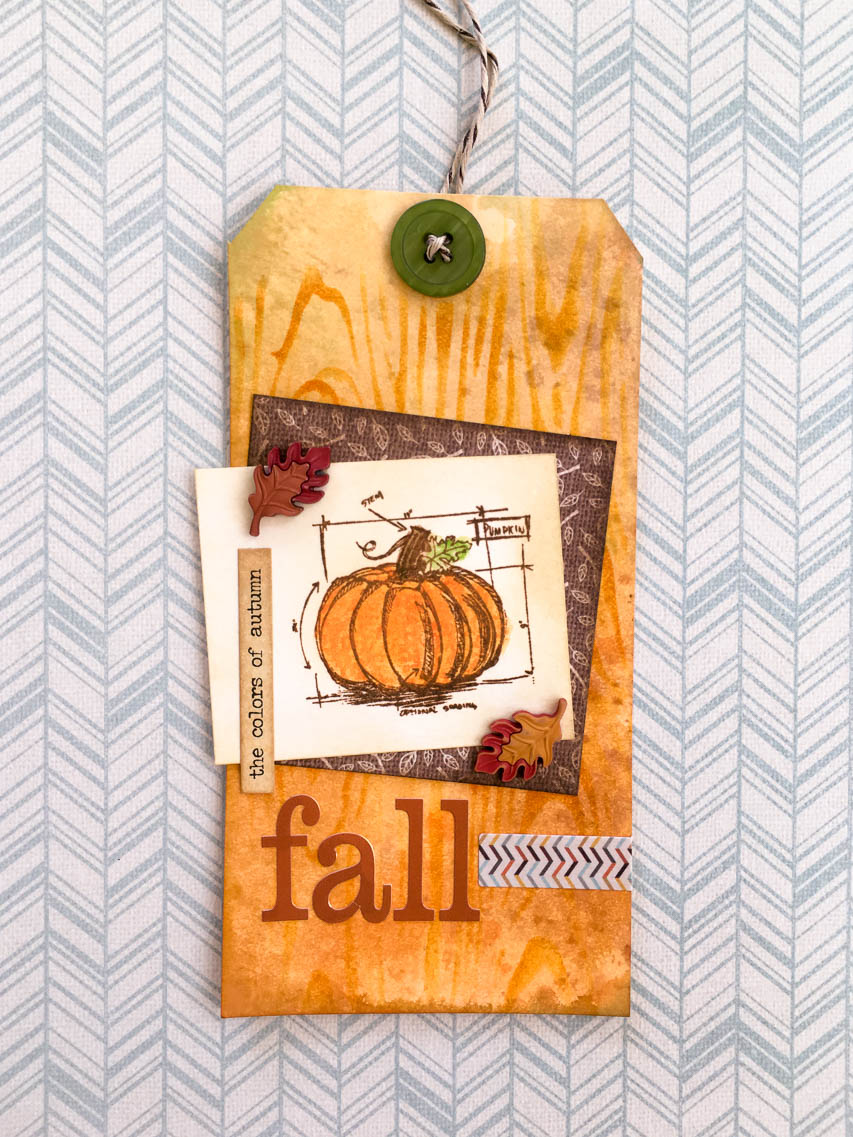
Whether you are planning a hospitality gift for your party hosts, or dropping some fresh baked pumpkin spice brownies at the neighbor’s, this fall pumpkin tag is a warm and friendly way to say “hello” to someone special!
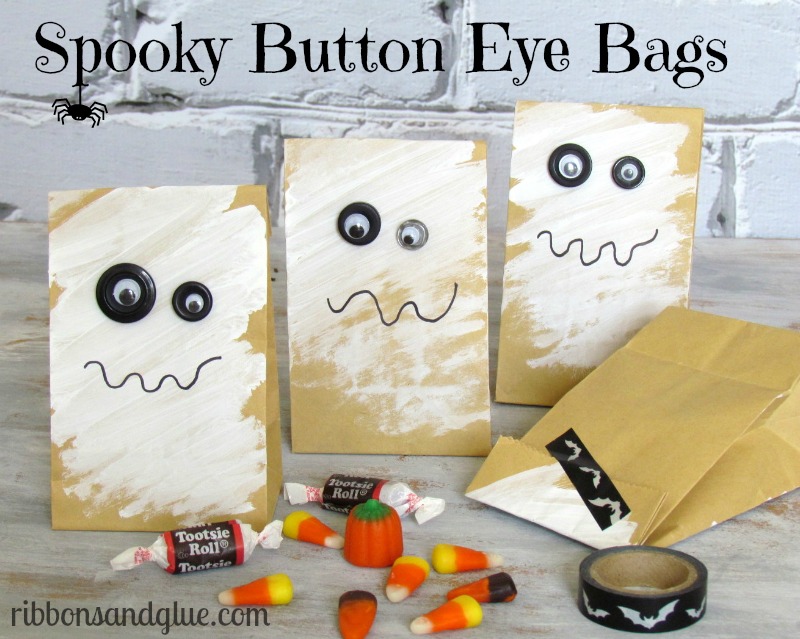
When it comes time to hand out candy, our spooky button eye bags will be the talk of the neighborhood or your kids’ classroom! They are so simple to make that the kids can help!
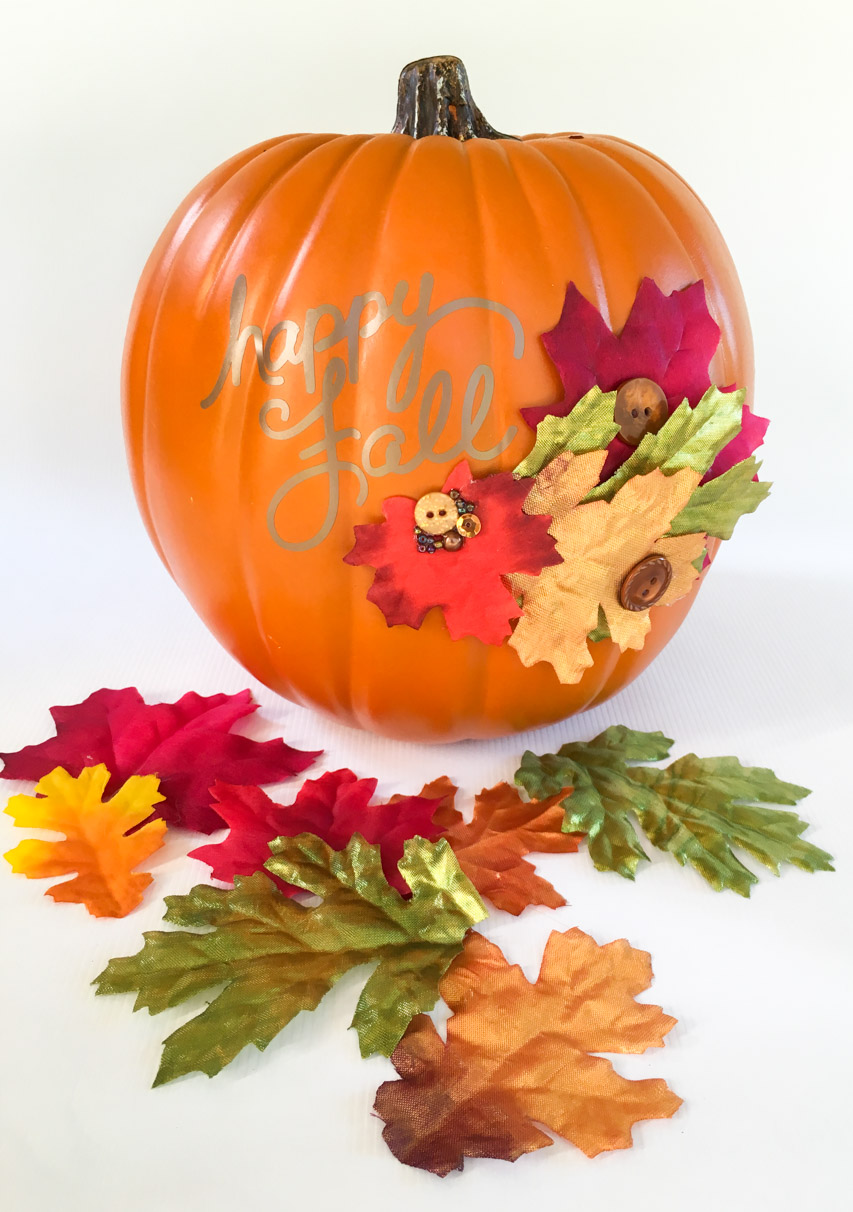
Pumpkins are seasonal decor that can go from early fall all the way through to Thanksgiving. This decorative pumpkin will add a beautiful touch to your home or porch all season!
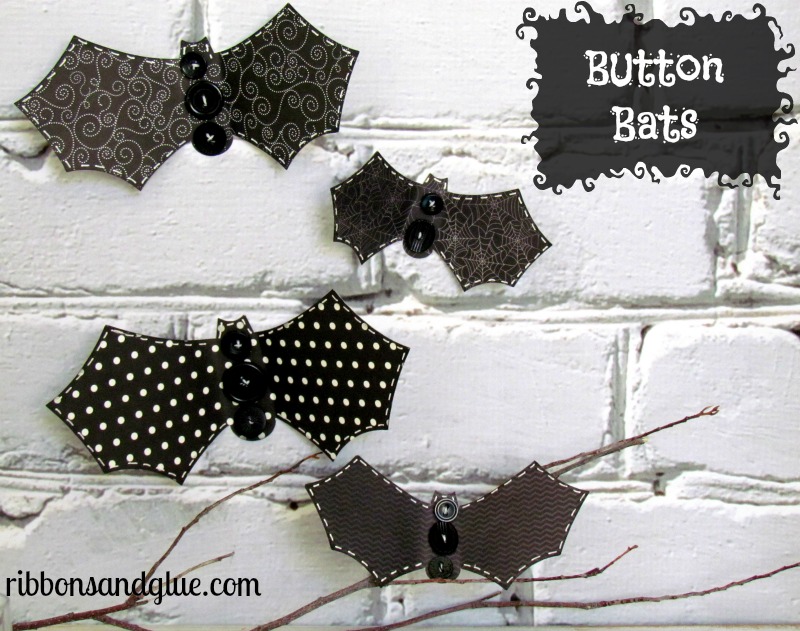
Halloween wouldn’t be complete without some bats! These button bats are more cute than spook, and will look great hanging from the ceiling, staked into a plant, or stuck to a wall.
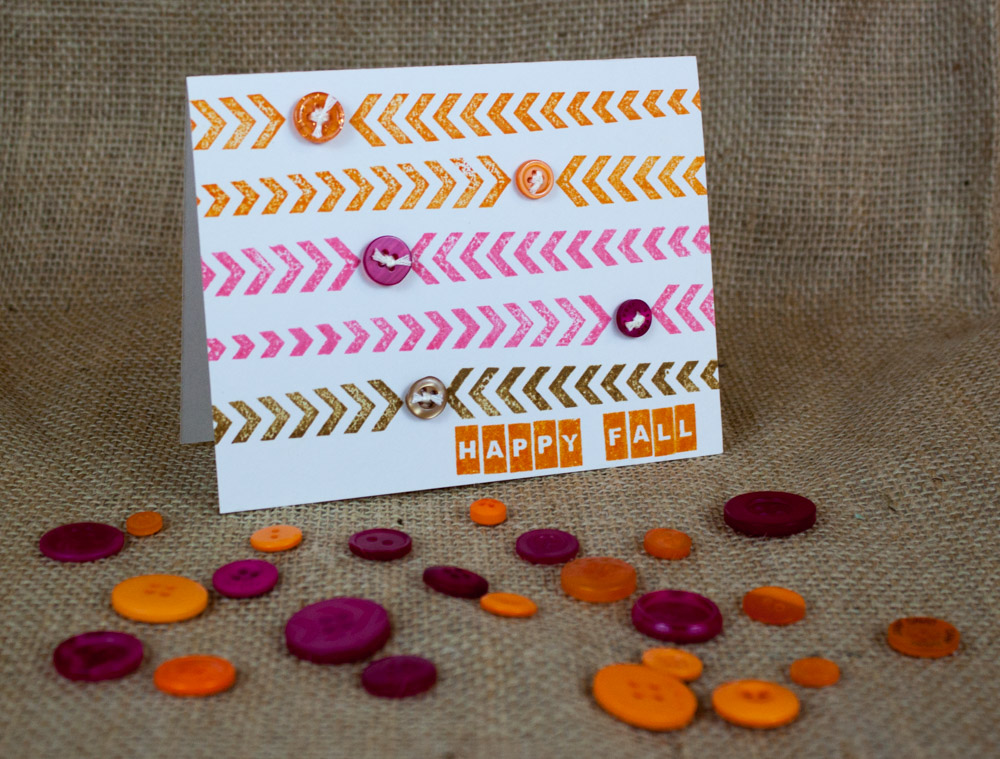
If you aren’t quite ready to give up all the color in your world for the browns of fall, we’ve got the perfect card for you! This fall card brings nice bright pink and orange to a cheery “happy fall” sentiment.
Looking for buttons for your Halloween projects? Don’t miss our brand new Scary Button Bonanza, Trick or Treat Button Basics, and Fall Festival Button Basics!
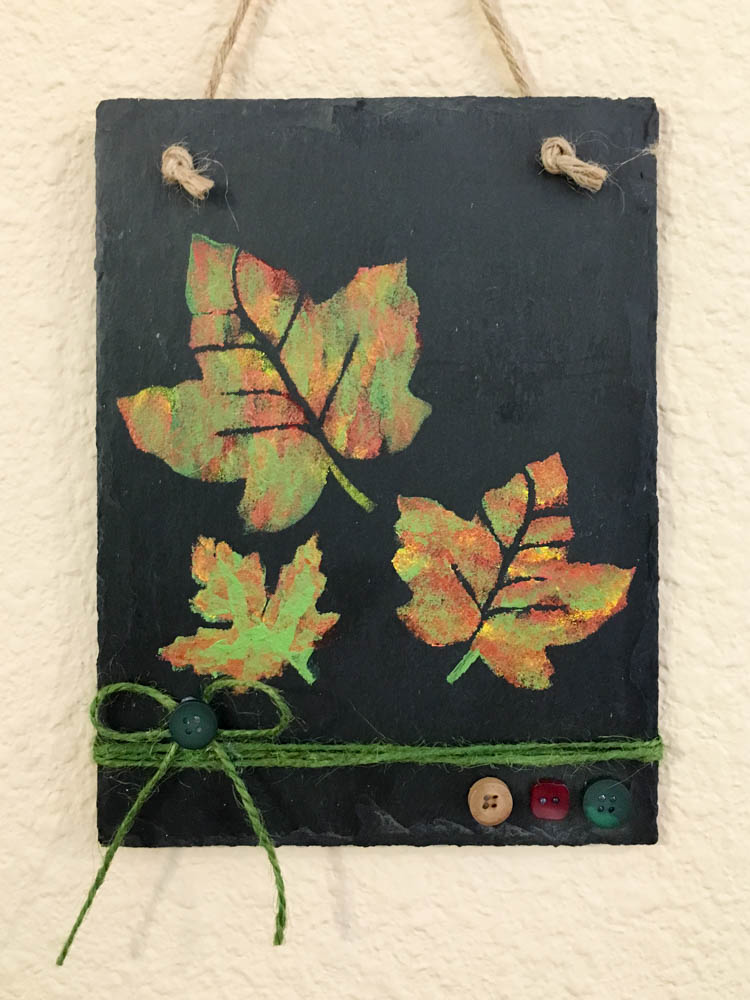
School is starting in many parts of the country, and that means that cooler temperatures – and changing leaves – can’t be far behind! Today’s project is a piece of slate wall decor with painted leaves that will bring fall colors inside so you can enjoy them where it is warm!
Supplies:
(For my paint selections, I used Delta Ceramcoat “Ranchero”, Delta Ceramcoat Select “Light Foliage Green”, Folkart “Cardinal Red” and “Daffodil Yellow”, and Martha Stewart Crafts Metallic Acrylic in “Rust”. But the exact shades aren’t as important as getting a light green, a red, an orange, a yellow, and a metallic.)
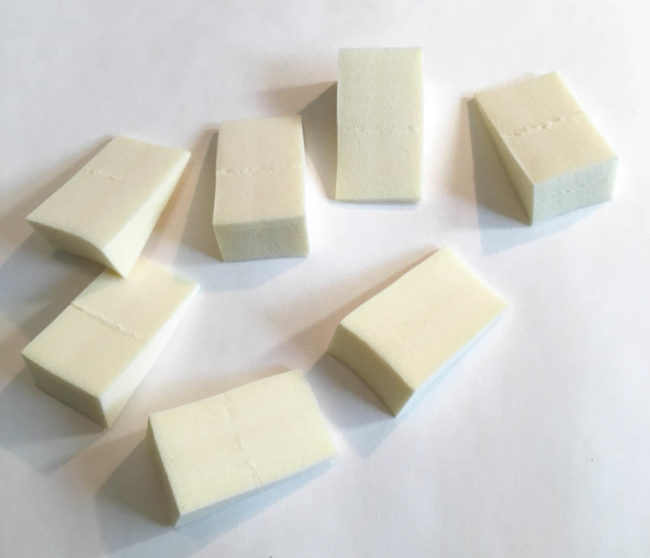
The paint effect looks complex, but the technique is actually really simple. The secret to it is using disposable make-up sponges to apply the paint with a “dabbing” motion, instead of a brush. It’s so simple that even young children can do it!
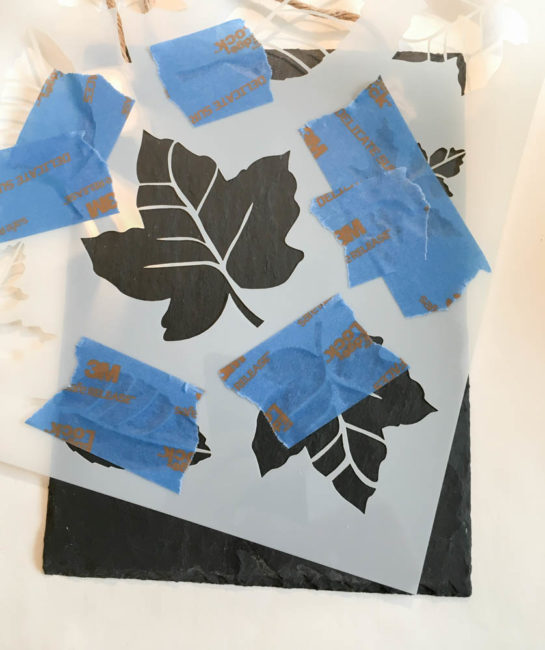
Taping down the stencil, and using tape to cover all of the nearby open areas that I don’t want to paint, helped to ensure that I got a perfect impression from my stencil.
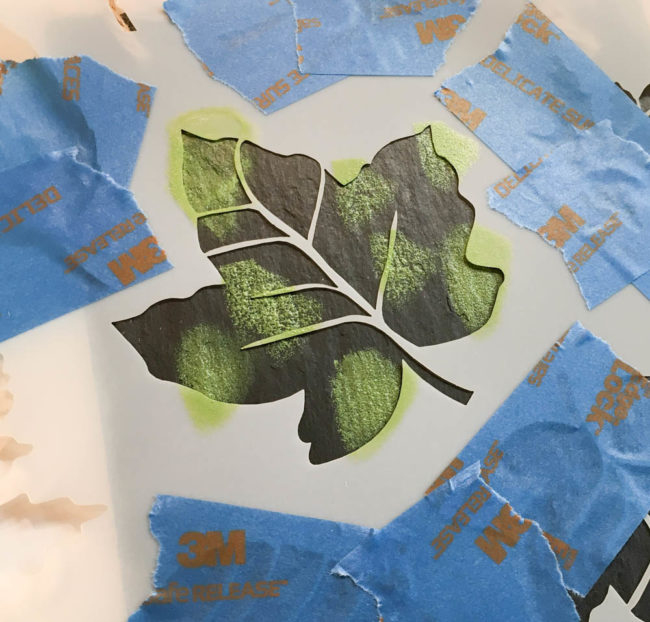
I started with the light green color of paint, using one of the cosmetic sponges. I dabbed one of the end edges of the sponge into the paint, and then dabbed most of the paint off on the palette that I was using. I then used the damp sponge to dab blotches of color onto the stencil. I repeated this process with each color (except the metallic), filling in the whole stencil area.
Then I used the metallic color and dabbed it heavily over the top of the stencil, but not filling in quite completely. I wanted small areas to peek out from underneath. Then I repeated a layer of the light green paint, but not quite as heavily as the metallic.
Sometimes when applying new paint over paint that is still wet your colors might mix and blend a bit. As long as the sponges aren’t too wet, the colors shouldn’t shift too much.
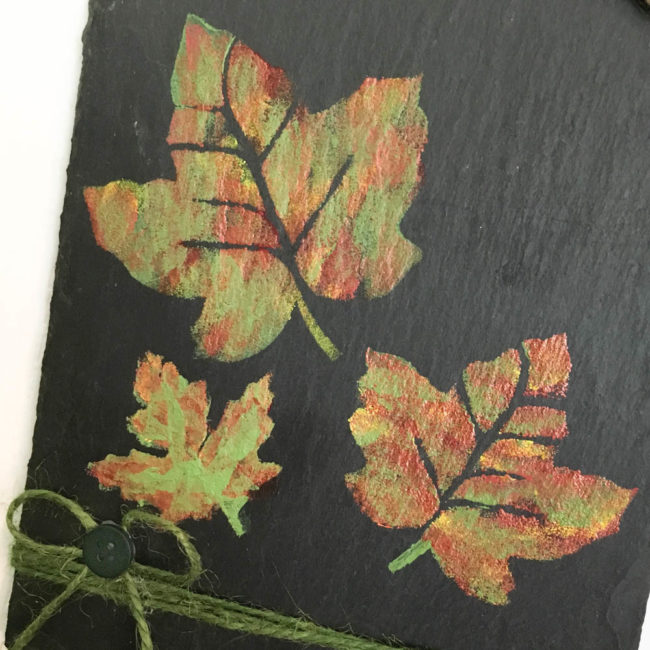
The finished effect will look something like this – a mix of metallic and green with hints of other colors like red and yellow peeking through. Just like with leaves in nature, no two painted leaves will come out the same!
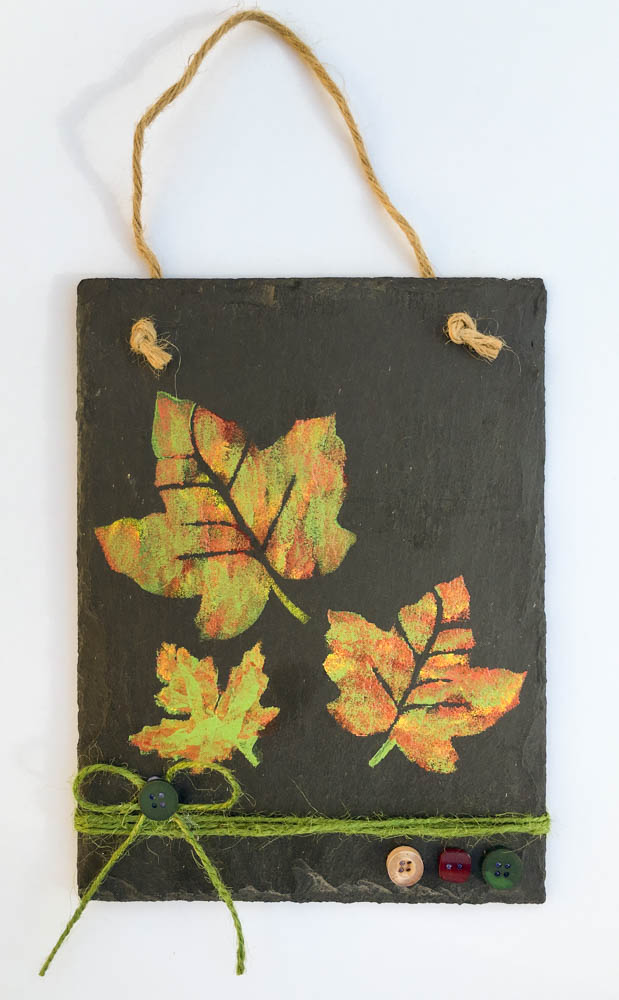
The painted leaves are pretty on their own, but the slate doesn’t really look finished without some dimension on it. I wrapped jute string around the bottom of the slate and secured it on the back with hot glue. The string provides “ground” that the leaves are falling to. Then I made a bow by twisting some string and attached it with some hot glue. I attached a button to hide the hot glue making the bow. Buttons are great concealers for glue and seams! Then, finally, in the bottom corner, I attached three more buttons. I like the repetition of the three leaves as three buttons for balance, and it provides a visual anchor for the other end of the string.

The buttons I used are from our “Argyle” Button Tote. With deep reds and greens, trendy navy, and neutral cream and black, the Argyle mix is a great selection to have in your creative toolbox for the holidays in the last part of the year! What will you use Argyle for?
I like Halloween, but I’m not super into the really frightful stuff, I’m more into delightful – so this is about as creepy as I get with this Spooky Halloween Card!
I’ve stamped my batty background and the Happy Halloween sentiment using Happy {OWL}oween Stamps from A Jillian Vance Design. I inked my stamp with a Tombow Marker in sort of an Olive Green, which went well with the Kraft Cardstock. I colored each bat with a few shades of Copic Gray Markers – T1, T4 and W3.
I cut my Ghost and lightly sponged Toffee Crunch Memento ink around the edges, leaving the parts that overlap plain.
The focal word on my Spooky Halloween Card was created using Lavanderia Script from from LOST TYPE. I have a tutorial on my blog if you have a Silhouette and haven’t made fun focal words like this. “Make Pretty Words on the Silhouette” – it’s easier than you think! Once the word was cut out, I lightly inked it with Cloud White VersaMagic Ink.
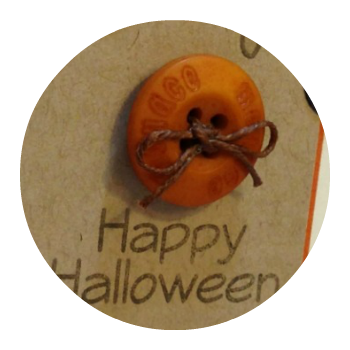
To bring a little attention to the gorgeous Tangerine Button, I tied some waxed linen thread through it. This thread is thick but not super bulky, and it holds its shape perfectly!
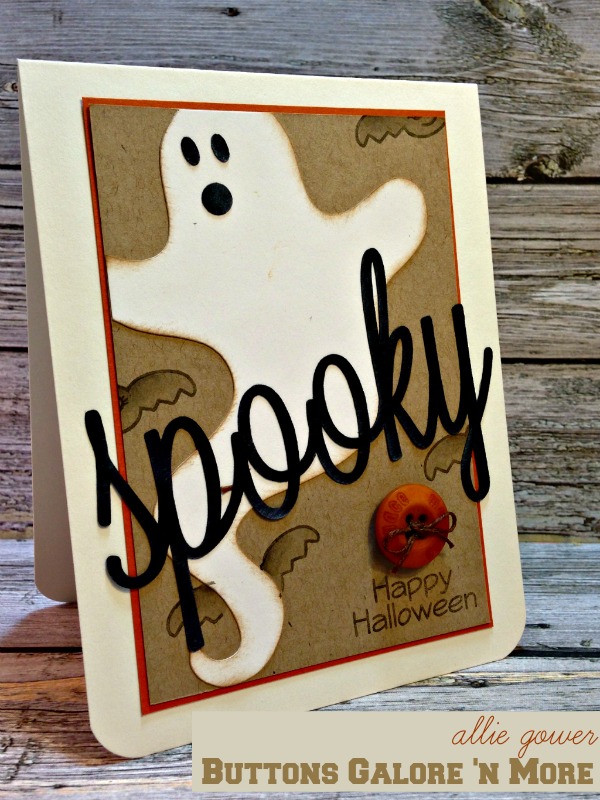
Tangerine Tango Buttons are perfect for Halloween. You get about 125 buttons in a reusable Pillow Box, and it’s such a fun assortment. They stay down well with Ultra Thin Glue Dots, also available from Buttons Galore & More.
I save a lot of money using Craft Glue to adhere all my paper. I find for the detailed titles, that painting the adhesive with a foam brush or a foam applicator works really well. It dries clear, without leaving a shiny finish, just in case I get a little sloppy.