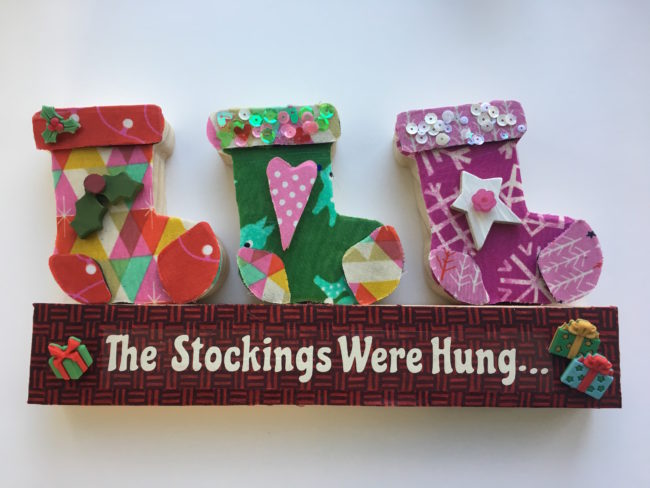
Hi! It’s Aimee here with a great project to add to your Christmas mantle decor this year. Using the new stockings set, I added a little fabric and some button bling to dress up these simple wood decor pieces. Continue Reading →

Hi! It’s Aimee here with a great project to add to your Christmas mantle decor this year. Using the new stockings set, I added a little fabric and some button bling to dress up these simple wood decor pieces. Continue Reading →
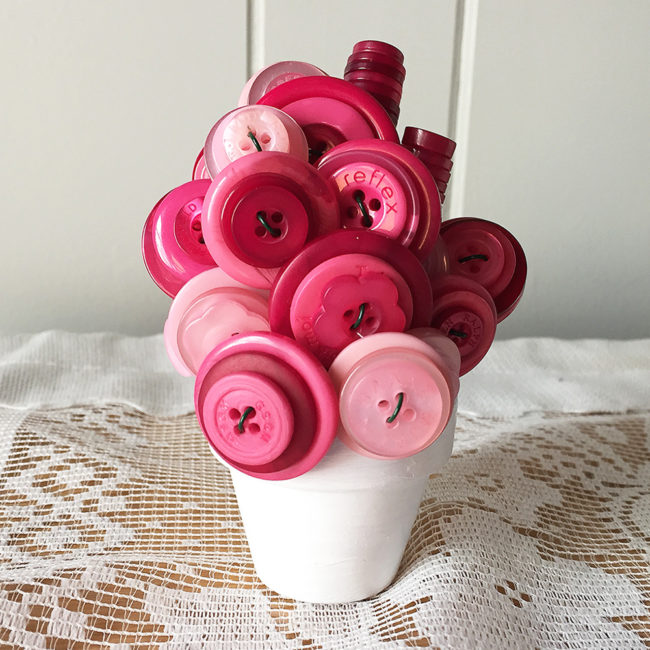
Flowers are pretty, but they are also expensive and don’t last very long. A button bouquet is affordable and simple to make and will add some vintage charm to your home, wedding, or shower – and never needs watering! Continue Reading →
Hey, y’all! Lorrie here with a fun new DIY decorated candle project that is super easy but makes a great gift!
I’ll admit it – I am a candle addict! I have a ton of them in my own home, plus they are my go-to gift for lots of different people: teachers, co-workers, friends, in-laws. You name them, and they have probably gotten a candle from me! Since I do love giving them, I am always on the lookout for deals on candles, because as much as I love them the one downside is that sometimes they are a little expensive. I have found that after the holidays, lots of stores have great prices on candles. I usually buy several to give throughout the year. But sometimes, those candles can be a little boring. They may be just a plain jar candle, or like I used for this project, just a 3-wick pillar candle. But with a little ribbon and some Pet Shop Button Basics buttons from Buttons Galore & More, these plain candles can go from “meh” to “wow” very quickly! Continue Reading →
Autumn is one of my very favorite seasons. I love the cooler (but not cold) temperatures and the gorgeous bright colors that appear in nature. This Button Vase Fall Canvas wall art is the perfect project when you’re short on table space but want to add those beautiful fall colors to your home.
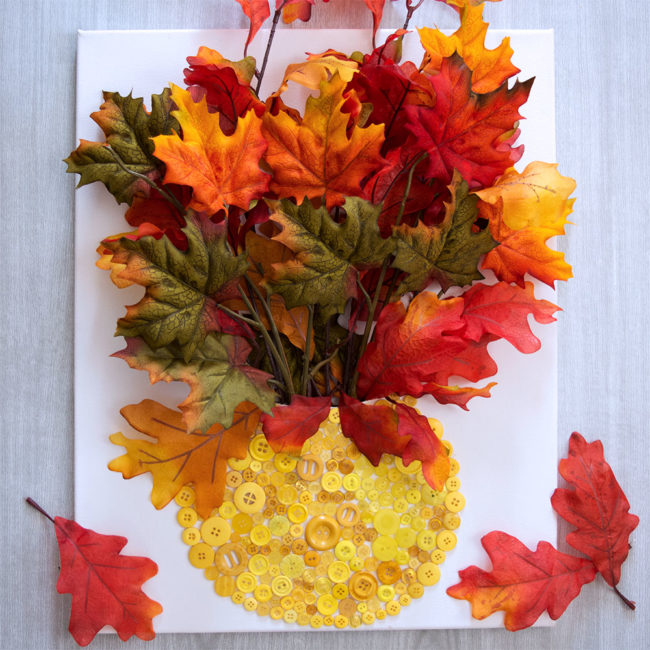
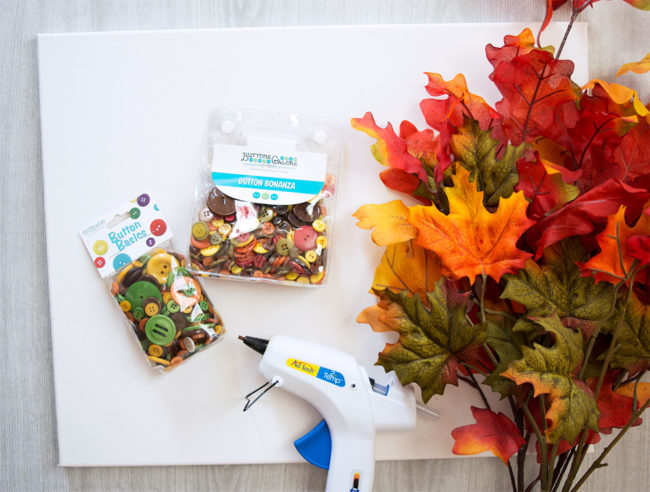
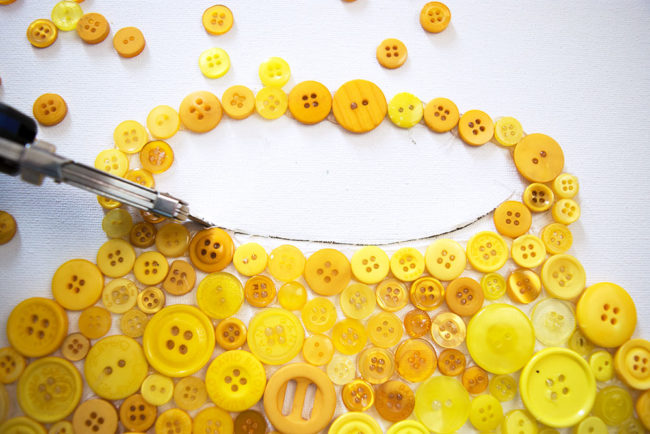
Use a pencil to draw (or trace) a simple vase shape to the bottom half of your blank 16×20 canvas.
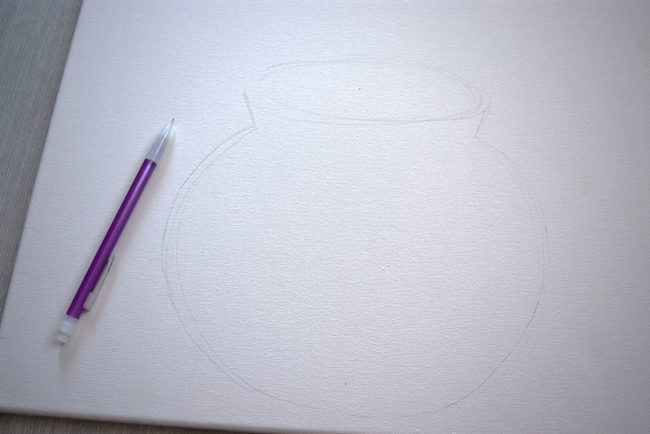
It doesn’t need to be perfect, just a rough outline so that you know where to place the buttons for the button vase. The buttons will cover up any pencil marks. I drew a round vase, but you can make it any shape you want. Whichever shape you use, make sure to keep it on one end of the canvas.
Glue buttons to the outlined vase you drew on the canvas. I used a hot glue gun to attach the buttons.
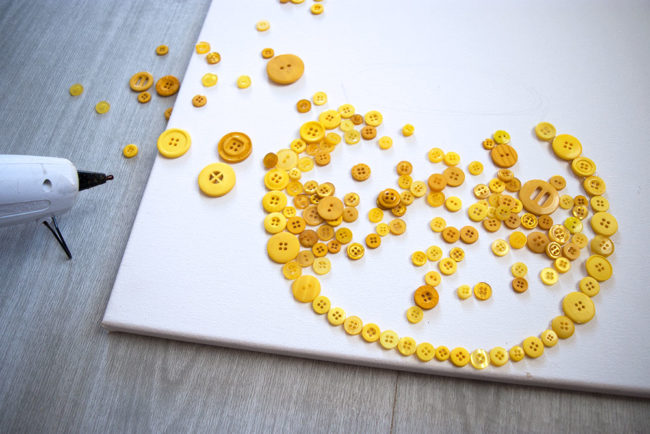
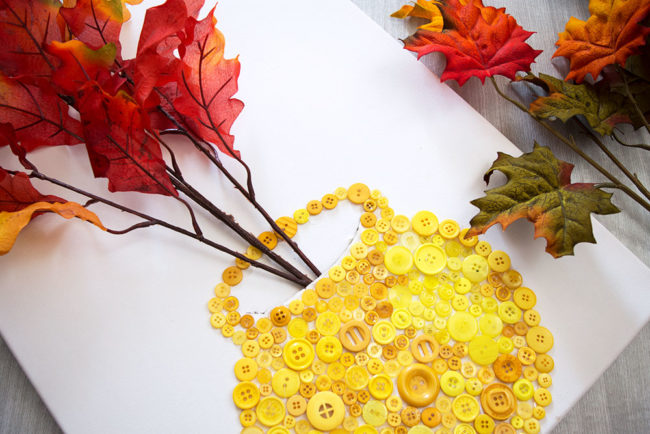
Because I was using Silk Autumn Leaves in my vase with beautiful red and orange colors, I made my vase Yellow to complement them. I used every yellow button in the Harvest and Fall Festival button sets to fill my round yellow vase. I liked that the shades of yellow in these two sets were in line with the yellow you’d actually see on fall leaves.
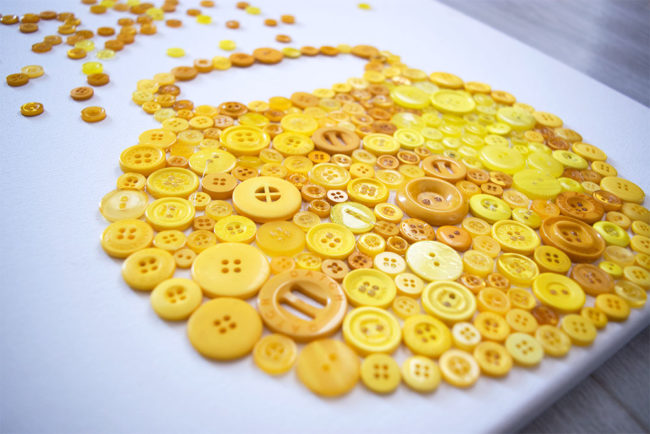
Don’t glue buttons inside the mouth part of the vase at the top but fill the rest of the vase.
Use a sharp craft knife to cut a line in the canvas just above the buttons in the mouth of the vase.
Insert your Autumn Silk Florals or Leaves through the hole in the canvas. Arrange them however you like. I find that the canvas vase looks best when it’s full. I used four Silk Leaf stems to fill my vase.
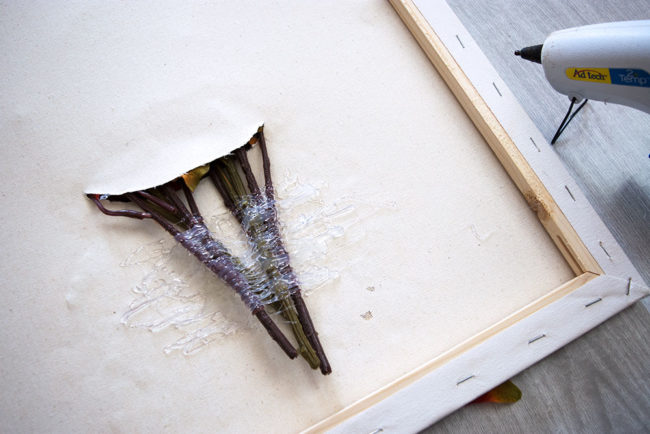
Turn your canvas over, and use hot glue to secure the stems in place for added stability. I used an entire small glue stick to fix my stems in place.
Use single leaves to fill in any blank spaces or gaps at the base of the stems. Secure them in place with hot glue.
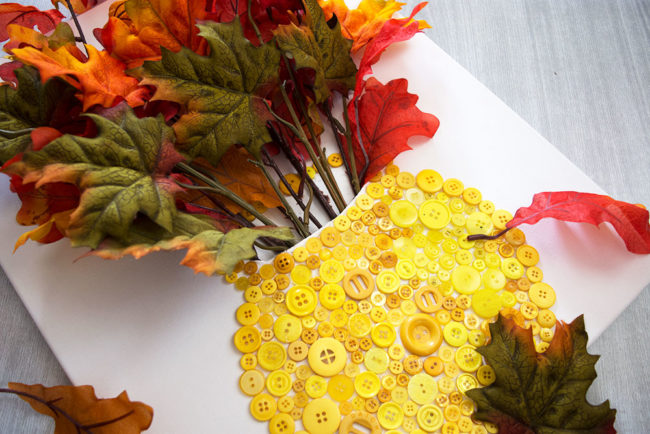
If you have some unruly leaves on the stems that aren’t laying quite right, a dot of hot glue can help secure them to the canvas in a more pleasing way.
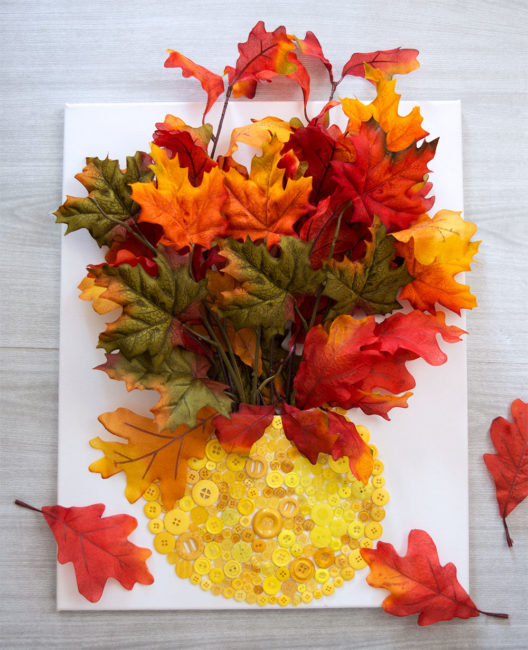
Hang your canvas on the wall, or prop it up on a table for a beautiful bright pop of autumn colors! I think that I will take a slightly smaller canvas and use the red buttons in the Fall Festival and Harvest button packs to make a smaller red vase with some pretty silk sunflowers! The pair will look great together with my fall decor. The possibilities are endless if you just change the color of the buttons for your vase to complement the flowers or leaves you have! Happy Fall Crafting!
You can celebrate a little bit of Christmas in July by crafting this fun and easy Embroidery Hoop Christmas Card Holder. This simple craft is a great way to get your kids involved and teach them basic button sewing. It will look so cute on the wall holding your Christmas cards! You can customize it by changing the button shapes, or colors to suit your decor needs.

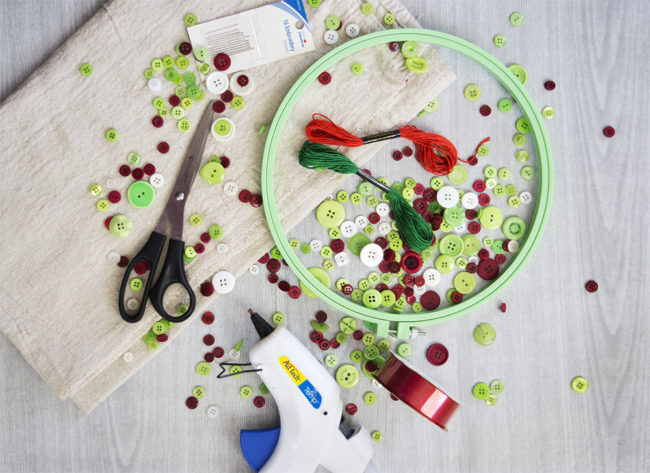
To start making your embroidery hoop Christmas card holder, lay your embroidery hoop on your fabric and trace around the outside edge of the hoop. Don’t trace right along the edge of the hoop, since you want the fabric circle to be bigger than the embroidery hoop. The circle doesn’t need to be perfect. You will need two fabric circles. I used a canvas drop cloth that I already had, but you could also use a cotton fabric or even burlap. You don’t want the fabric to have too much stretch though, since it needs to hold the weight of the buttons and the cards firmly.
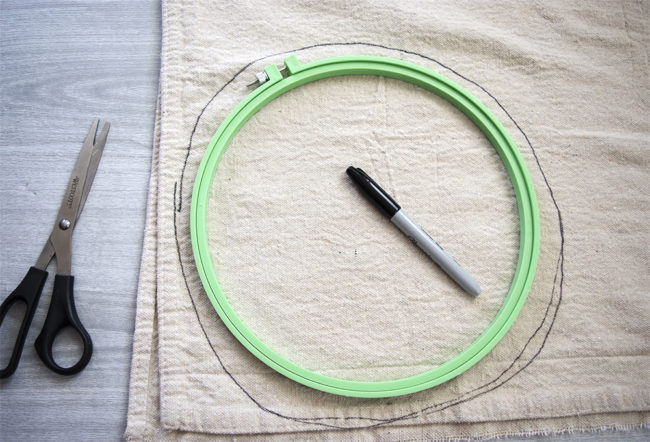
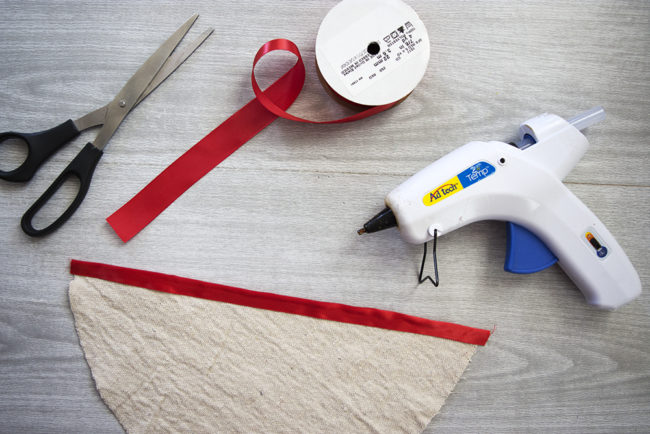
Cut out the circles of fabric, and then cut one circle in half. Don’t waste too much time trying to get the cuts perfect. You won’t even be able to tell if they are or not once the project is finished!

Finish the straight cut edge of your half circle by gluing ribbon to the edge and folding it over.
Trace a small circle onto the half circle of fabric. I used a wide mouth mason jar lid to trace the circle for my wreath.It was a perfect size. You can make your wreath bigger or smaller as desired.
Stretch the half circle fabric piece into the embroidery hoop for stability. Sew green buttons around the circle that you traced on the fabric. Tie a knot in your string and start under the fabric. Bring the needle up through the button and back down into the fabric.
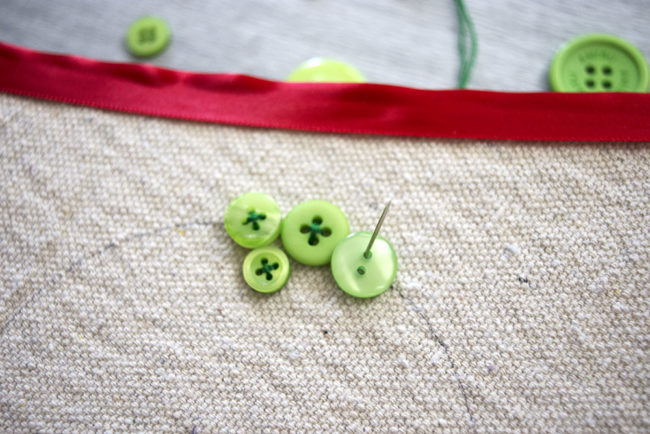
Repeat this step again so that your button is firmly attached to the fabric.

I used big buttons and small buttons around my wreath for some visual interest, and I used green buttons from both the Contemporary Christmas mix and the Button Bonanza Christmas Mix to vary the colors.
Use a few small red buttons for berries in the wreath. Sew them randomly into the green buttons using the red thread.
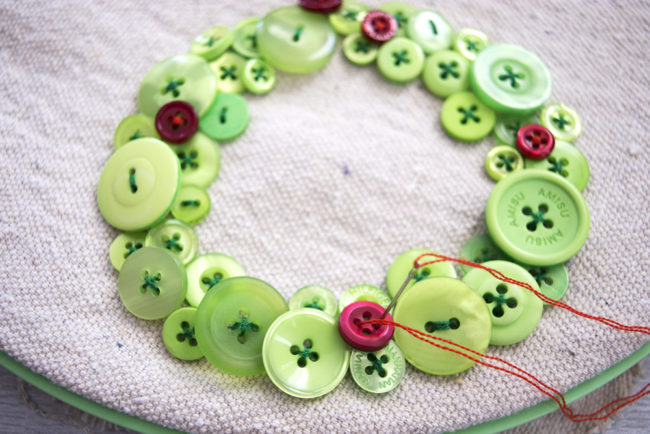
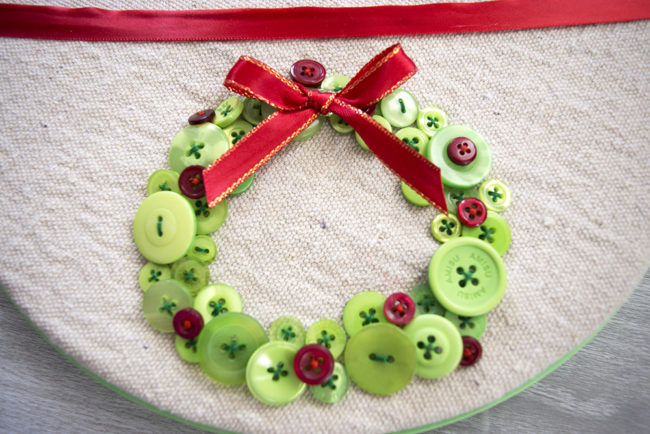
Add a small red ribbon bow to the button wreath. You can sew the bow to the wreath with your red thread, or you can use hot glue to attach it.
Lay your button wreath half circle of fabric over the full circle you cut in step one, and stretch them into the embroidery hoop. This creates the pocket for your cards to go into. Trim any extra pieces of fabric on the back of the hoop. Hang your completed embroidery hoop Christmas card holder on your wall!
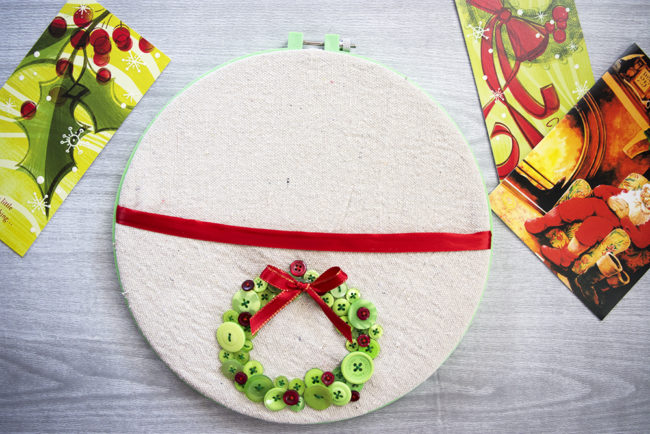
You can fit quite a few cards in one hoop, but if you typically get lots and lots of cards from your friends and family, you might want to make a couple of these fun hoops and hang them in a fun arrangement on the wall.
I think I will make two more hoops and put a Christmas tree shape on one, and perhaps some Christmas holly on another. The buttons are such a fun and cute way to add the colorful shapes to the fabric. Do you do any Christmas in July crafts? If Christmas in July isn’t your thing, this fun card holder can be customized to any time of the year! Create a fun button flower shape and hang it on the wall year round to hold other special occasion cards you might receive, or even just to hold your mail!
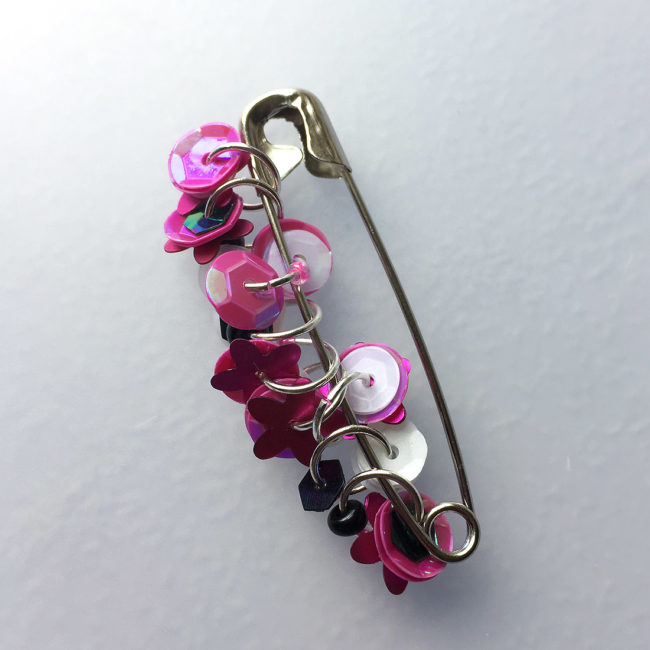
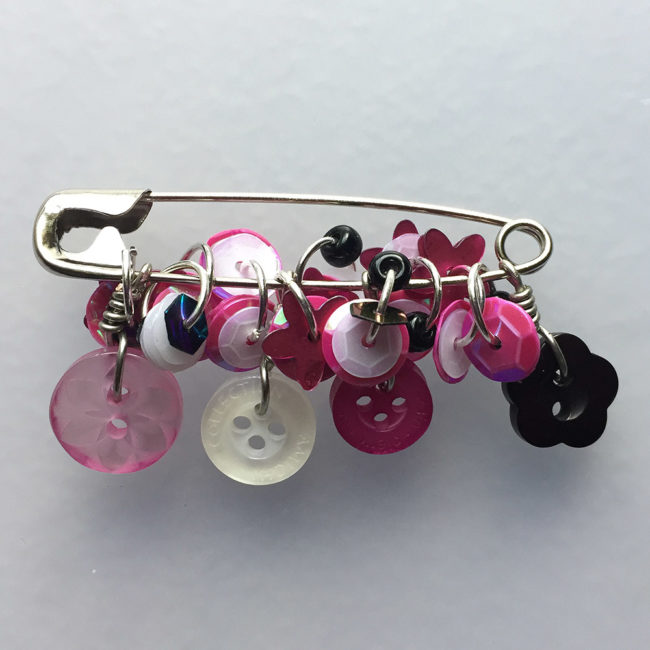
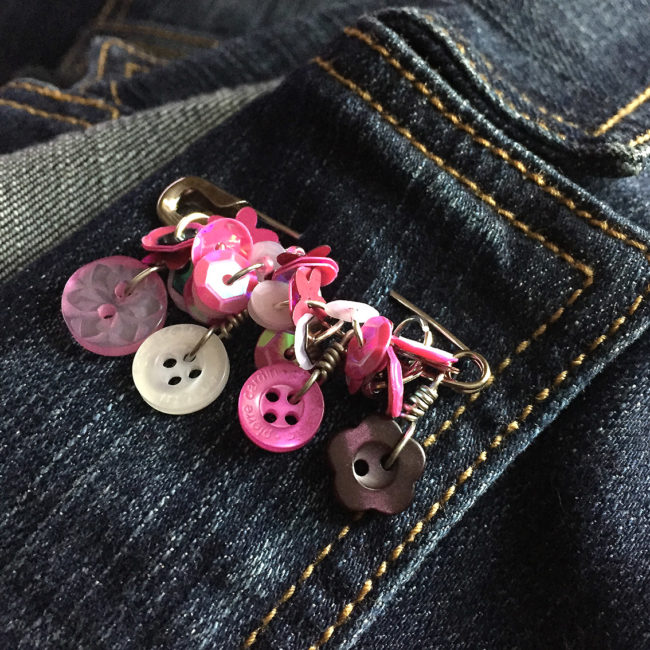
I’m constantly on the look out for fun accessories. But what I love more than looking for cool things is making my own. If you feel the same way, I have a beginner project to help you accessorize. In just a few easy steps, you can make sequin safety pin jewelry!
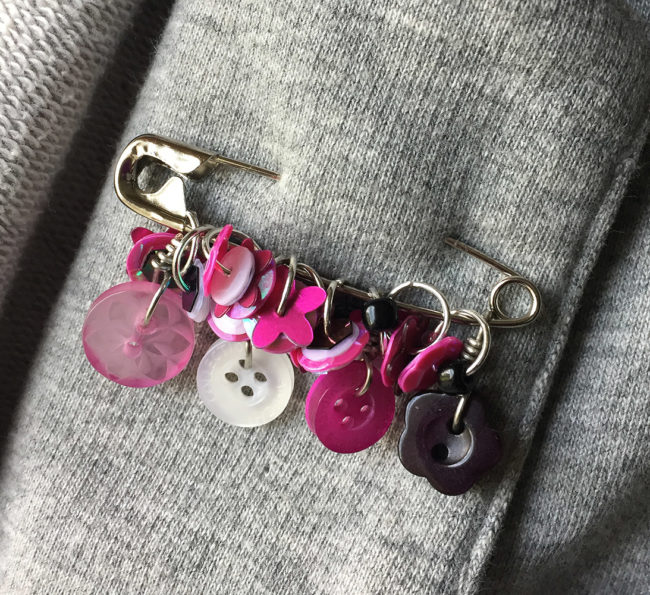
To start making your sequin safety pin jewelry, open the 8mm jump rings with jewelry pliers and add about 4-6 sequins to each ring along with a bead or two if you’d like. The rings will move around a lot if you start adding them to the pin as you go, so you may find it easier to just make a pile of completed jump rings.
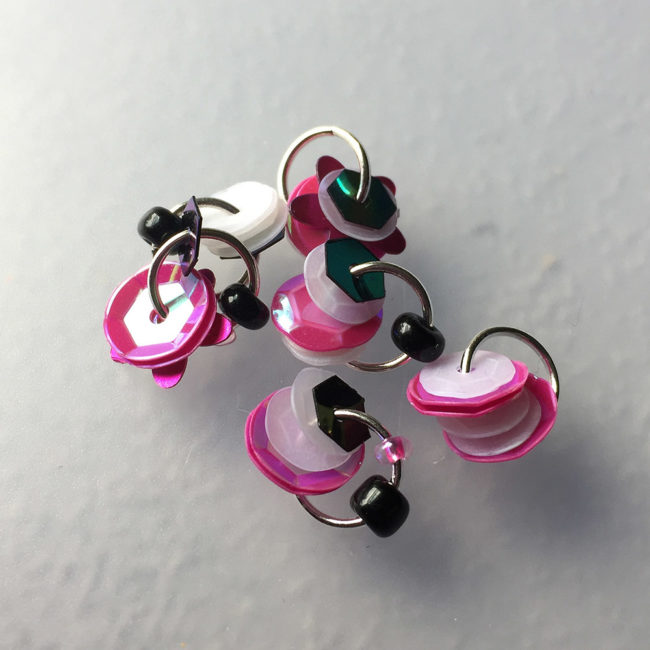
Once you have about 10-12 rings finished, add them to the safety pin. The jump rings should be added to the immovable side of the pin. At this point the pin will look pretty awesome as is, but I just love to add buttons to everything! I find the buttons not only give the pin a unique look, but they will also help keep the jump rings from floating around the loop at the end of the pin.
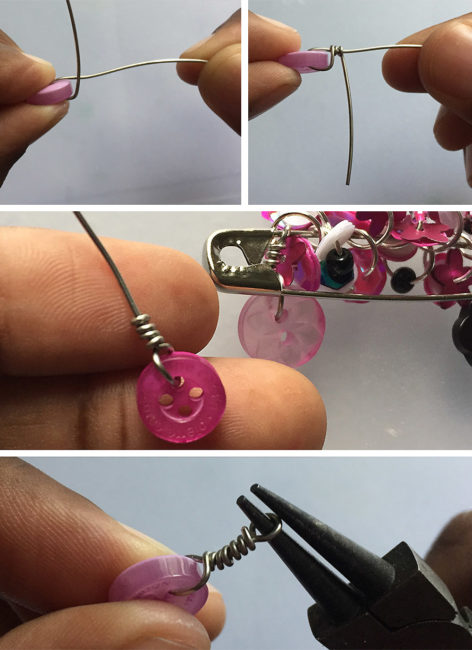
Cut a 5 inch length of wire. Place wire through one of the buttons holes. Bend one end of wire toward the back of the button. Twist that wire around 3-5 times and trim it. Cut the other piece short, but leave enough wire to create a loop.
Be sure to add a button before the first jump ring and behind the last ring on the pin. This will keep the jump rings from sneaking past the loop and getting away.
And your sequin safety pin jewelry is done!
There are so many options and color combinations available that I have already made myself a nice variety of sequin safety pins! I hope you find this to be a fun and easy way to bring a unique jewelry touch to an old shirt, jacket, or backpack.
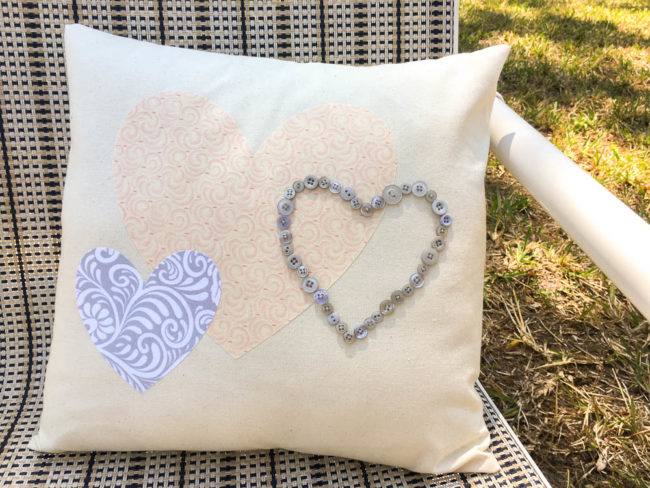
Buttons are a great embellishment for home decor projects – especially pillows! On my button heart pillow project, I used some gray buttons to create the third shape in a trio of hearts.
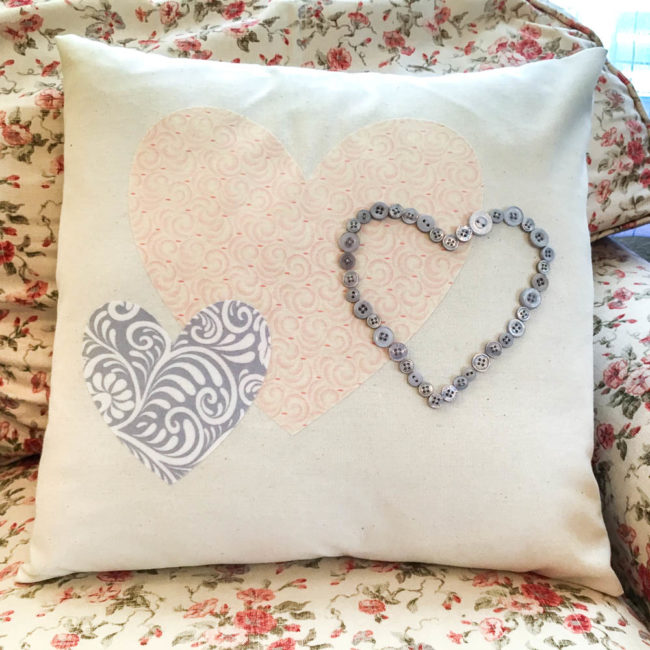
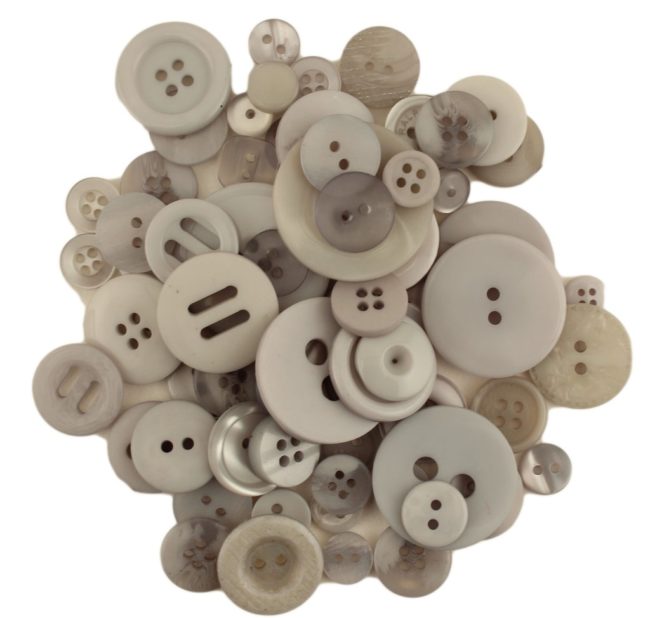
This button heart pillow project utilizes on of our versatile Button Basics bags of buttons. These bags contain approximately 150 two and four hole buttons between 1/2″ – 7/8″ in size, and come in a variety of colors. The beautiful color used today is Silver Gray, a lovely neutral shade of medium gray.
To start your button heart pillow, cut a piece of canvas fabric to 17″ by 36″ in size to serve as your pillow cover. This pillow cover is made using the envelope method, so it is removable to wash, clean, or to replace the pillow form.
Next select two fabrics, one for the large heart and one for the small heart. Cut the fabric to the sizes indicated in the supply list. Then, following the package instructions, iron the Therm O Web HeatnBond to the back of the two pieces of fabric. (Skip this step if you are going to hand cut your hearts and then sew them onto your pillow)
To cut out the heart shapes, there are two options. One is to create the hearts on your electronic die cutting machine and cut them out of the fabric that way. (That is what I did.) The other option is to draw them and cut them out by hand.
Place the hearts so the design they create is centered approximately vertically and horizontally on the canvas fabric. Iron them to adhere with the iron on adhesive. (Or pin in place and then sew them on if you are using that method.)
Next, draw or die cut and trace a third heart shape to serve as the outline for the button heart. Using a fabric marking pencil, trace that heart onto the pillow cover. This heart will serve as the lines to follow for placing buttons.
Hand sew buttons along the line of the heart design, keeping them centered on the traced line. Use smaller buttons at the angled parts of the heart, to avoid the buttons being too close together and making the lines indistinct.
After the buttons are completed, fold over and hem the short sides of the fabric so that the raw edge of the fabric is on the side away from the hearts. Lay the fabric out with the design facing up. Measure 15.5″ across the front of the design on the long axis of the fabric, centering the measurement on the design. Put a pin in the fabric on each side of the design where the 15.5″ extends to.
Using the pins as your fold lines, fold the long edges of the pillow in over the design to make a square. They should overlap, forming the opening that will let the pillow form in and out. Pin and then stitch a 3/4″ seam along the raw edges.
Clip the four corners, and turn the pillow cover right side out. Insert a pillow form and you are done!
(If you need more instruction on how to assemble an envelope pillow cover, there are plenty of great tutorials available for searching on Pinterest.)
This simple design can be adapted to plenty of decor styles and colors! In bright colors, it would be perfect for a teenage girl’s room. Do it in Valentine’s Day colors for a seasonal look. What will you heart doing with a button heart pillow?


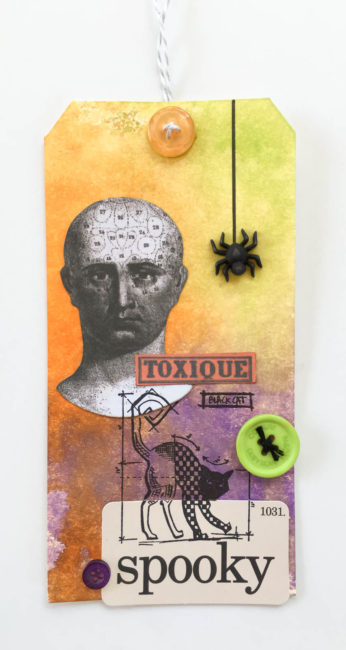
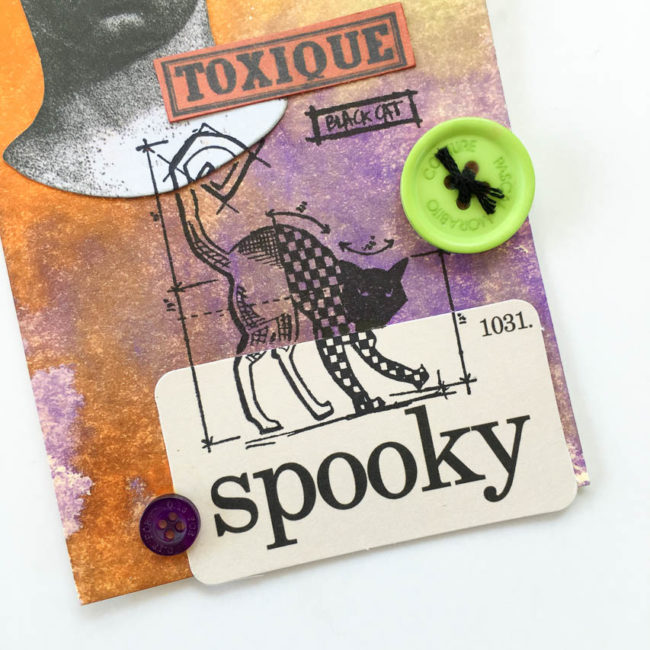
Today we’re taking a walk on the creepy side of Halloween, with a spooky Halloween tag that makes a great attachment for a treat bag or can be a unique holiday greeting by itself!
Supplies:
1. Create the background of the Halloween tag by spraying the three colors of Distress Spray Stain in a triangle arrangement on a craft mat and then dragging the tag across the ink. Allow to air dry, or dry with a heat gun.
2. Ink the edges of the paper elements with matching ink to hide the white edges, and glue them in place.
3. Using Archival ink, stamp the creepy cat on top of the background and paper elements.
Tip: If the stamp image is incomplete where the paper layers meet, use the fine point end of the Distress Marker to fill it in!
4. Draw a line for the spider web in the upper right corner using the brush end of the Distress Marker and a ruler.
5. Thread black embroidery floss through the green button and tie off.
6. Use a button shank remover to cut the shank off from the back of a spider button.
7. Glue all of the buttons into place using the PPA Matte Adhesive. (Make sure to center the orange one over the hole in the tag.) Let dry.
8. Thread twine from the back through the button and ending at the back again, to tie off the tag.
9. Enjoy your Halloween tag!
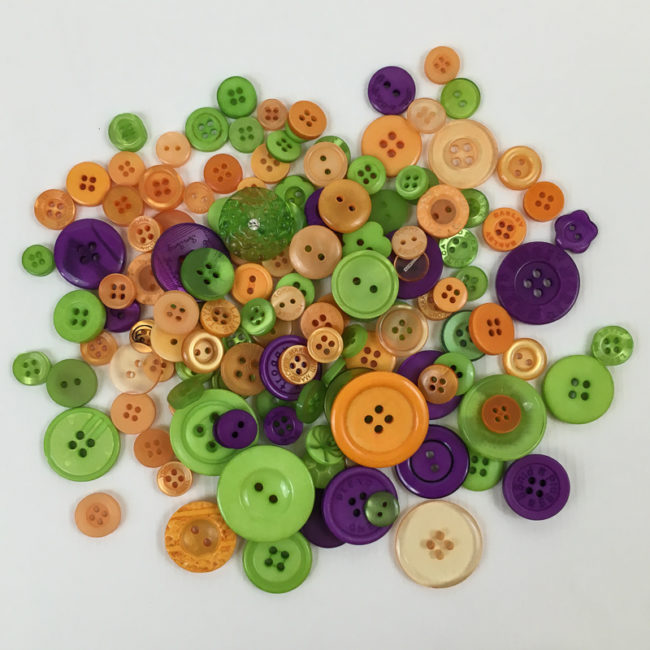
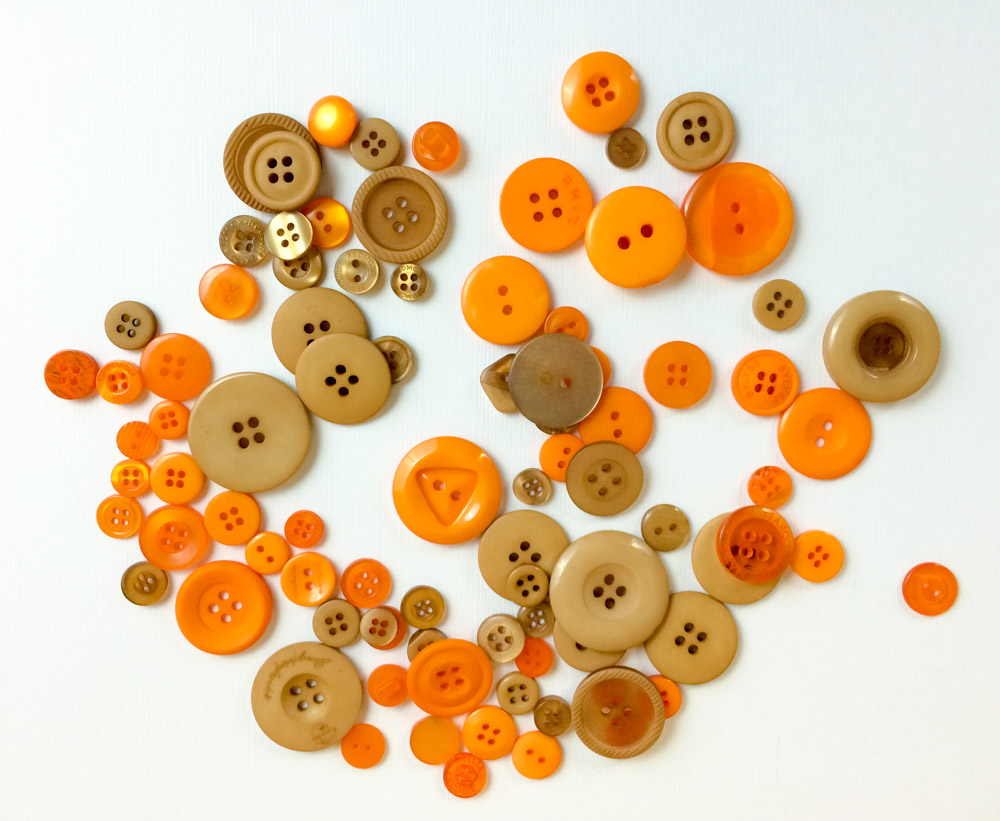
This week, we’re introducing you to six new Button Basics assortments! One of the new assortments is a vintage fall palette called Fall Festival, perfect for making fall, Halloween, and Thanksgiving projects.
Fall Festival is a mix of brown-tinged tones of green, orange, and yellow, along with coffee shades of brown.
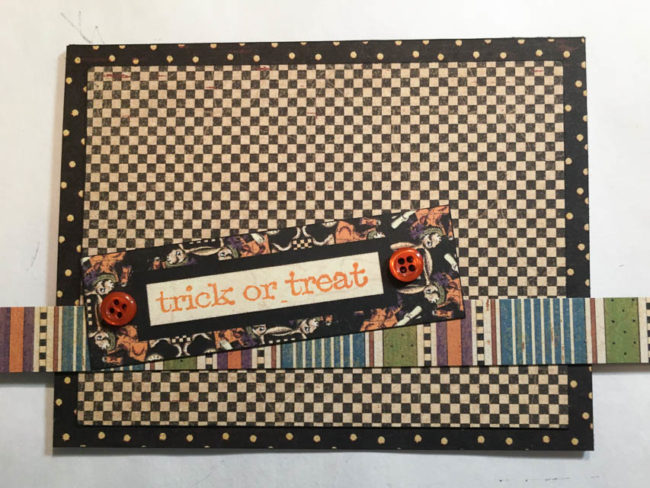
I decided to pair Fall Festival with Graphic 45’s new Halloween in Wonderland collection to make a retro fun Halloween card!
Supplies Used:
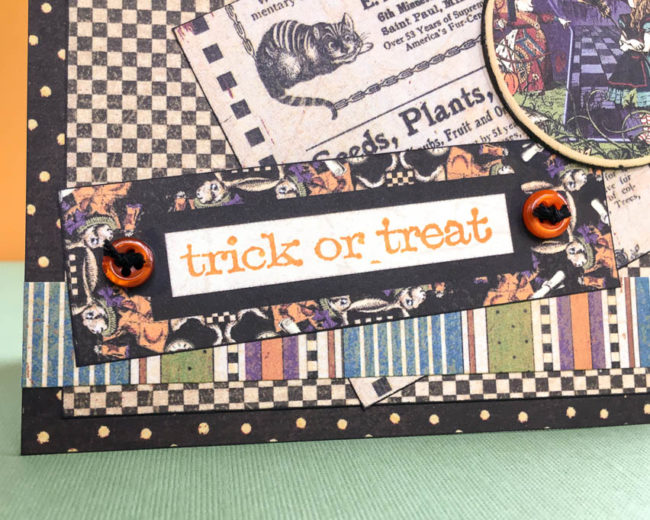
I used tiny orange buttons from Fall Festival, to visually “attach” the faux bookplate that is printed on the label from one of the cut out sheets in the Graphic 45 “Halloween in Wonderland” collection. The buttons highlight it as the sentiment block for my card, and Fall Festival’s color tones coordinate beautifully with the paper collection.
All of my buttons on this card are attached with PPA Matte adhesive, my favorite liquid adhesive for working with buttons and embellishments. It’s just the right consistency – thick enough to hold an embellishment in place, but not so thick that you can’t move it around to get it where you want it. It holds securely, and dries perfectly clear so there’s no need for anxious moments it a little spreads out from underneath your embellishment!
When making a project like a card, I frequently like to start with the most important elements of the design first, and then build around them. That means that I often am starting with elements that will be on top – like this sentiment block – and then working down in my design as I fill in around it. To do this, I lay pieces out without adhering them as I work.
I started by creating my background, and then putting in place the sentiment and the border that I wanted to anchor it. This of course, left me with a lot of open area made up of that super busy tiny checkerboard pattern. It overwhelmed my sentiment so I needed to tone it down.
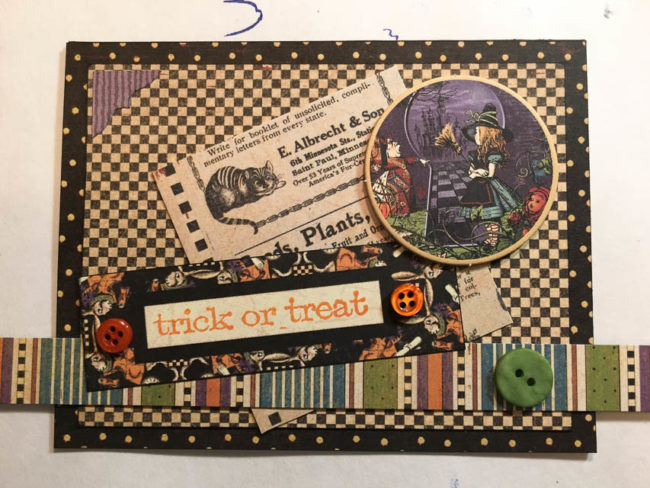
To fix this, I cut a block of a lighter, larger pattern and inserted it behind the sentiment block. Then I used a piece of decorative chipboard from the “Halloween in Wonderland” collection to fill a bit more of the space and add some color. A purple striped corner frame sticker completed the design.
I did all of that without adhering anything except for the purple sticker! So what do you do when you have everything arranged just how you want – but nothing is adhered? I grab my phone and just snap a picture like the one above. Then I can take the design apart to glue everything down, and use the photo as a guide to get everything back how I wanted it! It’s just another way we can turn the camera that is always in our pocket into a creative tool.
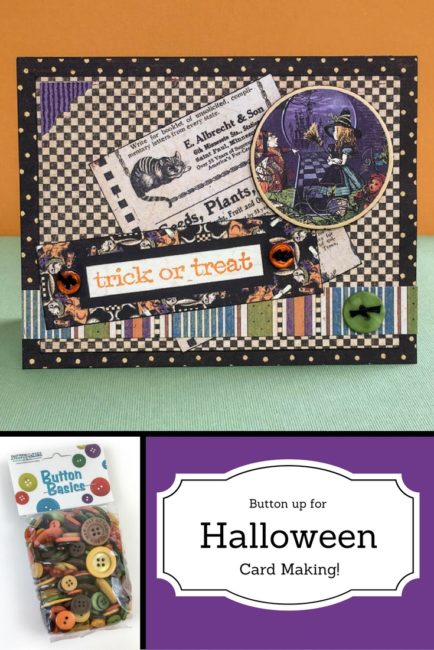
The new product introductions keep coming! Today we’re introducing 6 new colorways of Button Basics, our button candy bags that are just the right size for making fun projects. The new additions to the Button Basics line-up include two seasonal offerings for fall and Halloween, two blue assortments for winter and Christmas, and two new trend-based color groupings.
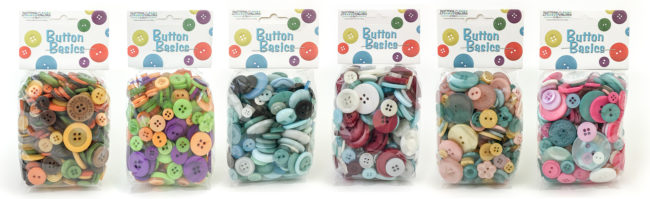
First, let’s take a closer look at Fall Festival! This beautiful assortment of browns, leaf green, rusty orange, and mellow yellow will have you yearning for a cup a cider and the crunch of leaves under your feet.
For Halloween, we think you’re never too old to love to Trick or Treat! Shades of light orange and green combined with pops of bright purple make this the perfect collection for the cutest Halloween projects on your block.
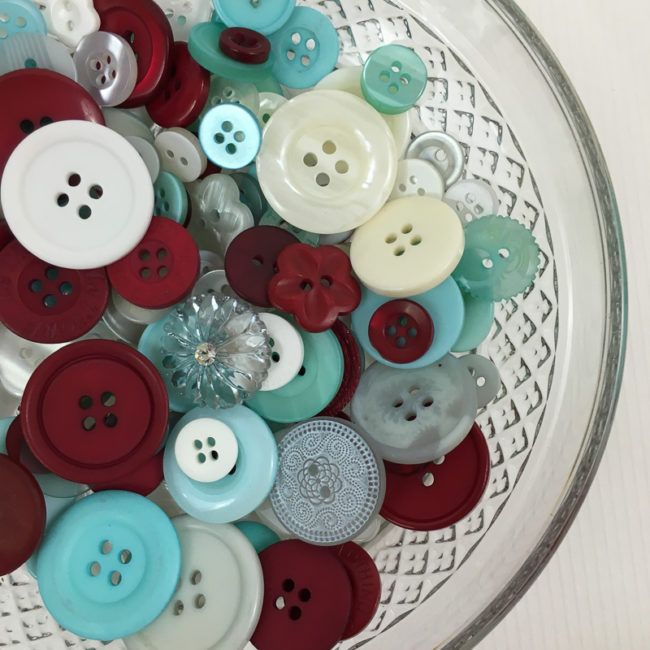
Blue is a hot color for Christmas, and we’re bringing it to you with Cool Winter! This mix adds a sophisticated shade of red to a cool mix of pale blue and white to create an elegant mix that will work for cards, ornaments – and even holiday party wear.
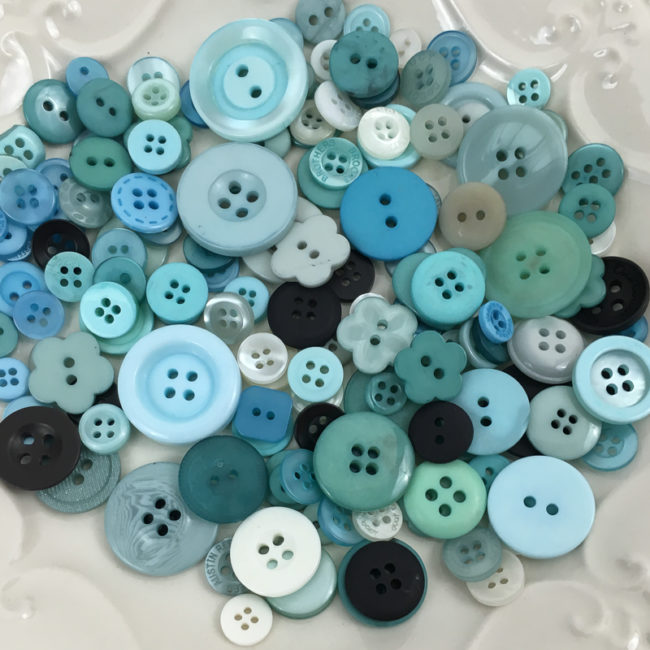
Are you “blue” this Christmas? Then Winter Flurries is the collection for you! Not content with just on shade of blue, this collection gives you an entire range of shades from deep midnight to pale ice to choose from so you’ll be able to find exactly the shade you need for your festive Christmas or winter project.
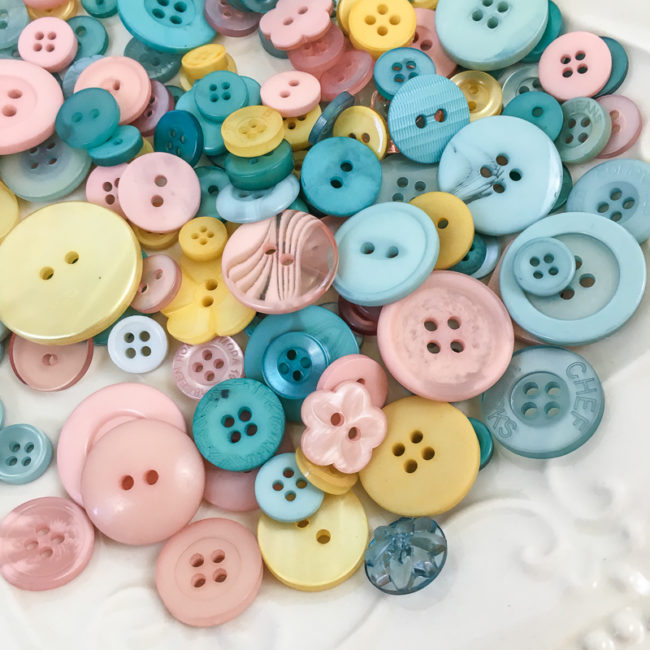
If you are a fan of heathered pastels – especially the colors of the year for 2016 – then you’ll love our new trend mix Bohemian Style. With rose pink, blue, and a pop of sunshine yellow, this trend mix matches well with current home decor, fabric and fashion color trends so you can create up-to-date looks.
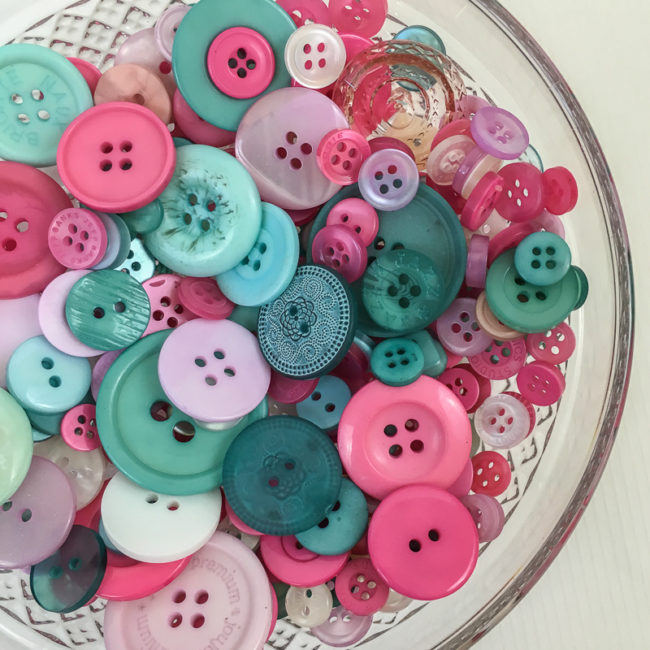
And finally, we have Party Time! This bright and happy combination of teal and bright pink with touches of white is perfect for parties, fashion, and everyday papercrafting projects.
Which of the new Button Basics is your favorite? You can get all of these new Buttons Basics on sale for $1 off from now until September 10th. That’s a great deal at $5.99 each! Why choose just one? Get yours now!
Even thought it’s still hitting temperatures close to 90 degrees at blog central here in Florida, Labor Day passing means fall will rapidly be settling in at Buttons Galore headquarters in New Jersey. And fall means a chance to pull out some colors and designs that many of us haven’t used all summer!
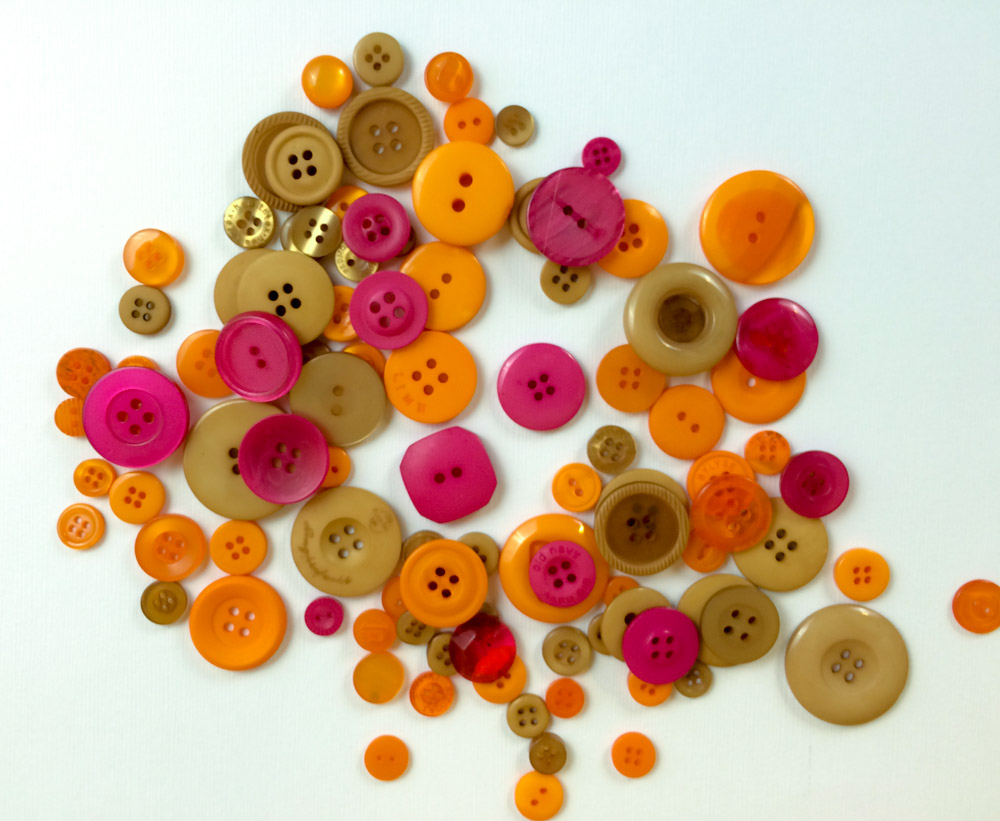
How about the Buttons Basics in Caramel and Outlandish Orange?
Add a nice holdover from summer – some deep pink from the “Summertime” Button Bonanza – and you’ve got a great mix of fall leaf colors!
Fall brings many occasions that call for dashing off a quick note to someone. Let’s make them pretty – and festive!
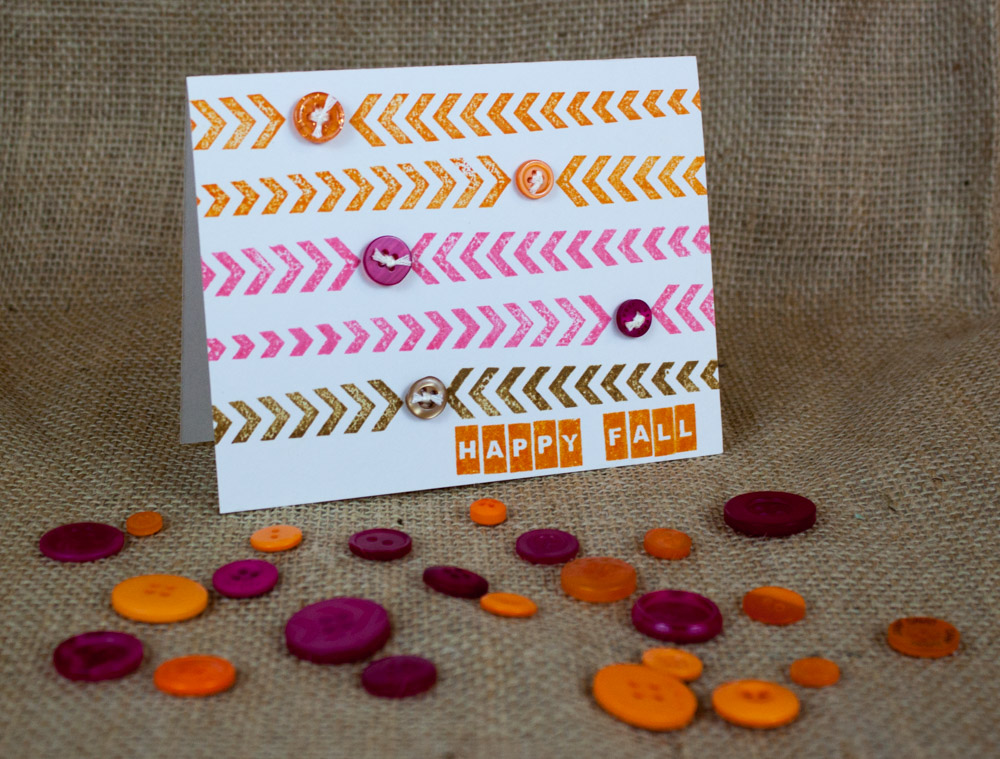
Look for Outlandish Orange, Caramel, and the Summertime mix at AC Moore!
1. Cut paper in half longwise and fold to make a card base.
2. Starting near the fold, use the stamp set to stamp the arrow border once from each side, leaving a gap in the middle to place a button. Work your way down the card, changing colors as you get closer to the bottom.
3. Use the alphabet stamps to create the phrase “Happy Fall,” aligned with the right edge.
4. Thread buttons and tie them using embroidery floss and needle.
5. Attach buttons in border gaps with adhesive dots.
This versatile button card design could work for any season or holiday, simply by changing up the color scheme and the sentiment that is stamped. Try the bright primary colors in our Primary Button Bonanza (also available at AC Moore) for a birthday card, or red, white, and blue for a patriotic theme!