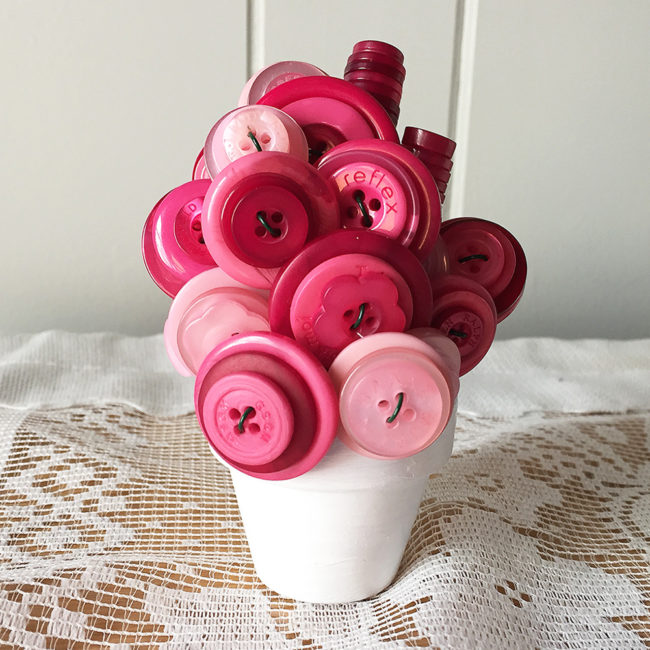
Flowers are pretty, but they are also expensive and don’t last very long. A button bouquet is affordable and simple to make and will add some vintage charm to your home, wedding, or shower – and never needs watering! Continue Reading →

Flowers are pretty, but they are also expensive and don’t last very long. A button bouquet is affordable and simple to make and will add some vintage charm to your home, wedding, or shower – and never needs watering! Continue Reading →
Hello Everyone! This is Katie from the Buttons Galore & More Design Team and today I have a fun wedding decor idea!
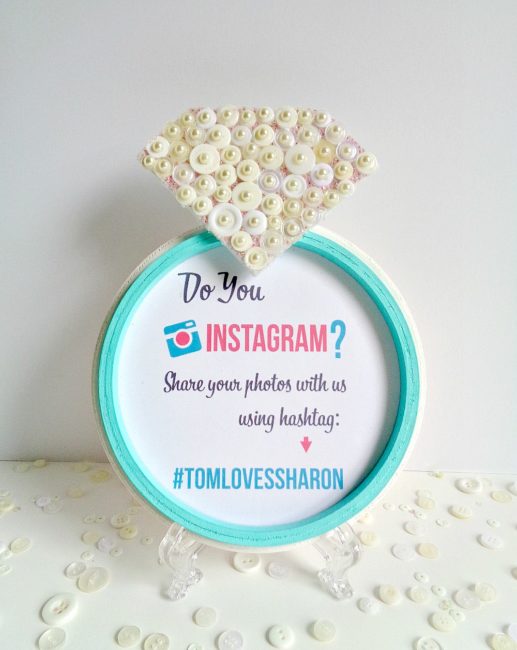
When I was given the task to make a wedding decor project, I wanted to create something that was cute, useful, and that could be saved in the long-run. With that in mind, I decided to create a diamond ring frame that could be customized to fit your wedding decor, be useful (since it’s a frame), and be saved by the bride. In addition, this project is super inexpensive to make because it’s made from a wooden plaque, an embroidery hoop, and a piece of foam board!
To decorate the diamond part of the ring, I decided to use the 28 Lilac Lane Embellishment Bottle in Winter Wonderland. Even though “winter wonderland” sounds wintry, this embellishment bottle could easily be used for wedding décor as well because the embellishment bottle contains several shades of white/cream colored buttons, along with seed beads and flat back half pearls. The flat back half pearls (in my opinion) really make this embellishment bottle perfect for wedding projects!
So, to find out how to make your own Diamond Ring Frame, keep reading below!
Supplies needed:
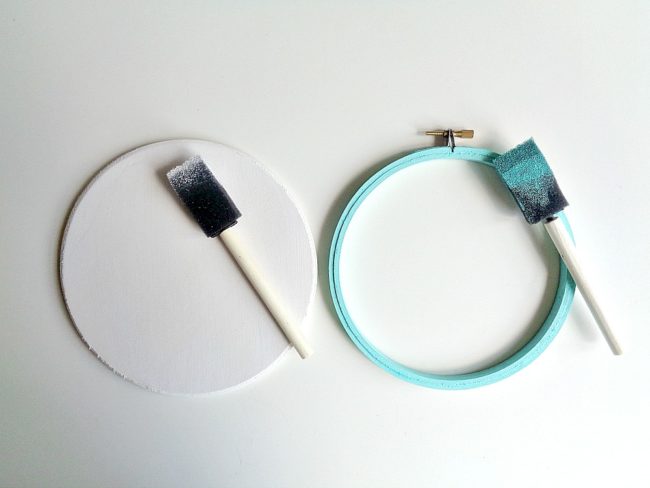
Step 1: Paint your wooden plaque white and your embroidery hoop mint. Then set both items aside to dry.
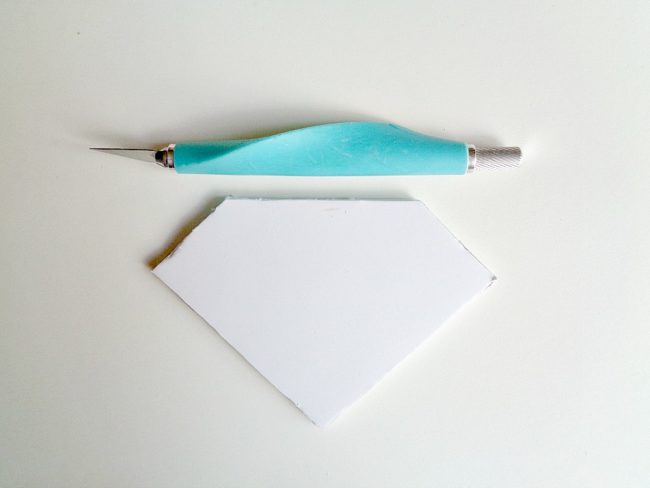
Step 2: Grab your foam board and cut out a diamond shape. The diamond I cut out for my 6-inch embroidery hoop was 5 inches by 3 ½ inches.
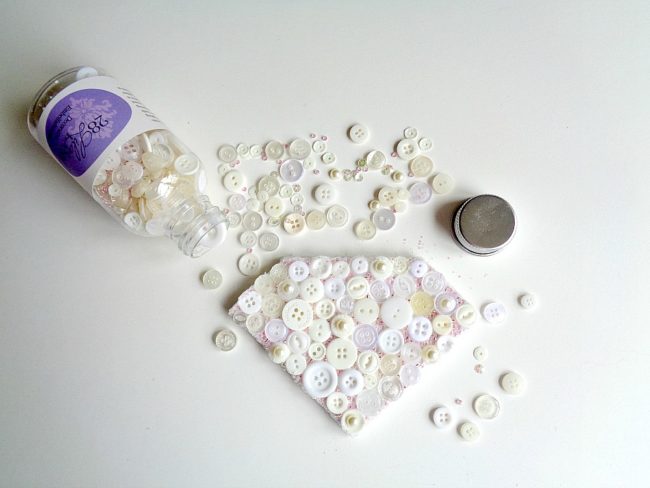
Step 3: Grab your 28 Lilac Lane Embellishment Bottle in Winter Wonderland and start decorating your diamond cut out. To do this, simply brush on a layer of decoupage glue onto your diamond cut out and begin arranging your buttons. While doing this, I also sprinkled on seed beads to fill in the gaps between the buttons. Finally, as an extra touch, I glued on a flat back half pearl to each of the buttons.
Once your diamond has been decorated, set the whole thing aside to dry.
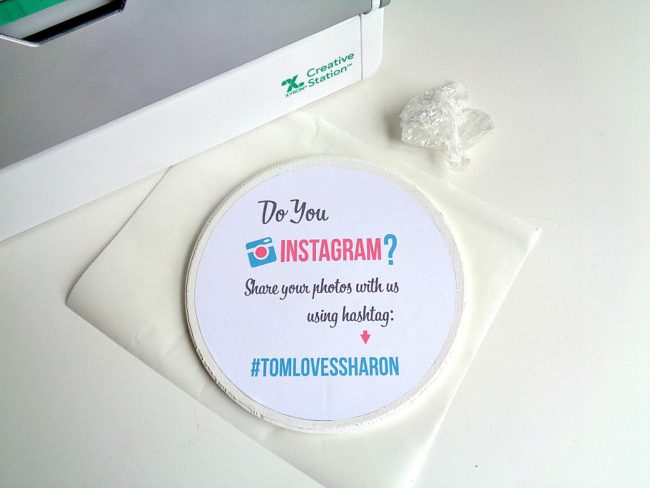
Step 4: Take your picture, sign, or image that you want to use for your frame and cut it down to size to fit on the inside of your embroidery hoop. Then take that image and run it through your Xyron 9” Creative Station. Once you have run your image through the Xyron Creative Station, rub the top of the sticker paper. Finally, peel the image off the sticker paper and adhere it to your wooden plaque.

Step 5: Using a hot glue gun, glue on your embroidery hoop to your main wooden plaque and then glue your diamond on top of the embroidery hoop.
Once all your pieces have been glued on, you’re ready to display your new Diamond Ring Frame!
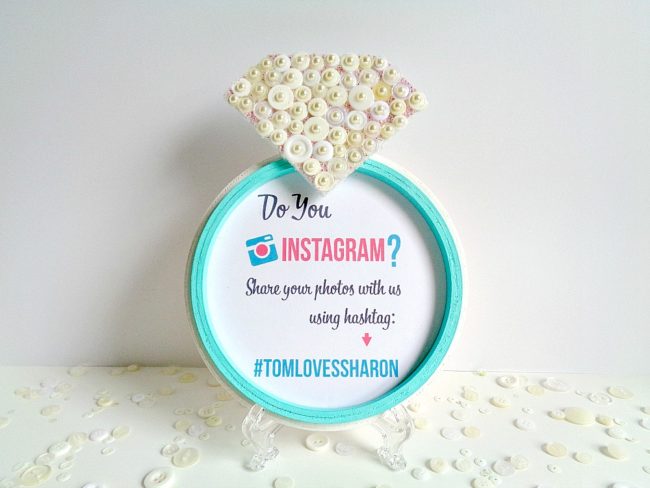

As you can see, I used my Diamond Ring Frame to hold a sign about taking Instagram photos during the wedding. However, this frame could be made to hold a variety of things. For example, the frame could hold photos, it could direct the guests to do something (like signing a guest book), or simply be used to display a favorite quote. Along those same lines, this Diamond Ring Frame does not have to be used at the wedding. It could also be used as a decoration for the bridal shower or bachelorette party instead!
What 28 Lilac Lane items would you use for your wedding or shower decor?
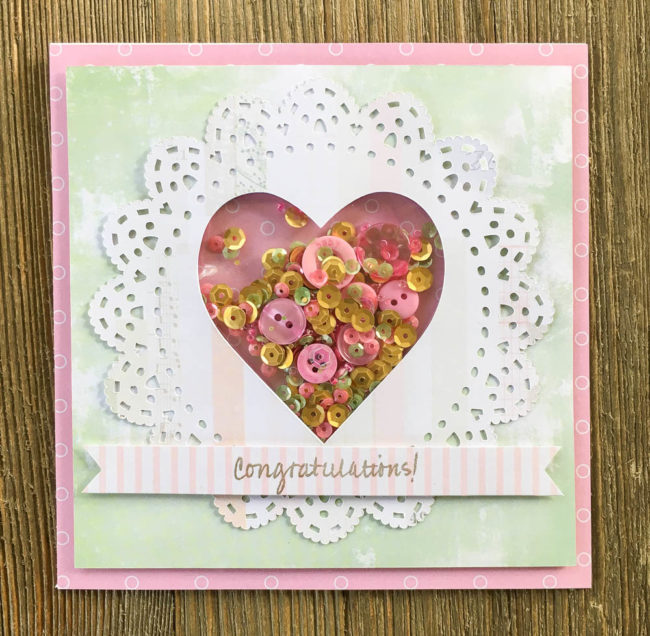
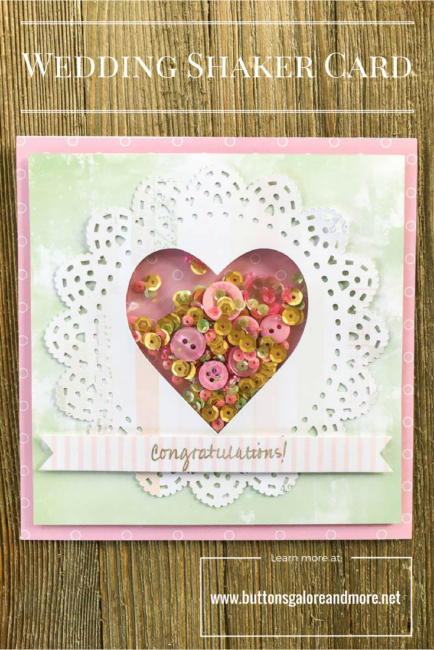
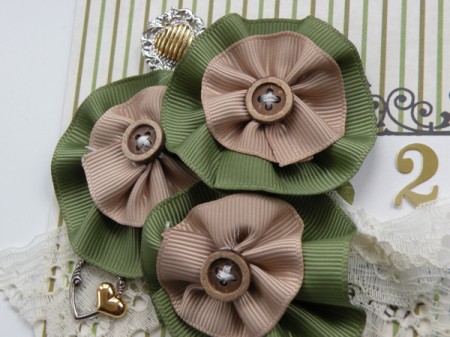
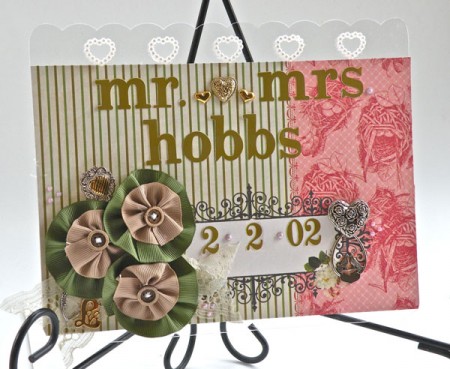
Shaker cards aren’t just a way to celebrate birthdays…they can also be a beautiful way to celebrate a more formal occasion like a wedding! This wedding shaker card pairs a sparkly shaker mix with a doily and die cut heart to celebrate the love of a special couple.
Supplies Needed:
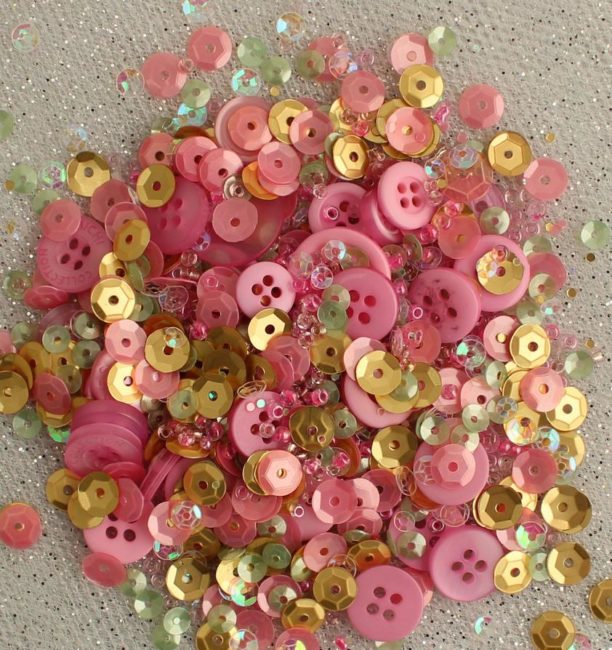
This shaker card features our versatile 28 Lilac Lane “Rose Garden” Shaker Mix that is a mix of gold, clear, pink, and green sequins, pink beads, and pink buttons to create the perfect shaker mix! Use this mix for occasions like weddings, to welcome a baby girl, or for a special birthday message.
Making this wedding shaker card is simple. Just die cut the doily for the card front, and then die cut the same heart shape out of both the doily and green layer of the card so they can be layered to create the card front with the shaker window. Glue the two pieces together and flip them over.
Using either a scrap of page protector or a Fuseable Pouch and Fuse tool, create a pouch that is slightly larger than the shaker window opening. Fill it about 1/2 full with the 28 Lilac Lane “Rose Garden” Shaker Mix, and then seal it with red liner tape or a Fuse Tool. Then use red liner tape to attach it to the back of the card front so that it shows through the shaker window.

To finish the wedding shaker card, attach the pink paper to the card base. Then use foam tape to attach the shaker card layer on top of the pink layer. Finally, cut a 1/2″ strip of paper and stamp the sentiment on it. Snip the ends into a banner and attach it with foam tape for dimension.
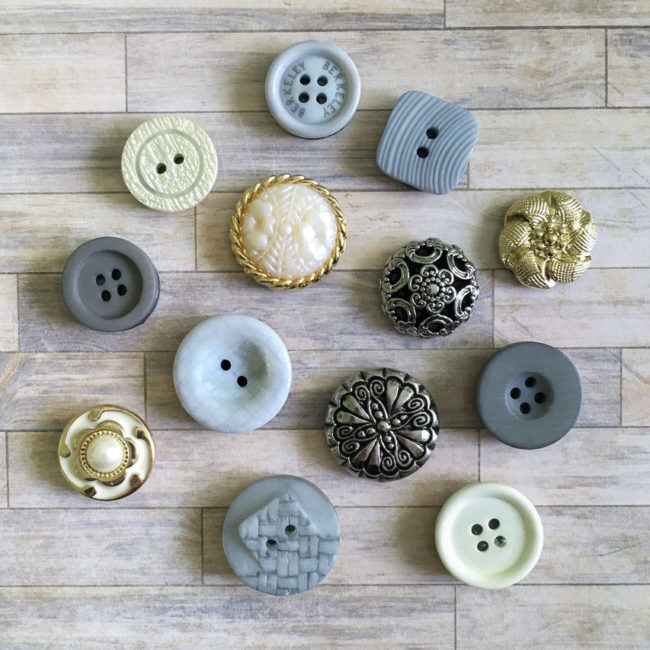
When you think of button magnets, you probably think of cute, brightly colored accessories for a classroom or a sewing room. But with the right button selections, button magnets can also be sophisticated accessories for flea market or farmhouse vintage style home decor.
Supplies needed:
Button magnets are so simple to make! Start by selecting buttons to create a coordinated set. Don’t forget to make sure they are all at least a little bit larger than the magnets that you plan to use! Next, cut the shanks off any that buttons that need it. (The buttons will attach more securely if you get the backs as flat as possible, so it pays to give some attention to detail on this step.) Glue the buttons to a round magnet using adhesive or a hot glue gun, pushing the buttons nice and flat on the magnets. Once the glue is dry, your button magnets are ready to use!
The trick to achieving a sophisticated look with button magnets is in the color and button selection. This “Wedding” Button Bonanza is full of creams and gray tones that are the perfect complement to many currently trendy home decor paint colors. They are subtle, and understated. Combine them with the metals of the Haberdashery set, and you have created an effortless collection that looks like grandma’s random button bag yet is perfectly coordinated.

These button magnets will look fabulous on a variety of surfaces – magnetic chalkboard, galvanized metal (see above), white board, even your fridge! They are an affordable way to create DIY wedding decor (hang up reception table assignments with them) or to add some style to a functional office board. What will you use them for?
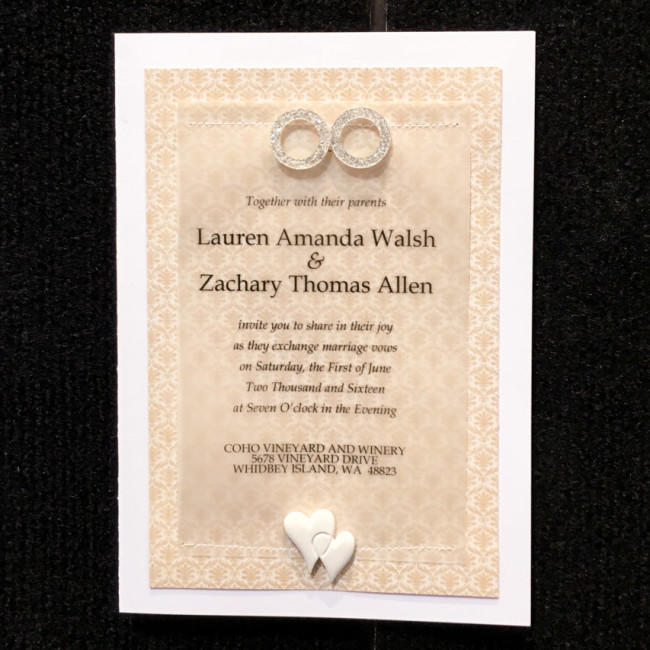
Are you hearing bells in your future – wedding bells, that is? If you are having a DIY wedding, our 3D wedding buttons can help you create a DIY wedding invitation and other beautiful items for your special day!
Supplies:
Making this invitation is easy!
Cut and fold the smooth cardstock to make a 5″ x 7″ sized card base.
Use a word processing program to create the invitation text. Print the text onto inkjet printable vellum.
Cut the patterned paper to size. Using your sewing machine, stitch the vellum onto the patterned paper.
Adhere the patterned paper & vellum combination to the card front. Adhere the buttons on top of the vellum.
Buttons Galore’s 3D buttons are available for bulk purchase. If you require a specific item in bulk to create large quantities of an item like this DIY wedding invitation, please contact our customer service department through our website for assistance.
Yesterday was Valentine’s Day, and that means love, romance…and proposals! So, for everyone who woke up this morning with a wedding in their future (or their family’s future), we’ve got a fun and easy project for you – a DIY wedding frame!
This wedding frame is multi-purpose – it can serve as a wedding or shower decoration, and then transition to home decor as a treasured memory after the big day is over.
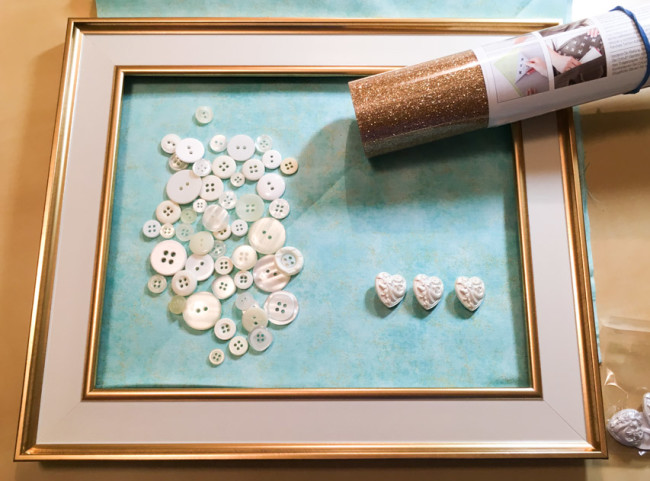 The first step in this project is to select a color scheme. This project is built around a fabric background, which can really be any color. I’ve chosen a beautiful aqua, but the wedding’s theme color or a color from the bride’s home decor might both be excellent choices.
The gold iron-on material matches both the frame and a fleck that is in the fabric. Our Haberdashery button pack is variegated between cream and white, so no matter what color of wedding dress the bride chooses, the collage will work.
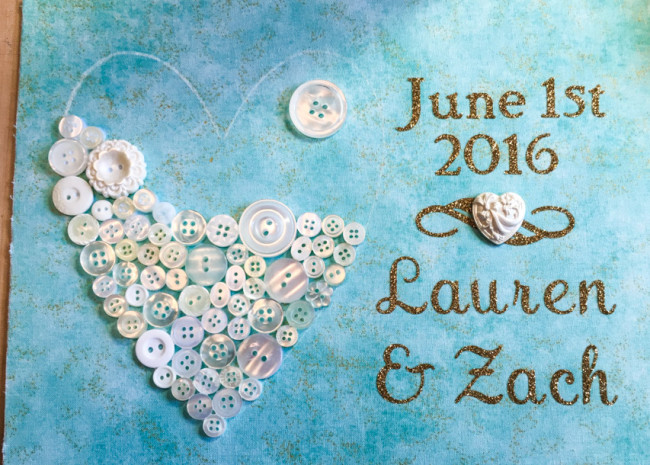
Use a fabric pencil to sketch out the area for the heart.
Measure the remaining area and create the text and other elements on your die cut machine. Cut from glitter iron-on material, and iron on to fabric following manufacturer’s instructions.
For the fabric to stand up to holding the collage of buttons in the frame, it needs to be stiffened. I used Krylon Spray Adhesive to laminate the fabric to a sheet of white chipboard as a backing.
Using white glue (I used PPA Matte by ArtQuest), adhere white buttons from the Button Basics and Haberdashery packages. Continue until the entire heart is filled. I ensured that the largest ones were spread around in a balanced fashion by laying them down first and then building around them.
Finish by removing the stem from a heart button, and gluing the heart on top of the glitter flourish.
Remove the glass from the frame, and place the cardboard sheet in place!
And now your beautiful memory of a special day is ready to enjoy!

Supplies:
Congratulations to all the newly engaged couples out there, and we look forward to seeing you make our DIY wedding frame!
You can add your own pretty handmade art to every guest table at your wedding reception with just a few steps. Use the Buttons Galore and More blank craft shapes to create mini masterpieces that coordinate with your wedding theme. You can use these pieces to embellish candle votive holders, make into wedding party gifts or even as jewelry for the bride and bridal party. I played with different colors and color combinations, use what works for your event theme. I used the idea of dragonfly decor.

Wedding Votives with Dragonfly Decor Art by Jen Goode

Start Ups are mini canvases for your own art

Spray layers of Smooch Spritz to add color

Finish with Champagne Smooch Spritz
Tips:
Don’t be afraid of adding more color. If you don’t heat set, you can wipe off some of the excess color and start over. Although you may not be able to wipe off all the color, you will be able to remove quite a bit of it.
If your stencil comes loose from the heat gun use, simply reapply with more adhesive spray.
Most importantly, have fun creating your own personalized dragonfly decor!

Dragonfly Art sparkles

Add color layers to other Start up shapes

Wedding votives with handmade Dragonfly art by Jen Goode
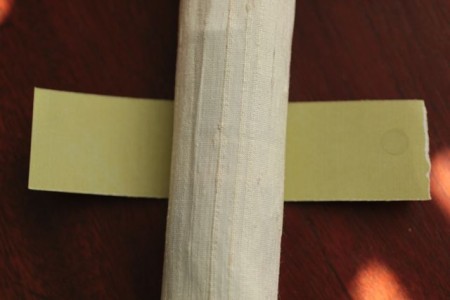
I am in love with doilies. Seriously, I think everything looks better with a doily. And, as Spring and Summer approach, I’ve also got pinwheels on my mind. So, when I was brainstorming some wedding ideas to share with you, I decided to combine my two loves. Of course I threw in a button for good measure too! These doily pinwheels would be great wedding favors or, if you want to give your wedding a whimsical touch, why not line the ceremony aisle with them? I can’t imagine a better way to walk into life as a newlywed than between pinwheels. After all, doesn’t your groom make your heart spin?
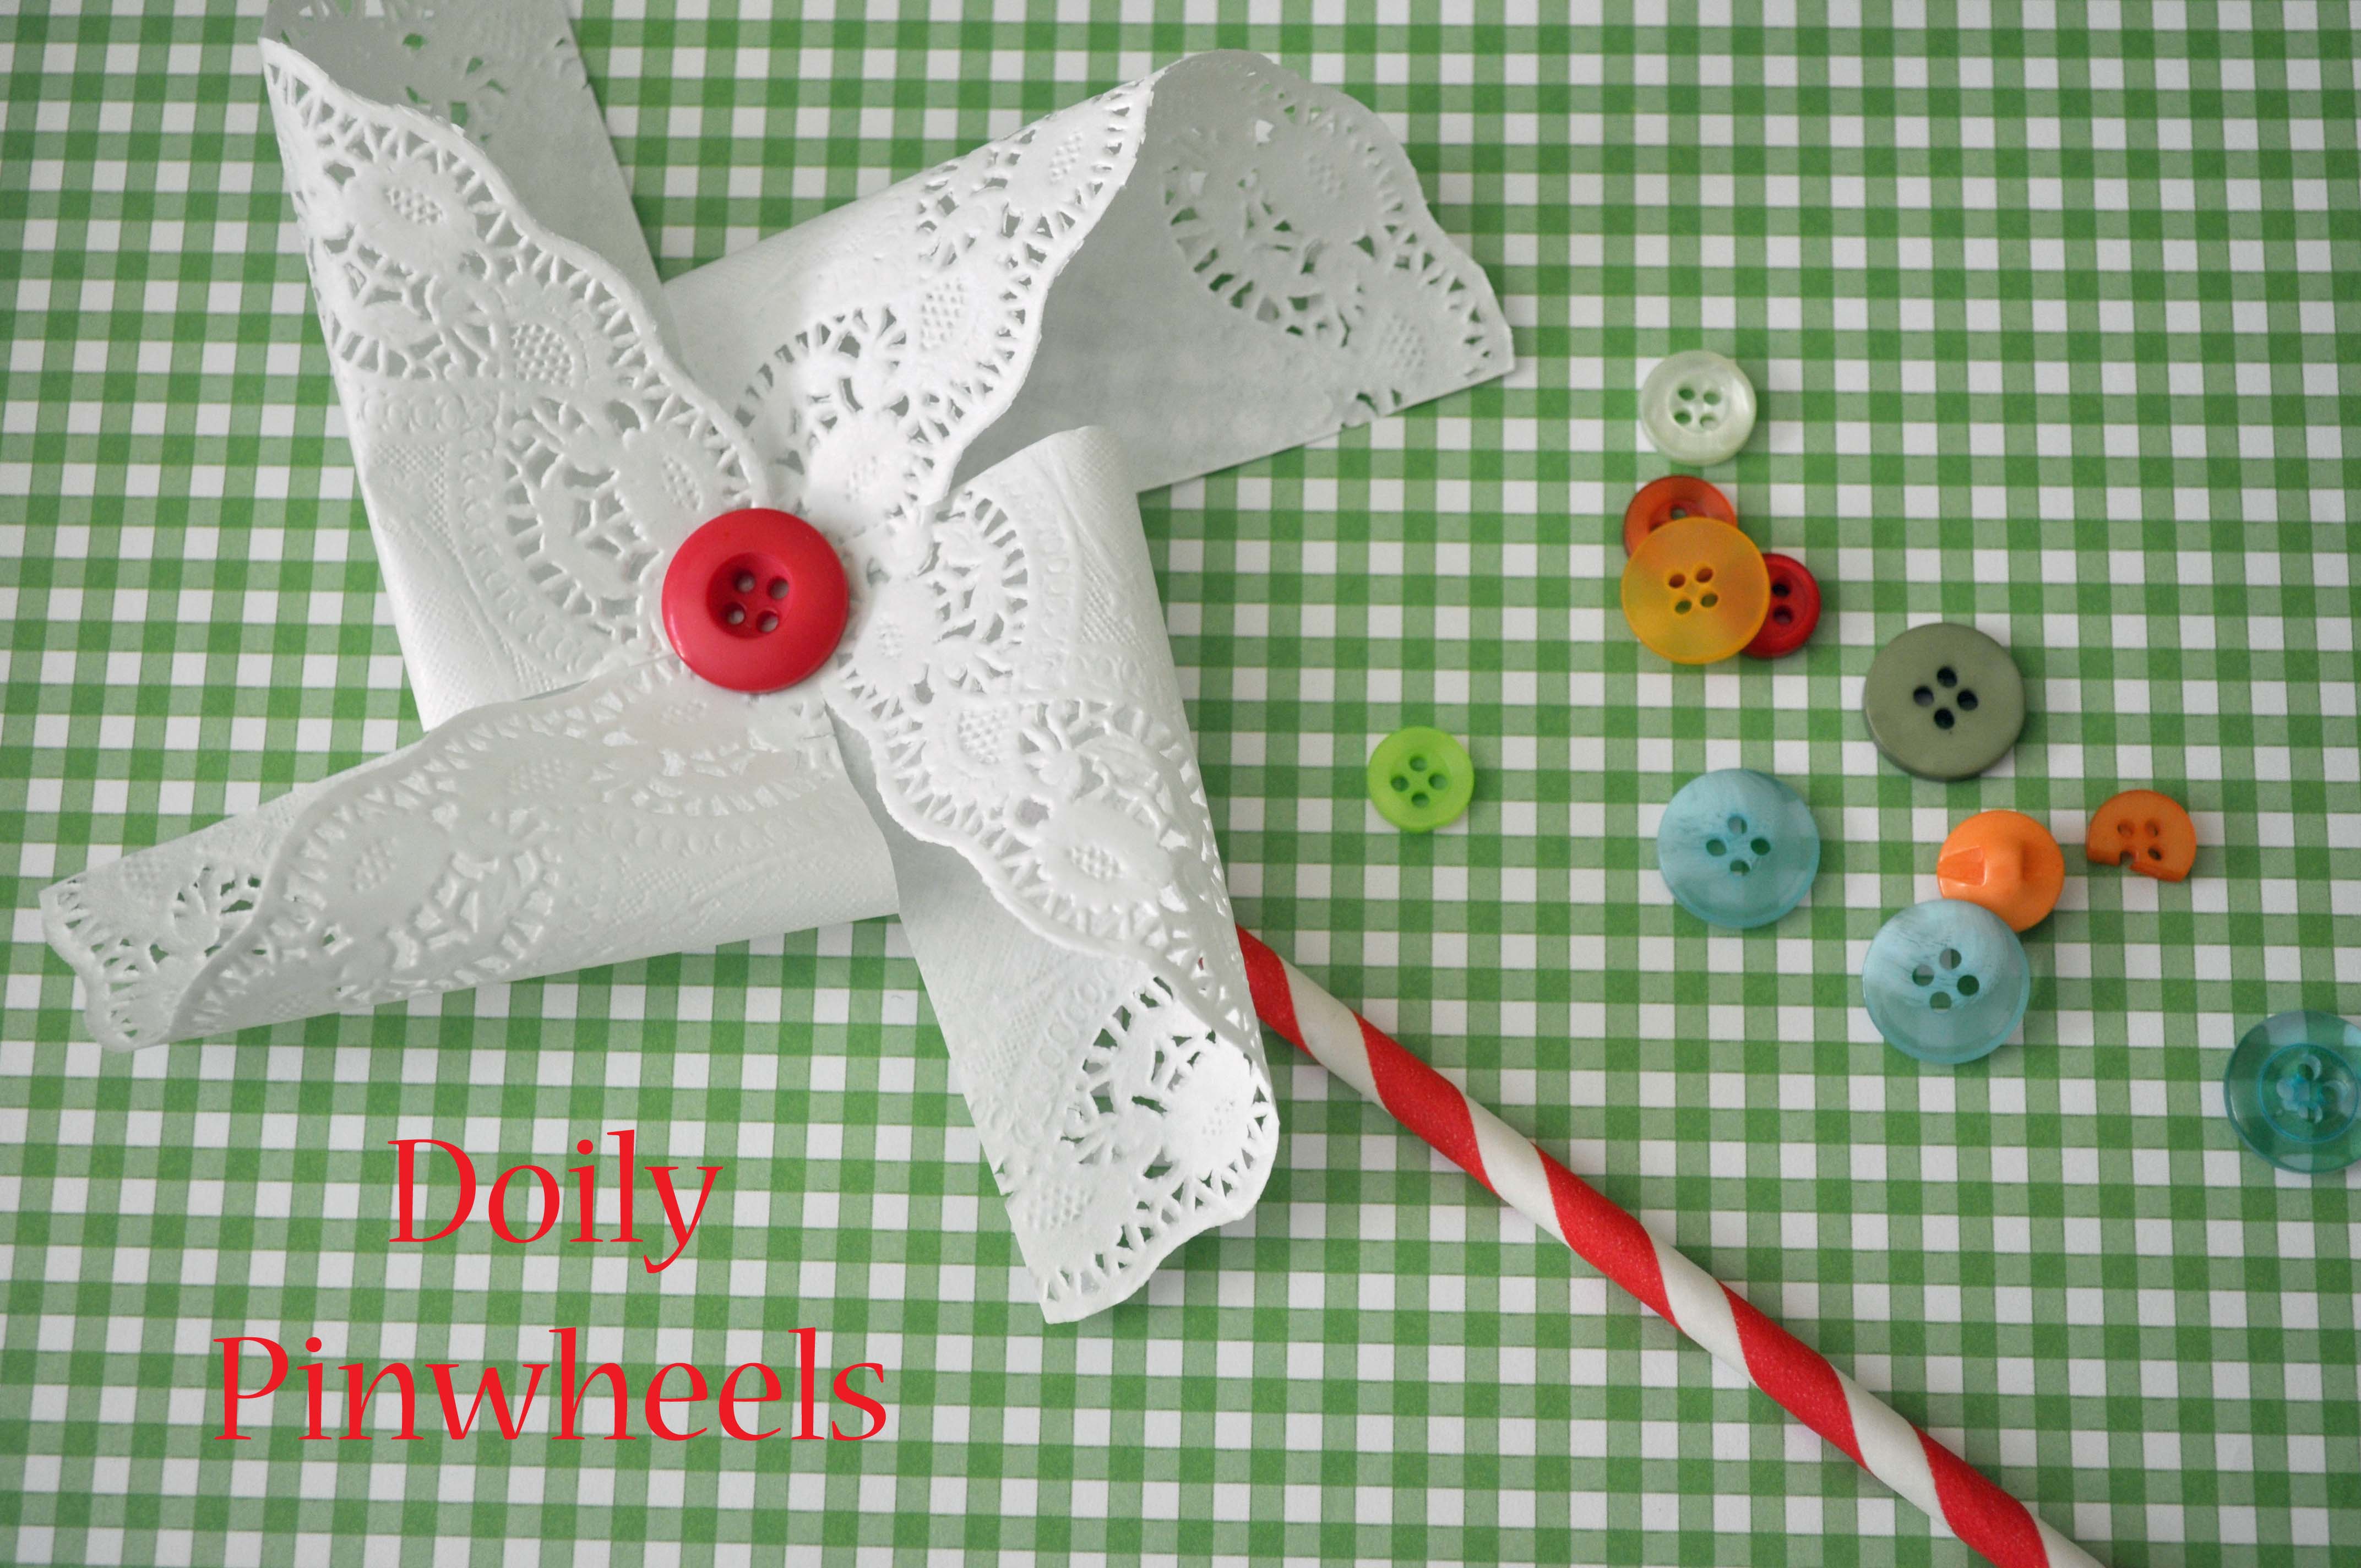

Tip: Match the button and the stripes of the straw to your wedding colors. If you can’t find straws to match, use wood sticks and paint them to match!
![]()
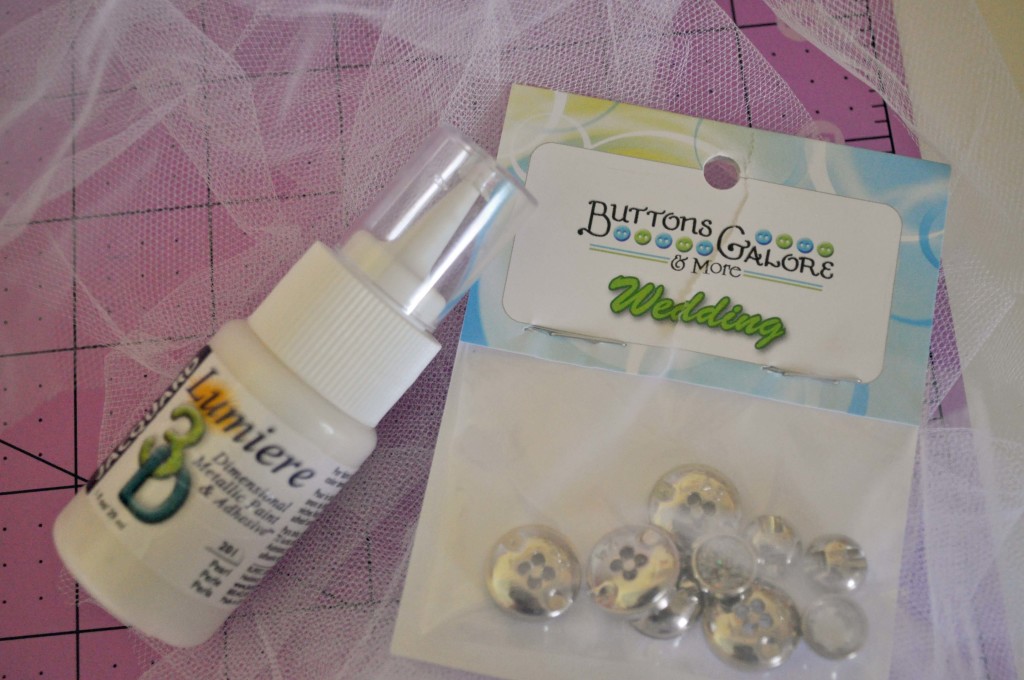
Something borrowed, something blue. This cute, DIY bridesmaid headband is perfect for your wedding. I love the “Tiffany” blue of the ribbon and the Buttons Galore & More Wedding Glitz buttons give it lots of sparkle. This headband is a great wedding project. It would look great on your bridesmaids, flower girls, or even as a alternative to a veil for a bride.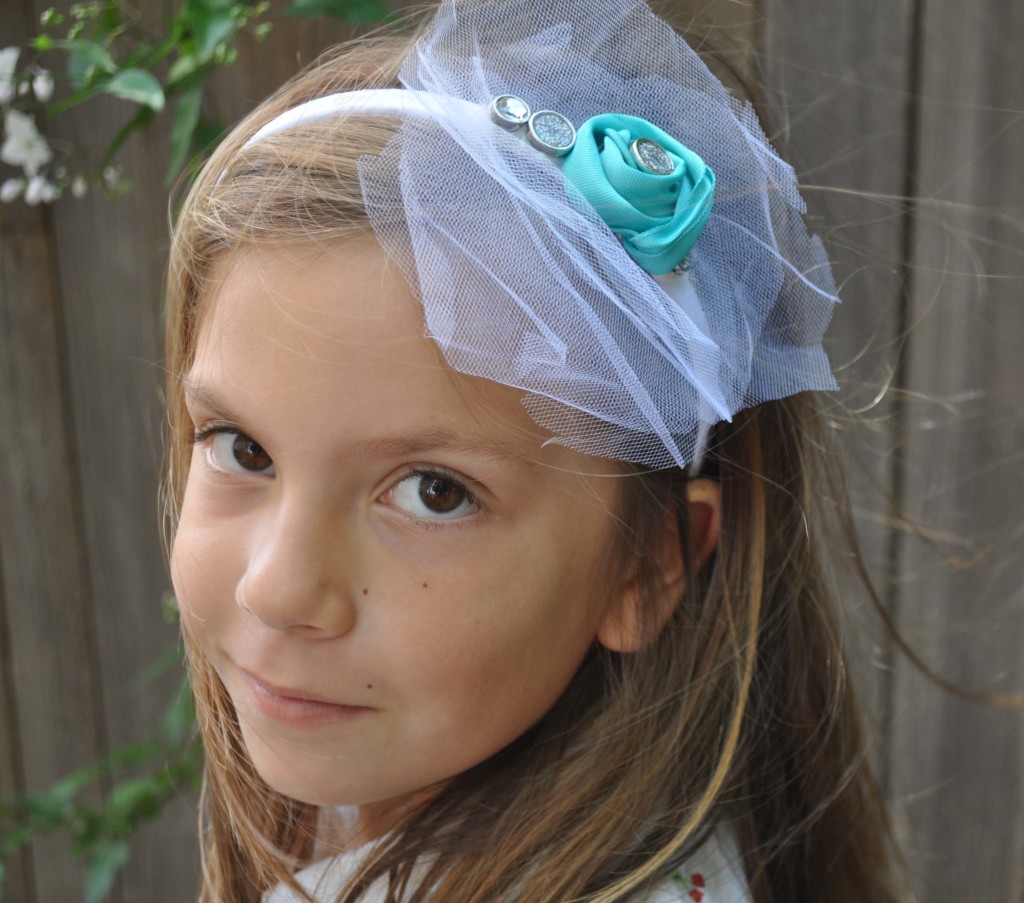
1. Using scissors, cut 3 circles, measuring approximately 6 inches in diameter, from the tulle. This doesn’t have to be perfect! Cut them freehand and let the edges be a little ragged. This will give the headband a soft, romantic look.
2. Cut 12 inches of ribbon. Twist and roll it into a flower shape.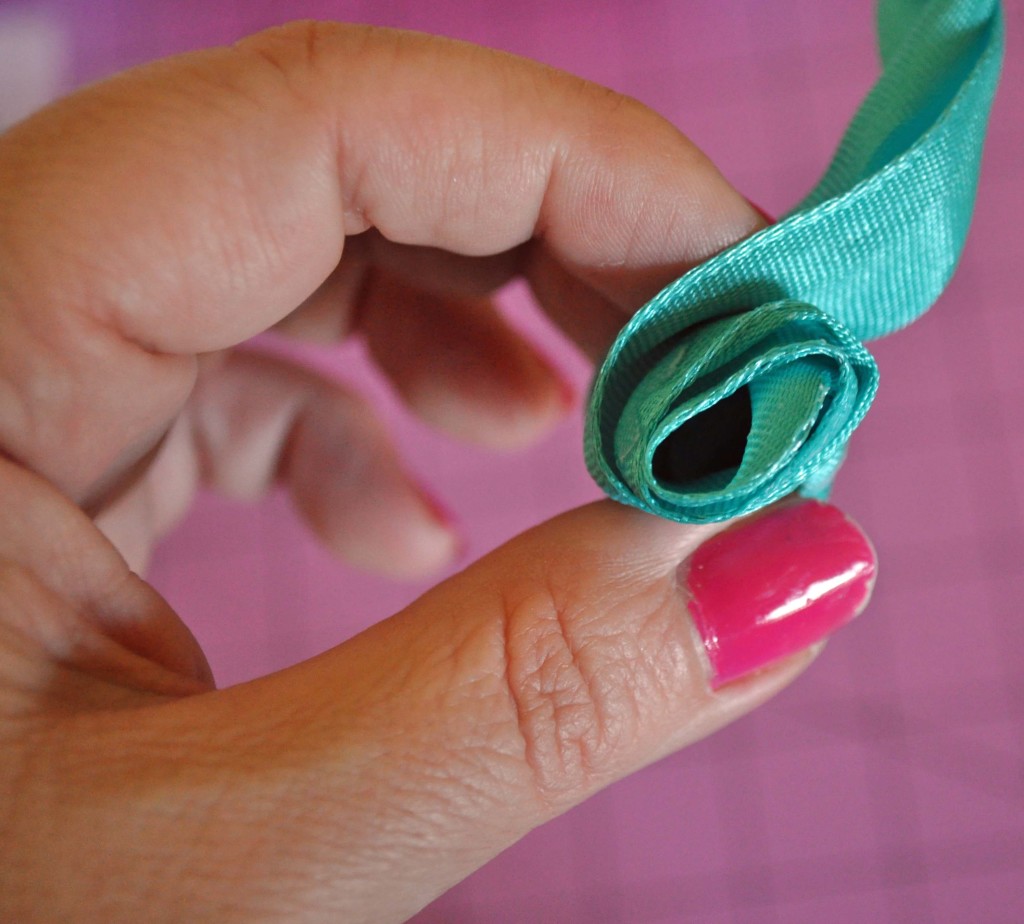
3. Using the Lumiere paint, apply a dab of glue to the side of the headband and attach the tulle circles to the headband. It should be placed 1-2 inches from the top, center of the headband.
4. Again using the Lumiere paint, attach the the ribbon flower and some additional Wedding buttons to the headband over the tulle. Add as much or as little bling as you like!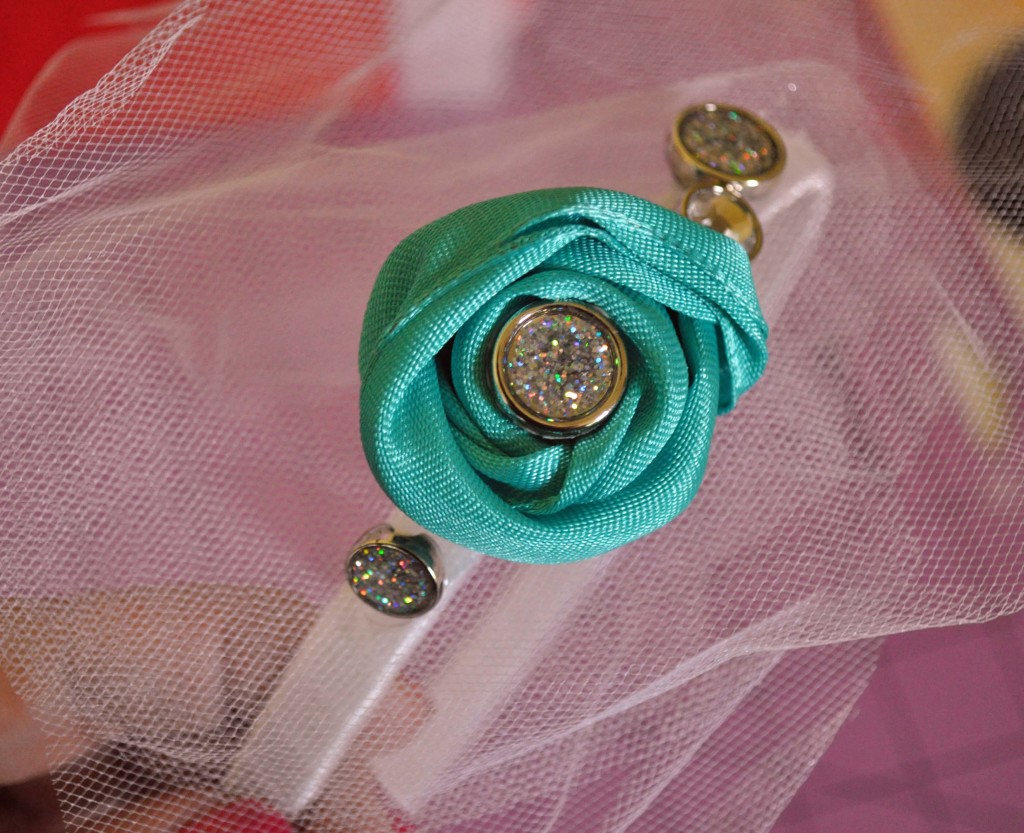
Tip: Lumiere 3D Dimensional Paint works great for this project as it works as both a glue and design element. When the paint dries it gives you a 3D pearl effect-perfect for a wedding.
![]()
You can create these adorable hand stitched little birds using a wide array of materials. Use your mixed-media mojo to create birdies with your own unique look and then embellish with pretty buttons to add color, sparkle and dimension. I absolutely love the new wedding buttons, so I had to use these little glittery hearts for my bird ornaments. Today I’ll share with you how you can make them too.

From the Buttons Galore and More Store:
Other materials used:


Sparkly wedding buttons

Cut off button back before gluing

Pretty button embellished hand stitched birds by Jen Goode
These hand stitched birdies make a great decoration you can add to any centerpiece, accent other key piece or even include as a gift tag accessory. Mix and match the colors of fabric and buttons to create pretty handmade pieces you can include in any occasion.
Good morning, Pinky here again,
I love making cards and scrapbooking but sometimes they just need a special embellishment to make them POP.
The cards I am sharing today really shine with the beautiful soft Buttons Galore & More buttons.
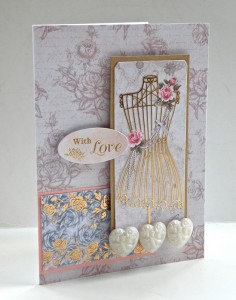
On this card I used the beautiful Buttons Galore & More Ribbon Heart buttons
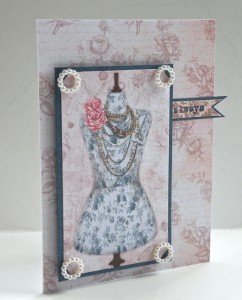
First cover white cardstock 6X9″ with patterned paper.
Use alternating colored cardstock to matte dress die cut and patterned paper.
Adhere matted patterned paper as shown.
Using thick pop dots, pop up dress die cut as shown in photo.
Pop up sentiment die cut using foam pop dots.
Using hot glue gun adhere 3 Buttons Galore & More Ribbon Heart buttons as shown above.
For this card:
First cover white cardstock 6X9″ with patterned paper.
Use alternating colored cardstock to matte dress die cut and sentiment.
Using thick pop dots, pop up dress die cut as shown in photo.
Tuck sentiment underneath dress die cut.
Using hot glue gun, adhere Buttons Galore & More Classic Circle buttons as shown.
2 beautiful cards in just 30 minutes!
This buttoned handbag is simply beautiful. If you have a little bit of time and basic sewing skills you could create it yourself. Check out the buttons in our haberdashery line.

http://pinterest.com/pin/121949102380039596/
 The pin it to Win It Contest ends on Friday and we would not want you to miss out on great inspiration, and a chance at being a GUEST DESIGNER or winning a prize.
We are celebrating spring and what better way to do it than with Pinterest. The site makes our hearts swoon— we use it as a creative kick-start, to figure out what’s for dinner, and to get inspired by gorgeous color combinations for our own projects.
Now we’d like to turn the spotlight on YOU & your creativity. Show us your BUTTON-inspired pinboards!! At the end of the contest we will send the Pinterest user with our favorite pin collection a tote bag filled with fabulous & inspiring crafting supplies. If you are the creator of our very favorite button project, you will receive an invitation to be a guest designer for a mutually agreed upon month at Buttons Galore & More and receive $25 worth of products of your own choosing from the Buttons Galore & More site. In addition, your creation will be featured on our website and in our newsletter — reaching thousands of crafters around the world who will turn your idea for a fabulous project into reality.
WHAT YOU NEED TO DO
Be sure you follow Buttons Galore and More on Pinterest. Create a new Pinterest board entitledButtons Galore Pin It To Win It Party.
Fill that board with at least 4 pins (feel free to add more!).
-2 of the pins must be of your favorite projects from the Buttons Galore blog
-2 pins must be of your own creations featuring buttons of any kind.
All the pins (even those not from ButtonsGaloreandMore.com) must have a caption explaining the pin’s relation to the party.Is it your favorite color mix? An awesome project? A card created by you? Your favorite scrapbook page? Tabletop decor?
All the pins (even those not from ButtonsGaloreandMore.com) must be hashtagged with both #buttons and #pinitparty.
Once your party pinboard is complete, enter the contest by posting a link to the pinboard in the comments section of April 2nds post Titled Pin it to win it starts TODAY.
This contest launches on April 2, 2012, and will run through 5 p.m. April 27, 2012. The Pinboards will be judged on originality, creativity, adherence to the contest rules, and a general sense of style, appreciation for all things interesting, authentic, and fun.
Note: You must be a member of Pinterest.com to enter, and you must be following ButtonsGalore. If you do not have a Pinterest account, you can sign up for one here or request an invitation in the comments section.
The Buttons Galore Party Pinboard Contest (the “Contest”) is sponsored by Buttons Galore and More (“Sponsor”).
ONE (1) GRAND PRIZE: A gift bag filled with craft supplies approx. retail value $75.
ONE (1) FIRST-PLACE PRIZE: approx. retail value $25
All federal, state and local laws and regulations apply; void where prohibited. PRIZES MAY BE SUBJECT TO TAX; ALL APPLICABLE TAXES ARE THE RESPONSIBILITY OF THE WINNER.
ELIGIBILITY: The Contest is open only to individuals, eighteen (18) years or older at time of entry, who are legal residents of the United States and Canada, excluding the Province of Quebec. Employees and Creative Team Members of Buttons Galore and More, their immediate families (defined as parents, children, siblings, spouse and grandparents), and those domiciled with any of the foregoing are not eligible.
ENTRY: All entrants must submit a Pinterest board entitled Buttons Galore Pin It Party, containing at least 4 pins, 2 of the pins must be of your favorite projects from the Buttons Galore blog and 2 pins must be of your creations featuring buttons of any kind.
Submissions to the Contest must be received by April 27 2012 at 5:00 p.m. Eastern Time (“ET”) in order to be eligible; entries received after that date will be deemed ineligible to win. Sponsor is not responsible for lost, late, inaccurate, incomplete, damaged, illegible, or misdirected entries.
Each entry must be submitted on an individual basis (i.e., no team, joint, or corporate entries) the entries created by the contestan must be the original creation of the submitting participant.
Entries may not contain profanity, nudity, pornographic images, violent images, anti-competition messages, illegal material, or material that violates the rights of third parties. Entries may not include confidential information, trade secrets, trademarks or copyrighted material belonging to any person or entity other than the entrant absent a suitable license or permission agreement, proof of which is required. Entries containing any forbidden matter or material otherwise deemed by Sponsor to be inappropriate will be disqualified. Online entries will be deemed submitted by the authorized account holder of the email address submitted at time of entry. One entry per person; multiple entries will be disqualified.
JUDGING: The Creative Team members and editors will select the winning entry based equally upon the criteria of originality, creativity, adherence to the contest rules, and a general sense of style appreciation for all things interesting, authentic, and fun.
By entering, you agree to be bound by these Official Rules, and that the decisions of the judges are final and binding in all respects. Judging will be completed by April 30, 2012, and potential winners will be notified by Pinterest comment on or before May 1, 2012. Sponsor reserves the right not to select any winning submissions based upon the quantity or content of submissions.
If required winner announcement is not in contact with Buttons Galore within seven (7) business days of notification, or if notification is returned as undeliverable, any prize will be forfeited and an alternate winner will be selected.
PRIZE AWARDS: Prizes will be awarded within sixty (60) days after winner verification. No prize substitution or transfer is permitted, except that Sponsor reserves the right to substitute a prize of equal or greater value for any reason. Sponsor is required by law to report prize values to taxing authorities; all taxes and any other incidental expenses on prizes are the sole responsibility of each winner.
While I love throwing birthday parties for my children, I often struggle to think of fun party favors that are also useful. With the popularity of baking-themed parties for the tween girl set, layered jar mixes are a perfect complement to the theme, and won’t become clutter later.

I focused on the Ebony & Ivory Trim Collage Kit to create most of this layered cookie jar, along with some bright pink fabric and the cake button from the Sweet Treats collection. There are 12 yards of ribbon in this collage kit, so I could make several coordinating jars from one kit.
Materials:
Ebony & Ivory Trim Collage Kit
Sweet Treats Buttons
Precision Diagonal Craft Cutters
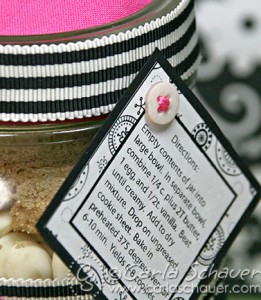
Pint canning jar with ring & lid, layered cookie mix (instructions found online try www.recipegolmine.com)
Bright pink fabric remnant (approximately 1-4”square and 1-12×1.5” strip for each jar)
Polyester fiberfill (or cotton balls)
Liquid glue
Fabric scissors
Computer printer or white cardstock and black pen
Black and white patterned paper
Black cardstock

These baking jars are easy to make assembly-line fashion, and are a fun way to send an activity home with guests after a party. Paired with a fun apron party craft, they make wonderful, useful party favors!

Button embellished napkin rings
I am helping a friend plan and prepare for her wedding and all of the events surrounding it. The project today is one of the napkin ring ideas I proposed to her. It is simple enough that her kids can help, not expensive, and very pretty all at the same time. She wants to go with shades of olive ( his favorite color), peach ( her favorite color, coral and turquoise (mine). Not that my colors matter at all. By adding shades of the four colors it helps to expand our options and stretches our budget even further. By limiting the colors it allows us to many things that we already own.
To make the napkin rings I used scrapbooking paper that had all of her colors. I buttons I used are Avacado and adhered with a glue dot.
Cut 1.5 inch strips
Add a glue dot to one end
Wrap around napkin
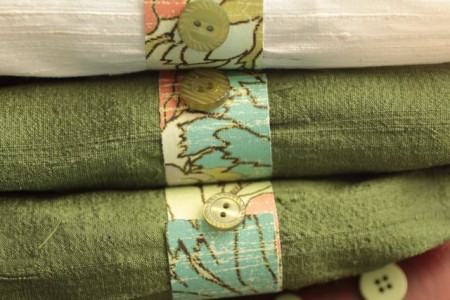
Add buttons with a glue dot and VIOLA!

Button embellished Wedding Keepsake
A wedding is such a blessing and a wonderful occasion. I love to add something handmade to every gift I give to the lovely Bride and Groom or on an anniversary. This keepsake acrylic wall hanging is the perfect addition to a gift or the perfect anniversary gift. It is a great way to memorialize the date of the wedding and show that you really care.
Supplies Used:
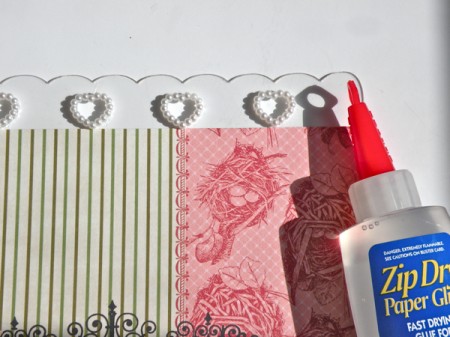
After I added paper to my acrylic base I used my Zip Dry and the Classic Hearts adhering them over each cutout.
Then using a foam pop dot I lifted up the Flat Back Heart Button adhering the Valentine’s Day Charm underneath.
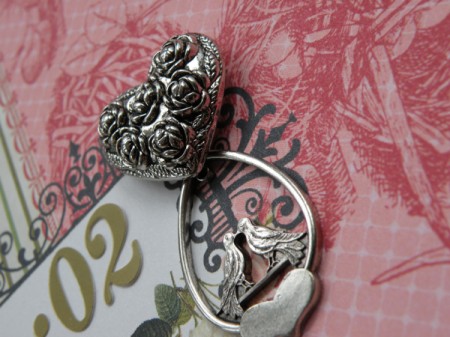
I also added the Valentine’s Charms in and around the Ribbon Rosettes I also used with my vintage ribbon stash that was from my grandmother.
In the end this is what I came up with, it’s soft and beautiful and will last a lifetime.
You could easily add fabric, lace or anything else you can find to make it personalized.
Thanks for coming by today ~ Pinky

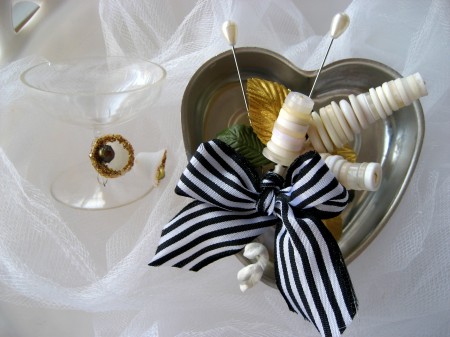
Handmade Button Boutonniere
Hello! It’s my distinct honor to be writing up my first post here at Buttons Galore and More! I am also so excited about sharing a creative way to make a one of a kind boutonniere that will definitely stand up to the activity of the wedding day…all the way from getting ready in the morning to the ceremony to the dancing and celebrating into the night and beyond! A button boutonniere can be made as unique as the person who will wear it!
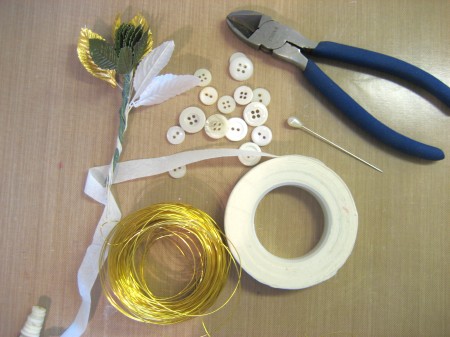
Supplies:
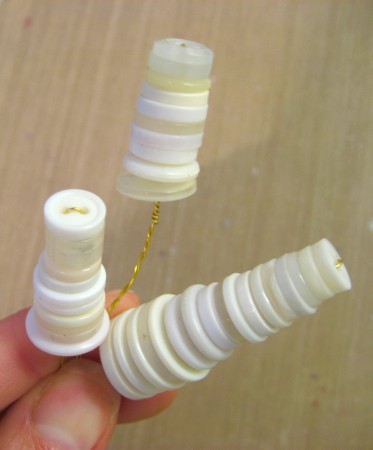
Begin by threading a stack of buttons of increasing size onto the craft wire(cut to 10-12 inches in length), smallest buttons first down to the largest in your selection. Twist the wire at the bottom of the stack tightly to secure the stack. I used different amounts and heights of buttons to make each stack a slightly different height when finished.
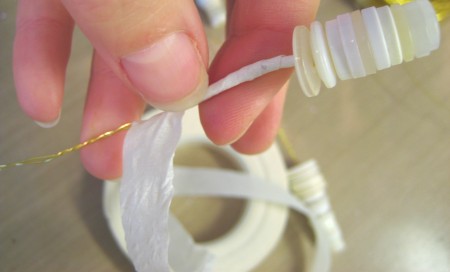
Twist wrap the florists tape around the wire stem approximately half way down the wire.
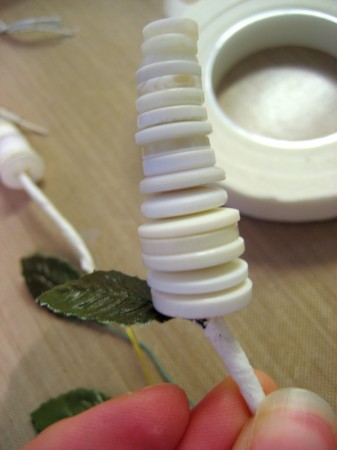
Add floral leaf picks or other decorative items the same way by wrapping the bundle with florist tape to approximately the mid-point.
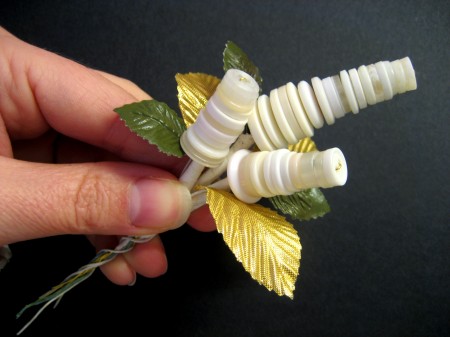
Once you have all three button flowers and leaf stems individually wrapped, group them in a pleasing way as one bouquet and twist the wire stems together. Wrap the whole stem from base of the bouquet to the tip of the wire with white florist’s tape.
Once the wrap is in place, use your fingers to corkscrew the bottom tail of the boutonniere. You can also arrange and shape the leaves and button flowers since they are wired which makes this boutonniere extra friendly to design!
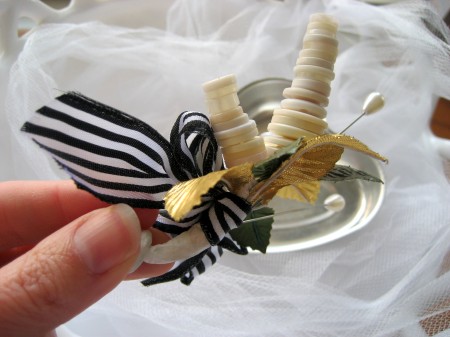
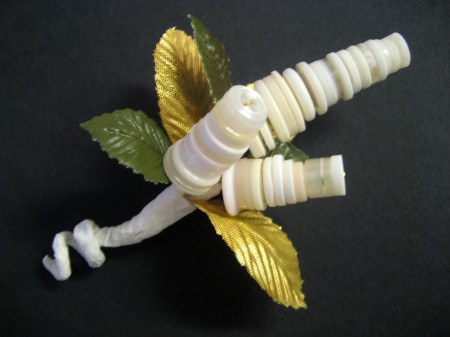
Add a bit of ribbon and corsage pins so this boutonniere is ready for the big day!
Ta da! That’s it! The great thing about button floral designs are that they can be done way in advance and will still look perfect on the big day. Not to mention, the cost on these per boutonniere are pennies compared to their fresh flower counterparts. These can also be easily translated into other holidays or get-togethers and customized with pretty vibrant colored buttons, ribbons and other trims. Add an elastic wrist strap to the back and this is a wrist corsage too. Got creative teenagers in your life? Gather the kids for a button corsage/boutonniere making day and they’ll be the newest smash hit since duct tape prom dresses! The sky is the limit and Buttons Galore and More has you covered with beautiful buttons and trims to make your day extra special!
Thanks so much for stopping by!
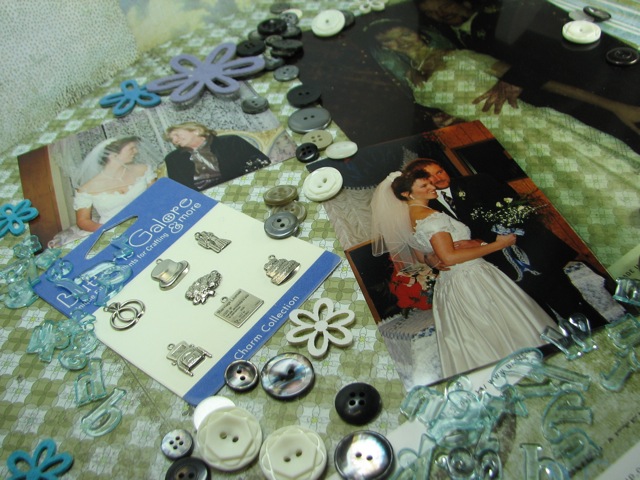
Scrapbooking

A beloved, but horribly neglected department of my personal crafty output.
What follows is a fun and crafty filled post that helped bring my wedding memories into much more beautiful light and will, hopefully, inspire you to get your craft on as well.

This is a simple votive favor I made for a baby shower but it could easily be transformed into a wedding reception/shower favor by using buttons in white or in the wedding colors.
Simply glue buttons on the bottom 1/4 of a straight sided votive candle holder. Fill with small gems and place a battery operated candle inside.
Of course, you can use a real candle but most halls, churches and other public spaces won’t allow an open flame. Check with the venue where you are holding the event prior to choosing a real candle.
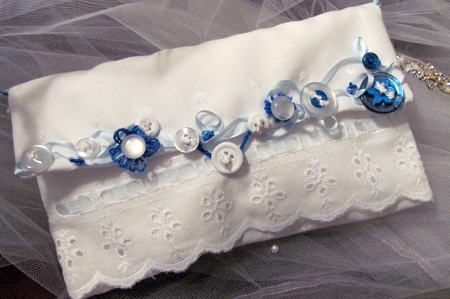
Button embellished bridal clutch by Jen Goode
Something borrowed, something blue this bridal clutch is the perfect accessory with a handmade touch. Use blue and pearl buttons along with delicate blue ribbon, eyelet fabric and faux satin, to create a pretty little purse fit for a wedding.