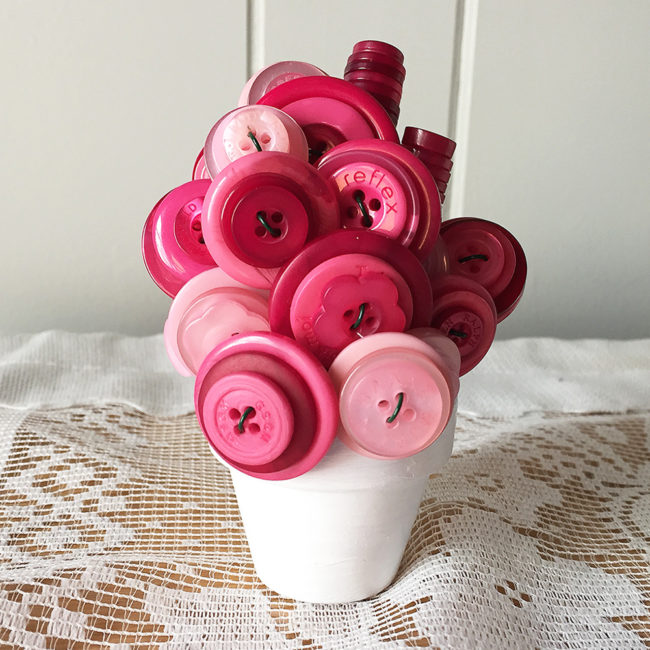
Flowers are pretty, but they are also expensive and don’t last very long. A button bouquet is affordable and simple to make and will add some vintage charm to your home, wedding, or shower – and never needs watering! Continue Reading →

Flowers are pretty, but they are also expensive and don’t last very long. A button bouquet is affordable and simple to make and will add some vintage charm to your home, wedding, or shower – and never needs watering! Continue Reading →
Hello Everyone! This is Katie from the Buttons Galore & More Design Team and today I have a fun wedding decor idea!
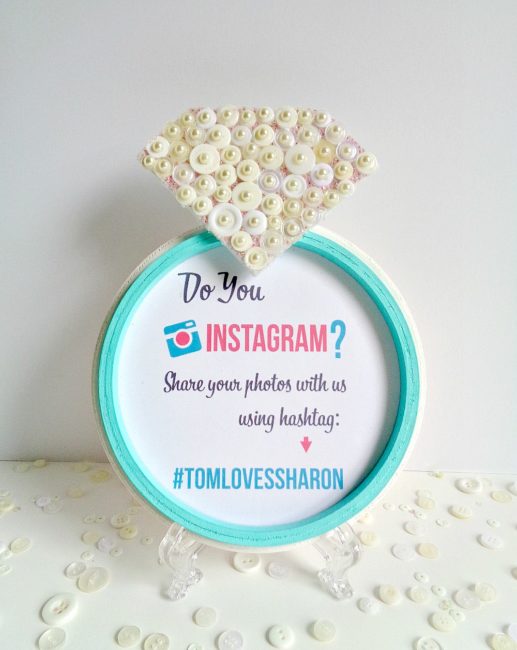
When I was given the task to make a wedding decor project, I wanted to create something that was cute, useful, and that could be saved in the long-run. With that in mind, I decided to create a diamond ring frame that could be customized to fit your wedding decor, be useful (since it’s a frame), and be saved by the bride. In addition, this project is super inexpensive to make because it’s made from a wooden plaque, an embroidery hoop, and a piece of foam board!
To decorate the diamond part of the ring, I decided to use the 28 Lilac Lane Embellishment Bottle in Winter Wonderland. Even though “winter wonderland” sounds wintry, this embellishment bottle could easily be used for wedding décor as well because the embellishment bottle contains several shades of white/cream colored buttons, along with seed beads and flat back half pearls. The flat back half pearls (in my opinion) really make this embellishment bottle perfect for wedding projects!
So, to find out how to make your own Diamond Ring Frame, keep reading below!
Supplies needed:
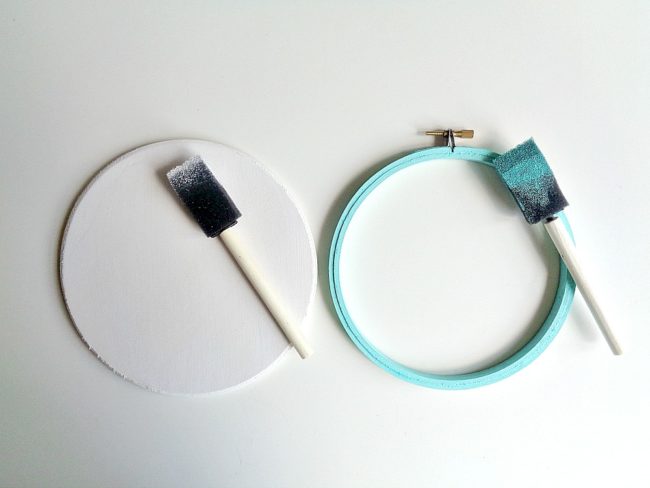
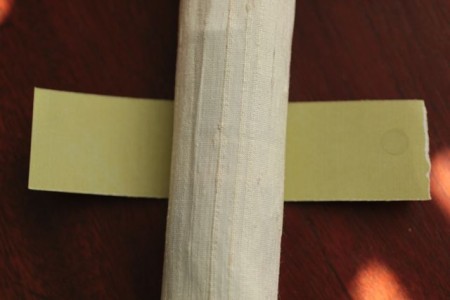
Step 1: Paint your wooden plaque white and your embroidery hoop mint. Then set both items aside to dry.
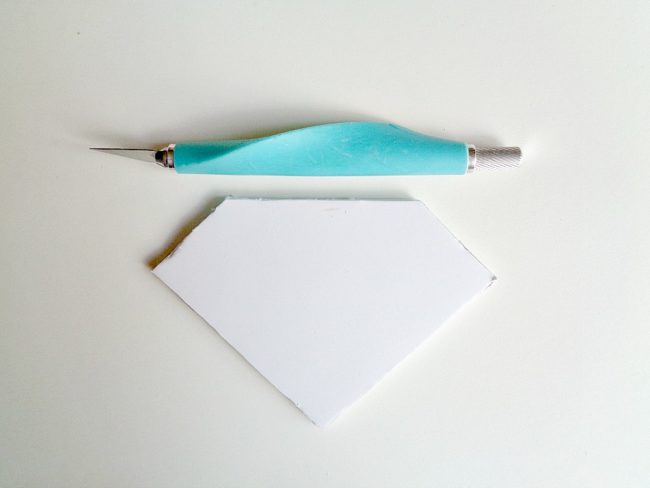
Step 2: Grab your foam board and cut out a diamond shape. The diamond I cut out for my 6-inch embroidery hoop was 5 inches by 3 ½ inches.
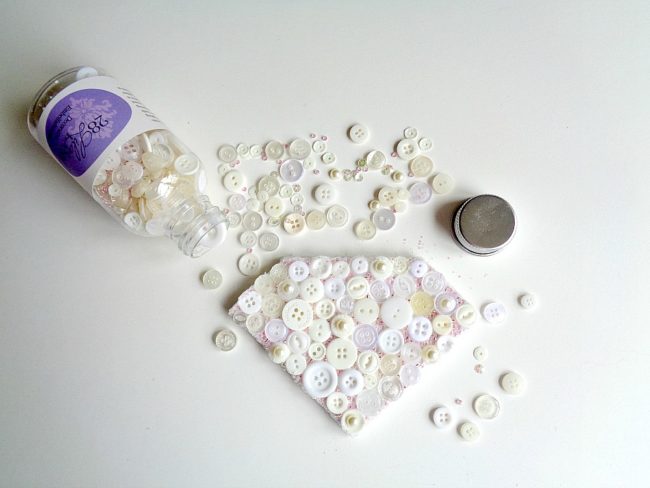
Step 3: Grab your 28 Lilac Lane Embellishment Bottle in Winter Wonderland and start decorating your diamond cut out. To do this, simply brush on a layer of decoupage glue onto your diamond cut out and begin arranging your buttons. While doing this, I also sprinkled on seed beads to fill in the gaps between the buttons. Finally, as an extra touch, I glued on a flat back half pearl to each of the buttons.
Once your diamond has been decorated, set the whole thing aside to dry.
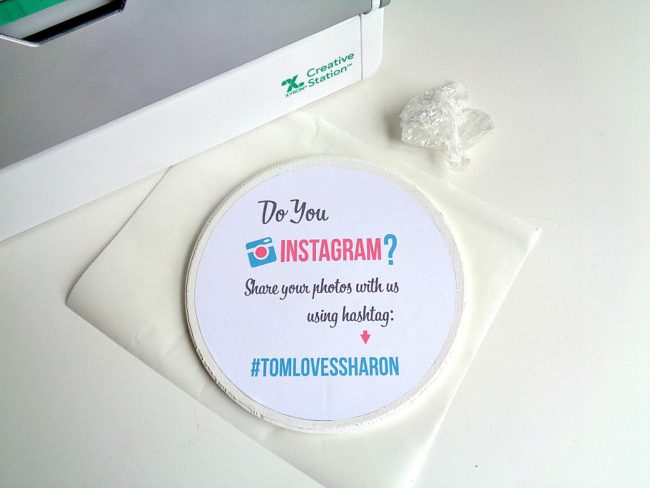
Step 4: Take your picture, sign, or image that you want to use for your frame and cut it down to size to fit on the inside of your embroidery hoop. Then take that image and run it through your Xyron 9” Creative Station. Once you have run your image through the Xyron Creative Station, rub the top of the sticker paper. Finally, peel the image off the sticker paper and adhere it to your wooden plaque.

Step 5: Using a hot glue gun, glue on your embroidery hoop to your main wooden plaque and then glue your diamond on top of the embroidery hoop.
Once all your pieces have been glued on, you’re ready to display your new Diamond Ring Frame!
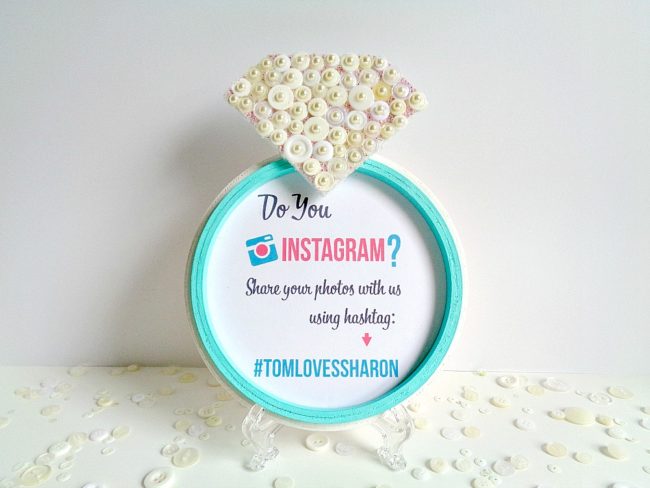

As you can see, I used my Diamond Ring Frame to hold a sign about taking Instagram photos during the wedding. However, this frame could be made to hold a variety of things. For example, the frame could hold photos, it could direct the guests to do something (like signing a guest book), or simply be used to display a favorite quote. Along those same lines, this Diamond Ring Frame does not have to be used at the wedding. It could also be used as a decoration for the bridal shower or bachelorette party instead!
What 28 Lilac Lane items would you use for your wedding or shower decor?
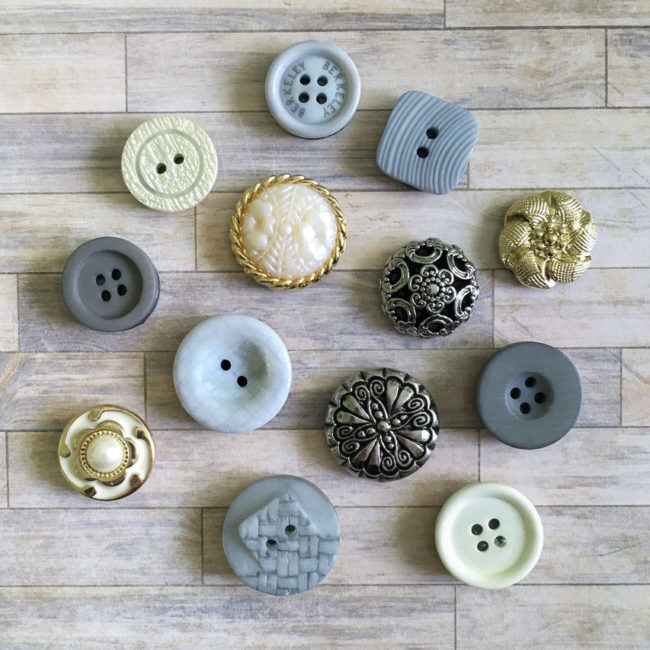
When you think of button magnets, you probably think of cute, brightly colored accessories for a classroom or a sewing room. But with the right button selections, button magnets can also be sophisticated accessories for flea market or farmhouse vintage style home decor.
Supplies needed:
Button magnets are so simple to make! Start by selecting buttons to create a coordinated set. Don’t forget to make sure they are all at least a little bit larger than the magnets that you plan to use! Next, cut the shanks off any that buttons that need it. (The buttons will attach more securely if you get the backs as flat as possible, so it pays to give some attention to detail on this step.) Glue the buttons to a round magnet using adhesive or a hot glue gun, pushing the buttons nice and flat on the magnets. Once the glue is dry, your button magnets are ready to use!
The trick to achieving a sophisticated look with button magnets is in the color and button selection. This “Wedding” Button Bonanza is full of creams and gray tones that are the perfect complement to many currently trendy home decor paint colors. They are subtle, and understated. Combine them with the metals of the Haberdashery set, and you have created an effortless collection that looks like grandma’s random button bag yet is perfectly coordinated.

These button magnets will look fabulous on a variety of surfaces – magnetic chalkboard, galvanized metal (see above), white board, even your fridge! They are an affordable way to create DIY wedding decor (hang up reception table assignments with them) or to add some style to a functional office board. What will you use them for?
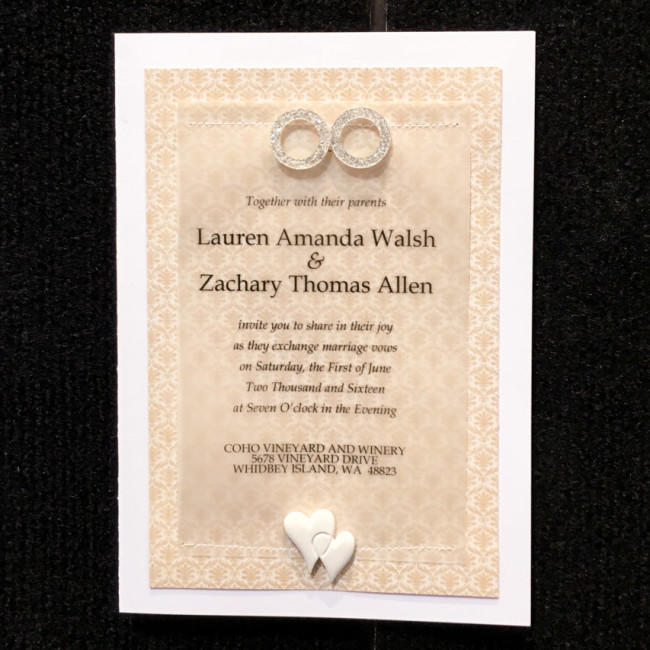
Are you hearing bells in your future – wedding bells, that is? If you are having a DIY wedding, our 3D wedding buttons can help you create a DIY wedding invitation and other beautiful items for your special day!
Supplies:
Making this invitation is easy!
Cut and fold the smooth cardstock to make a 5″ x 7″ sized card base.
Use a word processing program to create the invitation text. Print the text onto inkjet printable vellum.
Cut the patterned paper to size. Using your sewing machine, stitch the vellum onto the patterned paper.
Adhere the patterned paper & vellum combination to the card front. Adhere the buttons on top of the vellum.
Buttons Galore’s 3D buttons are available for bulk purchase. If you require a specific item in bulk to create large quantities of an item like this DIY wedding invitation, please contact our customer service department through our website for assistance.
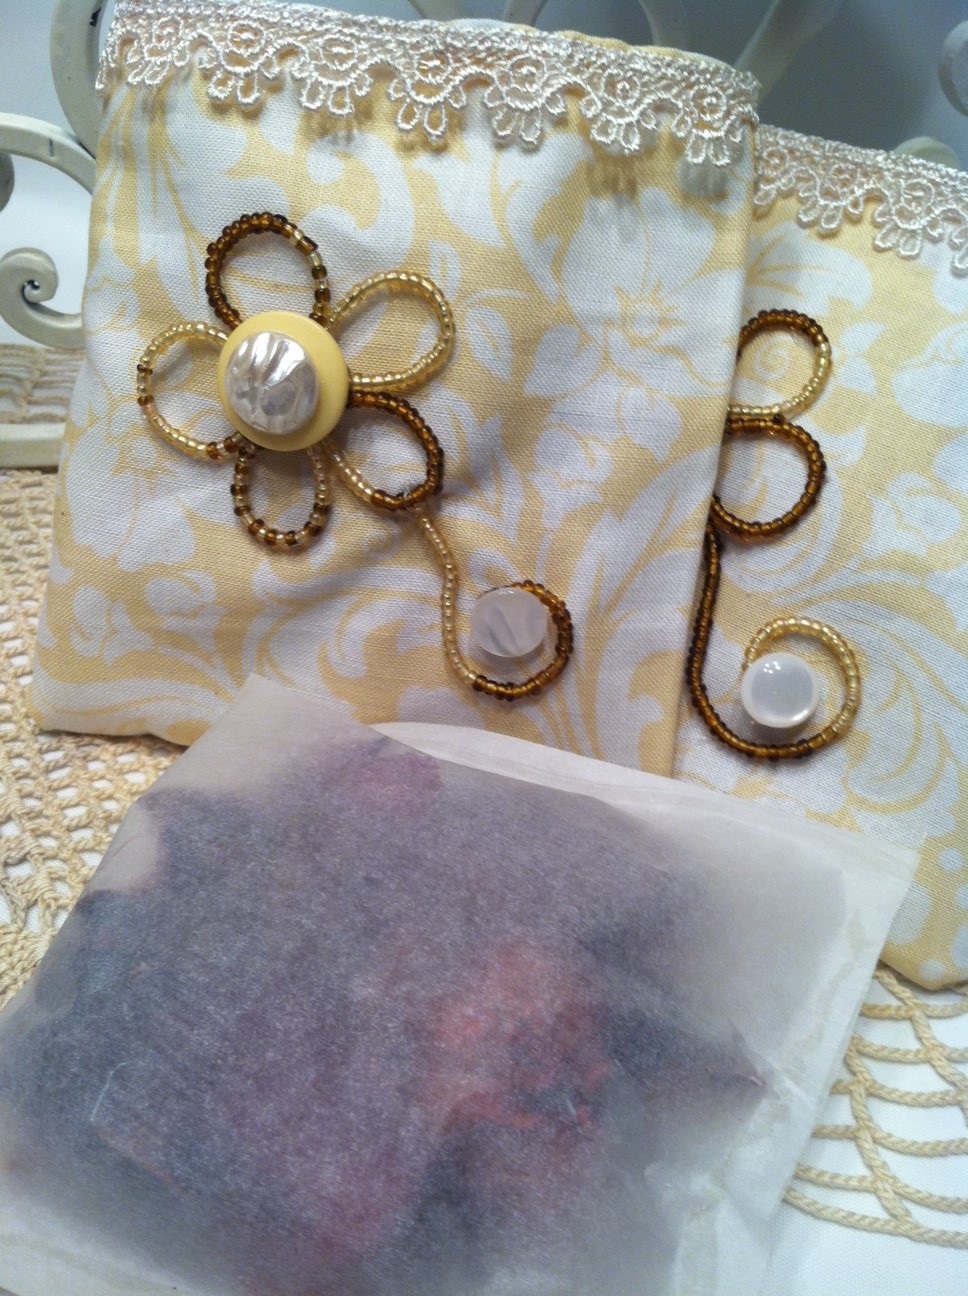
With Spring just around the corner, many young couples are planning their weddings. What better gift than a Ivory Pearl Haberdashery Wedding Favor Sachet Set. Buttons Galore & More offer more than just buttons they offer young couples the ability to create lovely wedding invitations and favors with their lovely line of buttons.
For my project today I used one that I have totally fallen in love with. The Ivory Pearl Haberdashery. The ivory pearl finished buttons come in a variety of sizes and its truly something that can be used over and over again regardless of what the occasion is.
Now who wouldn’t want a scented wedding favor? Especially one with lovely buttons such as the Ivory Pearl Haberdashery? These favors can be used to provide scent to any room in your home after the wedding is over.


These Ivory Pearl Haberdashery Wedding Favor Set can be created for any occasion it doesn’t necessary have to be done for weddings, but I think that anyone attending a wedding would truly love receiving such a lovely favor.
BUTTONS GALORE & MORE:
Now I know it may seem like a lot of materials. Trust me it makes a lovely Wedding Favor Sachet. I started out by cutting my fabric that I picked up at my local fabric store. I cut the fabric 4 1/2″ x 5″ and sewing the edges leaving an opening. Now, I’m not that great at sewing. So I glued my ivory trim with Beacon adhesive Fabri-Tac. Wow this glue is amazing. I was really amazed on how quick it dried up and how well it glued the trim to the fabric. Once you have this all done you can begin beading the flowers by using a floral wire. I twisted the wire once all the glass beads were on the fabric wire to create a flower. To make the swirls on the side of the flower I did the same thing.
I applied the flowers to the fabric using Beach Adhesive Fabric-Tac. It was just that easy to adhere to the sachet bags. Next I applied my buttons from Ivory Pearl Haberdashery collection and Sunny. They are on Buttons Galore & More website. I placed a piece of Velcro Press and Close Fastener to the inside of the sachet bags. This will allow you to refresh or replace your potpourri bags anytime you want.
The potpourri is something I picked up at my local Walmart. I used Canson Tracing Paper to hold my potpourri. I cut about 3 3/4″ x 4″ tracing paper. I hot glued the edges leaving an opening and then placed my potpourri inside and sealed the top with more hot glue. I placed it inside of my Wedding Favor Sachet and sealed with the Velcro Press & Close Fasteners.
I couldn’t stop just here I had to make a card to accommodate this lovely Wedding Favor Sachet Bags. The card is 5 x 5 1/2″ and I used the same technique to create the flower. I added the Ivory Pearl Haberdashery buttons to the flower petals which I glued using hot glue. I also saved a piece of the fabric that I used for the bags and applied it my card and to top this card off I used Teresa Collins Vintage Find Acrylic Stamp, Staz On and Buttons Galore & More Sm. Rectangle Sliders . I stamped the word “LOVE” using Black Staz On Ink and stamped it directly to the Sm. Rectangle Sliders. I used Glue Dots to attach my seam binding ribbon to the card and finished my card up.
I hope this inspires you to create something lovely and amazing for your Wedding using Buttons Galore & More buttons for your wedding favors.

Button embellished napkin rings
I am helping a friend plan and prepare for her wedding and all of the events surrounding it. The project today is one of the napkin ring ideas I proposed to her. It is simple enough that her kids can help, not expensive, and very pretty all at the same time. She wants to go with shades of olive ( his favorite color), peach ( her favorite color, coral and turquoise (mine). Not that my colors matter at all. By adding shades of the four colors it helps to expand our options and stretches our budget even further. By limiting the colors it allows us to many things that we already own.
To make the napkin rings I used scrapbooking paper that had all of her colors. I buttons I used are Avacado and adhered with a glue dot.
Cut 1.5 inch strips
Add a glue dot to one end
Wrap around napkin
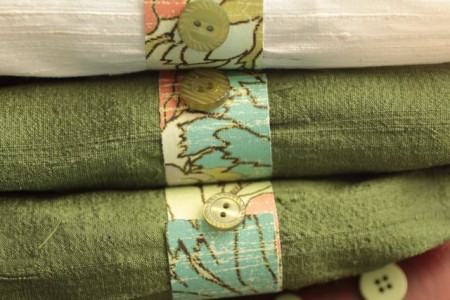
Add buttons with a glue dot and VIOLA!