Header

Tag Archives | Burlap

Burlap and Buttons Cuff

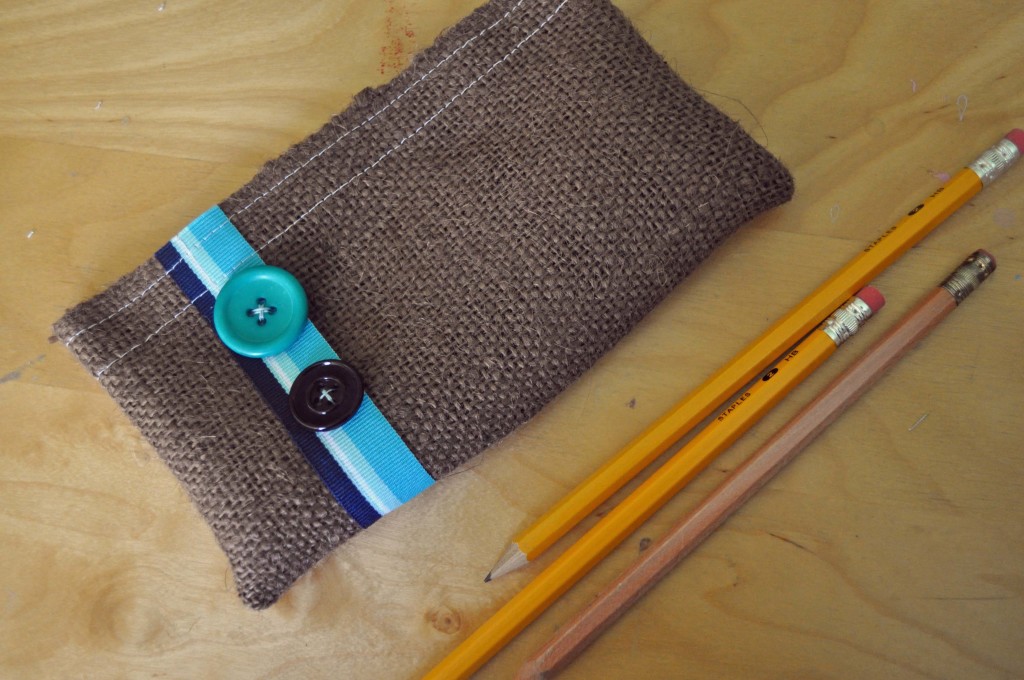
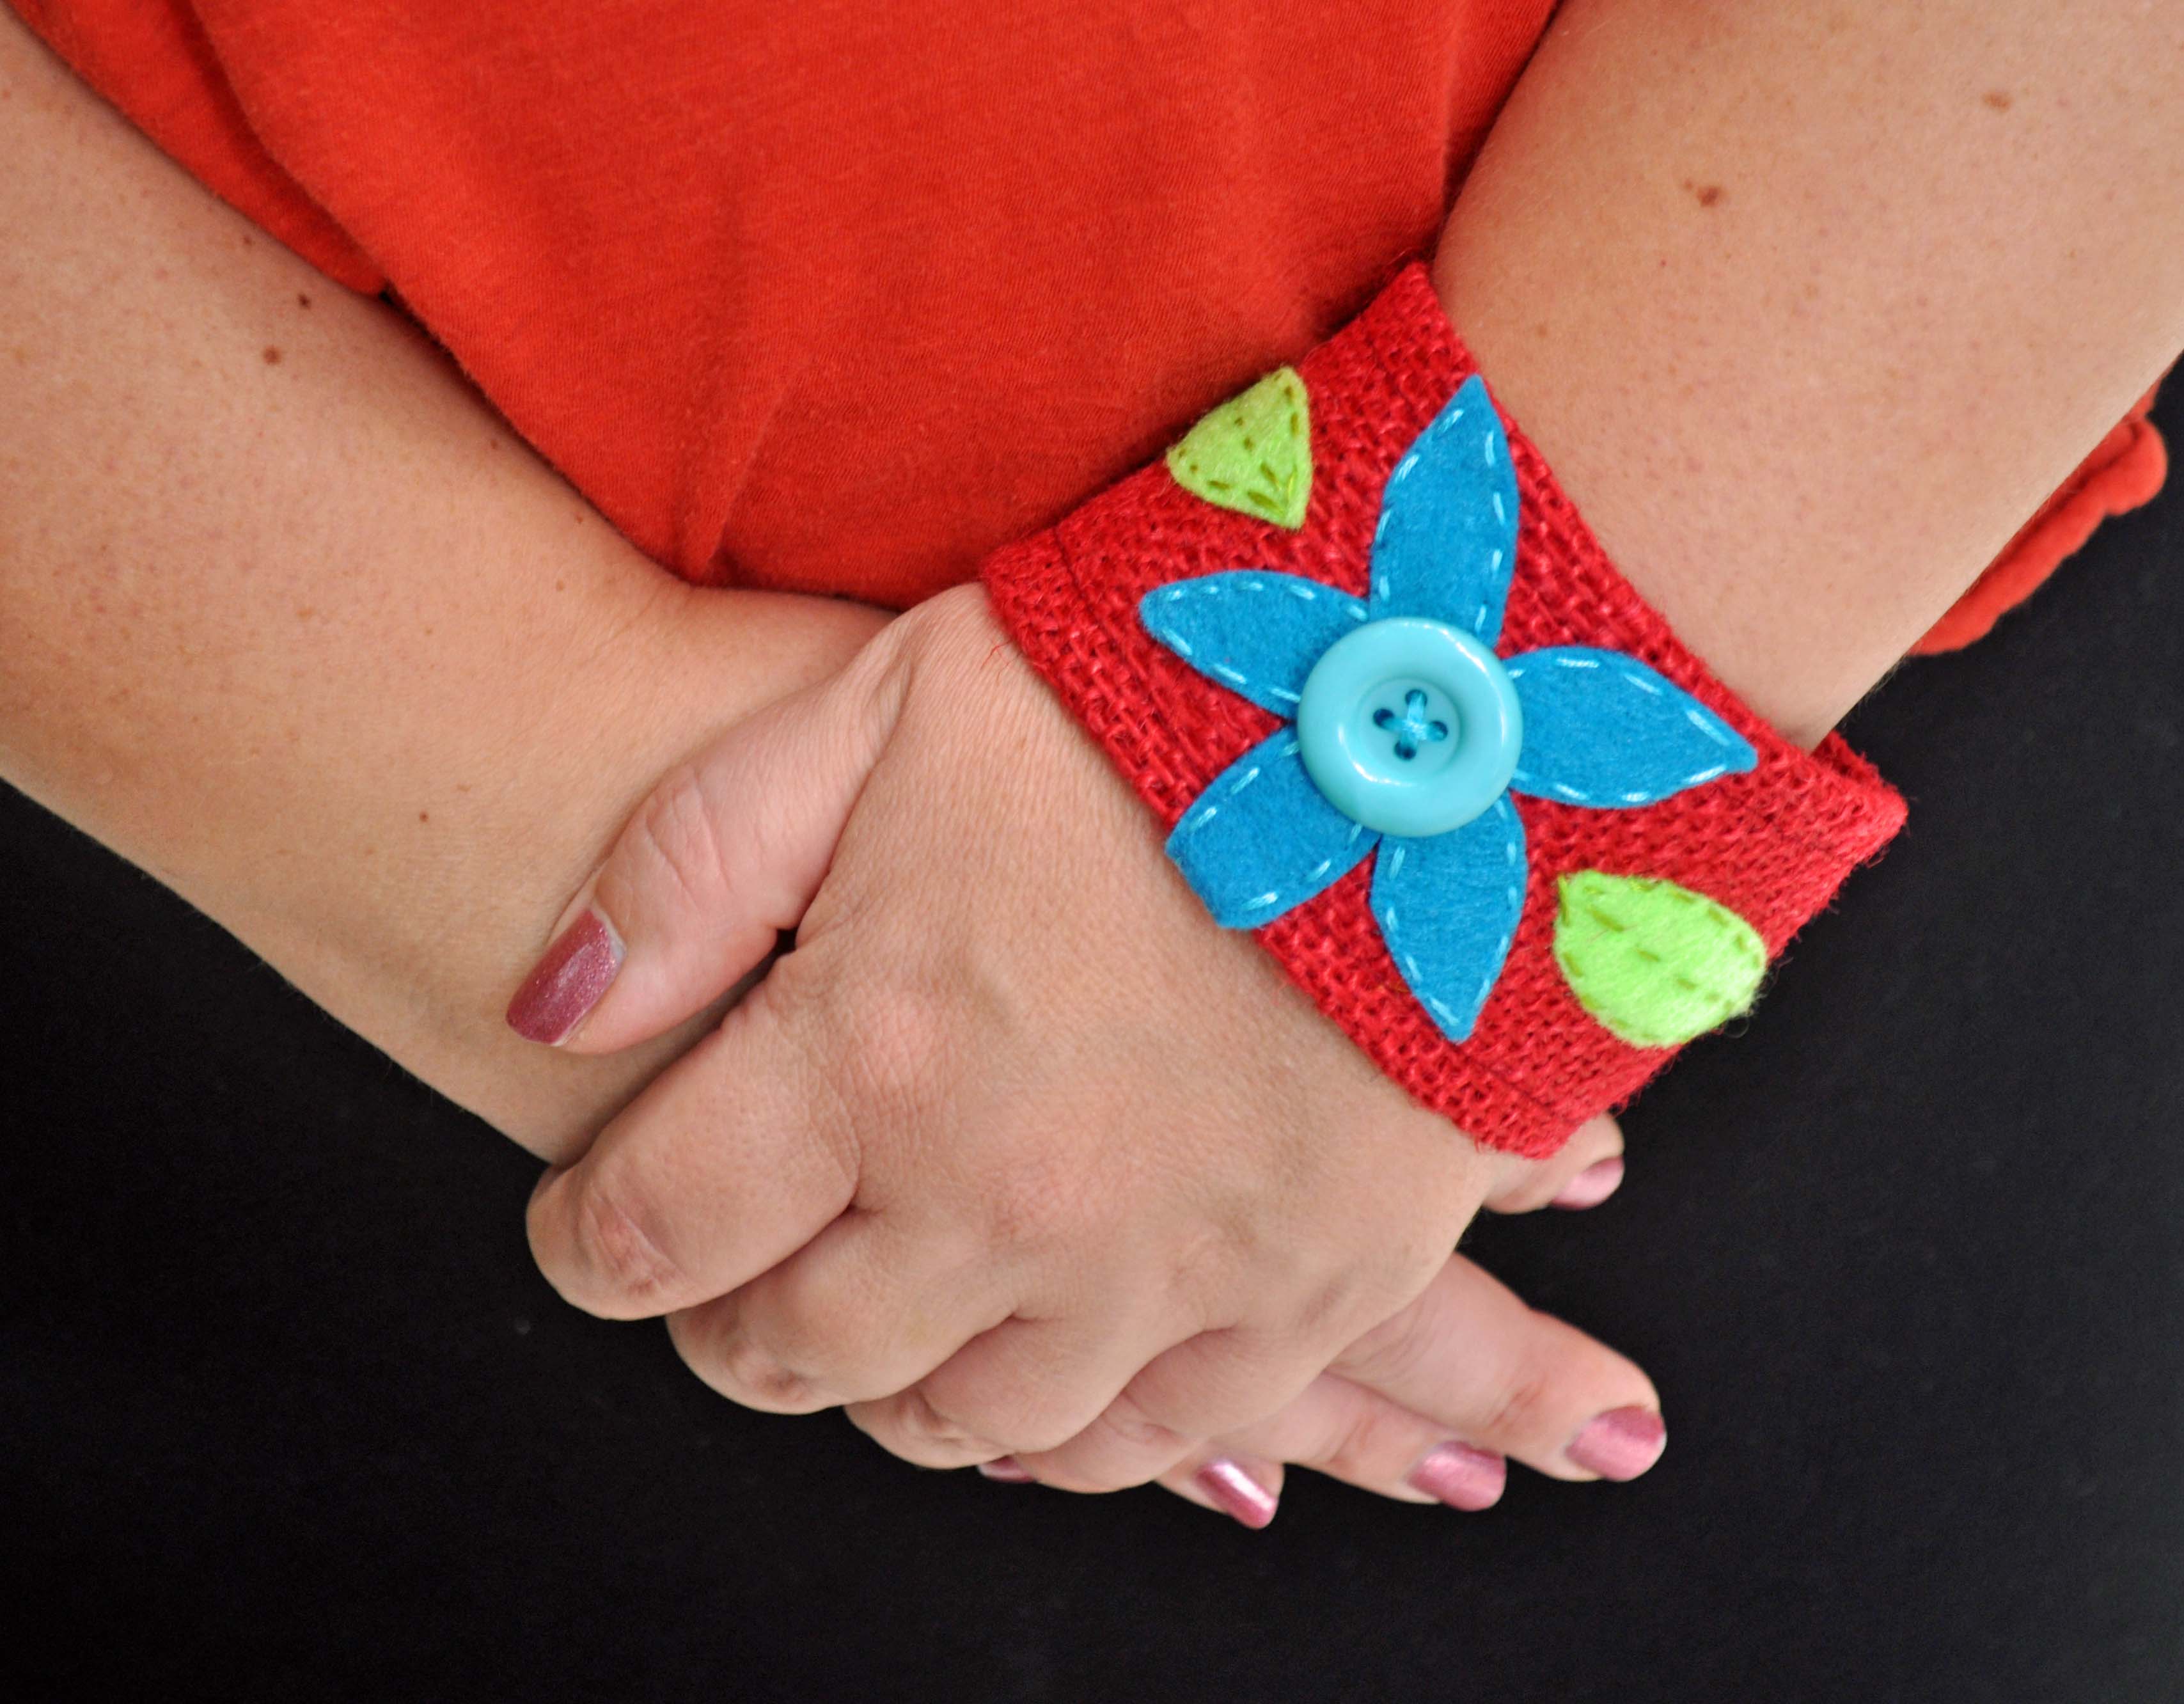
Short-sleeved, summer tops demand a good burlap and buttons cuff, don’t you think?  Create this simple and rustic burlap cuff for your next walk on the beach.  It’s hip and cool and so easy to make!

Cuff Beauty Shot

Supplies:

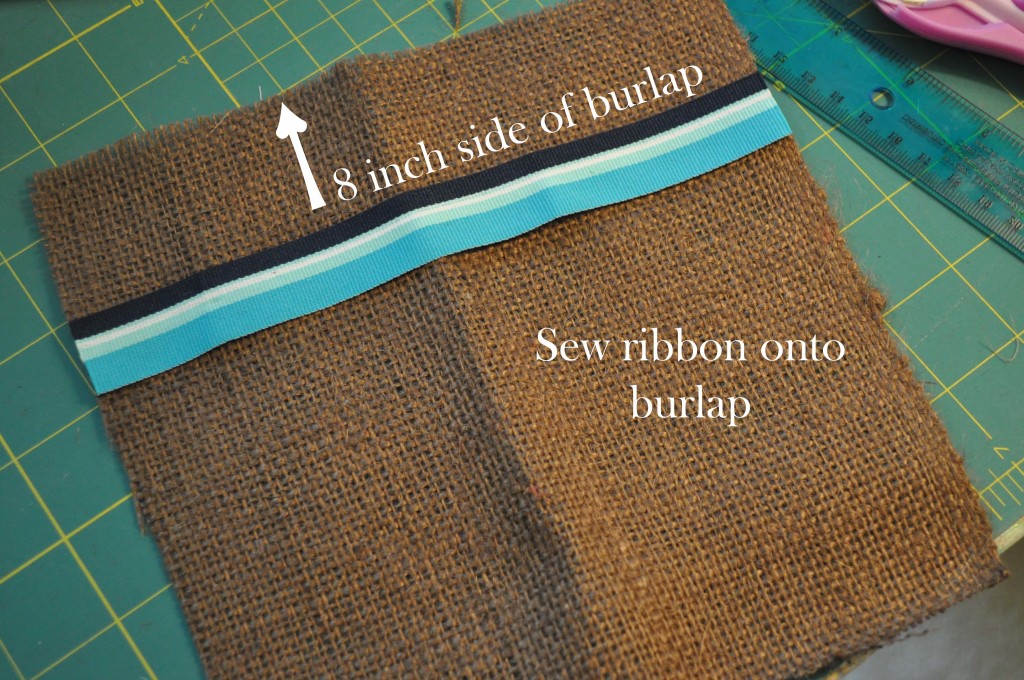
  • Burlap cut to 10″ by 6″
  • Assorted colors of felt scraps
  • Buttons
  • Embroidery floss & thread

Instructions to make a burlap and buttons cuff:

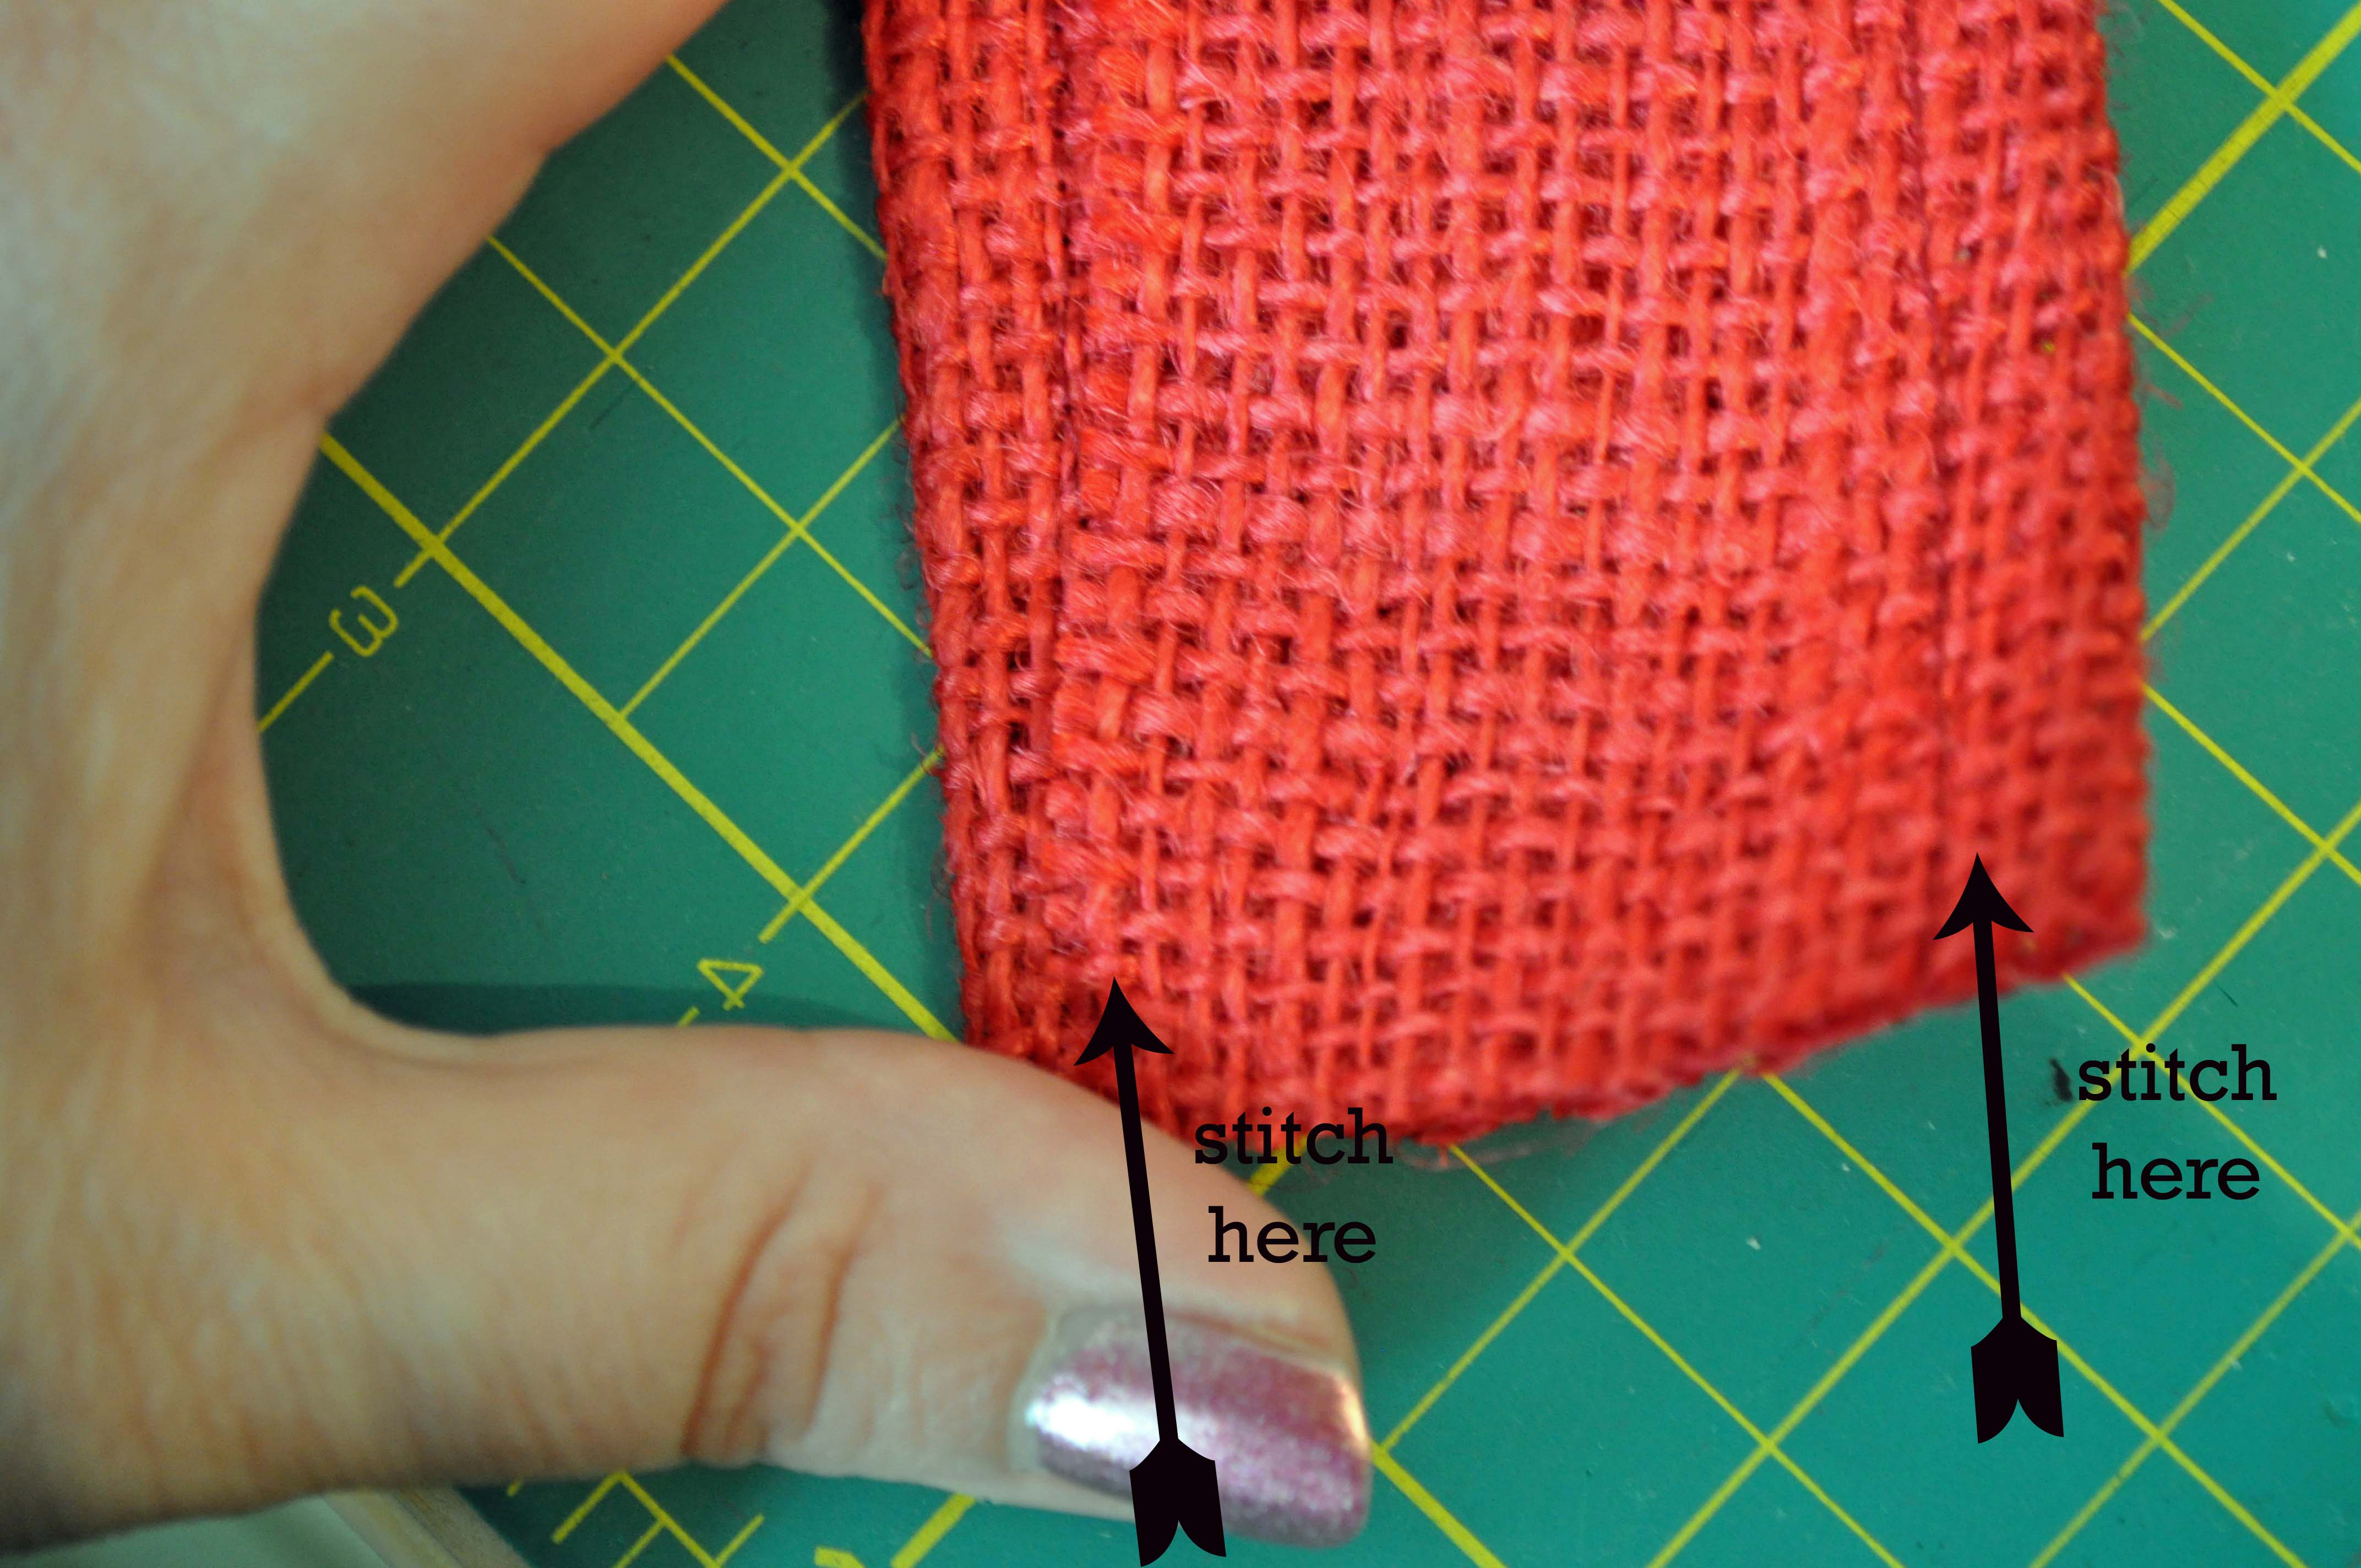
1. Fold the burlap into thirds to create a long strip measuring 10″ x 2″.  Pin in place and stitch along the edges.

Putting Cuff together

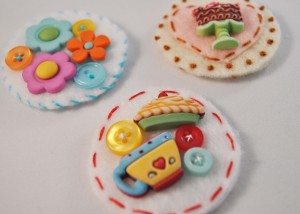
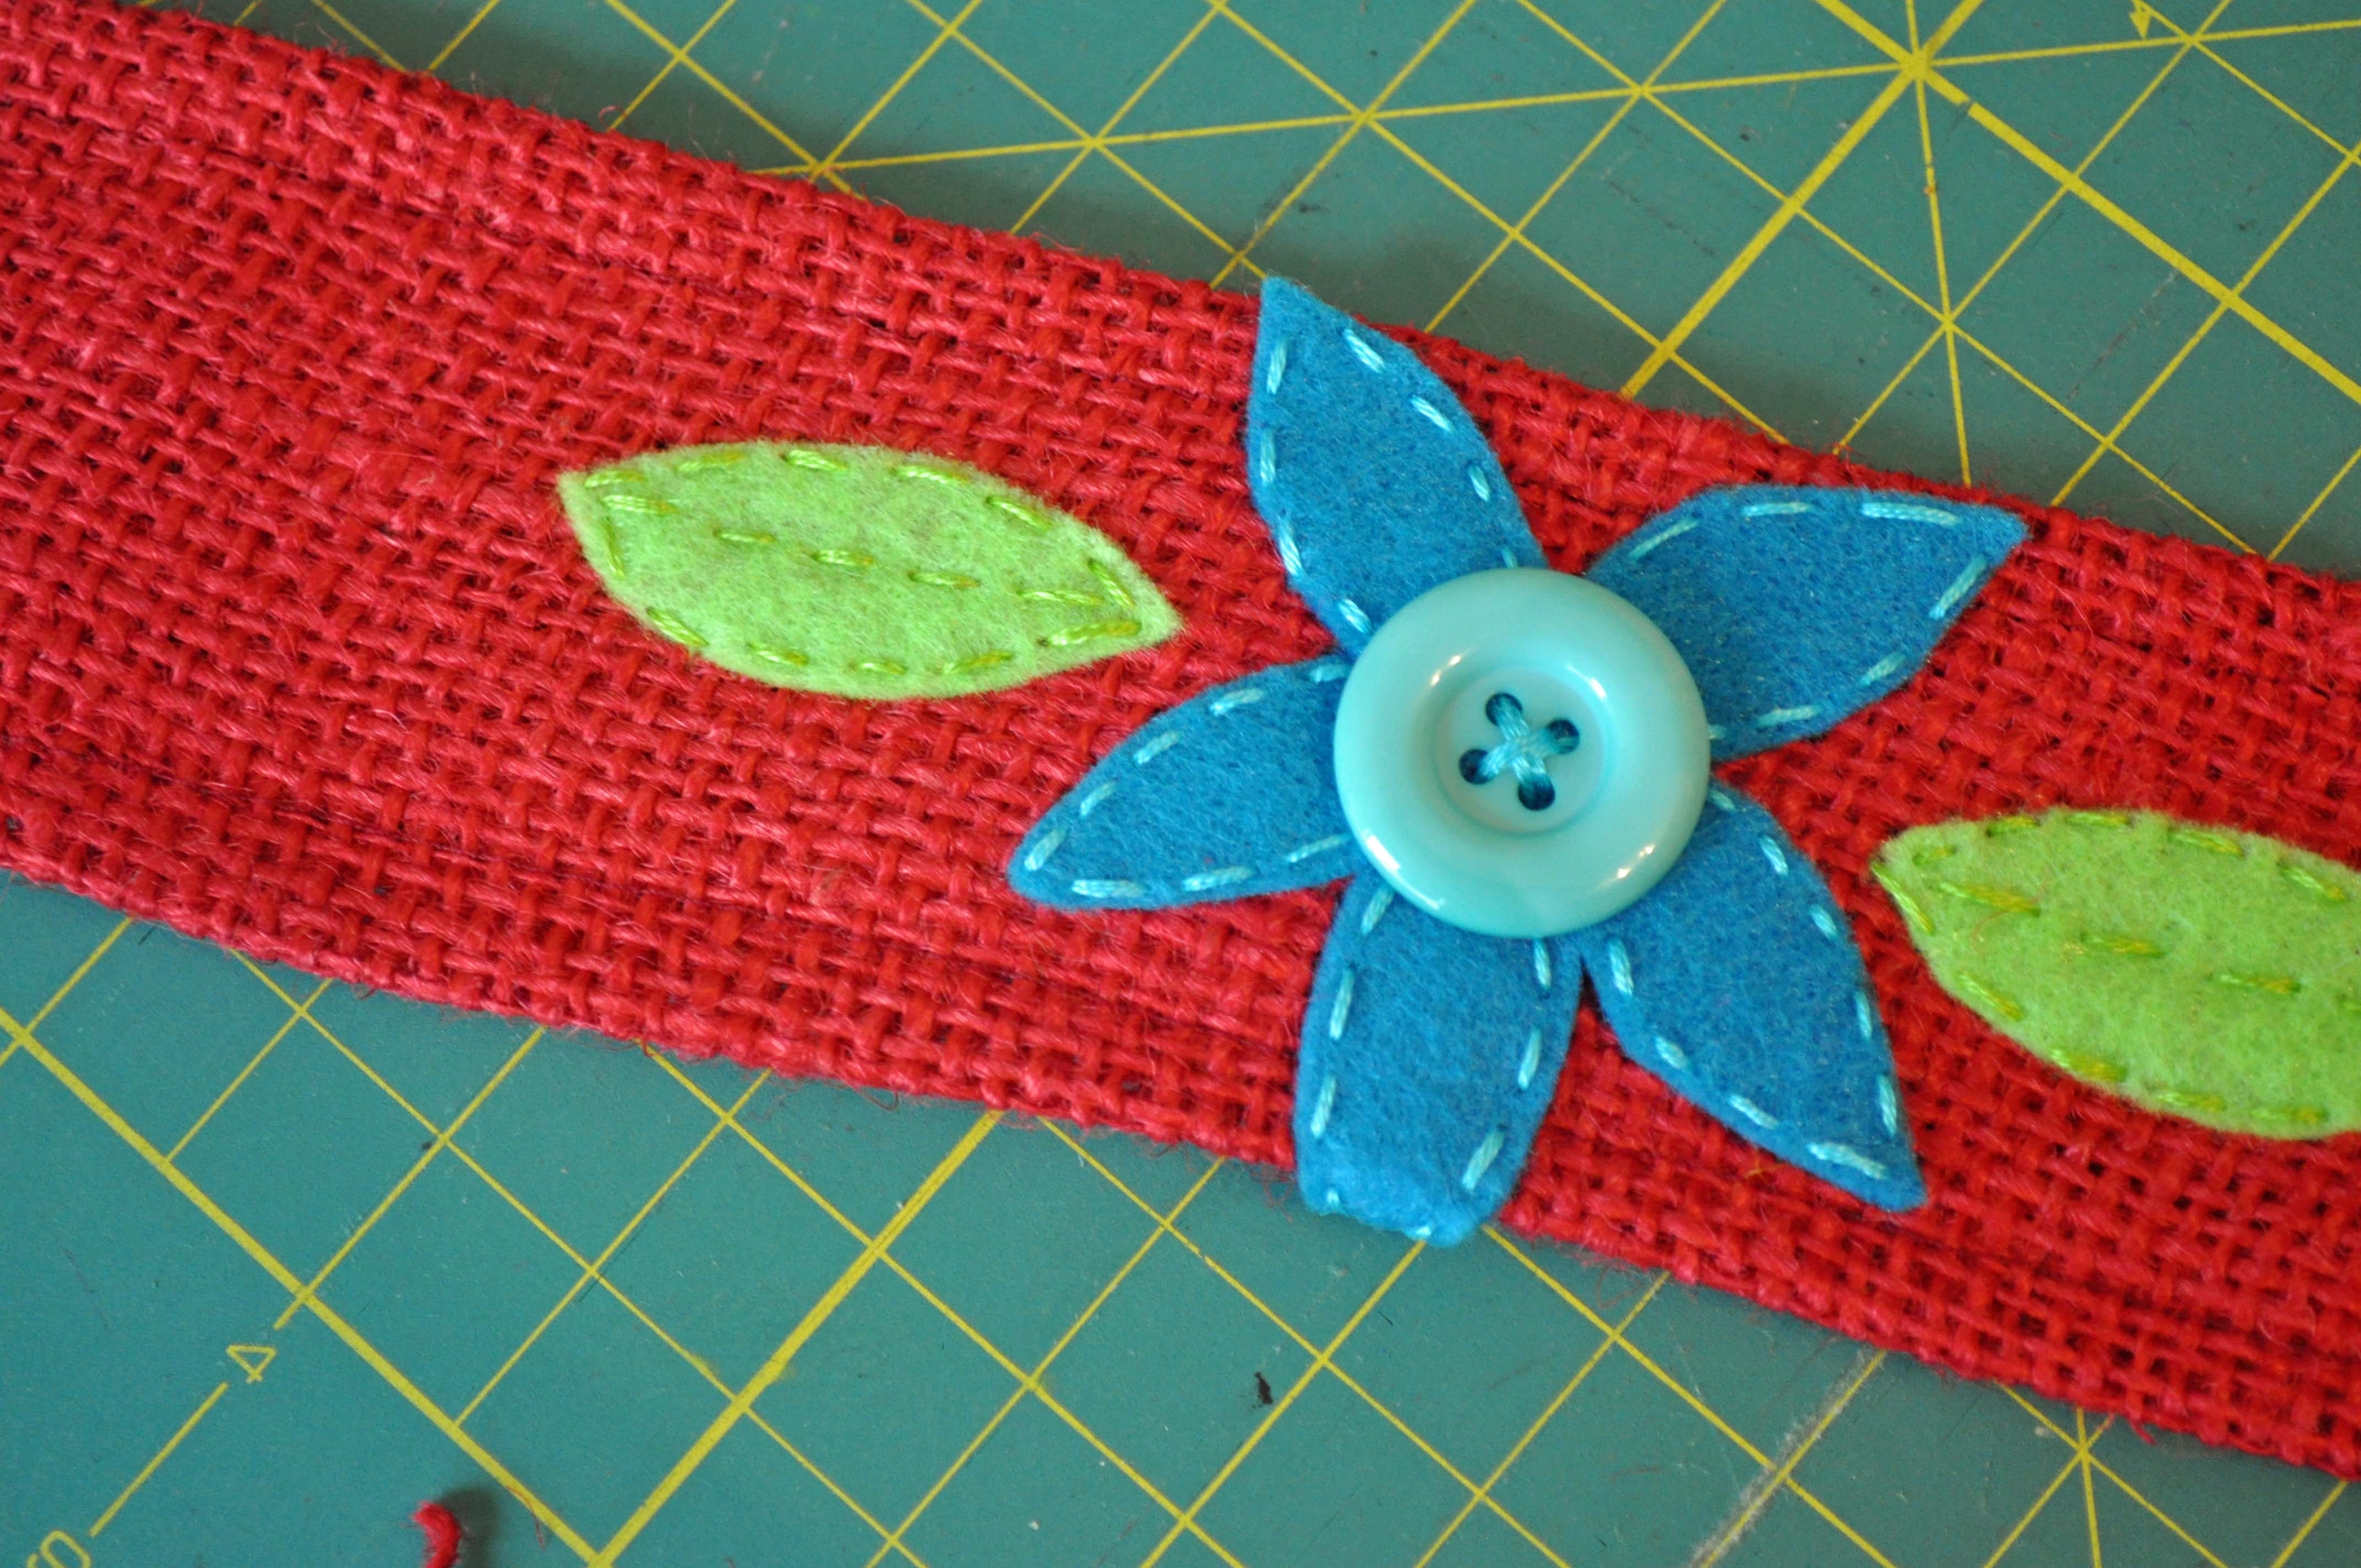
2. Using felt scraps, cut out petals and leaves to form a flower.  Arrange in the center of the burlap rectangle and using embroidery thread, stitch them into place.

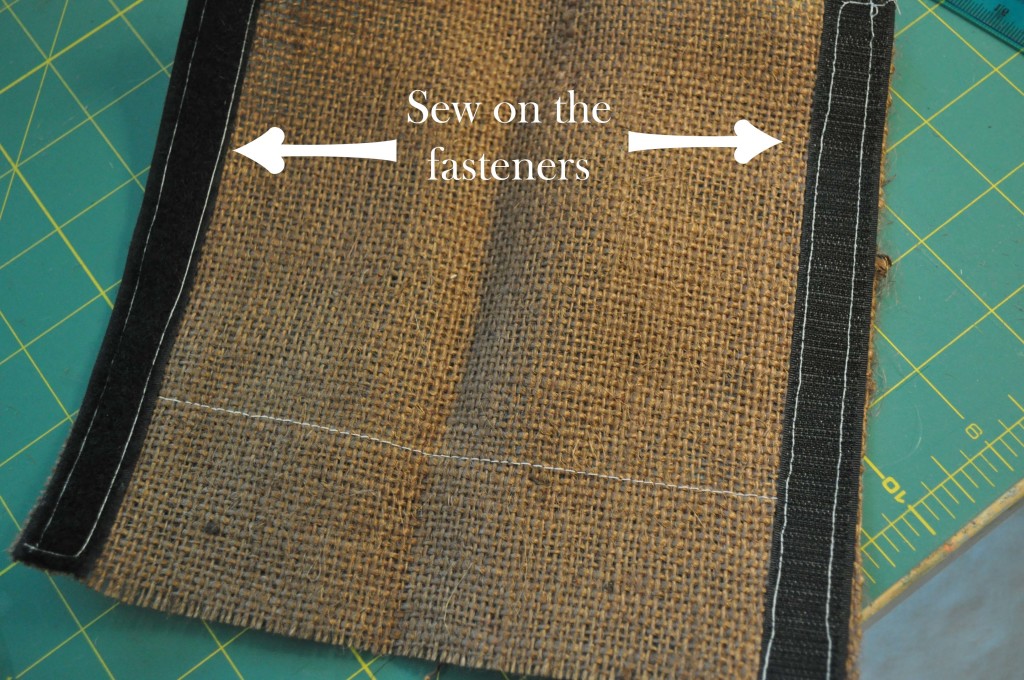
3. Stitch buttons into place.  Use them for the center of the flower.  You can really go crazy and add more into the design. (I strongly believe you can never have too many buttons on a project!)

Sew on felt pieces and buttons

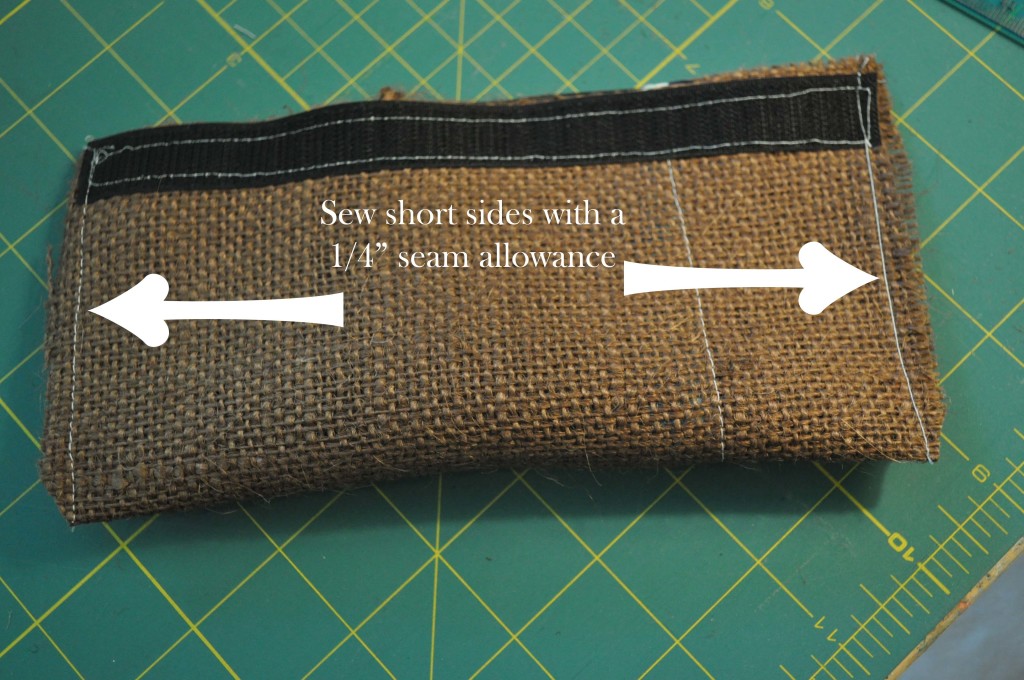
4.  Once the design is stitched in place, use embroidery thread to attach the two short ends of the cuff together.

Note: I measured my wrist at the beginning of the project and made sure that I could slip the cuff on and off.  If you prefer a tighter fitting cuff, measure your wrist size and then use a hook & loop, snap, or BUTTON closure to secure the cuff on your wrist.

Thanks for getting crafty with me today!  For more button crafts, stitching and lifestyle ideas visit me on my blog at www.laurabraydesigns.com.

www.laurabraydesigns.com

1

Sew a Button and Burlap Pencil Case

Sew a button and burlap pencil case for the guy in your life. It’s just right for the high school graduate who is heading off to college in the Fall or it would also be a great Father’s Day gift.

button and burlap Button & Burlap Pencil Case II

I know I’m always trying to keep my husband organized and he’s always looking for pens and pencils. Do you think there’s any chance a button and burlap pencil case is going to help?  Naw, I don’t think so either, but it’s fun to make!

Supplies needed for a button and burlap pencil case

  • Burlap cut to 7.5″  x 8″
  • Velcro (R) Brand Sew-On Fasteners cut to 7″ long
  • Ribbon cut to a length of 8″
  • Buttons – the Haberdashery line has some great masculine colors!
  • Basic sewing supplies

Instructions for sewing a button and burlap pencil case

1. Sew ribbon onto burlap parallel to the side that measures 8″. Place it approximately 1.25″ from the edge of the burlap.

Ribbon Onto Burlap

2. Sew the Velcro (R) Brand fasteners onto the 7.5″ inch sides. (These will be perpendicular to the ribbon.) I like to leave the top of the case without finishing it. The rough edge gives it a more masculine touch!

Sew on Fasteners

3. Fold in half, right sides facing (the side that you sewed the ribbon onto is the “right” side). The 7.5″ edges should be even. Press with an iron.

4.  Sew the short sides closed.

Sew Closed

5. Clip the corners and turn the bag right side out.

Sew On Button

6. Sew buttons onto ribbon. I know it’s a bit harder to sew them on when the case is sewn, but it’s best to leave this step for last, so you can see the best placement for them.

www.laurabraydesigns.com

1

Make a DIY Gift bag rosettes…

dress up that kraft bag with burlap and buttons!

I love the blank canvas of a brown kraft gift bag!  While keeping it simple is a great way to go with the brown bag, going a little fancy and fabulous is pretty fun too!  Follow me as I upcycle a brown gift bag by adding a fun handmade rosette to add a punch of color to this gift wrapping staple!

Nothing like the summer skies to inspire a bright pop of yellow and blue!  Today’s project uses the following supplies:

Let’s get started!

I began with a piece of burlap, approximately 5×10 inches.

Cut burlap with a metal ruler and rotary cutter into 1×5 inch strips.

Loop and glue strips of burlap around a scrap of paper that will serve as the base for our rosette.  Continue gluing and layering paper strip, doily, flowers, ric rac and buttons until you get a fun rosette that can be added to your brown bag like this….

Hello sunshine!  We just went from drab to fab with a very simple addition to this bag!

Thanks so much for joining me!  I hope you’ll try fancy-ing up your gift bags with burlap, buttons and other craft supplies!

2

Buttons & Burlap Summer Scrapbook Page Idea

Summer, when you hear that word what images does it conjure up in your mind? For me I think of the heat, the BRIGHT colors and RELAXING! I love Summer. I know a ton of people who just hate the heat, but being a gal who’s always got cold fingers and toes, I love that during the summer month’s my body feels WARM all over, all day long! Bright colors, well I love those too! Wearing them, creating with them, you name it, I love it! And relaxing…well let’s just say there’s a well loved, well worn hammock in my backyard that my kids and I all enjoy piling into and having a good snuggle time in. I can relax with the best of them, and in STYLE to boot! LOL

For my project today you can see each of these elements we are talking about have been captured perfectly! From the bright sunshine, the bright colors of the porch chair and the slouchy posture of my sweet Elliott, this scrapbook layout just screams SUMMER. Pairing up bright buttons & bright papers with a nice wide swath of burlap helps to give this layout rest amongst the busyness. Now, while I was creating I got to the point where everything was on the layout EXCEPT the title. And I was STUCK…I mean the page was cute, but needed something…but what….that was when I emailed a photo of the layout and then called our DT Lead Niki Meiners and said “What’s wrong with this page..I am stuck” As if on cue she replied “Oh just add a title to the page – SUMMER” “Where??? Where would I even put a title??” I replied. “Ummm right there under the photo overlapping the patterned paper, burlap and above the cluster of red big buttons…” And you know, she hit the nail on the head!!! It was JUST what this layout needed. Talk about a friend being a help just when you need it!!!  So now you tell me…who do you call if you get stuck or just can’t seem to “make it all workout” in your creative process??

0

Happy- A Burlap and Button Banner

Hi all!  Ryann here with a quick and easy tutorial to share with you today featuring burlap and buttons.  Making little banners is a great way to use up scraps of paper or fabric because it doesn’t take much of either to put together a great little project to use for family celebrations!  Your banner can be as big or as little as you want it, it all really depends on how large of a word you want to use.  I find it’s best to use an odd number of pennants to achieve the “best” look for a banner.

Supplies Used:

1.  Die cut enough pennants to make your banner.  If you do not have a pennant die cut, trace a triangle shape on a piece of heavy weight cardstock and use it as a template.

2.  Cut out enough scalloped circles to place one on top of each burlap pennant.  Place alphabet stickers onto scalloped circles to create message.

3.  Decorate with buttons.

4.  Thread burlap pennants with twine.


The possibilities are truly endless when making pennant banners from burlap and buttons.  If you wanted to make a longer banner such as “Happy Birthday”, you could split your sentiment into two banners and have one hanging below the other.  I’m going to hang my little “Happy” banner in my craft room!  :)  I hope you will give pennant banners a try – they are so simple to make and fun to have!  Thanks for joining me today!


1

Button and Burlap Patriotic Welcome Decor

I don’t do as much decorating for the patriotic holidays as I’d like. I do have quite a few family members in the military, so I think I get more caught up in remembering their service than I do decorating. This year I wanted to change that, so when I was challenged with using burlap in a button project, I knew right away what I wanted to do…

paint burlap and button American flag decor

paint burlap and button American flag decor by Jen Goode

Make an American flag decor sign using buttons and burlap. Using some paint on the burlap, it’s easy to get that rustic look with lots of fun texture and interest without having to create a super detailed piece. This project can easily be created in just a couple hours. I used Decoart craft paints for this project. Feel free to use what you have on hand.

Burlap and button project supplies

Burlap and button project supplies

Materials you need:

  • Ivory buttons
  • Tan/natural colored burlap
  • American Paint in Alizarin Crimson, Primary Blue and Light Buttermilk.
  • Decoart Dazzling Metalics paint in Glorious Gold
  • Craft glue
  • 1/4″ Wood dowel
  • Natural colored twine
  • Paint brush and Scissors
  • Wood letters to spell “Welcome”
Tie twine and glue buttons for faux sewn look

Tie twine and glue buttons for faux sewn look

Welcome patriotic wall art

Welcome patriotic wall art

Step by Step instructions

Make your own Patriotic wall decor using buttons and burlap:

  1. Cut burlap to your desired size
  2. Paint an American flag on the burlap (make sure to protect your work surface under the fabric). Let dry.
  3. Attach buttons to blue area of flag. You can either sew or glue. I tied twine through the buttons and then glued the buttons in place.
  4. Cut second piece of fabric, paint blue.
  5. Paint wood letters and dowel using Gold. I used a paper towel to spread the paint to give a bit more aged look. Let dry.
  6. Glue letters in place.
  7. Attach Welcome piece to flag fabric piece. either sew or glue. Add final buttons on edges as shown.
  8. Attach to dowel. I pinned mine but you can sew or glue – whichever you prefer. Tie twine around the edges of the dowel and hang as desired.

Tips:

  • Using a flat, square brush helps make nice stripes and blocks of color with the paint.
  • To create frayed look, gently pull threads of burlap on top or bottom of fabric to remove. Repeat until desired frayed look.
Patriotic wall decor using buttons and burlap

Patriotic wall decor using buttons and burlap

1

Teacher’s Gift: Burlap & Button Gift Bags

It’s the end of the school year and time to give your favorite teacher a token of your appreciation.  This easy burlap gift bag can hold a small gift and has a darling felt & button badge pin.  After the gift is opened, the badge can be worn as a pin on a favorite sweater or tote bag and the burlap bag can be reused for future gifting.

Supplies:

  • Burlap cut into a 6” X 5” rectangle
  • Two 1 ½” diameter circles of felt
  • Buttons-I love Buttons Galore & More’s Sweet Delights Buttons for this project!
  • Embroidery Floss
  • Pin Back
  • Ribbon
  • Basic sewing supplies & sewing machine

Instructions:

  1.  Fold the burlap rectangle in half lengthwise.  Sew a ¼” seam along the long sides.  Leave the top open.
  2. Turn-out the burlap so that the seams are on the inside of the bag.  Pull some strands of the burlap off of the top opening to give the bag top a frayed look.
  3. Hand sew buttons onto one of the felt disks.  Using a straight stitch or running stitch, sew the embellished felt circle onto the blank felt circle. 
  4. Sew a pin-back onto the back of the felt badge.
  5. Pin the badge onto the burlap bag.
  6. Fill the bag with your gift or candy.  Tie the top closed with a decorative ribbon.

Felt & Button Badges by Laura Bray

1

Fifteen Minute Fashion: How to create these adorable Button & Burlap Rosette Hair Bows

Hi there and welcome back!!! Today I have alot of info to share so get comfy! :) First I wanted to tell you about our June theme, then I have a really cute tutorial for you on how to make these delightful burlap & button rosette hair bows.

Our theme this month if you didn’t guess by my intro project is Buttons & Burlap!


Keep any eye out for our Buttons & Burlap Challenge Contest coming later in the month...if you don't have any burlap or buttons you may just want to go get some...just thinking out loud here. ;)


So this month we were given  a theme where we as designers have been challenged to work with Buttons & Burlap. I think you will really enjoy what the  design team has cookin’ for you! And today, I have the first project and it comes with a FULL STEP BY STEP PHOTO TUTORIAL!!! Yay!!! Who doesn’t love a good tutorial? So let’s get started. The supplies I have used are:

Buttons – I think my two came from various Button Jar assortments.
Burlap – you can find this at most big box craft stores and it’s CHEAP!
Westcott Brand Rotary Trimmer, Cutting Mat, Steel Ruler & Tiny Thread Snips
Large Needle
Twine or Yarn
Sharpie Oil Based Paint Pens
Ribbons & Trims
Hot Glue Gun & Hot Melt Glue


Begin by cutting a 1.5" strip of burlap in your choice of color...length is not all that important but these were approximately 12" long.


Use a large needle threaded with twine or yard and sew a large basting stitch about .25" from one edge.

Pull on the ends of the twine used to create a gather. Tie a knot to the back of the rosette and spread the ruffles so that they are evenly spaced along the tied circle of twine.


Remove outer few bands of burlap to create distressed edges


Use hot glue to attach hair clip to back side of rosette


Create polka dots on surface of button using Sharpie paint pen


Tie a length of green twine through the buttons and tie in a knot on the under side trim ends with sharp snips


Liberally cover entire knot with hot glue


Press onto front center of rosette to finish hair bow


Alternate button idea - try out all the various color/pattern themes you can think of! Get creative!!!


Just a quick shot of the two side by side.

And finally my adorable little model (my daughter :) ) who was just over the moon to be getting such “high fashion hair bows” today when Momma was done working…. :)


2

Upcycled Spring Floral Bouquet – An Earth Day Project

Upcycled Spring Floral Bouquet

Burlap and buttons make a great wrap for a bouquet that will last longer than a week. I love fresh flowers, but they do not love my budget. A more budget friendly idea is the tin can that I repurposed.

Tools and Materials:

Sizzix Tattered Florals and Leaf  Die Cut

Beacon Adhesive – FabriTac

Jute Cording,  Burlap, Styrofoam, Krylon Spray paint, Westcott Scissors and kraft knife.

Buttons – Tangerine Tango, Class

Directions:

Clean and dry tin can. Spray paint can. Let dry and repeat.

Use Krylon to Paint Can

Place floral foam inside can.

Place Floral Foam inside

Cut burlap to fit. Adhere burlap with Quick Grip.

Cut Burlap to Fit Can

Slide buttons on to jute cording. Wrap cording around container. Adhere buttons into place. Add a second layer of buttons where desired and glue into place.

Recycled Can - Earth Day Project

Add flowers into container.

This recycled tin can vase will work for any type of flowers, fresh or hand made.

3

Powered by WordPress. Designed by WooThemes