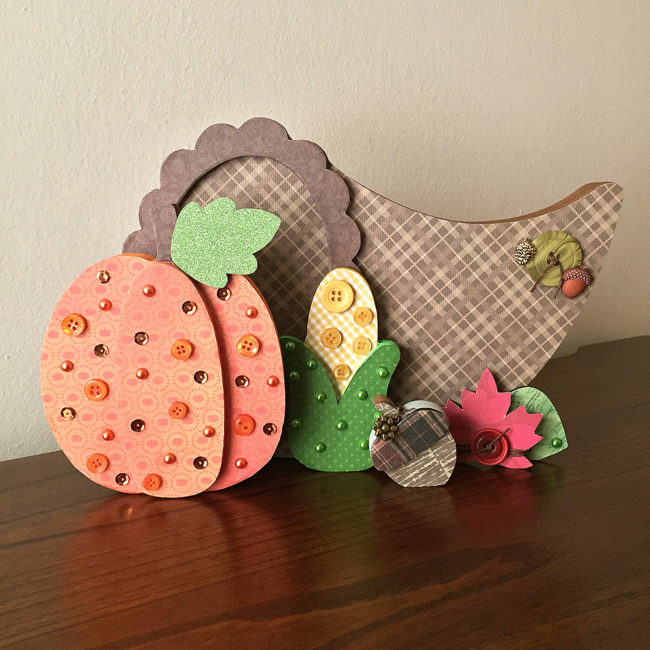
Thanksgiving will be here soon and the house will be full of relatives and friends. Why not create something to show off before dinner with this DIY thanksgiving cornucopia home decor set? Continue Reading →

Thanksgiving will be here soon and the house will be full of relatives and friends. Why not create something to show off before dinner with this DIY thanksgiving cornucopia home decor set? Continue Reading →
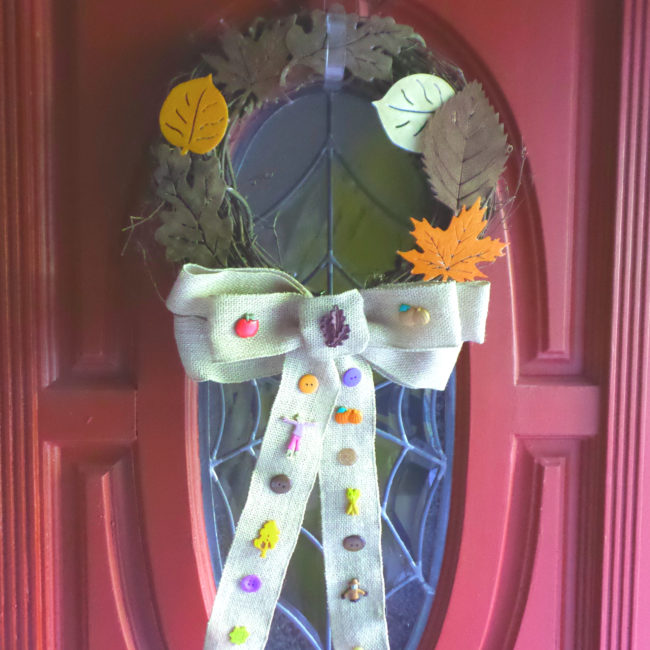
Hi everyone! It’s Lorrie here with a fall wreath featuring autumn-themed buttons from Buttons Galore & More! This fall wreath will look great on your front door to greet visitors, or on the wall inside your home to add some seasonal flair.
To make this easy fall wreath, I started with a grapevine wreath and a plain burlap bow that I picked up at my local craft store. I decorated the wreath itself with some plastic leaves that I painted in beautiful autumn colors. But the real fun starts with the bow! Continue Reading →
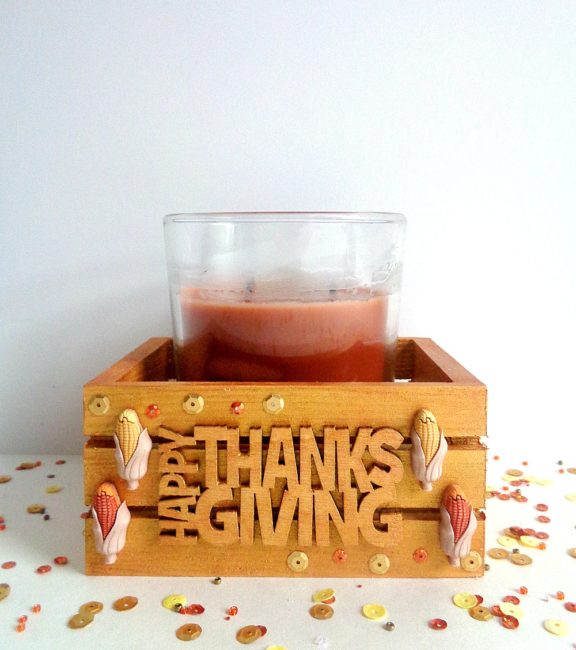
Hello Everyone! This is Katie from the Buttons Galore & More Design Team and today I will be showing you how to make a Thanksgiving candle holder for super easy decoration for your Thanksgiving!
Making decorations for Thanksgiving Day may not be on your radar, simply because you are most likely too worried about making Thanksgiving Day dinner. However, making some type of decoration for Thanksgiving does not have to be difficult or time-consuming. To prove it, today I am going to be showing you how to make your own Thanksgiving Candle Holder! Continue Reading →
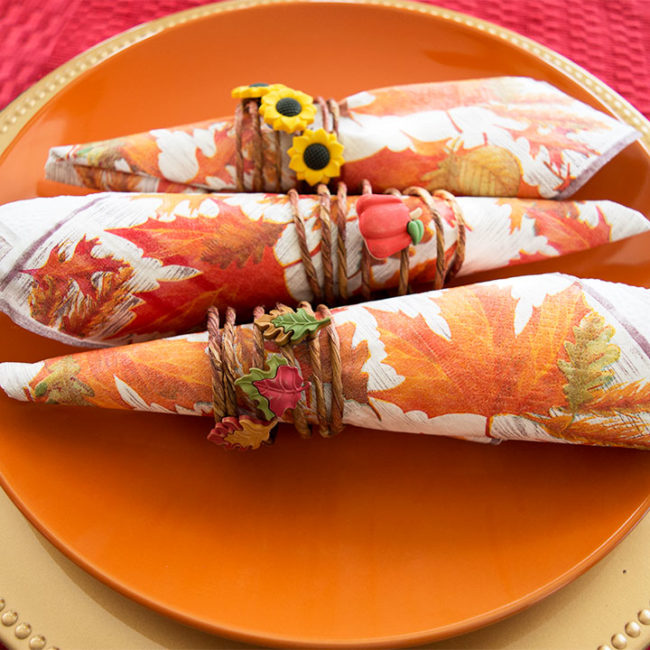
With Thanksgiving right around the corner, I’ve been thinking about how to dress up my holiday table a little bit more this year. I’ve never actually used napkin rings before, and I thought it might be a fun addition to my Thanksgiving table. These easy Thanksgiving napkin rings only take about 10 minutes to make. Thanksgiving table decor couldn’t get any easier! I love the fun fall vibe they add to the table. And the buttons from our super adorable Fall Friends button collection were so perfect for the project! Continue Reading →
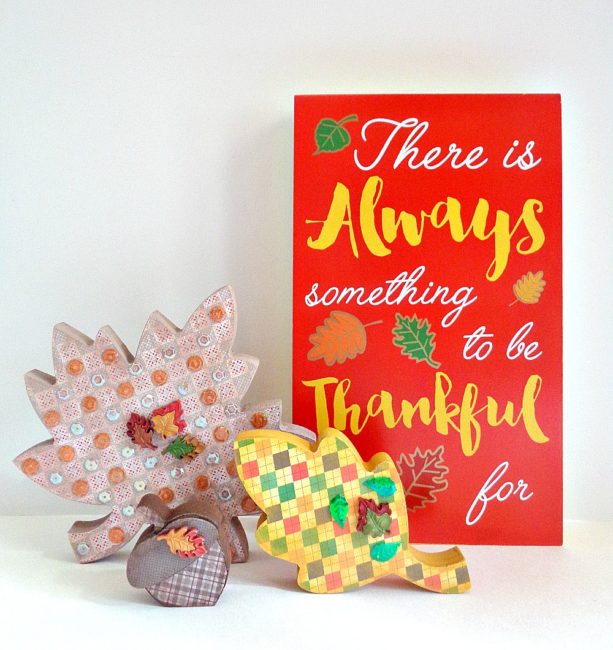
Hello Everyone! This is Katie from the Buttons Galore & More Design Team and today I will be showing you how you can decorate a new product available from Buttons Galore and More!
If you haven’t noticed, Buttons Galore & More has a new area on their website which is dedicated to home décor. This home décor is a new line of wooden products which are super easy to embellish and decorate. The nice thing about the new line is that you have tons of options for different holidays, themes, or seasons. Continue Reading →
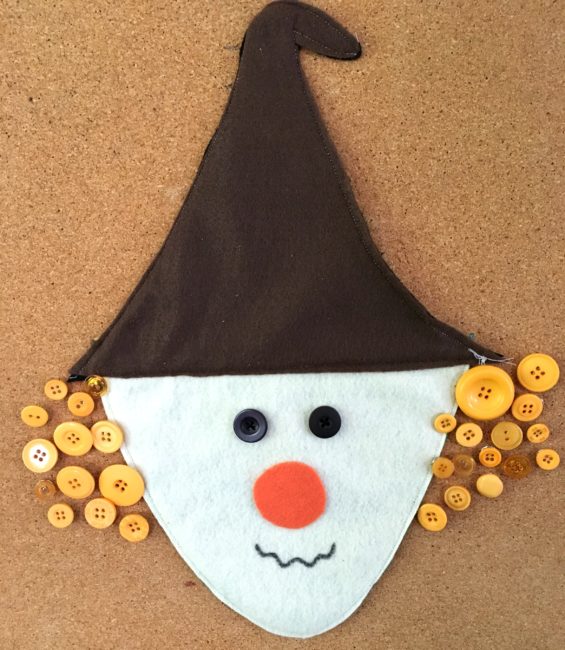
It’s hard to believe it, but fall is creeping upon us and with Fall comes holiday after holiday. Here is a fun and fairly easy fall countdown calendar project to count down the days till Halloween and/or Thanksgiving using some easy to find craft materials and of course…buttons!
Here’s what you need to make this fun, reversible witch and scarecrow fall countdown calendar.
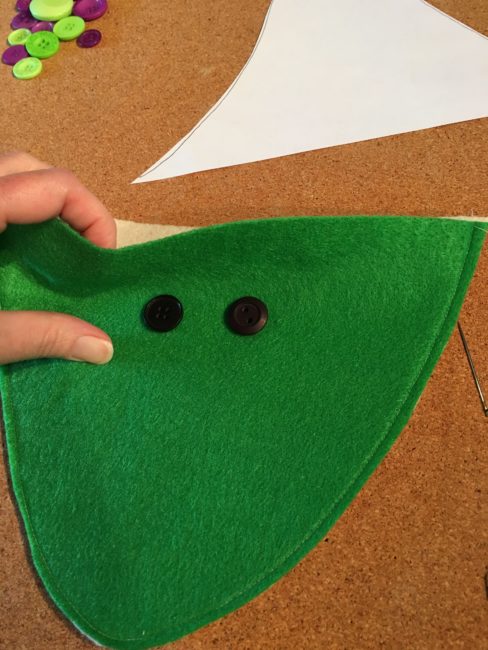
First, print out your patterns and cut out the felt according to the directions on the patterns. You will have 1 brown hat, 1 black hat, 1 green face and 1 tan face. If you are sewing your project together, go ahead and sew around the curved part of the face. Don’t forget to leave the top open! You will then need to sew your black button eyes onto the green face and onto the tan face.
If you are gluing your project, go ahead and glue the two faces together and then glue the black buttons for eyes onto each face. Let dry well before going on to the next step.
Cut out a wiggly, carrot shaped nose for your witch, along with a circle nose for your scarecrow. Attach them to your faces with craft glue. Use the black permanent marker to draw a mouth for each.
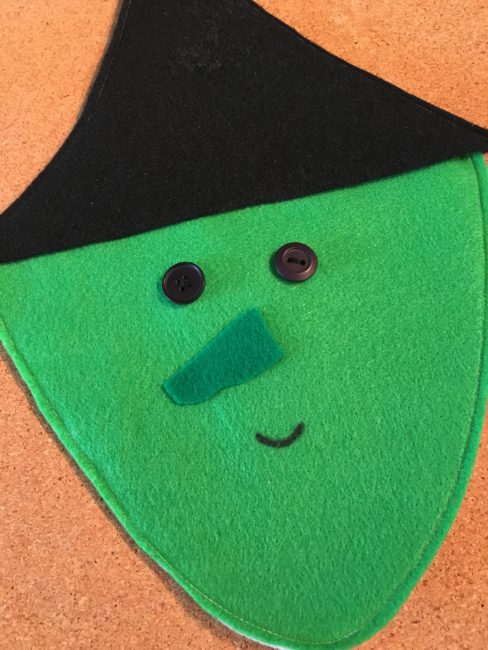
Next, if you are sewing your hats together, sew up and around the two sides, leaving the straight edge of the hat open. Then slide your face inside the two pieces of your hat and sew together; making sure to sandwich all the layers of the felt together when you are sewing.
If you are gluing, glue the hat pieces together and then slide the face inside the hat. You can attempt to glue these parts together, but I would recommend leaving them unattached. They will appear one piece when you attach it to the cork board.
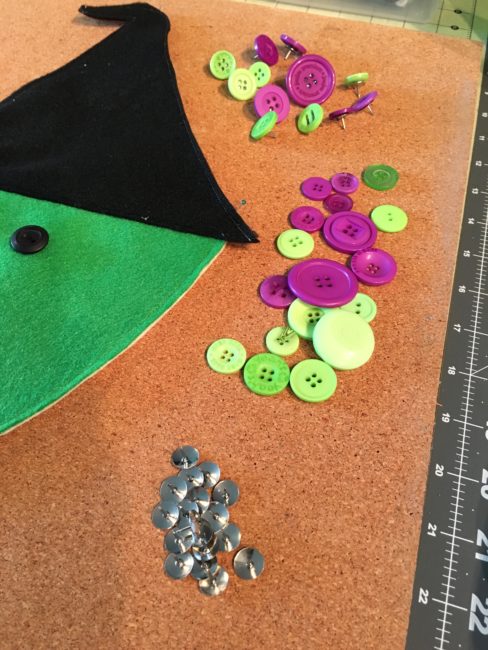
Heat up your hot glue gun and while it’s heating, separate your button pack. The witch hair uses 31 of the purple and green buttons and the scarecrow uses 28 of the orange from the Trick or Treat Button Basics BCB129. Glue the buttons on the thumb tacks and let them cool off.
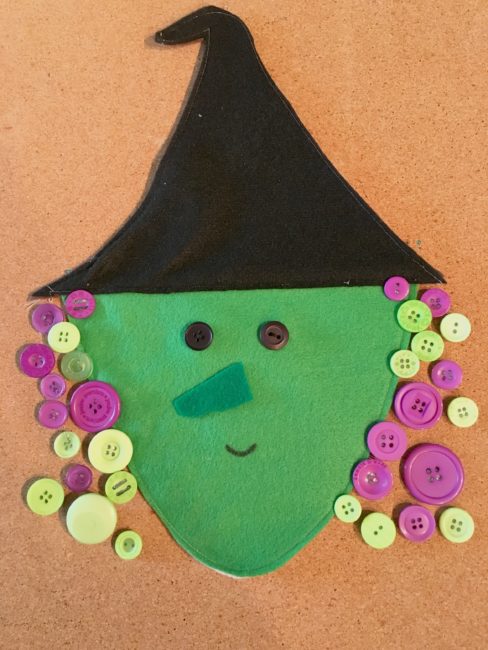
And there you have it! Attach your witch to your cork board with straight pins and either start out with all 31 buttons, taking one off each day until Halloween arrives, or add a button each day as it gets closer! Whichever you prefer!
Once Halloween is past, flip over your witch and start counting down the days till Thanksgiving!
Thanksgiving and Halloween are coming fast…make your fall countdown calendar today!
Hello Everyone! This is Katie from the Buttons Galore & More Design Team, and today I have a fun button pumpkin wall hanging project to get you in the mood for fall decorating!

This project is perfect to make if you are looking for an easy and inexpensive way to spice up your home décor for fall, halloween, and thanksgiving. I got the idea for this project when I saw a felt wall hanging designed for the 4th of July. However, instead of a pumpkin, the original wall hanging had a heart shaped flag made from felt and a few buttons. Personally, I thought the idea was cute but could be recreated in a simpler way. In today’s project, the whole DIY is only 3 steps and does not involve any sewing tools!
To decorate my button pumpkin wall hanging, I used two button sets for a majority of the project. Those two button sets were the 28 Lilac Lane ”Pumpkin Spice” Embellishment Bottle and the Buttons Galore Autumn Value Pack. Both of these button sets provided a wide variety of harvest/fall style buttons and worked really well together. My personal favorite out of both of these sets was definitely the 28 Lilac Lane ‘”Pumpkin Spice” Embellishment Bottle because you received a ton of beautiful orange colored buttons.
So, to find out how to make your own pumpkin button wall hanging, keep reading below!
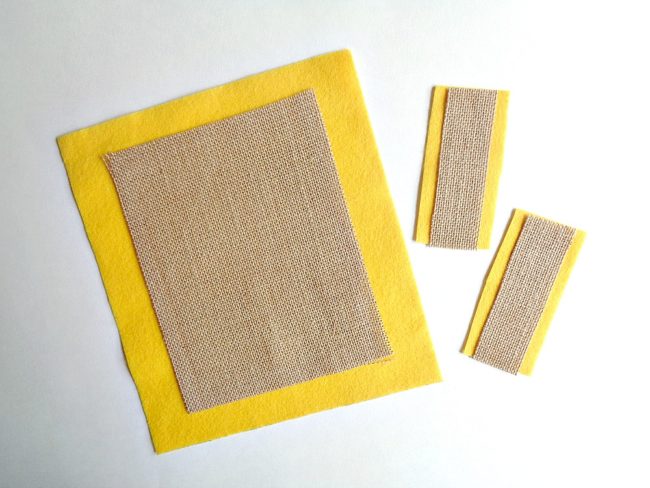
Step 1: Cut one piece of felt that measures 9 inches by 10 inches and two smaller pieces of felt that measure 2 inches by 3 ½ inches. Then cut out one piece of burlap that measures 6 ½ inches by 8 inches and two smaller pieces that measure 1 inch by 3 ½ inches.
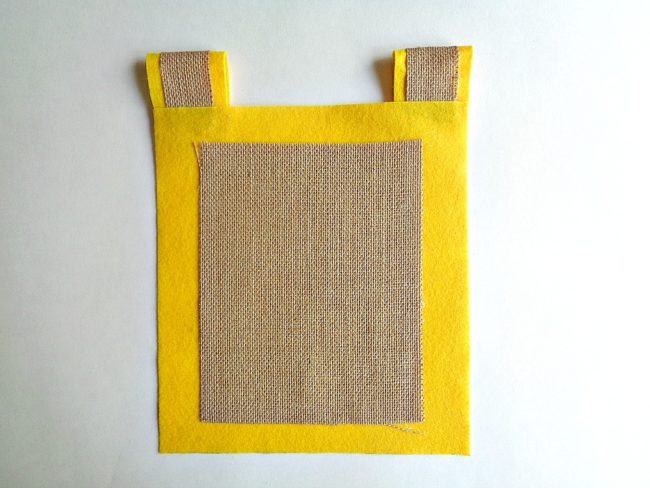
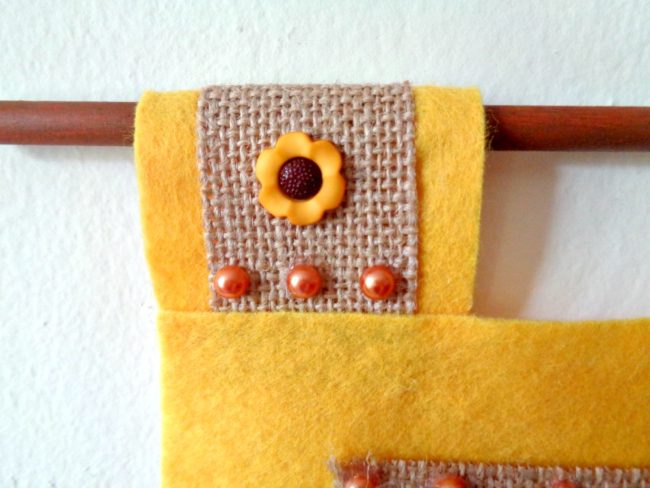
Step 2: Layer the larger piece of burlap centered onto the larger piece of your felt and glue it into place with your hot glue gun. Then layer the smaller pieces of burlap centered onto your smaller pieces of felt and glue them into place. Finally, create loops for your wall hanging by folding over the smaller pieces of felt/burlap and glue them in the corners of your larger felt piece.
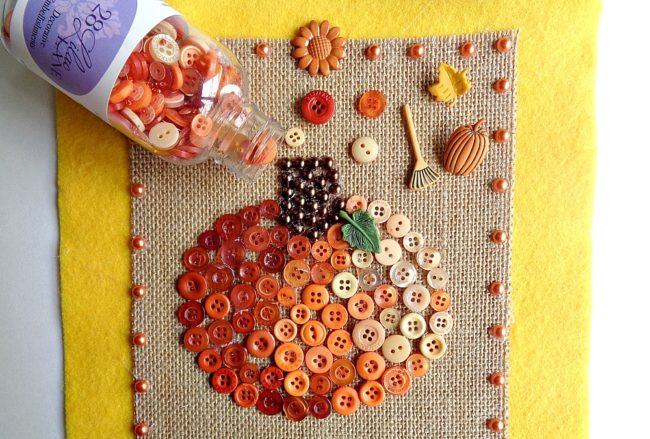
Step 3: Now take your pen and draw the outline of a pumpkin onto your burlap. Then begin gluing on your buttons around the outside of your pumpkin to create an outline and then fill in the middle with more buttons. For my pumpkin, I decided to go from dark to light buttons and then use shimmering half pearl flat backs for the stem. Finally, use the rest of your normal buttons and decorative buttons to decorate the rest of your wall hanging.
For my button pumpkin wall hanging I used the following:
Once you are happy with how your button pumpkin wall hanging looks, you are ready to hang it on the wall by sliding a dowel rod or wooden stick through the two loops!

I loved how this pumpkin button wall hanging turned out and I think it would look so cute as part of a gallery wall!
While creating this project, I did free hand the design of the pumpkin. However, if you are not comfortable drawing your own pumpkin (in step 3), you can always google ”pumpkin template” and print out a template to trace around. With that being said, if pumpkins are not your thing, you could always change the main image to be something else. For example, I think a leaf created from the 28 Lilac Lane “Toasted Graham” Embellishment Bottle would look really pretty.
If you made this pumpkin button wall hanging, what 28 Lilac Lane items would you use?
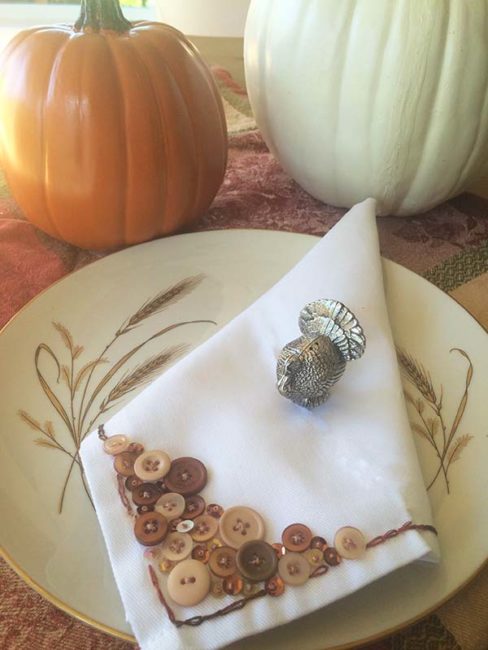
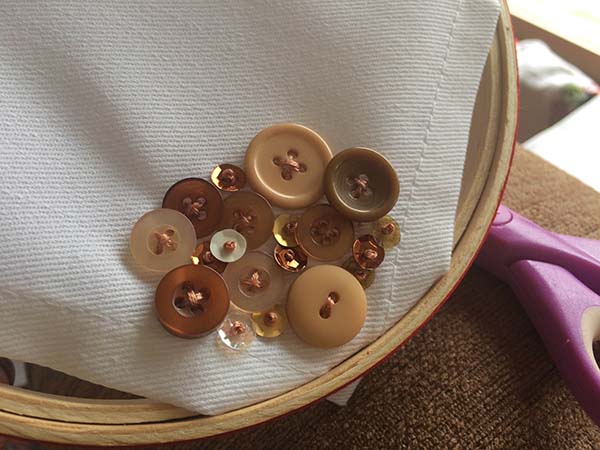
Editor’s Note: Today we welcome back former design team member Laura Bray as a guest designer to share a project for embellished Thanksgiving napkins that are an easy way to make your holiday table beautiful!
Hi Button Lovers! It’s Laura Bray. Some of you may remember me when I was on the design team for Buttons Galore & More. I still use my BGM buttons on my craft projects and I’m so excited about the 28 Lilac line of buttons – the kits and bottles make it so easy to make a pretty, coordinated craft.
It’s almost Thanksgiving, so I wanted to show you how you can turn a plain, cloth napkin into beautiful, boutique-style table décor for the holidays.
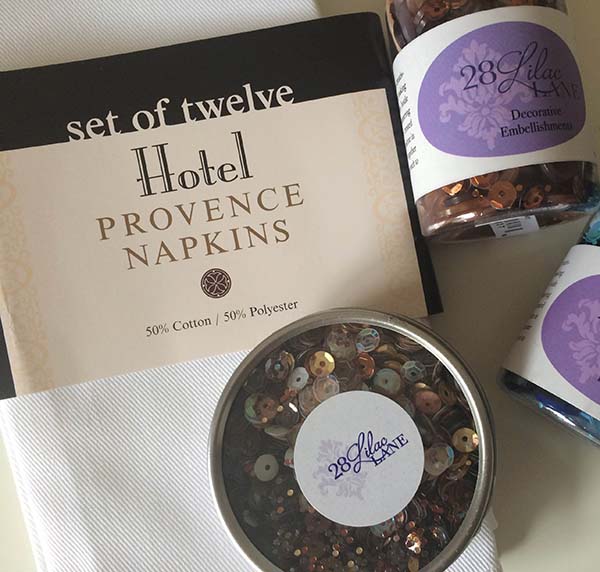
Supplies:
Pick a corner to embellish, then begin stitching on buttons of varying sizes and sequins onto the napkin randomly. Not a sewer? You can also use fabric glue!
To clean your napkins, hand wash and try to avoid submersing the embellished corner in water.
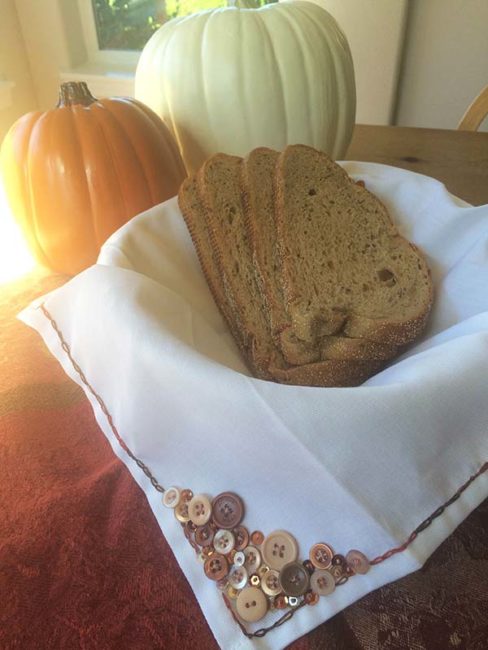
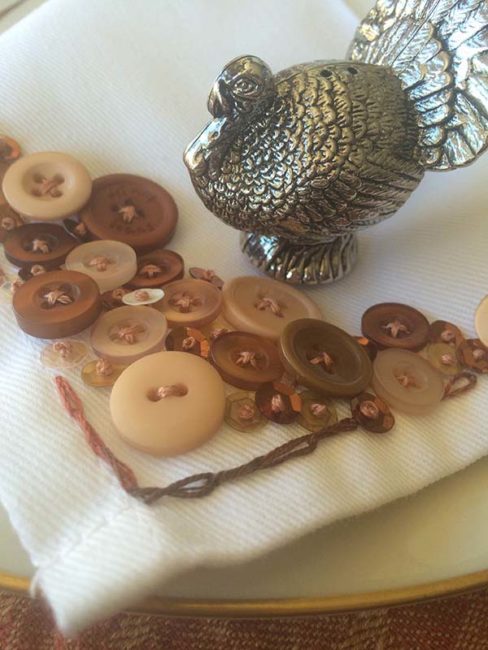
These look so stunning they will probably become family heirlooms!