Header

Archive | November, 2016

Pretty Pastel Christmas Tree Card with Buttons & Stamps!

Christmas isn’t just green and red anymore…pink and blue are also becoming more part of the palette. Today, I’m going to show you how to create a beautiful pastel Christmas tree card with our versatile new “Coral Reef” Button Bonanza bag!

Pretty Pastel Christmas Tree Card

Supplies Needed: 

This card uses our new “Coral Reef” Button Bonanza to create a fun pastel blue and pink Christmas look that is super trendy and oh-so-pretty! The shades of pale blue, soft rose pink, and white are perfect for a retro pastel Christmas tree card look.

Coral Reef Button Bonanza by Buttons Galore

Making this card is fast and easy, but with the gorgeous patterned papers and the pearly button accents, it looks anything but plain!

To begin your card, cut the pink background for your card base to 4.25″ by 5.5″. Then cut the garland paper to 4″ by 5.25″, and adhere it on top of the pink base. Next, get out a blank card base and adhere the layered background to the front of it.

Stamp the Christmas tree in brown ink on blue text pattern paper, and then add the star in gold at the top. Trim closely to the tree in a rectangle shape. Adhere the tree block on top of the pink striped paper, and trim it to leave a small border around the edges of the tree.

Pastel Button Christmas tree Close-up

Select buttons from the Coral Reef collection, and use PPA Matte Adhesive (or other clear glue) to adhere them to the tree. Once the glue is dry, attach the tree block to the card base, angled in the upper left corner.

Stamp sentiment on green patterned paper, and trim to size. Adhere in lower right corner.
Pretty Pastel Christmas Tree Card

This pastel Christmas tree card design could be used to create seasonal trees all year round – pretty spring blossom colors mixed with bright green, fall colors, or all white for a snow covered winter tree! What season’s tree will you button up?

1

Video | DIY Rose Christmas Ornament with 28 Lilac Lane

Pink is hot, hot, hot for Christmas this year! Today we’re sharing a beautiful rose Christmas ornament by 28 Lilac Lane designer May Flaum that will add a brilliant touch of pink and gold to your Christmas tree.

DIY Rose Christmas Ornament by May Flaum using 28 Lilac Lane shaker mixes.

May’s rose Christmas ornament is created with one of her six brand new 28 Lilac Lane shaker mixes that have just been released. This pink and gold shaker mix is called – you guessed it! – Rose Garden. This gorgeous mix will take you from a retro pastel Christmas, into Valentine’s Day, or use it to create beautiful girly embellishments year-round!

And now, May herself will show you how it is done!

horizontal-line

DIY Rose Christmas Ornament by May Flaum:

With the holidays fast approaching I am always looking for hand crafted gift ideas and special homemade touches. These new shaker mixes are great for so many projects including homemade ornaments. In this video tutorial I will walk you through creating a lovely rose garden ornament perfect for my aunt who loves pink & gold at the holidays.

Here’s a closer look at my finished DIY rose Christmas ornament project!

DIY Rose Christmas Ornament by May Flaum using 28 Lilac Lane - make Christmas pink!

horizontal-line

Don’t miss the chance on our Black Friday Sale to get May’s 28 Lilac Lane embellishment bottles for 15% off! Use code EMB15 through Friday, November 25th to save on all your favorite bottles from the collection. Don’t miss out on the new ones like Savannah Stroll, Winter Wonderland, and Coral Reef!

0

DIY Holiday Gift Ideas with Buttons

Nothing says you care at the holidays like a handmade gift! These DIY Holiday Gift Ideas with buttons will help you create a gift that matches everyone on your list.

diy holiday gifts

Mixed Media Locket

DIY Holiday Gift Jewelry close-up

With a few jewelry findings and one of our 28 Lilac Lane embellishment kits, you can make a one-of-a-kind locket for a special woman (or girl) in your life. Make it sweet, or make it dramatic…you decide and choose the embellishments!

Button Collage Frame

Button Frame with Glam Girl Buttons by Buttons Galore

A button collage frame is so easy to make the kids can do it…but with the right color choices, it can be perfect for any decor from farmhouse to graphic. This one, made with our Glam Girl Button Bonanza, will fit in a tween room or a country decor. An all white version (like the tray below) could go shabby chic, or try shades of pink for a cute girl’s room accessory!

Button Tray

Button Tray close-up

A simple wood tray becomes a beautiful accessory for decor or entertaining with a button collage and some resin.  For a shabby chic look, choose the Ivory/Pearl Haberdashery buttons, or for a more rustic or beachy feel for poolside entertaining, try the Natural Haberdashery.

Button Charm Bracelet

gold button charm bracelet

How about a little button bling? Pair some of our Gold/Silver Haberdashery buttons with a chain link bracelet and you’ve got a retro Button Charm Bracelet. It’s a great piece to accessorize all of those trendy 70’s looks with!

Mason Jar Sewing Kit

Mason Jar Sewing Kit

Looking for something pretty and practical too? This mason jar sewing kit will make it easy and fun for your college student or newlywed to replace that missing button. And it is decorative while it is waiting to be used!

0

Tis the Season to make a Christmas Cat Card!

We’re cat owners at our house, and as anyone who owns a cat knows…it makes Christmas decorating extra, well, interesting. We decorate, the cat un-decorates. So today, my project is a Merry Christmas cat card that celebrates that annual feline-human war of December!

Christmas Cat Card by Nancy Nally for Buttons Galore

Supplies:

  • Buttons Galore “Tis the Season” Button Bonanza
  • PPA Matte Adhesive
  • watercolor paper
  • Tim Holtz for Stamper’s Anonymous “Crazy Cats” stamps
  • Tim Holtz for Stamper’s Anonymous “Simple Sayings” stamps
  • Ranger Archival Ink in Jet Black
  • Ranger Tim Holtz Distress Crayon in Vintage Photo
  • Ranger Tim Holtz Distress Ink in Vintage Photo
  • Water brush
  • Black Pen
  • Tim Holtz idea-ology “Yuletide” paper
  • 26 gauge German style wire (antique brass)
  • Cream colored cardstock

This Christmas cat card has a very simple design. It’s featured embellishments are Christmas ornaments made from buttons from the “Tis the Season” Button Bonanza that is brand new for this holiday season. Featuring deep red and green tones that are accented by a light sage green shade, “Tis the Season” is a versatile button mix for almost any holiday craft project.

Tis the Season Button Bonanza by Buttons Galore

Instructions: 

Cut a piece of watercolor paper to 4.5″ by 6.5″. Use Archival ink to stamp the Crazy Cat.

Use a ruler and the black pen to draw the line across the bottom underneath the cat. Don’t draw through the cat’s paws!

Scribble on a scrap piece of watercolor paper with the Distress Crayon. Using your waterbrush, pick up some of the color and use it to watercolor the cat.

Cut a piece of patterned paper to 5″ by 7″ and ink the edges. Adhere the watercolor paper centered on it. Cut a piece of cardstock to 7″ by 10″. Fold in half to make a 5″ by 7″ card, and adhere card front to it.

Cut a strip of patterned paper 1/2″ wide. Stamp the sentiment on it, and trim the ends. Adhere to bottom right of card.

Select three buttons to serve as your “ornaments”. Thread the holes on the buttons with German style wire. Use the tail of the wire to create a loop for the ornament’s “hanger” before snipping off the excess wire.

Use liquid glue like PPA Matte Adhesive to glue the button ornaments in place.

Since it mostly relies on bulk supplies like buttons and tools like stamps to make, this Christmas cat card could easily be made in quantity. Simply substitute cardstock or a variety of patterned paper for the paper used for the matted background and the sentiment strip. and you can make this card over and over with a Button Bonanza and your stamp! And since it is fast and easy to make, your cards will be done in no time!

0

Send a Retro Merry Christmas Card Wish!

Tis the season to be jolly! Today I’m here to show you how to combine two of our holiday products that have a turquoise toned blue in their palette to make a fun retro Merry Christmas card!

Retro Merry Christmas Card by Nancy Nally for Buttons Galore

Supplies Needed:

  • patterned paper
  • washi tape (or patterned paper)
  • red ink
  • Merry Christmas stamp
  • white cardstock
  • clear drying glue (such as PPA Matte Adhesive)

This project pairs seed beads from our beloved 28 Lilac Lane “Let It Snow” embellishment kit with buttons from our new “Cool Winters” Button Basics. With similar tones of blue, these two coordinate together beautifully to add a pop of trendy color to holiday projects of all kinds.

Winter Flurries Button Basics

This card is 5″ by 7″, so to start my retro Merry Christmas card I cut the snowflake background paper to that size.

Next, I cut a 5″ wide strip of white cardstock that was a few inches tall. I stamped “Merry Christmas” on it with red ink, centering the image near the bottom. Then I used scissors to cut the top of the sentiment block into a wavy design.

To create the beaded edge, I started by spreading a bead a white glue along the edge. Then I sprinkled seed beads over the glue until it was covered, and set the sentiment block aside to dry.

Cutting the trees is easy! I simply used three scraps of paper and cut them into various sizes of triangles. The tree “trunks” are made from washi tape (but could also be made from strips of paper). Some of the tree triangles hung over the edge, so I just snipped them off. Once those elements were adhered in place, then I used liquid glue to adhere three buttons as toppers for the trees.

Once the glue holding the seed beads was dry, then I adhered the sentiment block across the bottom.

To finish my card, I used white cardstock to make a blank card and then adhered the finished card front onto it.

Retro Merry Christmas Card by Nancy Nally for Buttons Galore

I hope this cheery little retro Merry Christmas card greeting will help you brighten the holidays of someone special!

0

Decorate a Faux Pallet Christmas Tree!

Welcome to the Handmade Holidays blog hop at Buttons Galore! We’re sharing a faux wood pallet Christmas tree to decorate a desk or tabletop…but this tree is hiding a very useful secret!

Faux Pallet Christmas Tree

This fun little pallet Christmas tree is equally at home in a dorm room, or a farmhouse style decor. But at 17″ wide and more than two feet tall, it’s a challenge to store after all the gifts are opened. Or is it?

Velcro Assembly for Pallet Christmas Tree

By using Industrial Strength Velcro to assemble the pallet Christmas tree instead of glue or nails, I made it able to be completely disassembled! Just pull apart the Velcro and instead of a big awkward tree, you’ve got a small bundle of wood that can be much more easily packed in an ornament box!

Disassembly also allows the flower pot – which is deliberately not seasonally decorated – to be used year round for flowers or other seasonal decorations when it isn’t being used for the tree.

Supplies Needed:

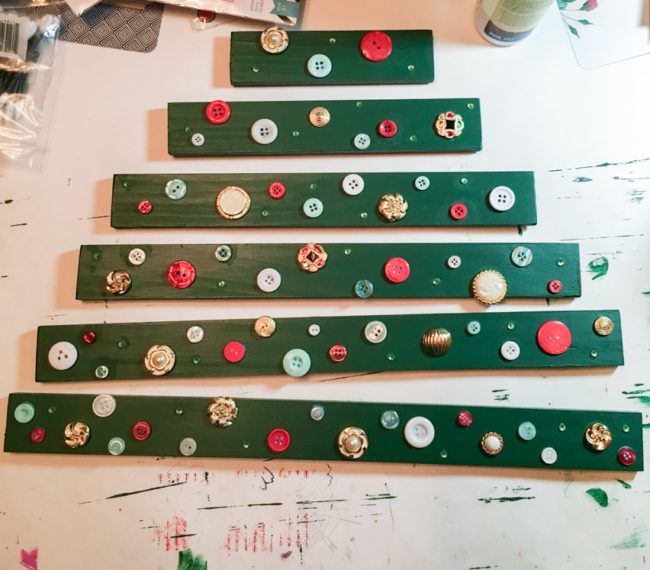
I started by cutting the craft wood into the following lengths: 6″, 9″, 12″, 14″, 16″ and 17″. Then I trimmed the 1″ x 2″ pine board to 26″ in length.

Pallet Christmas Tree Pieces

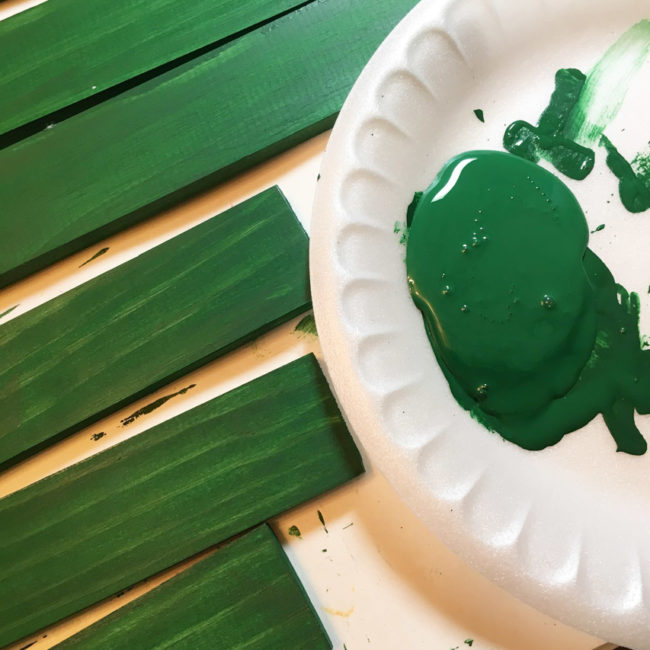
I used the Americana satin paint (made by DecoArt) in multiple thin coats applied with a foam brush to get a nice smooth finish on the boards.

Painting Pallet Christmas Tree

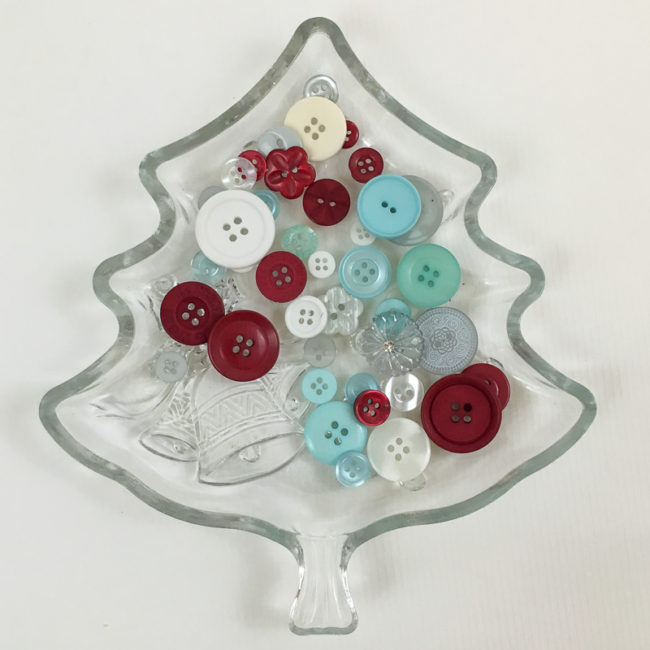
After the paint was dry, I laid out my boards in the arrangement for the tree. Then I started decorating my tree! I used Button Shank Removers to cut off the stems from the Haberdashery buttons, and filled in around them with buttons from the 28 Lilac Lane bottles and kit. Tiny green sequins from the Yuletide Greetings bottle added nice little sparkly highlights around various areas of the tree, too!

Decorating Pallet Christmas Tree

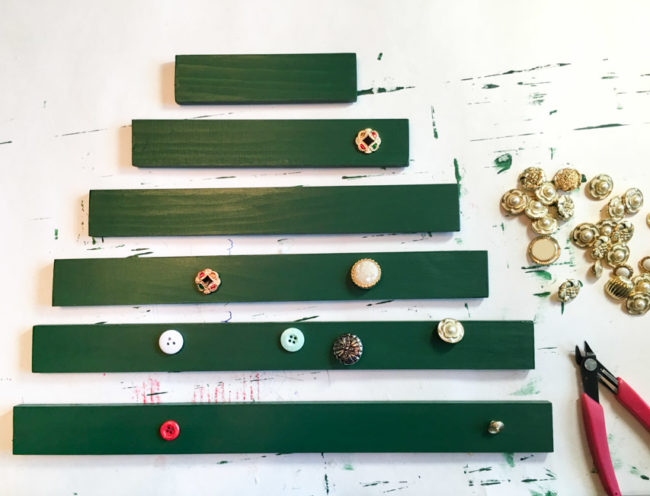
When it was all glued down, I was left with this! Notice how I hung some of the button “ornaments” off the edges of some of the wood branches to add some interest.

Decorated Pallet Christmas Tree

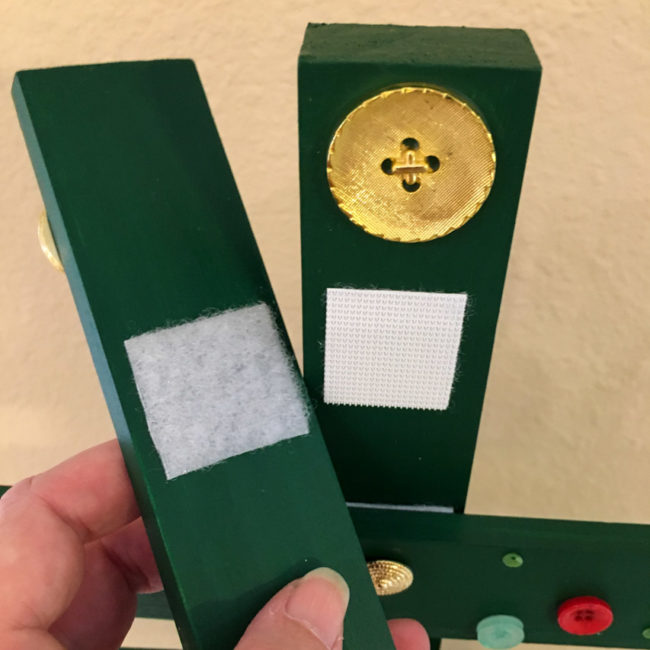
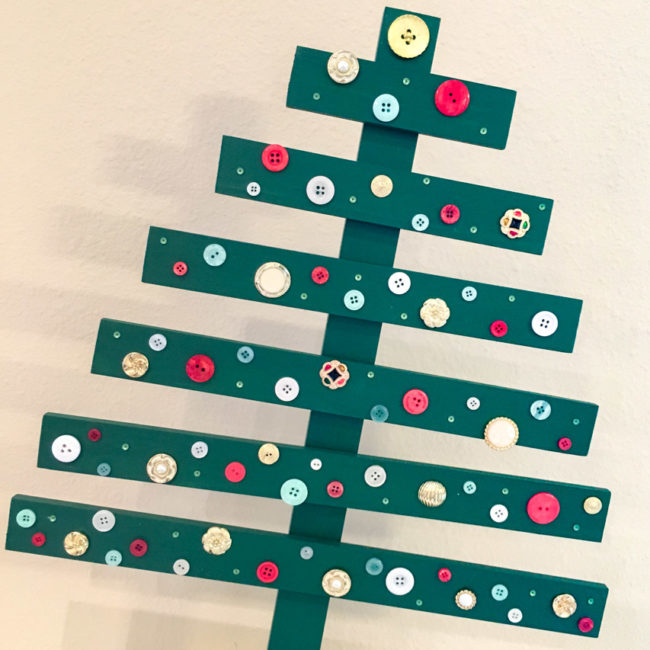
Attaching the branches to the stem was super easy with the Velcro. First, I cut 1.25″ squares from the Velcro. Then I measured and placed a mark at the center of the back of each “branch”. I peeled one side of the Velcro and adhered it centered vertically on the branch, using the center mark to get it centered left to right.

Then I peeled the second side of the Velcro and pressed the branches into place on the tree’s “trunk”. Once they were in place, I glued a big gold button to the top of the trunk as my tree’s top.

Pallet Christmas Tree with Trunk Attached

Painting the pot is fast and easy! I just dipped a paintbrush in water and then into the white chalk paint. This diluted the paint and when it spread, it created a whitewash effect. In areas that it didn’t spread as much as I would like, I just dipped the brush in water again and used the water to dilute the paint a bit more.

To create a second layer of paint for a mottled effect in the whitewashing, I repeated the technique with the more cream colored chalk paint. This time I just dabbed the paint instead of trying to fully cover the pot, and it created the textured look below.

Whitewashed Clay Pot for Pallet Christmas Tree

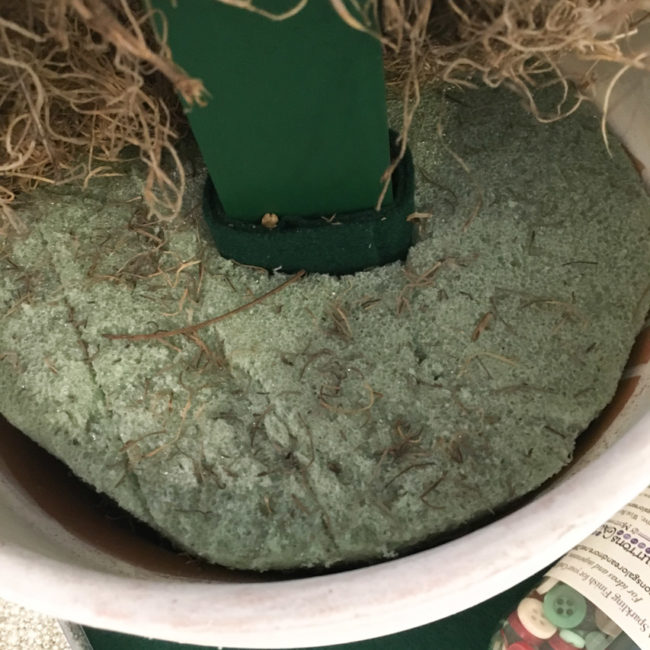
The base is part of what makes the pallet Christmas tree collapsible. I trimmed the foam so that it fit nicely into the pot, and then carved a hole down the middle of it for the tree trunk. To make the fit nice and snug, I wrapped the trunk in a strip of felt. This method makes the fit adjustable as wear and tear erodes away the foam base!

For the finishing touch, to hide the foam, I covered it in a layer of moss.

Base of Pallet Christmas Tree

This faux pallet Christmas tree is the perfect decoration for a buffet table, an office, or a kid’s bedroom! There’s so many places to use it…where will you put yours?

Faux Pallet Christmas Tree

Now, it’s time to get hopping to see more holiday decor ideas. But before you go…how about a giveaway? Here’s a peek at the huge assortment of prizes that are up for grabs!

handmade-holidays-hop-prize-image

Use the Widget below for your chance to enter!

a Rafflecopter giveaway

Thanks to all of our fellow sponsors!

  • Clearsnap
  • Hydrangea Hippo etsy shop
  • Hepp’s Salt Co. (food)
  • The Twinery
  • Scrapbook Adhesives by 3L
  • Stencil1
  • DecoArt, Inc.
  • Walnut Hollow
  • Graphic 45
  • Iron Orchid Designs

Now…click here to visit the next stop on the hop – or click below to see the entire hop list:

2

Make a Watercolor Card with new Coral Reef embellishments!

A few weeks ago we introduced you to our six new 28 Lilac Lane embellishment bottles. Candy Corn, Winter Wonderland, Yuletide Greetings, Savannah Stroll, Through the Woods, and Coral Reef embellishments bottles are currently shipping, just in time for holiday projects and stocking stuffers!

new 28 Lilac Lane embellishment bottles for fall 2016 from Buttons Galore & More!

Today, I’m here to show you an up close look at a project by 28 Lilac Lane designer May Flaum! This project uses the gorgeous and versatile 28 Lilac Lane Coral Reef embellishment bottle, a blend of coral pink and shades of green that is seasonal year round.

28 Lilac Lane Coral Reef embellishments

The delicate tones of Coral Reef are perfect for using with watercolors. With its natural floral color palette, Coral Reef works beautifully for watercolor floral cards! In the video below, designer May Flaum shows how she paired her 28 Lilac Lane Coral Reef embellishment bottle with a stamp to create a quick and easy floral greeting!

Here’s a closer look at May’s finished card…just a sprinkling of Coral Reef embellishments takes this card from simple to simply fabulous! It’s simple, quick, and easy to do, but makes all the difference in the finished card.

Watercolor Flower Card by May Flaum for 28 Lilac Lane

Check with your Buttons Galore local retailer or visit our online store to get your 28 Lilac Lane Coral Reef embellishments today!

0

Make an Adorable Layout with Guest Laura Vegas!

Today Buttons Galore is excited to welcome guest blogger Laura Vegas, who is sharing with us an adorable layout and also a card. These fun projects are made with our Button Basics in Sky Blue, Candy Apple Green, Cotton Candy, and Lemon Yellow.
lauravegas_bg_sheisadorable
Hey everyone, it’s Laura Vegas here. I’m so excited to be here guesting on the Buttons Galore blog, and have created two projects to share with you all today. Buttons are one of my absolute favorite embellishments! I have a massive button collection, and yet I can never pass up adding more colorful buttons to my stash. They just speak to me!
lauravegas_bg_sheisadorable_detail1
One of my favorite ways to incorporate buttons onto my projects is to add them to the centers of shapes. I tend to use a lot of flowers, circles, and stars on my layouts, and buttons are the perfect addition to any of those shapes. For this layout, I started by die cutting a floral background piece from white cardstock, using my Silhouette Cameo die cut machine. I love that it had lots and lots of flowers to embellish with my buttons!
lauravegas_bg_sheisadorable_detail2
I wanted to add some subtle interest to some of the flowers on the background piece, and vellum came to mind. I was able to find an individual flower cut file that matched one of the flowers on the background piece. I sized the flower numerous times to match up with the flowers on the background piece, and then cut them all from a sheet of vellum. To add some texture, I ran each vellum flower thru a dotted embossing folder before layering them over the background flowers.
lauravegas_bg_sheisadorable_detail3
Personally, I always thread my buttons when using them on layouts and cards. I don’t like to have any “naked” buttons on my projects ;) My go-to way to adhere my buttons, is to thread my string through the button holes, and then laying the string ends flat against the button, I add a glue dot (or sometimes two if it’s a larger button) right over the string. This holds the ends in place, and I can them simply adhere my button to where it needs to go.
lauravegas_bg_sheisadorable_detail4
The exception to this rule, is when I’m working with clear buttons. I don’t want those strings and glue dot to show through the clear button. So for those buttons, I will take the extra time to use a needle and stitch my button directly onto the page.
lauravegas_bg_sheisadorable_detail5
I tend to be a more simpler scrapper, in that I keep my embellishments more on the simpler side. So I am always turning to buttons, as well as basics like brads and enamels. Oftentimes, they are all I need to finish off a project mostly made up of photos, cardstock, and patterned paper.
lauravegas_bg_itsyourbirthdaycard
I wanted to whip up a quick card to share with you as well, using the same idea of adding buttons to the center of flowers. This time I fussy cut some flowers from a sheet of patterned paper to create this easy birthday card.
lauravegas_bg_itsyourbirthdaycard2
A fun, and super simple, way to add texture to paper flowers (whether die cuts or fussy cut from patterned paper), is to crumble them up really good. You can even lightly mist the paper with water to make it easier to work with. Then you simply un-crumble your flower, flattening it out as much or as little as you like. Add a threaded button to the center of each flower, and you’ve got the most adorable little flowers to add to your projects!
I’ve had so much fun creating these projects, and I hope you enjoyed them too! Thanks Buttons Galore for the opportunity to guest design for you and create with your colorful buttons!
laura vegas headshot
Learn more about today’s guest blogger, Laura Vegas: Hi there! I’m Laura Vegas, from Northern California, where I live with my husband Joe, and my two daughters, Alyssa (20) and Sarah (17). I have been scrapbooking for well over 22 years now. I scrapbook mostly about my girls and our family, but like to mix it up now and then by scrapping photos and stories about my daycare kids and family friends as well. I have been fortunate enough to design for some amazing manufacturers in the industry over the last 11 years, and have also had my work published in a variety of publications for the last 10 years. I was honored to be a member of the 2010, 2011 and 2012 Creating Keepsakes Dream Team and the 2013, 2014 and 2015 Scrapbook & Cards Today design team. I just recently left my position as Creative Team Coordinator for Bella Blvd after 5 years, and am currently designing for Kerri Bradford Studio.
0

Bling up a Holiday Gift Tag with Buttons and 28 Lilac Lane!

It’s November and that means…the leftover trick or treat candy has been eaten (at least at our house)…and it’s time to jump full on into Christmas trees and snowflakes and all things Christmas! For our readers that like to personalize their gifts, today I’ve got a holiday gift tag that will be remembered long after the holiday is over!

DIY Holiday Gift Tag

Supplies:

The background on this tag was created by inking a craft mat with the four shades of blue Distress Ink, spritzing it with water, and then dragging the tag through it. A heat gun helped to speed the drying process. The nice thing about this technique is that if you don’t like the effect that you get, you can add and remove color by spritzing the tag with water, or adding another layer of color, until you get just the effect that you are happy with.

DIY Holiday Gift Tag close-up

Once the background was thoroughly dry, I stamped the snowflake stamp with clear embossing ink and heat embossed it with white embossing powder. Since the stamp was not as tall as the tag, I made sure that I started the stamp at the bottom of the tag. Using the PPA Matte Adhesive to glue a line of buttons across the area where the snowflakes stop disguised the transition area from snowflakes to plain background.

Next, I stamped the poinsettia stamp in Archival ink on watercolor paper,  and colored it in with watercolors and a waterbrush. Finally, I trimmed it to a size that would work on the tag.

It’s not very visible in the photos, but I used Stickles to create a border around the outside edge of the poinsettia square to add a little extra glint of sparkle to the tag. I also used various colors of seed beads from both of the embellishment kits to create some dimension in some areas and create the flower’s center. (The seed beads in our kits adhere beautifully with the PPA Matte Adhesive, which is what I used here.)

DIY Holiday Gift Tag close-up

The trickiest part of assembling this holiday gift tag is getting the loops of silver string and the poinsettia layered and adhered. I laid down a pool PPA Matte Adhesive in the middle of the tag, and created my string loops by passing the string through the glue area repeatedly. Then I pressed the poinsettia block down on top of it and when it dried, everything was adhered together!

At first glance, it looks like the snowflake charm is looped through the string but if you look closer…it is not. I simply glued it on with the loop laying over the string. This helps everything lay a little more flat and stay adhered better.

The final touch on my holiday gift tag are the two phrase stickers I added in the bottom corner. If you didn’t want to put the to and from information on the reverse side, these strips could have it instead.

0

Powered by WordPress. Designed by WooThemes