Header

Tag Archives | ribbon

Fifteen MINUTE Friday – Scrap Ribbon Trees

Check out these adorable Christmas tree ornaments made from scraps of green ribbon and Laura Kelly buttons in Radical Red and Passionate Pinks (and one yellow)!

Ribbon Scrap Tree

So cute, so easy and so much fun!  The Aleene’s Quick Dry formula in the Always Ready bottle (available at Joanne’s) makes crafting things like this easy peasy.  I am in love with the stuff!

Here are the simple directions:

  1. Tie green ribbon scraps around a stick from a tree.
  2. Trim the ribbon to shape a tree.
  3. Add buttons and a hanger with Aleene’s Quick Dry Adhesive.
  4. Ta Da!

This is a great craft for kids. Here are lots of other DIY ideas for celebrating the season with kids too!

And you can enter to win a fabulous contest too!

a Rafflecopter giveaway

Happy Creating for the Holidays,

Laura

1

Drink Charm Gift Idea for Father’s Day

Today I am exited to share this awesome drink charm gift idea from Laura Bray.  These adorable and simple drink charms are a fabulous idea for Father’s Day for those of you who want to create something magnificent in a short amount of time.

Best-Dad-Drink-Charm-1024x680

To get the tutorial and learn more about the amazing Laura Bray, visit her blog post here.

Happy Father’s Day Weekend,

Laura

0

Lucky Felt and Button Four Leaf Clover

This quick craft creates a mini masterpiece that can be used to tie around a gift or use as a tie around a napkin for a table decoration.  It’s a quick, fun festive way to celebrate St. Patrick’s Day around your home.

material needed for the felt four leaf clover:

  • Green Felt in 2 Shades (Kunin makes the best!)
  •  Green Buttons
  • Needle/Green Thread (or embroidery floss)
  •  Ribbon

Directions for Lucky Felt and button four leaf clover. 

 1.  Cut a four leaf clover from the felt about 2 inches in diameter.  I used pinking shears.

Felt Clover

2. Cut another four leaf clover from the other shade just a tad larger.

3.  Sew green buttons through the smaller felt shamrocks tying knots in the tops between each one.

DSC00598

4.  Sew the ribbon through both layers of felt hiding the stitches behind a button or two.  Use a length or ribbon that will go around your gift or rolled napkin.

FeltButtonClover

Ta Da…a mighty green little decoration that is bound to bring someone a little luck!  As tiny bit of Irish information- when making a toast, the Irish say “Slainte”.   Slainte is a well wish litterally translated – to your health.

3

Button Christmas Card

Holly here from Ribbons & Glue sharing a Button Christmas Card with you today to show you how easy it is to embellish your Christmas cards this year with Buttons Galore buttons.

Mistletoe Card

To make this Button Christmas Card,  I used a Pebbles in My Pocket Mistletoe cut file, Pearl Buttons for berries and gorgeous May Arts Ribbons.

button card2

It really is easy to a add dimension on to your cards with simple buttons.

Supplies Used to Make Button Christmas Card:

  • Buttons Galore Pearl Buttons
  • Kraft Paper
  • Pebbles From Me to You
  • May Arts Stitched Ribbon
  • May Arts Ribbon Pom Poms
  • Mistletoe Stamp
  • White Gel Pen
  • Memento Ink

For more Christmas Inspiration, check out  my blog Ribbons & Glue.

newsignature

Like Me on Facebook!

0

Water Bottle Favors

AfterPromWater2

Sometimes creating the perfect party favor that equally serves as a decoration is simple to button up.  This project can be used to create color themes for birthdays, weddings, baby showers, etc…  Here is a really simple, quick and decorative way to create favors that are great for summertime.

AfterPromH20AdTech

Remove the label on the water bottle.   Using ad-tech’s hot glue, add a little message and a button or two from Laura Kelly’s bright collection of colors along with a ribbon tied in a bow and you have a bright, cheery favor that is sure to be a hit.

AfterPromWater

For more fun party decorating ideas with the prom theme, visit Laura’s blog.


0

Flower pot Flowers

It is springtime and that means gardening, planting, flowers and sunshine.

Polkadot Flower pot Flowers

If you are working towards creating a colorful flowerpot garden, here is a fabulous QUICK and easy way to add bright colors.

IMG_4378

To make the Flower pot Flowers :

grosgrain ribbon, bright Laura Kelly colored buttons, hot glue (I use ad-tech high temp) and wooden skewers!

Use grosgrain ribbon loops to create petals and then hot glue gun buttons to the centers to add color and hold them together then hot glue the to the non pointed end of the skewer.  Flip them over and hot glue a button to the backside so that if they turn around in your garden they will still look cute.

RibbonButtonFlowers

What a fabulous way to create color in fifteen minutes.  These flowers withstand the weather and last all season long.  Of course they are pretty indoors too.  You could even make a whole pot of just these and never have to water.

RibbonFlowers

If you want to know where the polka dotted flower pots came from, hop over to my blog and find out.

Happy Fifteen Minute Friday with Flowerpot Flowers!

1

Embellished Hand Towels home decor

Valentine Hand Towel Close-Up

Embellished hand towels are one of my favorite home decor crafts.  I think little holiday touches, throughout the house, make everyone smile and turns an ordinary day into something special.  Today, I  have a DIY project for an embellished Hand Towel.  It’s simply a matter of embellishing a store-bought hand towel with ribbons and buttons.  You’ll be amazed by how easy the project is and how cute your guest bathroom will look when you hang this cute, embellished hand towel in it!

Supplies for the embellished hand towel:

Instructions for the embellished hand towel:

1. Lay the hand towel flat on your work surface.  Measure out your ribbons and lace to span the width of the front of the towel.  Pin in place and sew them onto the towel.

Sew Ribbon Onto Towel valentine's day home decor

2. Fold the towel in half in order to establish the center mark of the towel.  Place a button on top of the ribbon at the center mark and stitch in place.

Sew Buttons onto towel

3. Sew buttons on either side of the center button.

It’s best to gently hand wash the towel once it has been decorated. Alternately, go ahead and drive your family crazy by telling them the towel is only for decoration and not to be used.

Valentine Hand Towel Beauty Shot

Laura Bray www.laurabraydesigns.com


1

Button Bumblebee BZZZZZZ

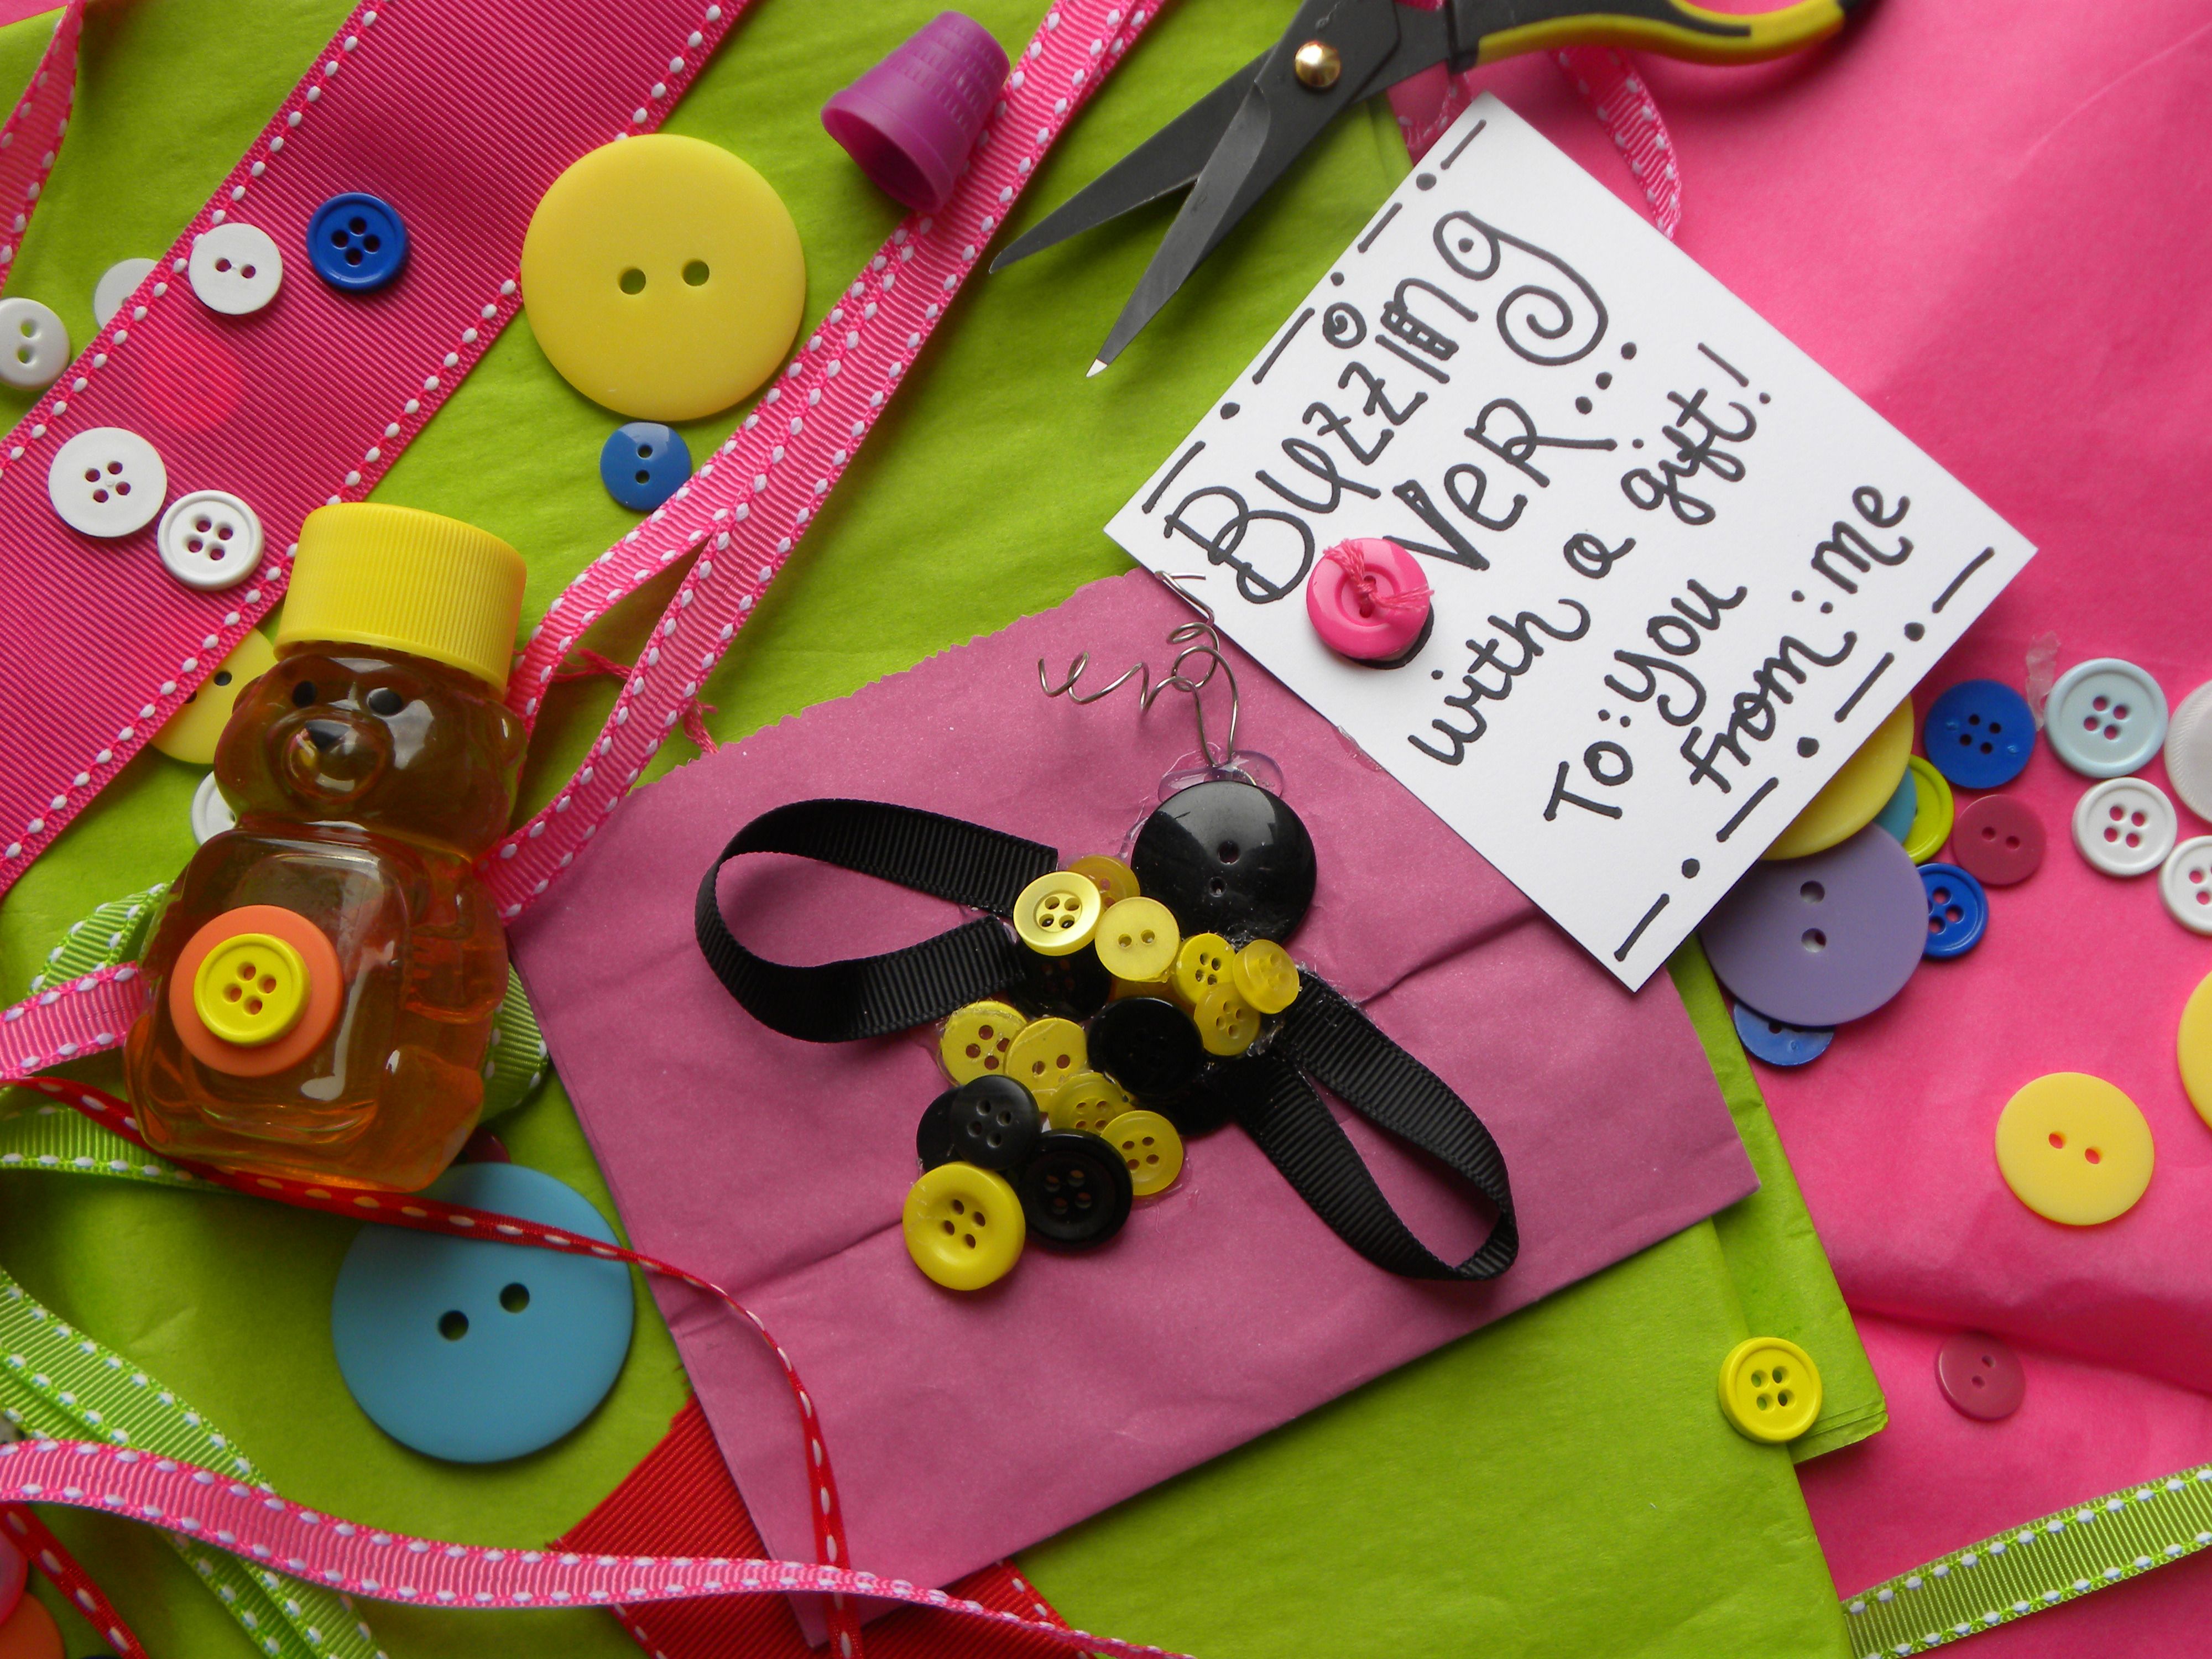
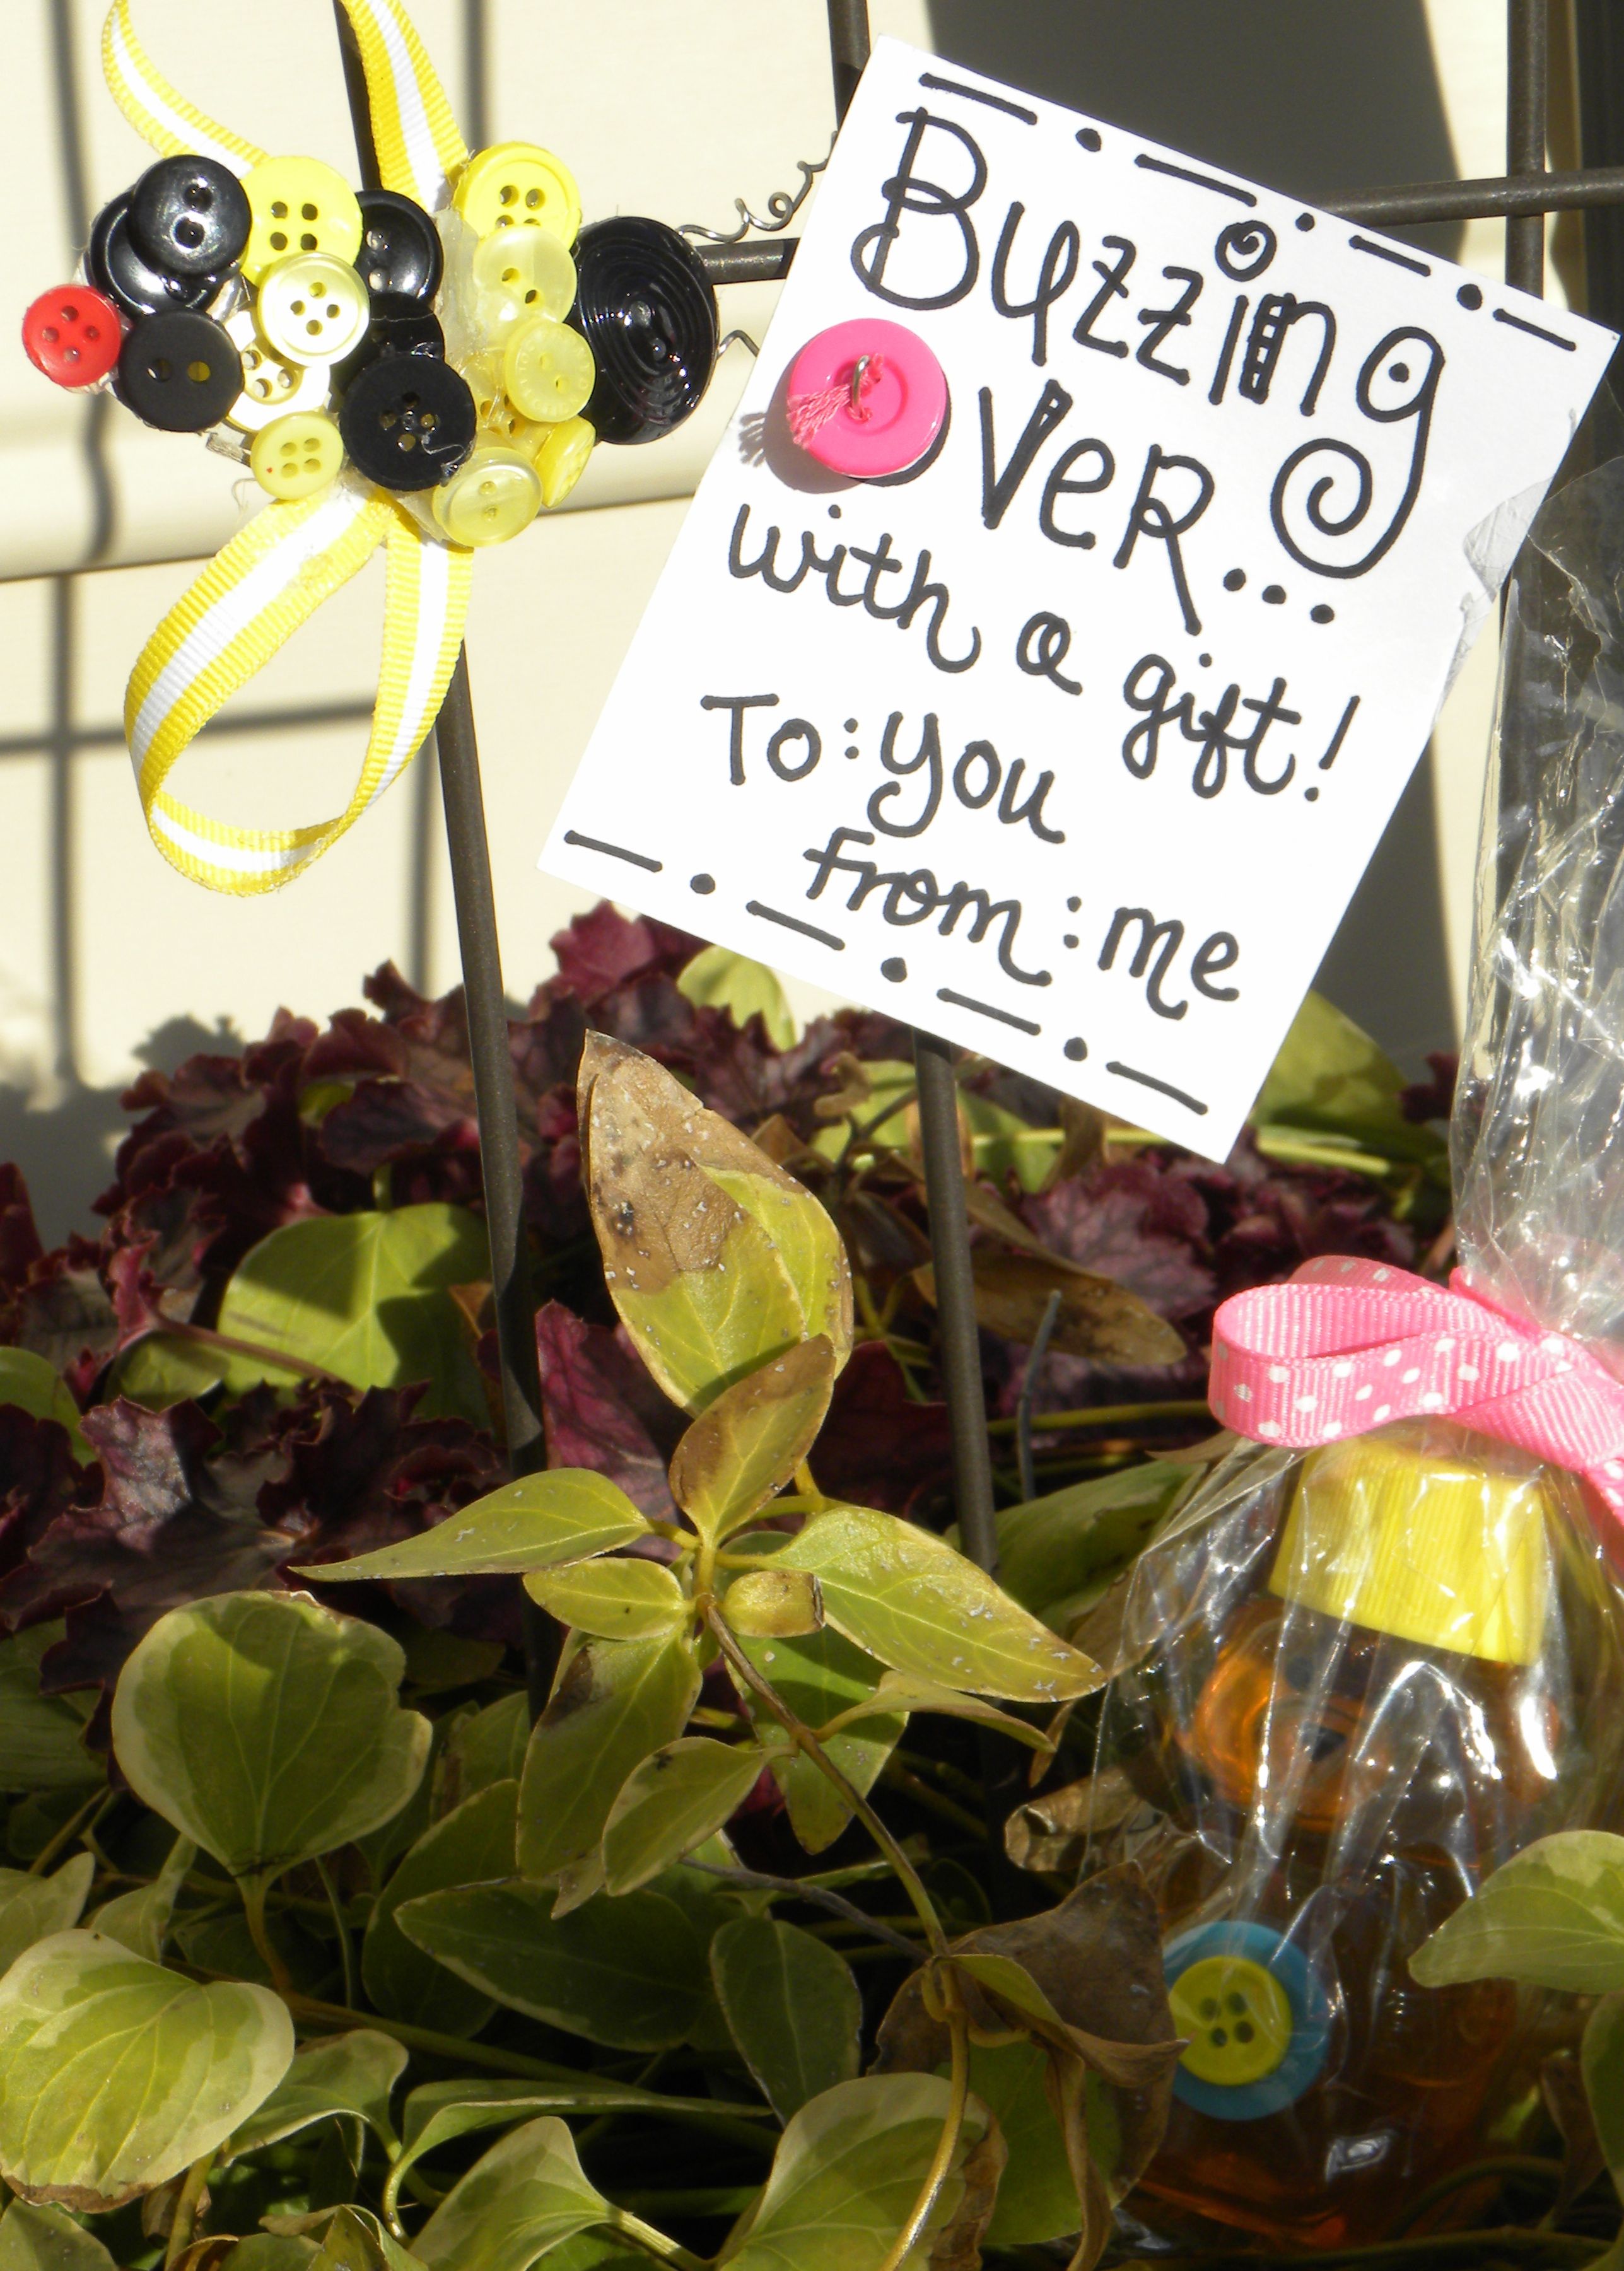
Button Bumblebee is Buzzing over with another fabulous craft!  You can create this cute little creature in no time.  It makes a perfect package topper for all your spring time gift giving needs. Not only could you use it as a package topper, it could make a magnet, place it on a close pin to hold papers or even as an accent on a headband.

For the Button Bumblebee will need:

Button Bumblebee

Directions to make the Button Bumblebee:

1.  Use the yellow and black buttons to design a striped bumble bee, using a large black button for the head.

2.  Use a hot glue gun to adhere them to any surface I used felt) then add a few smaller buttons to the stripes for the stacked effect.

3.  Cut a piece of bendable wire into a 5 inch piece.  Bend it in the middle and them spiral each side around a pencil to get the antennas.

4.  Adhere the antennas with hot glue above the large black button head.

5.  Cut two pieces of black gross grain ribbon into 5 inch pieces and glue them to the body to make wings.


Button Bumblebee

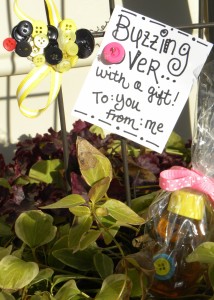
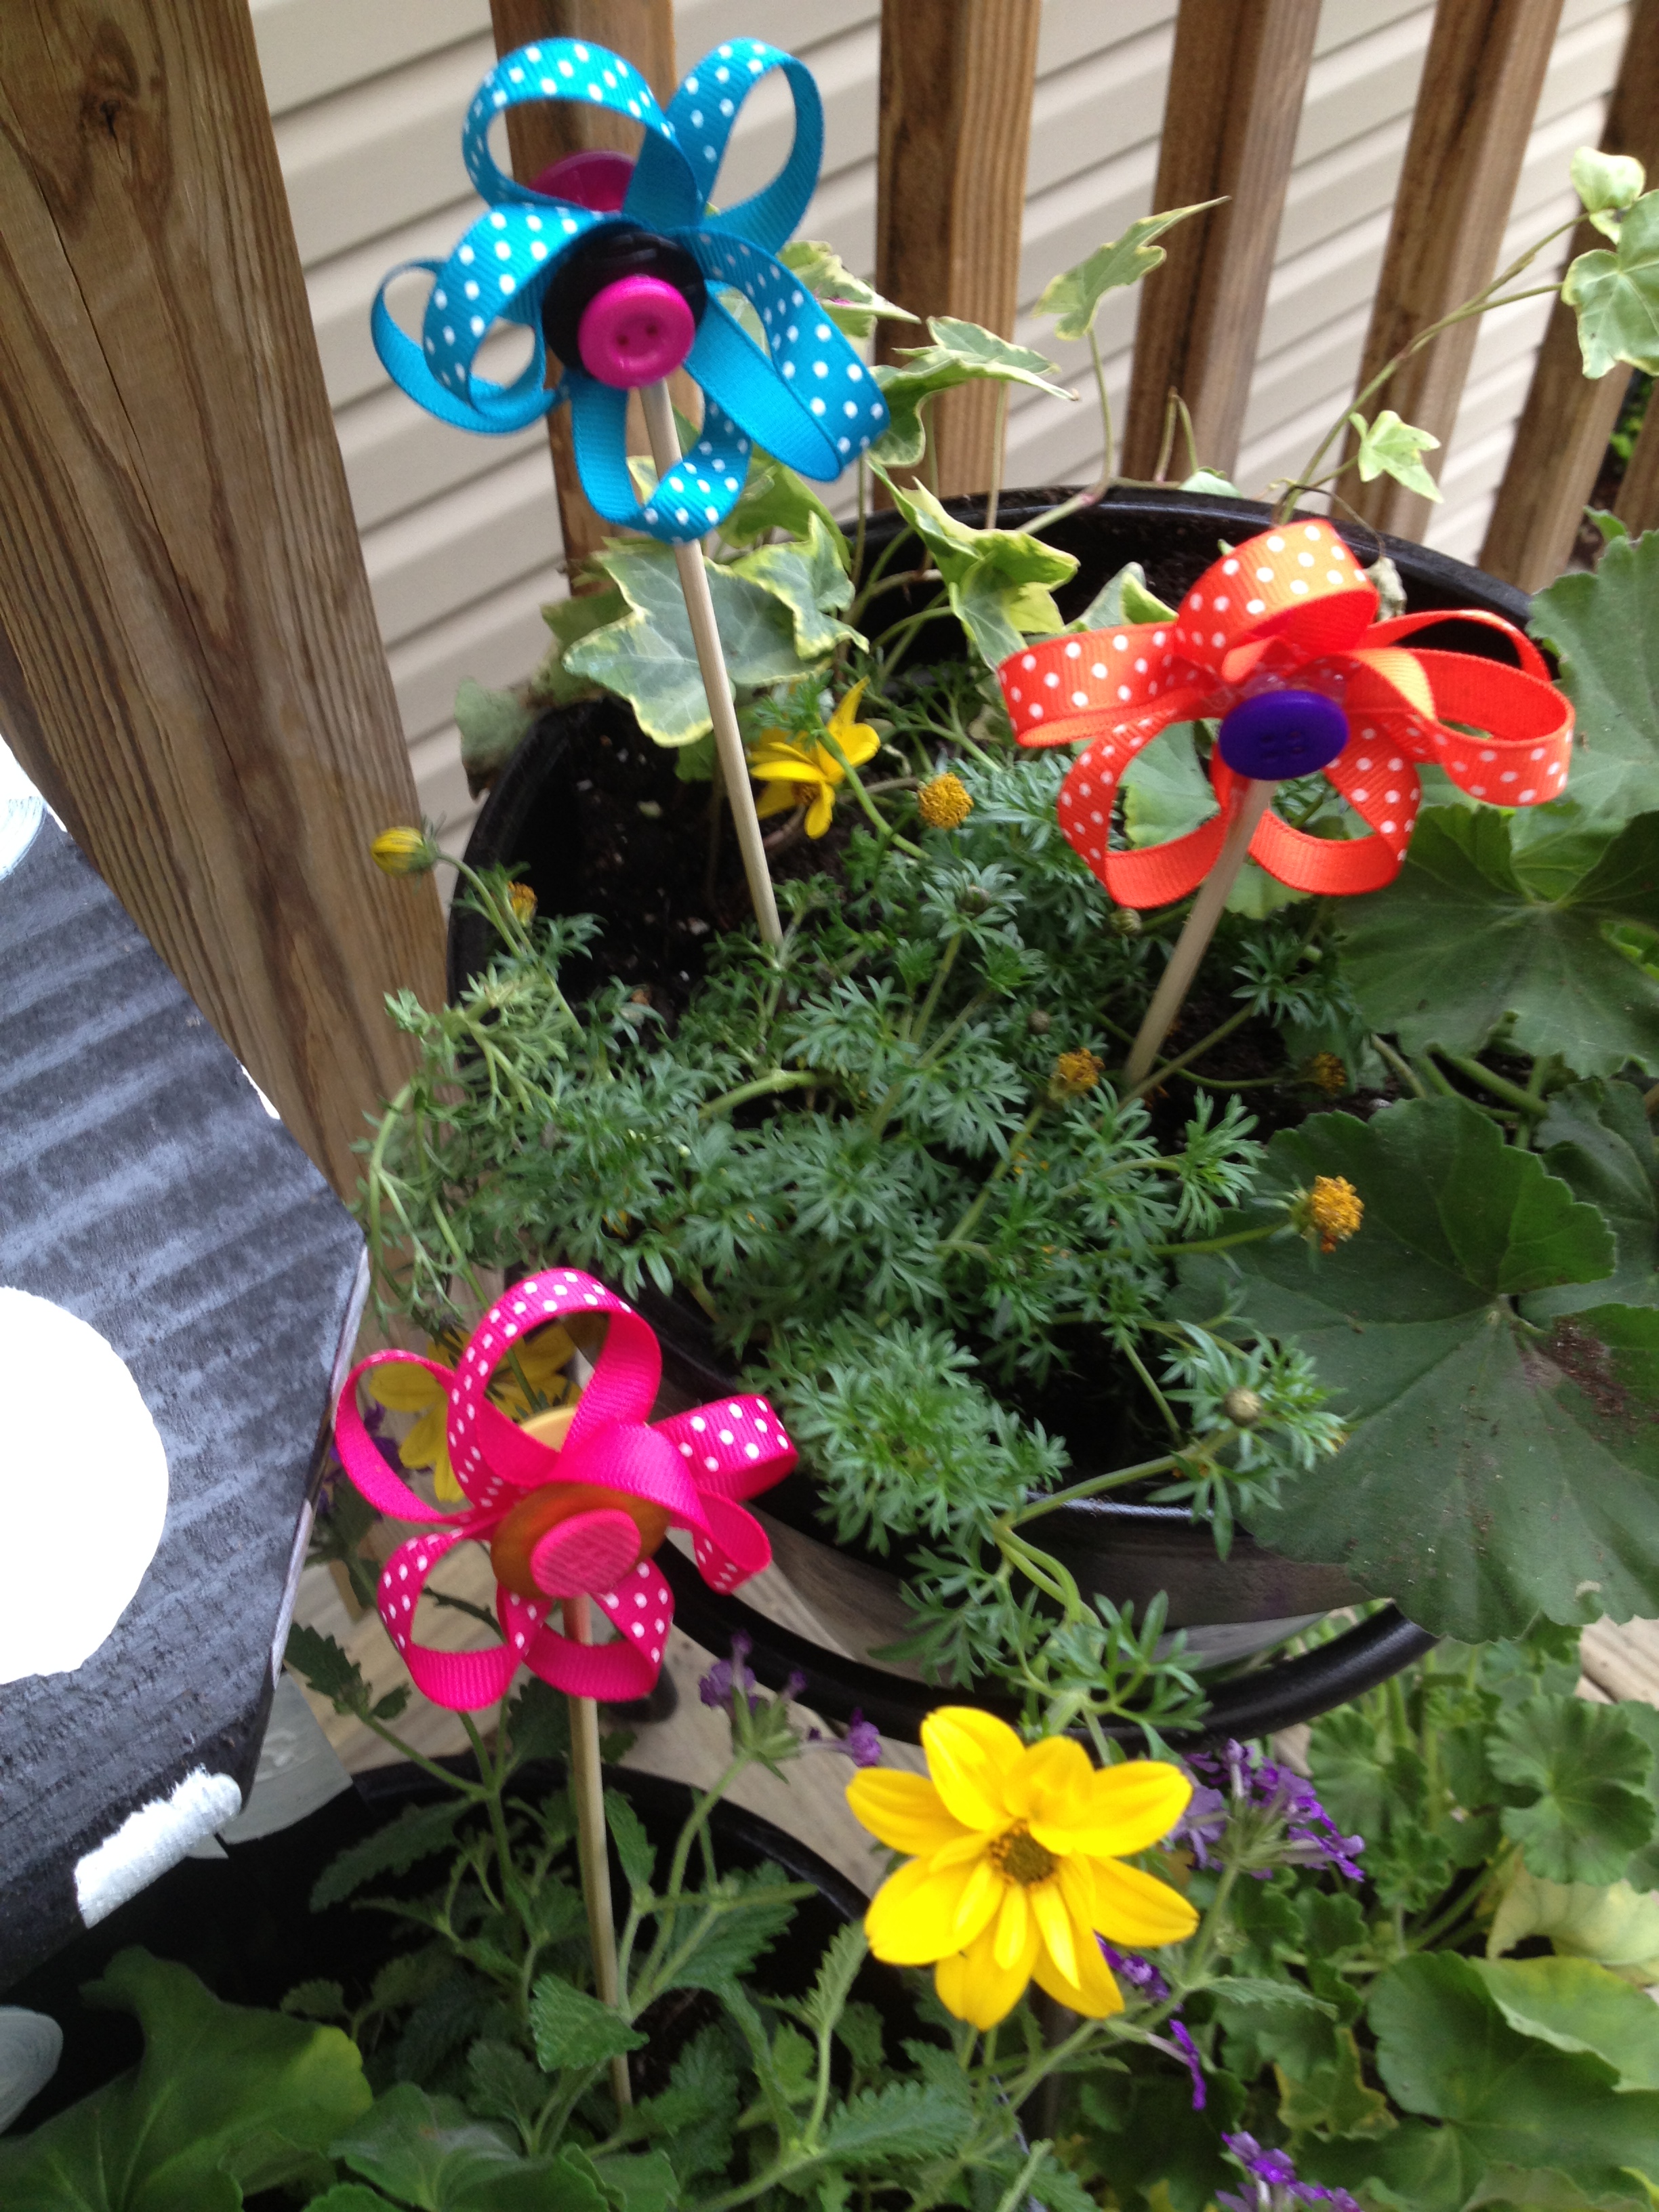
I think the Button Bumblebee makes a very  cute decoration for a plant or a gift tag for some yummy local honey.

Happy Buzzing Around and Creating Button Fun!

1

styrofoam button ornament

styrofoam button ornament

A styrofoam button ornament – This quick craft project is bright and cheery and EASY PEASY! It is great for a kids craft on a rainy day, scout activity or for a girls night in.

Materials to make a styrofoam button ornament:

  • Styrofoam ball (the bigger it is, the longer it will take and the more buttons you will need),
  • Button  orange pink green
  • Straight pins with white pearly ball ends
  • Ribbon.

Directions to make a styrofoam button ornament:

1.  Using a Styrofoam ball in the size of your choice, cut a piece of ribbon 10 inches long and tie a bow in the middle.  Attach both ends of the ribbon to the ball with a straight pins.

2. Place your first button on the ends of the ribbon.  Secure it following step 3.

3.  Place the buttons on the surface of the styrofoam.  Use a straight pin to hold the button in place.  (If you want you can also use HOLD THE FOAM glue to hold them in place)  Use multiple colors of the round buttons and the push pins to cover the entire surface.

If you would like to create multiple  Styrofoam ball ornaments,  you can find them sold in bags and separately at your local craft store.  They are most often found in the floral isle.  I am sure you can order them on line too.

DSCN4077

0

Wire Heart Hanger

Wire heart hangers can be made quickly and I am going to show you how.  This week the quick-to-make and adorable craft is something you can use for Valentines Day next week or any other day that you want to spread some love.
Wire heart hanger


Materials for Wire heart hanger :

  • skinny bendable wire
  • buttons
  • ribbon

Directions to make wire heart hanger:

  1. Cut a piece of bendable wire 10 inches long.
  2. Put one end of the wire through a button, slide it  about an inch in and wrap  the wire around the button.
  3. Add another button about a half inch from the first by putting the wire through one hole of the button and out another.
  4. Fill the wire up using these two methods, twisting and bending as you like and then shape it into a heart.
  5. Add ribbon to make a hanger.

Happy Creating and Lots of Love!

0

Powered by WordPress. Designed by WooThemes