Header

Tag Archives | Valentine

Make a Geo Heart Valentine Card for Someone Special!

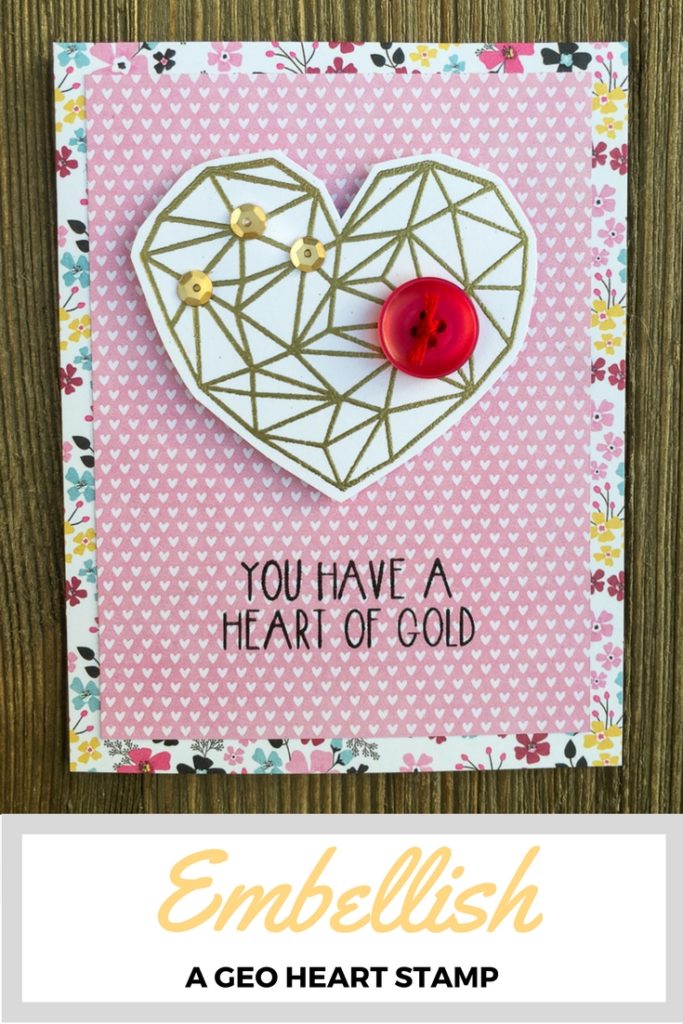
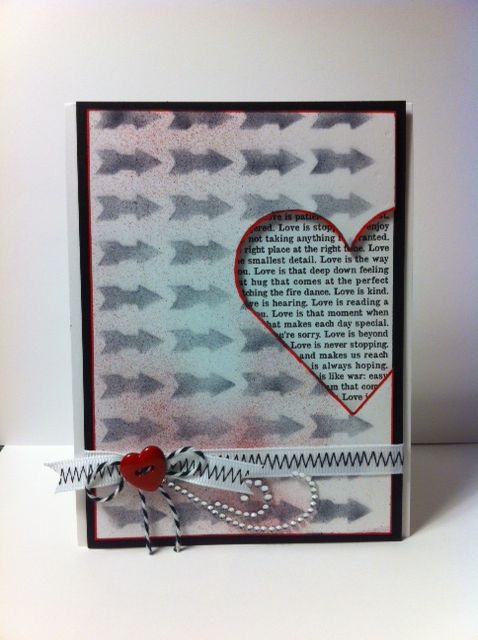
Are you feeling the love? It’s time to start thinking Valentine’s Day! This geo heart valentine card is trendy, fun, and best of all…oh so easy to make!

Make a golden geo heart Valentine card for someone special!

Supplies:

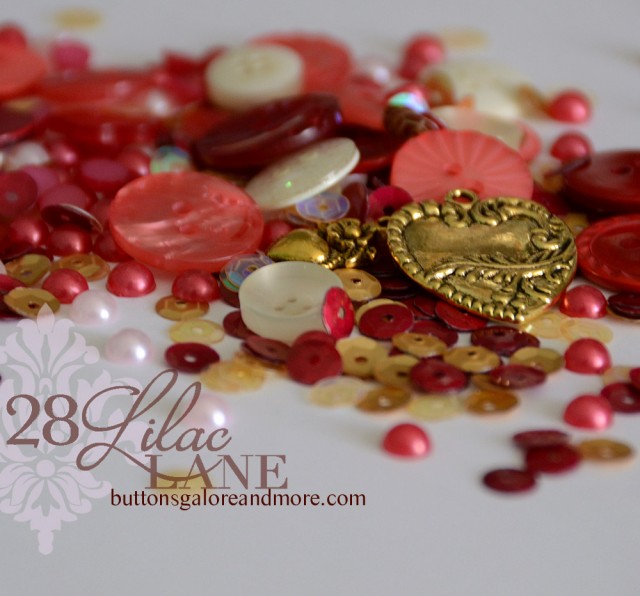
  • 28 Lilac Lane “Love Story” embellishment kit
  • Simple Stories “Love & Adore” 6×6 paper pad
  • white smooth cardstock
  • white card base
  • Neat & Tangled “Heart of Gold” stamp set
  • Ranger Tim Holtz Distress Ink in Black Soot & Embossing
  • Ranger Super Fine Detail Gold Embossing Powder
  • embroidery floss
  • foam adhesive

Valentine’s Day is the perfect time to use our 28 Lilac Lane embellishment kit called “Love Story”. This kit is packed full of beautiful rose and white buttons and seed beads, along with gold and rose pearls and sequins. For those extra-special greetings, there’s even a few charms and some ribbon, too. Love Story will make loads of valentines for the ones you love!

28-lilac-lane-love-story

One of my favorite things to do with my 28 Lilac Lane embellishments is to customize my stamps with them. I love stamps, but it can be difficult to create different looks using the same image repeatedly to get value out of it. Adding buttons, sequins, pearls, or beads over an image can help make it look like an entirely new design!

This clean and simple geo heart valentine card design is very quick and easy to make with only a few basic supplies. It truly is only a ten minute project! Or it can turn into twenty minutes if your cat gets up on your work table and knocks over your entire container of beautiful “Love Story” embellishments so you have to clean them up. (Let’s not talk about how I know that…)

How to make a geo heart valentine card:

To make this geo heart valentine card, I cut my floral paper to the size of the card front. Then I glued it down to the blank white card base. I cut the heart print paper a half inch smaller each direction, and glued it centered on top of the floral paper. To finish preparing the card base, I stamped the sentiment in black ink on the center of the bottom of the card front.

I stamped the geo heart design on white paper with embossing ink, and then heat embossed it with gold embossing powder. I used fine pointed scissors to cut out the heart. Don’t worry if your hand cutting skills aren’t the best! Since this heart doesn’t have super smooth curves, it’s quite easy to hand cut.

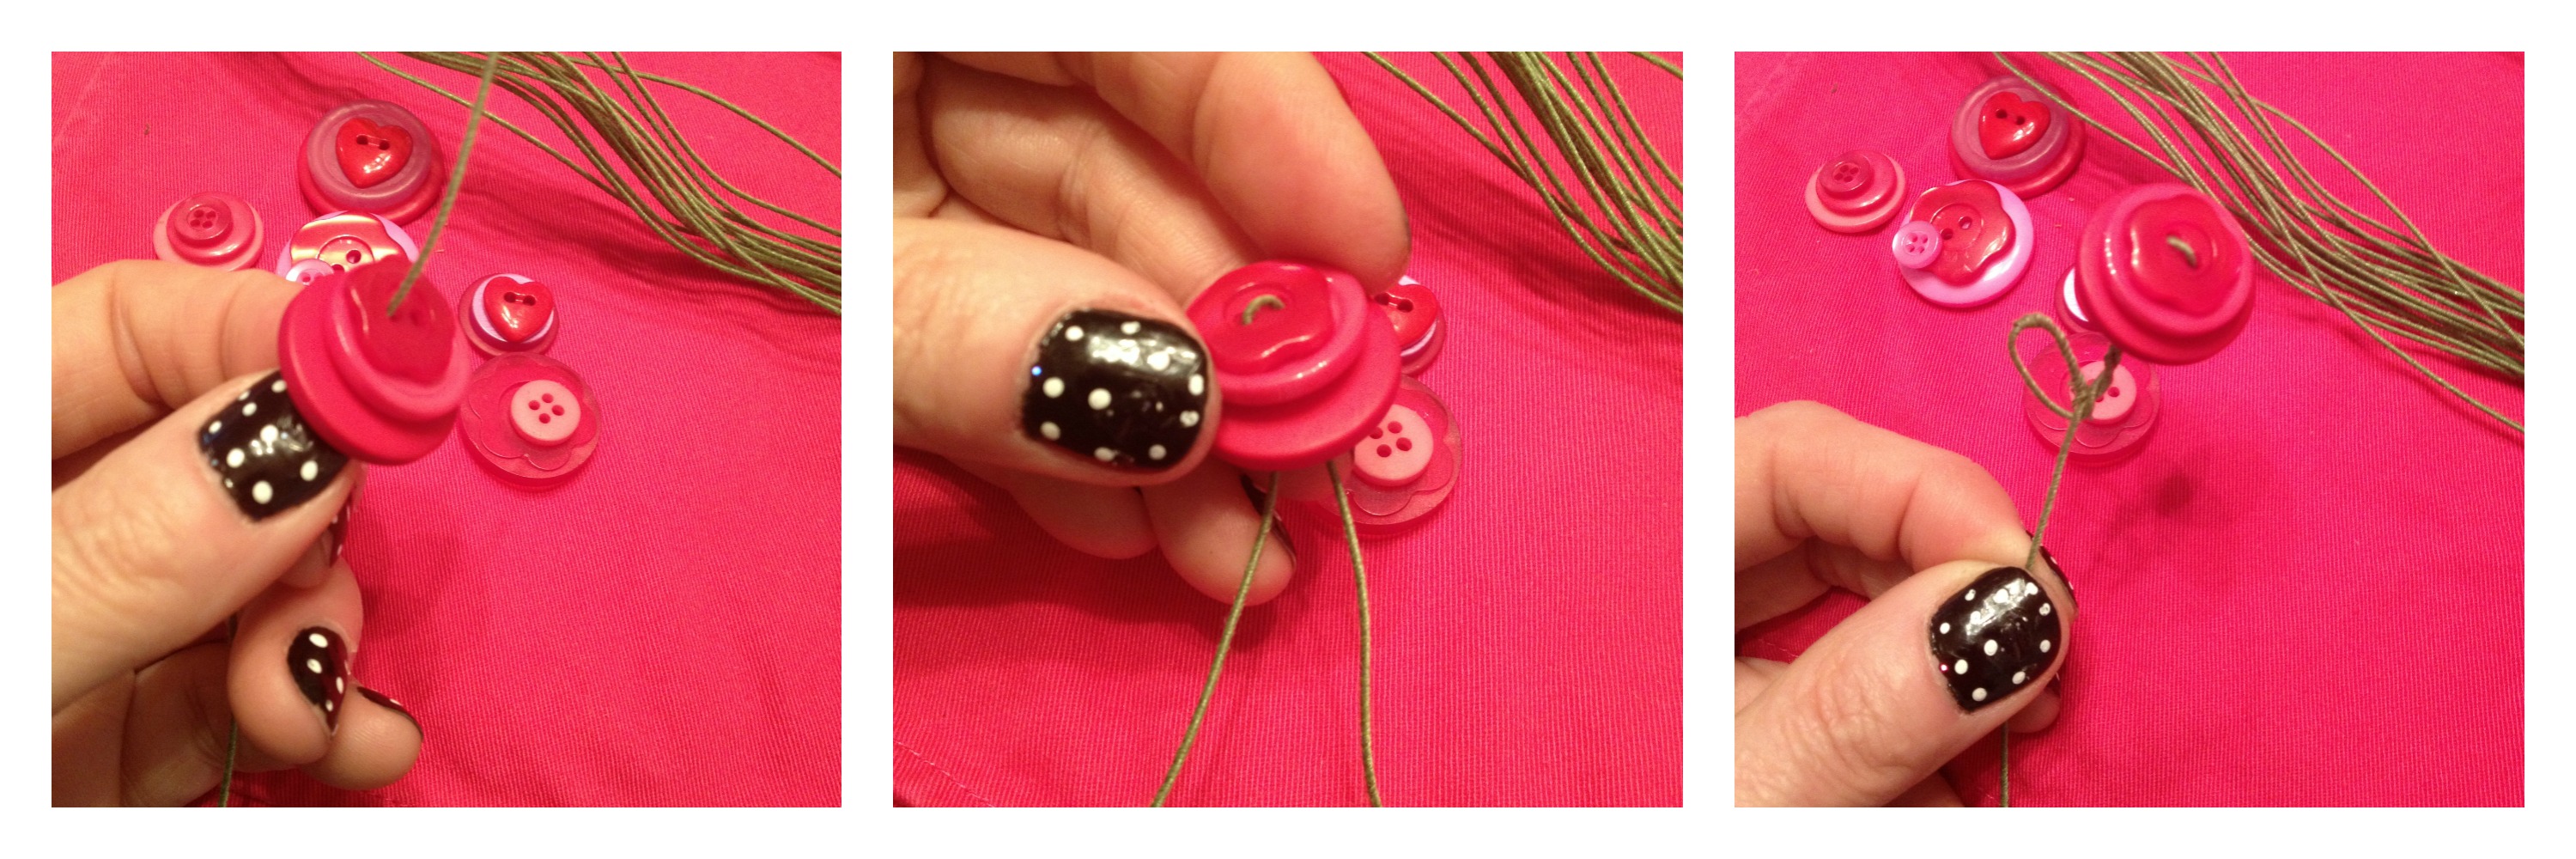
To embellish the heart, I glued a few gold sequins at the intersections of lines in the geo heart. Then I chose a nice big rose button for a big pop of color, and then tied it off with matching embroidery floss before gluing it down. Finally, I used foam dot adhesive to attach the heart to the card front.

embellish a geo heart with 28 Lilac Lane

1

Valentine Gift Wrap Ideas

Here is a quick and fun way to create a Valentines day candy bar wrapper and button it up with love! You can download the free Printable to use or use decorative papers to cover your candy bars then embellish them with Radical Red, Wild White,  Sweet Blush and new Passionate Pink buttons from my Laura Kelly collection.

Valentine Gift Wrap Ideas with FREE Printable

If you want to use the free downloadable printable, you can grab it on my blog here.  There are several fun borders and cut outs that you can chop up and use with the buttons.

MAMPS_PrintablePictureCutUp

Here are a few other ideas of things you can wrap up with paper and buttons to create Valentines.

3Gifts


Supplies for Valentine Valentine Gift Wrap Ideas:


1

Button Flowers For Valentines Day

Sometimes the simple little cute things make the best gifts.  Here is a way to use buttons to create flowers that are fabulous for Valentines Day and only take a few minutes.


#fifteenminutefriday

To make the flowers, you will need buttons (Radical Red and Heart Shaped Ones are my faves for this) and green floral wire.  I used floral wire with a green fabric-like coating.  The first step is to lay out your flowers ahead of time, layering 2-3 buttons in stacks.

ButtonSteps

Feed the floral wire up from the bottom of the stack then back down through the other holes in the buttons then bend the wire to create stems/leaves.

ButtonsSteps2

Once your flowers are complete, there are lots of ways you can use them for Valentines Day.  Here is a fun way.  Twist the wire around a bag of kisses and add a little Valentine message.

Kisses

If you want to see the ways that I used the other flowers made from buttons, you can visit my blog and get some more fabulous ideas.  Click here to hop over there.

Happy Creating Button Valentines Day Flowers,

Laura

0

A Valentines Day Frog To Love

Here is a super quick and easy pattern and project for a Valentines Day frog to love.

Valentines Day Frog

You will need a few supplies and can follow these directions or make up your own to suit your style.  The pattern is simple and friendly.  This is what I recommend:

Materials

Here is how I made it:

Use the patternto cut out the body and eyes from green felt.  The body should be cut on the fold of the felt and the eyes are only 1 piece.  Pin the eyes to the top inside of the frog body as shown.  Stitch the frog body closed with green embroidery floss, leaving and opening to stuff if with filling.  Then finish sewing closed.  Use the pattern to cut out the white part of the eyes from Phoomph and white felt then adhere them to the frog prince and glue on the buttons.  Using black embroidery floss, stitch a mouth.  Cut a heart from red felt to make his kissy lips.  Cut out four legs and attach them with either tacky glue or stitching.

Steps

Whoever said you had to kiss a lot of frogs to find a prince clearly did not know that you could just make one.

Happy Stitching, Glueing and Buttoning Up Some Valentines Day Fun,

Laura

0

Buttons and Doodles For Valentines Day

It’s a new year, 2014!   That means we are that much closer to Valentines Day which I love, as in love.  Here are a few quick and easy ways to doodle up some button Valentine art that can be used on gift cards, Valentines or gift bags (or anything else you might dream up).

BGM_DoodleBags

To create these masterpieces, you will need a marker ( I used a Sharpie of course) to do your doodling and Glue Dots to stick your buttons to your creations.  The button colors that I used are all from my Laura Kelly collection, out of the assorted color mix.  I did the doodling first (suggested are included here) and then attached the buttons and added tulle and twine and other ways make them each unique.

SuppliesIdeas

My favorite of these three is the one with the flowers, so much so that I created a variation of it for my blog too.  I love the Viewtainer filled with candy for Valentines Day a lot too.  After the candy is gobbled up, the container is the perfect storage place for BUTTONS!

DoodleValentineStrip

Which one do you like best?  Do you want to create some of these fun doodle and button Valentines?

PrizeViewtainerValentine

If so, then this prize might just be perfect for you.  Enter to win a bright red Viewtainer filled with these goodies.

a Rafflecopter giveaway

Happy Creating Love,

Laura

PS: To follow me on Facebook, click here.

1

Sunday Card Tutorial: Make a Window Card

Window Cards are cool.  Have you ever wanted to make a window card? Have you ever had to make a BUNCH and wanted them all to be the same?

Window Card by Allie Gower


Materials to make Window card:

I have a Grand Calibur from Spellbinders, but this should work in any machine. You need repositionable tape – I use Tissue Tape – as you can see! You will also need two post it notes.

Start by making an outline of your card, so that you know where to place each card front.

Making the Perfect Cut


You also want to tape down the die. You will cut through the tape – no worries, just put tape all over it and really rub it down. Then, you are ready to die cut your panels. Use some post it notes to hold it in place. These will really stick after running through your machine, but won’t leave any residue.

Making the Perfect Cut


Rinse. Lather. Repeat. Just kidding. Keep going, just line up your panel  and secure with post – its. Before you know it, you’ll have a nice neat stack of card fronts.

Making the Perfect Cut


My card fronts were created with an arrow stencil. This is a new stencil that Donna Salazar designed for Want2Scrap. It worked great. I used my trust post its to hold it in place, and airbrushed some black ink. Afterwards, I sprayed on a little red ink, and outlined the card.

I finished the card off with ribbon, a Red Heart Button and some twine, and a rhinestone flourish.

Behind the opening is some cardstock. I raised up the card front with some dimensional adhesive. The card front is matted on black, and then adhered to the card base.

If you have to make several cards, or even just one – this easy technique will help you get it right – the first time, and every time.

Buttons Galore Supplies Used to Make the Window Card:


Additional Supplies Used to Make the Window Card:

  • Cardstock – My Favorite Things Replenishments
  • Patterned Paper – Canvas Corp.
  • Stencil and Flourish – Want2Scrap
  • Die – Classic Heart from Spellbinders
  • Ink and Airbrush System – Copic
  • Ribbon – American Crafts
  • Twine – Doodlebug Design

Would you like me to send this card to you? I will be sending it to one lucky winner.

Simply leave a comment and Pin this card!


Thanks for joining me, I’ll be back next Sunday with a fun Card Making Tutorial for you featuring, of course, fabulous BUTTONS!


Sunday Card Making: Make an OWL LOVE YOU Valentine Card

Do you like puns?  There is nothing cuter than OWL LOVE. I think this card would work well for Valentine’s Day, or any day with the simple HELLO!

This card is not difficult, but it’s got a little cutting and some die cutting and punching.

I started with Spellbinders Labels 20 and cut two green shapes and embossed them. I though these worked well for bushy foliage. I also die cut a branch from the Spellbinders BUGS set, and I also embossed it and added some ink for added contrast.

I stamped the Owl with some Crystal Blue ink from Close To My Heart – the owl is a Stamp of the Week from Unity Stamp Company. I have a love for owls, and some of my close friends call me Owlie – it’s even the name of my character on the Wii. It’s okay to laugh! I fussy cut the owl – not as hard as SOME shapes. I doodled around his feet and gave him some eyelashes with a Copic multiliner. I stencilled on his nose – I stamped a second owl and cut out the nose. I colored and outlined. An owl can be blue and sit in a tree, but a blue nose – never! I added some metal brads for his eyes.

I punched a heart using a Fiskars punch. The paper is from Canvas Corp and has all kinds of love words on it. I added a Red Heart Button. I tied a little bow with some Doodlebug Design Twine. At the bottom, I stamped “hello” from the same stamp set. I colored in the heart with a Copic Marker and added some Turquoise Rhinestones from Want2Scrap.

I did a little rounding at the bottom of the card and on the sentiment.

That’s it!

I hope you will love this card.


Hello by Allie Gower

Buttons Galore Supplies used to make the OWL LOVE YOU Card:

Additional supplies used to make the OWL LOVE YOU Card:

  • Cardstock – My Favorite Things Replenishments
  • Stamps – Unity Stamp Company (Stamp of the Week Program)
  • Dies – Spellbinders Labels 20 and Bugs
  • Punches – Scalloped Heart and Corner Punch from Fiskars
  • Twine – Doodlebug Design
  • Ink – Close To My Heart and Copic
  • Bling – Want2Scrap

Do you want this OWL to love you forever?

I will send him to a lucky winner.

Leave a comment and PIN him. I know, you were going to do that anyway. Good luck and I’ll see you all next week.

Sunday Card Making: A Valentine that Holds a Gift Card

Are you giving a Gift Card to your Valentine this year? Gift cards are great, but they rarely come in a cute package. Am I right?

This is easy peasy. You will be ready to present those gift cards in style, for every occasion.

Ready? Here we go!

Valentine for Gift Card


I’ve mad a standard card. A2 – 4.25 x 5.5 – inside though, I added a flap. Above, I’ve stamped and cut and matted, and added a row of glorious Buttons in Laura Kelly Walters fabulously bright colors. Easy peasy, right?

I like to stamp a lot of images and keep them in a baggy so when I’m bored, yes, like that ever happens. What I mean is when I have time, I can sit down and color. Then, when I need a card, I already have images ready to go. This cute set of stringing hearts is from the Unity Stamp Company’s Kit of the Month. I stamped with Tuxedo Black Memento ink from Tsukineko/Imagine Crafts and colored with a few Copic Markers.

Shall we head inside?

Below, I added the flap. I stamped and fussy cut my hot cup of steamy cocoa and the sweet sentiment sentiment. Inside the flap, I stick on my cards with a Glue Dot. If you prefer, you can tape up the sides and make a pocket.


Valentine Gift Card Flap


Buttons Galore and More Supplies Used to Make This Valentine Gift Card:

Additional Supplies Used to Make This Valentine Gift Card:

  • Cardstock – My Favorite Things Replenishments
  • Ink – Tsukineko Memento in Tuxedo Black, Copic Markers
  • Stamps – Unity Stamp Company Kit of the Month Set.


I hope you enjoyed this EASY PEASY Gift Card lesson.

This card could be for you! Leave a comment and Pin the card and a lucky winner will be chosen.

Join me again next week – hope you like OWLS!


4

Wire Heart Hanger

Wire heart hangers can be made quickly and I am going to show you how.  This week the quick-to-make and adorable craft is something you can use for Valentines Day next week or any other day that you want to spread some love.
Wire heart hanger


Materials for Wire heart hanger :

  • skinny bendable wire
  • buttons
  • ribbon

Directions to make wire heart hanger:

  1. Cut a piece of bendable wire 10 inches long.
  2. Put one end of the wire through a button, slide it  about an inch in and wrap  the wire around the button.
  3. Add another button about a half inch from the first by putting the wire through one hole of the button and out another.
  4. Fill the wire up using these two methods, twisting and bending as you like and then shape it into a heart.
  5. Add ribbon to make a hanger.

Happy Creating and Lots of Love!

0

Sweet Valentine hearts with little buttons and BIG Love!

Sweet sweet Valentine hearts!  Little buttons are so fun to work with.  This project is so simple and so adorable that it is a Valentines Day must –do!

Directions to make sweet Valentine heart:

Using sharp fabric scissors, cut felt hearts measuring approximately 2 inches wide and 2 inches tall.

sweet valentine heart buttons

I like Kunon felt because it is thick and soft.  Stack several buttons on each felt heart and sew through the holes from top to bottom and back up through to the top.  Tie a knot on top of the button stack to secure the buttons.  For a more colorful effect, use different colored floss from the top button in the stack.

These sassy little button/felt hearts make a great addition to any valentine treat.  You can use them in many fun ways including a decoration on a treat box or bag.  To adhere them to your surface of choice, choose the glue that works the best for that surface.  I recommend Aleene’s Tacky Glue for most crafting projects that work with felt.

Valentine Felt Buttons Pkg

If you really love stitching, you can turn a piece of felt into an envelope with a few quick stitches up each side and add a felt heart button stack to close up a love letter with a special touch.  I added ribbon to mine too!  You can also add one to a little clothespin and attach to a Valentine’s Day Treat!  This pretzel treat is super yummy.  You can get the recipe on Laura’s Inklings.
Felt Button Heart BG

Materials needed sweet Valentine heart:

Red, Pink and White Buttons (Laura Kelly’s Bright Colors), Red, Pink and White Embroidery Floss, Red and Pink Felt, Embroidery Needle and Scissors.

I really hope you enjoy making the sweet valentine heart as much as I did.

1

Powered by WordPress. Designed by WooThemes