Header

Tag Archives | Patriotic Crafts

Make Patriotic Hoop Wall Art with 28 Lilac Lane [free download]

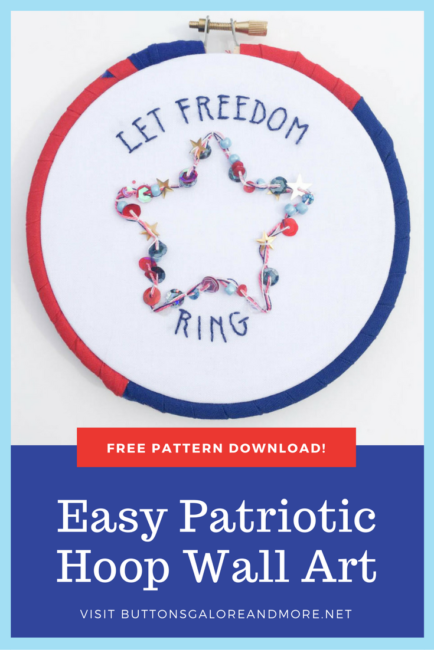
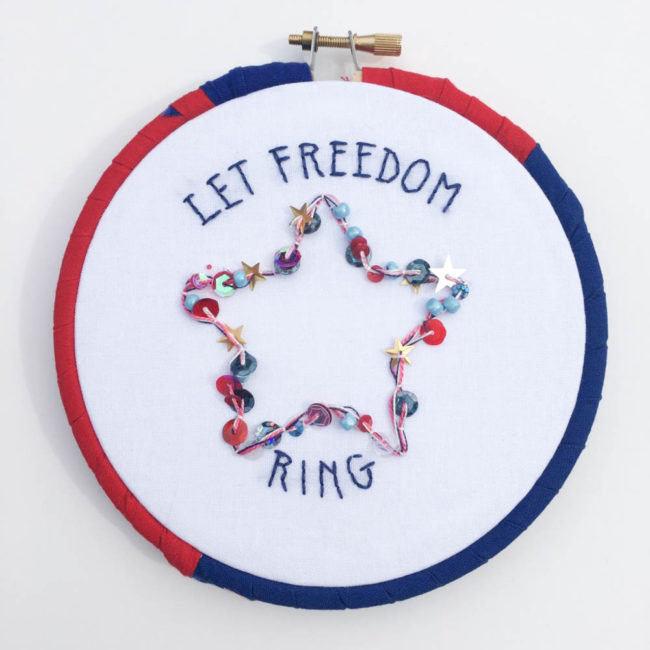
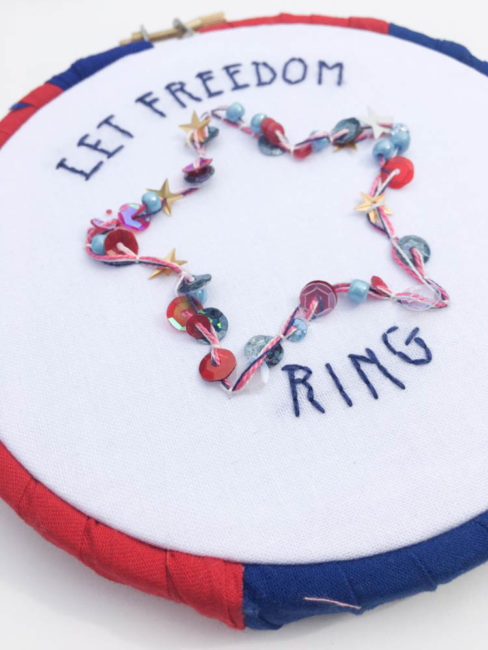
Summer time is kicking up into full gear and July 4th will be here before you know it! Red, white and blue and backyard BBQs are on the horizon! This little patriotic hoop is a great way to get started on those patriotic decorations.

Patriotic Hoop Wall Art

Supplies Needed:

Patriotic Hoop Wall Art

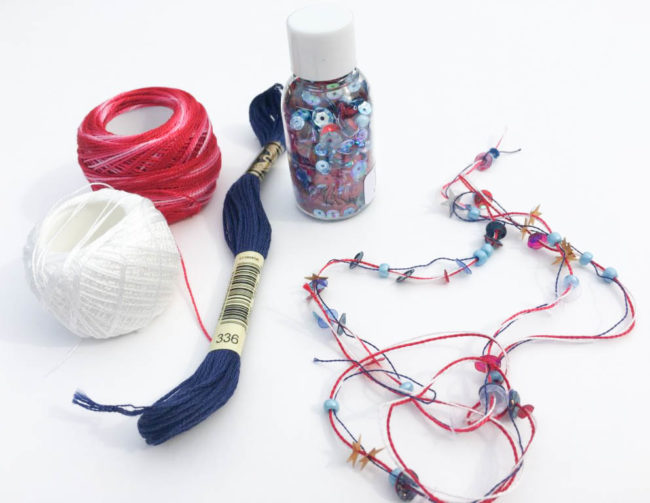
This patriotic hoop features the Stars & Stripes sequin & bead mix that is a mix of larger blue beads, small and large sequins, star sequins and smaller seed beads and glitter. I used the blue beads and sequins to create beaded thread for my hoop.

To get started: take about a yard of each thread; using only 1 strand of the blue divisible floss. Thread all three colored threads onto your needle and pick up different bits of the sequin and beads and push them along down your thread. Continue until you have distributed the beads and sequins sporadically along the thread. They don’t need to be in any sort of order, just make sure that they are spaced out well.

Patriotic Hoop Wall Art

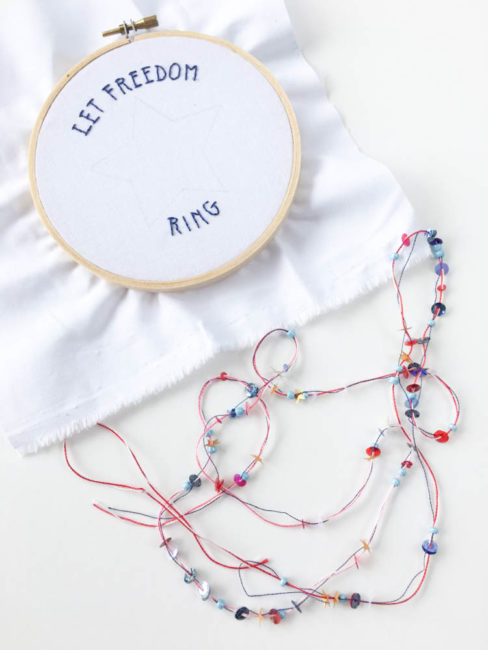
Find a sunny spot and transfer your embroidery pattern onto your fabric. Use three strands of the blue embroidery floss (#336) and backstitch the text. Lay your beaded thread on one of the star lines and with the white cotton perle, use a couching stitch to sew down the beaded thread along the outline of the star. Couch your beaded thread around the star two times.

To finish your hoop you can wrap it in a mix of blue and red fabrics, as I did, or you could even paint the hoop. Set your finished piece inside the hoop, trim your fabric about one inch from the edge of the hoop and hot glue it to the inside.

Patriotic Hoop Wall Art

This patriotic hoop wall art is a great project for even a beginner at embroidery. It’s one that looks like it took hours and advanced skills, but is made up of basic embroidery stitches and techniques and can easily be finished in an afternoon!

patriotic hoop wall art using 28 Lilac Lane sequin & bead mix. Design by Aimee Davis for www.buttonsgaloreandmore.net - easy embroidery project for 4th of July.

1

Frame a Patriotic Rustic Flag for July 4th!

It’s time to make another addition to our holiday frame project! This time, we’re creating a rustic flag insert for the frame that will be perfect for showing your patriotic pride for the 4th of July or the upcoming Olympics!

(For those new to the series, the holiday frame project is a 8″x10″ frame that I’m creating a series of decorative inserts for to celebrate various holidays and occasions. To see previous installments in the series, click here.)

Rustic Flag Frame

Supplies:

The hardest part of making this rustic flag project is…the math! To start, you are going to need to measure the opening on your frame, and decide how much border you want around your frame. Then use the painter’s tape to mask off the edges right up to the area that you want to paint.

Divide the remaining vertical area by 7 to determine the width of the stripes on the flag. Use painter’s tape to mark off the bottom stripe and fill in the stripe with paint. Remove the tape right away. While the stripe dries, determine how wide you want your blue area for the stars (I suggest about 40% of the width). Then mask it off with vertical strip of tape to protect it while you paint the top two red stripes. Measure down from the top to create your first stripe, lay down a piece of painter’s tape to protect the “white” stripe, and fill in the red stripe with paint. Remove the tape immediately after painting.

Letting each stripe dry before painting the next one, continue measuring and masking with tape before taping, until all 4 red stripes are painted.

Holiday Frame Flag in progress

Once all of the red paint is dry, then you can lay down painter’s tape to paint the blue area.

Holiday Frame Flag in progress

Peel the tape up as soon as you are finished painting, while the paint is still wet. Because of the open weave of the burlap, your paint will appear “patchy”, since in some places it will fill in the weave and in some it won’t. This adds to the rustic feeling of the project!

Painted Rustic Flag on Burlap

The final step is to select 13 small to medium sized white buttons from the Patriotic Mix of Button Basics. Arrange them in a random way in the blue area, and use a hot glue gun to attach them to the flag.

Flag buttons close-up

Now you’re all ready to put your flag in your frame and celebrate the 4th of July or cheer on Team USA for the Olympics this summer!

Rustic Flag frame is great home decor for the 4th of July! Created by Nancy Nally for Buttons Galore.

0

Red White and Blue Card

Create a quick Red White and Blue card to celebrate Summer

Hi, it’s Allie here from My Card Party. I had some extra patriotic stickers from Authentique, and lots of patriotic cardstock from DiscountCardstock.com so I thought I’d make a summery card.

Red, White, and Blue

Happy Summer to you!

Red White and Blue Happy Summer to You


Shopping at Buttons Galore is always fun. There are so many categories and styles. My favorite thing to do is Shop by Color. I had so much red, white and blue going on in this card that black buttons seemed to be the way to go. There are many choices in the Black and White category.  I settled on a package of Cookies and Cream Buttons.

Supplies for creating Red White and Blue Card

  • Cookies and Cream Buttons
  • Ivory Smooth Cardstock #80 and Currant Red Cardstock (Discount Cardstock)
  • Bulk Bling (Want2Scrap)
  • Stickers (Authentique, Sentiment – SRM)
  • Twine and Baker’s Floss (Jo-Anne’s Fabrics)

Tools

  • Other – Martha Stewart Butterfly Punch, Martha Stewart Score Board
  • Hot Glue (AdTech)
  • Scissors (Westcott Brand)
  • Desert Sand Ink and Ink Sponge (Tsukineko)

Instructions

  1. Create a card base 4.25 x 11 and fold in half.
  2. Ink edges of card front with Tsukineko Desert Sand Memento Dew Drop.
  3. Tie multiple colors of floss through Cookies and Cream Button.
  4. Add twine and embellishments. Finish with sentiment and bling.

Thanks for joining me today. I’ll see you next Sunday.

See more of my creations at My Card Party.

0

Patriotic Craft – Country Chic Flag

Patriotic Craft – a Country Chic

Hi, Allie here and I’m sharing my Patriotic Craft – a Country Chic Flag. We are your LAST stop on the I Love the USA Blog Hop today. Are you hopping with us for this amazing Patriotic Craft Party? You should arrive here via Jen Hadfield’s Tator Tots & Jello Blog.

 *******If you’re just getting started – be sure to visit Laura Kelly at Laura Kelly Designs so you don’t miss a SINGLE project!  (Also, this is where you enter for the great prizes)******


The designers have worked long and hard to bring you patriotic inspiration.  We have gathered top name designers in their respective fields such as: sewing, scrapbooking, card making and many more.  We hope you can share in their pride and enthusiasm for all that America stands for and the beautiful country that she is.

Patriotic Craft - A Country Chic Flag

I Love the USA Star Pennant Flag Close Up

designed by Allie Gower for Buttons Galore

Patriotic Craft – a Country Chic Flag

Materials needed:


I’ve used lots of Patriotic Buttons along with Laura Kelly’s Beautiful America Fabric. (click the links to purchase) We really appreciate you hopping with us today.  Are you inspired to create something patriotic?

If so please share your projects with us on our Facebook page or on Pinterest or even Twitter using hashtags #ilovetheusabloghop  #craftpatriotic #laurakellyart    


Four more days left of the I LOVE THE USA BLOG HOP… so, keep hopping. Don’t forget to share your crafts too.  We really do love seeing what you all create. Comments are always welcome.  We all like a little love now and then, right?  From all of us at Buttons Galore and More, we wish you a creative, happy and safe  Flag Day and 4th of July too! Keep crafting!!!

To enter the I love the USA BLOG HOP, enter the -> a Rafflecopter giveaway 

20

Patriotic Button Card

Let’s make another easy Patriotic Button Card.

This is simply stickers and a cluster of Patriotic buttons. I used hot glue which allows me to put buttons where I want, and cluster them together. I finished off the card with some simple doodling.

Let the kids loose with buttons and stickers, and have them make some cards for friends and neighbors.

Patriotic Button Card

Supplies

  • Buttons – Patriotic
  • Stickers – Authentique
  • Cardstock – Discount Cardstock
  • Twine, Embroidery Thread
  • Adhesive – Hot Glue by Adtech
  • Copic Multiliner

How to Make a Patriotic Button Card

  1. Create a card base 4.25 x 11″ and fold in half.
  2. Apply stickers.
  3. Tie twine and embroidery thread to buttons and glue to card.
  4. Doodle edges.


Thanks for joining me today.

See more of my creations at MyCardParty.

0

A Patriotic Craft Party – the I Love the USA Blog Hop

It’s going to be a Patriotic Craft Party of epic proportions…

You’re invited to join us for the I Love the USA Blog Hop!

I Love the USA Patriotic Party Crafts - I Love the USA Blog Hop

 Cupcakes say PARTY! You’re invited to a Patriotic Craft Party!

28 Fabulous Artists – scrapbookers, cardmakers, seamstresses and more joining forces to take your patriotic crafts soaring to new heights. Join our Hostess Artist Laura Kelly Walters and Jen Goode and a parade of sponsors including Laura Kelly “America the Beautiful” General Fabric for Jo-Ann’s Craft Stores, Coats & Clark, Plaid, Fiskars, and Buttons Galore.

A Patriotic Craft Party – the I Love the USA Blog Hop

Check out this ALL STAR Line Up for the Blog Hop!

Our Hostesses

The Button Bevy

And Lots of Honored Guests


Join us!  If you want to follow along with hashtags and share your projects with us on our Facebook, Pinterest or even Twitter use hashtags #ilovetheusabloghop  #craftpatriotic #laurakellyart  


0

Patriotic Bracelet with Buttons and Ribbon

Create a Patriotic Bracelet with Buttons and Ribbon. This could easily be done with the kids in a variety of colors with lots of different buttons.

I’ve knit my ribbon by wrapping it around my fingers. As a child I would sit for hours and make yarn chains and pull them out. I guess I was bored during the summer! If you aren’t familiar with this technique, you could easily braid some ribbons.

It’s fun to find inexpensive craft ideas for the kids during the summer.
Patriotic Bracelet Ideas


Supplies

  • Buttons – Patriotic Value Pack
  • Ribbon – Michael’s
  • Embroidery Thread – Coats & Clark
  • Rhinestones – Want2Scrap Bulk Bling

How to Create a Patriotic Bracelet with Buttons and Ribbon

  1. Knit or braid ribbon, leaving a length at each end to tie on wrist.
  2. Tie a bow with buttons around the bracelet with several strands of embroidery thread.
  3. Hot glue a rhinestone on each bow to hold knots in place.

Thanks for joining me today.

See more of my creations at MyCardParty.

0

Patriotic Scrapbook Layout by Linda Auclair

Linda enjoyed the Collage Trim Kit so much that she couldn’t stop with just the wallhanging! So, she created a layout to share using the same paper collection and leftover buttons from the supply list on the Patriotic Wall Art from last week. She was able to chaperone her youngest daughter’s recent class trip to the NH State House, and took a bazillion photos!

Materials Used –

If you would like to know more about Linda you can read her bio below or check out her blog. I know you will find so much more inspiration there!

About Linda:

Hi! I’m Linda Auclair, and I live in New Hampshire with my husband and daughters, Brigid and Aileen. My son Jonathan is away attending grad school at UPenn this year. I’ve been a papercrafter forever, and in the past decade, I have had the good fortune to work for a variety of companies, such as Fiskars, Creative Imaginations, Epiphany Crafts, and my current Design Team post at Echo Park Paper, as well as a number of online retailers. I have had my work published in magazines and eZines, and have been guest blogger/designer for a number of manufacturers. I am an active blogger, and love to share my designs, along with tips and tricks I have discovered, with my readers at http://elendae.wordpress.com/

3

Powered by WordPress. Designed by WooThemes