Header

Tag Archives | Haberdashery Buttons

Make a Thread Spool Photo Holder with Buttons!

Hi, Connie here with Buttons Galore & More design team sharing a simple and cute (as a button) thread spool photo holder. I will be using the Buttons Galore “Winter Mist” Haberdashery button mix. The buttons are a beautiful mix of vintage greens, purple, burgundy and light tan.

thread spool photo holders

I created several of these thread spool photo holders using the supplies I had on hand. They can be enhanced many different ways to make them each unique. I wanted the original spool label to remain. I used felt to wrap around the center of the spool adding color to the project. (The spools could also be painted or pattern paper could be used.) The Winter Mist Haberdashery button pack comes with different size buttons and beautifully coordinated. You get a nice mix of color!

thread spool photo holders

Supply list to make thread spool photo holders:

How to make thread spool photo holders:

  1.  Insert large paper clip into spool hole – if it is loose glue it in.
  2.  Measure and cut felt for center of spool. Wrap around the spool and glue.
  3.  Glue buttons and embellishments to front of spool.
  4.  Let dry.

thread spool photo holders

These thread spool photo holders can be used as teacher gifts, personalized place cards, displays for vintage photos, to show off a proud kid moment, and in many more ways. What about holding a favorite recipe? There’s so many ways for using these photo stands.

thread spool photo holders

thread spool photo holders

These thread spool photo holders are fun to make and the kids can join in too. Adding different elements can truly make them a “one of a kind” thinking of you gift. Buttons Galore & More have gorgeous buttons that would be perfect for this project! Thanks for stopping by today!

0

Learning To Sew with Buttons on a Fall Hoop Project

I’ve had the joy of teaching sewing in our community for the past few years to children of all ages. When people discover that I teach sewing to children, the first question they always ask is “what is a good beginner project?” This little hoop project is always my number one go-to project for anyone who has never used a needle and thread and wants to learn to sew. Even better, including buttons in the project ensures that they will also walk away with a great life skill for those days when a button pops off their shirt at the most inopportune time – and you know we’ve all been there!

learn to sew with a fall hoop project

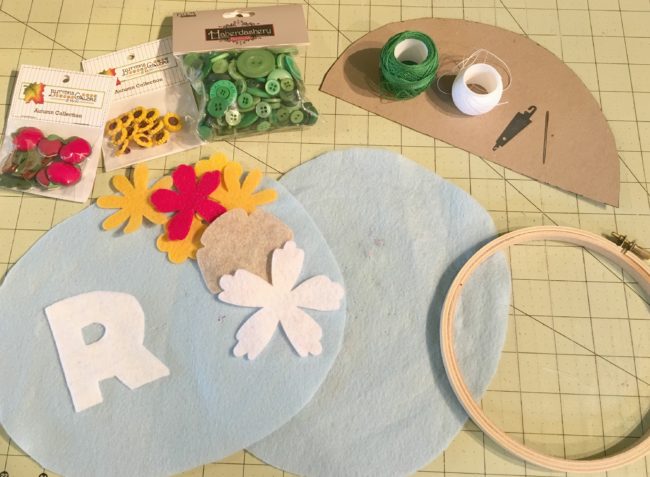
First up, let’s talk supplies. You will need the following to complete the two hoops:

Now that you’ve gathered up all your materials, let’s get started and learn to sew! First, you need to find something to make a roughly 8-inch circle. Find a bowl or something round to trace around and cut your blue felt into two circles.

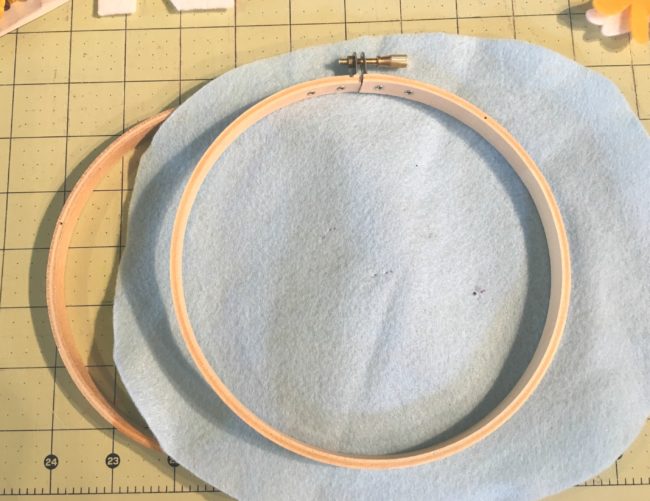
Next up, let’s set them in your embroidery hoops. This is often the most daunting thing for new stitchers, but all you need to do is make an embroidery hoop “sandwich”! Unscrew the bolt just a little and separate the hoops into two parts. Take the part without the bolt and lay it on your workspace. Then lay your blue felt circle on top of the bolt-less hoop and sandwich them all together by setting the hoop with the bolt outside the bottom hoop and the felt. Tighten up the screw and pull on the edges of the felt just a little to make everything tight.

learn to sew fall hoop project

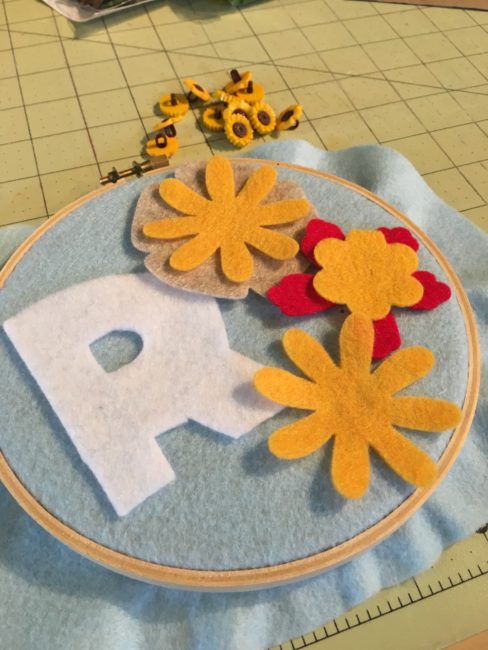
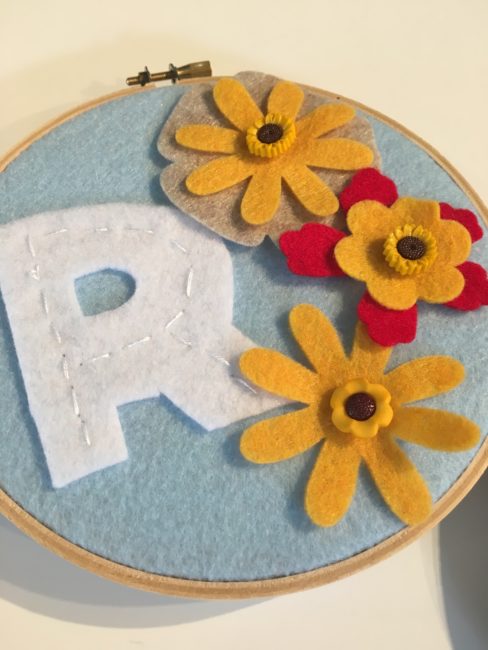
Now, print out the pattern page with your initial on it and cut out the correct initial for you. Use the paper pattern to cut out your initial with whatever color felt you would like. Then gather up your Sunflower buttons, the felt flowers, and your initial. Lay them all out on top of the hoop in whatever design you like best.

learn to sew fall hoop project

Now it’s time to stitch down your initial. Take your white thread and needle. Thread your needle and make sure to put a knot on the end! We are going to stitch down our initial with a running stitch.

learn to sew fall hoop project

learn to sew fall hoop project

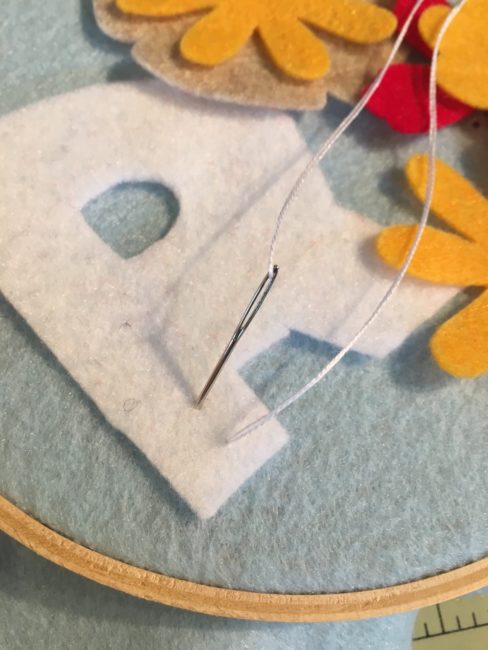
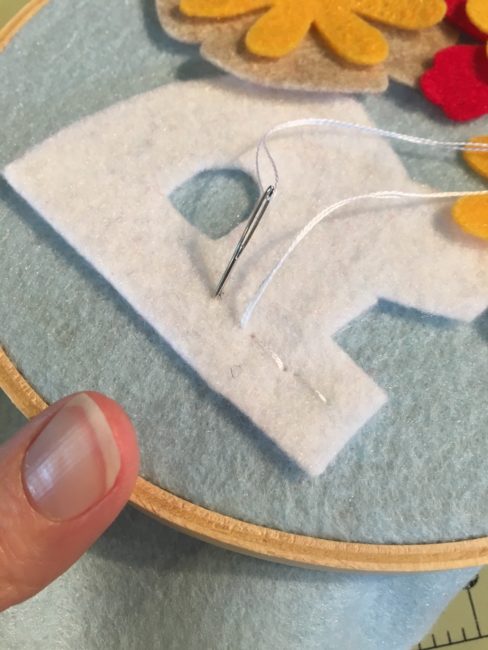
First up, bring your needle up from the bottom and pull gently until your knot stops the thread. Don’t pull too hard or you will pull your knot all the way through! Then bring your needle back down about a pinky finger width from where you started and pull the thread all the way through. Then bring your needle back up and then down as you stitch along the middle of your initial letter. Always remember to “follow your thread” and stitch with a rhythm of up and down.

learn to sew fall hoop project

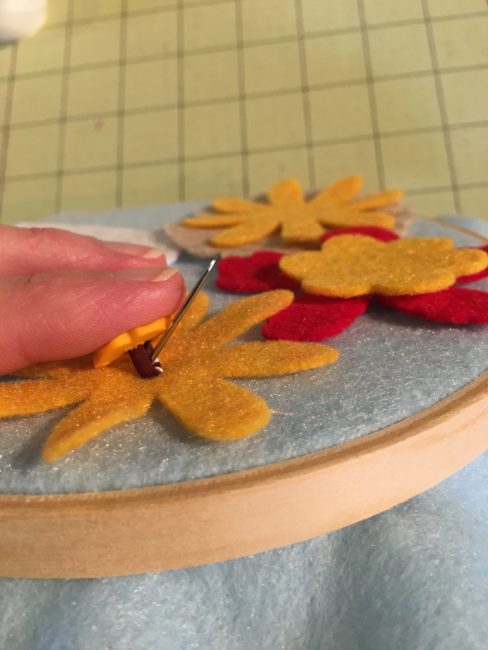
Lastly, grab your Sunflower buttons and lay them on top of your felt flowers. These are shank style buttons and can be a little more tricky for little hands to sew. Start out by bringing your needle up from the bottom and pull it all the way through till the knot stops you. Then take your button shank and thread it onto the needle and thread. Let it fall all the way down and then put your needle back through the top of the felt, pulling the button tight to the felt as you pull the thread from underneath. Continue to sew the button on a few more times and then move down to the next flower.

To finish off my hoops, I like to take a hot glue gun and glue the rim of extra felt around to the inside of the back. But sometimes I like to leave it open like a little ruffle fringe! Your choice!

Put a pretty ribbon through the top and you are done!

learn to sew fall hoop project

To make the tree, gather up a scrap of brown felt and cut out a little tree trunk. You have the option of sewing down your tree trunk with a running stitch or you can use some craft glue to glue it down.

learn to sew fall hoop project

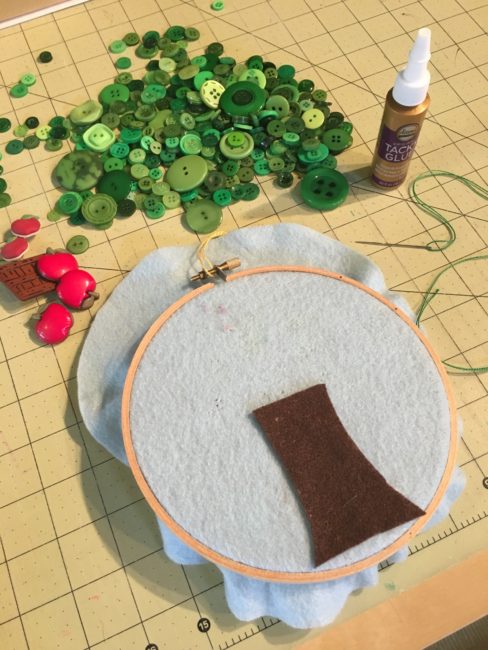
After gluing down the trunk, grab your green thread, a needle and the Apple Pickin buttons from the pack and stitch those down in random spots above your tree trunk. These are the same shank style as the sunflowers. Next, pour out your bag of Green Haberdashery buttons and choosing those that fit best, stitch down green buttons around your apples to fill in the tree.

learn to sew fall hoop project

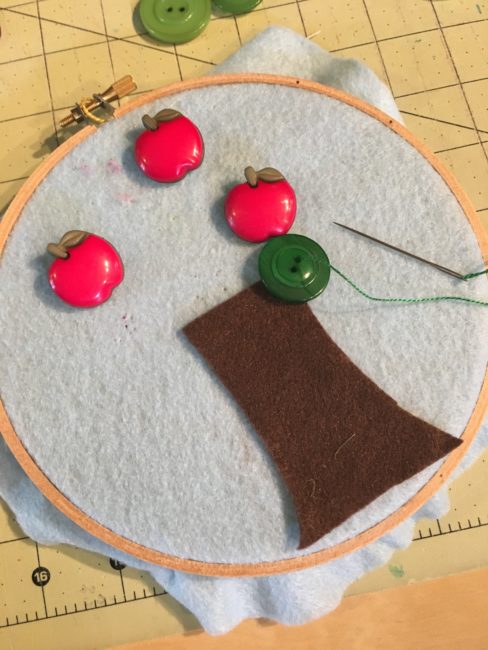
After you sew all the button “leaves” down, take your apple basket and apples and stitch those down near the bottom of the tree. Add a little ribbon for hanging, finish the back by gluing the felt edge to the back or leave it like a ruffle.

learn to sew fall hoop project

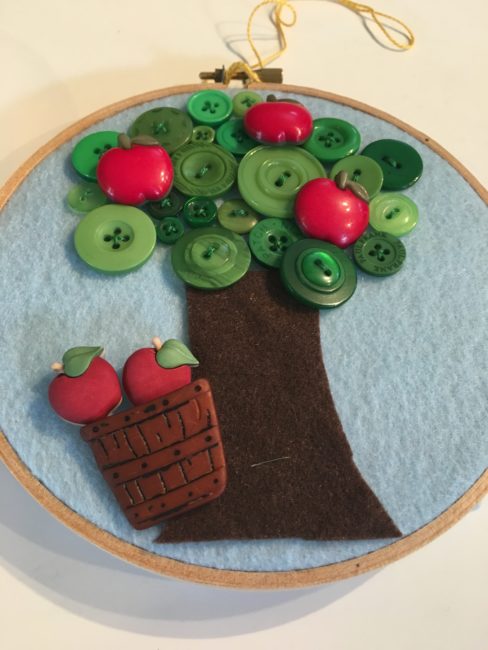
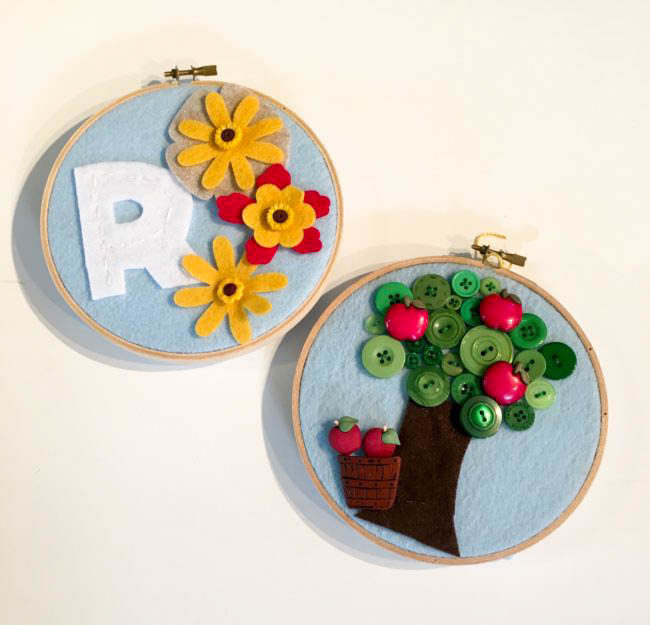
And there you go, two little Fall inspired hoops – these are perfect projects for beginning stitchers!

learn to sew fall hoop project


SaveSave

1

It’s Time for a Back to School Photo Frame!

Today we are joined by blogger/designer/instructor/author May Flaum, from www.craftwithmay.com, who is sharing a back to school project with us. – editor

When I have supplies not being used, I try to envision a purpose and make it useful. In this case I had a small 5×7 chalkboard that has been sitting around way too long. Since I don’t see myself using it as intended, I decided to convert it into a photo frame for this school picture.

May Flaum button frame

This is one of my favorite ways to use buttons, and it’s a super quick and easy project too! It will work on any flat wood frame, and I love how it turned out. The less you think about perfect button placement, and the more you just fill the space and enjoy – the better it will turn out!

I worked with the beautiful Vintage Vogue buttons and I really liked how quick and easy they made this project.

Buttons Galore Vintage Vogue buttons

Supplies Needed:

How-to:

1. Paint frame with white paint if desired

2. Apply a liberal amount of liquid adhesive around the wood frame.

May Flaum button frame step 3 3. Start with large buttons, place at random in a few places. Then fill in spaces with medium and small buttons.

May Flaum button frame step 4 4. Add more adhesive as needed, place buttons until all spaces are full. If there are any awkward gaps, layer a button on top! Once satisfied, set aside and let it dry fully before adding a photo.

May Flaum button frame close up

To learn more about May Flaum, see more of her projects or take one of her online classes, visit www.craftwithmay.com

0

Button Ladybug Valentine

Holly here from Ribbons & Glue sharing with you a 3D Button Ladybug Valentine that is sure to make the “Love Bug” come out of you.

Button Ladybug Valentine

I’ve has this wood ladybug for a while now and always thought it would look really cute with Buttons Galore black  Haberdashery Buttons on it.  I finally busted her out of hiding and did just that.

How to make a Button Ladybug Valentine:

Wood Ladybug dyed with RIt Dye

I dyed the Ladybug Cherry Red using Rit Dye.

DecoArt painted Ladybug

Then, painted the body of the ladybug with  DecoArt Glamour Dust paint

Ladybug with black buttons

and adhered black Haberdashery Buttons from Buttons Galore.

button ladybug

I hot glued the pretty lil’ Lady on a wood block to make it into a 3D Valentine and added a few embellishments from the Pebbles Inc Yours Truly collection.

Supplies Used to make a Button Ladybug Valentine:

For more Valentine’s Day inspiration check out my blog Ribbons & Glue.

newsignature

Like Me on Facebook!

0

Grandchildren Welcome Sign

Whenever  I visit family, I  like to give them a handmade gift.  This year,  I made the Grandparents (my in-laws) a  Grandchildren Welcome sign embellished with Buttons Galore Haberdashery buttons.


Grandchildren Welcome sign


I cut, sanded, painted, stained and distressed a wood board.  Yes, I did it all myself.   You can view my previous BGM tutorial on how I created the look of my wood board here.

I then used my Silhouette and a cut file from Kolette Hall to cut out the black vinyl lettering.

Grandchildren Welcome sign


To give the Grandchildren Welcome sign a little something extra, I hot glued Haberdashery buttons along the side of the sign, added a big black grosgrain ribbon bow and another Haberdashery button in the middle.


Grandchildren Welcome sign

Supplies used to make Grandchildren Welcome Sign:


newsignatureLike Me on Facebook!

2

Spooky Button Eye Treat Bags


Lots Trick-or-Treaters will visit our house during Halloween and I like to give special treats to a few of my kids friends that come by.   Something special and fun like these Spooky Button Eye Treat Bags.

Kids could easily make these spooky treat bags for there friends too.


BGM ghost bags

How to make Spooky Button Eye Treat Bags


BGM ghost tutorial

  • Use DecoArt  paint and a dry brush technique to paint  the front of your bag.

BGM ghost tutorial 2

  • Adhere Haberdashery Buttons using Mini Glue Dots.
  • Adhere Googly Eyes to center of black button.
  • Use a Sharpie to make a funny face.
  • Fill with yummy treats
  • Fold top of bag over, adhere a piece of  Halloween Washi tape to keep bag closed.


BGMghostbags2


Supplies Used to make Spooky Button Eye Treat Bags:


newsignature

Like Me on Facebook!


2

Shaker Charm with buttons

Today, I’ve got this shaker charm. These are easy to make and can be a wearable memento. I think of my Dad a lot in the Spring, and I  think of a strong man. My dad was quiet, but in his silence, he always had so much to say. He left us in April 1997 after a brave fight with cancer, but he’ll be in my heart, forevermore. My dad let me share his work space to experiment with different crafts. I think he’d really enjoy seeing some of the things I make now. I’d like to share some Button Jewelry ideas with you this month. So, if you like jewelry, you will want to come back each Thursday for a new project.


Shaker Charm


These are very easy to make. This charm is 3×1″. I’m using a Memory Frame, Slide Glass and Capsules from Ranger Ink.

How to make a Shaker Charm

  • Trace patterned paper and card stock to match the size of the glass slides and cut it out. A
  • Add some tissue tape and stickers.
  • Sandwich the decorated paper between two glass slides.
  • Place a variety of small Haberdashery Buttons in the capsule (upside down).
  • Lay the slides on the capsule and carefully slide everything into the Memory Frame.
  • Adorn with token.
  • Remove fasteners from brad and adhere to outside of capsule with a Glue Dot.

There are lots of different items you can place inside the capsule, and equally as many ways to decorate the slides and make this shaker charm a personalized memento. I left the back blank with card stock, but you could easily add a photo. When I’m not wearing charms, I like to hang them around the house – on knobs, lights, etc. My kids even wear them on their hoodies as zipper pulls.


Supplies to make a Shaker Charm

  • Haberdashery Buttons – Buttons Galore
  • Paper and Stickers – Authentique
  • Memory Frame, Glass and Capsule – Ranger
  • Tissue Tape, Token – Tim Holtz
  • Brad – Creative Impressions
  • Adhesive – Glue Dots
  • Jump Ring**, Waxed Cotton – Fire Mountain Gems


I hope you’re inspired to grab some buttons and create a memory. I’ll be back next Thursday with some more Button Jewelry.


**Note – you will need pliers to open and shut the jump ring.


2

Powered by WordPress. Designed by WooThemes