Header

Tag Archives | graduation

A Crazy Bird Told Me…It’s Graduation Time!

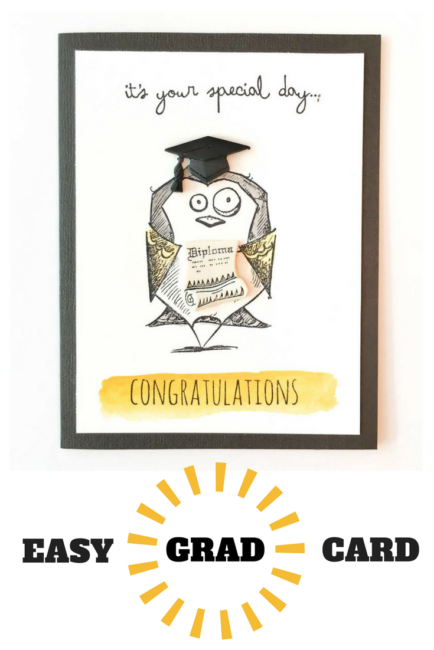
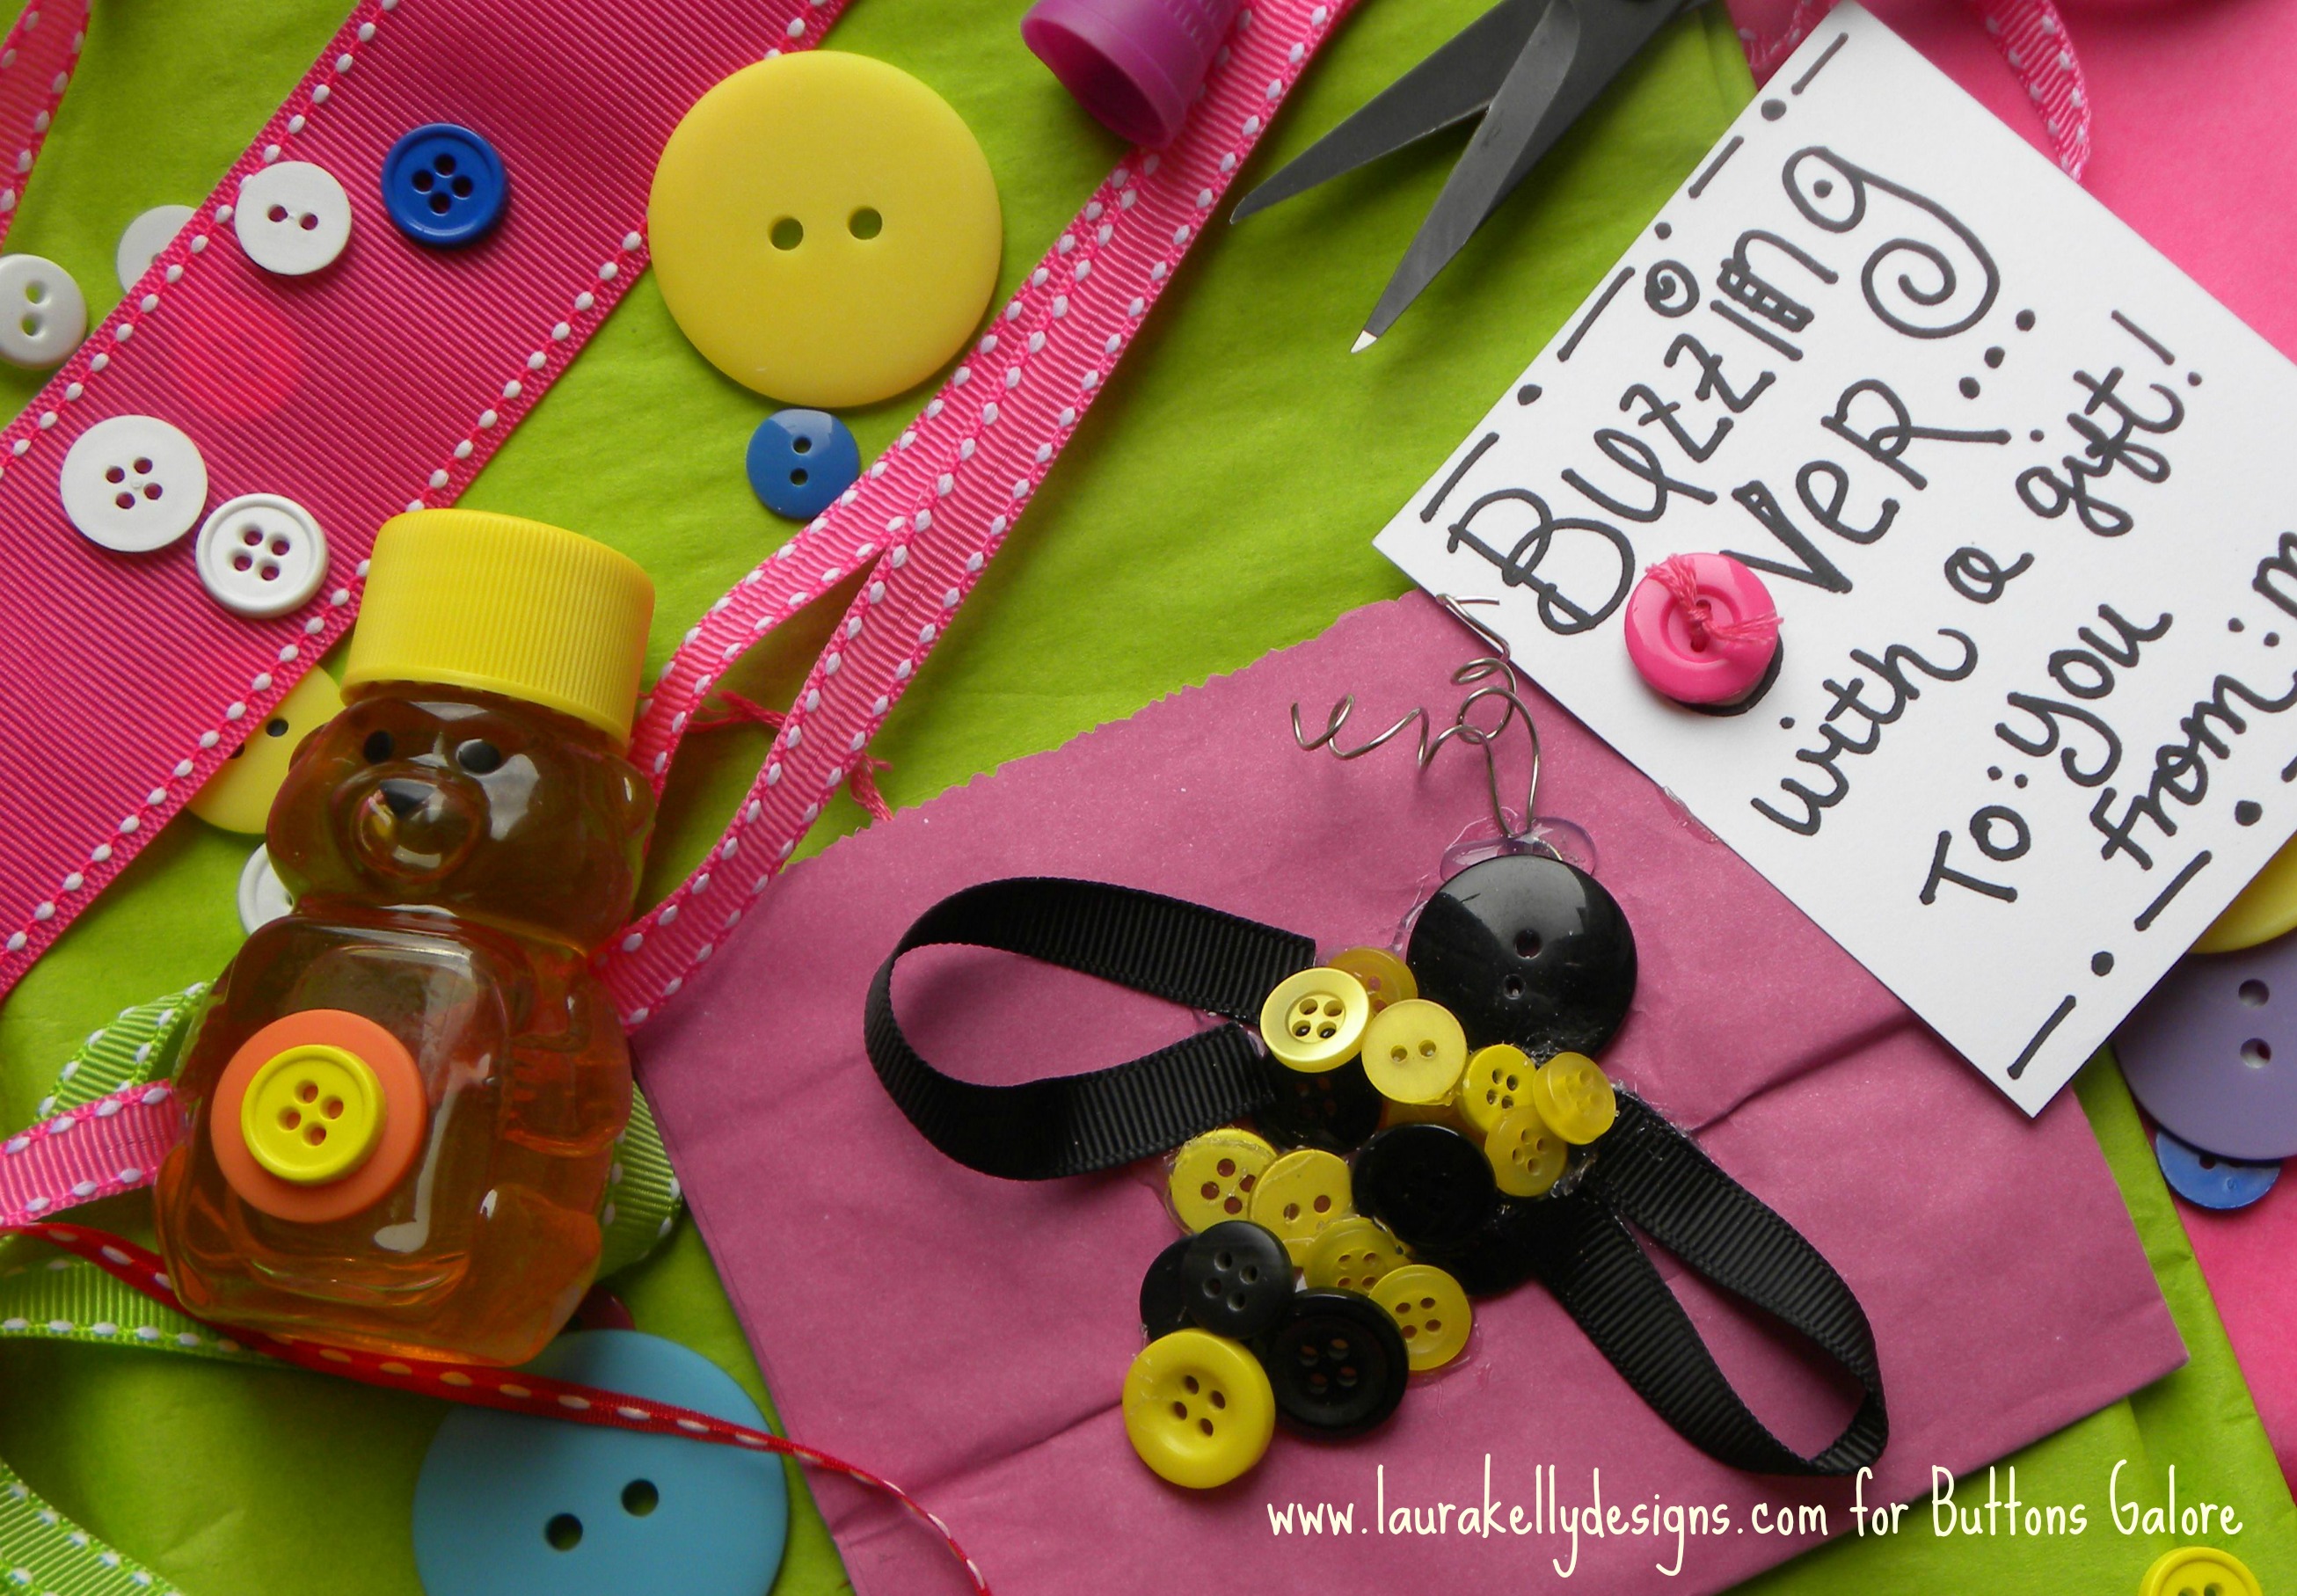
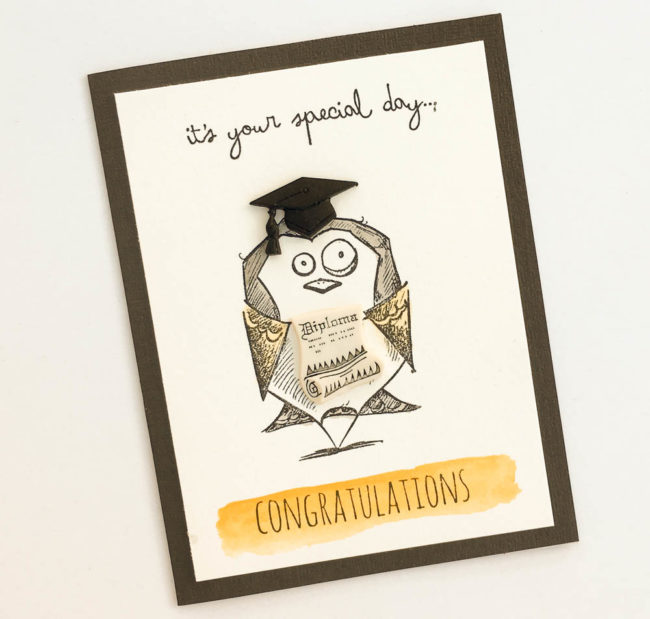
Graduation season is here! Just because the big day is a formal affair, that doesn’t mean that the cards can’t have some fun. Our 3D buttons dress up this bird so he’s ready for the walk across the stage!

Crazy Bird Graduation Card

Supplies Needed:

This card uses our 3D buttons as accessories for some crazy stamped characters! This character gets a whole new dimension – literally – with a fun button graduation hat and his own button diploma.

To make this card, select a card base in one of the graduate’s school colors. (You’ll want to choose the darker of the two school colors for the card base.)

Cut a 3.75″ by 5″ piece of watercolor cardstock and adhere it centered on the cardfront. Use watercolors in the lighter of the two school colors to paint a block along the bottom of the paper. Stamp the sentiments at the top and bottom in waterproof ink, and then stamp the bird in the middle.

Crazy Bird Grad Card close-up

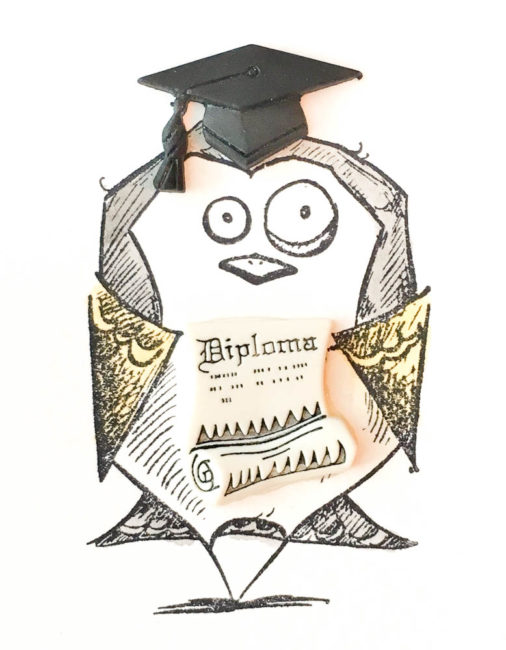
Use the watercolors to paint in the bird. (I used the yellow school color for the bird’s wings to hold the diploma.) Then cut the shanks off of the graduation hat and diploma buttons, and adhere them to your bird.

This bird will put a smile on the face of your special grad while bringing your good wishes to them! Happy Graduation, Class of 2017!

Easy Graduation Card using 3D buttons from www.buttonsgaloreandmore.com

0

Say Congratulations with a Button Balloon Card!

This time of year means graduations, and all sorts of other occasions for which congratulations are in order. Running out of time to make cards for all of them? Just dive into your Button Bonanza bags and dig out some of the largest buttons to make balloons!

Congratulations Button Balloon Card

Supplies:

I used the “primary” Button Bonanza bag for this but the beauty of a simple design like this is that you could use any color scheme that works for your occasion. For a graduation or sports-related occasion, use school colors! Recent graduate got a new job? Make your balloons the recipient’s favorite colors or their new employer’s corporate colors. With our huge palette of Button Bonanza colors, the options are endless!

Button Balloon Card

To make this card, select the buttons that you want to use and arrange them to make a row of “balloons”. Before you glue them down, nudge them up just slightly to get a pen in to draw your “string” lines and bows. Then use clear drying adhesive like PPA Matte Adhesive to glue the buttons down so that it looks like the strings are tied to their bottoms.

For the final step, get out a handwritten sentiment stamp (or a pen if you are braver than I am) and use black ink to stamp the sentiment in the lower right corner of the card front.

Button Balloon Card

Send some button balloons to someone special!

0

You are the Bee’s Knees!

It it that busy springtime season of gift giving again…Teacher Appreciation, Mothers Day, Graduation!!!  Here is a cute bee that you can make out of buttons to decorate any gift and and let someone know that you think they are the bee’s knees!

Button Bee

To make the bee, you will need to use hot glue to hold all of the pieces together.  I added ribbon for wings and wire for antennas.  Super cute, really easy and lots of fun!

Button Bee 2

I chose my Sunshine Yellow and Black Beauty buttons from the Laura Kelly mix offered as a Bright Mix of Colors.  You can buy them individually bagged by colors too.

ButtonsLK

Happy Gift Giving,

Laura

0

Sew a Button and Burlap Pencil Case

Sew a button and burlap pencil case for the guy in your life. It’s just right for the high school graduate who is heading off to college in the Fall or it would also be a great Father’s Day gift.

button and burlap Button & Burlap Pencil Case II

I know I’m always trying to keep my husband organized and he’s always looking for pens and pencils. Do you think there’s any chance a button and burlap pencil case is going to help?  Naw, I don’t think so either, but it’s fun to make!

Supplies needed for a button and burlap pencil case

  • Burlap cut to 7.5″  x 8″
  • Velcro (R) Brand Sew-On Fasteners cut to 7″ long
  • Ribbon cut to a length of 8″
  • Buttons – the Haberdashery line has some great masculine colors!
  • Basic sewing supplies

Instructions for sewing a button and burlap pencil case

1. Sew ribbon onto burlap parallel to the side that measures 8″. Place it approximately 1.25″ from the edge of the burlap.

Ribbon Onto Burlap

2. Sew the Velcro (R) Brand fasteners onto the 7.5″ inch sides. (These will be perpendicular to the ribbon.) I like to leave the top of the case without finishing it. The rough edge gives it a more masculine touch!

Sew on Fasteners

3. Fold in half, right sides facing (the side that you sewed the ribbon onto is the “right” side). The 7.5″ edges should be even. Press with an iron.

4.  Sew the short sides closed.

Sew Closed

5. Clip the corners and turn the bag right side out.

Sew On Button

6. Sew buttons onto ribbon. I know it’s a bit harder to sew them on when the case is sewn, but it’s best to leave this step for last, so you can see the best placement for them.

www.laurabraydesigns.com

1

Graduation Card

Here’s a simple Graduation Card inspired by Dr. Seuss.

graduation card

Congratulations!
Today is your day,
You’re off to Great Places!
You’re off and away!


I hope this simple card inspires you!

I cut my letters on the Silhouette. The font is called Apple Gothic, and came with my Mac. The size is 72 point.

I used Glue Dots to adhere these adorable Buttons.

Supplies used to make Graduation Card:

1

Quick and Simple Money Holder Envelope

Money Holder Envelopes can only mean one thing … It’s Graduation time again and maybe you want to show those special Grads some love.   Cash love that is!

Here’s how to make a quick and simple money holder envelope that can be stuffed full of congrats cash and gift cards for that starving ex-student.

Money Holder Envelope for Buttons Galore and More

Money Holder for the Graduate


IMG_4607

Supplies Needed to Make a Money Holder:


IMG_4610

8 x 7 inch piece of cardstock scored at 2″ and 6″

congrats4

1. Trim out sentiment and adhere. 2. Peel off backing and sprinkle glitter 3. Remove excess glitter. 4. Done!

 Use Clearsnap Design Adhesives

To quickly add a Congratulations sentiment on to the money holder,  I used these convenient  Design Adhesives from Clear Snap.  Really neat product and sooo easy to use!

IMG_4669

You could use any choice of adhesive to make your money holder but I choose to stitch mine together using a sewing machine, added a clear Velcro coin to keep the envelope closed (don’t wanna lose any of that congrats cash now) and added a ribbon bow and  Haberdashery button for some sophistication.

I love how the black and white stitching contrast together,  adds a ‘lil sophistication on the envelope.  Now that they’re a graduate,  they should be a little more sophisticated, right?

newsignature

Like Me on Facebook!

1

Shine On! (A Card of Encouragement)

Recently, my son participated in an Invention Convention- and when he didn’t win a prize, I could tell he took it kinda hard. So I whipped up this little card to encourage him to “Shine On” and not get discouraged.

To make it, I cut 2 circles from Core’Dinations cardstock Gemstones Collection and mounted them at the top of the card. Then I applied a Wacky Tacky Tape star shape and sprinkled silver microbeads on top. I finished it off with a white button threaded with a little embroidery floss, held in place with a mini Glue Dot.

To create the texture at the bottom, I “stacked” three rows of patterned and solid ribbon from the Retro Blue Button & Ribbons collection and adhered it with Zip Dry. I made a text block and brackets with more cardstock and used my trusty Dymo Label Maker to create the words.  A few more coordinating buttons finished off my design.

You could also use the sentiment, "Reach High."

I really love this color scheme, and it would be lovely for either a boy or a girl…and could easily stand in for a graduation card, too! Now wouldn’t it be a lovely card to send to someone who needs a little “pick-me-up?”

To see another card using another color scheme and a flower/ladybug motif, visit my blog, CraftTestDummies.com.

0

Reach for the buttons!

And you’ll land amongst the stars!

This time of year, many fine folks are spreading their wings and moving up in the world. This project goes out to all of the graduates out there, large and SMALL!

Here’s a hybrid home dec/scrapbook memorabilia collection to get your buttons sparkling for attention – check out my quickie forgotten fine art canvas makeover!

Old canvas was stripped from this frame.  The frame was then painted with acrylic paint.

Once dry, crackle medium was applied and spread, generously.  Let dry, at least until tacky.

Spread 2nd color over crackle medium.   (The 2nd coat doesn’t have to be perfect.) Let dry for several hours.

Once dry, attach chicken wire to the backside with strong staple gun.

Drape fabric onto the back of chicken wire and attach.

Cut stars from card stock and embellish with baker’s twine embellished buttons from Buttons Galore & More.

Lay out pictures and embellishments, memorabilia, etc.

Secure with glue, tape or clips, as desired.

Give the grad in your world a big hug and blessings to REACH FOR THE STARS!

3

Powered by WordPress. Designed by WooThemes