Header

Tag Archives | accessories

Hit the Beach with Summer Fun Crafty Sunglasses

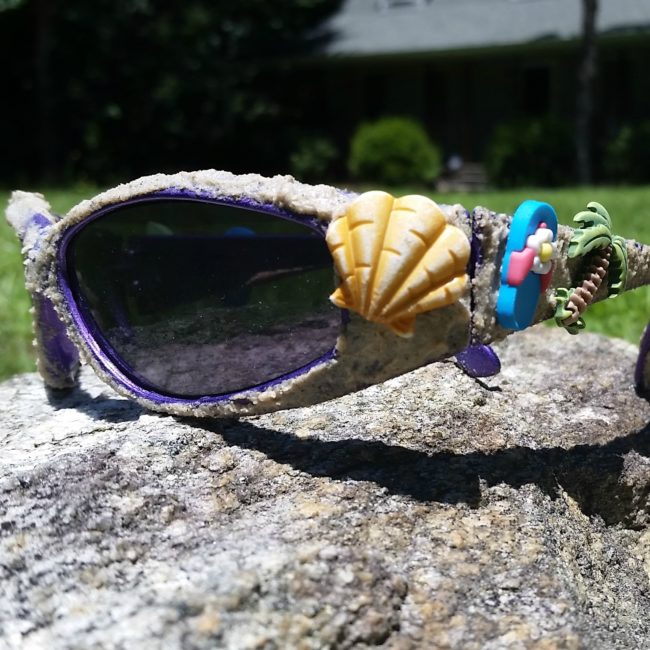
Hi! It’s Lorrie here, visiting the Buttons Galore blog today! Buttons are a fun and easy way to embellish your summer fashion, but have you thought of adding them to your accessories? Who cares if you can’t make it to the beach this summer? Bring the beach to you every single day with these super cute crafty sunglasses (that look and feel like they are covered in sand) featuring summer-themed buttons from Buttons Galore!
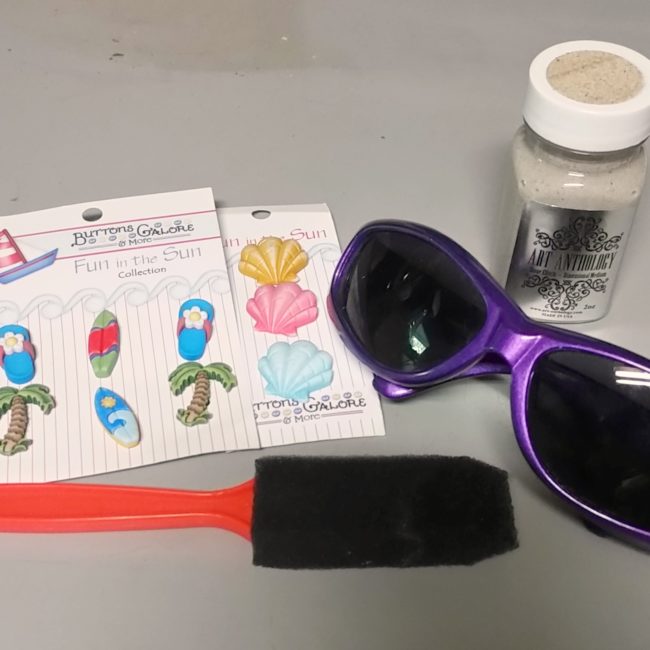
beach crafty sunglasses

Materials Needed:

  • sunglasses
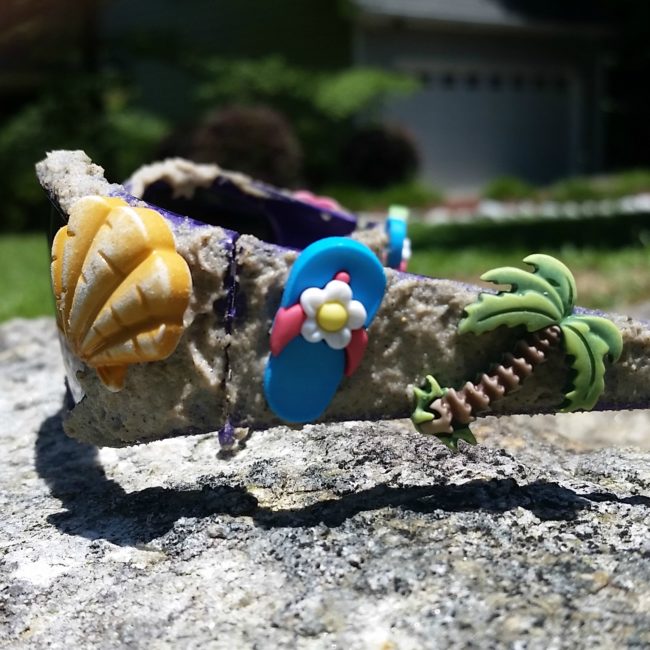
  • Paradise Found and Fan Shells buttons from Buttons Galore
  • Stone Effects Dimensional Paint from Art Anthology in “Sandstone”
  • foam brush or palette tool
  • hot glue gun
  • button shank remover

beach crafty sunglasses supplies

How to:

  1. Apply Stone Effects paint to the sunglasses with a foam brush or palette tool. If you are using a foam brush, apply the paint with a tapping motion to get better coverage and to add even more dimension.beach crafty sunglasses in progress
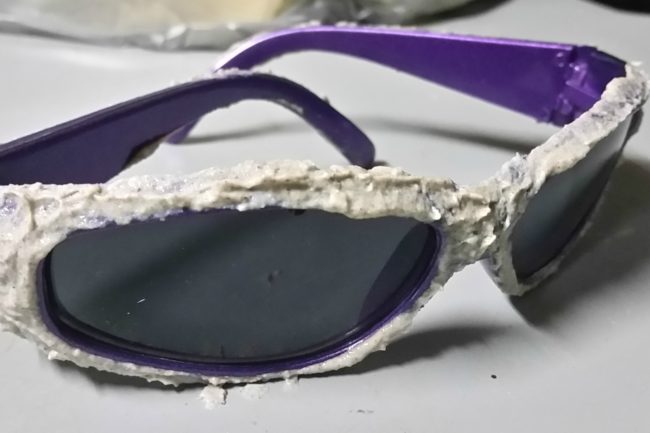
  2. While the paint on your sunglasses is drying, remove the shanks from the buttons using a button shank remover.
  3. Once the dimensional paint is dry, place the buttons onto the sunglass frames and the ear pieces by attaching them with hot glue.

beach crafty sunglasses

Now you are ready to hit the beach with your summer fun crafty sunglasses – whether the “beach” is your local pool or an expanse of tropical sand!

0

Make a Headband with Buttons & Ribbon

So, what can you do with some button basics and a pretty piece of ribbon?

buttons and ribbonAdd a plain satin headband to the mix and you can make a headband that is fabulously perfect just for the young style diva in your life!

Button Headband headshot

Making this headband is easy! Here’s what you need:

  • Satin Headband
  • Satin Ribbon
  • Buttons Galore Button Basics in Blush (available at AC Moore)
  • Embroidery Floss & Needle
  • Aleene’s Fabric Fusion glue
  • Hot Glue Gun

Headband close-upInstructions:

1. Glue ribbon to satin headband, turning under raw ends to finish them before gluing. If your ribbon is very thin or sheer, attach using dots of glue in locations that will have buttons over them, so the glue won’t show.

2. Thread buttons with floss and tie off to finish them.

3. Hot glue buttons to headband on top of ribbon.

That’s all it takes to get a beautiful custom accessory!

headband display

This headband is easy to make for any occasion or season – just switch up the color scheme and you have an instant accessory for Christmas, Halloween, or even school spirit! What occasion will you make a headband for?

0

Quick and Easy Button Earrings

Need to make a set of super quick earrings? It doesn’t get any faster or easier than these.
Button Earrings copy
Supplies:

  • Earring Findings-You can get these at your local craft store in the jewelry section.
  • Buttons-The possibilities are endless here! Buttons Galore and More has a huge selection of buttons, so you can make a different pair of earrings to match every outfit and occasion.
  • Glue

Instructions:

  1. Glue your button onto the earring finding.
  2. Allow to dry for 24 hours before wearing.

This project is easy enough for children to do it. It would be a fun party activity for your little girl’s next party. Teachers-this would make a nice Mother’s Day craft project too!

Added bonus: Go to my blog, Laura Bray Designs to download some free, printable Mother’s Day cards that you can put your button earrings on!


1

Burlap and Buttons Cuff

Short-sleeved, summer tops demand a good burlap and buttons cuff, don’t you think?  Create this simple and rustic burlap cuff for your next walk on the beach.  It’s hip and cool and so easy to make!

Cuff Beauty Shot

Supplies:

  • Burlap cut to 10″ by 6″
  • Assorted colors of felt scraps
  • Buttons
  • Embroidery floss & thread

Instructions to make a burlap and buttons cuff:

1. Fold the burlap into thirds to create a long strip measuring 10″ x 2″.  Pin in place and stitch along the edges.

Putting Cuff together

2. Using felt scraps, cut out petals and leaves to form a flower.  Arrange in the center of the burlap rectangle and using embroidery thread, stitch them into place.

3. Stitch buttons into place.  Use them for the center of the flower.  You can really go crazy and add more into the design. (I strongly believe you can never have too many buttons on a project!)

Sew on felt pieces and buttons

4.  Once the design is stitched in place, use embroidery thread to attach the two short ends of the cuff together.

Note: I measured my wrist at the beginning of the project and made sure that I could slip the cuff on and off.  If you prefer a tighter fitting cuff, measure your wrist size and then use a hook & loop, snap, or BUTTON closure to secure the cuff on your wrist.

Thanks for getting crafty with me today!  For more button crafts, stitching and lifestyle ideas visit me on my blog at www.laurabraydesigns.com.

www.laurabraydesigns.com

1

Powered by WordPress. Designed by WooThemes