Header

Tag Archives | wood

Craft a Wood Trinket Box with Button Lid

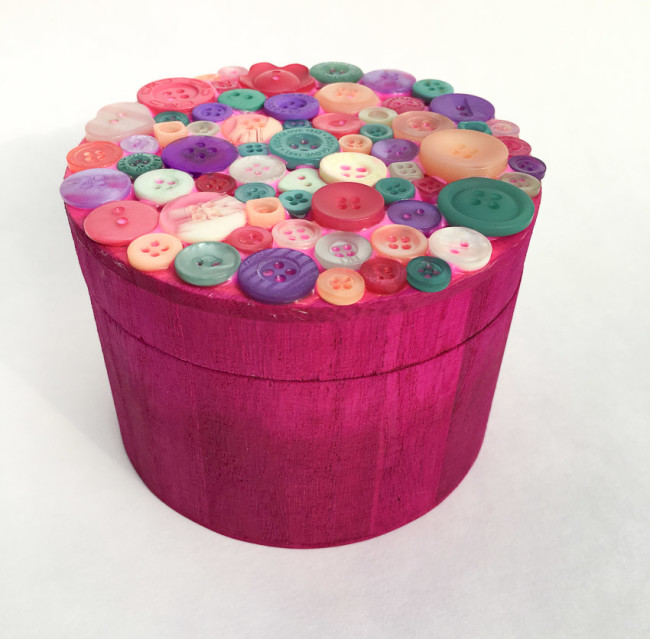
You can never have too many pretty little places to stash mementos and accessories. This little wood trinket box with a multi-colored button lid is a great way to hold your favorite jewelry, souvenirs like ticket stubs, or even office supplies!

Wood trinket box with button lid

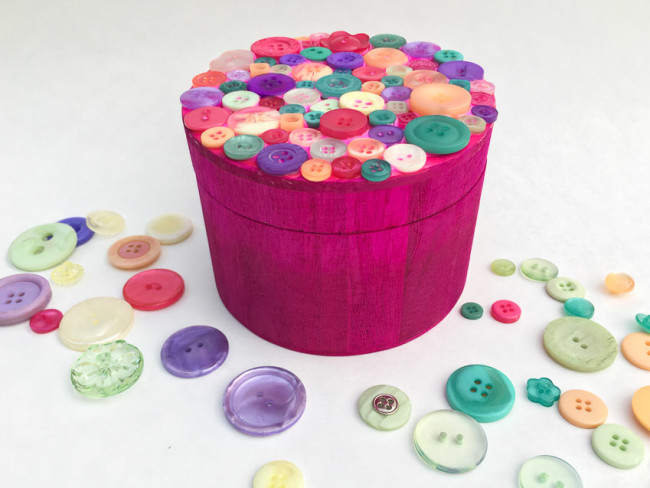
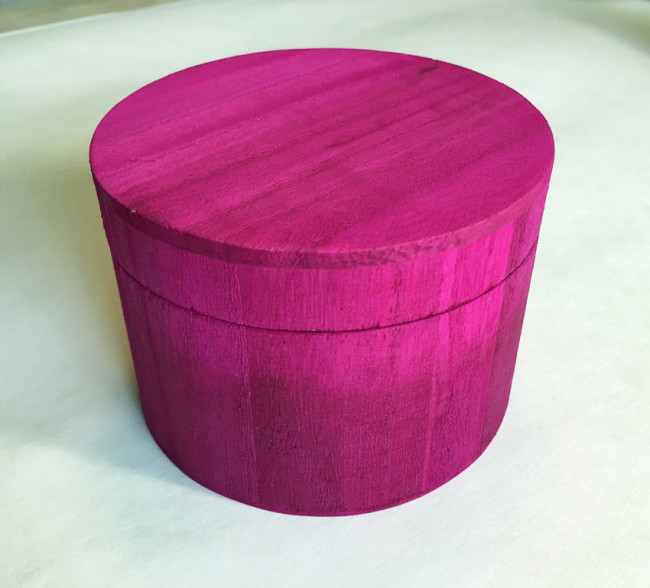
This wood trinket box starts with a fun ombre finish created using the brand new Plaid Ultra Dyes. These are somewhat like water soluble brightly colored wood stains, and blend. I layered several colors to get the effect shown here: Raspberry Beret and Hot Flash applied on the bottom, and the top area with several coats of Hot Pink. Then a coat of hot Pink was layered over the entire project. The end result was almost a dip dye effect.

wood trinket box with ombre Ultra Dye

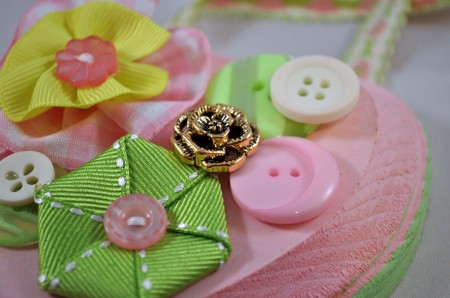
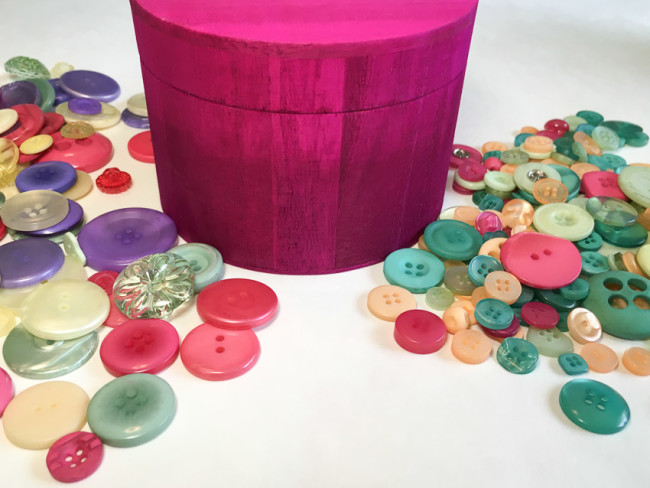
To find a selection of lots of colors for my button collage for on the lid of the trinket box, I decided to pull buttons from two different button assortments. On the left is our Spring button box, with the purple buttons, and on the right is our Vacation button box, with the dark teal and peach colors. Both assortments share in common some pink and light green shades, making them well suited to work together.

Buttons to match wood trinket box

I laid down a thick layer of white glue and then went to work filling in the lid with the buttons. The key (for me anyway) to achieving a random look is to try to not have buttons touch each other that are the same color. It’s also important to make sure that too many buttons of the same size aren’t clustered together in an area.

Buttons glued to wood trinket box lid

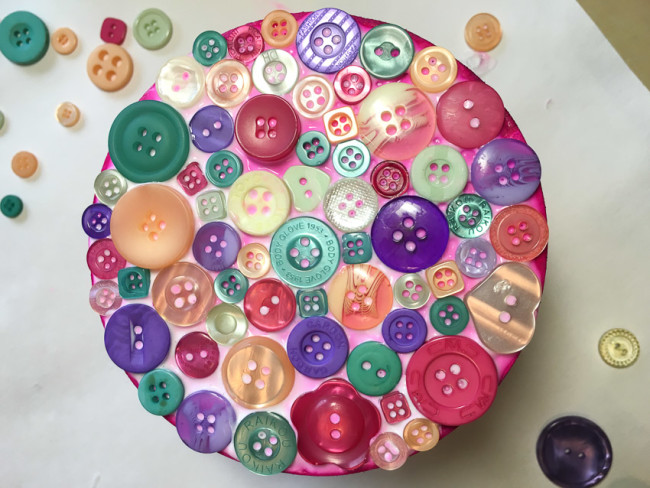
After the glue dries clear, that buttons will appear to be floating on the lid of the wood trinket box!

Wood trinket box with button lid

This wood trinket box with a button lid is a fast and easy project for all ages – a great project for a Mother’s Day gift or for summer vacation crafts for the kids! What will you use it for?

Supplies:


0

Button Ladybug Valentine

Holly here from Ribbons & Glue sharing with you a 3D Button Ladybug Valentine that is sure to make the “Love Bug” come out of you.

Button Ladybug Valentine

I’ve has this wood ladybug for a while now and always thought it would look really cute with Buttons Galore black  Haberdashery Buttons on it.  I finally busted her out of hiding and did just that.

How to make a Button Ladybug Valentine:

Wood Ladybug dyed with RIt Dye

I dyed the Ladybug Cherry Red using Rit Dye.

DecoArt painted Ladybug

Then, painted the body of the ladybug with  DecoArt Glamour Dust paint

Ladybug with black buttons

and adhered black Haberdashery Buttons from Buttons Galore.

button ladybug

I hot glued the pretty lil’ Lady on a wood block to make it into a 3D Valentine and added a few embellishments from the Pebbles Inc Yours Truly collection.

Supplies Used to make a Button Ladybug Valentine:

For more Valentine’s Day inspiration check out my blog Ribbons & Glue.

newsignature

Like Me on Facebook!

0

wooden pumpkin crafts – DIY a Photo Frame

PumpkinFrameF

Wooden pumpkin crafts are great for autumnal home decor.  I created a whole patch of pumpkins for display in my home.  I am in love with the pumpkin frame and the way it stands out in the patch.  I guess it is partially due to the adorable photograph I placed in the frame .  It is my oldest son and the photo is from 14 years ago, but I really do think the frame is adorable too.

WoodenPumpkins

Materials for Wooden Pumpkin crafts:

  •  The frame is from the dollar section in your local craft store.
  •  Rit Dye in two colors (Tangerine and Apple Green) liquid or powder
  •  Burlap trim, fabric scrap and rosette
  • AdTech Hot glue gun and glue sticks
  • Covered working area, rubber gloves and sand paper


FrameTrims

Directions to make the Wooden Pumpkin Crafts:

  1. Sand any rough surfaces.  Dust off any excess.  Dip dye the wooden frame in Rit Tangerine dye.  Allow the frame to dry completely on a covered surface.
  2. Dip dye the  trims in Apple Green Rit dye.  Allow trim to dry completely.   Use  the  hot glue to attach the trim around the frame to create a band.  Attach the fabric scrap strips as the leaves and tendrils on the top of the frame.
  3. Using the hot glue gun, create a stack of brown buttons to resemble a stem.


DyeingMaterials

I created a button stack for a stem with my Laura Kelly Bold Brown buttons and love the way the stem turned out.

Stem created with buttons dyed buttons for fall craft wooden pumpkin crafts

To find out more about making a whole patch of wooden pumpkin crafts, visit my blog post today.

Happy Decorating for Halloween,

Laura


2

Haberdashery Heart

Haberdashery Button Heart by Laura Bray

Haberdashery Button Heart by Laura Bray

I love, love, love the Haberdashery Trim Collage Kits by Buttons Galore and More.  Just the word “haberdashery” makes me feel all happy & old-fashioned.  And the goodies included in the kit?  Well, once I started brainstorming for a Valentine project, I couldn’t stop myself.  There are a million ways to use this kit.  You could even buy a few, invite your friends over for a Valentine tea, and make these hearts. They’ll make great Valentine’s Day gifts, but would also be sweet in a baby’s nursery.

Haberdashery Hearts

Supplies:

Instructions:

  1. Paint the wood heart with pink and green paint.  Allow to dry for one hour.
  2. Glue buttons and embellishments from the Trim Collage Kit onto the wood heart.
  3. Glue a length of ribbon to the back of the heart for a hanger.


0

Powered by WordPress. Designed by WooThemes