Header

Tag Archives | Stitch

Lucky Felt and Button Four Leaf Clover

This quick craft creates a mini masterpiece that can be used to tie around a gift or use as a tie around a napkin for a table decoration.  It’s a quick, fun festive way to celebrate St. Patrick’s Day around your home.

material needed for the felt four leaf clover:

  • Green Felt in 2 Shades (Kunin makes the best!)
  •  Green Buttons
  • Needle/Green Thread (or embroidery floss)
  •  Ribbon

Directions for Lucky Felt and button four leaf clover. 

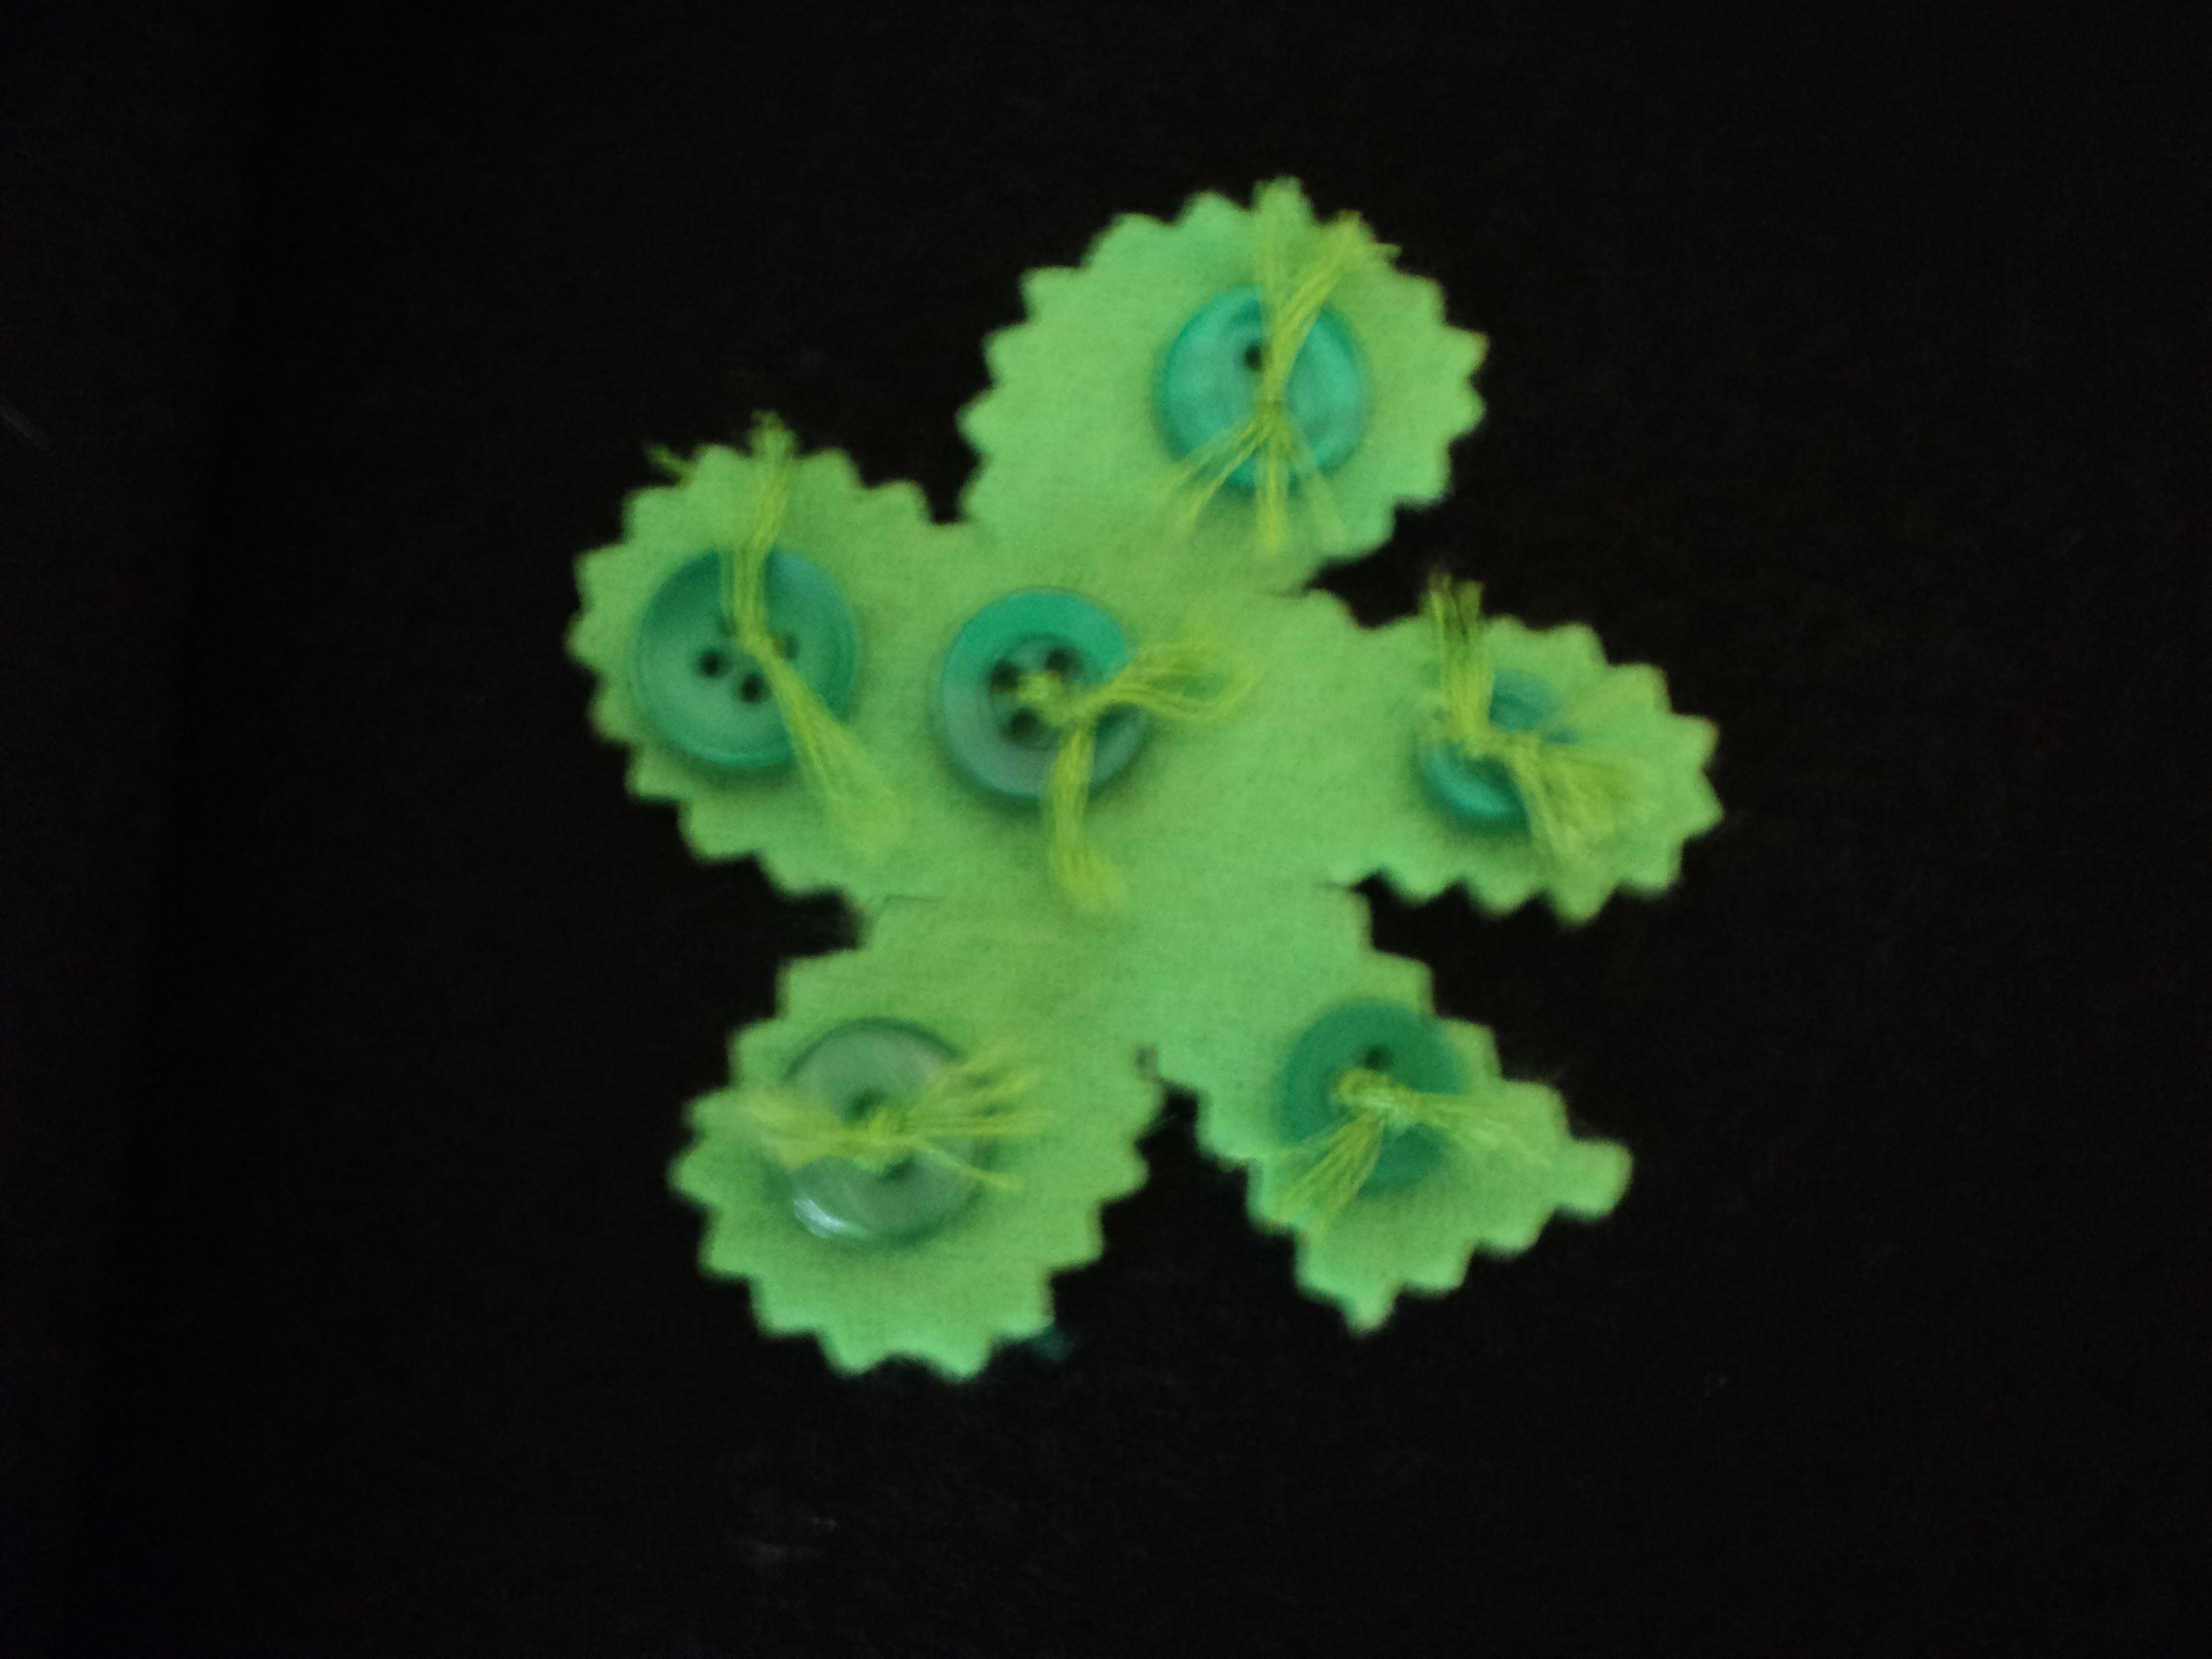
 1.  Cut a four leaf clover from the felt about 2 inches in diameter.  I used pinking shears.

Felt Clover

2. Cut another four leaf clover from the other shade just a tad larger.

3.  Sew green buttons through the smaller felt shamrocks tying knots in the tops between each one.

DSC00598

4.  Sew the ribbon through both layers of felt hiding the stitches behind a button or two.  Use a length or ribbon that will go around your gift or rolled napkin.

FeltButtonClover

Ta Da…a mighty green little decoration that is bound to bring someone a little luck!  As tiny bit of Irish information- when making a toast, the Irish say “Slainte”.   Slainte is a well wish litterally translated – to your health.

3

Stitch Up an Adorable 2014 Banner

I dyed these adorable little pennant pieces from Canvas Corp with Rit Dye…with intentions of making a holiday banner. Little did I know that they would end up being for the holiday of New Year’s when I dyed them Cherry Red.  I am so glad I “forgot” to complete that project because they were perfect for this week’s blog post showing you how to stitch up an adorable banner to bring in 2014.

Banner2014BGM

I sorted from my Laura Kelly collection of assorted buttons and found 6 large ones in different colors from the red.

BannerMaterials

Then I matched up double colors of embroidery floss from Coats and Clark to do the stitching for each of the 6 pennant pieces.  I set it all out to make sure it was going to be “just right” and balanced.

BannerColorPlanning

To stitch on the numbers and add the buttons (stitched through the front and tied in knots), I used two colors, doubled up.

DoubleFLoss

Then I set it all out to decide where it should be hung.  I love my Westcott brand scissors almost enough to hang them too.

Stitched

I decided that the perfect place was on my craft shelves.  I think it looks great there and love the way the little pieces all hang with the mini clothespins (also from Canvas Corp).  And now…to create new projects with all of the Laura Kelly bright, bold and amazing colors of buttons for 2014!  It is going to be great!

Happy New Year,

Laura


1

DIY T-Shirt Pumpkin Decor

Last week we made autumn scarves out of t-shirts (that we stole from Daddy’s drawer) using Rit Dye and we had a bunch of leftover scraps.  Not being able to bear throwing away such beautifully dyed fabric, I decided to stitch up a DIY pumpkin and see how it would turn out for Halloween decor.  It took less than 15 minutes and I think it is quite adorable and will make for some fun decorating.

Easy To Make T-Shirt Pumpkin

pumpkinlove

I matched up the fabric and drew on the top the shape of a little pumpkin.  Then I cut the shapes out at the same time so they would match up for stitching.  I stitched around the outside and stuffed the guts with a grocery bag.  I love to use recycled items when I am crafting.  I stitched on a two button stem (using Laura Kelly Bold Brown buttons) which I think really puts the mini decor into the “cute as a button” category.  Now I want to make about 5 more because they look like they are growing on the vines when I put them outdoors.

TshirtPumpkin

I also really like the way it looks outside on the fairy wall in the back yard.  Maybe I will spray it with the stuff I use to waterproof my boots and leave it out to see how long it makes it in the weather.  I think that a bunch of them around the fairy wall would be really fun and magical over the next few weeks.

TShirtPumpkinWall

I used the white scraps from the t-shirts too to make…a ghost of course.  I am sharing that project on my blog today.

ButtonGhost

Happy Fifteen MINUTE Crafting,

Laura

0

Button pumpkin onesie – Baby’s First Halloween

Pumpkin Onesie

Babies are so adorable when they are dressed to celebrate the holidays.  This pumpkin onesie creation for Halloween is super cute as well as quick and easy.

ButtonPumpkinOnesie

Directions to make the pumpkin onesie:

All you need is a onesie, embroidery floss and a large Outrageous Orange button .  If you want to put your pumpkin on a green onesie and you can’t find one, you can dye one.  That is what I did first.  I used Rit Dye’s Apple Green and tie dyed it in a mason jar.

 Button Pumpkin Onesie

It is best to embroider the stem and vines first and then add your button.  My favorite floss is embroidery floss by Coats and Clark!  I think the little pumpkin is just simply so adorable. So make your little pumpkin a onesie today.

ButtonPumpkin

Happy Pumpkins, Buttons and Stitching,

Laura

Pumpkin Onesie Bottom


0

DIY Simple and FUN Picnic Napkins

Picnics are such a great way to connect with family and friends.  From creating the yummy contents in the basket to making the decorations for the outing, it is just good old fun!  While some people spend lots of time on the meal in the basket, others prefer to spend time creating the parts of the picnic that create the atmosphere.

PICNIC_Napkins

Here are some REALLY simple napkins that you can make from any fabric scraps (including outgrown clothing, towels, sheets or pillowcases) in a  matter of minutes.  You will need the fabric, pinking shears (I love Fiskars), buttons and embroidery floss (Coats and Clark for me).  They are really fun to make out of bright colored towels for kids and holidays if you are looking for a twist on this simply button project.

Napkin_Materials

Cut the fabric into 16 x 16: inch squares.  Pick a corner for each and add a few stitched on buttons.  Voila!  You have adorable, creative and festive picnic napkins.

Napkins_Buttons

If you prefer, you can fold them in squares and make cocktail napkins.

Napkins_Folded

If you love the festive RED picnic basket, place card pots and tall jar votive, check out my blog to find out how I got them such an awesome color.  (hint: Krylon).

Happy Creating with Buttons,

Laura


0

Powered by WordPress. Designed by WooThemes