Header

Tag Archives | quick and easy

Make a Quick Card with Buttons & Pocket Cards!

Looking for an easy quick card idea? Look no further than your Project Life cards and your buttons and embellishments from 28 Lilac Lane!

Creating this quick card is simple – and fast. It takes only five minutes! This project uses leftover Project Life cards as a shortcut to creating a beautiful color blocked card. Depending on the style of the kit you are using, the design could be graphic, shabby, or cute in style.

Quick Card with Buttons

Supplies:

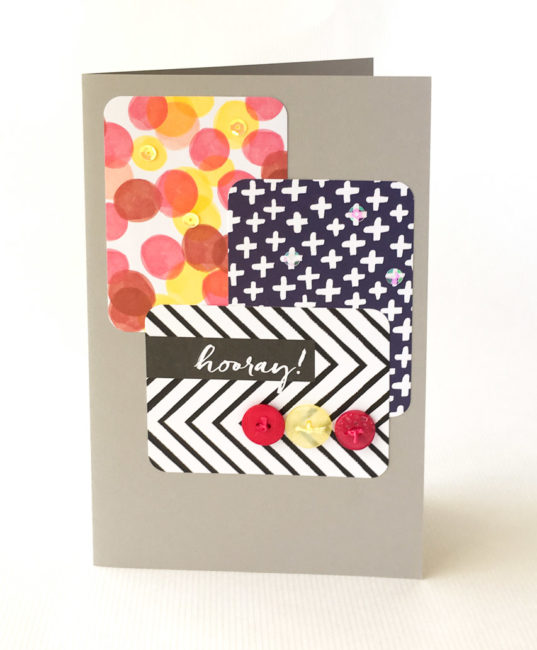
The key to this card’s fun design is to think in threes. All of the major design elements are arranged in threes, creating repetition and harmony in the design.

Start by folding a letter sized piece of cardstock in half for the base. Then select 3 project life cards and arrange them layered, as shown in the photo above. Select three sequins that match each of the top two cards, and arrange them in a triangle on the card. (Since my cards were very geometric, I chose to place the sequins centered on design elements.)

For the final touch, choose three buttons that match the cards. I chose three that matched the circles on the top card, to repeat the design element visually and bring that color down closer to the bottom for balance in the design. Tie embroidery floss through the holes of the buttons to make them feel more finished. Adhere in a row.

Variation: If you don’t find a card in your stash that contains an appropriate greeting or sentiment for your occasion, you can substitute a strip of paper with a stamped or handwritten sentiment. Just place it on top of the pocket card in the location where my card says “hooray”.

0

Quick and Easy Place Cards Ideas

Quick and easy place cards ideas!

Do you need place cards for your next event? Create some with just buttons and paper. Here are some quick and easy place cards ideas.

Quick and Easy Place Cards Ideas


These are easy to create.

I’ve cut my cards 3X3″ and folded them in half. The image below shows how the easy grass border is made and attached. This month we’re lucky enough to be playing with Fiskars products, so of course I used my Fiskars orange handled scissors. Thanks, Fiskars!


Quick and Easy Place Cards Ideas - Making the Grass Border


The cloud is a die cut that I inked. To finish off these quick and easy place cards, just add stickers. I love these adorable, chunky butterflies from Buttons Galore’s Butterfly Kisses Collection. I like to use Beacon’s 3-1 glue to make sure they stay put. Buttons Galore has several kinds of adhesive to offer in their Adhesives section.

Quick and Easy Place Cards Ideas Close Up Green

Quick and Easy Place Cards Ideas Close Up Orange


Supplies Used

Tools Used

  • Fiskars scissors
  • Sizzix Vagabond and cloud die

Thanks for joining me today. I hope you will find that our buttons are a great embellishment for all of your paper crafts.

1

Quick and Easy Gifts – Make a handmade note card set

It’s that time of year where we all start looking for quick and easy gifts. Being able to make them homemade is a bonus!!! Why not make a handmade note card set? Mine is not Christmas themed, or Fall themed…I like generic…it works well when I am in a pinch! I can just grab & go! BUT I do like to make my gifts in good seasonal colors. So for this set I thought I would show you my “thought process” on how to make a set of cards in a quick and easy assembly fashion. :) Just add in your papers, matching buttons, ribbon and bling of your choice and you are all set and ready to get creating your very own quick and easy gifts!


Gather up supplies. I generally like to pick my papers first, then cardstock, ribbon and embellishments. As you can see, I have chosen three different colors of Button Bonanza Bags just to be sure I have the perfect color when the time comes for embellishing. You can also see I have printed out my sentiments panels using Duetica Lettering Arts Studio’s Mandolyn Font in the Outline feature then colored it in using my Copic markers. Another neat trick to PERFECTLY matched sentiments that say JUST what you want in just the perfect size for your project. :) Once I was done coloring them in I die cut each sentiment panel using Spellbinders Nestabilities and I was all set!

Using a Bow Easy Ribbon Tool REALLY helps make the set look polished, all of my bows look exactly alike!

Add an extra touch by outlining the first letter using a glue pen then shake on a bit of coordinating glitter.

Another great touch that really doesn’t take too long is to embellish the embellishments! I love to add a bit of bling to the center of my buttons.


And here you have it! A cute set that took less than an hour start to finish! Not bad….


0

Powered by WordPress. Designed by WooThemes