Header

Tag Archives | zippered pouch tutorial

Make a Spring Zip Pouch for Mom!

Regular readers of the site may remember this delightful zip pouch that I made last fall during the Handmade Holidays blog hop. It is from a pattern called Everyday Zips by Joanna Figueroa of Fig Tree & Company, available online or at local quilt stores.

Zippered Notions Bag

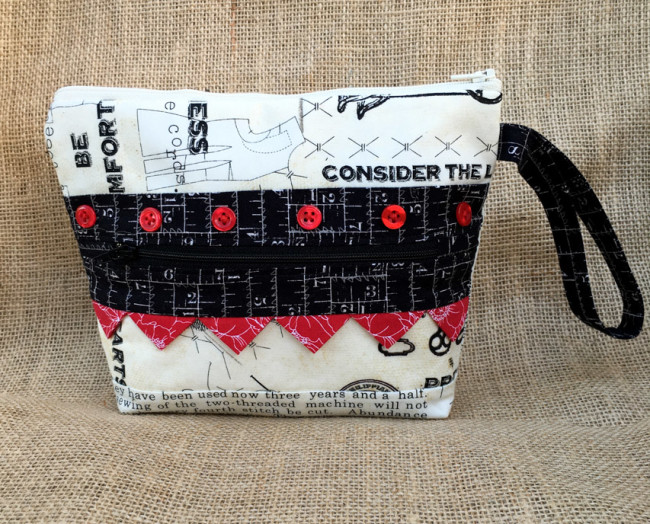
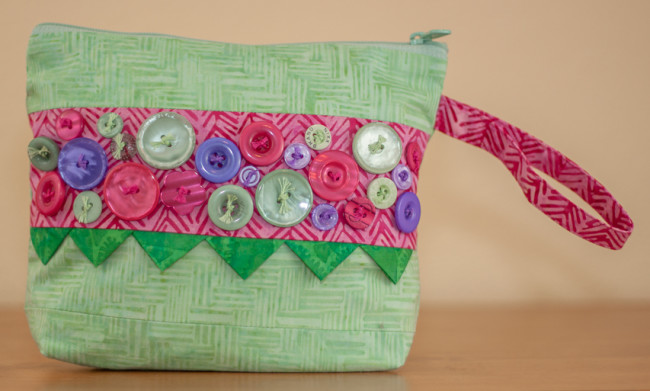
Making the pouch was so simple and fun that I decided to make another one for the trade show booths in January…this time in a spring color scheme, and with a few modifications. Because you can never have too many zip pouches, right?

Spring Zip Pouch

Supplies:

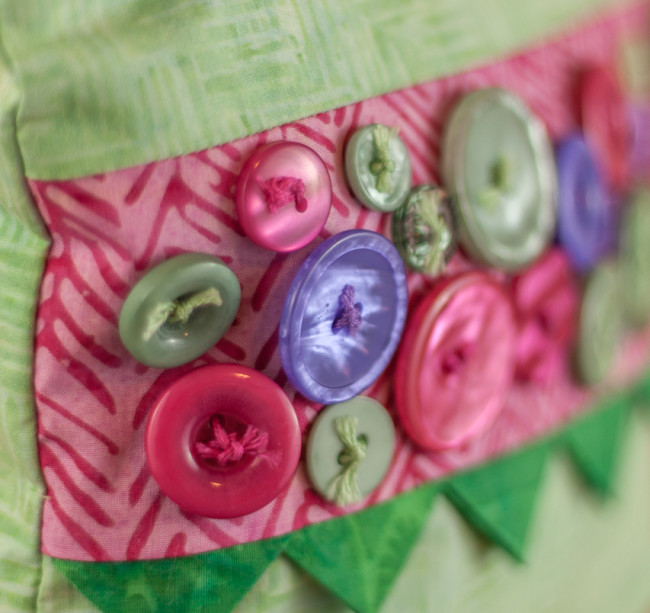
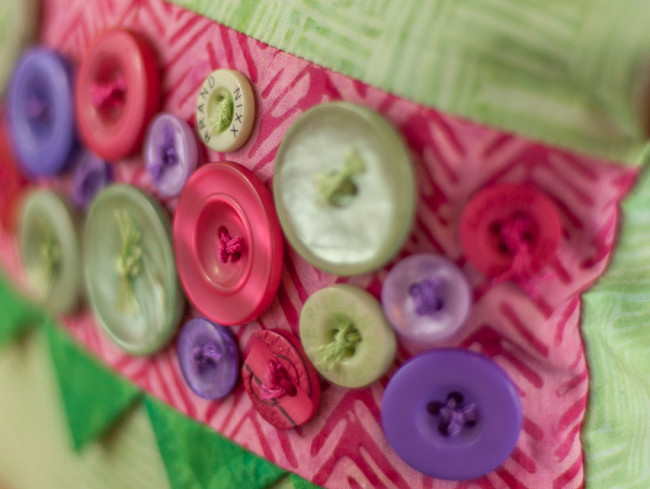
For this version, I created a totally different look. Instead of vintage style neutrals, the new design used batik print quilt fabric in spring colors. The light green fabric was used for both the exterior body and for the lining. The bright pink contrast panel and the green prairie points create an impression of leaves surrounding flowers.

Instead of just a few button accents, the spring zip pouch has a whole collage of buttons decorating its front panel!

Spring Zip Pouch close up

As well as adding buttons, I also took something away from the front of the pouch. You might have already noticed that the zipper pocket isn’t on the front of the new design of the pouch. Removing it simplified the sewing of the pouch and made room for the large decorative button collage.

Spring Zip Pouch close up 2

Making the change to remove the zipper from the panel was easy. I measured what each of the three pattern pieces for this panel would be in height after the seam allowances were removed. Then I added those three numbers together, added the seam allowance to the top and bottom of it.  That gave me the new height I needed to cut my panel to. (The width is provided by the pieces for above and below the zipper.) Using those dimensions, I created the new pattern piece. The piece I ended up cutting was 3″ by 9.5″. I then simply skipped the steps in the pattern dealing with installing the pocket zipper and the pocket lining.

Zip pouches make great gifts for Mother’s Day, birthdays, and teacher appreciation! What occasion do you have coming up that a fun zip pouch gift would be perfect for?

0

Zippered Bag with Buttons by Denise Clason

 Make a Zippered Bag with Buttons

Fall Zippered Bag with Buttons by Denise ClasonZippered bag measurements 10×10 bag

Fall Zippered Bag with Buttons by Denise Clason


  • *(5) Coordinating Fat Quarter (FQ) Prints or use scraps, minimum 10” x 10”
  • *1 bag “Button Tote Bag Assortment” by Buttons and More, #1138473
  • *(2) 10” x 10” scraps of cotton batting, Warm & Company
  • *Star Multi-Color Machine Quilting Thread, to match fabrics, Coats & Clark
  • *10” Polyester Zipper, Coats & Clark
  • *Rotary Cutting Tools, Olfa
  • *Temporary Spray Adhesive, Sulky (green cap)
  • *Fray Check, Dritz
  • *1/8” wide12” strand cording to match fabric

Supplies for zippered bag:

1/4” foot, zipper foot, multi-purpose foot, scissors, sewing machine, iron

All seam allowances are 1/4”.

Cutting Instructions for Zippered Bag:

From each FQ, cut (1) 2 1/2” x 10” strip (front of bag)

From one FQ, cut (1) 10” square (back)

From one FQ, cut (2) 10” squares (lining)

From cotton batting, cut (2) 10” squares

Fall Zippered Bag with Buttons by Denise Clason

All seam allowances are 1/4”.

1.  With 1/4” foot, sew each 10” strip RST, along 10” side, Press

zippered bag

2. Layer backing (face down), batting, lining (face up) Spray Temporary Spray Adhesive between layers. Repeat with front and lining.


3. With darning foot and feed dogs lowered, quilt bag using loopy design. Repeat with backing layers. Use matching lining thread in bobbin.

  1. Trim Front bag approximately 10” x 10” and then trim Back bag the same size.


Fall Zippered Bag with Buttons by Denise Clason

5. Position various buttons to front bag, in random places. Sew with machine or by hand. I used my machine and the variegated thread, it changed with the color of each button! Apply Fray Check to back of each button to secure.

Fall Zippered Bag with Buttons by Denise Clason

6. With Zipper foot, sew zipper RST onto front of bag along top raw edge.

7. Sew zipper RST to back of back. Use pins if necessary.

8. With the Multi-purpose foot, zig-zag along zipper edge.

9. Turn bag over to Right side and topstitch along zipper edge.

Fall Zippered Bag with Buttons by Denise Clason

10. Upzip zipper! (for turning right side out) With 1/4” foot, and RST, sew bag along all three sides. Backstitch at each end. Zig-zag along seam allowances.

Fall Zippered Bag with Buttons by Denise Clason

11. At corners of bag, match up side seam with bag bottom seam, pin on either side of seam. Check inside of bag to make sure they line up. Sew a seam, approximately 1 1/4”, from tip of corner . Backstitch at each end. Zig-zag and trim. Turn bag RSO.

Fall Zippered Bag with Buttons by Denise Clason

12. Thread cord through zipper pull and tie a knot. Thread cord through three different buttons and tie a knot. Trim cording even. Apply Fray Check to ends. Enjoy!

Fall Zippered Bag with Buttons by Denise Clason

Denise Clason has been an artist/designer for over 35 years, selling her creative and beautiful designs to friends and teachers at an early age.  She continues to design and has  been published and licensed in the craft, decorative painting, sewing and quilting industries.  Along the way she has designed product for several manufacturers.  Denise is the author of 9 books. Her latest book, “Sewing Vintage Aprons” was published by All American Crafts”, released June 2011. Another two books were published by Krause Publication’s, “New Country Quilting,” released Spring 2005 and “Quilted Bags & Totes,” released Fall 2006. Denise is a Designer Member of The Craft & Hobby Association (CHA).  Please contact her at denise@deniseclason.com or visit her website & blog: www.DeniseClason.com. She would love to hear from you!

2

Powered by WordPress. Designed by WooThemes