Header

Tag Archives | My Favorite Things

Paris Wall Art

STYROFOAM™ and Buttons – Paris Wall Art.

Paris Wall Art

I could never get tired of Paris. Let’s make some Paris Wall Art!  I was surprised at how easily this came together.

Paris Wall Art Supplies:

  • Buttons – Sweet Delights
  • Adhesive – Beacon’s 3-in-1Mini Glue Dots, Fabri Tac
  • Heart Shape – Styrofoam Crafts
  • Ribbon, Charm and Bling – Want2Scrap
  • Paris Die – My Favorite Things
  • Patterned Paper – Bo Bunny
  • Cardstock – DiscountCardstock.com
  • Flowers – Wild Orchid
  • Other – Dymo Labeler and Label Tape, Jump Rings, White Versacraft Ink, Red Copic Marker

Instructions:

  1. Trace heart and cut out of patterned paper. Adhere with Beacon’s 3-in-1.
  2. Line outer edges with rose ribbon using Fabri Tac.
  3. Create Dymo Label. Pink edges and adhere to heart.
  4. Die cut Eiffel Tower and distress with White Versacraft Ink. Adhere with Mini Glue Dots.
  5. Embellish with rhinestones, flowers and additional ribbons.
  6. Accent charm with Copic Marker. Add charm to black bow using jump rings.

Thanks for joining me today.

See more of my creations at My Card Party.

0

Snap Happy

It’s Red, White & Blue season, the perfect colors for this Snap Happy Card. Will you be taking lots of pictures on the 4th?

Every week we share fresh card making ideas using buttons. This week we’re using my absolute favorite Heart Novelty Buttons. I made a card with a gift card inside that’s good for some prints at one of our local stores. What family doesn’t print a ton of pictures?

Snap Happy

Supplies for creating Snap Happy Card

Buttons – two Heart Novelty Buttons – Buttons Galore and More

Stamps  – Gina K Designs

Cardstock – DiscountCardstock.com

Embellishments – Turquoise Rhinestones – Want2Scrap; Twine – Doodlebug Design; Stickers – SRM

Tools: Dies (Inverted Scalloped Circles, Star, Circles – Spellbinders Paper Arts; Labels – My Favorite Things) ; Embossing – Sizzix

Adhesive: Hot Glue – Adtech; Dimensional Foam Tape – 3M; Scor-Tape – Scor-Pal

Other: Ink – Tsukineko; Markers – Copic; Flashing Tape – available at most Home Improvement Stores

Directions

  1. Create a Neenah Solar White cardstock base 4.25 x 11″. Score and fold in half.
  2. Cut your mats: Neenah Solar White mat 4 x 5.25″ – Black Licorice mat 3.5 x 3.5″ – Currant Red mat 3.25 x 3.25″ – Emboss Currant Red mat.
  3. Adhere mats to card with Scor-Tape.
  4. Die cut pieces: inverted circle from Lunar Blue Cardstock, a Black Licorice circle, and slightly smaller Neenah Solar White circle and label shape.
  5. Stamp and color image on Neenah Solar White circle. Stamp sentiment on label shape and attach to card.
  6. Embellish with Turquoise Rhinestones. Tie black and white twine through one Heart Novelty Button and glue to stamped image.
  7. Layer round pieces with Dimensional Foam Tape.
  8. Adhere Flashing Tape to scrap paper and die cut and emboss star. Adhere to card with Dimensional Foam Tape
  9. Wrap aqua and white twine around card and secure with second Heart Novelty Button.
  10. Add sticker sentiment to bottom of card.

Thanks for stopping by today. To see more of my art, please visit me at My Card Party. I’ll see you on Thursday with some new Button Jewelry.

Until then, keep creating!

2

Sunday Card Tutorial: Make a Window Card

Window Cards are cool.  Have you ever wanted to make a window card? Have you ever had to make a BUNCH and wanted them all to be the same?

Window Card by Allie Gower


Materials to make Window card:

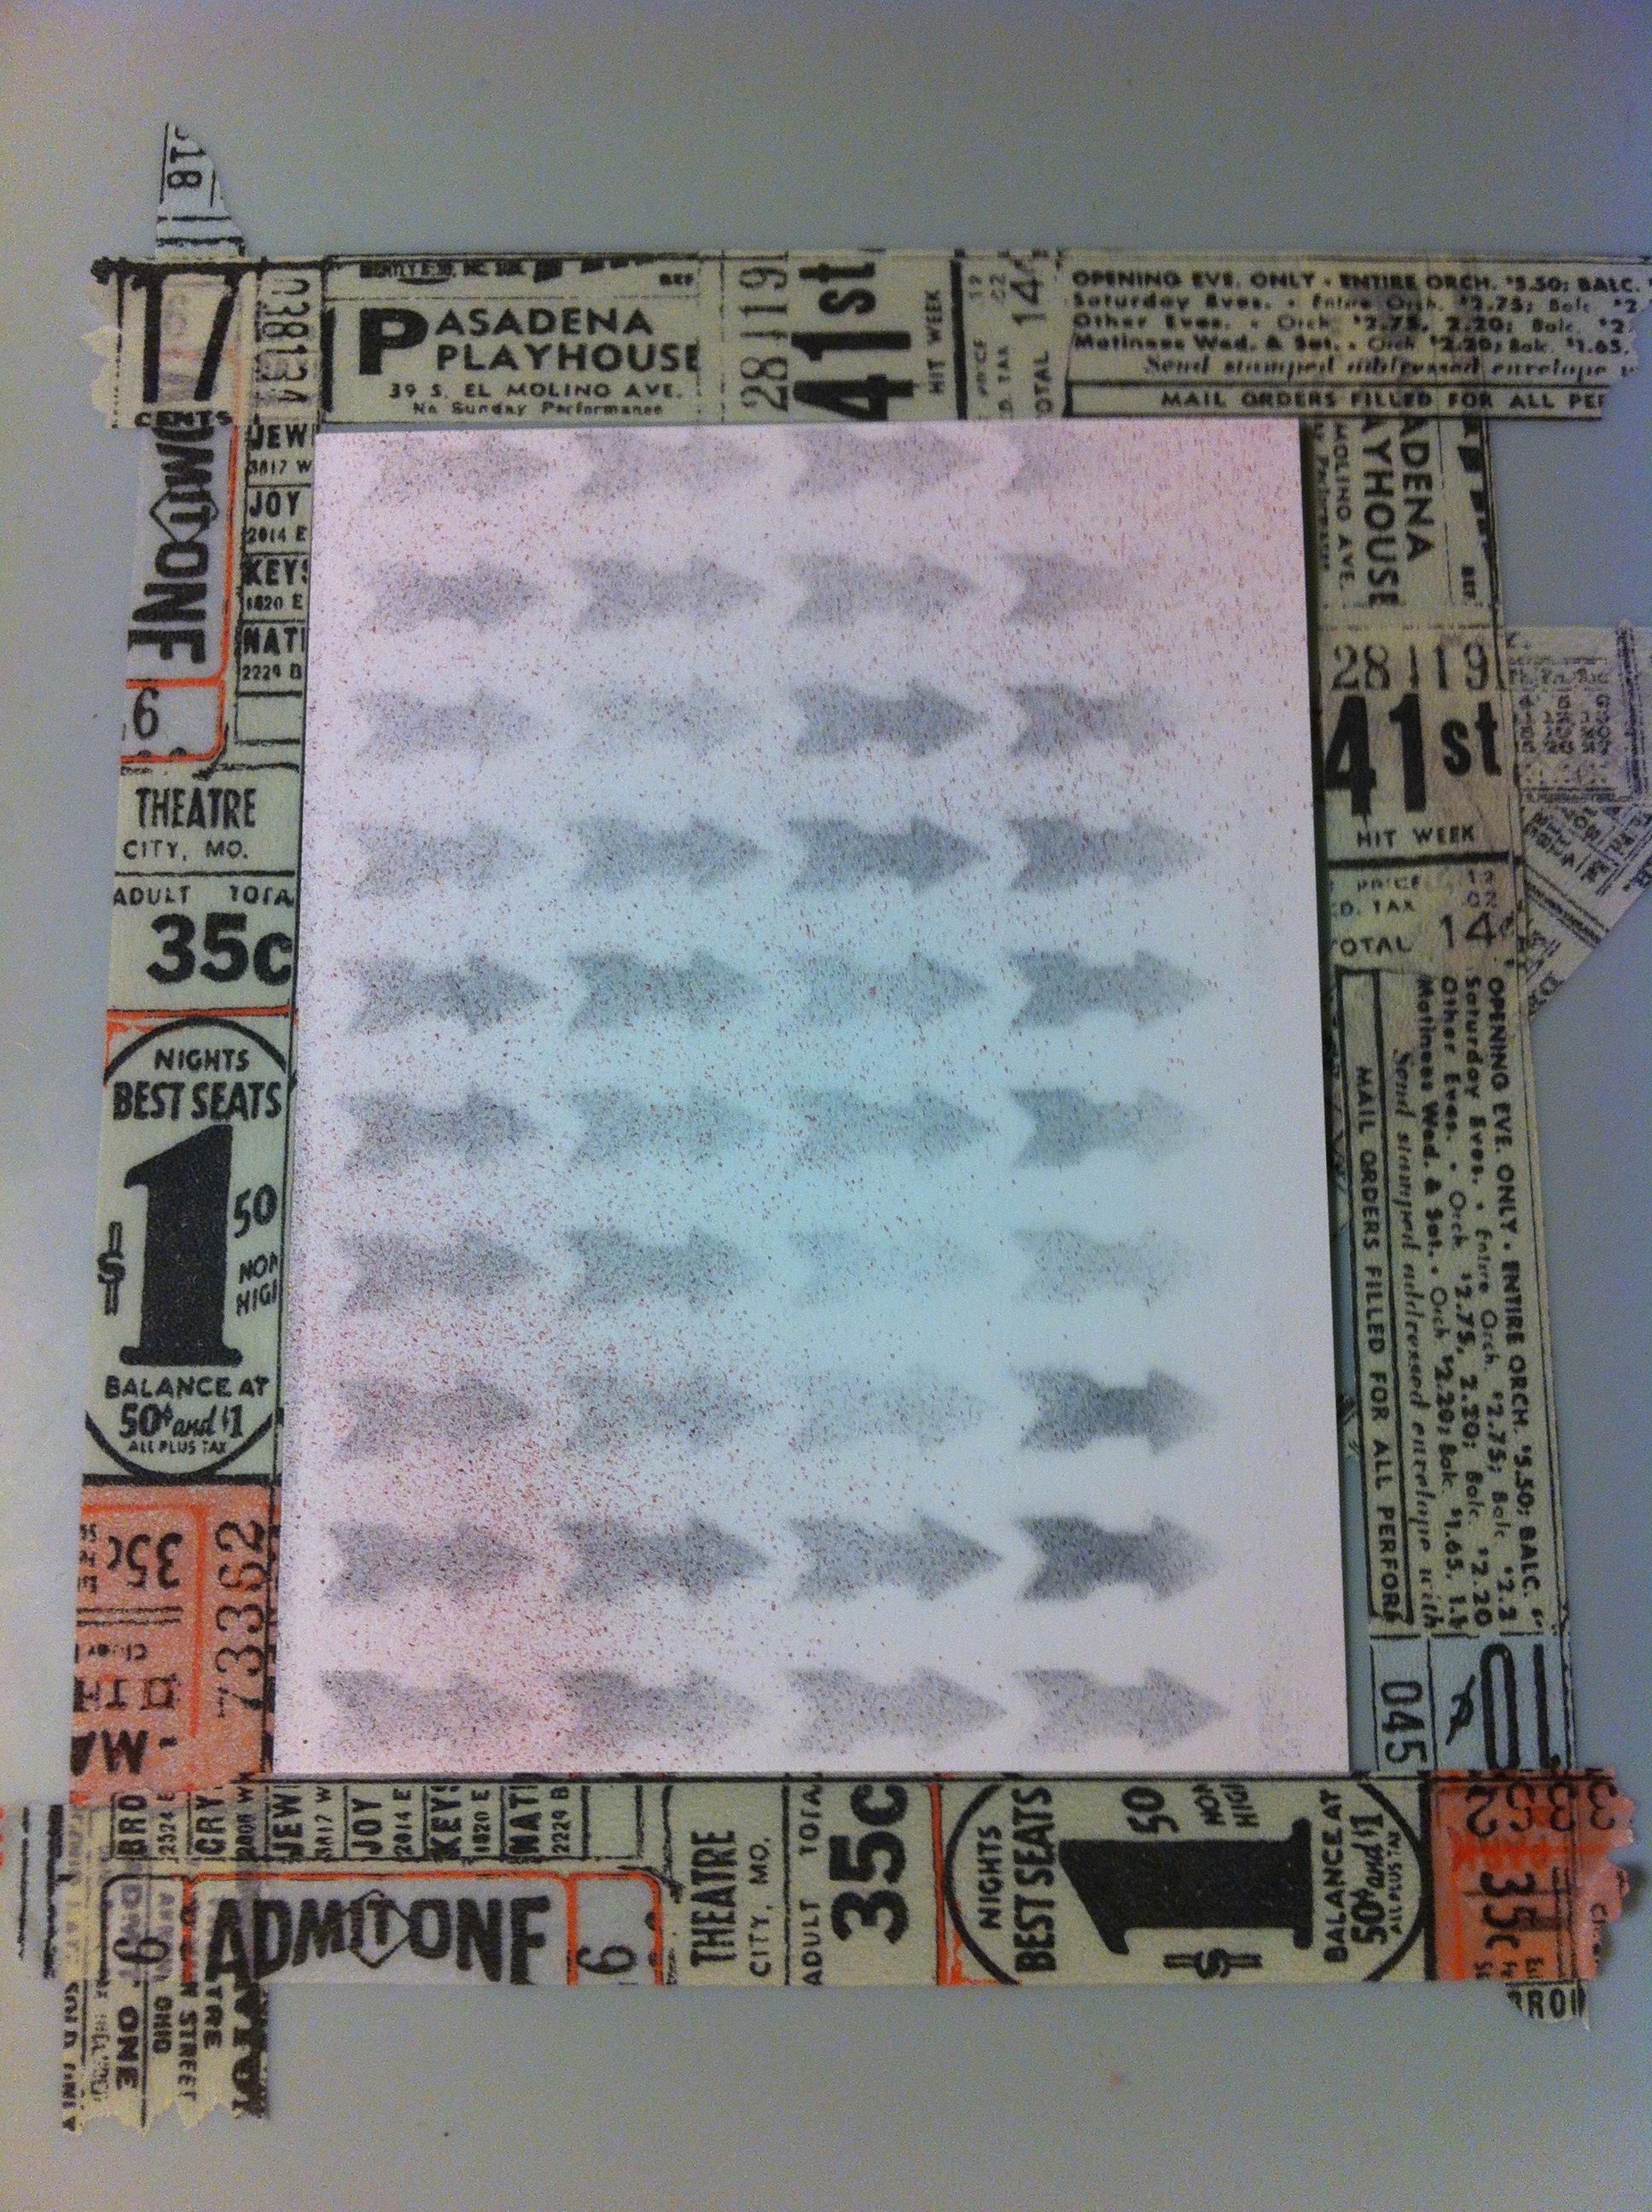
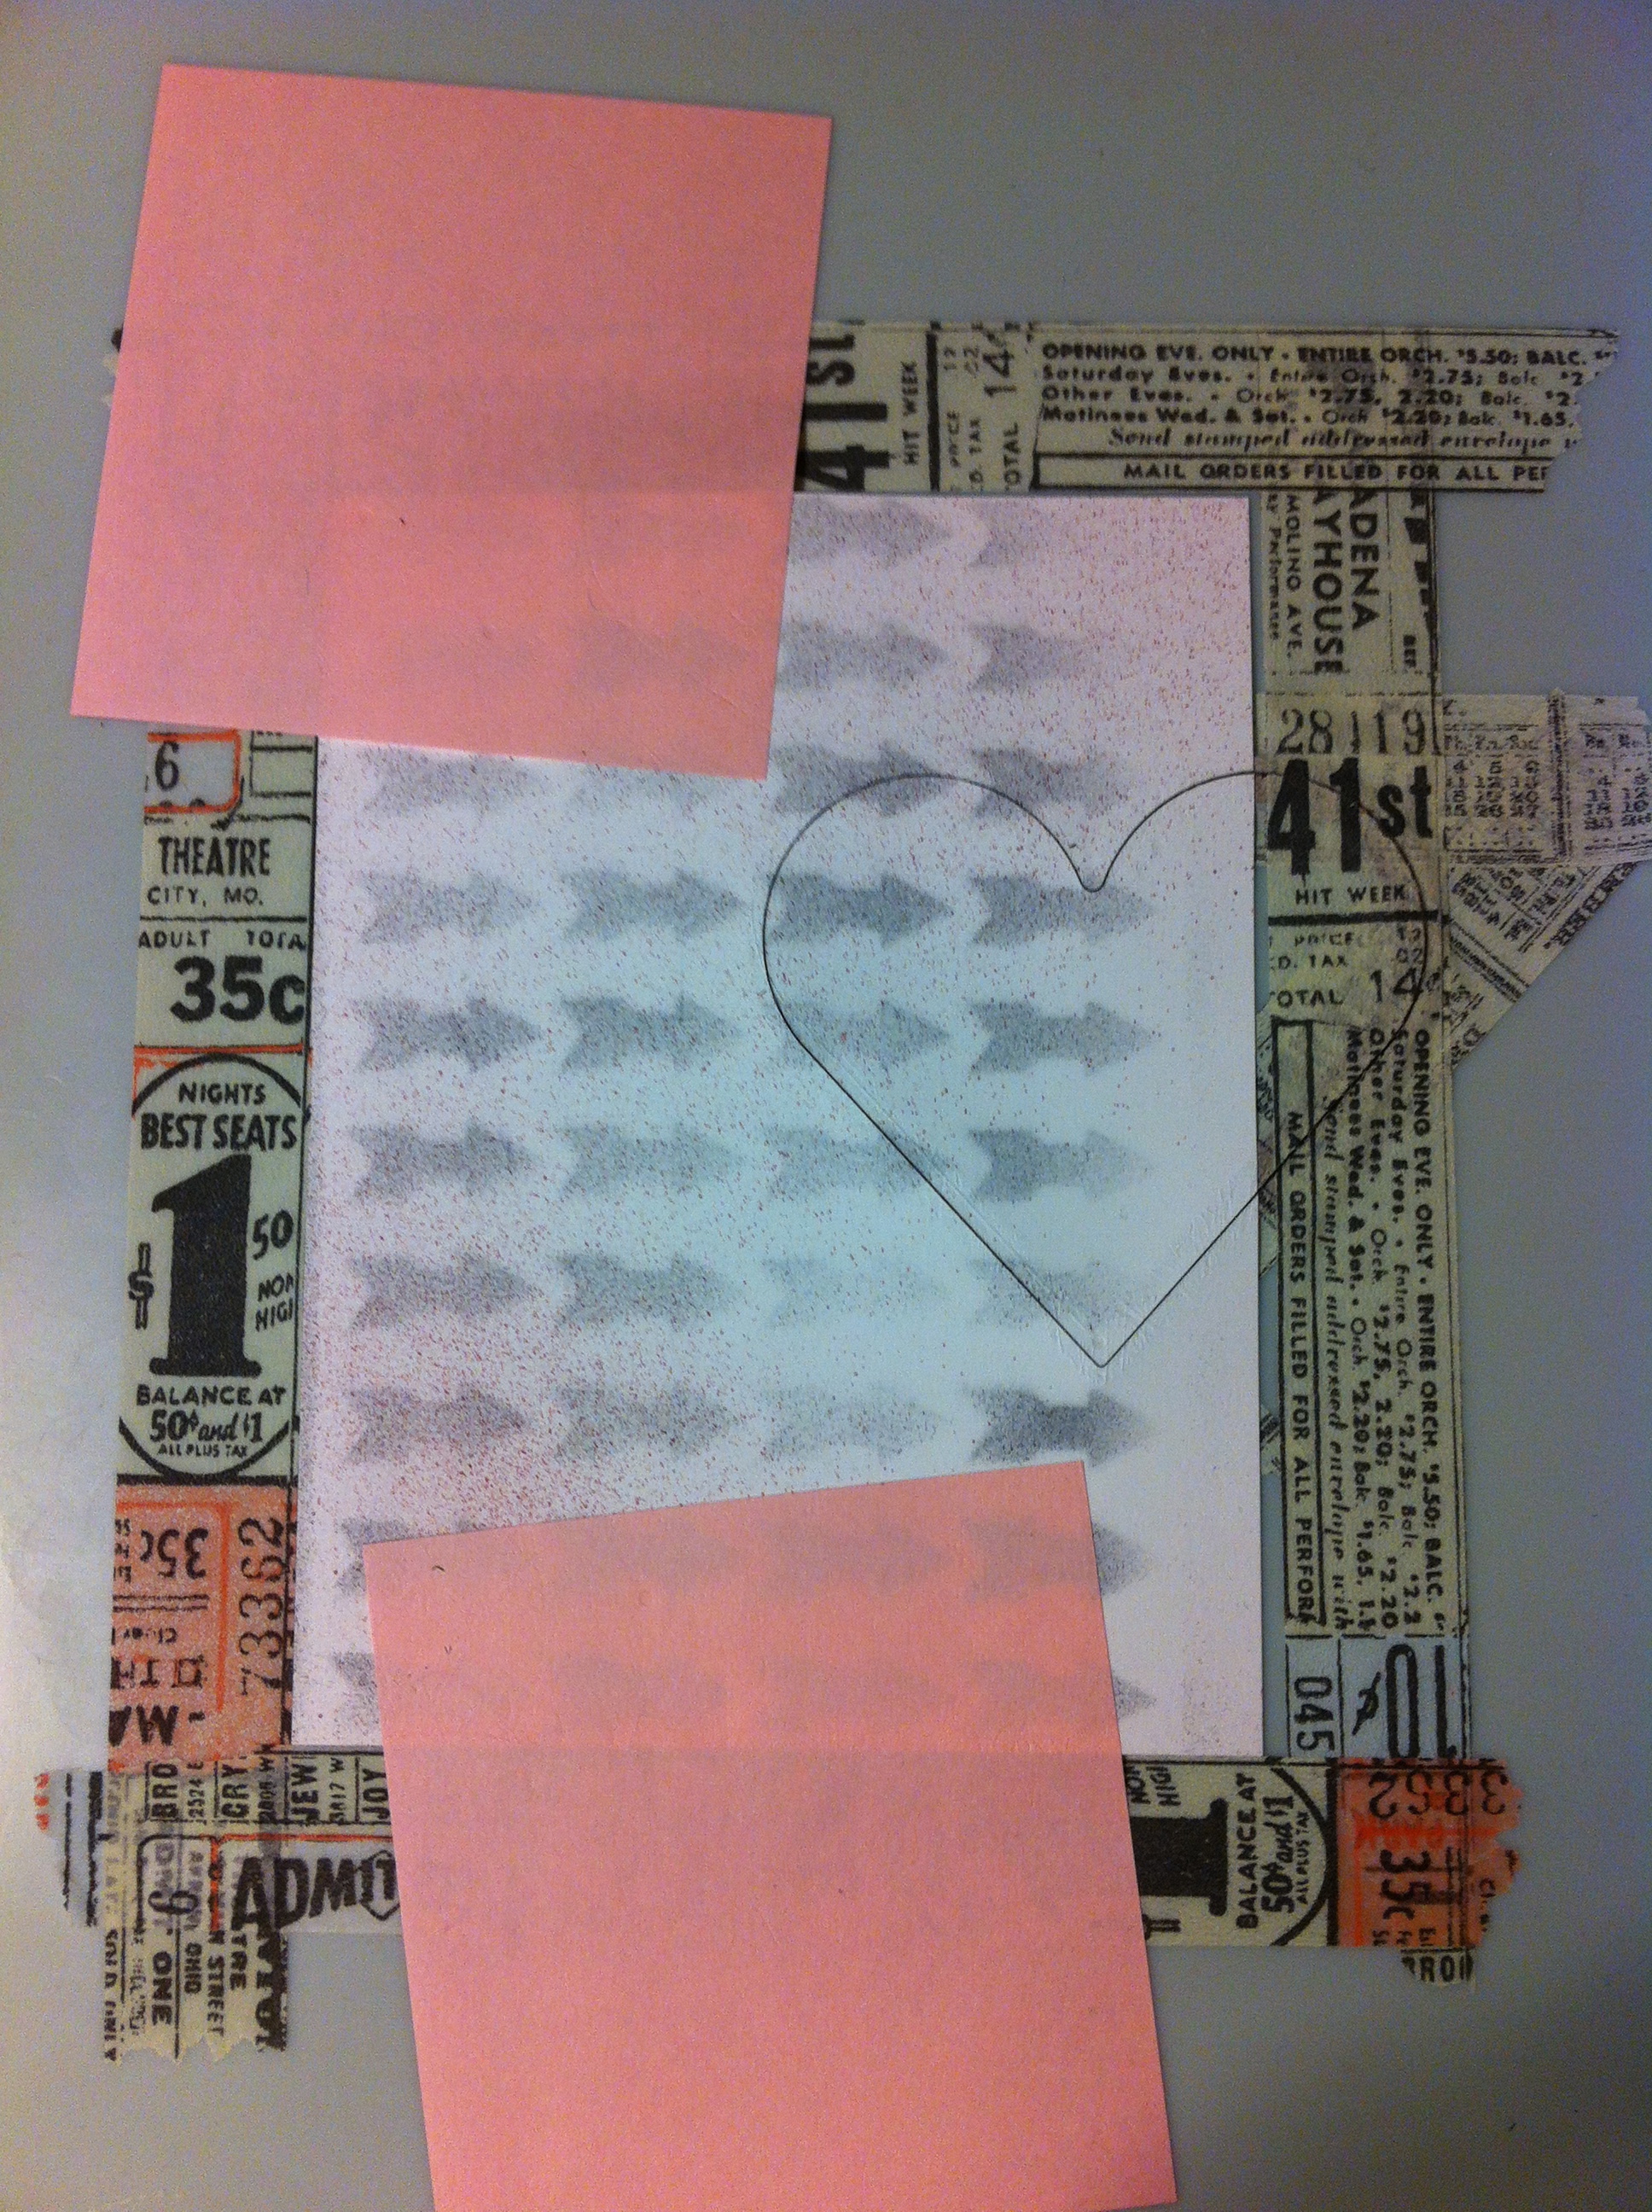
I have a Grand Calibur from Spellbinders, but this should work in any machine. You need repositionable tape – I use Tissue Tape – as you can see! You will also need two post it notes.

Start by making an outline of your card, so that you know where to place each card front.

Making the Perfect Cut


You also want to tape down the die. You will cut through the tape – no worries, just put tape all over it and really rub it down. Then, you are ready to die cut your panels. Use some post it notes to hold it in place. These will really stick after running through your machine, but won’t leave any residue.

Making the Perfect Cut


Rinse. Lather. Repeat. Just kidding. Keep going, just line up your panel  and secure with post – its. Before you know it, you’ll have a nice neat stack of card fronts.

Making the Perfect Cut


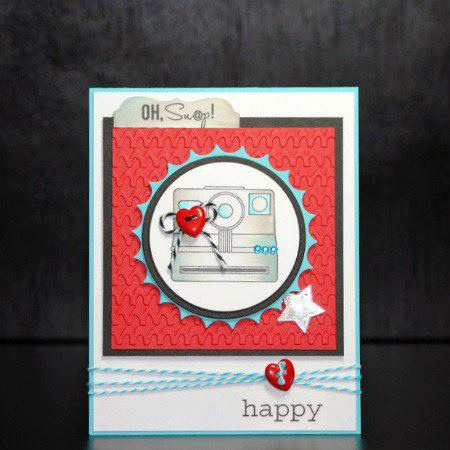
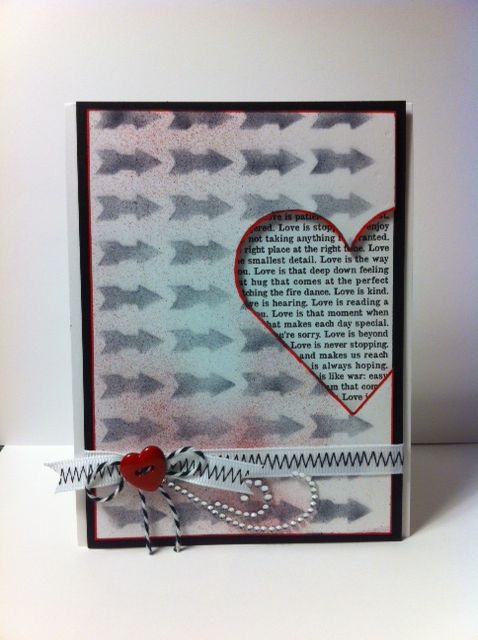
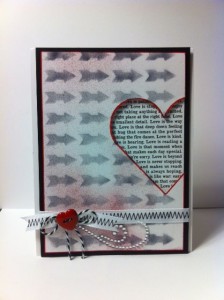
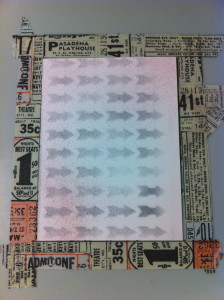
My card fronts were created with an arrow stencil. This is a new stencil that Donna Salazar designed for Want2Scrap. It worked great. I used my trust post its to hold it in place, and airbrushed some black ink. Afterwards, I sprayed on a little red ink, and outlined the card.

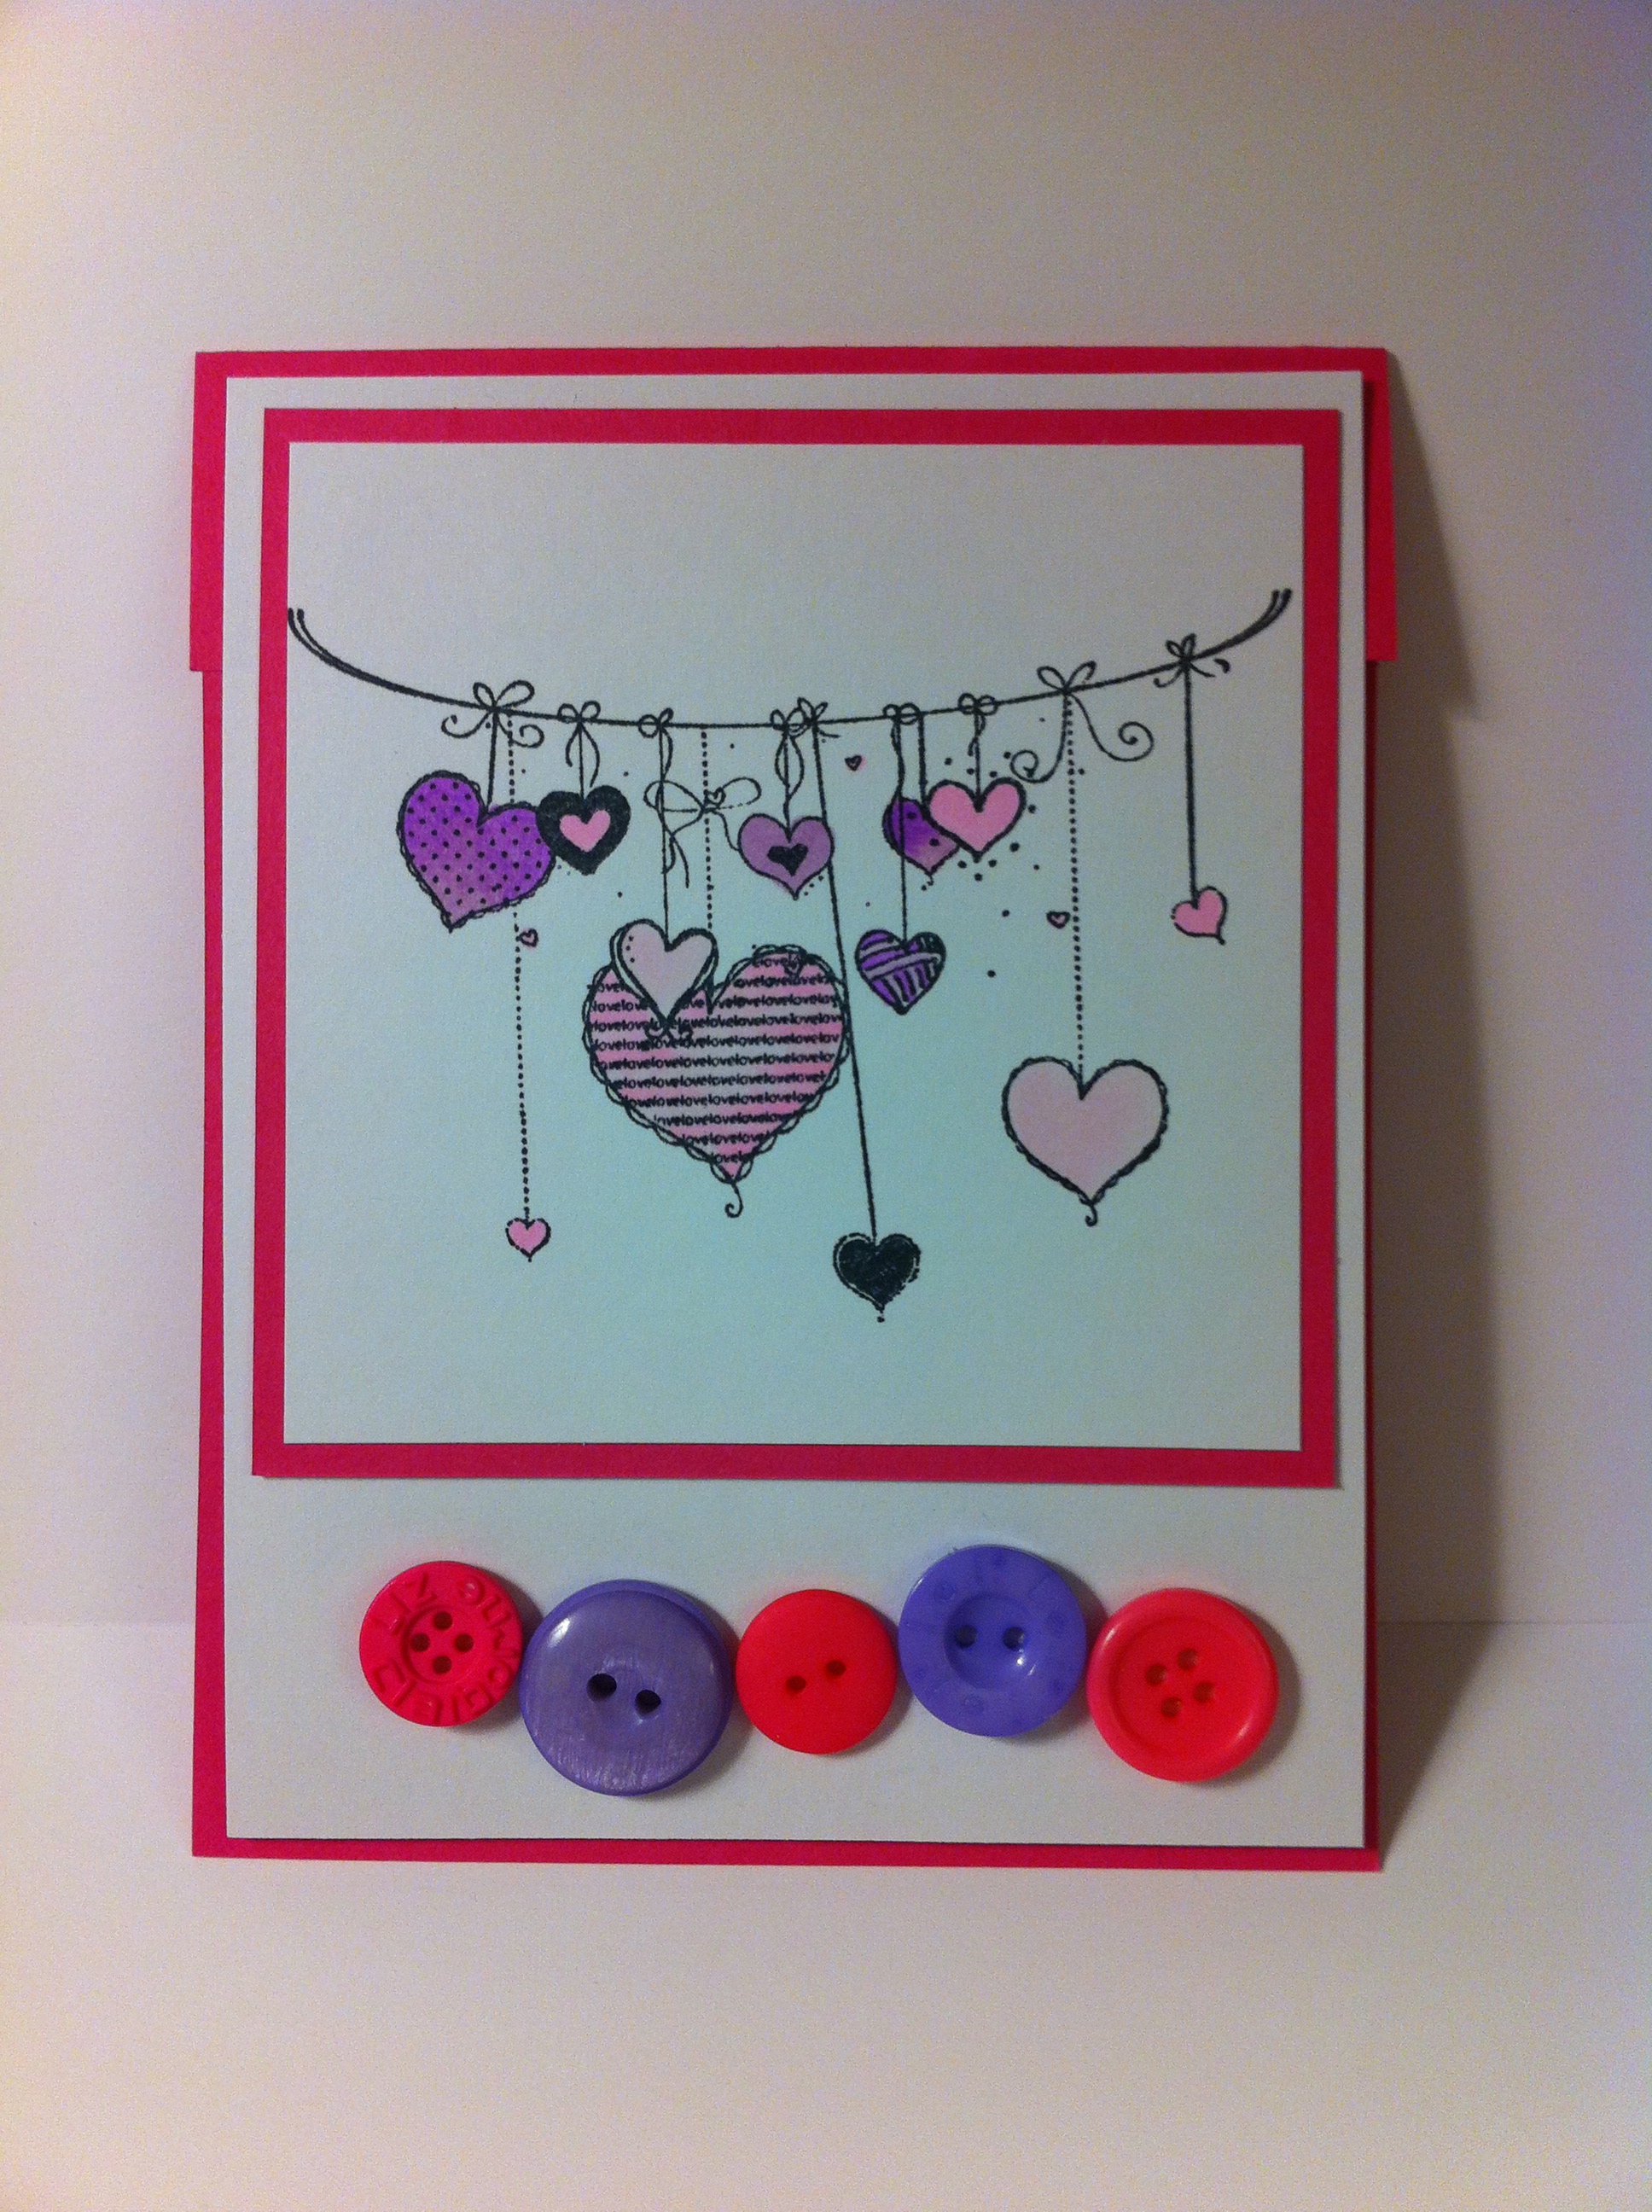
I finished the card off with ribbon, a Red Heart Button and some twine, and a rhinestone flourish.

Behind the opening is some cardstock. I raised up the card front with some dimensional adhesive. The card front is matted on black, and then adhered to the card base.

If you have to make several cards, or even just one – this easy technique will help you get it right – the first time, and every time.

Buttons Galore Supplies Used to Make the Window Card:


Additional Supplies Used to Make the Window Card:

  • Cardstock – My Favorite Things Replenishments
  • Patterned Paper – Canvas Corp.
  • Stencil and Flourish – Want2Scrap
  • Die – Classic Heart from Spellbinders
  • Ink and Airbrush System – Copic
  • Ribbon – American Crafts
  • Twine – Doodlebug Design

Would you like me to send this card to you? I will be sending it to one lucky winner.

Simply leave a comment and Pin this card!


Thanks for joining me, I’ll be back next Sunday with a fun Card Making Tutorial for you featuring, of course, fabulous BUTTONS!


Sunday Card Making: Make an OWL LOVE YOU Valentine Card

Do you like puns?  There is nothing cuter than OWL LOVE. I think this card would work well for Valentine’s Day, or any day with the simple HELLO!

This card is not difficult, but it’s got a little cutting and some die cutting and punching.

I started with Spellbinders Labels 20 and cut two green shapes and embossed them. I though these worked well for bushy foliage. I also die cut a branch from the Spellbinders BUGS set, and I also embossed it and added some ink for added contrast.

I stamped the Owl with some Crystal Blue ink from Close To My Heart – the owl is a Stamp of the Week from Unity Stamp Company. I have a love for owls, and some of my close friends call me Owlie – it’s even the name of my character on the Wii. It’s okay to laugh! I fussy cut the owl – not as hard as SOME shapes. I doodled around his feet and gave him some eyelashes with a Copic multiliner. I stencilled on his nose – I stamped a second owl and cut out the nose. I colored and outlined. An owl can be blue and sit in a tree, but a blue nose – never! I added some metal brads for his eyes.

I punched a heart using a Fiskars punch. The paper is from Canvas Corp and has all kinds of love words on it. I added a Red Heart Button. I tied a little bow with some Doodlebug Design Twine. At the bottom, I stamped “hello” from the same stamp set. I colored in the heart with a Copic Marker and added some Turquoise Rhinestones from Want2Scrap.

I did a little rounding at the bottom of the card and on the sentiment.

That’s it!

I hope you will love this card.


Hello by Allie Gower

Buttons Galore Supplies used to make the OWL LOVE YOU Card:

Additional supplies used to make the OWL LOVE YOU Card:

  • Cardstock – My Favorite Things Replenishments
  • Stamps – Unity Stamp Company (Stamp of the Week Program)
  • Dies – Spellbinders Labels 20 and Bugs
  • Punches – Scalloped Heart and Corner Punch from Fiskars
  • Twine – Doodlebug Design
  • Ink – Close To My Heart and Copic
  • Bling – Want2Scrap

Do you want this OWL to love you forever?

I will send him to a lucky winner.

Leave a comment and PIN him. I know, you were going to do that anyway. Good luck and I’ll see you all next week.

Sunday Card Making: A Valentine that Holds a Gift Card

Are you giving a Gift Card to your Valentine this year? Gift cards are great, but they rarely come in a cute package. Am I right?

This is easy peasy. You will be ready to present those gift cards in style, for every occasion.

Ready? Here we go!

Valentine for Gift Card


I’ve mad a standard card. A2 – 4.25 x 5.5 – inside though, I added a flap. Above, I’ve stamped and cut and matted, and added a row of glorious Buttons in Laura Kelly Walters fabulously bright colors. Easy peasy, right?

I like to stamp a lot of images and keep them in a baggy so when I’m bored, yes, like that ever happens. What I mean is when I have time, I can sit down and color. Then, when I need a card, I already have images ready to go. This cute set of stringing hearts is from the Unity Stamp Company’s Kit of the Month. I stamped with Tuxedo Black Memento ink from Tsukineko/Imagine Crafts and colored with a few Copic Markers.

Shall we head inside?

Below, I added the flap. I stamped and fussy cut my hot cup of steamy cocoa and the sweet sentiment sentiment. Inside the flap, I stick on my cards with a Glue Dot. If you prefer, you can tape up the sides and make a pocket.


Valentine Gift Card Flap


Buttons Galore and More Supplies Used to Make This Valentine Gift Card:

Additional Supplies Used to Make This Valentine Gift Card:

  • Cardstock – My Favorite Things Replenishments
  • Ink – Tsukineko Memento in Tuxedo Black, Copic Markers
  • Stamps – Unity Stamp Company Kit of the Month Set.


I hope you enjoyed this EASY PEASY Gift Card lesson.

This card could be for you! Leave a comment and Pin the card and a lucky winner will be chosen.

Join me again next week – hope you like OWLS!


4

Winter Card: Sunday Cardmaking


I’m back with another winter card for Sunday Cardmaking here at Buttons Galore. I had some holiday pictures to mail off, and I thought this was a fun winter card to create, to accompany those pictures.

Do you love a winter card that’s easy to make? I used all scraps!

Directions for making Winter Card

I started with an 8.5 x 11″ sheet of cardstock from  My Favorite Things and cut a piece 4 x 8″ and folded it in half. Yes, I like to make cards in all shapes and sizes.

I cut a piece of patterned Authentique paper sized 3.5″ square. I also cut a 1 x 4.5″ strip of the same paper, and flipped it over. I stamped snowflakes on this piece, and accented it with Dimensional Pearls Paint and bling and pearls from Want2Scrap. I colored the pearls with a Copic marker to get a matching shade. I stamped the sentiment on a scrap of white cardstock and trimmed it into strips. The edges were lined with a Copic marker, and then colored with a lighter shade to match the patterned papers.

The sentiment reads …

In the depths of winter, I finally learned that within me was an invincible summer.

I promise, Spring is coming. The trees will soon be singing again.

To finish off the winter card, I punched some snowflakes from the matching patterned paper and painted them with some glossy accents and sprinkled Sugar Shimmer. These are adhered with dimensional foam dots. I then chose three matching Clear Round Buttons and punched out small circles of a coordinating Authentique patterned paper. I adhered the paper to the buttons with Glossy Accents then I attached the Clear Round Buttons and two Rustic Coconut Shell Buttons using Memory Book Dot ‘n Go glue dots.

Buttons Galore Products Used 

 Promotional Products Used

Additional Products 

  • Bling – Want2Scrap
  • Glossy Accents, Dimensional Pearls Paint – Ranger Ink
  • Snowflakes – Punch
  • Ink – Copic, Memento
  • Stamp – Close To My Heart


 Thank you for joining us this Sunday. I’ll be back next Sunday with another project idea.
0

Fun Snowman Treat Bags: Sunday Cardmaking

I’m back with a Sunday Cardmaking project.  This week we’re making Snowman Treat Bags. I made a couple of quick, simple snowman thank you cards, and wanted something nice to put them in. Snowman Treat Bags are perfect!

Let me walk you through the process. It’s not hard at all!

Directions for making Snowman Treat Bags

I started with two 8.5 x 11″ sheets of cardstock from  My Favorite Things and cut a piece 6 x 11″. I scored from left to right at 1″, 6″, and 7″ and folded them, and then adhered them together. For the bottom of the bag I used a piece of cardstock that was 3 x 6″ and I scored it to create three one inch folds. I attached that at the bottom. The handle at the top is 1 x 11″ and it’s held in place with two brads and some adhesive.

I stamped my image on cardstock and colored with Copics, and stamped again on patterned Authentique paper – cutting out the scarf and part of the hat. I used a Copic Marker to highlight some of the shadows. I cut a panel out of the same patterned Authentique paper sized 5.25″ square. I colored the edges of the bag and the mat with a Copic marker to match the patterned paper. The paper edges are inked in the same color using the broad tip. I embellished the stamped image with Polar White Flower Soft and some red pearls from Want2Scrap. I painted the snowman with Smooch. He doesn’t sparkle much in the photo, but after a few coats, he was twinkling in person.

I tied a bow around the bag to hold the cards in place and cinched the bow with some Doodlebug twine and a Wild White Button topped with a Brilliant Blue Button anchored by a snowflake brad. I placed the stamped image on the bag with some dimensional foam tape. Five holes were punched at the top, and I placed five Wild White Buttons held in place by brads. You can simple spread the “legs” on the brads a little to go through the holes, then squeeze them back together to attach to the paper. I used 3 in 1 Craft Glue just to help them stay put.

Buttons Galore Products Used 

 Promotional Products Used

Additional Products 

  • Snowflake Brads and Red crepe ribbon – Creative Impressions
  • Ivory Flowers – Petaloo
  • Bling – Want2Scrap
  • Snowflakes – Punch
  • Ink – Copic, Memento
  • Stamp – unknown
  • Twine – Doodlebug Designs
  • Fluff – Polar White Flower Soft


 Thank you for joining us for Snowman Treat Bags: Sunday Cardmaking. I’ll be back next Sunday with another project for you.
2

Winter Card Ideas: Sunday Cardmaking

I’m back with more winter card ideas. I had some holiday pictures to mail off, and I thought this was a fun card to create, to accompany those pictures.

Let me walk you through the process. It’s not hard at all!

WINTER CARD IDEAS

Directions for making Winter card

I started with an 8.5 x 11″ sheet of cardstock from  My Favorite Things and cut a piece 6″ square and folded it in half. I chose this size, because inside, I added a Caribou gift card, just a little after the holidays treat! I just stuck it on with a Memory Book Dot ‘n Go glue dot.

A piece of patterned Authentique paper sized 2.75 x 5.75″ was added. I colored the edges of the card with a Copic marker to match the patterned paper. The paper edges are inked in the same color using the broad tip. I stamped the image on cardstock with Memento ink and then taped my die in place using Washi tape to hold it in place. When I removed the die and paper, I left the tape, and sponged on some Close to My Heart ink to distress it.

I placed some white chipboard on a Wacky Tape Sheet and die cut a bird and wing. The bird was then glittered with some Clearsnap Sugar Shimmer.

I bent the vine in the shape I wanted and adhered it with 3 in 1 Craft Glue. I threaded some Rustic Coconut Shell Buttons using some twine, and adhered the buttons using Memory Book Dot ‘n Go glue dots and a few foam squares for added dimension. I added the rest of the embellishments using 3 in 1 Craft Glue and Memory Book Dot ‘n Go glue dots.

Buttons Galore Products Used 

 Promotional Products Used

Additional Products 

  • Sizzix – Bird Die
  • Ivory Flowers – Petaloo
  • Vine – Prima
  • Bling – Want2Scrap
  • Snowflakes – Punch
  • Ink – Copic, Memento
  • Stamp – Close To My Heart
  • Twine – Doodlebug Designs


I am glad you joined us for Sunday Cardmaking. I hope you are enjoying the Winter Card Ideas. I’ll be back next Sunday with another project idea.
4

Shabby Chic Card: Sunday Cardmaking

Cardmaking - Winter I

I’ve got a shabby chic card for today’s Sunday Cardmaking post – and it is very easy. It’s for a friend that loves all things shabby chic.

Let me walk you through the process. It’s not hard at all!

Directions for a shabby chic card:

I started with an 8.5 x 11″ sheet of cardstock from  My Favorite Things and cut a strip 5.5 x 11″ and folded it in half. A piece of patterned Authentique paper sized 5.25″ square was added. I placed some plain cardstock on a Wacky Tape Sheet and die cut a star. The star was then glittered with some Clearsnap gold glitter. I adhered the large snowflake and glittered star and button with 3 in 1 Craft Glue.

I gathered the fibers and ribbons. I cinched them together with Wild White Buttons and Rustic Coconut Shell Buttons using some twine. I punched two small holes in the cardstock behind each button, and tied the ribbon to the card. The rest of the embellishments were adhered using 3 in 1 Craft Glue and Memory Book Dot ‘n Go glue dots.

Once everything was dry, I placed the card, along with a few small gifts, in a bubble mailer. It’s a little late for Christmas, but it’s a nice winter card, too. Don’t you think?

Buttons Galore Products Used for the shabby chic card:

 Promotional Products Used

Additional Products 

Large White Glittered Snowflake and Christmas Tree – Michael’s, Poinsettia and Gold Leaves – Prima, Assorted Fibers – Basic Grey, White Flowers – unknown


Thank you for joining us this Sunday and my shabby chic card. I’ll be back next Sunday with another winter card idea.

3

Powered by WordPress. Designed by WooThemes