Header

Tag Archives | Kids’ Fall Crafts

Reversible Halloween & Thanksgiving Fall Countdown Calendar

It’s hard to believe it, but fall is creeping upon us and with Fall comes holiday after holiday. Here is a fun and fairly easy fall countdown calendar project to count down the days till Halloween and/or Thanksgiving using some easy to find craft materials and of course…buttons!

Here’s what you need to make this fun, reversible witch and scarecrow fall countdown calendar.

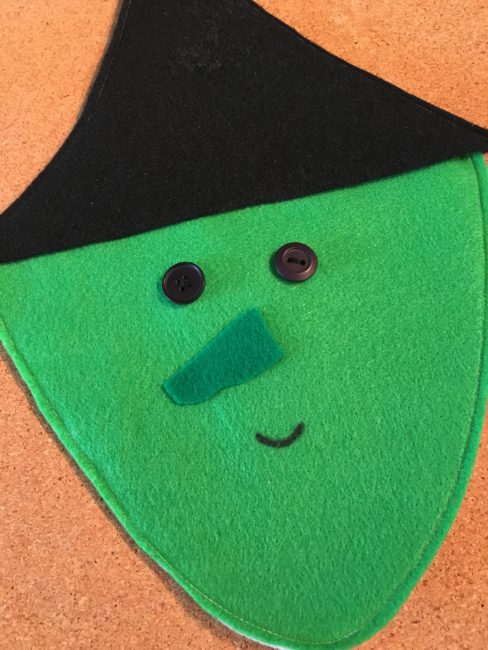
First, print out your patterns and cut out the felt according to the directions on the patterns. You will have 1 brown hat, 1 black hat, 1 green face and 1 tan face. If you are sewing your project together, go ahead and sew around the curved part of the face. Don’t forget to leave the top open! You will then need to sew your black button eyes onto the green face and onto the tan face.

If you are gluing your project, go ahead and glue the two faces together and then glue the black buttons for eyes onto each face. Let dry well before going on to the next step.

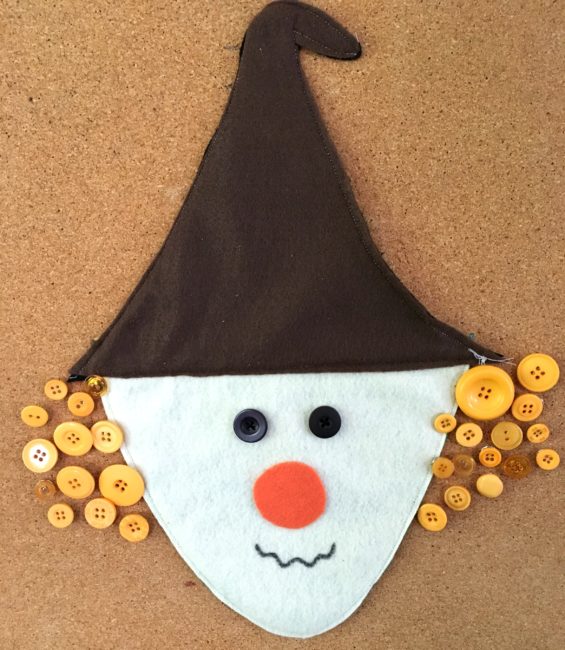
Cut out a wiggly, carrot shaped nose for your witch, along with a circle nose for your scarecrow. Attach them to your faces with craft glue. Use the black permanent marker to draw a mouth for each.

Next, if you are sewing your hats together, sew up and around the two sides, leaving the straight edge of the hat open. Then slide your face inside the two pieces of your hat and sew together; making sure to sandwich all the layers of the felt together when you are sewing.

If you are gluing, glue the hat pieces together and then slide the face inside the hat. You can attempt to glue these parts together, but I would recommend leaving them unattached. They will appear one piece when you attach it to the cork board.

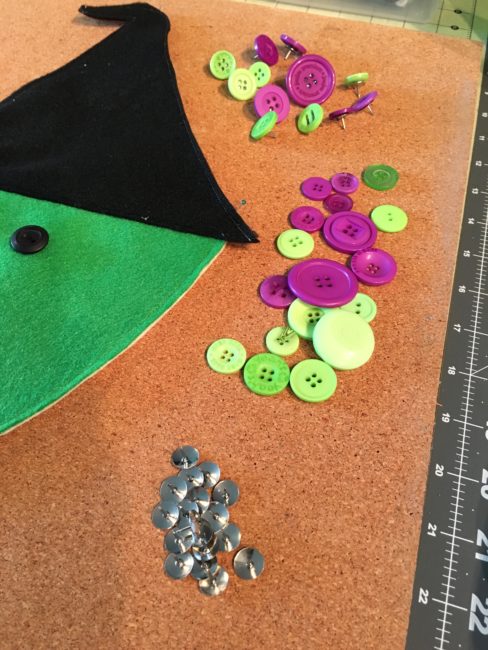
Heat up your hot glue gun and while it’s heating, separate your button pack. The witch hair uses 31 of the purple and green buttons and the scarecrow uses 28 of the orange  from the Trick or Treat Button Basics BCB129. Glue the buttons on the thumb tacks and let them cool off.

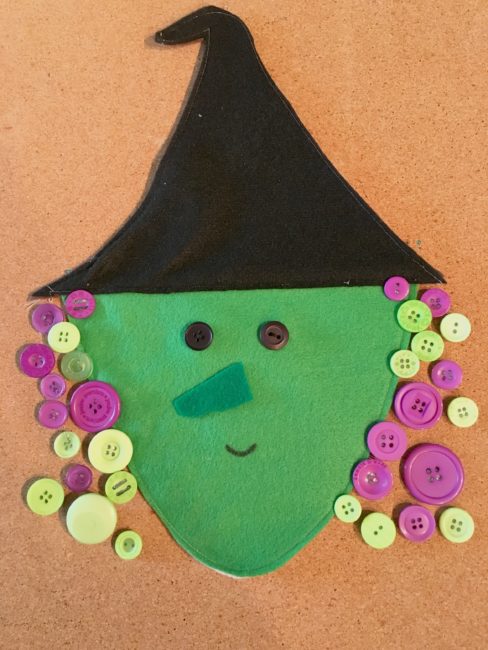
And there you have it! Attach your witch to your cork board with straight pins and either start out with all 31 buttons, taking one off each day until Halloween arrives, or add a button each day as it gets closer! Whichever you prefer!

Once Halloween is past, flip over your witch and start counting down the days till Thanksgiving!

fall countdown calendar

Thanksgiving and Halloween are coming fast…make your fall countdown calendar today!

0

Learning To Sew with Buttons on a Fall Hoop Project

I’ve had the joy of teaching sewing in our community for the past few years to children of all ages. When people discover that I teach sewing to children, the first question they always ask is “what is a good beginner project?” This little hoop project is always my number one go-to project for anyone who has never used a needle and thread and wants to learn to sew. Even better, including buttons in the project ensures that they will also walk away with a great life skill for those days when a button pops off their shirt at the most inopportune time – and you know we’ve all been there!

learn to sew with a fall hoop project

First up, let’s talk supplies. You will need the following to complete the two hoops:

Now that you’ve gathered up all your materials, let’s get started and learn to sew! First, you need to find something to make a roughly 8-inch circle. Find a bowl or something round to trace around and cut your blue felt into two circles.

Next up, let’s set them in your embroidery hoops. This is often the most daunting thing for new stitchers, but all you need to do is make an embroidery hoop “sandwich”! Unscrew the bolt just a little and separate the hoops into two parts. Take the part without the bolt and lay it on your workspace. Then lay your blue felt circle on top of the bolt-less hoop and sandwich them all together by setting the hoop with the bolt outside the bottom hoop and the felt. Tighten up the screw and pull on the edges of the felt just a little to make everything tight.

learn to sew fall hoop project

Now, print out the pattern page with your initial on it and cut out the correct initial for you. Use the paper pattern to cut out your initial with whatever color felt you would like. Then gather up your Sunflower buttons, the felt flowers, and your initial. Lay them all out on top of the hoop in whatever design you like best.

learn to sew fall hoop project

Now it’s time to stitch down your initial. Take your white thread and needle. Thread your needle and make sure to put a knot on the end! We are going to stitch down our initial with a running stitch.

learn to sew fall hoop project

learn to sew fall hoop project

First up, bring your needle up from the bottom and pull gently until your knot stops the thread. Don’t pull too hard or you will pull your knot all the way through! Then bring your needle back down about a pinky finger width from where you started and pull the thread all the way through. Then bring your needle back up and then down as you stitch along the middle of your initial letter. Always remember to “follow your thread” and stitch with a rhythm of up and down.

learn to sew fall hoop project

Lastly, grab your Sunflower buttons and lay them on top of your felt flowers. These are shank style buttons and can be a little more tricky for little hands to sew. Start out by bringing your needle up from the bottom and pull it all the way through till the knot stops you. Then take your button shank and thread it onto the needle and thread. Let it fall all the way down and then put your needle back through the top of the felt, pulling the button tight to the felt as you pull the thread from underneath. Continue to sew the button on a few more times and then move down to the next flower.

To finish off my hoops, I like to take a hot glue gun and glue the rim of extra felt around to the inside of the back. But sometimes I like to leave it open like a little ruffle fringe! Your choice!

Put a pretty ribbon through the top and you are done!

learn to sew fall hoop project

To make the tree, gather up a scrap of brown felt and cut out a little tree trunk. You have the option of sewing down your tree trunk with a running stitch or you can use some craft glue to glue it down.

learn to sew fall hoop project

After gluing down the trunk, grab your green thread, a needle and the Apple Pickin buttons from the pack and stitch those down in random spots above your tree trunk. These are the same shank style as the sunflowers. Next, pour out your bag of Green Haberdashery buttons and choosing those that fit best, stitch down green buttons around your apples to fill in the tree.

learn to sew fall hoop project

After you sew all the button “leaves” down, take your apple basket and apples and stitch those down near the bottom of the tree. Add a little ribbon for hanging, finish the back by gluing the felt edge to the back or leave it like a ruffle.

learn to sew fall hoop project

And there you go, two little Fall inspired hoops – these are perfect projects for beginning stitchers!

learn to sew fall hoop project


SaveSave

1

Button Pumpkin

How about a Button Pumpkin for your door? This will be fun to do with the kids.

I used Hot Glue, but the kids could easily use a Craft Glue or Glue Dots.

Button Pumpkin

Supplies for Making Button Pumpkin:

Instructions:

  1. Cut paper pieces for pumpkin. Lightly trace center of pumpkin as a guideline. 
  2. Place buttons on bottom half – the outer edges, and glue into place. Add small buttons on top of other buttons for added interest and to hide some of the paper.
  3. Create the center panel. Adhere buttons. Attach to pumpkin using dimensional foam tape – you may need a few layers.
  4. Add stem and leaf. Draw “veins” on leaf and shade to add interest.

Project Note:

If you do use hot glue and you have a lot of strands of glue and messy areas, just hit them with a hair dryer or heat embossing tool – they’ll melt away – easy peasy. If you do not have an electronic cutter, print one offline onto cardstock or trace, or be brave and draw one by hand.

Enjoy. Happy Fall Y’all!

1

Powered by WordPress. Designed by WooThemes