
Hello Everyone! This is Katie from the Buttons Galore & More Design Team, and today I have a fun button pumpkin wall hanging project to get you in the mood for fall decorating!

This project is perfect to make if you are looking for an easy and inexpensive way to spice up your home décor for fall, halloween, and thanksgiving. I got the idea for this project when I saw a felt wall hanging designed for the 4th of July. However, instead of a pumpkin, the original wall hanging had a heart shaped flag made from felt and a few buttons. Personally, I thought the idea was cute but could be recreated in a simpler way. In today’s project, the whole DIY is only 3 steps and does not involve any sewing tools!
To decorate my button pumpkin wall hanging, I used two button sets for a majority of the project. Those two button sets were the 28 Lilac Lane ”Pumpkin Spice” Embellishment Bottle and the Buttons Galore Autumn Value Pack. Both of these button sets provided a wide variety of harvest/fall style buttons and worked really well together. My personal favorite out of both of these sets was definitely the 28 Lilac Lane ‘”Pumpkin Spice” Embellishment Bottle because you received a ton of beautiful orange colored buttons.
So, to find out how to make your own pumpkin button wall hanging, keep reading below!
Supplies for Making Button Pumpkin Wall Hanging:
- 28 Lilac Lane ”Pumpkin Spice” Embellishment Bottle
- 28 Lilac Lane ”Paws and Pets” Embellishment Kit
- Buttons Galore Autumn Value Pack
- 2 pieces of felt (in the same color)
- 1 piece of burlap
- dowel rod or wooden stick
- ruler
- scissors
- pen
- hot glue gun + glue sticks
How to Make a Button Pumpkin Wall Hanging
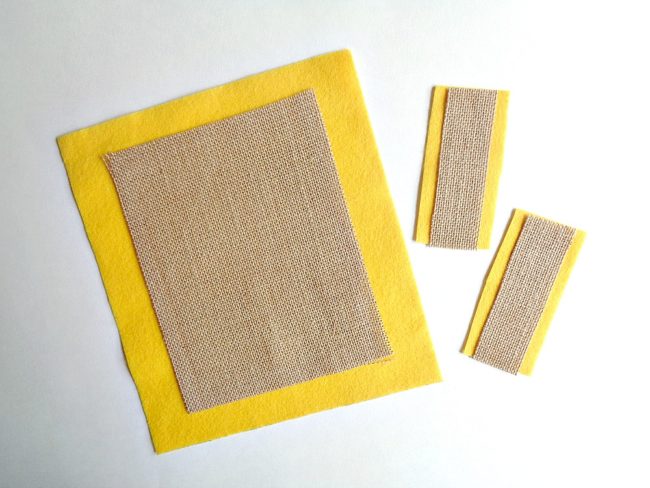
Step 1: Cut one piece of felt that measures 9 inches by 10 inches and two smaller pieces of felt that measure 2 inches by 3 ½ inches. Then cut out one piece of burlap that measures 6 ½ inches by 8 inches and two smaller pieces that measure 1 inch by 3 ½ inches.
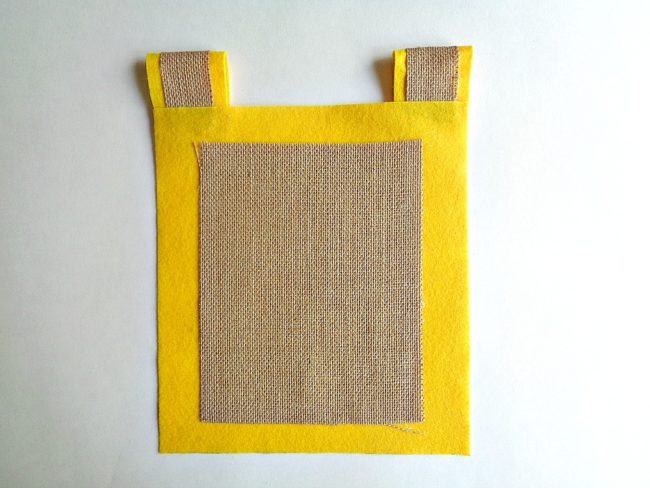
Step 2: Layer the larger piece of burlap centered onto the larger piece of your felt and glue it into place with your hot glue gun. Then layer the smaller pieces of burlap centered onto your smaller pieces of felt and glue them into place. Finally, create loops for your wall hanging by folding over the smaller pieces of felt/burlap and glue them in the corners of your larger felt piece.
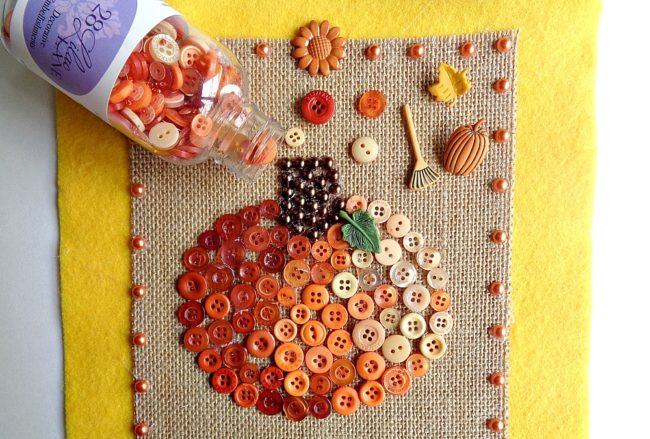
Step 3: Now take your pen and draw the outline of a pumpkin onto your burlap. Then begin gluing on your buttons around the outside of your pumpkin to create an outline and then fill in the middle with more buttons. For my pumpkin, I decided to go from dark to light buttons and then use shimmering half pearl flat backs for the stem. Finally, use the rest of your normal buttons and decorative buttons to decorate the rest of your wall hanging.
For my button pumpkin wall hanging I used the following:
- Buttons and Shimmering Half Pearl Flat Backs from 28 Lilac Lane ”Pumpkin Spice” Embellishment Bottle
- Shimmering Half Pearl Flat Backs from 28 Lilac Lane ”Paws and Pets” Embellishment Kit (this was used for the pumpkin stem)
- Decorative buttons (like the green leaf) from Buttons Galore Autumn Value Pack
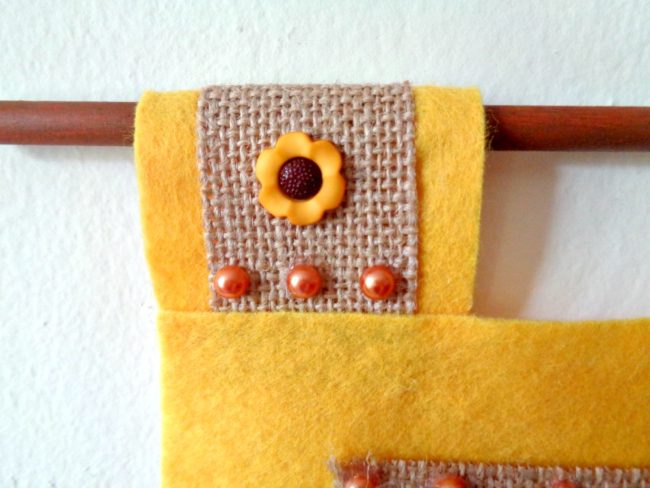
Once you are happy with how your button pumpkin wall hanging looks, you are ready to hang it on the wall by sliding a dowel rod or wooden stick through the two loops!

I loved how this pumpkin button wall hanging turned out and I think it would look so cute as part of a gallery wall!
While creating this project, I did free hand the design of the pumpkin. However, if you are not comfortable drawing your own pumpkin (in step 3), you can always google ”pumpkin template” and print out a template to trace around. With that being said, if pumpkins are not your thing, you could always change the main image to be something else. For example, I think a leaf created from the 28 Lilac Lane “Toasted Graham” Embellishment Bottle would look really pretty.
If you made this pumpkin button wall hanging, what 28 Lilac Lane items would you use?
