Header

Tag Archives | Beacon’s

Altered Tea Box

Warm up someone specials day with this Altered Tea Box.

It’s something that many of you out there may see everyday, a simple tea box filled with that glorious beverage that soothes as you drink it. Why not take this simple drinkable pleasure and make it into a pretty and inexpensive gift to brighten someone’s day.

Altered Tea Box

I covered this Altered Tea Box with patterned papers and embellishments by JilliBean Soup, Cold Avocado Soup Collection.

The beautiful gold button is from the Vintage Gold Button pack by Buttons Galore & More.

IMG_8670

Covering the Altered Tea Box was fairly simple, just use a ruler to measure all dimensions and cut accordingly.

Altered Tea Box Project Recipe:

IMG_8664

An Altered Tea Box would make a brilliant gift for so many occasions. Get Well, Just to Brighten Your Day, Missing You, Mother’s/Father’s Day, House Warming, or a Hostess Gift.

IMG_8679

Thank you so very much for stopping by and checking out my Altered Tea Box, check out some more great gift ideas while you’re here.

0

Sunday Cardmaking: Create an Easy Ombre Easter Card

Let’s Create an EASY Ombre Easter Card. Ombre is a Spanish word that simply means graduated colors. I really wanted to make a simple, sweet Easter card, and I did not want to use traditional colors. These blues are calm and happy to me. I like the tone on tone bunnies on the blue strips, and the bunnies and button eggs add a little bit of fun. I used a paint sample as my inspiration. This simple construction allows you to make a lot of cards, without a lot of work.

Easter Card

Material used to create an EASY Ombre Easter card:

Buttons Galore Product used:

I also used:

  • Dies – Quickutz
  • Embossing Folder – Sizzix
  • Cardstock – Bazzill
  • Dimensional Adhesive

Directions for making the EASY Ombre Easter Card:

  1. Create a 5×7″ card base.
  2. Cut four pieces of graduated blue cardstock 4 3/4 x 1.5″ and emboss. Place on card, leaving room in between each strip. Adhere to card base.
  3. Die cut four bunnies from same graduated card stock. Adhere to graduated blue rectangles with dimensional adhesive.
  4. Add buttons.

I hope you enjoyed this Ombre Easter card. When I’m making a lot of cards, I love to do something simple, but different. You can get a lot of strips out of each piece of blue card stock, and cut all your bunnies out of the scraps. When my kids were little we used to have their friends over and make fun cards for friends and family.

Thanks for stopping by.

Allie

1

Sunday Cardmaking: Make a St. Patrick’s Day Card

Let’s make a FUN St. Patrick’s Day Card.

As an Irish lass, I just HAVE to share another St. Patrick’s Day Card.

Sometimes I like to make easy cards. Other times, I like to pull out lots of toys and tools, and for this card, I got out sandpaper, my scor-board and all kinds of goodies.

Let’s get started!

Happy St Patricks Day

How to make this FUN St. Patrick’s Day Card.

  1. The base is a standard A2 size (4.25 x 5.5″) and opens at the bottom. The dark green mat is 4 x 5.25″ and the white mat it 3.75 x 5″. The light green strip is 1.75 x 5″.
  2. Score light green strip at every quarter inch. Turn over and sand score lines.
  3. Stamp sentiment. Assemble card.
  4. Die cut three clovers and sand around the edges. Tie twine through assorted Orange Buttons and adhere to clovers with Beacon’s.
  5. Add ribbon. I like to fold over the top edge and use Red Liner Tape to hold it down. Add bling to ribbon and dot i in St. Patrick’s.

We had a lot of fun using tools, but it wasn’t hard… Was it? Grammar Note – the plural of clover really is clovers, I researched it. It sounds wrong, doesn’t it?

Buttons Galore Supplies Used to make this FUN St. Patrick’s Day Card.

Cross Promotional Supplies Used to make this FUN St. Patrick’s Day Card.

Additional Supplies Used to make this FUN St. Patrick’s Day Card.

  • Sentiment, Twine, and Cardstock – Close To My Heart (I like to use this cardstock because it has a fun white core.)
  • Clover die cuts – Sizzix
  • Sandpaper – Bazzill Sanding tool
  • Ribbon – American Crafts
  • Bling – Want2Scrap
  • Dimensional Foam Adhesive

Thanks for stopping by today. I hope your St. Patrick’s Day is filled with luck to last you through the year.

2

Fun Snowman Treat Bags: Sunday Cardmaking

I’m back with a Sunday Cardmaking project.  This week we’re making Snowman Treat Bags. I made a couple of quick, simple snowman thank you cards, and wanted something nice to put them in. Snowman Treat Bags are perfect!

Let me walk you through the process. It’s not hard at all!

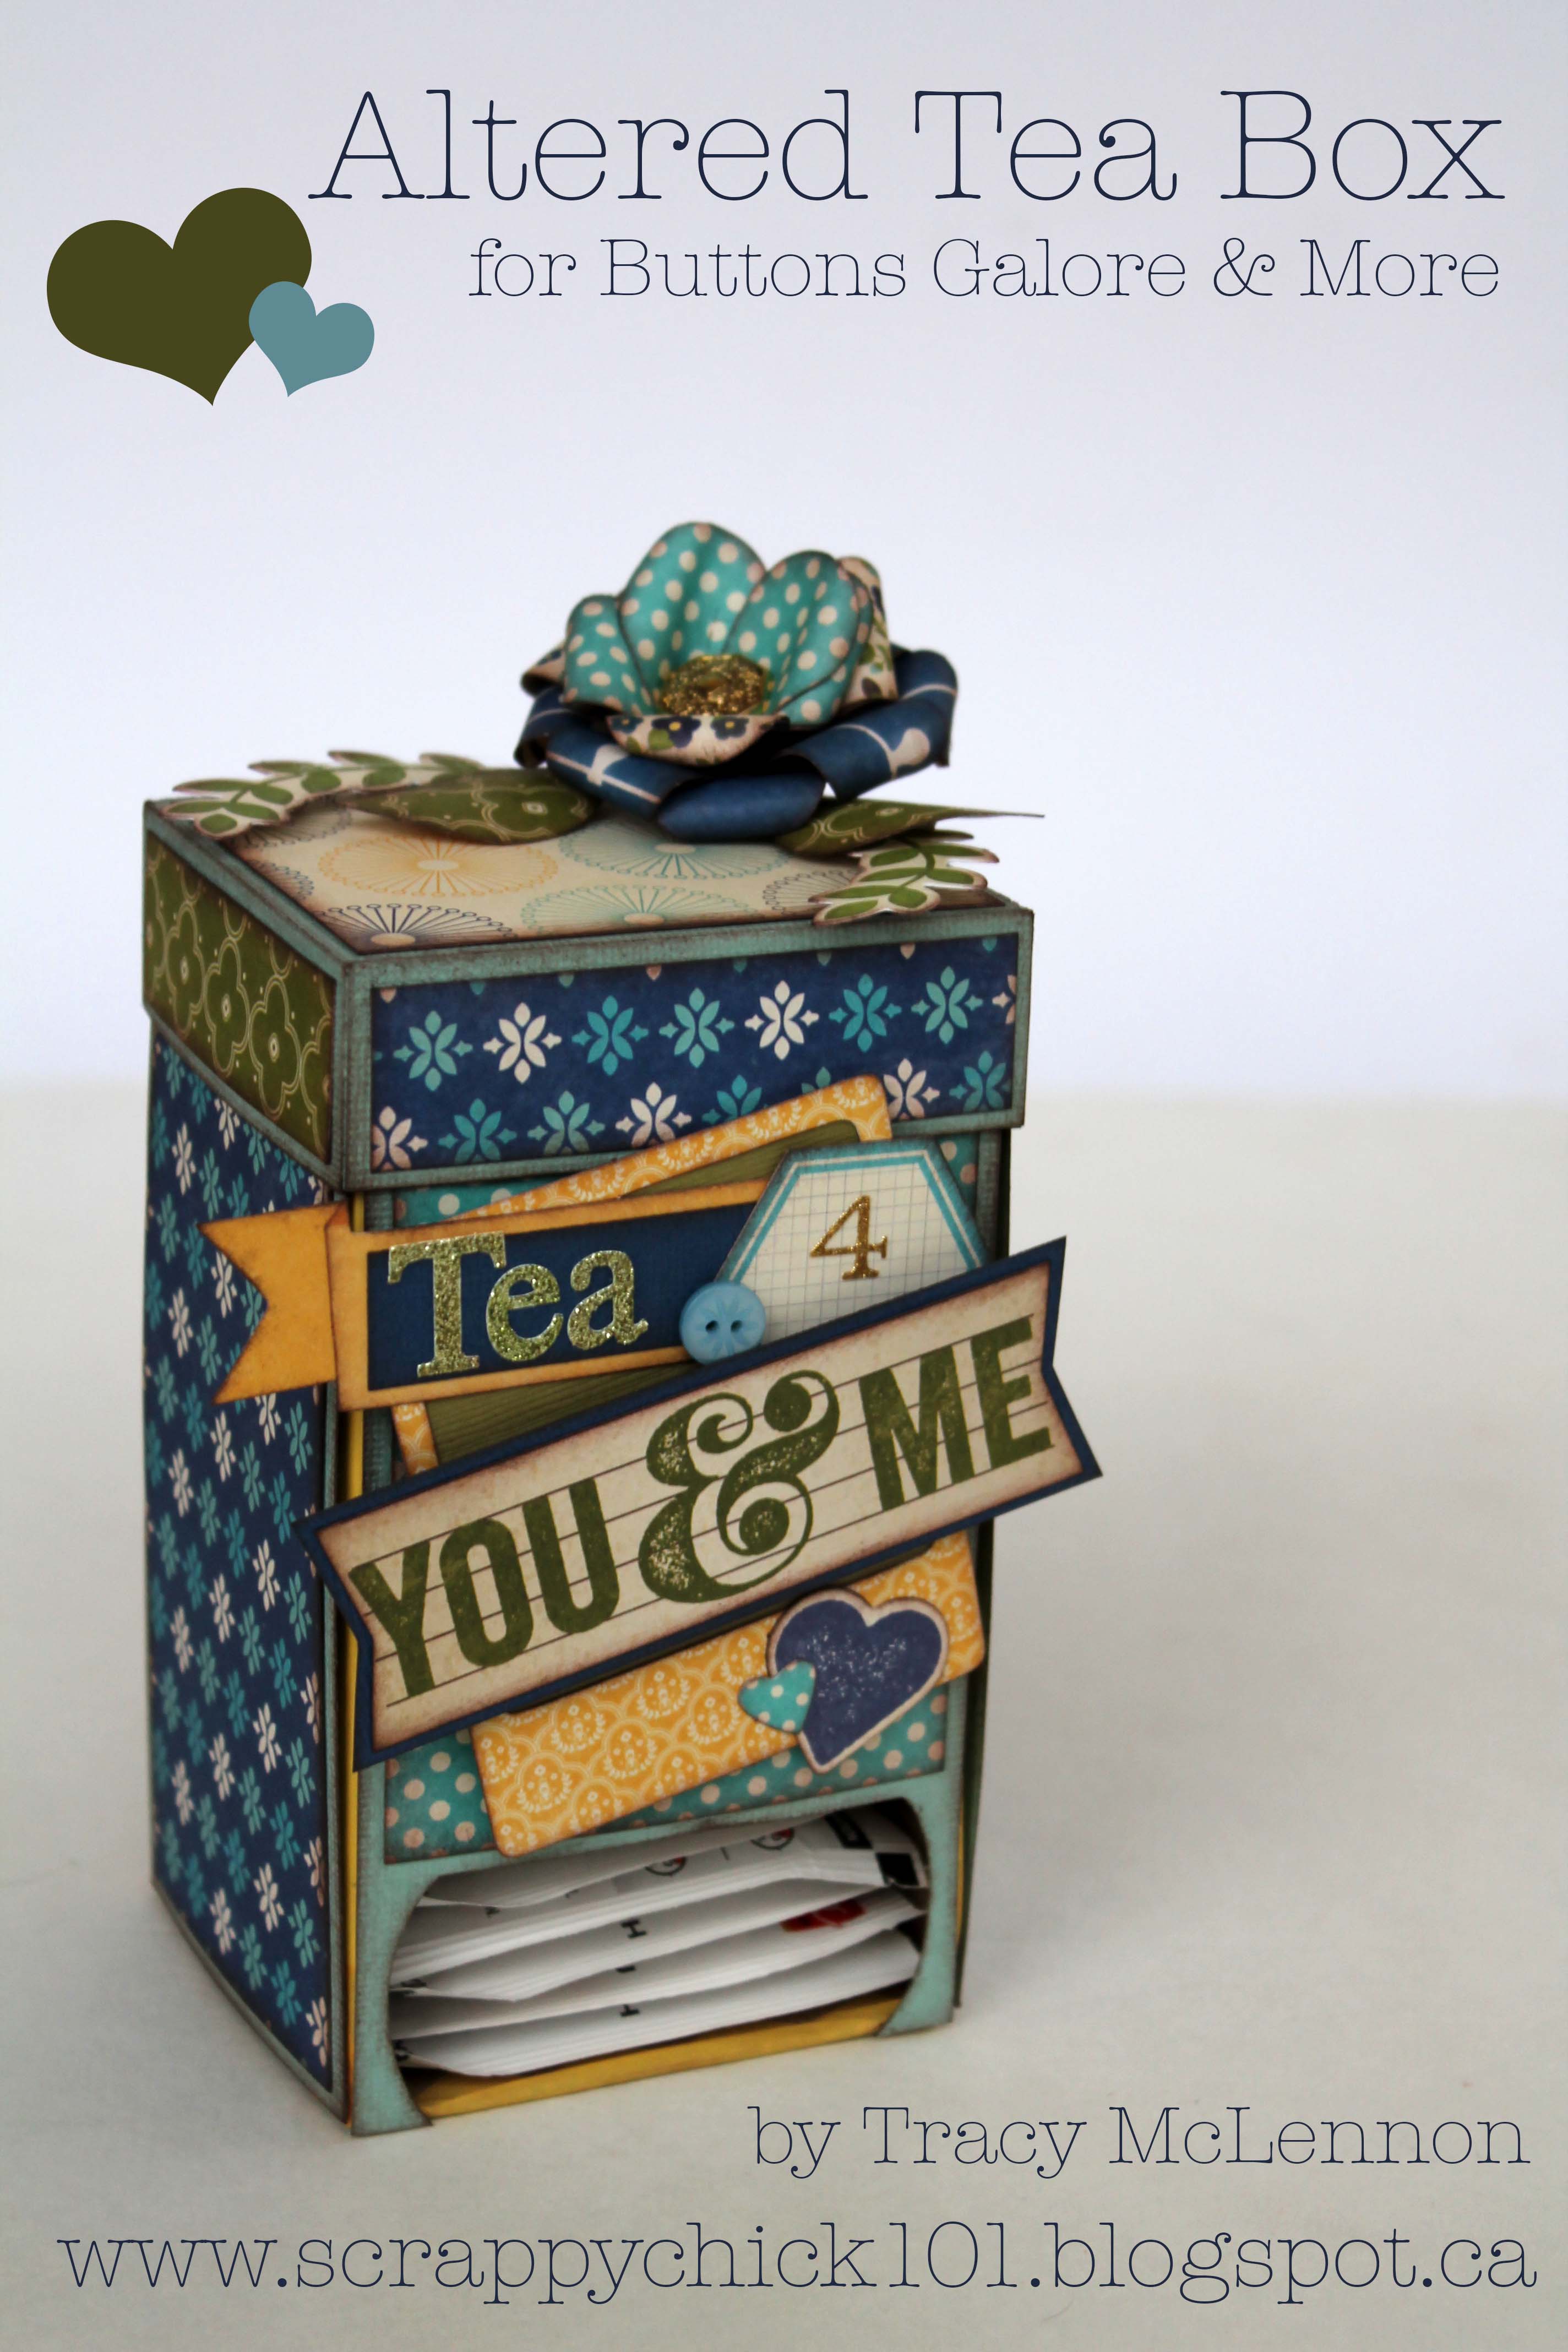
Directions for making Snowman Treat Bags

I started with two 8.5 x 11″ sheets of cardstock from  My Favorite Things and cut a piece 6 x 11″. I scored from left to right at 1″, 6″, and 7″ and folded them, and then adhered them together. For the bottom of the bag I used a piece of cardstock that was 3 x 6″ and I scored it to create three one inch folds. I attached that at the bottom. The handle at the top is 1 x 11″ and it’s held in place with two brads and some adhesive.

I stamped my image on cardstock and colored with Copics, and stamped again on patterned Authentique paper – cutting out the scarf and part of the hat. I used a Copic Marker to highlight some of the shadows. I cut a panel out of the same patterned Authentique paper sized 5.25″ square. I colored the edges of the bag and the mat with a Copic marker to match the patterned paper. The paper edges are inked in the same color using the broad tip. I embellished the stamped image with Polar White Flower Soft and some red pearls from Want2Scrap. I painted the snowman with Smooch. He doesn’t sparkle much in the photo, but after a few coats, he was twinkling in person.

I tied a bow around the bag to hold the cards in place and cinched the bow with some Doodlebug twine and a Wild White Button topped with a Brilliant Blue Button anchored by a snowflake brad. I placed the stamped image on the bag with some dimensional foam tape. Five holes were punched at the top, and I placed five Wild White Buttons held in place by brads. You can simple spread the “legs” on the brads a little to go through the holes, then squeeze them back together to attach to the paper. I used 3 in 1 Craft Glue just to help them stay put.

Buttons Galore Products Used 

 Promotional Products Used

Additional Products 

  • Snowflake Brads and Red crepe ribbon – Creative Impressions
  • Ivory Flowers – Petaloo
  • Bling – Want2Scrap
  • Snowflakes – Punch
  • Ink – Copic, Memento
  • Stamp – unknown
  • Twine – Doodlebug Designs
  • Fluff – Polar White Flower Soft


 Thank you for joining us for Snowman Treat Bags: Sunday Cardmaking. I’ll be back next Sunday with another project for you.
2

Winter Card Ideas: Sunday Cardmaking

I’m back with more winter card ideas. I had some holiday pictures to mail off, and I thought this was a fun card to create, to accompany those pictures.

Let me walk you through the process. It’s not hard at all!

WINTER CARD IDEAS

Directions for making Winter card

I started with an 8.5 x 11″ sheet of cardstock from  My Favorite Things and cut a piece 6″ square and folded it in half. I chose this size, because inside, I added a Caribou gift card, just a little after the holidays treat! I just stuck it on with a Memory Book Dot ‘n Go glue dot.

A piece of patterned Authentique paper sized 2.75 x 5.75″ was added. I colored the edges of the card with a Copic marker to match the patterned paper. The paper edges are inked in the same color using the broad tip. I stamped the image on cardstock with Memento ink and then taped my die in place using Washi tape to hold it in place. When I removed the die and paper, I left the tape, and sponged on some Close to My Heart ink to distress it.

I placed some white chipboard on a Wacky Tape Sheet and die cut a bird and wing. The bird was then glittered with some Clearsnap Sugar Shimmer.

I bent the vine in the shape I wanted and adhered it with 3 in 1 Craft Glue. I threaded some Rustic Coconut Shell Buttons using some twine, and adhered the buttons using Memory Book Dot ‘n Go glue dots and a few foam squares for added dimension. I added the rest of the embellishments using 3 in 1 Craft Glue and Memory Book Dot ‘n Go glue dots.

Buttons Galore Products Used 

 Promotional Products Used

Additional Products 

  • Sizzix – Bird Die
  • Ivory Flowers – Petaloo
  • Vine – Prima
  • Bling – Want2Scrap
  • Snowflakes – Punch
  • Ink – Copic, Memento
  • Stamp – Close To My Heart
  • Twine – Doodlebug Designs


I am glad you joined us for Sunday Cardmaking. I hope you are enjoying the Winter Card Ideas. I’ll be back next Sunday with another project idea.
4

Shabby Chic Card: Sunday Cardmaking

Cardmaking - Winter I

I’ve got a shabby chic card for today’s Sunday Cardmaking post – and it is very easy. It’s for a friend that loves all things shabby chic.

Let me walk you through the process. It’s not hard at all!

Directions for a shabby chic card:

I started with an 8.5 x 11″ sheet of cardstock from  My Favorite Things and cut a strip 5.5 x 11″ and folded it in half. A piece of patterned Authentique paper sized 5.25″ square was added. I placed some plain cardstock on a Wacky Tape Sheet and die cut a star. The star was then glittered with some Clearsnap gold glitter. I adhered the large snowflake and glittered star and button with 3 in 1 Craft Glue.

I gathered the fibers and ribbons. I cinched them together with Wild White Buttons and Rustic Coconut Shell Buttons using some twine. I punched two small holes in the cardstock behind each button, and tied the ribbon to the card. The rest of the embellishments were adhered using 3 in 1 Craft Glue and Memory Book Dot ‘n Go glue dots.

Once everything was dry, I placed the card, along with a few small gifts, in a bubble mailer. It’s a little late for Christmas, but it’s a nice winter card, too. Don’t you think?

Buttons Galore Products Used for the shabby chic card:

 Promotional Products Used

Additional Products 

Large White Glittered Snowflake and Christmas Tree – Michael’s, Poinsettia and Gold Leaves – Prima, Assorted Fibers – Basic Grey, White Flowers – unknown


Thank you for joining us this Sunday and my shabby chic card. I’ll be back next Sunday with another winter card idea.

3

Powered by WordPress. Designed by WooThemes