Header

Tag Archives | authentique

Red White and Blue Card

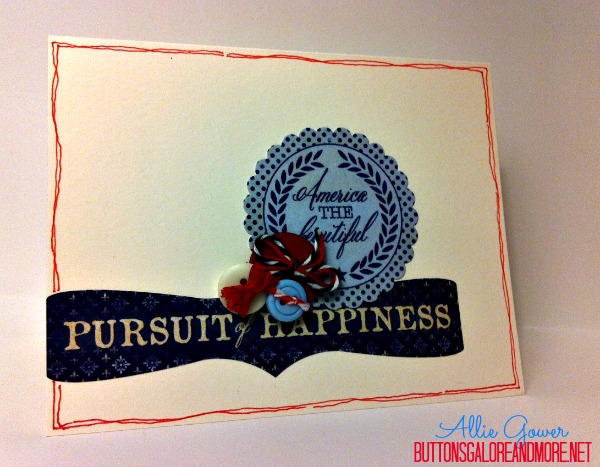
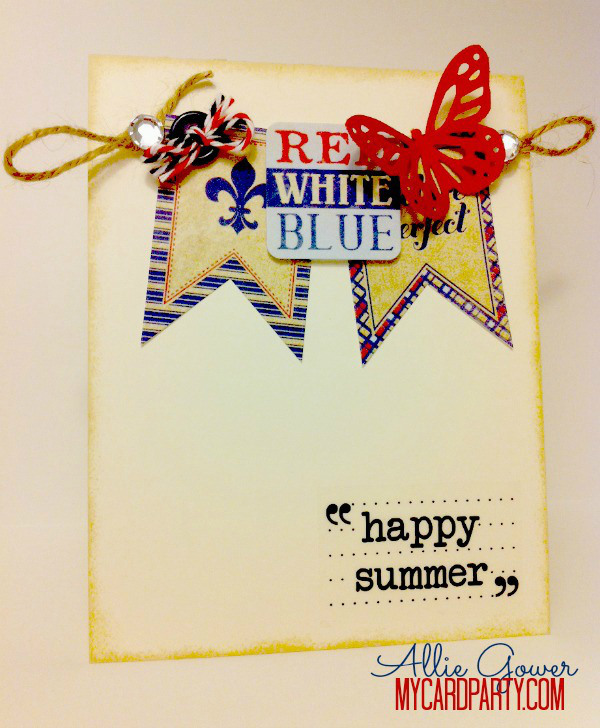
Create a quick Red White and Blue card to celebrate Summer

Hi, it’s Allie here from My Card Party. I had some extra patriotic stickers from Authentique, and lots of patriotic cardstock from DiscountCardstock.com so I thought I’d make a summery card.

Red, White, and Blue

Happy Summer to you!

Red White and Blue Happy Summer to You


Shopping at Buttons Galore is always fun. There are so many categories and styles. My favorite thing to do is Shop by Color. I had so much red, white and blue going on in this card that black buttons seemed to be the way to go. There are many choices in the Black and White category.  I settled on a package of Cookies and Cream Buttons.

Supplies for creating Red White and Blue Card

  • Cookies and Cream Buttons
  • Ivory Smooth Cardstock #80 and Currant Red Cardstock (Discount Cardstock)
  • Bulk Bling (Want2Scrap)
  • Stickers (Authentique, Sentiment – SRM)
  • Twine and Baker’s Floss (Jo-Anne’s Fabrics)

Tools

  • Other – Martha Stewart Butterfly Punch, Martha Stewart Score Board
  • Hot Glue (AdTech)
  • Scissors (Westcott Brand)
  • Desert Sand Ink and Ink Sponge (Tsukineko)

Instructions

  1. Create a card base 4.25 x 11 and fold in half.
  2. Ink edges of card front with Tsukineko Desert Sand Memento Dew Drop.
  3. Tie multiple colors of floss through Cookies and Cream Button.
  4. Add twine and embellishments. Finish with sentiment and bling.

Thanks for joining me today. I’ll see you next Sunday.

See more of my creations at My Card Party.

0

Patriotic Button Card

Let’s make another easy Patriotic Button Card.

This is simply stickers and a cluster of Patriotic buttons. I used hot glue which allows me to put buttons where I want, and cluster them together. I finished off the card with some simple doodling.

Let the kids loose with buttons and stickers, and have them make some cards for friends and neighbors.

Patriotic Button Card

Supplies

  • Buttons – Patriotic
  • Stickers – Authentique
  • Cardstock – Discount Cardstock
  • Twine, Embroidery Thread
  • Adhesive – Hot Glue by Adtech
  • Copic Multiliner

How to Make a Patriotic Button Card

  1. Create a card base 4.25 x 11″ and fold in half.
  2. Apply stickers.
  3. Tie twine and embroidery thread to buttons and glue to card.
  4. Doodle edges.


Thanks for joining me today.

See more of my creations at MyCardParty.

0

Sunday Cardmaking: Making a Valentine that Hides a Sweet Surprise

Have you ever wanted to hide a sweet surprise in a Valentine card?

Sweet Surprise Card by Allie Gower

This is a standard Easel Card Valentine with a sweet surprise.

If you’ve never created an Easel Card, here is a very easy tutorial. On my Valentine, I’ve made the size a little larger – the card is 6×6.

The sweet surprise is that in the bottom half of this Valentine, I’ve wrapped a Hershey Bar.

I added a panel of black cardstock, and scored it to make a little sleeve for the candy bar. I didn’t glue it, so the card doesn’t have to be destroyed to enjoy the candy. Apparently, no one wants to rip up the card to get to the goods! Nothing stops me from getting to chocolate.

Hershey Valentine

Sometimes people ask about the buttons and other dimensional items, and if it makes the cards hard to mail, or expensive.

Once you get a certain size, you’re paying a premium anyway, so I just pop my cards in a bubble mailer or a small box, and grin and bear the cost of mailing. My only other option is to hand deliver, which I love to do! I don’t want to hold back on my creativity – so I say layer it on, and on, and on.

Buttons Galore and More Supplies Used to Create this Valentine:

Chocolate Covered Strawberries

Strawberries

Mini Glue Dots

Beacon’s 3-in-1 Glue

Additional Supplies Used to Create this Valentine:

Paper – Authentique

Stamps – Gina K Designs

Ink – Close to My Heart

Dies – Spellbinders

Bling – Want2Scrap

Thanks for checking out my Valentine.

If you have any questions, just leave me a comment below.

I’d like to send this card to someone! Leave a comment here, and PIN the photo for a chance to win.

15

Winter Card: Sunday Cardmaking


I’m back with another winter card for Sunday Cardmaking here at Buttons Galore. I had some holiday pictures to mail off, and I thought this was a fun winter card to create, to accompany those pictures.

Do you love a winter card that’s easy to make? I used all scraps!

Directions for making Winter Card

I started with an 8.5 x 11″ sheet of cardstock from  My Favorite Things and cut a piece 4 x 8″ and folded it in half. Yes, I like to make cards in all shapes and sizes.

I cut a piece of patterned Authentique paper sized 3.5″ square. I also cut a 1 x 4.5″ strip of the same paper, and flipped it over. I stamped snowflakes on this piece, and accented it with Dimensional Pearls Paint and bling and pearls from Want2Scrap. I colored the pearls with a Copic marker to get a matching shade. I stamped the sentiment on a scrap of white cardstock and trimmed it into strips. The edges were lined with a Copic marker, and then colored with a lighter shade to match the patterned papers.

The sentiment reads …

In the depths of winter, I finally learned that within me was an invincible summer.

I promise, Spring is coming. The trees will soon be singing again.

To finish off the winter card, I punched some snowflakes from the matching patterned paper and painted them with some glossy accents and sprinkled Sugar Shimmer. These are adhered with dimensional foam dots. I then chose three matching Clear Round Buttons and punched out small circles of a coordinating Authentique patterned paper. I adhered the paper to the buttons with Glossy Accents then I attached the Clear Round Buttons and two Rustic Coconut Shell Buttons using Memory Book Dot ‘n Go glue dots.

Buttons Galore Products Used 

 Promotional Products Used

Additional Products 

  • Bling – Want2Scrap
  • Glossy Accents, Dimensional Pearls Paint – Ranger Ink
  • Snowflakes – Punch
  • Ink – Copic, Memento
  • Stamp – Close To My Heart


 Thank you for joining us this Sunday. I’ll be back next Sunday with another project idea.
0

Fun Snowman Treat Bags: Sunday Cardmaking

I’m back with a Sunday Cardmaking project.  This week we’re making Snowman Treat Bags. I made a couple of quick, simple snowman thank you cards, and wanted something nice to put them in. Snowman Treat Bags are perfect!

Let me walk you through the process. It’s not hard at all!

Directions for making Snowman Treat Bags

I started with two 8.5 x 11″ sheets of cardstock from  My Favorite Things and cut a piece 6 x 11″. I scored from left to right at 1″, 6″, and 7″ and folded them, and then adhered them together. For the bottom of the bag I used a piece of cardstock that was 3 x 6″ and I scored it to create three one inch folds. I attached that at the bottom. The handle at the top is 1 x 11″ and it’s held in place with two brads and some adhesive.

I stamped my image on cardstock and colored with Copics, and stamped again on patterned Authentique paper – cutting out the scarf and part of the hat. I used a Copic Marker to highlight some of the shadows. I cut a panel out of the same patterned Authentique paper sized 5.25″ square. I colored the edges of the bag and the mat with a Copic marker to match the patterned paper. The paper edges are inked in the same color using the broad tip. I embellished the stamped image with Polar White Flower Soft and some red pearls from Want2Scrap. I painted the snowman with Smooch. He doesn’t sparkle much in the photo, but after a few coats, he was twinkling in person.

I tied a bow around the bag to hold the cards in place and cinched the bow with some Doodlebug twine and a Wild White Button topped with a Brilliant Blue Button anchored by a snowflake brad. I placed the stamped image on the bag with some dimensional foam tape. Five holes were punched at the top, and I placed five Wild White Buttons held in place by brads. You can simple spread the “legs” on the brads a little to go through the holes, then squeeze them back together to attach to the paper. I used 3 in 1 Craft Glue just to help them stay put.

Buttons Galore Products Used 

 Promotional Products Used

Additional Products 

  • Snowflake Brads and Red crepe ribbon – Creative Impressions
  • Ivory Flowers – Petaloo
  • Bling – Want2Scrap
  • Snowflakes – Punch
  • Ink – Copic, Memento
  • Stamp – unknown
  • Twine – Doodlebug Designs
  • Fluff – Polar White Flower Soft


 Thank you for joining us for Snowman Treat Bags: Sunday Cardmaking. I’ll be back next Sunday with another project for you.
2

Winter Card Ideas: Sunday Cardmaking

I’m back with more winter card ideas. I had some holiday pictures to mail off, and I thought this was a fun card to create, to accompany those pictures.

Let me walk you through the process. It’s not hard at all!

WINTER CARD IDEAS

Directions for making Winter card

I started with an 8.5 x 11″ sheet of cardstock from  My Favorite Things and cut a piece 6″ square and folded it in half. I chose this size, because inside, I added a Caribou gift card, just a little after the holidays treat! I just stuck it on with a Memory Book Dot ‘n Go glue dot.

A piece of patterned Authentique paper sized 2.75 x 5.75″ was added. I colored the edges of the card with a Copic marker to match the patterned paper. The paper edges are inked in the same color using the broad tip. I stamped the image on cardstock with Memento ink and then taped my die in place using Washi tape to hold it in place. When I removed the die and paper, I left the tape, and sponged on some Close to My Heart ink to distress it.

I placed some white chipboard on a Wacky Tape Sheet and die cut a bird and wing. The bird was then glittered with some Clearsnap Sugar Shimmer.

I bent the vine in the shape I wanted and adhered it with 3 in 1 Craft Glue. I threaded some Rustic Coconut Shell Buttons using some twine, and adhered the buttons using Memory Book Dot ‘n Go glue dots and a few foam squares for added dimension. I added the rest of the embellishments using 3 in 1 Craft Glue and Memory Book Dot ‘n Go glue dots.

Buttons Galore Products Used 

 Promotional Products Used

Additional Products 

  • Sizzix – Bird Die
  • Ivory Flowers – Petaloo
  • Vine – Prima
  • Bling – Want2Scrap
  • Snowflakes – Punch
  • Ink – Copic, Memento
  • Stamp – Close To My Heart
  • Twine – Doodlebug Designs


I am glad you joined us for Sunday Cardmaking. I hope you are enjoying the Winter Card Ideas. I’ll be back next Sunday with another project idea.
4

Shabby Chic Card: Sunday Cardmaking

Cardmaking - Winter I

I’ve got a shabby chic card for today’s Sunday Cardmaking post – and it is very easy. It’s for a friend that loves all things shabby chic.

Let me walk you through the process. It’s not hard at all!

Directions for a shabby chic card:

I started with an 8.5 x 11″ sheet of cardstock from  My Favorite Things and cut a strip 5.5 x 11″ and folded it in half. A piece of patterned Authentique paper sized 5.25″ square was added. I placed some plain cardstock on a Wacky Tape Sheet and die cut a star. The star was then glittered with some Clearsnap gold glitter. I adhered the large snowflake and glittered star and button with 3 in 1 Craft Glue.

I gathered the fibers and ribbons. I cinched them together with Wild White Buttons and Rustic Coconut Shell Buttons using some twine. I punched two small holes in the cardstock behind each button, and tied the ribbon to the card. The rest of the embellishments were adhered using 3 in 1 Craft Glue and Memory Book Dot ‘n Go glue dots.

Once everything was dry, I placed the card, along with a few small gifts, in a bubble mailer. It’s a little late for Christmas, but it’s a nice winter card, too. Don’t you think?

Buttons Galore Products Used for the shabby chic card:

 Promotional Products Used

Additional Products 

Large White Glittered Snowflake and Christmas Tree – Michael’s, Poinsettia and Gold Leaves – Prima, Assorted Fibers – Basic Grey, White Flowers – unknown


Thank you for joining us this Sunday and my shabby chic card. I’ll be back next Sunday with another winter card idea.

3

Christmas Craft with Styrofoam Brand Authentique

Vintage Style  Christmas Craft Decoration with Styrofoam cubes, Authentique papers, Red and Green Button Galore Buttons.

Christmas Craft Bristle Brush Tree

Today I bring you a Christmas Craft for your home.  The Vintage Christmas Cube has an old world Christmas feel.

I love digging through my Buttons Galore buttons. I selected several from the Color Bulk buttons. This is a tree I purchased at a hobby shop (for train landscape). I simply adhered tiny buttons with Mini Glue Dots.

Close Up

This is the full project.

I used a styrofoam cube from the Styrofoam Corporation. It’s about 3×3. I cut some papers (Authentique) 2 3/4″ square and applied them with Buttons Galore’s Beacon 3-in-1 glue. I’ve decorated some chipboard letters (Want2Scrap) with some sharpies that I received in my DT box. I then coated those with a layer of adhesive and some glitter from Donna Salazar. I finished the project off with a little bling (also Want2Scrap) and a Christmas tree that is decorated with what else … BUTTONS, using some mini dots, also from Buttons Galore. There are also some buttons held in place with a fancy pin (Maya Road).

 Supplies for  Vintage Style Christmas Craft :

  • styrofoam cube – Styrofoam Corporation

  • buttons – Color Bulk buttons

  • paper – Authentique

  • bling, chipboard – Want2Scrap

  • adhesive – Beacon’s, Glitter It, Mini Dots – all from Buttons Galore

  • glitter – Clearsnap

  • flowers – prima

  • stick pin – Maya Road

    I hope you enjoyed this Vintage Style Christmas Craft.
2

Powered by WordPress. Designed by WooThemes