Header

Tag Archives | Bulk Buttons

Bugs and Kisses

Bugs and Kisses. What’s cuter than that?

Sharing a fun and easy summer card. Do you have paper that you love, that you’ve used and used til you just have scraps, and none of the fun embellishments left to go with it? When you have buttons in every color, you don’t have to be afraid of not having anything to match! I love kitschy old retro papers. This is paper from my “retro” stash, and of course, I was able to find matching embellies, and make a few too!

Bugs and Kisses


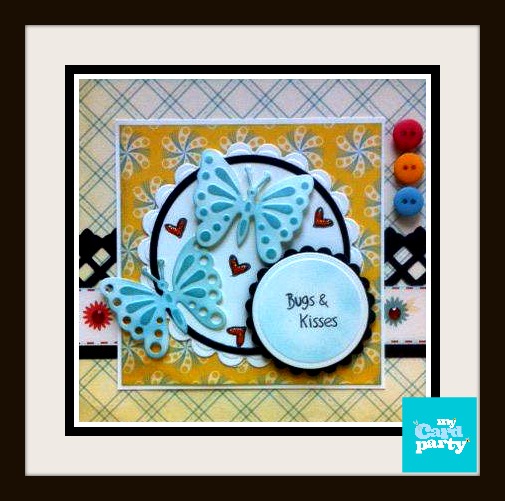
Supplies for Bugs and Kisses Card

Buttons Galore – Satin Finish buttons from Orange, Blue and Fire Engine Red Bulk Collections

Other – Papers – Cosmo Cricket, Dies – Spellbinders Paper Arts, Ink and Glitter Glue – Ranger, Bling – Want2Scrap

Notes and Tips

  • Use Spellbinders dies to cut, emboss and stencil. Tape dies in place with repositionable tape and run through machine, repeat and emboss, then daub on ink. This is done on the butterflies and the sentiment circle.

Thanks for stopping by. See more of my creations at My Card Party.

Keep celebrating your sweet life with creativity.

Allie Blog Signature


2

Button Topiary Trio for Spring

Make a button topiary.  As the Ohio winter lingers on, I find that I am incorporating more bright cheery decor into my home.  This trio of button flower topiaries fits the bill perfectly, adding a touch of Spring inside to hold me over until the snow melts and the daffodils peek through the ground again.  You can make the button topiary as large as you would like.  I chose to make a trio of small button topiaries.

Button Flower Topiary Trio


Material used to make Button Topiary:

Buttons Galore & More Products used:

I also used:

  • 3 Paper Mache’ Flowerpots (2 small, one medium)
  • Yellow acrylic and glitter paints (DecoArt)
  • 1″ Paintbrush
  • 22 gauge craft wire
  • needle nosed jewelry pliers
  • Styrofoam Foam balls, cut (diameter of pots)
  • felt flowers
  • Coordinating ribbon
  • Green surface material (like that used for models)
  • Beacon Fabri-Tac liquid adhesive

 Directions to make Button Topiary:

Paint and prepare flower pot for button topiary flowers

 First, paint each flowerpot using yellow acrylic paint.  Apply multiple coats as necessary.  Paint one coat of yellow glitter paint over acrylic paint and let dry completely.   Cut foam balls in half, placing one half in each painted flowerpot, and glue in place. (Steps a & b, above)  Spread glue over foam ball and press green model foliage into glue to secure (Step c).

Glue felt flower to button blossom

Cut 8″ length of craft wire.  Choose 3-4 buttons of various colors and sizes from Color Bulk Buttons, and thread one end of wire up through holes on buttons.  Bend wire in half using needle nose jewelry pliers and thread back down through button holes from top.  Twist wire ends together under button “blossom” to add strength.   Glue felt flower to back of several blossoms if desired (I added them to large button topiary only).

Push button stems into flower pot topiary

Once all the flowers are finished, start adding them to the flowerpots.  Add a small dab of glue to the ends of the wire stems and gently push into the foam ball to secure.   Fill in remaining spaces, bending wire stems as necessary to create arrangement.  Repeat for additional flowerpots.

Single button flower topiary

To complete the button topiary, wrap each flowerpot with coordinating ribbon and glue into place.  For small topiaries, remove shank from Daisy Delights button and glue over ribbon ends.  For large topiary, remove shank from Daisy Delights button and glue in center of Tangerine Stitched button.  Glue button stack over ends of ribbon.

Enjoy the touch of welcome Spring color of a button topiary !

Thanks for stopping by,
Carla

5

Sunday Card Making: A Valentine that Holds a Gift Card

Are you giving a Gift Card to your Valentine this year? Gift cards are great, but they rarely come in a cute package. Am I right?

This is easy peasy. You will be ready to present those gift cards in style, for every occasion.

Ready? Here we go!

Valentine for Gift Card


I’ve mad a standard card. A2 – 4.25 x 5.5 – inside though, I added a flap. Above, I’ve stamped and cut and matted, and added a row of glorious Buttons in Laura Kelly Walters fabulously bright colors. Easy peasy, right?

I like to stamp a lot of images and keep them in a baggy so when I’m bored, yes, like that ever happens. What I mean is when I have time, I can sit down and color. Then, when I need a card, I already have images ready to go. This cute set of stringing hearts is from the Unity Stamp Company’s Kit of the Month. I stamped with Tuxedo Black Memento ink from Tsukineko/Imagine Crafts and colored with a few Copic Markers.

Shall we head inside?

Below, I added the flap. I stamped and fussy cut my hot cup of steamy cocoa and the sweet sentiment sentiment. Inside the flap, I stick on my cards with a Glue Dot. If you prefer, you can tape up the sides and make a pocket.


Valentine Gift Card Flap


Buttons Galore and More Supplies Used to Make This Valentine Gift Card:

Additional Supplies Used to Make This Valentine Gift Card:

  • Cardstock – My Favorite Things Replenishments
  • Ink – Tsukineko Memento in Tuxedo Black, Copic Markers
  • Stamps – Unity Stamp Company Kit of the Month Set.


I hope you enjoyed this EASY PEASY Gift Card lesson.

This card could be for you! Leave a comment and Pin the card and a lucky winner will be chosen.

Join me again next week – hope you like OWLS!


4

Powered by WordPress. Designed by WooThemes