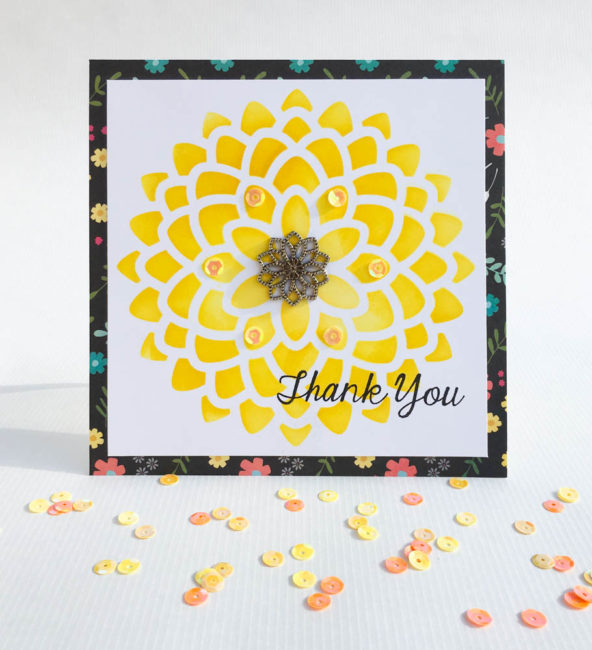
It’s always a good idea to have some thank you cards on hand to share your gratitude with others. This big thank you card featuring 28 Lilac Lane products will make an impact at a full 6″ by 6″ in size!

Supplies Needed:
- 28 Lilac Lane “A New Leaf” embellishment kit
- Button Shank Remover
- PPA Matte Adhesive
- White Smooth Cardstock
- Stencil One stencil (Mum)
- Tim Holtz Distress Ink Pads (Squeezed Lemonade, Mustard Seed)
- Tim Holtz Mini Ink Blending tool
- Black Ink
- Simple Stories “I am” paper (Thankful)
- Pink & Main stamps (Many Thanks)
When I was making this, I knew that I wanted a button to decorate the center of this design but wasn’t sure what until I saw this rosette button in the “A New Leaf” kit while I was creating my card. It’s very ornate, but it matches almost perfectly the mum design! The visual repetition that it creates is perfect. I could also have taken a regular button and tied it on with contrasting thread for some pizzaz.
I also like using sequins that are the same color as the background that I place them on as an embellishment! This technique adds a bit of shine and dimension to the design without the sequins being too garish. On this card, I used the sequins to create a sun kissed circle of highlight around the center of the flower.
To begin making your extra big thank you card, cut a piece of white smooth cardstock that is 6″ x 6″. Center the stencil on the cardstock. Holding firmly, begin to scrub the lighter color of ink (squeezed lemonade) into the design with the ink blending tool. A circular motion blends best.
Work the Squeezed Lemonade into the center half of the design and then switch to the darker color (Mustard Seed) for the outer half of the design. Once all of the design has been inked, switch to a clean blending foam and begin to rub in a circular motion to blend the colors together where they meet.
Once the ink is dry, trim the white cardstock so that it is just slightly larger than the stenciled mum design. Cut a piece of matching patterned paper that is 6″ x 6″ in size. Adhere the stenciled design on top of the patterned paper and attach them both on top of a card base. (The card base can be made by folding a 6″ x 12″ piece of paper in half.)
Stamp the sentiment in the bottom corner of the card. Cut the shank off of the featured button and glue it into the center of the stenciled design with PPA Matte adhesive. This adhesive is great for working with our buttons – it will hold the button in place but will dry clear and invisible if it leaks out around the edges of the button or through the holes in the button!
For the finishing touch on your big thank you card, select a few yellow sequins from the assortment in the 28 Lilac Lane “A New Leaf” embellishment kit, and glue them onto the design around the center of the flower using PPA Matte.
Floral design cards are great for many occasions. Instead of “thank you” consider substituting sentiments for birthdays, housewarming, or other occasions. This easy card will bring a smile to someone’s face!
Nancy Nally
Latest posts by Nancy Nally (see all)
- We’re blog hopping with Poppy Stamps! - September 28, 2017
- Announcing…New 28 Lilac Lane Premium Collection Sequin Tins! - June 30, 2017
- Announcing…the new Buttons Galore Design Team! - May 18, 2017


No comments yet.