Header

Tag Archives | Styrofoam

Candy Cane Button Tree

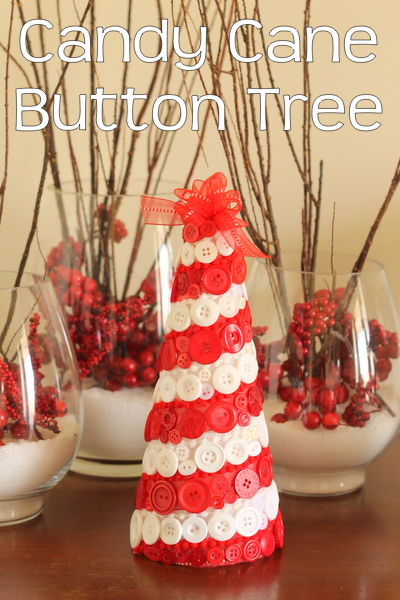
My candy cane button tree is the perfect addition to your holiday decor.  Grab a styrofoam cone and get started on this fun tree today.  It may look complicated but I will show you how to lay out your colors to get those perfect candy cane stripes every time.

candy cane button tree-005

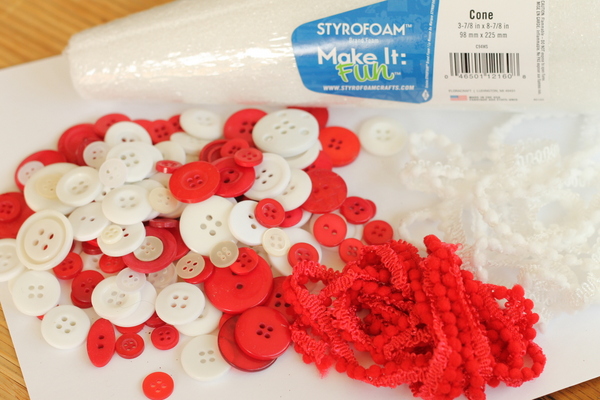
Candy Cane Button Tree Supplies:

  • Red and white buttons
  • 3 7/8″ Styrofoam cone
  • May Arts mini pom pom fringe in red and white
  • May Arts shear red ribbon (not shown below)
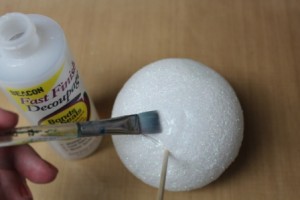
  • Hot glue

candy cane button tree-001

Candy Cane Button Tree Instructions:

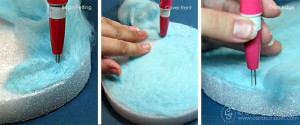
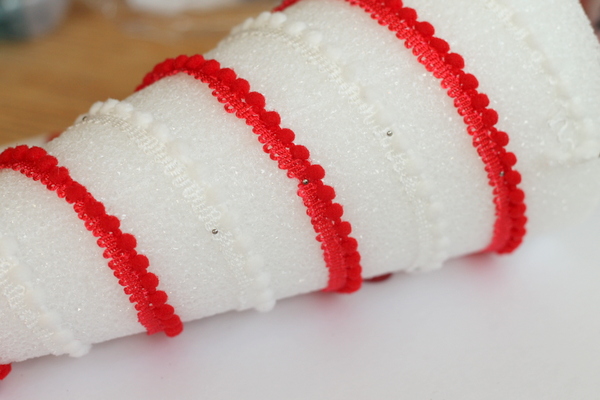
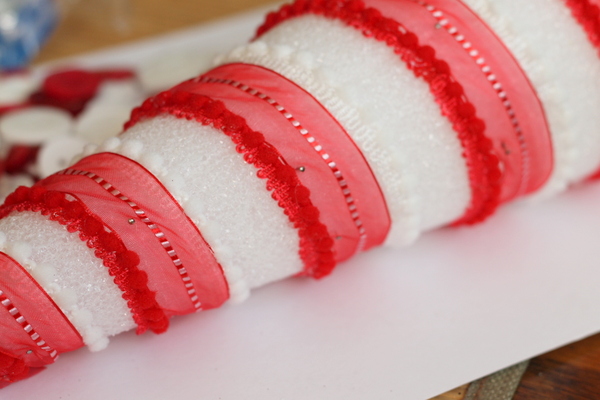
1.  Wrap your red and white mini pompom fringe around the cone.  Hold in place with sewing pins for now.  Adjust until you like the spacing and location of your candy cane stripes.  Hot glue your fringe into place and remove the pins.

candy cane button tree-002

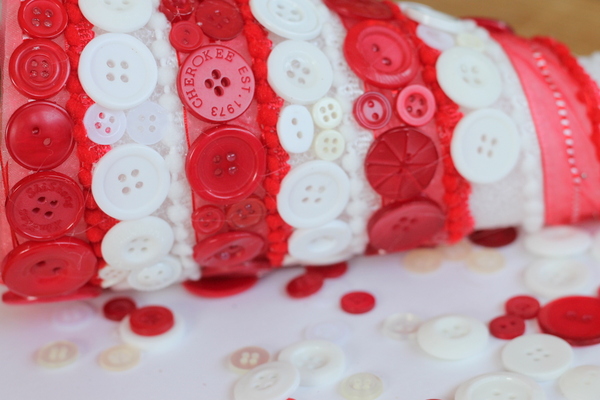
2.  You don’t want the white cone showing through your red buttons so add the red shear ribbon just in the “red” stripes of your candy cane.  Again hold in place with pins for now.

candy cane button tree-003

3.  Because the ribbon is shear, there is no need to hot glue it down before you add your buttons.  The hot glue will seep through the ribbon with the buttons on top.  So start adding various size buttons with hot glue filling the red and white stripes all the way up the cone.  Remove the pins in the shear ribbon as you go up the red stripe.

candy cane button tree-004

4.  Once you reach the top, add a mini bow from some additional red shear ribbon.  Again attach with hot glue.

candy cane button tree-006

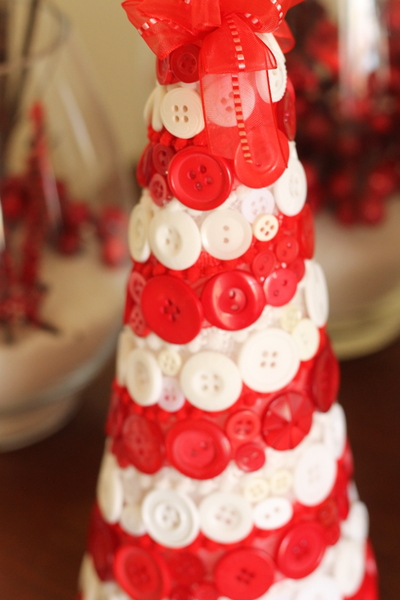
5.  Use a hair dryer to remove any glue strings.  You are ready to display your candy cane button tree for the holidays.  This is a super fun way to celebrate the holidays in your home.

candy cane button tree-007

I love candy canes and of course candy cane button trees.  How about you?  Will you be making a button tree this holiday season?

4

Button Topiary Trio for Spring

Make a button topiary.  As the Ohio winter lingers on, I find that I am incorporating more bright cheery decor into my home.  This trio of button flower topiaries fits the bill perfectly, adding a touch of Spring inside to hold me over until the snow melts and the daffodils peek through the ground again.  You can make the button topiary as large as you would like.  I chose to make a trio of small button topiaries.

Button Flower Topiary Trio


Material used to make Button Topiary:

Buttons Galore & More Products used:

I also used:

  • 3 Paper Mache’ Flowerpots (2 small, one medium)
  • Yellow acrylic and glitter paints (DecoArt)
  • 1″ Paintbrush
  • 22 gauge craft wire
  • needle nosed jewelry pliers
  • Styrofoam Foam balls, cut (diameter of pots)
  • felt flowers
  • Coordinating ribbon
  • Green surface material (like that used for models)
  • Beacon Fabri-Tac liquid adhesive

 Directions to make Button Topiary:

Paint and prepare flower pot for button topiary flowers

 First, paint each flowerpot using yellow acrylic paint.  Apply multiple coats as necessary.  Paint one coat of yellow glitter paint over acrylic paint and let dry completely.   Cut foam balls in half, placing one half in each painted flowerpot, and glue in place. (Steps a & b, above)  Spread glue over foam ball and press green model foliage into glue to secure (Step c).

Glue felt flower to button blossom

Cut 8″ length of craft wire.  Choose 3-4 buttons of various colors and sizes from Color Bulk Buttons, and thread one end of wire up through holes on buttons.  Bend wire in half using needle nose jewelry pliers and thread back down through button holes from top.  Twist wire ends together under button “blossom” to add strength.   Glue felt flower to back of several blossoms if desired (I added them to large button topiary only).

Push button stems into flower pot topiary

Once all the flowers are finished, start adding them to the flowerpots.  Add a small dab of glue to the ends of the wire stems and gently push into the foam ball to secure.   Fill in remaining spaces, bending wire stems as necessary to create arrangement.  Repeat for additional flowerpots.

Single button flower topiary

To complete the button topiary, wrap each flowerpot with coordinating ribbon and glue into place.  For small topiaries, remove shank from Daisy Delights button and glue over ribbon ends.  For large topiary, remove shank from Daisy Delights button and glue in center of Tangerine Stitched button.  Glue button stack over ends of ribbon.

Enjoy the touch of welcome Spring color of a button topiary !

Thanks for stopping by,
Carla

5

styrofoam button ornament

styrofoam button ornament

A styrofoam button ornament – This quick craft project is bright and cheery and EASY PEASY! It is great for a kids craft on a rainy day, scout activity or for a girls night in.

Materials to make a styrofoam button ornament:

  • Styrofoam ball (the bigger it is, the longer it will take and the more buttons you will need),
  • Button  orange pink green
  • Straight pins with white pearly ball ends
  • Ribbon.

Directions to make a styrofoam button ornament:

1.  Using a Styrofoam ball in the size of your choice, cut a piece of ribbon 10 inches long and tie a bow in the middle.  Attach both ends of the ribbon to the ball with a straight pins.

2. Place your first button on the ends of the ribbon.  Secure it following step 3.

3.  Place the buttons on the surface of the styrofoam.  Use a straight pin to hold the button in place.  (If you want you can also use HOLD THE FOAM glue to hold them in place)  Use multiple colors of the round buttons and the push pins to cover the entire surface.

If you would like to create multiple  Styrofoam ball ornaments,  you can find them sold in bags and separately at your local craft store.  They are most often found in the floral isle.  I am sure you can order them on line too.

DSCN4077

0

Make a money tree – Easy DIY STYROFOAM Christmas craft with buttons

Money doesn’t grow on trees!!!….or does it?  Check out this fun and easy way to give a money tree gift in a creative way.

Today I am excited to use a Styrofoam plus BUTTONS from Buttons Galore!  Check out the supplies…

Materials to make a money tree:

Directions to make a money tree:

Begin by wrapping your cone in bills and securing the corners with sequin pins.  Once you have all of the foam covered you can embellish to your heart’s content with buttons, colorful seamstress pins, tinsel chenille and more!  Important to note that non of the items were adhered with adhesive because in the end this money tree is meant to be harvested so make it easy for the recipient to wrap and just use pins.

I love the glow on the “lights”!

Thanks for joining me today! I hope you will make a money tree for your next gift.  No matter if it is a Christmas money tree, birthday money tree or a graduation money tree, the recipient will surely love a tree made of money.  I know I would.

3

Creating Easy Home Decor Using Buttons and STYROFOAM

Howdy all! I am so sorry to keep you waiting all month for my home decor project! I have had a SUPER busy summer and this month just was the busiest of them all. But tonight, JUST BEFORE JULY IS OVER I have a fun home decor idea for you that is quick, easy and can be easily customized to fit your home’s Christmas decor! So let’s get busy!!! And hey, now’s a great time to start working on holiday decor because it’s best to be prepared now and now hurried later, right? So HAPPY CHRISTMAS IN JULY Y’ALL!!!!
Supplies Needed: STYROFOAM Cone, Two Tones of Butt ons, Acrylic Paint and Paint Brush, Glitter, Hot Glue, wood circle for trunk or other trunk material.


Begin by placing a pool of paint onto a piece of scrap paper as a palette for easy clean up.


Apply a full coverage layer of paint to entire surface of cone.


While the paint is still wet, liberally cover surface with glitter.


Find a button the same size as the top of the cone.


Build a stack of buttons in graduating size and hot glue together to be a "tree topper".


Once the paint has fully dried, hot glue the topper to the top of the cone.


Randomly glue buttons all along the outside of the cone in various sizes and shades of green.


Glue a line of large Ivory buttons along the bottom edge.


Hot glue the piece of cut tree limb to bottom as a tree trunk.


Ahhh your brand new hip and happening home decor project ready for the mantle, table top or anywhere else in your home!


I would LOVE to see your home decor pieces! Please share a link here so I can come to your blog and see how you decorate for the holidays!!! And hey if you happen to have a great button project that is just a HUGE BONUS! :) Enjoy!

2

Christmas Craft with Styrofoam Brand Authentique

Vintage Style  Christmas Craft Decoration with Styrofoam cubes, Authentique papers, Red and Green Button Galore Buttons.

Christmas Craft Bristle Brush Tree

Today I bring you a Christmas Craft for your home.  The Vintage Christmas Cube has an old world Christmas feel.

I love digging through my Buttons Galore buttons. I selected several from the Color Bulk buttons. This is a tree I purchased at a hobby shop (for train landscape). I simply adhered tiny buttons with Mini Glue Dots.

Close Up

This is the full project.

I used a styrofoam cube from the Styrofoam Corporation. It’s about 3×3. I cut some papers (Authentique) 2 3/4″ square and applied them with Buttons Galore’s Beacon 3-in-1 glue. I’ve decorated some chipboard letters (Want2Scrap) with some sharpies that I received in my DT box. I then coated those with a layer of adhesive and some glitter from Donna Salazar. I finished the project off with a little bling (also Want2Scrap) and a Christmas tree that is decorated with what else … BUTTONS, using some mini dots, also from Buttons Galore. There are also some buttons held in place with a fancy pin (Maya Road).

 Supplies for  Vintage Style Christmas Craft :

  • styrofoam cube – Styrofoam Corporation

  • buttons – Color Bulk buttons

  • paper – Authentique

  • bling, chipboard – Want2Scrap

  • adhesive – Beacon’s, Glitter It, Mini Dots – all from Buttons Galore

  • glitter – Clearsnap

  • flowers – prima

  • stick pin – Maya Road

    I hope you enjoyed this Vintage Style Christmas Craft.
2

Needlefelted Winter Scene

It’s Christmas in July with Buttons Galore & More and STYROFOAM Brand Foam!  I used my buttons and STYROFOAM Disc to create a holiday needle felting project.   Styrofoam is a wonderful base for needle felting, since the wool roving can be felted directly onto the surface, and if the piece is thick enough, no pad is needed.  I used a non-traditional color scheme of light blue, raspberry, and lime.  This color scheme can go up before Christmas and last through January.

Styrofoam and Button needlefelted scene

Supplies:

Buttons:  Sea Glass, Clear, Wood
Styrofoam Disc, 6×1”
wool roving, light blue
Clover needle felting tool
ric-rac, lime green
cardstock, raspberry
hemp twine, raspberry and dark brown
ribbon, light blue
accent ink, Smooch (Clearsnap)
thread, white
scissors
Beacon Adhesive
heat tool, optional
Needlefelting on Styrofoam supplies

Instructions:

  1.  Needle felt wool roving onto STYROFOAM disc using needle felting tool until entire front is covered.  (Note:  fibers felt together with motion of felting tool.  Be sure to use straight up/down motion to keep needles from breaking.)
    Steps for Needlefelting on Styrofoam
  2. Cut lime ricrac into pieces, each smaller than the last.  Layer smaller pieces over longer, and glue together.
    Making a tree with ricracUse scissors to trim into desired tree shape.  Wrap raspberry twine around tree to create “garland”
  3. Thread wood button with dark brown twine.  Glue into place as trunk, and glue tree over top of button.   Thread clear button with white thread.  Draw star on button using Smooch, covering thread.  Allow to dry (or use heat tool), and glue to top of tree.
    Drawing on clear button with Smooch Ink
  4. Thread Sea Glass buttons with white thread and glue to roving around tree for “snow”.
  5. Cut cardstock strips to cover sides of STYROFOAM disc and glue into place.
  6. Carefully apply thin layer of glue to raspberry twine and attach between cardstock sides and felted front of disc to create finished look.
    Needlefelted Styrofoam with buttons
  7. Cut length of aqua ribbon and attach to back of disc to form hanging loop.

Try this holiday project with the tree, or create your own winter scene with Buttons Galore & More!

Thanks for stopping by!


http://www.buttonsgaloreandmore.com/product/HAB106.html

0

Make an Aqua & White Holiday Wreath

Christmas in July?  With much of the United States suffering through a massive heat wave, I think we could all use an escape to something cool!  When challenged by Styrofoam and Buttons Galore and More to create Christmas decorations, I’ll admit to struggling, but one look at the cool, aqua of the Mint Cooler Color Blends buttons, and all I could think about was ice.  The great thing about this wreath is that it can be used for Christmas or Hanukkah.  It could even just be used throughout the entire winter season.  I few snow men and you have a Winter Wonderland!


Supplies:

  • 5 1/2″ Styrofoam Wreath
  • Buttons: Buttons Galore and More, Color Blends: Mint Cooler
  • 1″ Circle Mirrors
  • Silver beads
  • Craft Glue
  • Aqua & White Ribbon: 1 1/4″ wide

Directions:

  1. Glue ribbon around outside and interior edges of Styrofoam wreath
  2. Glue buttons, mirrors, and silver beads onto front surface of wreath.  It’s best to do one layer and then go back in and a second layer of buttons, strategically placed around the mirrors, with some overlap.  This gives the wreath extra dimension.
  3. Using more ribbon, tie a bow with extra long tails.  Glue the bow onto the top of the wreath and arrange the ties so that cascade down either side of the wreath.  Tack them in place with a dot of glue.
  4. Stack a few buttons and then glue the stack over the knot of the bow.

So there’s your super quick, holiday project!  If you get started now, you’ll have your holiday decorating “buttoned” up before you know it!

Craftily yours,

Laura Bray

Winter Wonderland Wreath by Laura Bray


4

Button up Christmas in July!

July is a great month to get a head start on those Christmas decorations and using BUTTONS in your creations is always FUN!  For this project I am using a Styrofoam Ball, Glitter, Kreinik Thread, Beacon Adhesives and beautiful BUTTONS!

Supplies:

  • Buttons Galore and More Buttons: Fancy Gold Grab Bag GB102
  • 6″ Styrofoam Ball
  • Gold Thread by Kreinik
  • Fast Finish Decoupage byBeacon Adhesives
  • Quick Grip Adhesive by Beacon Adhesives
  • Red Ultra Fine Glitter by Clearsnap
  • Skewer
  • Scissor

Instructions:

Apply Fast Finish Decoupage to entire Styrofoam Ball

Place Styrofoam ball onto skewer.  Sprinkle Glitter to cover; let dry.  Apply second coat of Fast Finish Decoupage; let dry.

Choose thread of choice and buttons.

Wrap thread around ball making 8 sections, then around center to create 16 sections.  Glue white and gold buttons at the top and bottom of ball where all threads meet.  Glue gold buttons around center where threads meet; let dry.

You have a beautiful ornament for your tree or a gift….Enjoy!

0

Upcycled Spring Floral Bouquet – An Earth Day Project

Upcycled Spring Floral Bouquet

Burlap and buttons make a great wrap for a bouquet that will last longer than a week. I love fresh flowers, but they do not love my budget. A more budget friendly idea is the tin can that I repurposed.

Tools and Materials:

Sizzix Tattered Florals and Leaf  Die Cut

Beacon Adhesive – FabriTac

Jute Cording,  Burlap, Styrofoam, Krylon Spray paint, Westcott Scissors and kraft knife.

Buttons – Tangerine Tango, Class

Directions:

Clean and dry tin can. Spray paint can. Let dry and repeat.

Use Krylon to Paint Can

Place floral foam inside can.

Place Floral Foam inside

Cut burlap to fit. Adhere burlap with Quick Grip.

Cut Burlap to Fit Can

Slide buttons on to jute cording. Wrap cording around container. Adhere buttons into place. Add a second layer of buttons where desired and glue into place.

Recycled Can - Earth Day Project

Add flowers into container.

This recycled tin can vase will work for any type of flowers, fresh or hand made.

3

Powered by WordPress. Designed by WooThemes