Header

Tag Archives | Gina K Designs

Inspirational Card

When your friend needs a pick me up, it’s time for an Inspirational Card.

Make some quick and easy cards. I like to make a bunch and leave the insides blank, so I have them ready when a friend needs a quick pick me up.

Inspirational Card

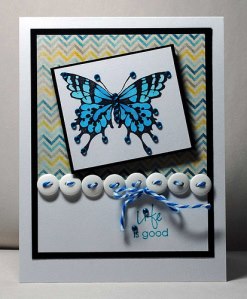
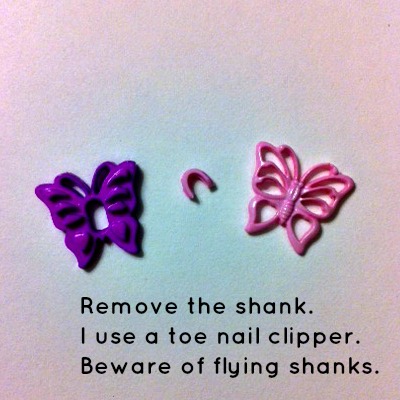
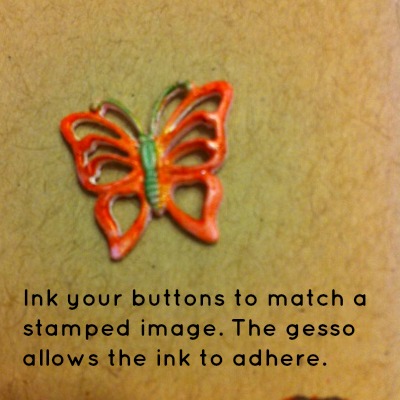
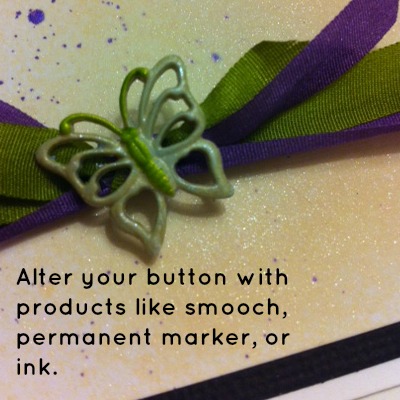
I love finding new ways to use buttons in my card making, and it was fun to make a border with the buttons. This was really easy to do, and would look fun with different kinds of buttons. I’m not great with bows, but this … I can do!

Supplies for making an Inspirational Card

  • Buttons – White Buttons by the Pound
  • Twine
  • Stamps – Gina K Designs
  • Cardstock – Discount Cardstock
  • Patterned Paper – Authentique
  • Ink – Tsukineko, Copic Markers
  • Bling – Want2Scrap
  • Adhesive – Scor-Tape and Dimensional Foam

Directions

  1. Cut and score cardstock to create a standard A2 Card (4.25 x 5.5″)
  2. Cut a 3.5 x 5″ black mat.
  3. Add a 3.25″ square of patterned paper mat and a white strip (1 x 3.25″) at the bottom.
  4. Cut a 2.5″ square black mat. Cut a 2.25″ square white mat.
  5. Stamp and color image, mat and adhere with dimensional foam. Stamp sentiment on white strip (1 x 3.25″) at the bottom.
  6. Cut a piece of twin four times the width of your card. Wrap around the back of the patterned paper. String buttons on both ends of the twine and tie a bow. Trim excess.
  7. Embellish butterfly and sentiment with bling.
0

Snap Happy

It’s Red, White & Blue season, the perfect colors for this Snap Happy Card. Will you be taking lots of pictures on the 4th?

Every week we share fresh card making ideas using buttons. This week we’re using my absolute favorite Heart Novelty Buttons. I made a card with a gift card inside that’s good for some prints at one of our local stores. What family doesn’t print a ton of pictures?

Snap Happy

Supplies for creating Snap Happy Card

Buttons – two Heart Novelty Buttons – Buttons Galore and More

Stamps  – Gina K Designs

Cardstock – DiscountCardstock.com

Embellishments – Turquoise Rhinestones – Want2Scrap; Twine – Doodlebug Design; Stickers – SRM

Tools: Dies (Inverted Scalloped Circles, Star, Circles – Spellbinders Paper Arts; Labels – My Favorite Things) ; Embossing – Sizzix

Adhesive: Hot Glue – Adtech; Dimensional Foam Tape – 3M; Scor-Tape – Scor-Pal

Other: Ink – Tsukineko; Markers – Copic; Flashing Tape – available at most Home Improvement Stores

Directions

  1. Create a Neenah Solar White cardstock base 4.25 x 11″. Score and fold in half.
  2. Cut your mats: Neenah Solar White mat 4 x 5.25″ – Black Licorice mat 3.5 x 3.5″ – Currant Red mat 3.25 x 3.25″ – Emboss Currant Red mat.
  3. Adhere mats to card with Scor-Tape.
  4. Die cut pieces: inverted circle from Lunar Blue Cardstock, a Black Licorice circle, and slightly smaller Neenah Solar White circle and label shape.
  5. Stamp and color image on Neenah Solar White circle. Stamp sentiment on label shape and attach to card.
  6. Embellish with Turquoise Rhinestones. Tie black and white twine through one Heart Novelty Button and glue to stamped image.
  7. Layer round pieces with Dimensional Foam Tape.
  8. Adhere Flashing Tape to scrap paper and die cut and emboss star. Adhere to card with Dimensional Foam Tape
  9. Wrap aqua and white twine around card and secure with second Heart Novelty Button.
  10. Add sticker sentiment to bottom of card.

Thanks for stopping by today. To see more of my art, please visit me at My Card Party. I’ll see you on Thursday with some new Button Jewelry.

Until then, keep creating!

2

Get Well Card

Make a simple Get Well Card.

A Get Well Card is always a good card to have in your stash, because injury and illness never arrive at a convenient time.

I randomly stamped flowers and accented with Bling. At the bottom of the card, I’ve cinched some ribbon with a Teal Ice button and some orange floss.

Get Well Card from BUTTONSGALOREANDMORE

Supplies Used to make Get Well Card

  • Buttons – Teal Ice
  • Stamps and Cardstock – Gina K Designs
  • Sticker Sentiment – SRM Sticker
  • Bling – Want2Scrap
  • Trim – Berwick, We R Memory Keepers
  • Ink – Tsukineko/Imagine Crafts

Thanks for joining me today. I hope you don’t NEED a card wishing you well, but if you do, I hope you get well soon!

1

Altering Buttons

Altering Buttons

There are lots of ways of altering buttons. Today, we cut off shanks and paint.

Altering Buttons to match a Poppy Card


Altering buttons to match a butterfly card.

I’m back with more buttons from the Butterfly Kisses collection. I needed to do something to make these butterflies match the cards I was wanting to make.

Butterfly Kisses

Butterfly Kisses Collection

Here’s how to get started.

Altering Buttons - Start by removing the shank

Gesso is like paint, but different – it’s almost like a crafty primer coat.
Altering Buttons - Apply Gesso to your Button

Once your button is primed, you can try lots of products.
Here, I use Smooch in a couple of colors.

Smooch comes in a nail polish style bottle with it’s own brush. So convenient. It’s made by ClearSnap.

Altering Buttons

To finish off this card, I added some ribbons from May Arts. As a kid, I grew up watching my mom sew. When she passed away, I received her sewing basket, and inside were her orange handled Fiskars scissors. Her scissors were carefully hand labeled – for sewing, for ribbons, and for paper. I still have them all.

You can also ink your primed buttons.

Altering Buttons

No button should ever go to waste!

Alter buttons to match your next project.

Supplies Used:

  • Butterfly Kisses buttons
  • Gesso – Claudine Hellmuth
  • Ink, Spritz and Smooch – Clearsnap
  • Ribbon – May Arts
  • Images – Gina K Designs
  • Paper – Cosmo Cricket
  • Other – Copic Markers

Tools Used:

  • Fiskars scissors
  • Toe nail clippers


1

Sunday Cardmaking: Making a Valentine that Hides a Sweet Surprise

Have you ever wanted to hide a sweet surprise in a Valentine card?

Sweet Surprise Card by Allie Gower

This is a standard Easel Card Valentine with a sweet surprise.

If you’ve never created an Easel Card, here is a very easy tutorial. On my Valentine, I’ve made the size a little larger – the card is 6×6.

The sweet surprise is that in the bottom half of this Valentine, I’ve wrapped a Hershey Bar.

I added a panel of black cardstock, and scored it to make a little sleeve for the candy bar. I didn’t glue it, so the card doesn’t have to be destroyed to enjoy the candy. Apparently, no one wants to rip up the card to get to the goods! Nothing stops me from getting to chocolate.

Hershey Valentine

Sometimes people ask about the buttons and other dimensional items, and if it makes the cards hard to mail, or expensive.

Once you get a certain size, you’re paying a premium anyway, so I just pop my cards in a bubble mailer or a small box, and grin and bear the cost of mailing. My only other option is to hand deliver, which I love to do! I don’t want to hold back on my creativity – so I say layer it on, and on, and on.

Buttons Galore and More Supplies Used to Create this Valentine:

Chocolate Covered Strawberries

Strawberries

Mini Glue Dots

Beacon’s 3-in-1 Glue

Additional Supplies Used to Create this Valentine:

Paper – Authentique

Stamps – Gina K Designs

Ink – Close to My Heart

Dies – Spellbinders

Bling – Want2Scrap

Thanks for checking out my Valentine.

If you have any questions, just leave me a comment below.

I’d like to send this card to someone! Leave a comment here, and PIN the photo for a chance to win.

15

How to make a statement by using a grouping

A few weeks ago I was stuck. I had to make my weekly card for Card Positioning Systems and I had everything but the finishing touch just wasn’t working. The sentiment I wanted to use was too small for the label die cut I was working with and I really wanted to use THIS SENTIMENT. You know how you can just get stuck with the image in your mind and nothing else works?? Yeah I was there…so I decided to embellish my main image…and not just with one, not two, but THREE fun buttons. Here you can see I chose some buttons from the Girly Button Pack. They were JUST THE RIGHT COLORS to go with my chosen patterned papers. So I kinda played around with the color balance and felt the two reds and one green was just what I needed. To spice things up I decided to use natural colored hemp in the red buttons, tied in a knot and snipped short. For the green button to add balance and interest I tied white twine, tied a big loopy bow and snipped the tails a bit longer. I felt it gave the card fun whimsy! If you’d like more info feel free to pop over to my blog Pink Lemonade. Enjoy!!

0

Powered by WordPress. Designed by WooThemes