Header

Tag Archives | Adtech

Walnut Hollow Wall Art

Walnut Hollow Wall Art

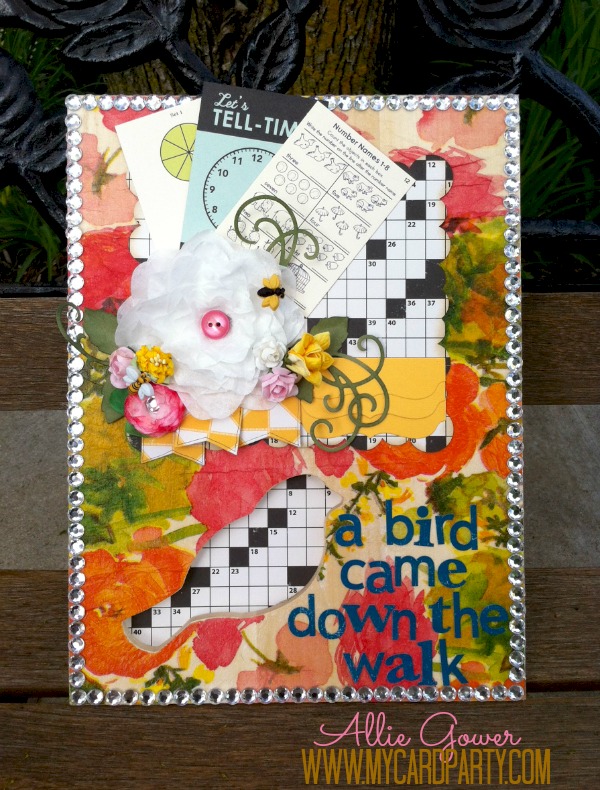
Allie here today making some Walnut Hollow Wall Art. This is really not hard, so colorful, and a lot of fun.

Walnut Hollow Wall Art

Supplies for my Walnut Hollow Wall Art:

  • Sweet Blush Buttons
  • Garden Bug Buttons
  • Board – Walnut Hollow
  • Bulk Bling – Want2Scrap
  • Fucschia Dye – Rit Dye
  • Crossword Puzzle Paper, Stickers and Vintage Cards – October Afternoon
  • Flowers – some are handmade using Spellbinders, additional flowers from Wild Orchid
  • Adhesives – Glue Dots, Adtech Hot Glue Gun and Glue Sticks, Plaid (Mod Podge)
  • Dies – Spellbinders, My Favorite Things, and Heartfelt Creations, Silhouette
  • Other – decorative napkin, coffee filters (for handmade flowers)

Instructions

  1. Decoupage a napkin onto the board and seal with Mod Podge.
  2. Cut main mat (Silhouette), flourish (Heartfelt Creations – Belle Rose Collection), tabs (My Favorite Things) and flowers (Spellbinders).
  3. Assemble large flower and add Sweet Blush Button center and Garden Bug accent. Assemble smaller flower (this flower was dyed with Rit Dye in Fuschia) and add Silver/Clear Bulk Bling Rhinestone.
  4. Add vintage cards and other paper embellishments. (Note – I doodled along the edges of some of these pieces.)
  5. Decorate edges with Bling.
  6. Add a sentiment using stickers. I chose a line from an Emily Dickinson poem. Note, stickers don’t stick well to the mod podge surface, so you may want to reinforce with adhesive.

Note – I lined the back of board with matching paper so that the crossword pattern would show through where the bird cutout is.

Thanks for joining me today.

See more of my creations at My Card Party.

2

Snap Happy

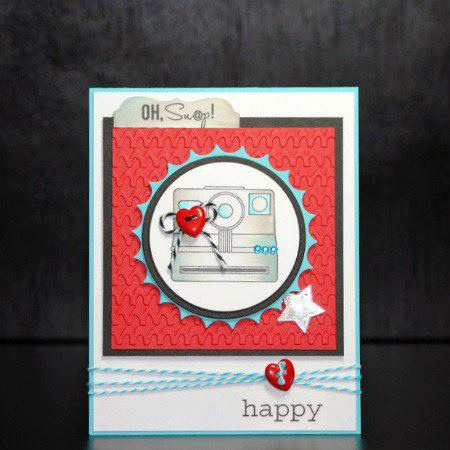
It’s Red, White & Blue season, the perfect colors for this Snap Happy Card. Will you be taking lots of pictures on the 4th?

Every week we share fresh card making ideas using buttons. This week we’re using my absolute favorite Heart Novelty Buttons. I made a card with a gift card inside that’s good for some prints at one of our local stores. What family doesn’t print a ton of pictures?

Snap Happy

Supplies for creating Snap Happy Card

Buttons – two Heart Novelty Buttons – Buttons Galore and More

Stamps  – Gina K Designs

Cardstock – DiscountCardstock.com

Embellishments – Turquoise Rhinestones – Want2Scrap; Twine – Doodlebug Design; Stickers – SRM

Tools: Dies (Inverted Scalloped Circles, Star, Circles – Spellbinders Paper Arts; Labels – My Favorite Things) ; Embossing – Sizzix

Adhesive: Hot Glue – Adtech; Dimensional Foam Tape – 3M; Scor-Tape – Scor-Pal

Other: Ink – Tsukineko; Markers – Copic; Flashing Tape – available at most Home Improvement Stores

Directions

  1. Create a Neenah Solar White cardstock base 4.25 x 11″. Score and fold in half.
  2. Cut your mats: Neenah Solar White mat 4 x 5.25″ – Black Licorice mat 3.5 x 3.5″ – Currant Red mat 3.25 x 3.25″ – Emboss Currant Red mat.
  3. Adhere mats to card with Scor-Tape.
  4. Die cut pieces: inverted circle from Lunar Blue Cardstock, a Black Licorice circle, and slightly smaller Neenah Solar White circle and label shape.
  5. Stamp and color image on Neenah Solar White circle. Stamp sentiment on label shape and attach to card.
  6. Embellish with Turquoise Rhinestones. Tie black and white twine through one Heart Novelty Button and glue to stamped image.
  7. Layer round pieces with Dimensional Foam Tape.
  8. Adhere Flashing Tape to scrap paper and die cut and emboss star. Adhere to card with Dimensional Foam Tape
  9. Wrap aqua and white twine around card and secure with second Heart Novelty Button.
  10. Add sticker sentiment to bottom of card.

Thanks for stopping by today. To see more of my art, please visit me at My Card Party. I’ll see you on Thursday with some new Button Jewelry.

Until then, keep creating!

2

Red White and Blue Card

Create a quick Red White and Blue card to celebrate Summer

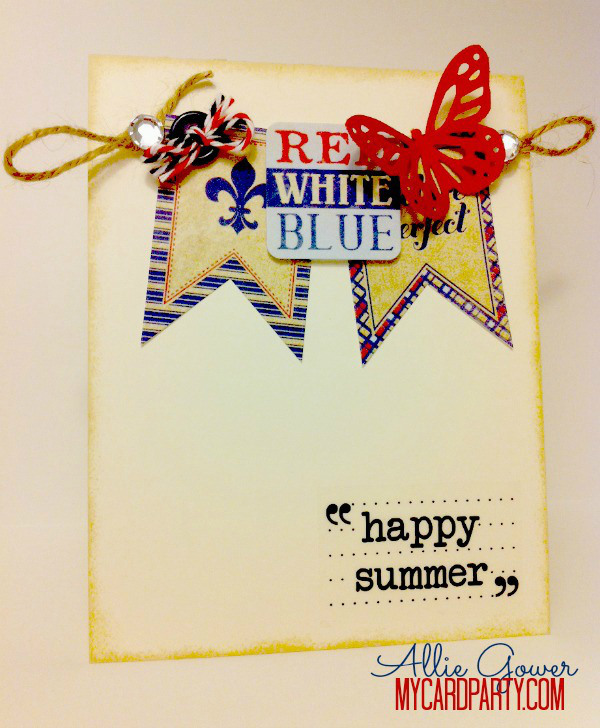
Hi, it’s Allie here from My Card Party. I had some extra patriotic stickers from Authentique, and lots of patriotic cardstock from DiscountCardstock.com so I thought I’d make a summery card.

Red, White, and Blue

Happy Summer to you!

Red White and Blue Happy Summer to You


Shopping at Buttons Galore is always fun. There are so many categories and styles. My favorite thing to do is Shop by Color. I had so much red, white and blue going on in this card that black buttons seemed to be the way to go. There are many choices in the Black and White category.  I settled on a package of Cookies and Cream Buttons.

Supplies for creating Red White and Blue Card

  • Cookies and Cream Buttons
  • Ivory Smooth Cardstock #80 and Currant Red Cardstock (Discount Cardstock)
  • Bulk Bling (Want2Scrap)
  • Stickers (Authentique, Sentiment – SRM)
  • Twine and Baker’s Floss (Jo-Anne’s Fabrics)

Tools

  • Other – Martha Stewart Butterfly Punch, Martha Stewart Score Board
  • Hot Glue (AdTech)
  • Scissors (Westcott Brand)
  • Desert Sand Ink and Ink Sponge (Tsukineko)

Instructions

  1. Create a card base 4.25 x 11 and fold in half.
  2. Ink edges of card front with Tsukineko Desert Sand Memento Dew Drop.
  3. Tie multiple colors of floss through Cookies and Cream Button.
  4. Add twine and embellishments. Finish with sentiment and bling.

Thanks for joining me today. I’ll see you next Sunday.

See more of my creations at My Card Party.

0

Patriotic Button Card

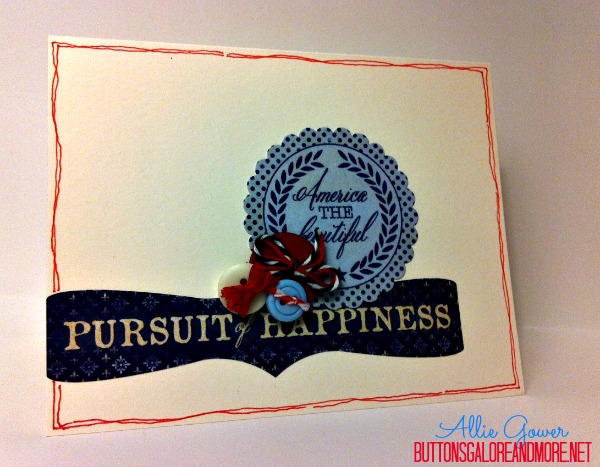
Let’s make another easy Patriotic Button Card.

This is simply stickers and a cluster of Patriotic buttons. I used hot glue which allows me to put buttons where I want, and cluster them together. I finished off the card with some simple doodling.

Let the kids loose with buttons and stickers, and have them make some cards for friends and neighbors.

Patriotic Button Card

Supplies

  • Buttons – Patriotic
  • Stickers – Authentique
  • Cardstock – Discount Cardstock
  • Twine, Embroidery Thread
  • Adhesive – Hot Glue by Adtech
  • Copic Multiliner

How to Make a Patriotic Button Card

  1. Create a card base 4.25 x 11″ and fold in half.
  2. Apply stickers.
  3. Tie twine and embroidery thread to buttons and glue to card.
  4. Doodle edges.


Thanks for joining me today.

See more of my creations at MyCardParty.

0

Button Up a Decorative Monogram

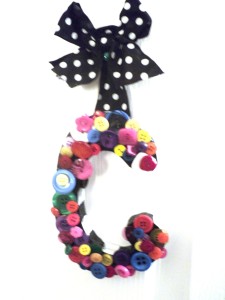
Initial_C

For a quick and personalized gift, cover a monogram in buttons and add a bow to hang it up.  You can use letters made from wood or cardboard.  They are sold in all kinds of sizes at the craft stores.  The best way to adhere buttons to them is with Ad-tech hot glue and a glue gun.

This letter “C” (for Chloe) is covered in buttons from the Laura Kelly collection.

Happy Creating!

1

Powered by WordPress. Designed by WooThemes