
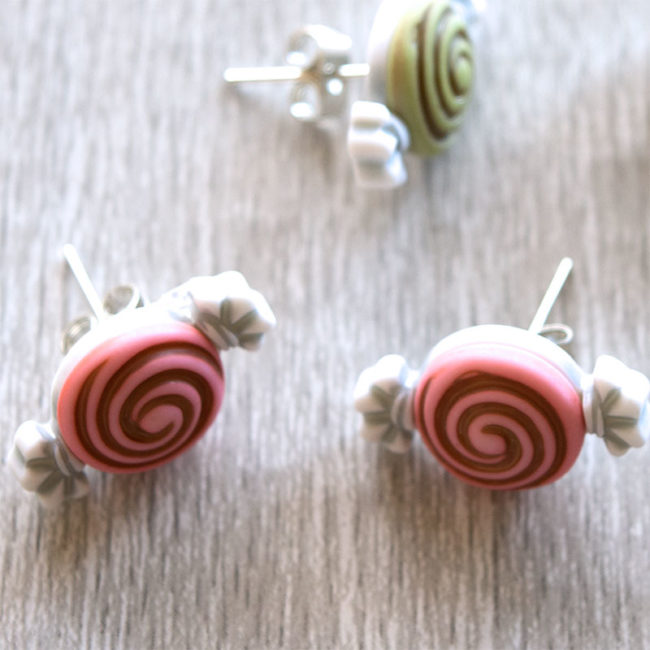
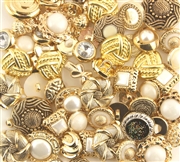
I love wearing fun holiday jewelry, but sometimes it can be expensive or difficult to find! Especially considering the limited amount of time you can wear cute holiday jewelry! Buttons make really great jewelry options, and it’s so easy and inexpensive to make your own earrings using your favorite holiday buttons. I turned these sweet “Candy Treats” 3D Buttons into some simple, but adorable DIY candy earrings in just a few minutes! With all of the cute Buttons Galore 3D holiday buttons, there are so many adorable options for your own holiday style! Continue Reading →
Tag Archives | button jewelry
DIY Dangle Earrings For Every Occasion
Hi! It’s Anaya from the Buttons Galore & More Design Team. With the holidays fast approaching, you’ll surely want to dress to impress for all of the upcoming parties and celebrations. If you’re like me, you get tired of showing up in the same old boring earrings. Well, today I’ve got the perfect project for you – DIY Dangle Earrings! Continue Reading →
DIY Flower Button Brooches for Fall Fashion Cheer!
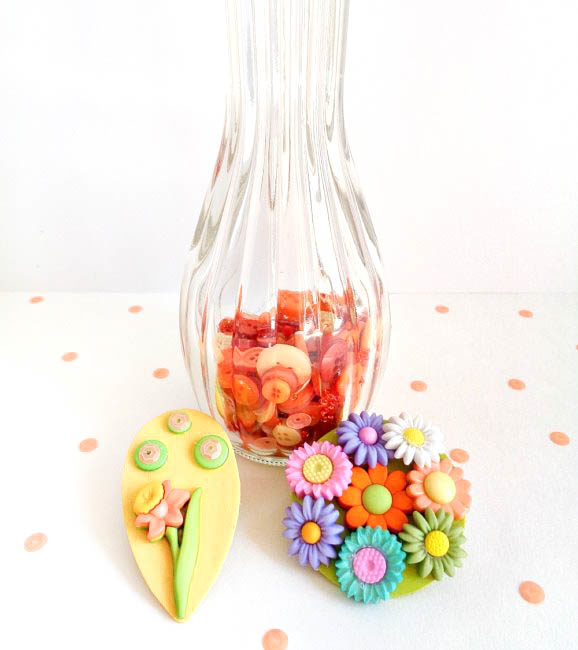
Hello button lovers! This is Katie from the Buttons Galore & More Design Team, and today I have a fun DIY flower button brooches project if you are someone who is just not ready to make that transition into the fall season!
Now, as a fall season girl at heart, I know making flower button brooches sounds a bit weird in September. However, there are those folks who just love spring and summer. If this is you, then these flower button brooches should make the fall season a bit more bearable and make those warm cardigans a bit cuter! Continue Reading →
Accessorize with an easy DIY Button Brooch!
Hi, Connie here with Buttons Galore & More design team! Today I will be sharing an idea using the Toasted Graham Embellishment Bottle by 28 Lilac Lane. The contents of the bottle remind me of graham crackers, buttons in rich brown tones along with seed bead and sequins. Taking beautiful embellishments and adding them to clothing to accessorize is a favorite project of mine. Making a DIY button brooch, to add to a denim shirt or straw hat, is where I started!

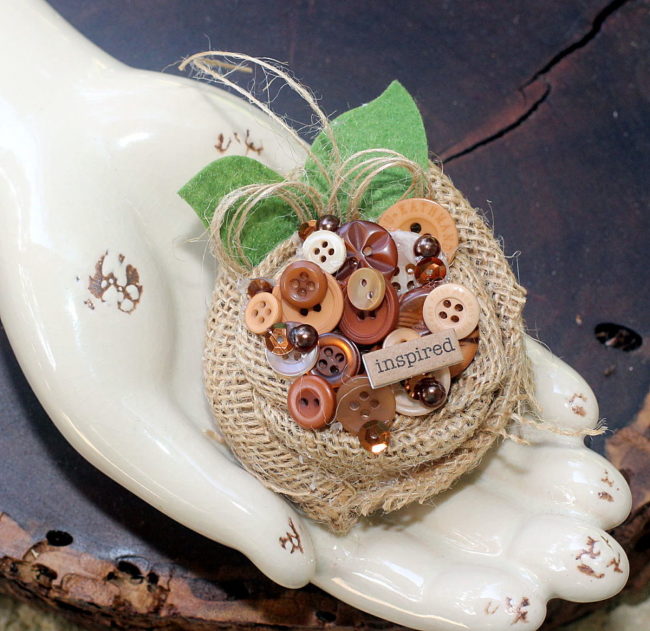
Take a small piece of burlap and twist it, to make an easy to create rose flower to serve as the base of the brooch. Coat the ends with a strong glue to keep them from fraying, and mount the burlap flower on a circle of felt, so the flower will not unravel.
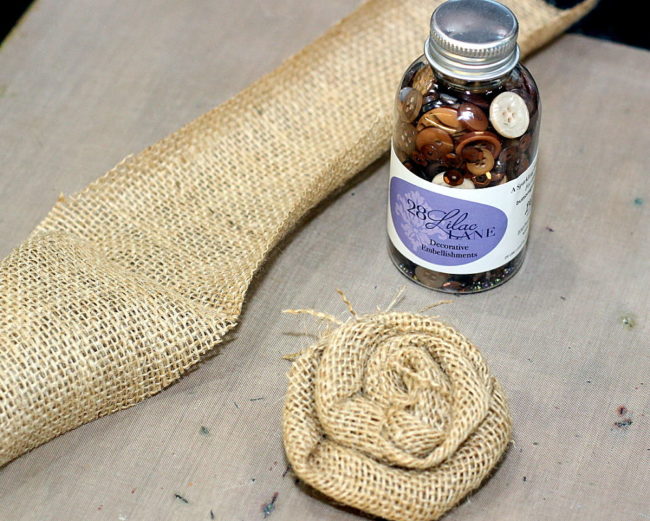
Now comes the fun part! Pour the contents of the Toasted Graham embellishment bottle on a dish (so you can see all of the pretties that are in it), and start selecting the buttons for the center of the DIY button brooch.
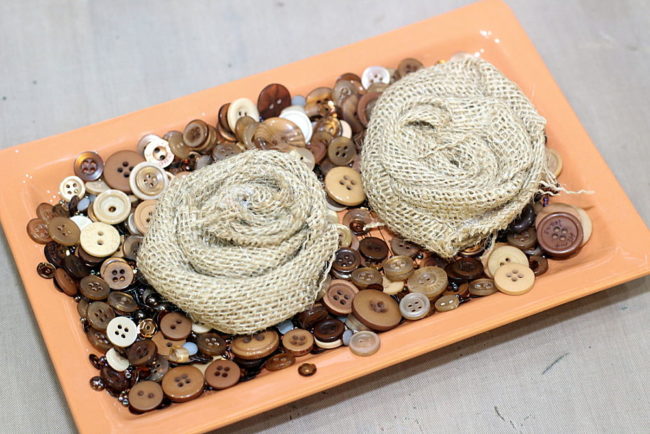
Using a strong glue, start gluing down buttons, sequins, pearls and beads onto the brooch. Overlapping the buttons and tucking in the sequins under the buttons will make a beautiful looking brooch. Add felt leaves and twine to finish off the brooch. Glue a pin onto the back of the brooch, making it easy to attach to a shirt or hat.
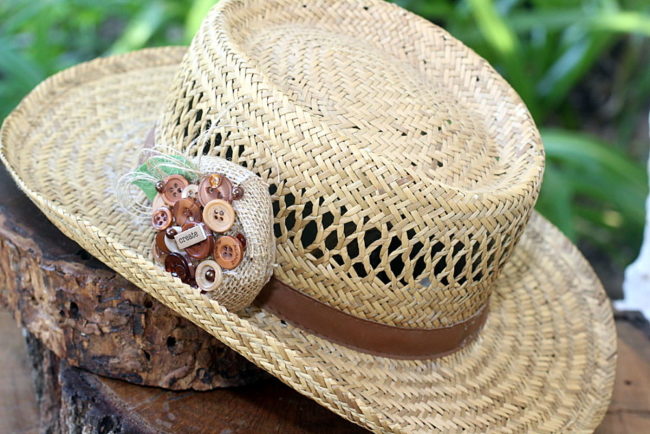 I love how the “create” brooch looks on this straw hat. It’s such a fabulous look for the fall season! Just attach it to the hat, using the pin that was glued to the back of the brooch.
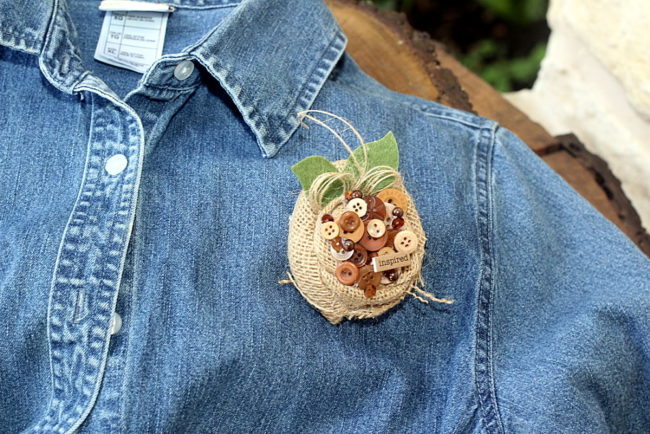
Here is the”inspire” brooch on the denim shirt. I love this look!
I hope you will give the 28 Lilac Lane embellishment bottles a try and create something to add to those hats, sweaters and shirts like I did!
Supplies Used:
28 Lilac Lane “Toasted Graham” Embellishment Bottle
Felt (leaves and back of brooch)
burlap
strong glue
word sticker
twine
Thanks for stopping by~
Connie Mercer/DT Member
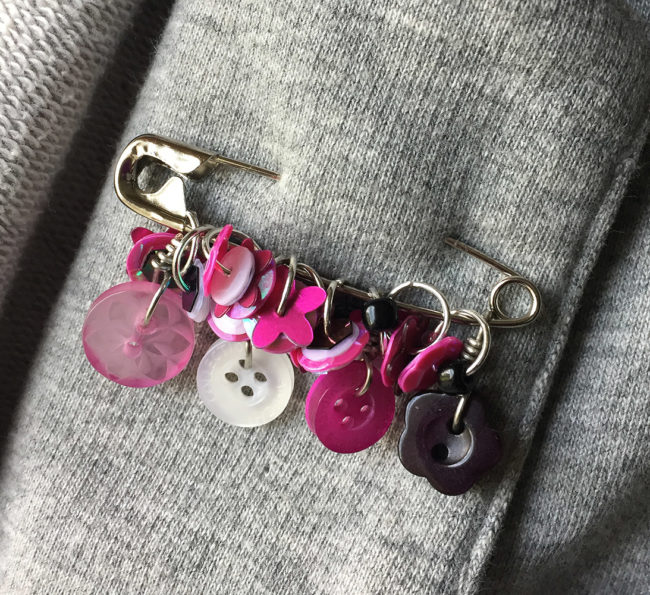
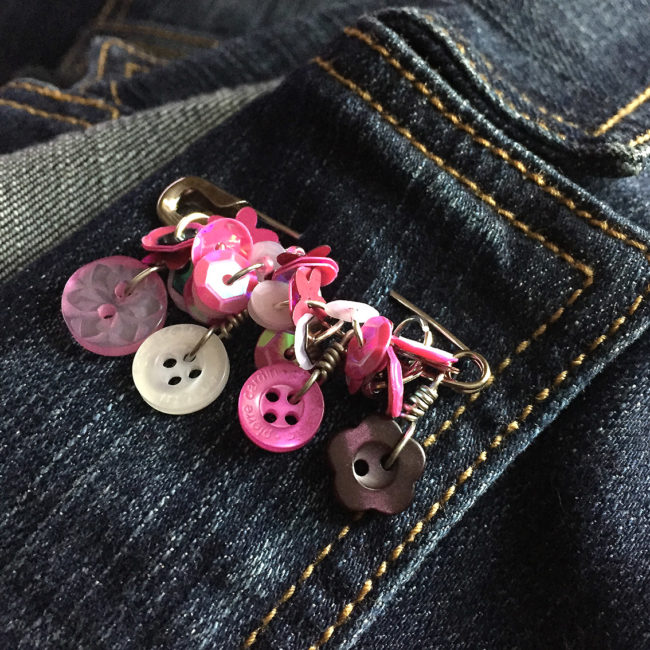
Sequin Safety Pin Jewelry will bling up your look!
I’m constantly on the look out for fun accessories. But what I love more than looking for cool things is making my own. If you feel the same way, I have a beginner project to help you accessorize. In just a few easy steps, you can make sequin safety pin jewelry!
Here’s what you’ll need to make sequin safety pin jewelry:
- 28 Lilac Lane “Hibiscus Bloom” Sequin & Bead Mix
- 28 Lilac Lane “On Lilac Lane” Embellishment Bottle
- Buttons Galore “Black & White” Button Basics
- 8mm jump rings
- 2″ safety pin
- jewelry pliers
- wire cutters
- 20 gauge jewelry wire
How to make sequin safety pin jewelry:
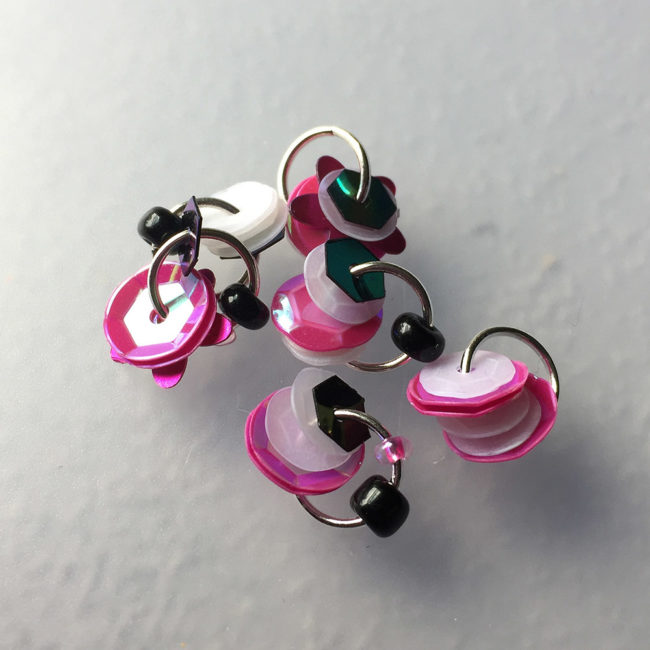
To start making your sequin safety pin jewelry, open the 8mm jump rings with jewelry pliers and add about 4-6 sequins to each ring along with a bead or two if you’d like. The rings will move around a lot if you start adding them to the pin as you go, so you may find it easier to just make a pile of completed jump rings.
Once you have about 10-12 rings finished, add them to the safety pin. The jump rings should be added to the immovable side of the pin. At this point the pin will look pretty awesome as is, but I just love to add buttons to everything! I find the buttons not only give the pin a unique look, but they will also help keep the jump rings from floating around the loop at the end of the pin.
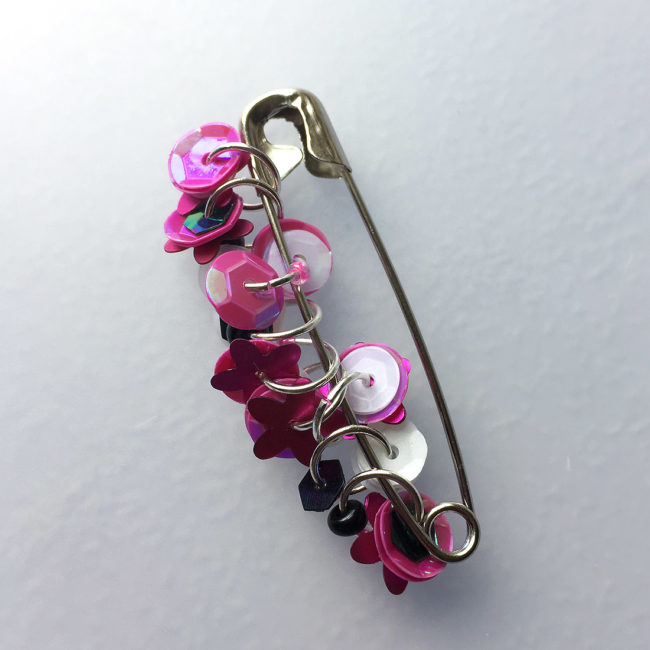
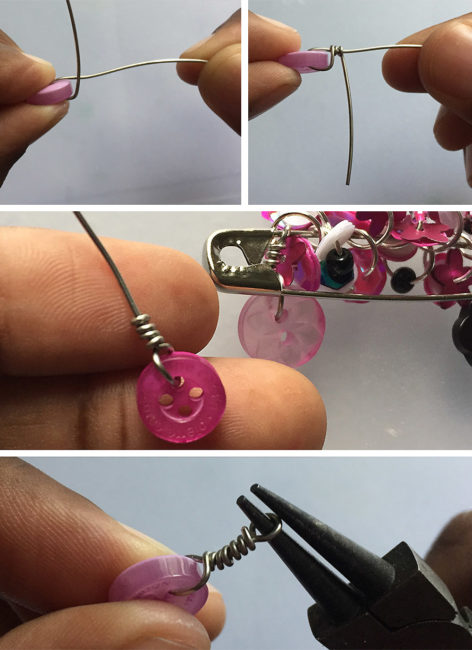
Cut a 5 inch length of wire. Place wire through one of the buttons holes. Bend one end of wire toward the back of the button. Twist that wire around 3-5 times and trim it. Cut the other piece short, but leave enough wire to create a loop.
Be sure to add a button before the first jump ring and behind the last ring on the pin. This will keep the jump rings from sneaking past the loop and getting away.
And your sequin safety pin jewelry is done!
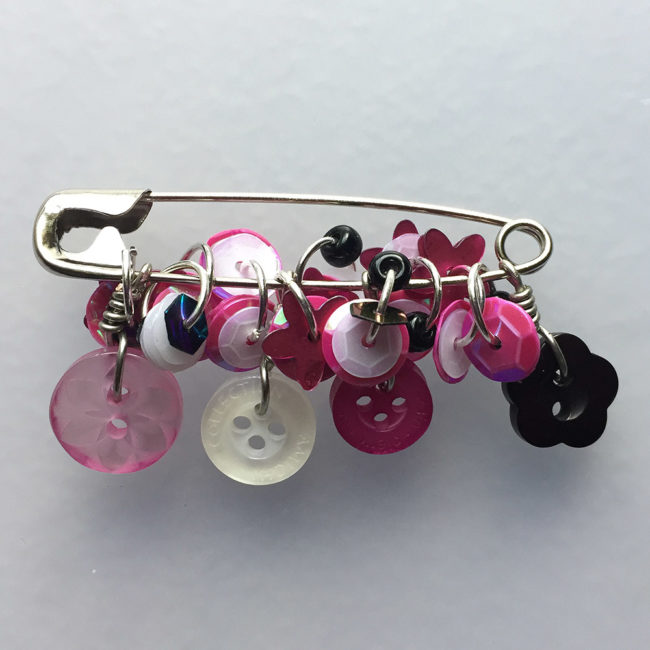
There are so many options and color combinations available that I have already made myself a nice variety of sequin safety pins! I hope you find this to be a fun and easy way to bring a unique jewelry touch to an old shirt, jacket, or backpack.
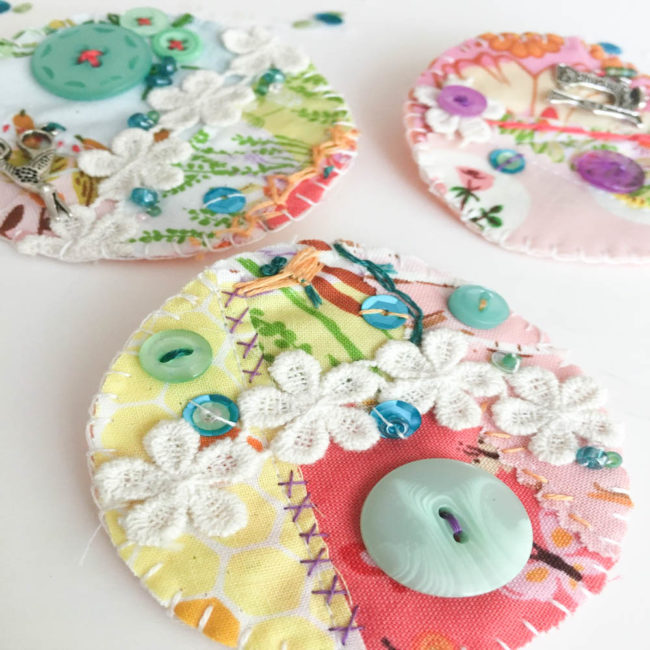
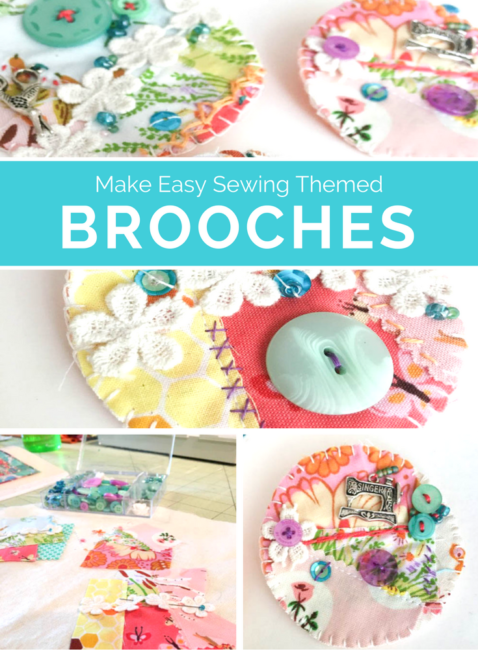
Sew Crafty Brooches Make Great Gifts for Crafters
These little crafty brooches make a great quick and easy gift for the lady in your life who loves to sew and create. Use up some scraps of fabric, spread your creative wings and add some bling with a sweet 28 Lilac Lane embellishment kit.

Here’s the supplies you will need:
- 28 Lilac Lane “Sew Crafty” embellishment kit
- scraps of fabric
- wool felt (for the backs)
- cotton fabric (for the tops)
- pins (Wonderclips are also super helpful)
- sewing needle
- embroidery floss (various colors)
- jar lid (or something 2-3″ round to trace)
- a sewing machine (not required, but helpful)
- safety pin or jewelry pin backs
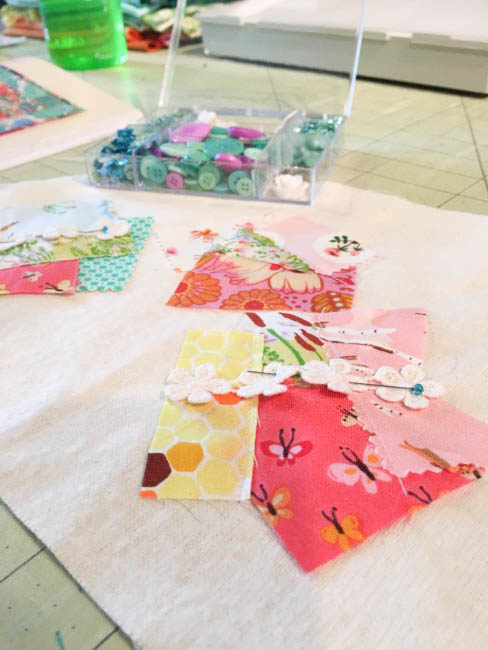
First, I laid out my backing fabric (I used a thicker cotton muslin that I had in my stash, but just a general cotton or even felt would work fine too). With a jar lid I had, I traced an outline of my circles onto the top of the fabric. Then I gathered up some various scraps of fabric and laid them out within the outlined circle. I used my sewing machine to sew down a few of the seams, but this could easily be done by hand with just a back stitch using a single strand of embroidery floss.
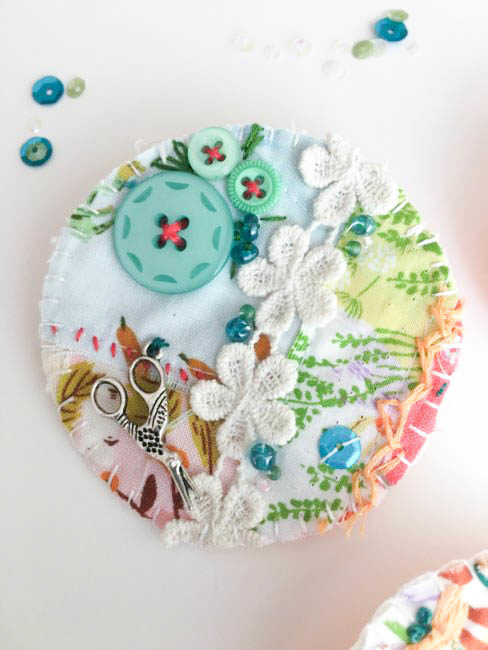
Next up, I laid out different elements from the 28 Lilac Lane “Sew Crafty” embellishment kit. The kit includes some trim, sequins, beads, buttons and a few charms. The trim lends itself greatly to being used as a typical trim or even cutting off each flower individually. This is where you can be creative and every brooch you make will be different!
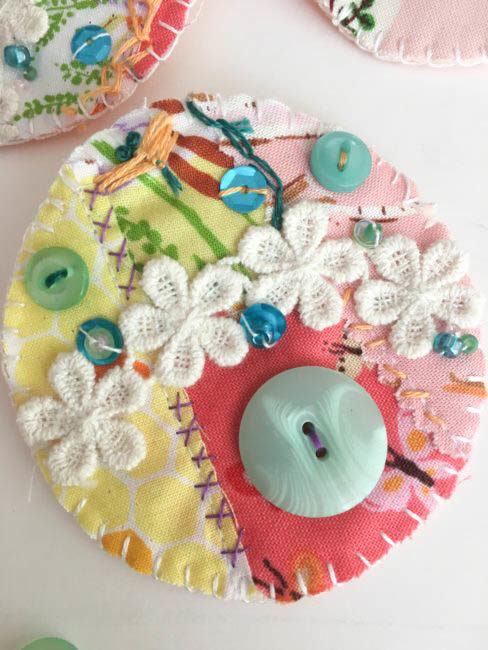
On a few of the seams I chose to add some simple embroidery stitches. I used two strands of divisible embroidery floss for all of my stitching. I made simple X’s, seed stitches, and a chainstitch. I sewed down the trim with a single strand of white embroidery thread and just stitched down on the flowers where the stitches won’t be seen.
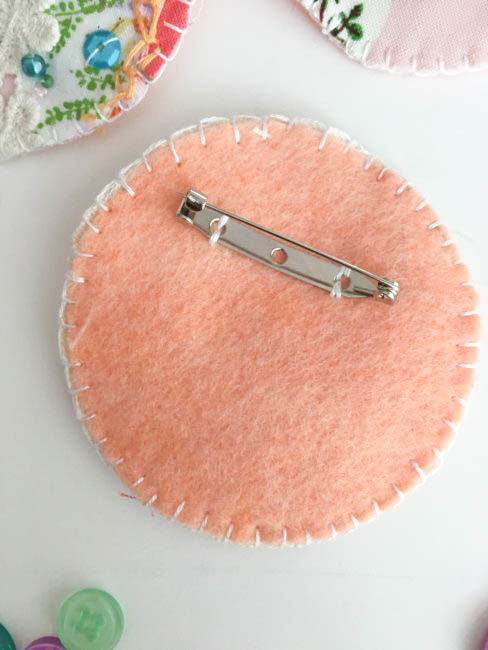
To finish out my crafty brooches, I took some felt and using the same jar lid cut out the felt and the brooch circles. The pin backs I used can be either sewn or glued down. I sewed down the pin back onto the felt.
Finally, I matched the top and backs of the brooches with wrong sides together. The brooches were sewn together using a buttonhole stitch to stitch the two layers together around the edge. There you have it!! Sweet little crafty brooches ready to wear!
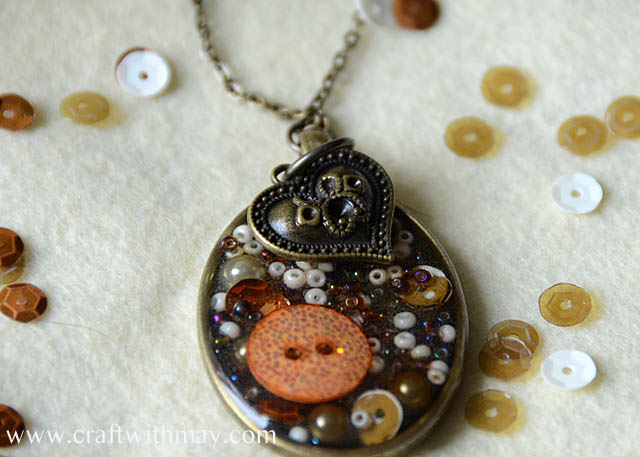
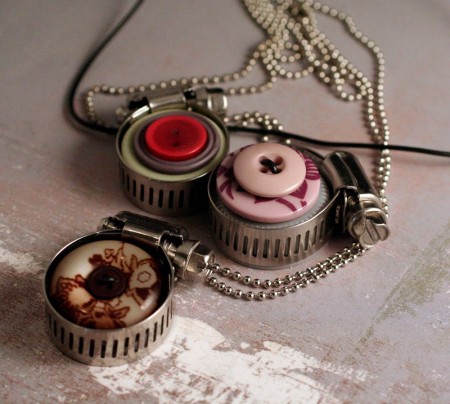
DIY Holiday Gift | Mixed Media Locket with 28 Lilac Lane
Christmas shopping time has arrived…and so has Christmas gift crafting time! A custom piece of jewelry is the perfect DIY holiday gift for a friend or family member…and with 28 Lilac Lane embellishments, a surprisingly easy one!

Supplies:
- 28 Lilac Lane “Attic Findings” embellishment kit
- 28 Lilac Lane “A New Leaf” embellishment kit
- Locket & Chain
- Ice Resin single use epoxy
- Pale Turquoise Ribbon
This locket is built using a very simple process. Fill the bottom of the locket with a single layer embellishments. Start with the large items (the buttons) and then fill in around them with the small items like the beads and pearls. Vary the color and placement of the items. Select a charm but don’t place it in the locket just yet!
Once you are satisfied with the placement of your bottom layer of embellishments, get out your Ice Resin. Following the directions on the package, use the Ice Resin to fill in a layer of epoxy on top of the layer of embellishments. Stop filling when the layer is just slightly covered. Before the resin dries, press the charm that you saved earlier into the top of the epoxy. It should just be slightly embedded, protruding out the top of the epoxy layer.
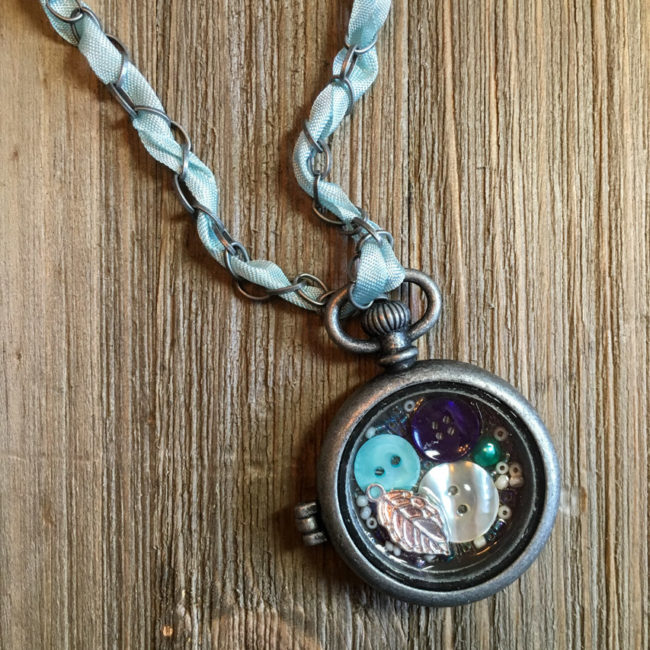
To create the ribbon embellished chain, thread a large needle (or a knitting darning needle) with the ribbon. Then weave it in and out of every other link the chain so that it is threaded into it. Tie the ribbon off to the chain at each end.
The fun thing about these DIY holiday gift lockets is that they can be created for any theme or color scheme, to perfectly match the recipient it is intended for! To see a different interpretation of this project in a pink color scheme, check out our previous mixed media locket article.
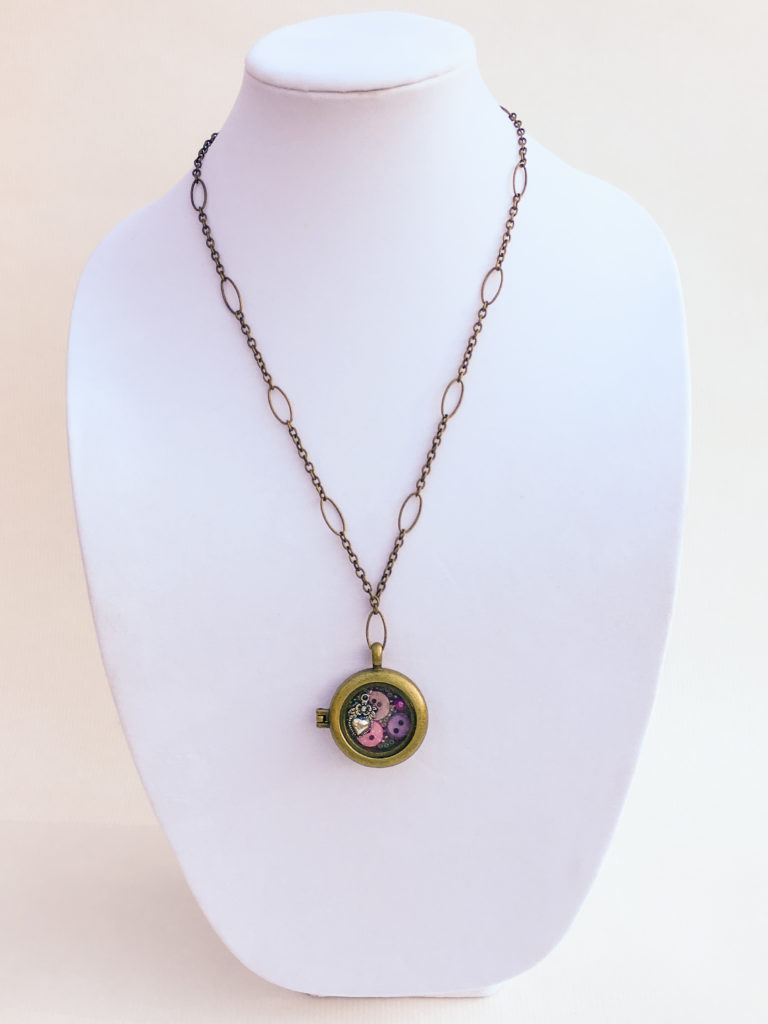
Wear Your Buttons with a Beautiful Mixed Media Locket!
Think our 28 Lilac Lane buttons are too beautiful to hide at home in your craft room? We do too! That’s why I made this this beautiful locket that showcases some of my favorite elements from the collection. This mixed media locket is a fun and eclectic piece of button jewelry that will let me show off my love of crafts in a fashionable way.
Supplies needed:
- Chain & Locket
- 28 Lilac Lane “Pretty Princess” embellishment bottle
- 28 Lilac Lane “Attic Findings” embellishment kit
- Ice Resin single use epoxy
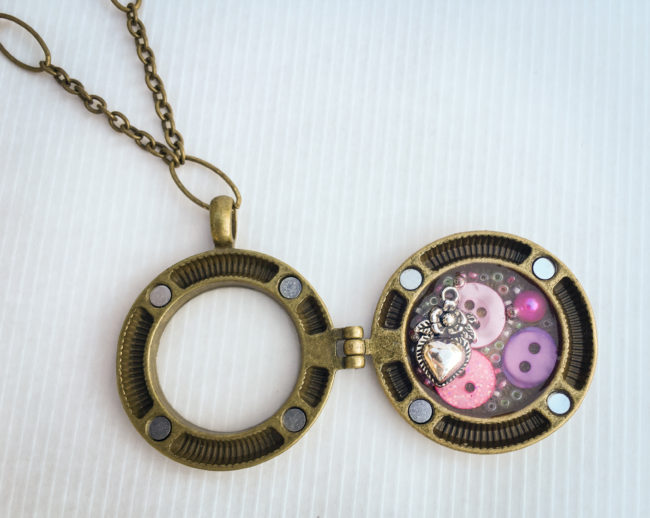
This mixed media locket is created by encasing 28 Lilac Lane embellishments in Ice Resin, a clear drying epoxy that is available in single use syringe dispensers. It’s a fast and easy project that can easily be completed in an hour or so, except for allowing dry time for the epoxy.
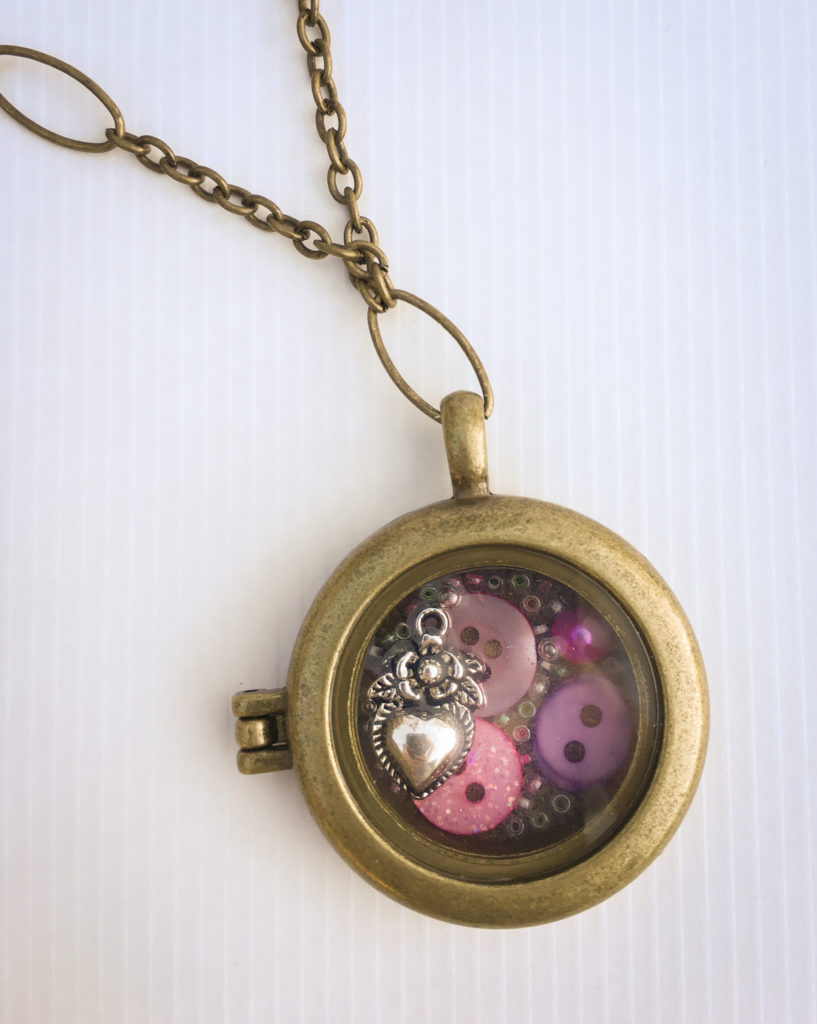
To make my design, I started by arranging the large colored items – the buttons and the flat back pearl – inside the locket. Once I was happy with how they looked, I gently filled in around them with the seed beads. This part of the process requires patience, as sometimes it means placing the beads one at a time.
Once the bottom layer of embellishments is placed, I selected a charm to place on top and set it aside.
Working with the epoxy was something I’d wanted to do for awhile but I was, I admit, a bit intimidated to try it. It turned out to be very easy – just push the plunger down to get the amount that you want, and stir! Once the epoxy was mixed well, I poured it over the bottom layer of embellishments to cover and hold them in place in the locket. Then I quickly pressed the charm down on top of the epoxy, so that it was just barely embedded and stuck out from the top. (Be very careful to not get your fingers in the epoxy! I suggest dropping the charm in and then using a toothpick or other tool to nudge it into place.)
Once the resin is dry, you can add a chain to your locket. Then you can wear and enjoy your mixed media locket masterpiece to share your love of crafts – and 28 Lilac Lane – through fashion!
28 Lilac Lane Pet Pendant with Ice Resin
I am new to the world of resin, but I’m really excited to test out possibilities and combine it with my new 28 Lilac Lane kits! Creating a dimensional piece for my daughter to wear in honor of our dogs seemed like a really fun place to start, and I hope that you enjoy this video tutorial. There are so many fun ways to utilize the Paws & Pets kit, and all of the kits in this line!
Button Jewelry – Perfect Gifts
Need some fun craft ideas for handmade jewelry? Button Jewelry – Perfect Gifts!
We’ve gathered up some of our favorite fast and easy pieces.
Make Easy Accessories Straight from the Button Jar
Upcycle Jewelry with Buttons and Hardware
Antique Button Earrings in a FLASH
Get all your buttons for your button jewelry at Buttons Galore and More. We have a large variety of buttons for sewing and crafting, as well as adhesives, trims and tools.
To help you with your holiday crafts, here is a list of our current specials:
Visit our “SPECIAL BUYS” section for savings:
20% off EVERYTHING*
Expires: 12/9/13 Code: HBH20
20% OFF Christmas Button Theme Packs*
Expires 12-20-13 Code: CBTP1213
20% OFF Holiday Fun 3D Buttons*
Expires 12-20-13 Code: 20HFUN
*Please note that offers may not be combined.
Free Shipping to the U.S. on orders over $30.
Button Charm
I’m creating a Button Charm today using a button as a frame for some seasonal artwork.
No, this is not hard. You can do this so easily.
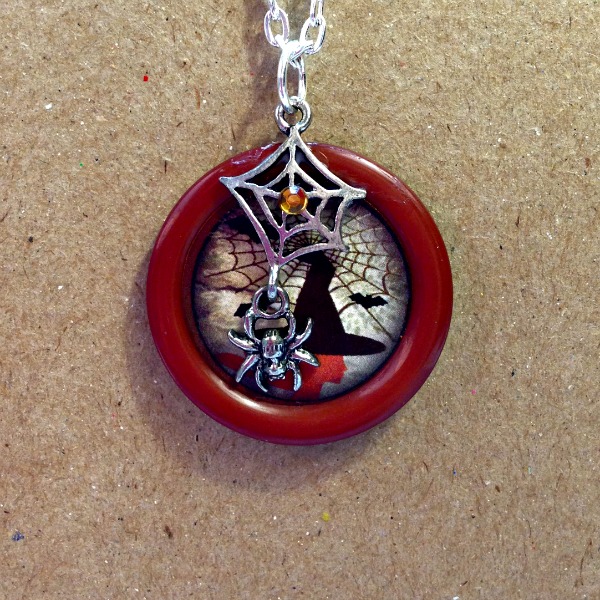
As you can see, I’ve just used a single large button for my piece today.
I punched out some art work from a sheet of Halloween images from Bottle Cap Inc. and adhered it to the center of a large button. I used Tacky Glue to attach a spider and web charm to the top of the button.
I love the way that the button acts as a frame for the image, the color really has a fun splash of Autumn color.
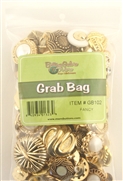
Great Buttons for your Seasonal Button Necklace:

Cappucino Grab Bag
Additional supplies:
Besides that big button and a focus image , you will want a charm. I purchase my charms at local bead shops, they have such fun, unique stuff. In addition, you’ll need some chain, jump rings, and pliers.
You will also need a good craft glue, I chose Tacky Glue. Let this set up overnight, at least 24 hours, before you wear it … this will make sure your charm stays put!
To finish off the piece, I added a little bit of bling from Want2Scrap, because I just like a little sparkle in … well, just about everything.
Seasonal Button Necklace
There is nothing simpler than stringing buttons, so why not make a Seasonal Button Necklace?
This is is a simple statement piece, and one you can change out year round.
Some people hear craft, or DIY, and cringe. Pretty pieces do not have to be complicated, or expensive. This month I’m making several pieces that are very inexpensive, and assembled with just some basic pliers and or glue.
Grab a friend, get some buttons, and let’s make some fun things to wear. At the end of the season, repurpose them! Easy peasy.
I’m using some really fun assortments that just say pumpkins and spice and everything nice!
Great Buttons for your Seasonal Button Necklace:

Black Beauty
Cappucino Grab Bag

Sunrise Assortment
Additional supplies:
You’ll need some chain, jump rings, and pliers.
Flower Button Pendant
Quick and Simple Flower Button Pendant
Some buttons are just too cute to pass up. Enjoy your favorites by wearing them. Simply make a Flower Button Pendant … or whatever shape your favorite button is!
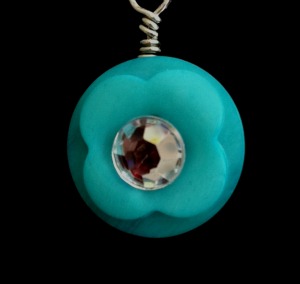
Some of the Bulk Buttons have a really fun assortment, and I found this pretty flower shaped button and thought it would make such a cute pendant.
I looped wire through the button holes and then wrapped to create a loop at the top. I adhered a rhinestone using Beacon’s 3-in-1 Adhesive.
These would be so fun to make with girls, and inexpensive, too!
Supplies for Flower Button Pendant
- Beacon’s 3-in-1 Adhesive
- Bulk Buttons by the Pound
- Bulk Bling Clear/Silver Rhinestone – Want2Scrap
- Wire – Fire Mountain Gems
- Tools – Pliers
Thanks for joining me today.
See more of my creations at My Card Party.
Button Key Ring
Hi all, Allie here with a quick Button Jewelry project. C’mon and get your Shine on!
a Button Key Ring
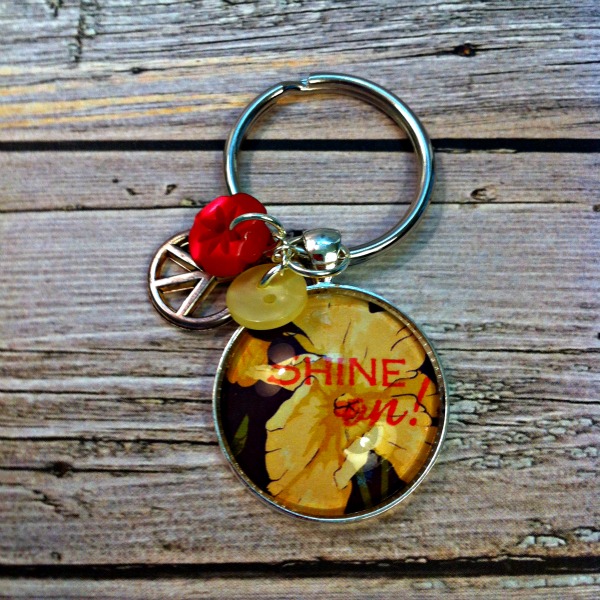
I created a fun key chain using a Charmed Key Chain Kit and some buttons from the Laura Kelly Designer Mix. To finish it off, I added a peace charm that was left over from another button jewelry project.
Directions:
- Stamp Shine On! sentiment on Watercolor Garden Paper. Adhere Jeweler’s Blank to paper using Glitter it Glue. Remove excess with a Q-Tip and cut out with non-stick scissors. (Note – any residue can be removed from scissors with hot water.)
- Adhere Jeweler’s Blank in Pendant Tray with Adhesive Tape.
- Place Pendant Tray onto Key Chain.
- Place buttons 9 mm jump rings. Place charm on a 7 mm jump ring. Attach a 9 mm jump ring to the loop on the Pendant Tray. Attach each charm using a 6 mm jump ring.
Supplies for Button Key Ring:
- Laura Kelly Designer Mix
- Charmed Key Chain Kit (includes Pendant Tray, Jeweler’s Blank and Key Chain)
- Adhesives: Glitter it Glue, Adhesive Tape
- Jump Rings – three 6 mm jump rings, one 7 mm jump ring, three 9 mm jump rings
- Peace Charm – leftover from a thrift shop find
- Watercolor Garden Paper and Shine On! Mini Stamp Set – Gina K Designs
- Ink – Lady Bug Memento – Tsukineko/Imagine Crafts (Note – test the ink you use with your choice of adhesive – some inks react with adhesives)
Tools Needed:
- One pair of beading pliers, optional – split ring tool
- Westcott Scissors
- Q-tip
Thanks for joining me today. To see more ideas and jewelry, please join me at My Card Party.
CHA CHA Button Bracelet
Create a fun Cha Cha Button Bracelet with your favorite buttons.
I thought a “CHA CHA” bracelet was appropriate, since Buttons Galore and More is at C.H.A. this week, the Craft and Hobby Association event in Las Vegas, Nevada.
It seems that everybody enjoys making their own custom, artisan jewelry these days, and I love making jewelry with BUTTONS!
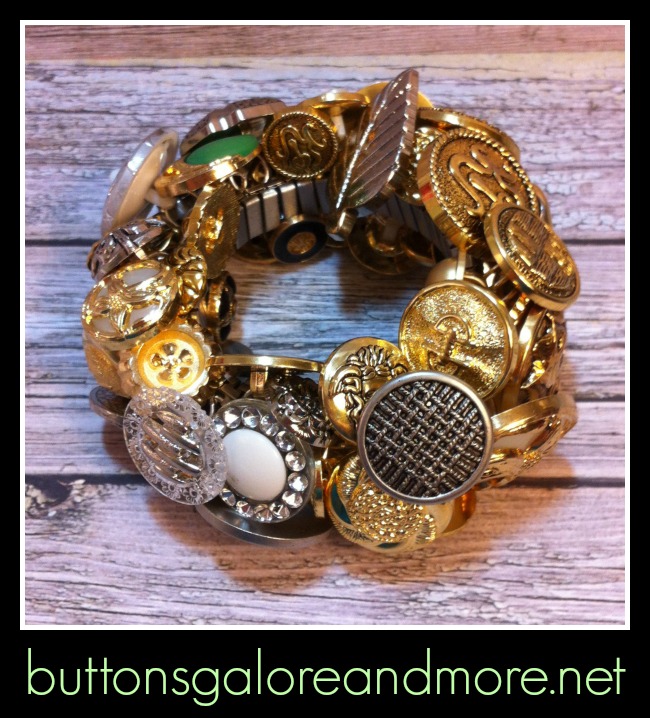
Cha Cha Bracelets are a lot of fun. The slip right on and one size generally fits all. It is basically an expansion bracelet, like a watch band, with loops for attaching beads, or in our case today … BUTTONS!
Buttons are lightweight AND affordable, and can be swapped out making this an inexpensive project.
Buttons Galore and More Supplies
Buttons – Fancy Gold Grab Bag (shown below)
Additional Supplies and Tools
Beading Pliers, Jump Rings, Cha Cha bracelet base (shown below)
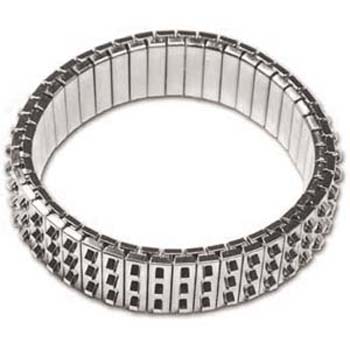
Instructions
- Attach a button to Cha Cha bracelet base using jump rings. I found it easiest to place the button on the jump ring and then thread the jump ring through the link on the bracelet base.
- Alternate sizes and styles and continue adding buttons to bracelet base. Leave open spots where desired.
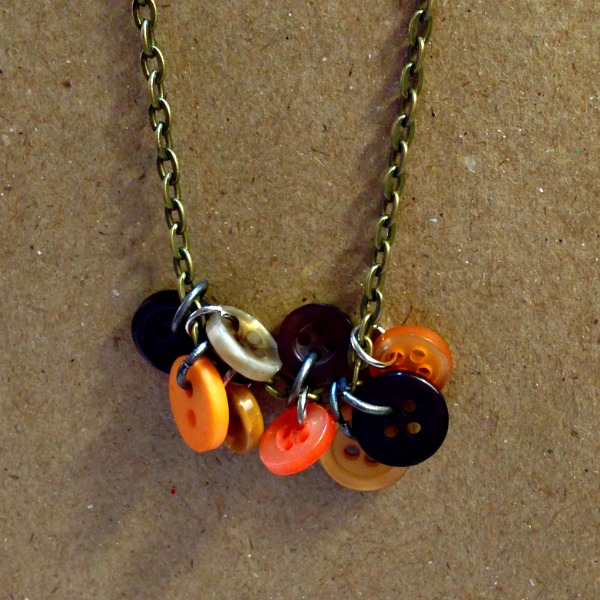
Chunky Button Necklace
Create a chunky button necklace.
For a fun button necklace, all you need is a thick chain, buttons and lots of jump rings. Don’t forget your pliers!
This button says sunshine to me!
I gathered up a hodge podge of orange and hot pink buttons.

Pumpkin Orange

Sweet Blush
Supplies:
- Laura Kelly buttons
- Jump Rings – 7mm, 10mm – Bead Landing (Michael’s)
- Chain – Bead Landing (Michael’s)
- Optional – lobster, split ring – Bead Landing (Michael’s)
Directions:
- Gather your buttons. Put an orange button AND a pink button onto a 10 mm jump ring.
- Attach each of these rings to a the necklace with 7mm jump rings.
- Add your closure. I used a lobster clasp with a split ring.
To change things up, mix different colors or add crystals, beads, or charms!
Give it a try. It’s inexpensive and FUN!

Thanks for stopping by. This week I’m linking it up with Real Family Fun!
To see more projects, tips, recipes and more, stop by My Card Party.
Visit us on Facebook for a chance to win some Laura Kelly buttons and a Me & My Peeps Decal!
Alter a Wood Button
Step One – Alter a Wood Button
Step Two – Create an Anklet with the Altered Wood Button.
First off, I love to alter things – so to alter a wood button was not outside my comfort range. At first, I was nervous but it just adds such a nice touch, and really accented the beads perfectly.
Do you really need to ask the question, to ink or not to ink? I mean really, don’t you just want everything to have your personal touch, a little added color? Buttons Galore has a variety of Carved Wooden Buttons and they are just little canvasses, waiting for you to create.
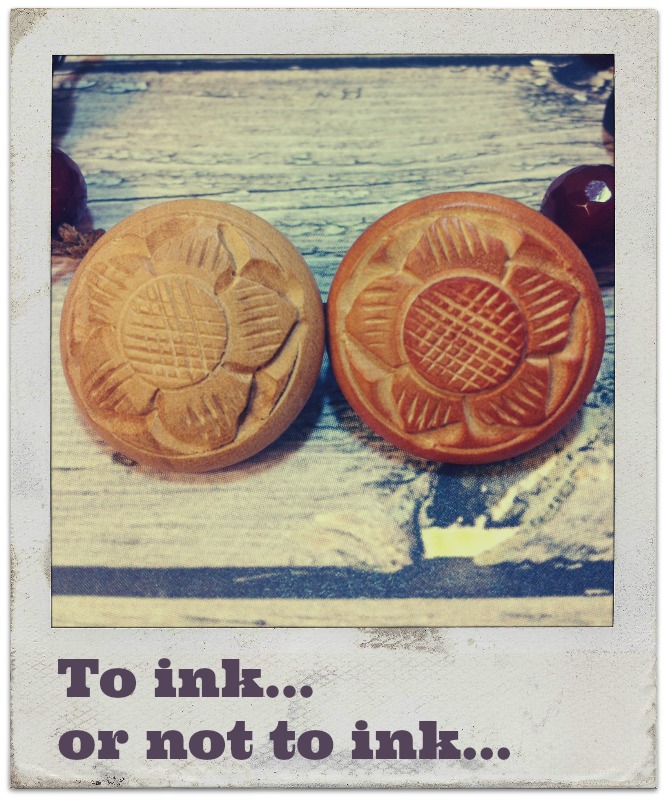
Supplies for Altered Wooden Button Anklet
You will need a Carved Wooden Button and some Rustic Coconut Shell Buttons.
Additional supplies include hemp and beads, as well as ink, glaze, and applicator (Tsukineko/Imagine Crafts). The beads I used are faceted Carnelian beads.
Directions
Altering the Wooden Button
- Dab Stazon Ink on button with an Ink Blusher. You really need to use a permanent ink that will not run or bleed. I like to buff off any excess with a paper towel.
- Seal the button with a finishing glaze. I used Creative Medium. This doesn’t get tacky – it’s perfect.

Creating the Ankle Bracelet
- Measure your ankle so that you can determine how large you want your anklet. Triple this measurement.
- Double your hemp and place the folded end through your Carved Wooden Button shank slightly. Pull the loose ends through this loop. Give yourself about 1/4″ of space and make a knot.
- Add a bead. Knot.
- Add a Coconut Shell Button. I take one of the strands and go up from underneath the button, then I take the other strand and go down through the top. This secures the button and prevents it from twirling around.
- Repeat until you have reached your desired length.
- Finish off with a loop. Make sure this look is large enough to accommodate the diameter of your Wooden Button.
- I like to wrap a segment of the bracelet with the remaining length. I loop around the bracelet and bring the end through the loop, doing this several times, then tie a knot in the end of each strand – just to secure everything. You can also put a little nail polish on the ends of the knots.
I hope you enjoyed this tutorial. With some different beads and buttons, you could really create so many different styles. With a little ink and glaze, you can really create a perfect match for any outfit.
See more of my creations on my own blog, My Card Party.
Thanks for joining me today. Since today is Independence Day, I want to wish all my American friends a safe and happy fourth. There is nothing quite like celebrating your freedom with the ones you love.
Button Earrings
These Button Earrings are super quick and fast. You can even swap out buttons to match your outfit.
Why buy when you can DIY? I chose these Teal Ice buttons to match a new shirt I got. It took me MINUTES to create these earrings. Jump rings are pretty hardy, so you could easily swap out buttons. However, they are so inexpensive and fun, you’ll want to whip up a bunch for yourself and your friends! I like to have friends over to make things. This is perfect!

Supplies for creating Button Earrings
- Findings – Earring wires, jump rings
- Buttons – Teal Ice
Instructions
This could not be simpler.
- Attach three buttons to jump rings through one of the holes. I used 10 mm rings.
- Attach three buttons on their rings to a small jump ring, and attach that to your pre-made earring wires. I used 7 mm rings for this step.
If you’ve never opened jump rings, I’ll share a little tip – don’t pull them apart, twist them… One side away from you and one side toward you. Then, when you are ready to close them, you want to go back and forth a little, this actually strengthens your ring. If you were working with something tinier than a button, like say a wrapped bead, you could even put a little adhesive like Gem Tac.
I’m linking it up with Create.Craft.Love this week. Join the party. #linkparty
Wear and enjoy! Thanks for dropping by today!
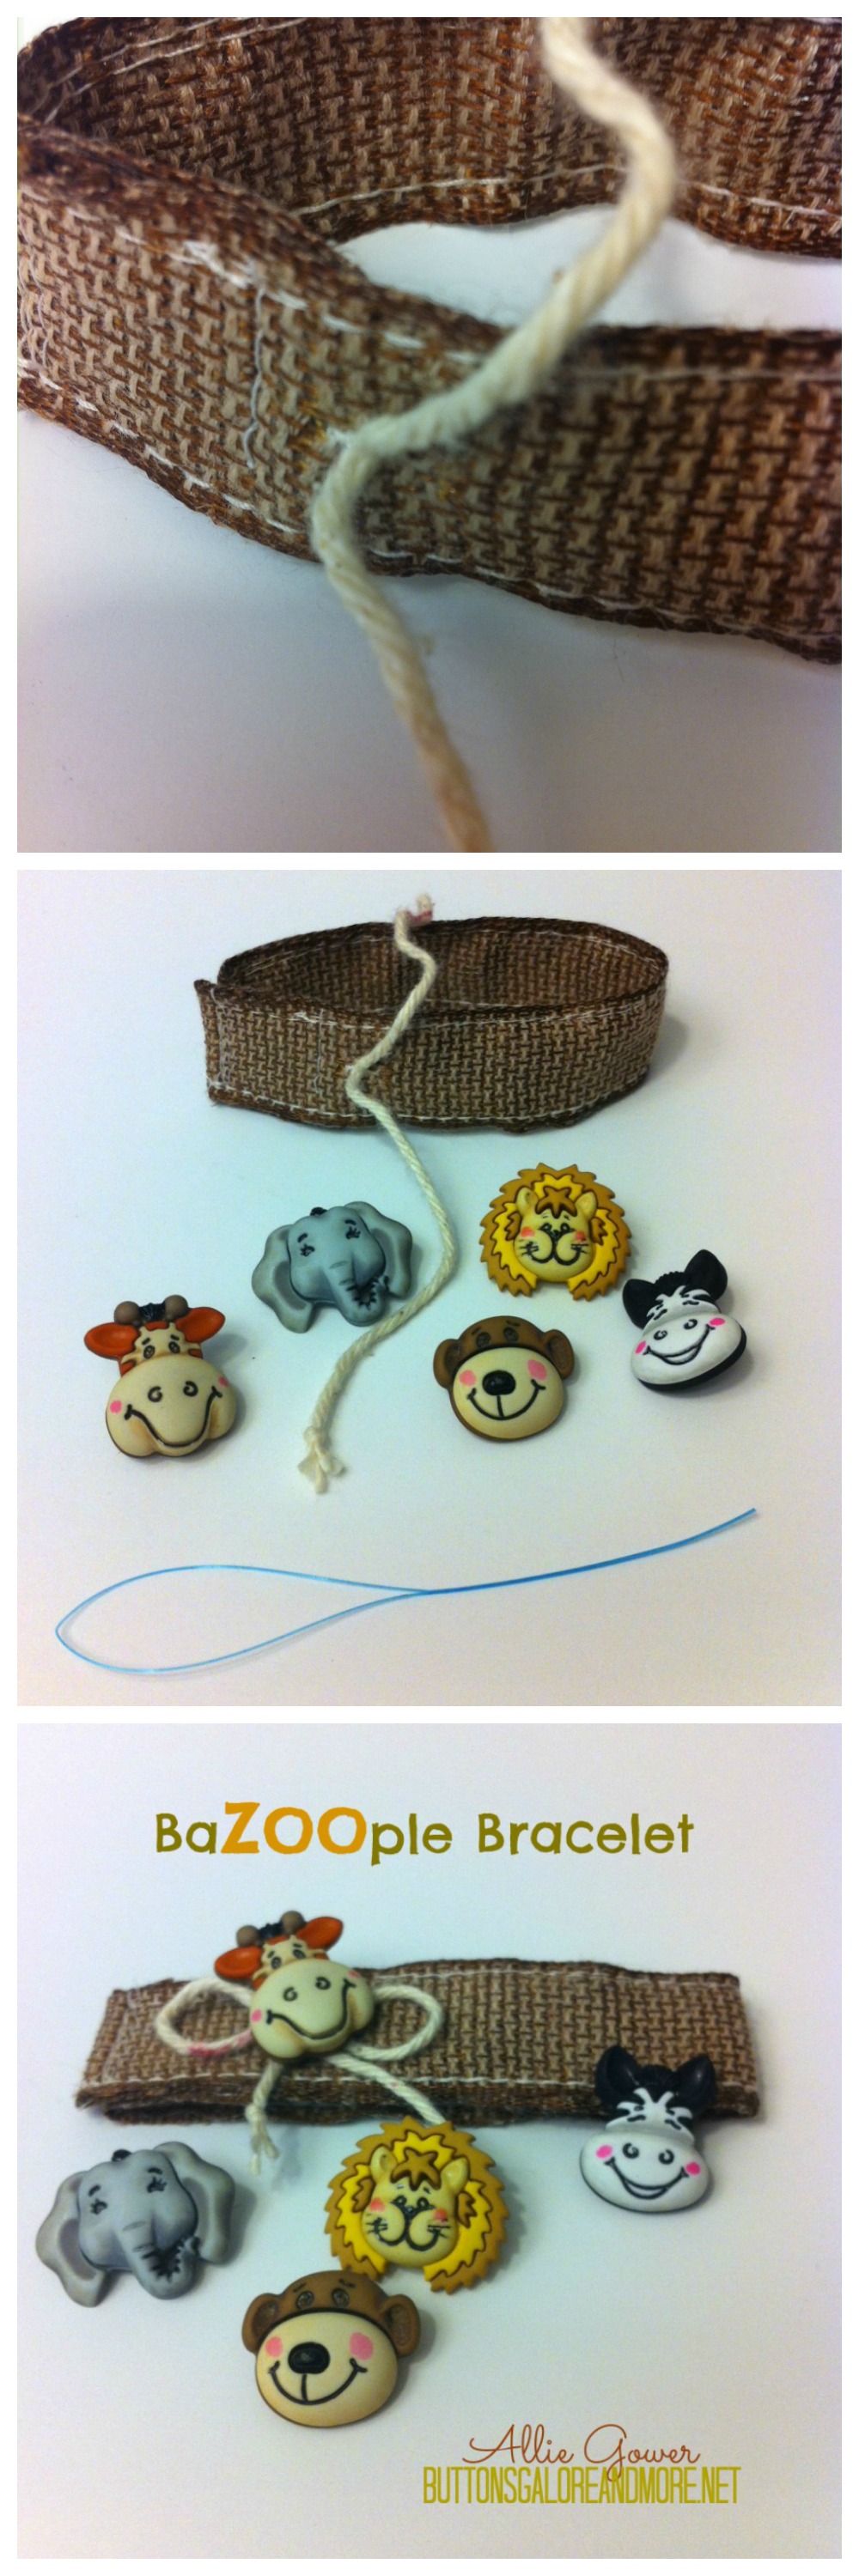
BaZOOple Bracelet
I’ve got a BaZOOple bracelet for you today. The buttons can be changed out.
We go to the Zoo a lot during the spring and summer, and I think this will be lots of fun to make and wear with the kids.
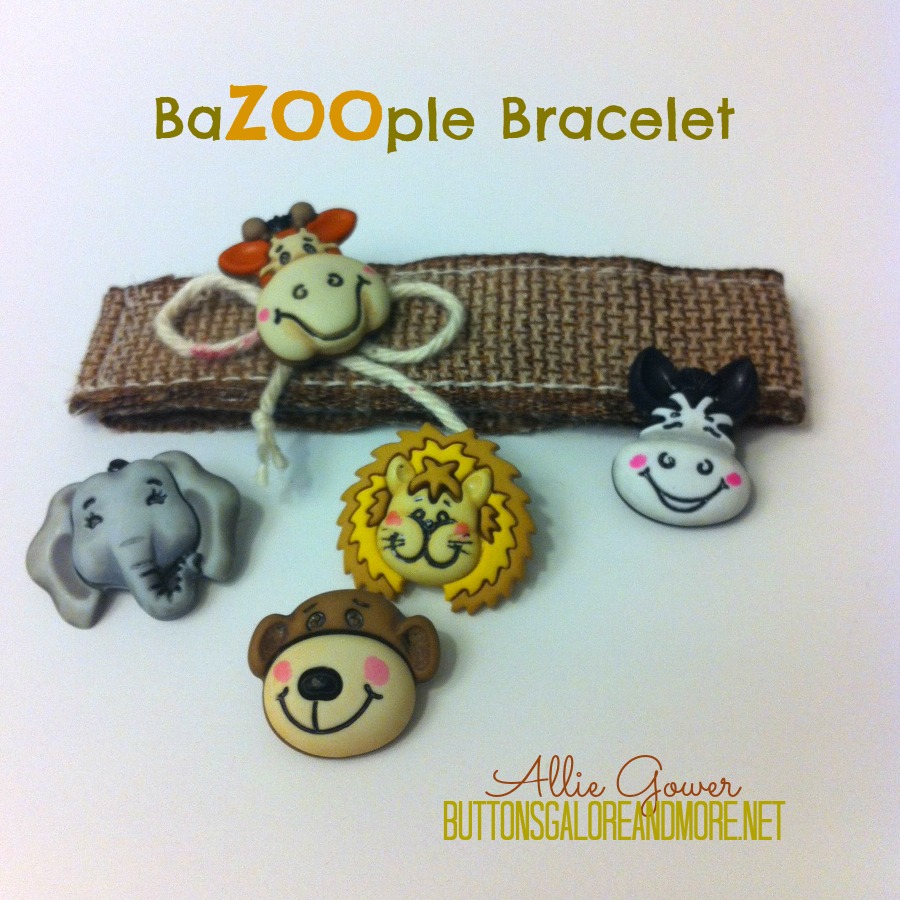

Supplies
- BaZOOple buttons (Lester the Lion, Zach the Zebra, Gertrude the Giraffe, Elsie the Elephant, Max the Monkey buttons)
- Ribbon – craft supply
- Yarn – craft supply
- thread – Coats & Clark
I like to include a floss threader in my little bracelet kit. These can be found in the dental area of your pharmacy – they’re very inexpensive and they really make my life easier!
How to Create the BaZOOple Bracelet
- Create a cuff using ribbon or fabric. I sewed a long piece of ribbon in half.
- Sew some yarn or twine to the cuff.
- Add your choice of buttons with shanks.
It’s really that easy!
Thanks for joining me today.
See more of my creations at MyCardParty.
Patriotic Bracelet with Buttons and Ribbon
Create a Patriotic Bracelet with Buttons and Ribbon. This could easily be done with the kids in a variety of colors with lots of different buttons.
I’ve knit my ribbon by wrapping it around my fingers. As a child I would sit for hours and make yarn chains and pull them out. I guess I was bored during the summer! If you aren’t familiar with this technique, you could easily braid some ribbons.
It’s fun to find inexpensive craft ideas for the kids during the summer.
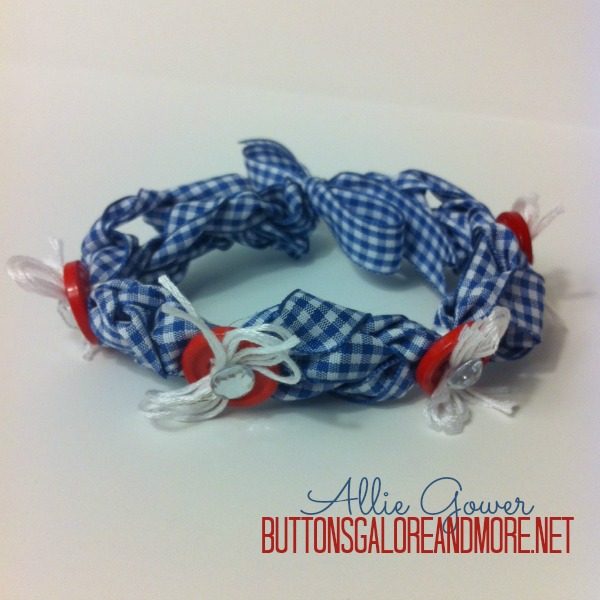
Supplies
- Buttons – Patriotic Value Pack
- Ribbon – Michael’s
- Embroidery Thread – Coats & Clark
- Rhinestones – Want2Scrap Bulk Bling
How to Create a Patriotic Bracelet with Buttons and Ribbon
- Knit or braid ribbon, leaving a length at each end to tie on wrist.
- Tie a bow with buttons around the bracelet with several strands of embroidery thread.
- Hot glue a rhinestone on each bow to hold knots in place.
Thanks for joining me today.
See more of my creations at MyCardParty.
Mixed Media Necklace
I created a mixed media necklace to share with you today. Mixed media to me means having fun. It’s more about the journey, and not so much about the results.
I like to incorporate elements that have meaning to me, or to the person I’m creating for. I love butterflies. They are all about change.

Supplies for creating a mixed media necklace
Note – this is what I used – use what YOU love. But of course, include some fun buttons! You don’t need everything on this list – you could play with paint, beads, remake an old necklace… The sky is the limit. Enjoy the journey!
- buttons – Shop by color at Buttons Galore
- chain and jump rings (Fire Mountain Gems)
- shrinky dinks
- napkin
- dies (Spellbinders)
- craft metal (Ten Seconds Studio)
- glitter and liquid adhesive (Art Glitter)
- copic markers and an ABS (air brushing system)
Here’s a fun little video showing some close ups and tips.
Thanks for joining me today. Please share something you make with buttons, I’d LOVE to see it.
You can find me at My Card Party.
Wizard of OZ Charm Bracelet
As a kid, I remember the first time I saw the Wizard of OZ, and I tried to capture all my memories in this Wizard of OZ Charm Bracelet. This month I’m sharing some easy Button Jewelry ideas. I hope you like them, and that you’ll come back every Thursday to see a new project.
I like to figure out how long I need to make a bracelet and then count the links, so I have a nice even variety of buttons and charms. My wrist is on the slim side – an average bracelet is about 7.5″. One thing to remember to take into account is how bulky your bracelet is – if it’s super chunky, you might need to go a little longer.
I’ll briefly go over what I used – the construction is pretty simple. Decide where you want things and add them with a jump ring. I used the satin finish buttons from the Teal Ice package. These are my favorite colors, so it was just a matter of what I liked! In addition to that I have some Want2Scrap charms – I used crowns, a key, a little girl, a music note, and a star – for the Wizard of course. In addition to the charms, I used an Epiphany Crafts punch to punch out OZ (from Graphic 45 papers) and Epiphany blanks and acrylic shapes (Circle 14) to make my OZ charms. The paper is actually blue, so the buttons went together nicely.
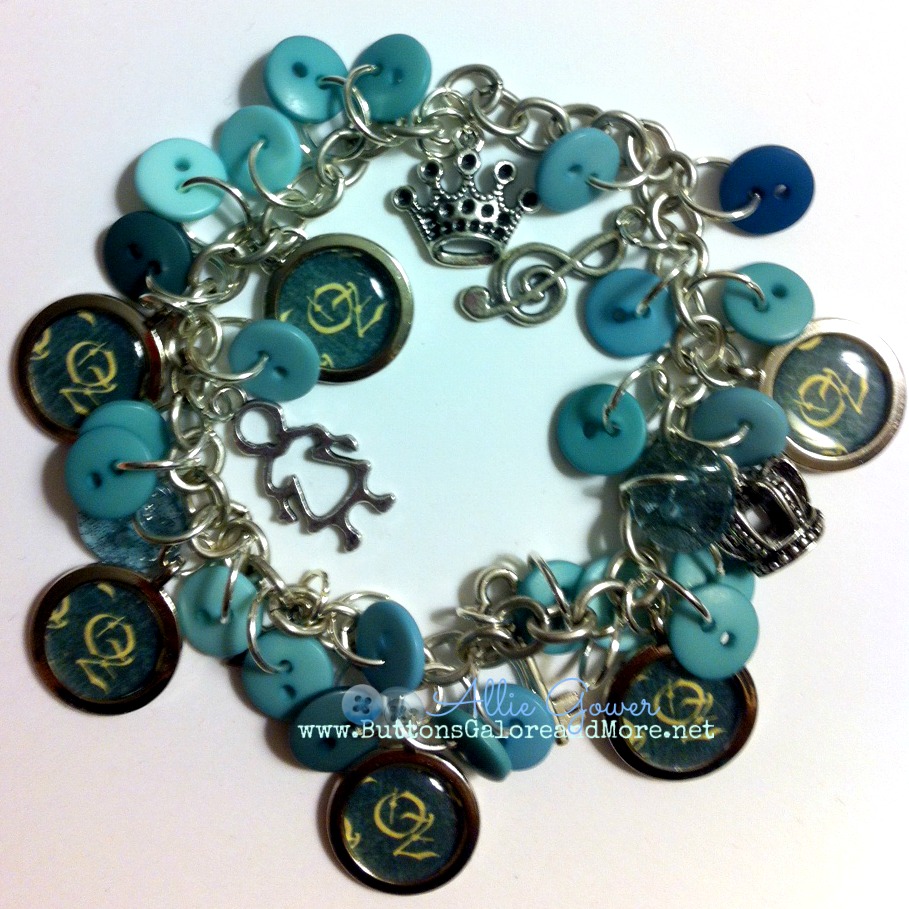
Supplies used to make OZ Charm Bracelet
- Teal Ice Buttons
- Chain, Jump Rings** – Fire Mountain Gems
- Blanks, Acrylic Disks, Circle 14 Punch – Epiphany Crafts
- Charms – Want2Scrap
- Paper – Graphic 45
I hope you’re inspired to grab some buttons and charms and create a Charm Bracelet. I’ll be back next Thursday with some more Button Jewelry.
**Note – you will need pliers to open and shut the jump rings.
Shaker Charm with buttons
Today, I’ve got this shaker charm. These are easy to make and can be a wearable memento. I think of my Dad a lot in the Spring, and I think of a strong man. My dad was quiet, but in his silence, he always had so much to say. He left us in April 1997 after a brave fight with cancer, but he’ll be in my heart, forevermore. My dad let me share his work space to experiment with different crafts. I think he’d really enjoy seeing some of the things I make now. I’d like to share some Button Jewelry ideas with you this month. So, if you like jewelry, you will want to come back each Thursday for a new project.

These are very easy to make. This charm is 3×1″. I’m using a Memory Frame, Slide Glass and Capsules from Ranger Ink.
How to make a Shaker Charm
- Trace patterned paper and card stock to match the size of the glass slides and cut it out. A
- Add some tissue tape and stickers.
- Sandwich the decorated paper between two glass slides.
- Place a variety of small Haberdashery Buttons in the capsule (upside down).
- Lay the slides on the capsule and carefully slide everything into the Memory Frame.
- Adorn with token.
- Remove fasteners from brad and adhere to outside of capsule with a Glue Dot.
There are lots of different items you can place inside the capsule, and equally as many ways to decorate the slides and make this shaker charm a personalized memento. I left the back blank with card stock, but you could easily add a photo. When I’m not wearing charms, I like to hang them around the house – on knobs, lights, etc. My kids even wear them on their hoodies as zipper pulls.
Supplies to make a Shaker Charm
- Haberdashery Buttons – Buttons Galore
- Paper and Stickers – Authentique
- Memory Frame, Glass and Capsule – Ranger
- Tissue Tape, Token – Tim Holtz
- Brad – Creative Impressions
- Adhesive – Glue Dots
- Jump Ring**, Waxed Cotton – Fire Mountain Gems
I hope you’re inspired to grab some buttons and create a memory. I’ll be back next Thursday with some more Button Jewelry.
**Note – you will need pliers to open and shut the jump ring.
Buttons and Birdhouse Challenge Winners
Buttons and Birdhouse Challenge Winners – we have a Winner Winner Chicken Dinner!
Thank you to everyone for viewing all the projects with buttons. We had our best participation ever and I cannot tell you how excited that makes me. Our designers place a lot of time, energy and love into each one of their projects in the hopes of inspiring you, our wonderful fellow crafters and showing you how to make really cool crafts. Enough of my mushiness and on to the important stuff.
Buttons and Birdhouse Challenge Winners
Author: nancy (ntorresdir@xxxxx.com)
Website:https://www.facebook.com
Comment: permalink
my vote is for Mai Larsen, espectacular
Nancy, Please contact us with your shipping address. nikimeiners@ yahoo . com She will take care of it for you.
The viewers favorite was Mai Larsen. We are very lucky to have Mai as she is bi-lingual and has brought a whole new group of fans to our blog. Muchas gracias Mai. Speaking of Mai – she also had the most votes too. ¡Felicidades! Mai.

Stay tuned to the blog for some great button jewelry ideas. Thursdays this month will feature unique DIY jewelry ideas with buttons for everyone. Tutorials and instructions will be provide for some of the pieces and materials lists for the rest.
Buttons Galore and More Appears on Cleveland TV Show

Buttons Galore and more on TV with Vicki O'Dell
Our very own Design Team member (ME!) appeared on a local Cleveland TV show in June to show viewers how easy it is to make a one of a kind button bracelet.
While there is a can of old collected buttons in a tin can shown – and they are fine to use – you may not find enough buttons in the colors you need or you may not want to use Grandmas buttons on a piece you will give away.
Our Button Bonanza packages hold enough buttons to make 2-3 bracelets and they come in lots of colors!